4. Mining
In This Chapter
![]() Learn the essentials you need for your first mining expedition.
Learn the essentials you need for your first mining expedition.
![]() Find the most profitable mining layers.
Find the most profitable mining layers.
![]() Avoid a speedy death with essential tips.
Avoid a speedy death with essential tips.
![]() Build an express elevator straight down to the diamond layer.
Build an express elevator straight down to the diamond layer.
![]() Discover the most efficient mining techniques.
Discover the most efficient mining techniques.
Mining is core to the Minecraft experience. Sooner or later, you’ll need to take a few pickaxes in hand, supplies to satiate hunger, and a bunch of torches and a sword or two and start plumbing the depths. You will find resources down there: iron, gold, diamonds, redstone, and more. You’ll find all the things you need to progress in the game. This chapter helps you find specific ores and develop efficient mining patterns that leave no stone unturned. Of course, it also gives you a few tips on how best to avoid an inadvertent respawn or at least recover with most of your hard-won resources and dignity intact.
Dig Deep, My Friend
Most of the desirable ores in Minecraft are located deep, close to the bedrock. Getting down there is a challenge in itself. There are two broad strategies:
![]() Find an existing ravine, canyon, or cave complex. These can also lead to abandoned mineshafts. Some caves run on for hundreds of blocks, joining with the surface here and there, and occasionally running very deep. You’ll usually see a range of exposed ores on their walls that make for easy pickings. The danger is that they are dark places, so in the larger caves, you will also run into a range of mobs. For now, even though this strategy will give you a bit of a head start, I suggest you hold off until you have armor, ranged weapons, and some sharp swords.
Find an existing ravine, canyon, or cave complex. These can also lead to abandoned mineshafts. Some caves run on for hundreds of blocks, joining with the surface here and there, and occasionally running very deep. You’ll usually see a range of exposed ores on their walls that make for easy pickings. The danger is that they are dark places, so in the larger caves, you will also run into a range of mobs. For now, even though this strategy will give you a bit of a head start, I suggest you hold off until you have armor, ranged weapons, and some sharp swords.
![]() Create your own mine. When you create your own mine, you can make sure it’s well lit to ensure that there are no dark places for mobs to spawn, even over multiple nights, so you can go quietly about your business. For maximum convenience, you can even start a mine within your own shelter so there’s no need to go outside. I focus on this strategy first. It is also likely that you will break out into cave complexes as you mine, so we’ll take a look at that second.
Create your own mine. When you create your own mine, you can make sure it’s well lit to ensure that there are no dark places for mobs to spawn, even over multiple nights, so you can go quietly about your business. For maximum convenience, you can even start a mine within your own shelter so there’s no need to go outside. I focus on this strategy first. It is also likely that you will break out into cave complexes as you mine, so we’ll take a look at that second.
Before you begin, ensure you have the right equipment for the job. At a minimum, you need the following:
![]() At least 20 torches, but bring more if you plan to go down for an extended period of time. Hold torches in your second hand to quickly swap between them and your pickaxe, or other primary tool.
At least 20 torches, but bring more if you plan to go down for an extended period of time. Hold torches in your second hand to quickly swap between them and your pickaxe, or other primary tool.
![]() Wood blocks that can be turned into ladders, torches, tool handles, chests, and crafting tables. The only place you can find wood underground is in an abandoned mineshaft, so bring wood with you as often as you can. Fifteen or so blocks should do for now.
Wood blocks that can be turned into ladders, torches, tool handles, chests, and crafting tables. The only place you can find wood underground is in an abandoned mineshaft, so bring wood with you as often as you can. Fifteen or so blocks should do for now.
![]() At least three stone pickaxes to dig out iron ore and a shovel for digging out dirt and gravel. Bring some swords as well, just in case.
At least three stone pickaxes to dig out iron ore and a shovel for digging out dirt and gravel. Bring some swords as well, just in case.
![]() Food. Nourishment is vital because a full hunger bar helps you heal from any damage you incur. Bring at least cooked meat, as well as bread if you’ve had the chance to build a wheat farm. In Chapter 6, “Crop Farming,” and 7, “Farming and Taming Mobs,” you’ll learn how to ensure a consistent supply of food.
Food. Nourishment is vital because a full hunger bar helps you heal from any damage you incur. Bring at least cooked meat, as well as bread if you’ve had the chance to build a wheat farm. In Chapter 6, “Crop Farming,” and 7, “Farming and Taming Mobs,” you’ll learn how to ensure a consistent supply of food.
This will get you started. When you have found enough iron ore, you should also craft the following items:
![]() Two buckets (one already filled with water and one for gathering lava). You can use the water bucket to create pathways across lava pools and even to create waterfalls that you can safely descend and ascend over otherwise lethal vertical distances. The bucket of lava makes a great source of energy for the furnace. In a pinch you can also use it for fighting off mobs in cave complexes (though this isn’t the best strategy because the lava can burn up any items that the mobs drop).
Two buckets (one already filled with water and one for gathering lava). You can use the water bucket to create pathways across lava pools and even to create waterfalls that you can safely descend and ascend over otherwise lethal vertical distances. The bucket of lava makes a great source of energy for the furnace. In a pinch you can also use it for fighting off mobs in cave complexes (though this isn’t the best strategy because the lava can burn up any items that the mobs drop).
Note: Chicken or the Egg?
Actually, buckets present a “chicken and egg” situation for new miners. As you can see in the crafting recipe here, you need three iron ingots arranged in a V shape on your crafting table to create a bucket. To get those iron ingots, you first need to find iron ore and then smelt the ore into ingots by using our good ol’ friendly furnace. Take heart—all this work is part of the Minecraft fun!
![]() An iron pickaxe for mining the more valuable ores, such as gold, redstone, and diamonds.
An iron pickaxe for mining the more valuable ores, such as gold, redstone, and diamonds.
Note: You’ll Need Obsidian
You might not be lucky enough to find diamonds on your expedition, but when you do find them, you need to create a diamond pickaxe for mining obsidian—the only type of pickaxe that can do so. You need obsidian in order to build the portal to access The Nether dimension described in Chapter 12, “Playing Through: The Nether and The End.”
The Mining Layer Cake Guide
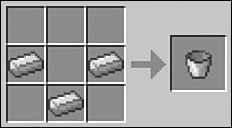
Before you start digging, let’s take a brief look at the ore layers in Minecraft. The Overworld has seven types of ore, as well as bedrock, and there is one more called Nether quartz that is found only in The Nether dimension. Figure 4.1 shows them all.
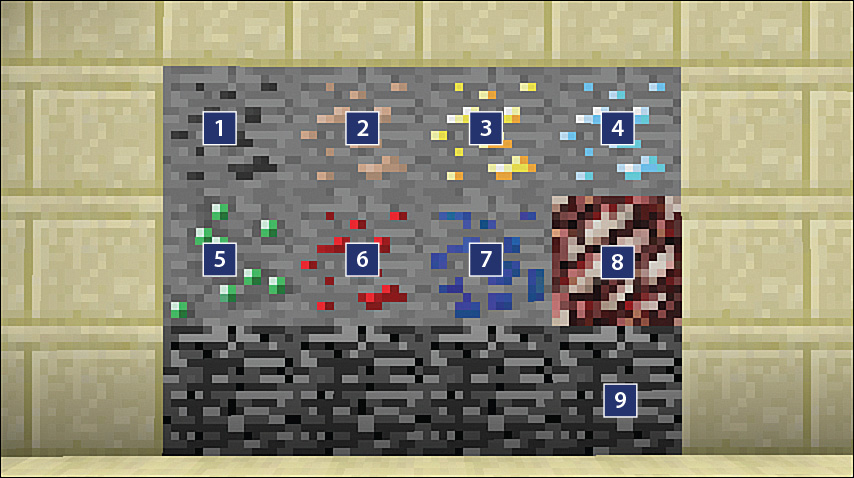
FIGURE 4.1 The most useful ores in the Minecraft world. Go get them all!
1. Coal
2. Iron
3. Gold
4. Diamond
5. Emerald
6. Redstone
7. Lapis lazuli
8. Nether quartz (Nether only)
9. Bedrock
In addition, you’ll find the following:
![]() Andesite (new)
Andesite (new)
![]() Diorite (new)
Diorite (new)
![]() Granite (new)
Granite (new)
![]() Stone
Stone
![]() Gravel
Gravel
![]() Dirt
Dirt
![]() Obsidian
Obsidian
![]() Netherrack (Nether only)
Netherrack (Nether only)
![]() Glowstone (Nether only)
Glowstone (Nether only)
Lapis lazuli is not only good for trading with villagers and making dyes, it’s also a spell component for enchantments. So if you want that fancy glowing +7 sword, you’ll need to get your hands on some of these gems. Remember to use a stone pickaxe or better to extract the ore.
World generation scatters various ores here and there in a statistical pattern that leads to a variety of striations. All the layers shown in Table 4.1 are counted from bedrock up. Layer 5, for example, is five layers above the lowest layer of bedrock, layer 0. (It might help if you think of layers as altitude.) To see your current height above layer 0, press F3 to open the debug screen and check the value shown next to y.
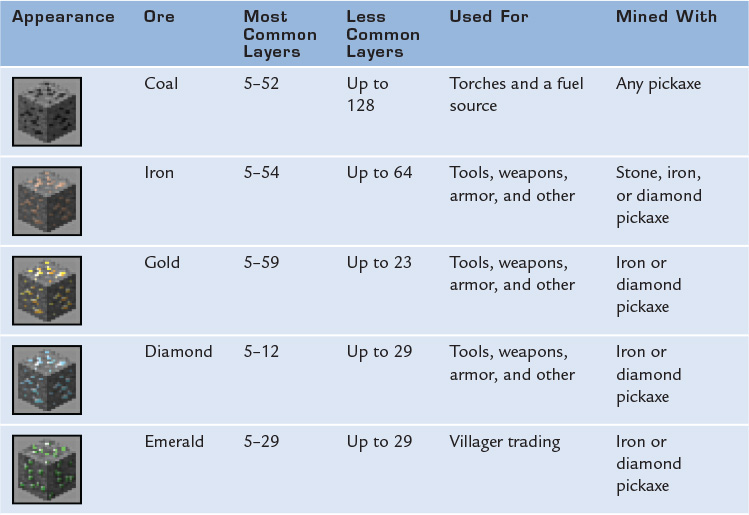
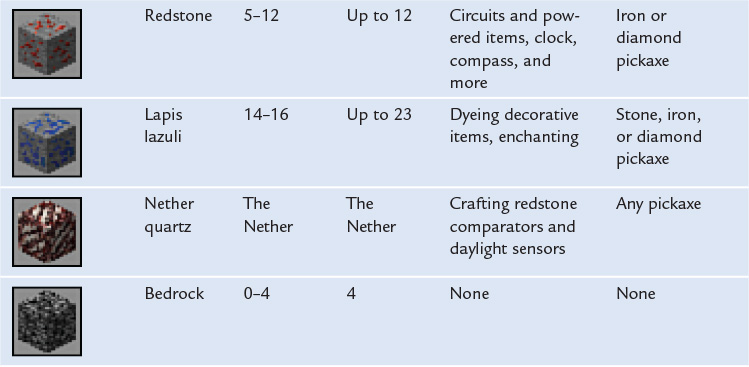
As you can see in the pattern of ore distribution in Table 4.1, there are a few layers where every ore can be found: layers 5–12. Although you can hit lava just about anywhere, including on the surface, it pools primarily in layers 1–10. This makes layer 11 a good target for mining. On your way there, you will definitely see plenty of ore, including coal and iron, and cartloads of dirt, gravel, and stone.
Getting there is a matter of luck and skill, and that can make for an exciting journey.
Lava Lakes and Other Pitfalls
Mining has its share of pitfalls, in both figurative and literal senses. Before you don your virtual miner’s hat, check through the following list of dos and don’ts:
![]() Don’t dig straight down—It’s tempting, certainly. You could potentially dig all the way to bedrock using just one iron pickaxe. The problem with that approach is that you never know what lies beneath. You could break through the top of a cave’s roof and face a fatal drop, fall into a nest of hostile mobs, or splash down in a lava lake and lose not only your life but also all your possessions.
Don’t dig straight down—It’s tempting, certainly. You could potentially dig all the way to bedrock using just one iron pickaxe. The problem with that approach is that you never know what lies beneath. You could break through the top of a cave’s roof and face a fatal drop, fall into a nest of hostile mobs, or splash down in a lava lake and lose not only your life but also all your possessions.
![]() Don’t dig straight up—It’s easy to get lulled into a false sense of security after tunneling for a while, but you have no idea what may be on top of the block just above your head. You may tap an underground lake and flood a good portion of your mine. If you are mining higher levels, you could even tap straight into the bottom of the ocean. You could also tap into a lava flow, resulting in almost certain death. Fortunately, you should be able to spot some drips from lava or water when it is above you and separated by just a single block. A separate danger is opening up an avalanche of loose gravel or sand that can quickly suffocate you. Therefore, always mine up at least one block away from your current position so you have a chance to retreat and block off the tunnel if things go awry.
Don’t dig straight up—It’s easy to get lulled into a false sense of security after tunneling for a while, but you have no idea what may be on top of the block just above your head. You may tap an underground lake and flood a good portion of your mine. If you are mining higher levels, you could even tap straight into the bottom of the ocean. You could also tap into a lava flow, resulting in almost certain death. Fortunately, you should be able to spot some drips from lava or water when it is above you and separated by just a single block. A separate danger is opening up an avalanche of loose gravel or sand that can quickly suffocate you. Therefore, always mine up at least one block away from your current position so you have a chance to retreat and block off the tunnel if things go awry.
Note: The Golden Rule
The advice not to dig straight up or straight down constitutes what is known as the “golden rule” of Minecraft. Bear it in mind as you proceed on your adventures.
![]() Keep some blocks in your hotbar—Always have cobblestone or dirt at the ready to block off your tunnel in case you break through into a danger zone. Water probably won’t kill you, but it can wash you back quite quickly and put out your torches. Lava oozes along much more slowly but is far more deadly. Be ready to block off any unexpected breakthroughs.
Keep some blocks in your hotbar—Always have cobblestone or dirt at the ready to block off your tunnel in case you break through into a danger zone. Water probably won’t kill you, but it can wash you back quite quickly and put out your torches. Lava oozes along much more slowly but is far more deadly. Be ready to block off any unexpected breakthroughs.
![]() Be careful, be prepared, and always know your way out—It’s easy to get lost down there, especially if you break into a cave complex and decide to explore. Use torches, signs, cobblestone arranged into arrows, and blocks attached to a wall with a torch facing the way out; they can all act like a trail of bread crumbs to help you find your way home. Read the sidebar “Signs, Signs, Everywhere” to learn how to make a sign.
Be careful, be prepared, and always know your way out—It’s easy to get lost down there, especially if you break into a cave complex and decide to explore. Use torches, signs, cobblestone arranged into arrows, and blocks attached to a wall with a torch facing the way out; they can all act like a trail of bread crumbs to help you find your way home. Read the sidebar “Signs, Signs, Everywhere” to learn how to make a sign.
![]() Keep your mines well lit—Any area you leave open and dark can be a place for mobs to spawn, and they will eventually come for you.
Keep your mines well lit—Any area you leave open and dark can be a place for mobs to spawn, and they will eventually come for you.
![]() Block off any unlit areas—These can include caves and fully explored tunnel branches. You can even knock your torches off the wall and collect them on your way out, as long as you remember to block off the entire branch when you get back to the main trunk so the mobs don’t break through. If you do break into a cave, place a torch on the wall inside the cave and block it off, leaving no more than a one-block gap. (Okay, explore if you must but remember that you’re on a mission.) You’ll be able to see the torch or at least the light from the torch on the other side as an indication that you can come back and explore it later. Then head in a different direction.
Block off any unlit areas—These can include caves and fully explored tunnel branches. You can even knock your torches off the wall and collect them on your way out, as long as you remember to block off the entire branch when you get back to the main trunk so the mobs don’t break through. If you do break into a cave, place a torch on the wall inside the cave and block it off, leaving no more than a one-block gap. (Okay, explore if you must but remember that you’re on a mission.) You’ll be able to see the torch or at least the light from the torch on the other side as an indication that you can come back and explore it later. Then head in a different direction.
To craft a sign, simply arrange six wood planks of any type above a stick, as shown in the associated crafting recipe. Then, once you right-click to place it, you’ll have the opportunity to add text to the sign, as shown in Figure 4.2. Making and placing signs is an excellent antidote to getting lost in the Minecraft world, especially when you’re mining deep underground.

FIGURE 4.2 Signs can help you navigate under and above ground. By the way, see that giant mushroom in the background? When you find one, try turning it into a treehouse.
Mining can be broken down into two parts: getting down and then cutting across to uncover as much valuable ore as possible. There are a few ways to do both.
Descending to Layer 11
The process of descending is also a process of discovery, and no two journeys will be the same. In all cases, follow any ore seams you find on the way down and then return to the plan. Check in with your layer level now and then by pressing F3 and checking the y coordinate or just dig all the way to the lowest layer of bedrock you can find and then count 12 layers as you go back up.
The 2×1 Ladder Descent
The fastest way to descend is in a 2×1 pattern, placing ladders or vines as you go against one of the walls so you can climb your way out. Vines are plentiful in the jungle and in swamp biomes, but not elsewhere, and you will need shears to collect them. Ladders are crafted from sticks in an H layout across the crafting grid, with each set of seven sticks making three ladder blocks. Their advantage over jumping up and down stairs, besides being a fast method of vertical movement, is that they don’t use up any energy, so you won’t see any drop in your hunger bar as you traverse.
Tip: Use the Shift Key to Pause on Ladders
Hold down the Left Shift key to pause whenever you are ascending or descending a ladder. While paused, you can place torches and do anything else required, including placing additional ladder segments.
Dig out the block directly in front of you, as well as the one underneath. If all looks good, turn around and dig out the block you were standing on and the one underneath that, and you’ll be down to a level pit. Place two ladder segments on the wall in front of you and repeat. Attach torches to the other wall every nine layers or so. You can also place blocks between the torches to break your fall. It shouldn’t really be necessary because it’s difficult to fall off a ladder, but staring down a 50-layer drop may induce feelings of virtual vertigo.
Figure 4.3 shows the view looking up to the sky from the bottom of a 53-layer pit.
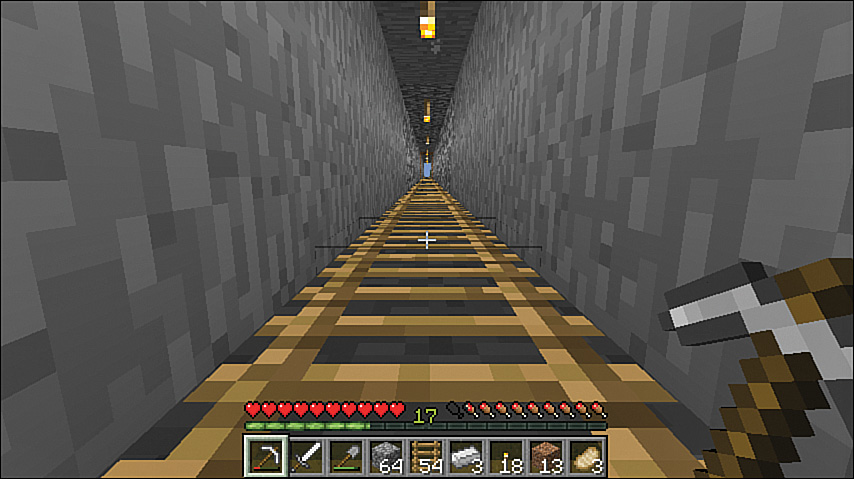
FIGURE 4.3 Sunlight seems such a long way away when you’re on layer 11, but ladders make for very fast ascents, and it takes only about 20 seconds to reach The Overworld.
Tip: Defying the Laws of Physics
Falling down the side of a shaft without a ladder is deadly, but like an acrobat at the circus diving off the high board into a saucepan of water, you can easily break your fall. Just dig out two blocks in the nonladder side of the shaft, pour a bucket of water against the side of the upper block, and survive shorter falls of around 50 blocks every time, as shown in Figure 4.4. You can also use this trick to make the world’s fastest one-way express elevator to get down in a hurry. If you take fall damage, try increasing the water’s depth. After a 250-layer fall you can splash down with zero damage in water just three blocks high.
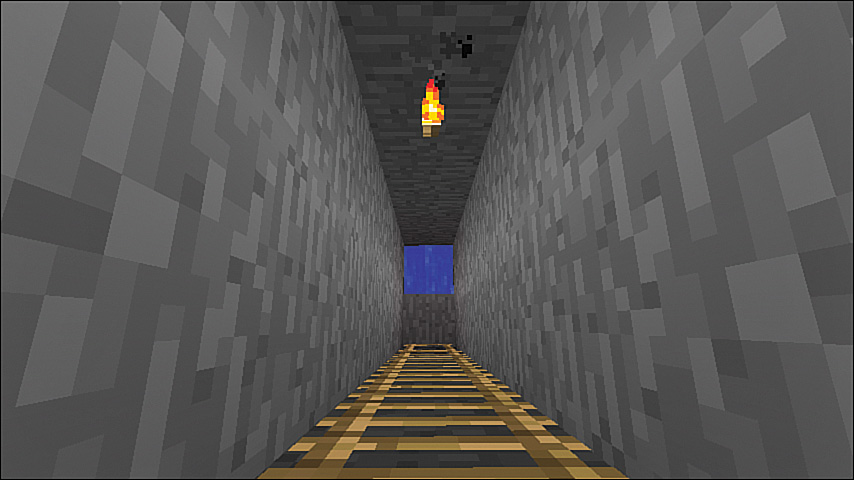
FIGURE 4.4 Break an otherwise breakneck fall down a long vertical shaft with a block or three of thud-absorbing water.
The Straight Staircase
The staircase is one of the most natural designs, and it helps you move along quickly. To build a staircase, you’ll need to break three blocks for each one down, so it’s not quite as efficient as the ladder descent, but it’s the simplest option available if you are short on wood for ladders and lacking in vines.
Start by digging down one block in front of you. Hop in the hole and then follow this pattern:
1. Dig out the block at eye level in front of you and the two underneath that.
2. Move into the hole in front of you.
3. Repeat.
As you go, don’t forget to place torches every nine or so steps. If you hit any problems, either take a 90-degree turn to the left or right and continue or make a bit of space for a landing and do a 180-degree turn.
You can see a typical straight staircase in Figure 4.5.

FIGURE 4.5 A straight staircase is easy to descend and fast to ascend. You can improve it by crafting cobblestone stairs so that no jumping is required on the return journey.
The Spiral Staircase
A spiral staircase takes a little more care to build than a straight one, and you might get a bit dizzy going up and down with all the frequent turns, but it has a couple of advantages:
![]() A spiral staircase descends vertically, which makes for more methodical exploration. It’s also easy to build if you don’t have the wood needed for a vertical access shaft.
A spiral staircase descends vertically, which makes for more methodical exploration. It’s also easy to build if you don’t have the wood needed for a vertical access shaft.
![]() A spiral staircase winds down around itself or a central core, exposing more surface area and therefore providing greater opportunity to discover seams of ore on the way down.
A spiral staircase winds down around itself or a central core, exposing more surface area and therefore providing greater opportunity to discover seams of ore on the way down.
There are several different versions. The tightest staircase possible is the 2×2. You can build one by following the same steps as for a straight staircase. However, each time you drop down one level, just turn to the right or left 90 degrees and start again. Keep turning in the same direction to ensure that you drop down vertically.
A 3×3 version of the same staircase involves going down two steps straight, turning, going down another two steps straight, and so on. This leaves a single-column central core that you can remove to create an open light well, which gives you more illumination from each torch you place. It’s also a bit easier to keep your bearings if you remove the central core as you go. Figure 4.6 shows the result.
A 5×5 version is similar, but you go down four steps and then turn. This leaves a solid block of 3×3 in the middle. You can then dig out the central block in the pillar and place a ladder against the side when you’re ready for faster ascents and descents. Open up blocks from the staircase into the core (except on the side reserved for a ladder) to bring light from the torches into the core. This style of staircase also exposes the maximum surface area, essentially mining out a block of 5×5 units all the way down. It is, however, a complicated method requiring that you keep careful count of the steps you dig on each side.
Layouts for Fast, Efficient Mining
There are numerous methods for mining, and some may lead to madness. You can wander around hacking at every rock in site, but you’re going to miss a lot of ore deposits, and it’s pretty easy to get lost in a maze of your own making. You can also go for grandeur, hollowing out halls as you go, dwarfing the Mines of Moria. Fortunately, Minecraft doesn’t yet have a Balrog, although the Ender Dragon comes close.
A gigantic, modern underground lair with powered rails allowing you to zip back and forth in minecarts also has its charm (see Chapter 9, “Redstone, Rails, and More”). There’s nothing wrong with that, and it does make for a fantastic creative challenge, but for your first serious dig, with what is probably still a quite limited set of tools, your aim should be to collect as much ore as possible with the least amount of effort and using the smallest number of pickaxes possible. That mine is called a branch mine.
Branch mines generally cover a rectangular surface area. You can choose any size you like, but you may also be limited by the terrain. Breakouts at layer 11 are quite common, and if you end up at a lava pool such as the one shown in Figure 4.7, you have little option but to treat it as the end of the trunk, or that particular branch. The good part is that lava pools provide a lot of light.
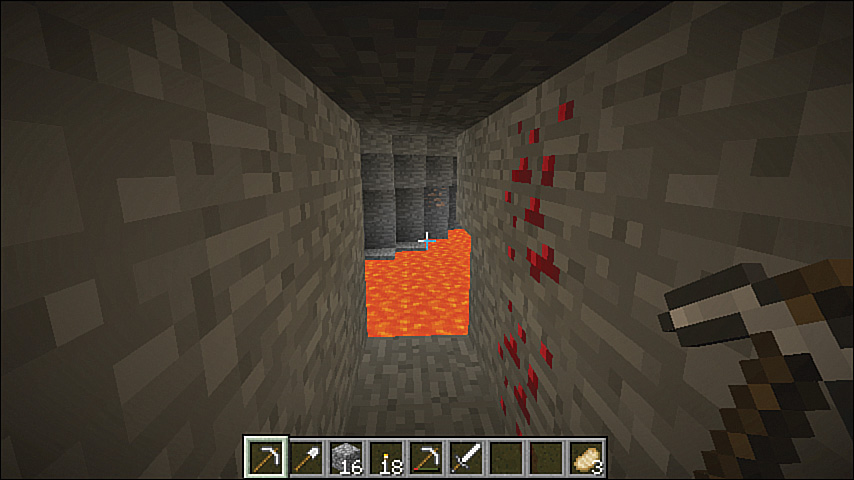
FIGURE 4.7 Lava lakes usually act as a natural barrier to further mining, at least in the beginning. Later you can use buckets of water to turn the lava into an obsidian bridge, but in the meanwhile just work around them.
So, what’s the most efficient layout? The one I prefer is quite simple, easy to navigate, and effective. It relies on the fact that blocks of ore—yes, even diamonds—almost always appear in veins larger than a single block.
A branch mine uses a horizontal central trunk that’s two blocks high by one block wide. Branches are then dug out perpendicular to the trunk, much like the branches of a tree—at least a strangely geometrical one.
Because each block of ore can be identified from any of its six sides, a distance of two blocks per branch exposes at least one side of every block to the side and also above and below you. In other words, move one space along a branch, and you expose a total of six blocks: two on each side, one below, one above, and the two in front of you.
Branch mining is the most thorough mining method available because it exposes every single block within the area the mine covers. But it’s not the most efficient because ore veins usually spread across clumps of 2 to 16 blocks. Think of the goal, therefore, as being to uncover veins of ore, not individual blocks. If you find one block in a vein, you expose the next, and you can then follow the vein to its end.
Spacing each branch every fourth block, with three blocks in between, works best. Figure 4.8 shows a top-down view.
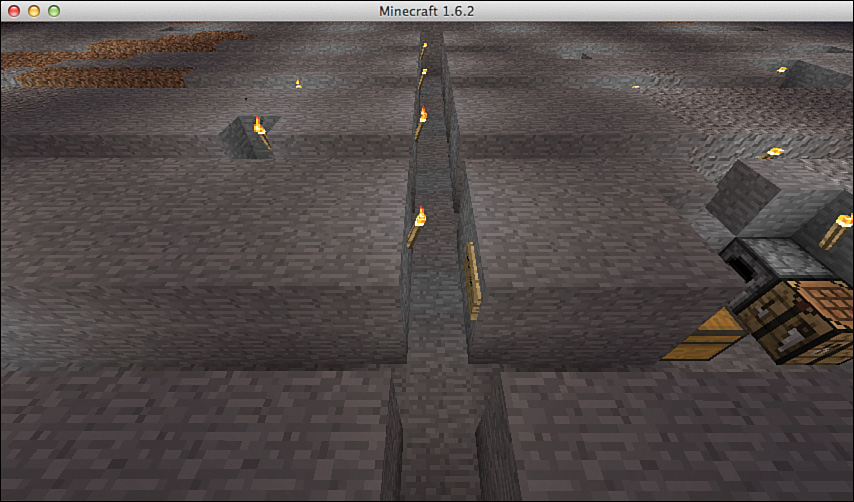
FIGURE 4.8 Space your branches every three steps, off a primary central trunk, and place a base camp for convenient crafting and storage.
Note: Spacing Your Branches
If your mining target is the more common ores such as coal and iron that occur in larger veins, you could even space your branches with four or five blocks in between. You might miss some smaller deposits but will intersect all the larger veins. This is an efficient technique that’s useful in the higher levels.
When you’ve completed mining layer 11, head back up using the same spacing principal vertically that you did horizontally, leaving a gap of three blocks, or layers, between the roof of your first trunk and the floor of the next. As you work higher, you lose most of the chances for diamonds, but other ores are plentiful. And you can head down to bedrock the same way, taking extra care because there’s a lot more lava about.
Staying Safe While You Mine
Your first mining expedition will undoubtedly turn up a lot of valuable ore. Don’t risk losing it all if you die. Chances are you won’t be able to make it back down from your last spawn point to pick up your valuables. Here are some tips that will help:
![]() Use the Left Shift key so that you can sneak around the edges of lava lakes and other hazards without risk of falling in.
Use the Left Shift key so that you can sneak around the edges of lava lakes and other hazards without risk of falling in.
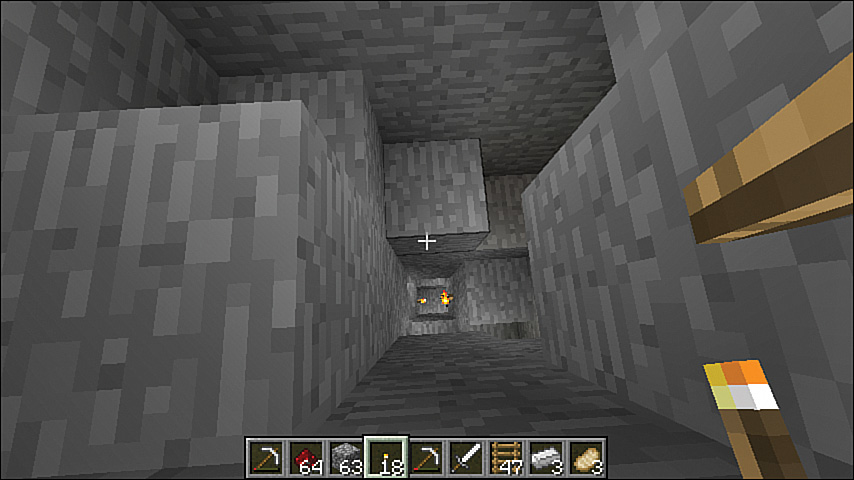
![]() Build a small base to act as a staging point. It’s easy enough to create a new crafting table and furnace, but if you’ve also been able to construct a bed and don’t have wool for another, consider bringing your bed down with you from your Overland dwelling. You can break it up with any tool and pick up the floating icon so that it slots into your inventory. Set up your base somewhere central to your mine and sleep in the bed at least once to set a new spawn point. Figure 4.9 shows a minimal layout where everything fits into a six-block space.
Build a small base to act as a staging point. It’s easy enough to create a new crafting table and furnace, but if you’ve also been able to construct a bed and don’t have wool for another, consider bringing your bed down with you from your Overland dwelling. You can break it up with any tool and pick up the floating icon so that it slots into your inventory. Set up your base somewhere central to your mine and sleep in the bed at least once to set a new spawn point. Figure 4.9 shows a minimal layout where everything fits into a six-block space.
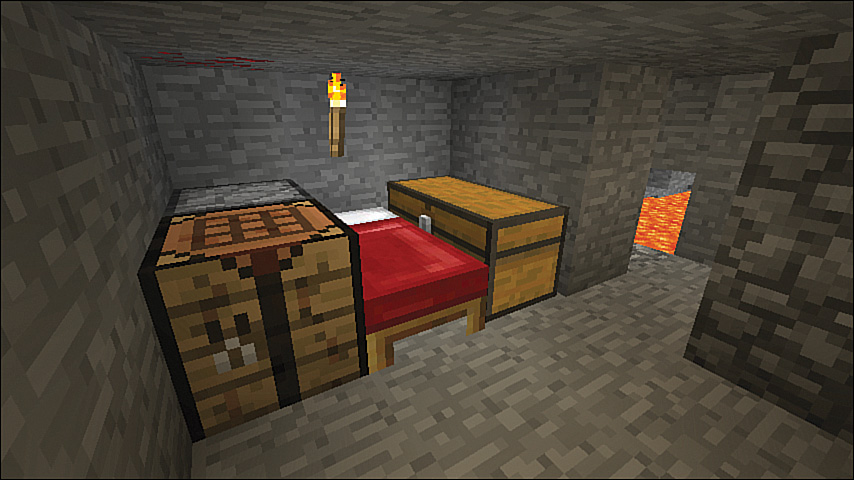
FIGURE 4.9 A mining base makes it easier to recover after a respawn. See the redstone in the upper-left corner? There’s plenty down here, so I left it as decoration.
Note: The Mobs Might Not Let You Sleep
You might need to try several base locations before you can successfully sleep in a bed. Any mobs nearby, even if blocked by walls, will prevent you from sleeping. Rather than search for and clear out caves, just pack everything up and find a new site somewhere else in your mine.
![]() Chests are easy to build, so place them in your base and anywhere you can access them with convenience in your tunnel system. Regularly return to a chest to drop off any valuable items you’ve found so that you can pick them up again if you respawn.
Chests are easy to build, so place them in your base and anywhere you can access them with convenience in your tunnel system. Regularly return to a chest to drop off any valuable items you’ve found so that you can pick them up again if you respawn.
The Bottom Line
Mining is the only way to gather many key resources, including the diamonds required to mine obsidian and get to The Nether dimension. Don’t make the mistake of mining too high, or you’ll miss most of the good stuff. Once you hit layer 11, you’ll be amazed at just how quickly you amass a huge range of useful resources. Mine your way in layers back up rather than starting at the top and working down, and you’ll have a plentiful supply of iron for tools, coal for torches, and masses of cobblestone to expand your dwelling on the surface.
Minecraft places resources in 16×16 blocks that run all the way from bedrock to the sky. (These are known as chunks.) There are an average of just over 3 diamond blocks per chunk, and of course you’ll find many times that of the more common ores. So if you don’t find what you need, just dig across at least 16 blocks and try again. There’s a wealth of material down there, and it won’t be long before you can build an incredible powered rail system that can zoom you up and down from the surface as fast as a freight train, as well as carry resources for you.
You may have noticed something as you’ve toiled away at mining: Those caves you’ve no doubt uncovered look mighty tempting, with so much exposed ore just waiting to be collected. The next chapter helps you get battle-ready so that you can head back down, take on the mobs, and take home the spoils.