5. Combat School
In This Chapter
![]() Mobs: how to seize the day and enjoy your slay.
Mobs: how to seize the day and enjoy your slay.
![]() Defend your territory with snow and iron golems.
Defend your territory with snow and iron golems.
![]() Wield a sword like a swashbuckler and deal extra damage with critical hits.
Wield a sword like a swashbuckler and deal extra damage with critical hits.
![]() Cover your flank with a shield.
Cover your flank with a shield.
![]() Happiness is a loaded quiver. Knock on the right doors and give hostile mobs the shaft.
Happiness is a loaded quiver. Knock on the right doors and give hostile mobs the shaft.
![]() Grow a thicker skin by crafting armor and coloring it like your favorite sports team or superhero.
Grow a thicker skin by crafting armor and coloring it like your favorite sports team or superhero.
It’s perfectly possible to live a peaceful existence in Minecraft. You can build a nice, safe mine; avoid cave exploration of any kind; create a self-sufficient farm that produces everything you need; protect your domain with mob-proof fences, keep it all well lit to prevent spawning inside; and retire at the end of each day with slippers on your soft, uncalloused feet in front of a warm fire, sipping a bowl of mushroom stew.
Ah, the serenity....But there’s one problem: You’ll miss out on most of the fun! Eventually, combat becomes a necessity. You don’t have to incite a full-scale war, but having the right equipment, some key tactics, and a few fighting skills will let you progress much faster and further in the game than you will if you take a purely passive path.
I’ve introduced a few of the hostile mobs previously, but now it’s time to get into the specifics of tactics, weapons, armor, and defense. It’s a tough world out there, and most of it is trying to kill you. Learn the names and ways of all the things that go bump in the night, how to bump back, and a few other things that can do the bumping for you.
Introducing the Menagerie
Minecraft mobs might be a pain in the derriere at times, but you’ll never get to Valhalla without ‘em. Let’s take a closer look at each of them and the unique tactics you can use to defeat them.
Remember that, in most cases, hostile mobs switch to pursuit mode if they are within 16 blocks and have a line of sight to your location. As soon as they switch, they’ll track you even if you move out of direct sight. You can use this to your advantage, leading mobs to locations that are better suited for counterattack or escape, or even maneuvering them into a positions where they can be pushed off a cliff or into a lava pool. (But do ensure that you keep your own footing while doing so.)
Each hostile has specific strengths and weaknesses. Although any tool can do damage, you’ll do best if you stick with a sword for short-range attacks and a bow for longer range. Mobs are also vulnerable to fire, so lighting the ground with a flint and steel can either weaken them enough that a final blow finishes them off or actually destroy them altogether.
This chapter introduces you to the mobs you are most likely to encounter in The Overworld. See Chapter 13, “Mods and Multiplayer,” for complete details on the mobs that inhabit The Nether and The End dimensions.
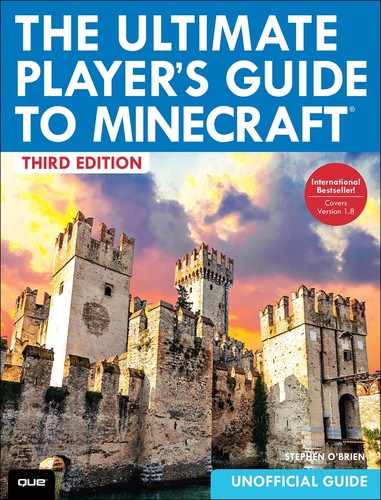
Zombies
The first mob you encounter in Minecraft will probably be the humble zombie (see Figure 5.1). The sound of one of them trying to beat down your door can set hairs on end, but their bark in single numbers is worse than their bite. Zombies are slow, and while a poorly handled encounter can definitely kill you, if you’re the aggressor, you’ll stay on top.
You can deal with zombies in a few different ways. If you encounter them close to a cave entrance and it’s sunny outside, just lead them out as soon as they enter pursuit mode and watch them burn up in the light. Keep your distance, though, because they can still attack and cause you fire damage. Zombies can happily exist in daylight when it’s shaded, overcast, or raining, or when they’re wearing helmets. For a more direct assault, keep your crosshairs on them and hit first and hit often, clicking your left mouse button continuously. They’ll only sometimes land a hit in return and will probably manage just one feeble attempt before they’re overcome.
If you encounter more than one zombie at once, along with other mobs sprinkled in for good measure, hack through the zombies first and make your escape or retreat.
Now, there is just one problem: Zombies can call up their undead buddies as reinforcements, and they can also cause additional zombies to spawn upon their death. The resulting zombie apocalypse can make it tricky if you’re caught outside at night.
Consider placing a wooden door at the entrance to a cave that connects back to your tunnel system. This will keep your base safe while you’re exploring. The door also protects your retreat route in case you need to make a hasty exit, and you can always knock it down for retrieval and permanently block off the cave after the mobs have wandered off.
Zombies drop rotten meat when they’re defeated. The meat is poisonous, but you can still eat it to build up your hunger bar. The best strategy here is to save up a few pieces and eat them all at once because you will still get only one hit of food poisoning. This is a great way to replenish your hunger bar from almost empty to full; your health will take a minimal hit from the poisoning and then start to replenish from the full hunger bar. Also, consider carrying a bucket of milk with you because drinking it instantly cures all types of food poisoning. You can also feed rotten meat to tamed wolves, as discussed later in the section “The Dogs of War,” to keep up their health.
Caution: The Dead Stick Together
Zombies are the most “mobbish” of Minecraft’s mobs. If you attack one, others nearby—even outside of the usual hostile range—might come swarming to help out their undead brethren.
Zombies sometimes (though rarely) drop items such as tools and armor.
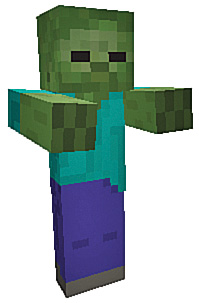
Spiders
Minecraft has two types of spiders and a skeleton/spider hybrid.
You’ll most often encounter the large spiders, shown in Figure 5.2. (See the sections “Cave Spiders” and “Spider Jockeys,” later in this chapter, for more information on the others.) The large spiders are jumpy, literally. They can leap two to three blocks in a single bound and can climb walls unless there is an overhang or a layer of a block type they can’t climb, such as glass. They’re fast, aggressive at night and in dark places, and a little bit tougher to defeat than your average zombie.

FIGURE 5.2 Spiders are fast and able to climb walls, but they’re easy to defeat even with a wooden sword.
Note: Building Spider-Proof Walls
Spiders can crawl up almost any wall unless it contains transparent blocks. Building these walls isn’t always practical, though. An overhang provides an alternative defense. Position a single block on the outside of the third level of any wall such that the block forms an upside-down ledge. Spiders can’t get through single-block gaps, so these overhangs only have to be positioned every second space, somewhat like the battlements on a castle keep’s walls. See Chapter 8, “Creative Construction,” for examples of this and other defensive construction techniques.
Spiders are, however, also very useful. Spiders drop string, a vital ingredient for crafting a bow. Every four pieces of string can also make one block (or bale) of wool. Gather three of those, and it’s enough for a bed, which can then be used to reset your spawn point. That’s very handy if there are no sheep nearby.
Sometimes a spider also drops one of its eyes. Treat spider eyes as a sort of extreme food if you can handle the concept, but keep in mind that they’re poisonous along the same lines as rotten meat. Spider eyes are also a useful ingredient in some potions.
Spiders are just one block high and two blocks wide, so a 1×1 opening in a wall will keep you safe.
Their jumping ability gives them a slight edge in combat. The best strategy is similar to that with defeating zombies: Click fast and often to hit them as rapidly as possible. Also, walk backward at the same time, as long as you know what’s behind you. This can help keep you out of range of their jump attack.
Caution: I Always Feel Like Somebody’s Watching Me
Ever had the feeling someone’s watching you? In Minecraft, that someone is probably a spider, watching you with all eight eyes, bright points of red in the dark. Spiders don’t require a line of sight to enter pursuit mode, so they’ll be on your trail as soon as you get within 16 blocks, and they’ll do almost anything to get closer. Lock yourself in your shelter for the night to stay safe. But take care in the morning: If you hear the spider’s hissing/slurping noise, it might be still waiting for you, hatred in every eye. Spiders have a habit of lurking in ambush on your roof, waiting for you to “tra la la” out the door the next morning without a care in the world, until their fangs sink into your back. Fortunately, the large spiders aren’t poisonous, so just make sure you have your sword in hand, ready to fight back, and you’ll be fine.
Skeletons
The sound of skeletons’ rattling bones usually gives these mobs away a few moments before their arrow pierces your breastbone. They’re sharpshooters, so the best approach is to stay out of the direct line of fire, ducking out to attack only when they’re close enough. Do it commando-style, moving sideways to avoid the feathered missiles that will undoubtedly be coming your way. It’s not an arrow-proof strategy, but it can help. Figure 5.3 shows a skeleton with its ubiquitous bow.

FIGURE 5.3 Skeletons are sharpshooters, so keep your distance until you can strike, and don’t let them sneak up behind you.
If you can get close enough, you can use a sword to finish off a skeleton, or group of skeletons quite quickly. For this reason, a good strategy is to try to wait somewhere protected and let the skeletons get within reach. Skeletons also burn up in sunlight unless they are protected by armor or are wearing a pumpkin head, so luring them out into the sun won’t always provide deliverance.
Skeletons usually drop arrows, and collecting them is an easy way to resupply your stock if you are also using a bow. You’ll also often find arrows that have missed their mark sticking out of blocks, but you can’t collect those, and breaking the block may cause you damage from the falling arrow.
Also, keep in mind that skeletons will try to circle around you and approach you from behind.
Cave Spiders
Cave spiders are invidious arachnids that you find in abandoned mineshafts. They’re fast, small, and poisonous, and they make large spiders look positively passive.
Cavers, as they’re often called, can slip through a gap one block wide and less than half a block high, so a 1×1 block hole in the wall offers no protection at all. You can easily spot them because of their blue coloring (see Figure 5.4).
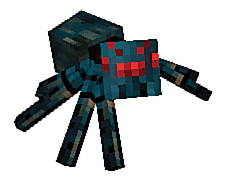
FIGURE 5.4 Inhabiting only abandoned mineshafts, cave spiders aren’t common, but they are definitely among the most deadly mobs.
Cave spiders don’t spawn naturally. They’re spewed out of a spawning device, a small fiery cage that shows a miniature version of themselves spinning around faster and faster until it seems they’re flung out the side through centrifugal force. It’s a bit like a washing machine’s spin cycle gone mad. You’ll also find other spawners busy dispensing other types of mobs such as zombies and skeletons. Slow them down or stop them completely using the tactics provided below.
If you are lucky enough to find an abandoned mineshaft, consider it a huge bonus. These massive structures sometimes come prestocked with well over a dozen chests with all kinds of goodies inside. Cave spiders and other mobs that may inhabit it can be a bit of a challenge, but go ahead and claim that mineshaft for your own. It’s now your mineshaft. Just take care as you go and ensure you are well prepared for a challenging exploration.
Here’s what you need to know:
![]() A bite from a cave spider won’t kill you. Like all other poisonings, it can take you down to half a heart on Normal difficulty. It’s the damage from the bite itself, not the poison, that can do you in.
A bite from a cave spider won’t kill you. Like all other poisonings, it can take you down to half a heart on Normal difficulty. It’s the damage from the bite itself, not the poison, that can do you in.
![]() Cavers are easy to kill but are smaller than other mobs, so you need to aim your crosshairs with a bit more care and click frenetically.
Cavers are easy to kill but are smaller than other mobs, so you need to aim your crosshairs with a bit more care and click frenetically.
![]() Fighting while walking backward works as well with cavers as with the large spiders, but cavers are faster so will be able to launch more attacks.
Fighting while walking backward works as well with cavers as with the large spiders, but cavers are faster so will be able to launch more attacks.
![]() A cave spider habitat is filled with spider webs. These will slow you down, but cavers can slip through those webs at normal speed.
A cave spider habitat is filled with spider webs. These will slow you down, but cavers can slip through those webs at normal speed.
![]() As you get close, place some torches down as close to the spawner as you can, or even on the spawner itself. This will prevent it spawning new mobs. You can then break it with a pickaxe, or more slowly with other tools. But keep your guard up, because there is often more than one spawner in close proximity.
As you get close, place some torches down as close to the spawner as you can, or even on the spawner itself. This will prevent it spawning new mobs. You can then break it with a pickaxe, or more slowly with other tools. But keep your guard up, because there is often more than one spawner in close proximity.
![]() There’s good news related to cavers: Abandoned mineshafts, where cavers live, are a treasure trove of resources waiting to be plundered. You’ll find loads of chests, and the mine’s structural reinforcements provide the only source of wood available underground.
There’s good news related to cavers: Abandoned mineshafts, where cavers live, are a treasure trove of resources waiting to be plundered. You’ll find loads of chests, and the mine’s structural reinforcements provide the only source of wood available underground.
Spider Jockeys
Sit a skeleton on top of a spider, and you get a spider jockey. A spider jockey jumps like a spider, shoots arrows like a skeleton, and is best given a wide berth. Fortunately, they’re rare. If you see one, smash the skeleton if you can and deal with the spider next. You may not survive, but isn’t that why you keep your valuables in a chest next to your spawn point?
Chicken Jockeys
What do you get if you sit a baby zombie on top of a chicken? A chicken jockey. They’re fast and able to leap off tall buildings, cliffs, and so on without taking any fall damage. Fortunately, they are a very rare spawn.
Creepers
If Minecraft has an anti-hero, it’s the creeper (see Figure 5.5). Think of creepers as walking improvised explosive devices (IEDs).
FIGURE 5.5 Creepers appear to be fairly docile until they get close and provide a taste of their truly explosive personality.
Don’t panic too much when you first spy a creeper. You can survive a creeper attack unless you are caught totally by surprise, and a little armor can go a long way.
If you should turn a corner and there’s a creeper right in front of you, do your best to sprint away. Your attack on a creeper needs to be well timed, and you need space to sprint in, thwack it, and move back out again so that its fuse resets. The force of your blow should usually be enough to knock the creeper far enough that this happens with reasonable surety. A sword with a knockback enchantment (see “Sprucing Up Your Weapons” on page 233) also helps a lot against creepers but actually makes things worse when you’re fighting skeletons.
Unfortunately, if you see a creeper swelling like a balloon (something it does just prior to exploding), it’s probably already too late.
Try to ensure that you don’t become tangled in a fight with a creeper near an important structure. Just about the worst situation is stepping out your front door, straight into one. You’ll end up with a crater where the front of your house used to stand. As one of the memes on the web reads, “I just undid in two seconds what you spent five hours building.” You are generally safe if you can keep a distance of at least two blocks, but creepers move quite quickly.
Creepers do have an Achilles heel. If you lure one to water, you can easily deal with it by attacking from below. Creepers are also scared of ocelots and their tamed version, humble cats (see Chapter 7, “Farming and Taming Mobs”).
As with most other mobs in Minecraft, creepers may seem somewhat formidable at first, but with a little practice, you’ll find that you can dispatch them fairly easily.
Creepers drop gunpowder, a key ingredient in crafting TNT blocks and making throwable “splash” potions, described in Chapter 10, “Enchanting, Anvils, and Brewing.”
Slimes
Slimes aren’t too common because they generally spawn in swamps and (far less regularly) in other underground areas. But slimes can ooze up far from a swamp biome and spawn in any light level.
If any mob needs frenetic clicking, it’s a slime. That’s because each large one splits into up to 4 smaller ones and up to 16 tiny ones (see Figure 5.6). The tiny ones don’t do damage but can be annoying as they swarm you. Just click and click and click until you’ve finished them all, and switch to your fists to finish off the tiny ones. All it takes to kill a tiny slime is one blow, and this will save durability on your sword.
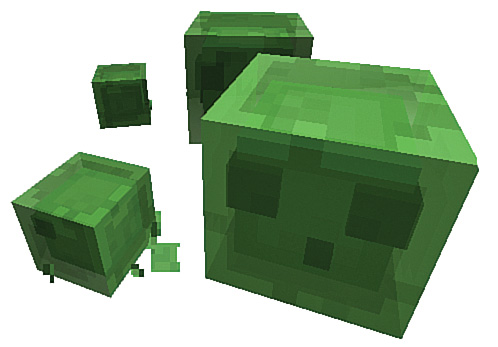
Slimes drop slimeballs, a substance that makes ordinary pistons stickier than duct tape. You can also craft slimeballs into slimeblocks, the only blocks in Minecraft that can stick to other blocks—moving as they move or making them move when the slimeblock moves. Slimeblocks also act like trampolines: Try jumping on one from a great height, and you’ll bounce back up part of the way without suffering any fall damage. In addition, you can use slimeballs to craft magma cream, which allows you to swim across lava lakes with impunity; this is very handy to use in The Nether. You can also use slimeballs for crafting leads, which makes passive mob management much, much easier. Slimeballs and slimeblocks are, in short, incredibly useful.
Endermen
The Enderman is a curious, otherworldy creature surrounded by a purple haze (see Figure 5.7). The Endermen call The End dimension home, and you’ll see them there in enormous numbers, but they also appear in The Overworld quite often, so I’ve also included them here.
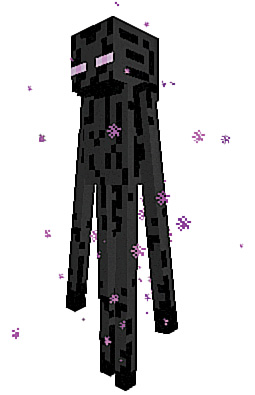
Endermen tend to teleport when attacked and have a habit of popping up behind you, which can make defeating them tricky. Your best bet, actually, is to ignore them. They’re not hostile unless you put your eyes (crosshairs) on them, so popping a pumpkin on your head, while not offering any protection or winning you any beauty contests, essentially hides your eyes so that Endermen don’t turn hostile.
Endermen drop Ender Pearls, an essential crafting component for Eyes of Ender. These unusual items help find the strongholds that house the Ender Portals needed to access The End dimension. Although priest villagers also trade Eyes of Ender (see Chapter 11, “Villages and Other Structures”), attacking and defeating Endermen to gain the Ender Pearls and then using those to craft the Eyes of Ender is the quickest way to find strongholds. Attack an Enderman’s legs to prevent it from teleporting away.
Incidentally, if you throw an Ender Pearl with a right-click, you’ll teleport to its point of impact. You can use this tactic to escape hostile mobs or travel through difficult terrain. The only danger is that you will take a damage hit of up to five health points each jump, so use with care.
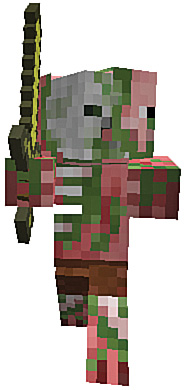
Zombie Pigmen
Like Endermen, these inhabitants of The Nether dimension are neutral unless attacked. As with wolves and zombies, attacking a Zombie Pigman causes them all to want to join in. If you get Zombie Pigmen riled up, you may find it best to try to make your escape. They’ll calm down eventually. Figure 5.8 shows their interesting visage—a mug shot if ever there was one.
Killer Rabbit of Caerbannog
The Killer Rabbit of Caerbannog is perhaps the most unusual mob in Minecraft. Every time a cute little passive rabbit spawns, there is a 1 in 1,000 chance it will turn into the Killer Rabbit of Caerbannog, a vicious although not particularly powerful hostile mob. (You’ll recognize its name if you’ve seen Monty Python and the Holy Grail.) The rabbit does, however, have a fast attack, so either keep your distance and use a ranged weapon or attack with at least an iron sword so you can swiftly deliver 10 points of damage to kill it off. Or, if you are feeling Monty, run away, run away!
Guardians and Elder Guardians
These hostile mobs spawn in or around the huge ocean monument structures that appear in deep ocean biomes. The guardians shown in Figure 5.9 attack squids and players with an electrified beam and can be extremely difficult to defeat without enchantments such as Night Vision (to make it easier to see underwater), Depth Strider (to speed up movement underwater), and Respiration (to allow underwater breathing).

You’ll also stand little chance of survival if you enter without a full suit of diamond armor and a diamond sword to inflict significant damage with every blow.
Elder Guardians are a stronger and larger version of guardians. Each monument contains three that will inflict you with mining fatigue, preventing the breaking of blocks. You’ll need to defeat them before you can start to break up the temple and retrieve the eight gold blocks hidden inside each.
Attacking with a bow and arrow at close range and then ducking behind a block to hide can be an effective method for defeating both mobs, but swords can also work just as well if you have a high-level strider enchantment. You’ll have several seconds to get out of the line of sight after first being targeted by each mob’s beam before it actually fires and does damage.
Finally, attack guardians and Elder Guardians only when they don’t have their spikes extended to avoid taking damage.
While ocean monuments don’t provide too much loot at present, this may change in the future. You can read more about them in Chapter 11.
Defensive Mobs
Balancing out the host of hostile mobs are a couple of defensive ones that are unique because they are created by players, although not at a crafting table. To create a defensive mob, you need to stack their blocks where you’d like them to spawn, always ensuring that you leave the pumpkin block to last.
Snow Golems
Snow golems aren’t the strongest line of defense because they don’t cause damage to any of The Overworld mobs, but their furious rate of snowball throwing can be enough to keep zombies and other hostile mobs at a distance, making them useful around your home. Create your own snow golem with these simple steps:
1. Gather at least eight snowballs by left-clicking any snow lying on the ground with a shovel.
2. Craft two snow blocks, using four snowballs for each.

3. Create a stack of the snow blocks by placing one on top of the other.
4. Place a pumpkin or jack-o-lantern on top of the stacked snow blocks, as shown in Figure 5.10, to bring the snow golem to life.
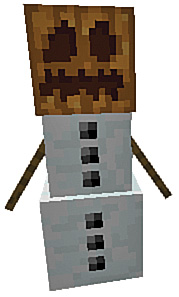
FIGURE 5.10 Snow golems aren’t particularly powerful, but who doesn’t want a snowball-hurling automaton in their front yard all year ‘round?
Unfortunately, snow golems have a tendency to wander, so place them behind a fence or walled area for best results. But ensure that there’s a roof over their head because like little Olaf in Disney’s Frozen, they don’t survive in rain or a desert.
Iron Golems
Iron golems exist to protect villages and their inhabitants. They’re incredibly powerful, and you really shouldn’t attack them. You also shouldn’t attack any villagers because the iron golems will rush to their defense.
Iron golems spawn naturally in villages of sufficient size (approximately 21 houses), but you can also build one much the way you build a snow golem:
1. Build up a collection of 36 iron ingots. (These golems are incredibly expensive.)
2. Create four blocks of iron using nine ingots each.

3. Place one block of iron on top of the other and then attach two more blocks to opposite sides of the upper block in the stack. You are, effectively, creating a stack of iron blocks in the shape of a T.
4. Place a pumpkin on top of the middle upper block where the head would go.
Besides smashing the heck out of spiders, zombies, and most other hostile mobs, iron golems have the endearing habit of giving red poppies to village children (see Figure 5.11). Unfortunately, they don’t really care too much about your well-being, so unless your strategy is to help protect villages, iron golems are not really worth building, especially given the enormous amount of iron required.

FIGURE 5.11 Iron golems aren’t directly on your side, but if you set up your house inside a village, you’ll be within their circle of protection.
The Dogs of War
Would you like a loving pet that follows you around everywhere and mercilessly kills your enemies? You need a canine companion. Dogs are essentially tame wolves. You tame a wolf by offering it a bone. Offer it enough bones, and its eyes will change from small and fierce to big and loving, and a collar appears. (Note that you can dye the collars if you want to tell your dogs apart. You can even give them tags and name them.)
Once a wolf transforms into a dog, it acts like a dog. It will stay by your side, staring lovingly at you with its head cocked to one side whenever you have meat of any kind in your hand, and it will attack anything you strike or that strikes you. They are not, however, invulnerable. If one gets hurt, it makes a yelping noise and briefly flashes red. Give a dog a steak to help it heal. Its tail (and its hit points) will rise until the dog is happy again. When dogs get really happy, they run off in pairs, kiss, and make a puppy.
You can tame any number of wolves and raise as many puppies as you like. I once had more than 30 dogs following me around. I pity the poor hostile mobs that dared attack me back then. They never seemed to see it coming—and neither did I. I once saw my pack of dogs take down an Enderman in 2 seconds flat, before the meanie had the chance to think, “Ow! Ow! Better teleport out of h...argh!”.
Dogs can help you save wear and tear on your weapons, too. Just thwack a hostile mob once, and the dogs will do the rest.
Tip: Give ‘em a Bone
Dogs love skeletons (they are made of bones, after all) and will chase them without prompting from you. Skeletons do run away from dogs as fast as their rickety bones can carry them, but the dogs are faster and will eventually catch up.
Mob Target Practice
Provided that your game isn’t set on Peaceful and you aren’t playing in Creative mode, you’ll eventually run across hostile mobs in the wild. However, if you’re dying (pun intended) to practice combat sooner rather than later, then I have a recipe you might want to try.
Start by pressing F3 and making a note of your avatar’s current x y z position value. Next, press F3 again to make the debug screen. Step a few paces outside that area.
As it happens, you can manually spawn mobs by using the /summon command. The basic syntax for the /summon command is as follows:
/summon mobname X Y Z
You can get fancier than this, though, going so far as to specify one or more datatags that describe additional parameters concerning the mob. If you want more information on /summon command syntax, consult the official Minecraft wiki: http://minecraft.gamepedia.com/Summon.
What’s curious about the /summon command is that you can use it to invoke into your environment, in broad daylight, mobs that normally come out only at night. To prove this, use the /time set day command (if you’re in night) to start a new day and then try invoking, say, a skeleton.
When you issue the /summon command, be sure to specify the location where you want the mob to appear, using the X Y Z syntax.
You can see the beginnings of one of my own practice combat sessions in Figure 5.12.
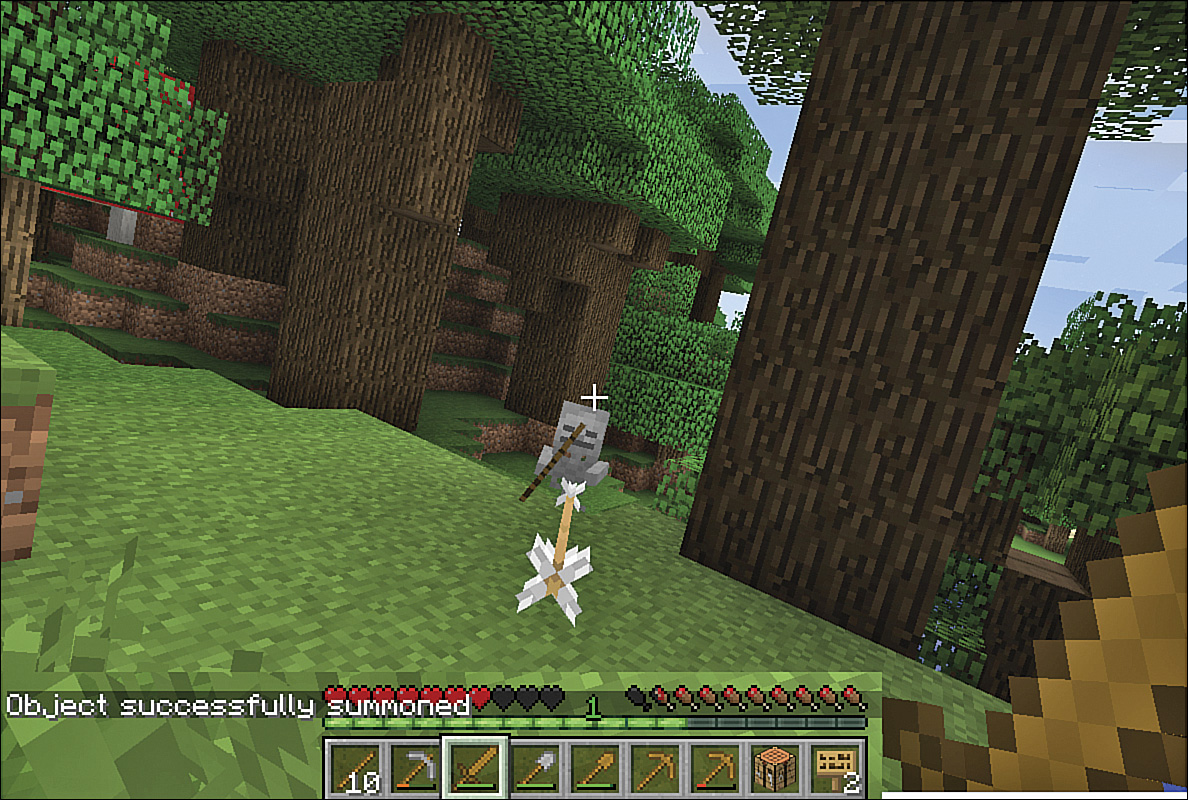
FIGURE 5.12 By manually summoning hostile mobs, you can build combat experience and prepare yourself for “real-life” encounters. In case you were wondering: Yes, that skeleton just launched an arrow at my heart.
In Creative mode, you can also fetch spawn eggs for the mobs from the creative inventory and place them with a right-click to summon the mob. Position yourself where you’d like and then type /gamemode survival to switch back to a normal combat scenario.
Weapons, Armor, and Shields
Out in the wild? Getting struck by skeletons? Zombies spawning everywhere? You can stand and fight, or you can decide to run. Either way, a decent set of weapons, a suit of armor, and a shield will help you survive to fight another day.
Minecraft has two primary offensive weapons: the sword and the bow. In a pinch, other tools will also do. None is as powerful as the sword, but if you run out of swords in combat, switch, in order of effectiveness, to an axe and then a pickaxe. If all else is lost, remember that you can also beat something over the head with a shovel.
Tip: Delivering the Winning Blow
Deliver a critical hit to cause up to 50% more damage. This works with every material and tool except the hoe. The trick is to make the hit as you are falling, and the easiest way to do that is to jump first, timing it right so that you have passed the apex of your leap by the time you strike. I’m not sure if it helps to yell “Hiiiiyaaa!!!” as you do so, but feel free to give it a try. You’ll know you’ve succeeded when you see a little bloom of stars around the unfortunate recipient of your attack immediately after the hit.
Critical hits can be crucial for survival. You can use them to kill some mobs with a single blow, saving your sword’s durability. Put in a bit of practice when you can, and the timing of the hit and the optional battle cry will become second nature.
The same techniques that work in many other combat games also work in Minecraft. Keep on the move; don’t just stand like a statue and flail. Float like a butterfly and sting like a bee. Use the left- and right-arrow keys to circle around the enemy and dodge direct blows, ranged attacks such as from skeletons, and melee attacks, which essentially are full-body broadsides by slimes and the like. Always use height to your advantage when you’re out in the open. It will help both with avoiding attacks and delivering critical hits.
It’s worth noting that even though you can dual-wield weapons starting from v1.9, you can only attack with the item held in your main hand. (You can set the main hand to be your left or right hand in Minecraft’s settings.) Use the F key to quickly swap items between hands.
However, you can use a bow held in your other hand, and you can carry torches or a splash potion. This makes it much easier to explore dark areas, carry out ranged attacks, and so forth. Replace that with a shield to attack and defend at the same time.
Dual-wielding really changes the nature of combat and combat tactics.
Swordcraft
The sword will no doubt become your go-to weapon. In a pinch, it’s easy to quickly craft a sword from a few raw materials, and its damage and durability increase quickly as you upgrade from stone to iron to diamond and, later, add some enchantments on top. Table 5.1 lists the materials, damage inflicted, and durability of each sword material.

The damage points represent the minimum damage from a successful strike. Critical hits increase that minimum by a random amount up to the totals shown in Table 5.1. Iron and diamond swords are obviously the most powerful, especially if you keep in mind that attack is actually the best defense. The quicker you can kill a mob, the less time it has to deliver blows in return. Dispatch them fast, and you can move on with your health mostly intact.
Sprinting while hitting also knocks back the target. This is a vital move for attacking creepers but not so good against skeletons because it gives them time to line up another shot. (If you’ve forgotten any controls, like how to sprint, make sure to refer to Table 1.1.)
The sword is unique among the weapons because it also provides a blocking move. Right-click to block any attack, either direct or ranged, if you can spot that arrow heading your way in time. This provides up to 50% of damage reduction, at the expense of dropping your speed to a crawl, so block at the last possible moment or in tight corners where there isn’t enough room for the usual evasive maneuvers. Even better, successfully blocking a fireball will change its direction and fling it back toward its sender.
Bows and Arrows
A fully charged bow delivers more damage than a standard diamond sword, making bows very powerful weapons. Bows and arrows also enable you to attack from a distance, giving skeletons a dose of their own medicine and keeping you well clear of creeper detonation range. Figure 5.13 shows a bow in action. Bows can only be used from your dominant hand, although any arrows held in the other will be used before others in your inventory.
Craft a bow from three sticks and three pieces of string and equip yourself with it in any quick access inventory slot.

There is one other part to the equation: arrows. You can choose from several types, including the enchanted spectral arrow, which is crafted from a standard arrow surrounded by four pieces of glowstone dust. This arrow gives its target a glowing outline even when they are invisible. Even better, dip the arrow’s tip into a potion for a long-ranged splash effect.
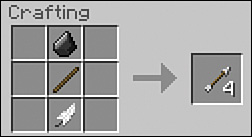
A piece of flint, a stick, and a feather will create a stack of four basic arrows. Four arrows isn’t a lot, and you’re going to need quite a few more to make having a bow worthwhile, but it’s a good place to start.
There are a number of ways to add more to your quiver. The easiest is to go for a quick scout in the morning when the sun comes up. Here’s why:
![]() Skeletons often drop arrows when they burn at dawn.
Skeletons often drop arrows when they burn at dawn.
![]() Zombies sometimes drop feathers at the same time.
Zombies sometimes drop feathers at the same time.
![]() Chickens can die during the night, victims of wolves or cacti. You can also kill any random chickens you find during your travels to get both meat and often one or two feathers per chicken.
Chickens can die during the night, victims of wolves or cacti. You can also kill any random chickens you find during your travels to get both meat and often one or two feathers per chicken.
Sticks and feathers are easy enough to come by, but what about flint?
Every mined gravel block has a 1 in 10 chance of dropping a piece of flint instead of a block of gravel. It’s a random process, but that also means that every block of gravel, if mined, placed, and mined again will eventually yield flint. You just need an efficient way to go about it.
Gravel usually seems to be a bit of an annoyance in mines because it’s so common, and clearing the long vertical shafts can require a lot of effort. But where flint is concerned, gravel is actually quite a benefit. Gather all the gravel you can because it will yield flint, even if it takes a little while.
Dig out a nice big room somewhere convenient underground, light it with torches, and then fill in the middle with all the gravel blocks you’ve mined. Then have at them with a shovel. Mining gravel with a shovel is incredibly quick, so it won’t take long. Placing just 10 blocks is likely to yield 1 flint (enough for four arrows), and then you can reuse the other 9 gravel blocks. Add a new block to the mix and repeat.
Tip: Superfast Flint Mining
The quickest way I’ve found to recycle gravel for flint is to create a room with a set of four eight-block-long trenches that are two blocks deep with an additional step in the end so you can climb out. This creates a total of 64 gravel spaces—conveniently equal to a full stack of gravel in a hotbar slot. Keep another full stack of gravel in a regular inventory slot. This is the replenishment stack. With the hotbar gravel selected, jump into each trench, running up and down while holding down the right mouse button to place the gravel in a continuous stream. Switch to the shovel and do the same in reverse while holding down the left button to harvest the gravel and flint. Iron shovels provide the best durability without chewing up the much rarer diamond gems.
You’ll get 6 to 7 pieces of flint each time you clear the room, which is sufficient to make between 24 and 28 arrows. Now replenish and repeat: Open your inventory window and hold down Shift while you left-click the spare stack of gravel. Just enough will be transferred from there to the hotbar stack to bring that back up to 64 units.
Ready for some archery practice? Follow these steps to shoot arrows with devastating force:
1. Make the bow the active item in your hotbar. Arrows can stay hidden in a regular inventory slot and are depleted automatically.
2. Use the crosshairs to aim at your target. You’ll need to learn to account for the arrow’s arc through the sky and to take into account your target’s movement. Aim directly at nearby targets and increasingly above their head as they get farther away. If they are heading clearly in one direction across your line of sight, aim slightly ahead of that movement to make up for the time it takes the arrow to reach them. There’s no hard-and-fast rule here; practice does make perfect.
3. Right-click and hold to pull back on the bow. Hold longer for a stronger shot. When it’s fully charged, the bow shakes slightly, showing that it’s primed for a critical hit with a damage bonus.
4. Fire the arrow by releasing the right mouse button. Fully charged shots leave a trail of stars behind the arrow as it flies.
Arrows deliver substantial damage and are the safest tool for dealing with skeletons, creepers, and other mobs that also deliver ranged attacks, such as ghasts and blazes.
Various enchantment effects can also greatly increase a bow’s strength and versatility, as well as provide an unlimited supply of arrows.
Shields
With the new dual-wielding capability also comes the ability to craft and use shields. These replace the need to block frontal attacks with a sword, but they also block an attack from the side on which the shield is held, and serve to allow you to attack and defend at the same time. Try dual-wielding two shields to block all attacks in an arc around your front and sides. Perfect for a headlong charge through an attacking mob of mobs.
You’ll need to right-click to hold the shield up to block attacks, and left-click at the same time to attack.
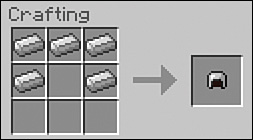
Craft a shield from one column of the same-colored wool, one column of any kind of planks, and a single iron ingot in the middle of the last column. Combine with a banner that uses the same base color as the wool to transfer its design (see Figure 5.14).


Shields take damage and can only be repaired at an anvil, although combining them at the anvil with an enchanted book of “unbreaking” will vastly increase their durability.
Armor-All
Armor is crafted from leather, iron ingots, gold ingots, and diamond gems. A fifth type of armor made from chain mail can’t be crafted but is available as a tradable item in some villages, if you are lucky enough to find it (see “Emerald City: Your Ticket to Trade” on page 248).
A full suit of armor requires 24 units of source material, but the materials don’t all have to be the same type. It’s best to think of armor not as a complete suit but as its individual parts: a helmet, chestplate, leggings, and boots. Each can be made from a different material, depending on what you have on hand, and each adds to the damage protection value that protects your entire body, regardless of where you are hit. Your avatar is, to put it plainly, one giant hit box...like a punching bag that can also strike back.
As mentioned in Chapter 3, “Gathering Resources,” each armor icon represents an 8% reduction in the damage you’ll take, so a 10/10 suit of armor will reduce the damage you take by 80%, whereas a 1/10 suit will absorb only 8%. Armor becomes less effective the more damage it absorbs, although the rate at which it deteriorates also depends on its material, with leather being the weakest and diamond the strongest.
Note: Which Suit Suits You?
Finding 24 units of any of the materials that can be turned into a suit of armor isn’t easy when you’re starting out, but if you happen to have spawned near a few cattle, consider starting a farm, as described in Chapter 7 and breed the cattle rather than try to find more of them in the wild. You can also craft the hide from four rabbits into one piece of leather. Horses also sometimes drop two pieces of leather when they die. If you haven’t found any willing bovines (or horses, perish the thought—it just seems wrong), and mining for an iron suit is the only reasonable option, ensure that you can build up enough of a stock of iron ingots for your tools before turning any into armor.
Your Heads-Up Display (HUD) shows the total defense points for your current armor. As with the other bars, each unit represents two points, and it decreases by half an icon as each point depletes.
Table 5.2 lists the maximum damage absorption provided by each armor material. Various enchantments can also improve the damage absorption of each type, with gold faring the best, followed by leather, diamond, and iron.

Having said that, not all the armor components made from one material provide the same damage protection. The chestplate always provides the highest protection, followed by leggings, the helmet, and boots. The ratios differ somewhat between materials but, generally, a chest plate is 3 to 3.5 times as effective as boots. Build your armor in chestplate–leggings–helmet–boots order for best results.
The crafting recipes for the different armor pieces are quite simple. I’ll show them for iron, and you can just substitute whatever materials you have on hand. The same material must be used for each piece, but as mentioned earlier, you don’t need to wear a full suit with each piece crafted from the same type of material. You can mix and match. For example, if you have been able to collect a lot of leather but only a handful of pieces of iron, consider using the leather for a chestplate and the iron for a helmet because this will give you the maximum damage protection from the available resources.
Here’s what you need to craft each piece of armor:
![]() Chestplate—8 units of material
Chestplate—8 units of material

![]() Leggings—7 units of material
Leggings—7 units of material

![]() Helmet—5 units of material
Helmet—5 units of material
![]() Boots—4 units of material
Boots—4 units of material

When you’ve crafted the armor, open your inventory window and Shift+click any piece to automatically put it in the correct armor inventory slot. You can also use an armor stand to keep your ready-to-wear suits out in the open instead of stuffed in a chest, or place the armor in four item frames on the wall.
Color-Coordinating Your Leather
Leather armor is the only armor that can be dyed. Although changing its color won’t help one iota with damage protection, it’s possible to step out in style by crafting up any of several hundred thousand different colors or color combinations for the different armor pieces. You could even make red, white, and blue armor to be like Captain America! Place the armor and different dyes in the crafting grid. Repeating the same dye more than once tends to weight the final color toward that dye. Figure 5.15 shows a finished example.
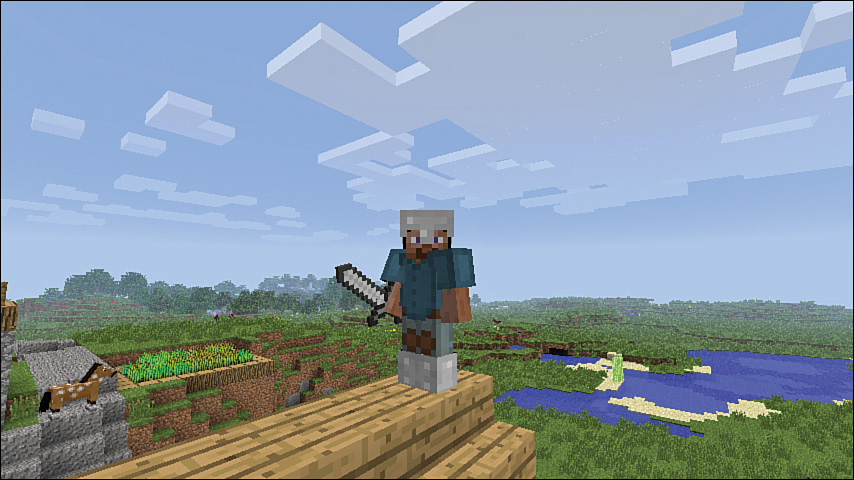
FIGURE 5.15 Ready for some village trading, in colored leather chestplate and leggings, paired with an iron helmet and boots.

You may be wondering why you’d bother dyeing your armor. Well, it’s certainly not necessary. But it’s fun to differentiate your character for Multiplayer mode. Otherwise, it makes no difference. And it’s also possible to change the entirety of your character’s skin by logging in to your account at http://minecraft.net and clicking the Profile link. See Chapter 13 for more information.
Taking Combat Damage and Healing
As this chapter comes to a close, it’s time we have a heart-to-heart discussion about health, damage, death, and healing in Minecraft.
Recall that the HUD includes your health bar, which consists of a row of heart icons. Each heart represents 2 hit points, giving your avatar a total of 20 hit points. These hit points can be lost through combat damage, of course, but they also decrement through starvation; fall damage; touching fire, lava, or cacti; drowning; suffocation; or getting caught in an explosion.
We’ve discussed armor and the armor bar; the row of defense point shields represents the amount of damage your avatar’s armor can sustain before you start losing hit points—that is, your avatar’s life.
What happens as you’re nearing death? You’ll observe your health bar shaking. If the worst happens and your avatar is killed, you’ll see the Game Over screen shown in Figure 5.16.

FIGURE 5.16 As long as you’re not playing Minecraft in Hardcore mode, death does not signify a permanent end of the road for your avatar.
Notice in Figure 5.16 that when you die, you are presented with your game score and are given the opportunity to respawn into the current world or return to the title screen. You’ll recall from earlier discussions in this book that the only option you have when you die playing Hardcore mode is to delete your world.
When you’re in any mode other than Hardcore, and you respawn your avatar, you’ll find yourself in the location in the world where you originally spawned when you started your game—or a place where you updated your spawn location. A nice pro tip for you is to issue the /spawnpoint command periodically to update your avatar’s spawn location.
The Bottom Line
Minecraft’s hostile mobs are quite a piece of work. Literally. They’re creatively constructed, have unique behaviors, drop vital ingredients that allow you to continue your journey, and present an interesting range of challenges. You can’t live with them and won’t succeed without them.
There comes a time, my friend, when loins must be girded, weapons honed, and armor polished to a mirrored gleam, and all that is left is to: Go forth and conquer!
Of course, don’t do it blindly. Practice around your base first while sharpening your skills. Don’t carry too much with you; if you do, when you’re killed in action, you’ll have to race back for it. Also keep the area around your base well lit to prevent too many hostiles from spawning nearby. This will give you a nice stream of stragglers wandering by at night, but in most cases not too many at once.
One final tip: Until you have an excellent perimeter defense set up, lead any creepers away from your base and practice your attack runs there. If you die, so be it; death happens, and it may happen often, but at least you’ll keep the side of your house from looking like it was hit by multiple rocket-propelled grenades.
In time, you will succeed, and picking off hostiles will seem like a walk in the park—maybe Central Park at 3 a.m., but a park nonetheless.