7. Farming and Taming Mobs
In This Chapter
![]() Create a passive mob farm for a constant supply of eggs, meat, and more.
Create a passive mob farm for a constant supply of eggs, meat, and more.
![]() Tame ocelots to scare off creepers and use wolves for self-defense.
Tame ocelots to scare off creepers and use wolves for self-defense.
![]() Gallop across the world by taming and riding horses and use donkeys and mules to cart supplies and resources.
Gallop across the world by taming and riding horses and use donkeys and mules to cart supplies and resources.
![]() Fancy a spot of fishing? Tap one of Minecraft’s unlimited food resources.
Fancy a spot of fishing? Tap one of Minecraft’s unlimited food resources.
Although historically, domestication of animals came before agriculture, in Minecraft it’s best to start with the green stuff. After you’ve mastered farming, then you might want to look at ranching.
Crops are nice and easy to grow, and there is very little hassle involved. If you wanted to live a vegan life, crops can provide everything you need, but animals provide other resources besides meat.
Minecraft’s passive and neutral mobs (all those that don’t actively seek to kill you) can provide food, ingredients for crafting, decorative items, transport, and, very handily, defense and attack assists. While they may not wander up for a quick cuddle, consider them, at least, as friendly as mobs get.
In this chapter, you learn how to make the most of Minecraft’s animal kingdom.
Farming and Working with Friendly Mobs
Mob farms create replaceable resources through breeding. Each animal is a little different, so I’ve compiled a list of characteristics in Table 7.1.
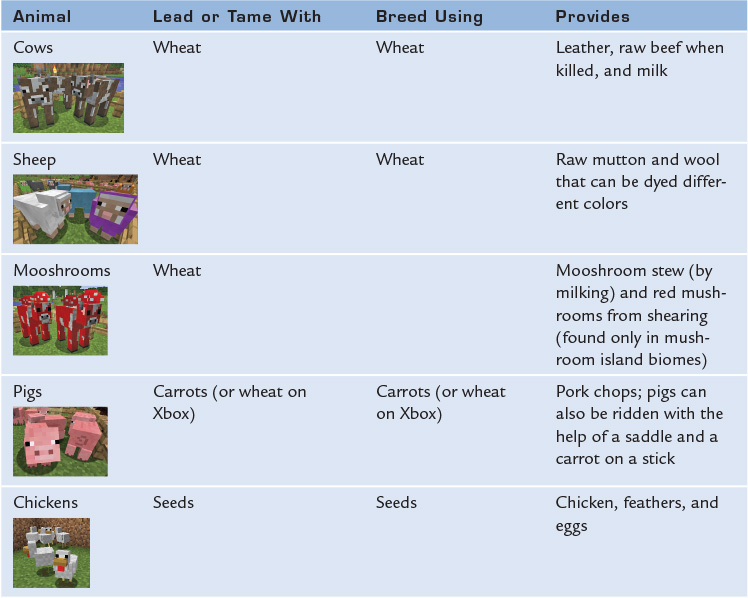
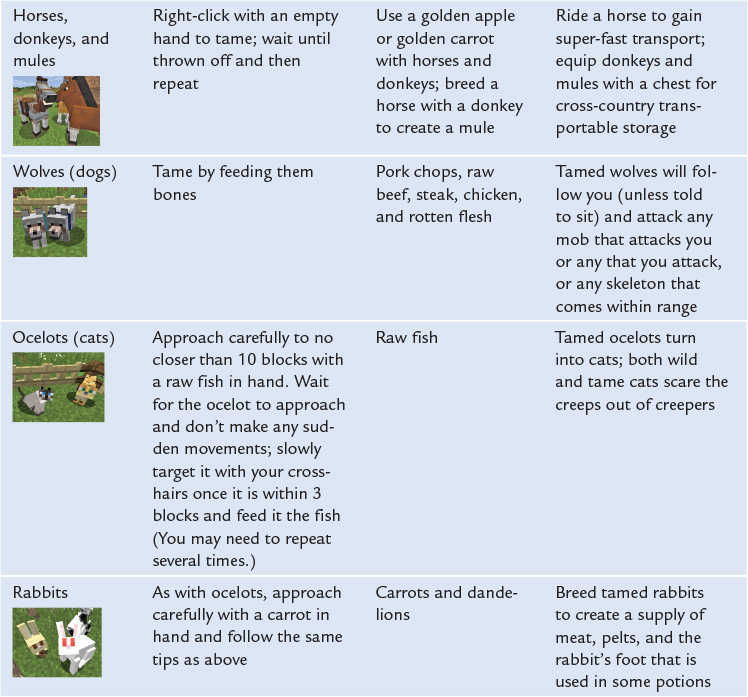
Figure 7.1 shows a mob farm with the most useful creatures (excepting rabbits)—a working farm with sheep, chickens, cows, and pigs. Fortunately, all the animals are self-sufficient and never starve to death. All you need to do to keep the numbers up is breed one pair for every one that you use up.
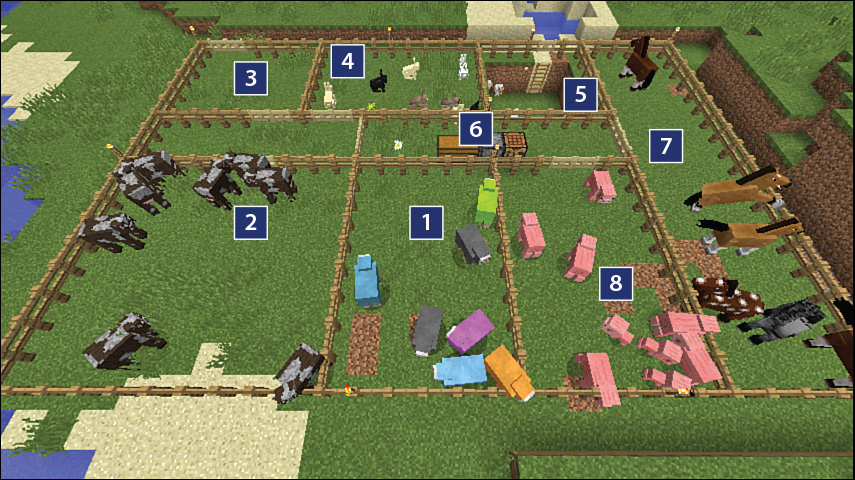
FIGURE 7.1 A passive mob farm.
1. Sheep pen, with sheep dyed in a variety of colors
2. Cattle pen
2. Chicken yard dug down two blocks to prevent them from escaping
3. Double gates in the corral to aid entry and exit
4. Rabbits being wascally
5. Chicken yard with access gained from a ladder against the wall just below the gate (chickens haven’t yet mastered ladder climbing)
6. Workshop and storage
7. Horses—stables would make a nice addition
8. Pigs in a pen
Farming involves a few basic steps that I’ll take you through in more detail as this chapter progresses:
1. Do like Noah and collect at least two of each creature.
2. Lure them back to your farm, either with food or, even easier, dragging them by the end of a lead.
3. Ensure that their enclosure is secure, with a fence or a two-block-high wall. (Chickens need a two-block-high fence or a three-block-high wall.)
4. Breed the animals using the specific food for the species.
5. In 5 minutes, when they’re be ready to breed again, repeat step 4.
6. Wait 20 minutes (24 Minecraft hours), and the newborn will have matured.
You’ll have the farm fully established in just a few day/night cycles.
There’s no need to go all Texan and build a giant cattle yard. If this is just for your needs and not a cooperative multiplayer game, two breeding pairs of each type provides plenty of resources.
Farms take a little bit of planning; otherwise, they turn into an exercise in herding cats. (See the ocelots info in Table 7.1.) Ensure that all animals have to go through a corralling yard to actually escape. This is a double-gate system, with the same purpose as an air lock, and can be shared by all pens. It can be quite tricky to get out and close a fence gate with the herd wandering around at random. Herds have a habit of (or perhaps a secret strategy for) preventing you from closing the gate before one or two have slipped through. The second yard stops those that do make a run for it from escaping the farm entirely. You can try to lead them back by enticing them with food, but that just attracts the rest of the group, making for double trouble. Using a lead makes it easier (see the next section, “Using Leads”), or you can just treat any escapees as volunteers for the chopping block.
Farm animals don’t need to be fed, but wolves do. Their tail acts as a health indicator. If a tamed wolf’s tail sticks straight out, it’s in full health—its tail gradually drops down as its health decreases. Any sort of meat will do, cooked or not, including the rotten flesh that zombies drop, although they get more hunger points restored from the cooked stuff (just like you do).
Tip: Puppy Power!
When more than one dog (wolf) gets very happy, you get puppies. As of v1.8, you can speed up the growth of puppies—or, indeed, any other animal—by feeding it the breeding item. So, in this case, any kind of meat except cooked mutton will make for happy tails and, soon, a full-grown wolf/dog.
Note: Your Farm Is (Mostly) Safe from Hostiles
None of the hostile mobs intentionally attack farm animals, although collateral damage from creepers exploding near you is always a possibility, and if you are caught off guard by a skeleton firing arrows over the fence, you could—I’m not saying you should—use a cow for cover. Keeping wolves around will keep the skeletons away. Heck, they’re made of bones! Both wild wolves and tame dogs chase skeletons without provocation, and the skeletons run from them. Wolves also have quite a taste for rabbits and sheep. They’ll stalk them in packs if they can and will even cross water to sink in their fangs. Ocelots, on the other hand, enjoy snacking on chickens.
Using Leads
You can always entice a friendly mob to follow you by using the items listed in Table 7.1, but mobs tend to stray after a while, and you will have to constantly backtrack to fetch them. A surer method is to craft a lead from four pieces of string and a slimeball. Right-click to attach the lead to the mob and, if possible, it will follow you, as shown in Figure 7.2. You can also right-click to tie a lead to a fence or post—which is handy to help prevent them from wandering off during the night if you haven’t had a chance yet to fence them in. Leads can stretch a maximum of 10 blocks before breaking.
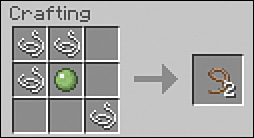

FIGURE 7.2 A wild horse on a lead. It doesn’t look very wild. In fact, it waits indefinitely, hitched to a fence post, while you go looking for that elusive saddle. While horses don’t much like water, they’ll happily cross ice.
Tip: When Pigs Fly
In Creative mode, any mob you have attached to a lead can also take to the skies as you fly. It looks a little like a fire-fighting helicopter carrying a water hopper, but it can be done. Just ascend gently so the lead doesn’t break. A mob will sustain damage and quite possibly die if dropped heavily onto land, and it is difficult to do this gently as they bounce up and down on the end of the lead like yo-yos. It’s much easier and safer to drop a mob down into a body of water instead of onto a hard block (so they don’t sustain any damage).
Breeding Animals
Breed animals by right-clicking on them while holding their favorite snack. You’ll know you’re on the right track when you see the floating love hearts appear above them (see Figure 7.3). To create offspring, feed two of the same species that are standing close together. Minecraft is genderless, so any two will do. They’ll quickly find each other and create a mini-me, although if you continue to hold their food source in hand, they’ll be a little distracted, so switch to something less enticing in your hotbar after you’ve fed them. Infants take 1 Minecraft day, or 20 minutes of real time, to reach maturity.

Breeding two sheep with the same dyed wool results in an offspring of the same color. (If the parents are different colors, the new color is randomly chosen from one of the parents, although there are some combinations that produce a new variant.) Use dyed wool to create colored carpet. While you can do this just by breeding the right sheep, dyes on their own are also incredibly useful—for staining leather armor, dog collars, hardened clay, glass, and banners, as described next.
Dying for Dye?
There are 16 dye colors in Minecraft, made from a combination of original materials and crafting:
Bone Meal
Cactus Green
Cocoa Beans
Cyan Dye
Dandelion Yellow
Gray Dye
Ink Sac
Lapis Lazuli
Light Blue Dye
Light Gray Dye
Lime Dye
Magenta Dye
Orange Dye
Pink Dye
Purple Dye
Rose Red
For example, place a rose on the crafting table to get rose red dye. A dandelion produces yellow dye. The lapis lazuli ore produces a deep blue dye, and cocoa beans produce brown dye. Combine lapis lazuli dye with bone meal to create a light blue dye. While wool and stained clay are limited to the 16 dyes available, armor can be stained using any combination of dyes. An internal formula mixes them up to produce a new color. Recent updates to Minecraft have added new flowers for dyes. Lapis lazuli is also a required component for creating enchantments, so ensure that you conserve some for later. Fortunately, it’s easy to gather in large amounts while you’re mining close to bedrock.
As just one example, add any dye to a block of white wool to obtain some nice coloration.
Dyeing is easy. You’ll find a comprehensive chart of all the possibilities at the official Minecraft wiki. Jump to http://bit.ly/1khXRGz to view. However, perhaps the most impressive use of dyes and other items is for creating banners. You’ll learn all about them in Chapter 8, “Creative Construction.”
Taming and Riding Horses, Donkeys, and More
The equine contingent in Minecraft provides the fastest transport available, besides flying in Creative mode. Horses are first past the post in the flying hooves race (660 blocks per minute), and with a speed potion they will run even faster. Donkeys and mules are pack animals, so they plod along a little slower, but they are still quite speedy. You can do anything you would normally do while riding any of these beasts, including fighting mobs, mining, and collecting dropped items. Their additional length also means that you can fly over single-block holes in the ground without fear of falling, and if you time the jump just right, you can leap over much longer gaps.
There is just one associated challenge: You need a saddle to stay on any of the animals for any useful amount of time, and saddles are not easy to come by. They can’t be crafted, so instead try looking in the chests located inside dungeons, desert temples, and Nether fortresses, or try trading for one with a villager, as described in Chapter 11, “Villages and Other Structures.”
When you’re properly equipped, follow these steps (which are identical for donkeys and mules, as shown in Figure 7.4) to acquire your own equine transport system:
1. Find a horse in the wild. This might take some time. When you do find one, assume that you’ve been smiled on by the mob-spawning gods. Approach it with an empty hotbar slot—in other words, empty hands.
2. Right-click the horse to mount it. You’ll more than likely be thrown off, but being bucked off won’t bruise you. Keep persevering. It may take four or five tries, perhaps even more. You can sweeten the deal for the horse by feeding it wheat, sugar, apples, or bread between attempts. When the horse displays the love-heart animation, you know it is finally tamed.
3. Open the inventory window while you are mounted or right-click with something held in your hand and transfer the saddle to the horse’s own saddle slot in the top left of the inventory window.
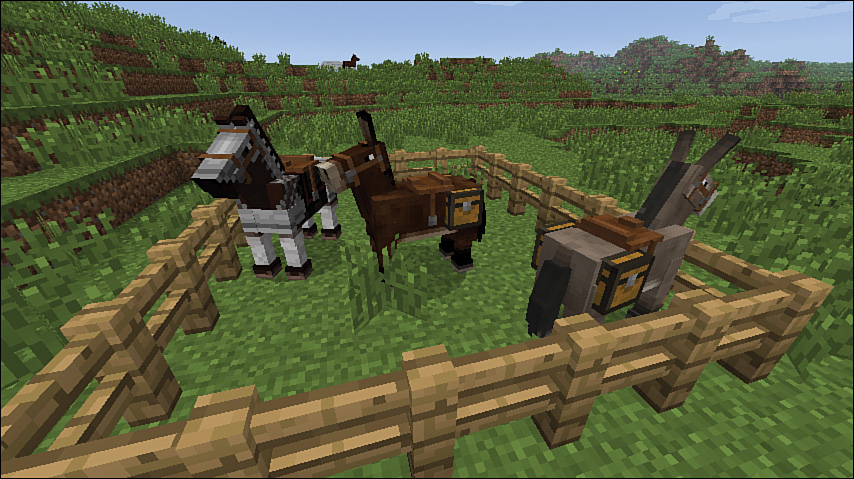
FIGURE 7.4 From left to right: a horse in iron armor, a mule with chest panniers and saddle, and a camera-shy donkey with the same.
Now you have a fully steerable mount. Use the standard movement keys to ride and press the left Shift key to dismount.
Donkeys and mules aren’t as fast as horses, but they can carry items in chests hanging from their sides. Each chest holds 15 items, so this is a handy mob that can help you bring home your haul.
The heads-up display (HUD) changes when you’re riding, as shown in Figure 7.5. A jump bar replaces the experience bar, and the hunger bar and oxygen bars make way for one showing the animal’s health.
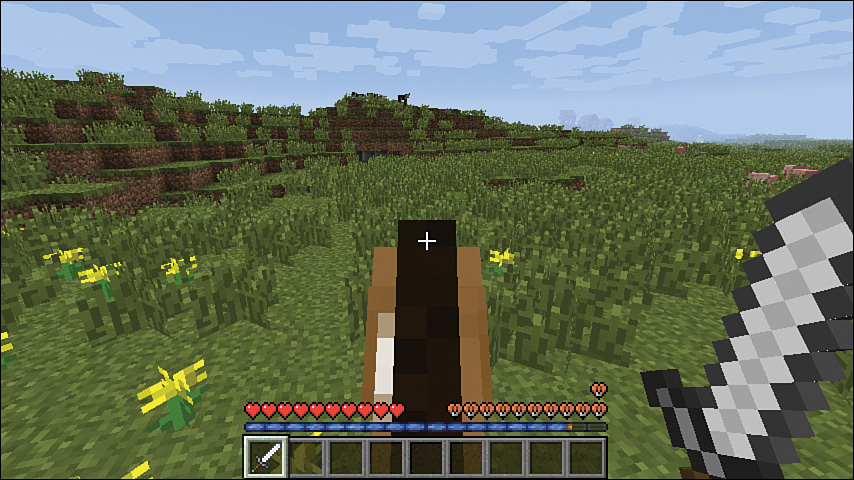
FIGURE 7.5 A jump bar almost fully charged. I find it easiest to release the spacebar when it reaches the end of the blue section. Usually, due to my reaction time, it then hits the fully charged point.
Jumping is easy, but as they say, timing is everything. As you run forward on the horse, hold down the spacebar, charging the jump bar until it peaks all the way to the right. Actually, Figure 7.5 shows the maximum charge with the bar fully lit up. It takes some practice to perfect this, so you might find it beneficial to build a little equestrian park using fences and mounds to create barriers over which you can leap until you have the timing just right.
Horses, donkeys, and mules vary somewhat randomly, and some can’t jump as high or as far as others. Horses are the strongest, and the best of them seem to be able to clear a wall 5 blocks high, which is actually quite amazing, given that every other mob except spiders can clear only a single block. Horses can also leap across up to 12 blocks (or so) when running at full speed, although a slower mount won’t make it so far.
Tip: Leave the Barn Door Open?
A gap of less than two blocks wide will keep a horse in a pen, but you will need to widen that if you want to ride the horse out and gallop in style.
Although riding a horse at full speed can be exhilarating, avoid doing that in deeply wooded areas where it’s easy to become entangled in low-lying branches. It’s even hard to ride a horse through deep woods. Hacking through low branches can take some time, and the branches could even kill you. Learn from my mistake! Riding through a thick forest, I got my head caught in a tree and quickly died. Whether I was smothered or concussed, I’m not sure. Once respawned, I had to go retrieve my items and search for my horse, which had, naturally, wandered off somewhere. Make sure that your path is tall enough for you and your horse!
Armoring Your Horse
Horses differ from donkeys and mules in that they can wear armor, as shown in Figure 7.6. Armor can’t be crafted and can only be found in the same places as saddles. Equip a horse with armor by mounting the beast and opening the inventory window. Then transfer the armor to the slot just below the saddle.

FIGURE 7.6 A horse in full iron armor. There are three types of armor, in increasing damage resistance: iron, gold, and diamond.
Loading Up the Pack
Attach a chest to a donkey or mule to access additional inventory slots. You need to dismount to do this. Right-click while holding something and then transfer the chest to the animal’s inventory slot.
As pack animals, donkeys or mules can’t be beat; they transport everything you need from one location to another. Figure 7.7 shows an example.
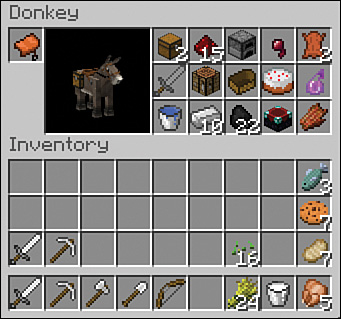
FIGURE 7.7 A donkey loaded with all the essentials for an expedition, including crafting table, chests, a furnace, and a boat.
Riding Pigs
Pigs can’t fly in Survival mode, but they can be ridden; for a long time, in fact, they were the only rideable entity in Minecraft, and remain the mount of choice for zombie pigmen. There’s no need to tame them; just place a saddle on a pig’s back and right-click it with an empty inventory slot selected. The pig will move randomly at first, but if you craft and hold a carrot on a stick, you can steer the pig as you would a horse.

Now that the larger beasts are available, there’s not a lot of use for rideable pigs, except for one small trick. Place one in a minecart and jump on its back, and the pig powers the minecart for you. This is another way to get around quickly, especially if you don’t have the gold available for powered rails. (See Chapter 9, “Redstone, Rails, and More,” for more on railed transport.)
Fishing
Fishing is a great way to ensure a steady supply of food, and it gives you the raw fish required to tame ocelots to turn them into rather cute house cats.
First, build a fishing rod from three sticks and two pieces of string.

Any body of water will do, but casting in a way that hits a solid block doubles the decrease in your rod’s durability, so always try to cast into deep water. You can do this standing on land or in water, or even sitting in a boat.
Watch the bobber carefully. The soon-to-be-ensnared gives itself away with a trail of bubbles leading right to the hook. Right-click as soon as you see the bob dip below the surface to catch the fish.
It’s generally best to fish in the rain. You’ll catch an average of 4 fish per minute. Otherwise, expect to catch around 2 per minute. Each rod can catch 65 fish before it breaks, and because it’s possible for fish to fly back over your head so that you lose the catch, it’s usually best to fish with your back against a tall wall.
A safer way to fish is from a boat, as shown in Figure 7.8. The key advantage is that boats provide protection from land-based mobs, and the guardians don’t venture far from their quite rare ocean monuments. However, if you do get attacked, you should be able to quickly speed away. Craft a boat with five wood plank blocks. Place it in a body of water and right-click to jump in. Use the W key to move forward and steer by pointing the crosshairs in the direction you want to go and S to slow down. Avoid solid blocks while you travel because they cause damage to your boat. Break up the boat with any hand tool when you’ve finished fishing to pull it back into your inventory.
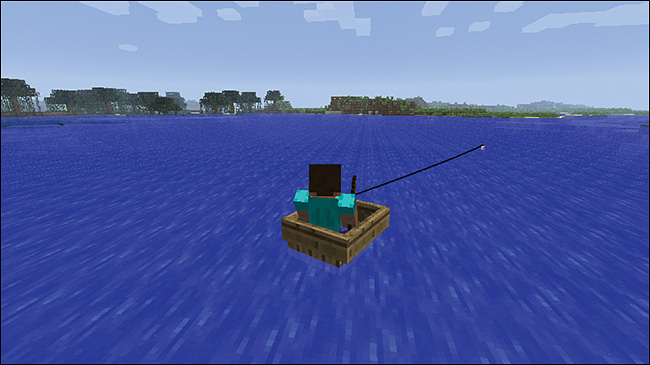
FIGURE 7.8 After a hard day’s mining, why not relax in a boat doing a spot of fishing? Boats also offer very fast transport—which is great if you’re near an ocean biome.
Ah, the Squid
There is one other friendly mob: the squid. It can’t be bred, so farming is out of the question; but if you kill one, you’ll find that its ink sacs do make for a mean black dye. Figure 7.9 shows a squid in the wild.
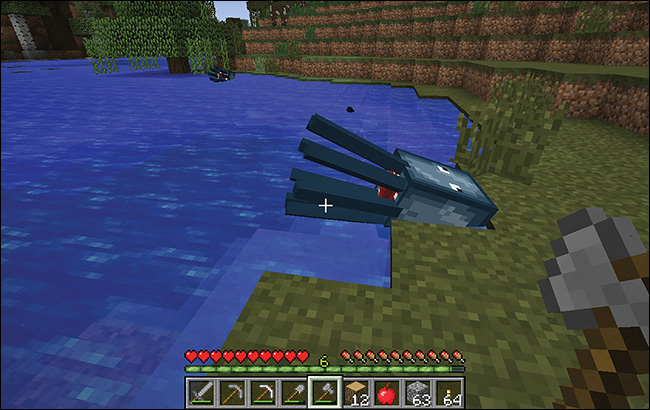
FIGURE 7.9 I felt bad about sacrificing this harmless squid, but I really needed the black ink to dye my super-cool leather armor.
As of Minecraft v1.8, killed squids drop experience orbs. Other than the experience point bump and the dye sac, the squid provides little other than some animated “color” to your Minecraft world.
The Bottom Line
Friendly mobs are more than just field dressing; they’re an important part of Minecraft’s gameplay.
If you’re lucky enough to spawn in a place with more than a few friendly mobs, go out and hack and slash for some fast food. Then work on pulling in the rest. If you don’t see very many nearby, try to resist giving your sword arm a workout. Friendly mobs don’t respawn, so the numbers won’t increase, and they can go on the endangered list all too quickly. Work on bringing some in and set up a farm.
You’ll find sheep and cows heading toward well-lit, grassy areas. Horses do much the same. Ocelots prefer jungle biomes, and chickens seem to be, well, just about everywhere. Oh, and perhaps the oddest friendly mob in Minecraft, the mooshroom, can be found hanging around its namesake: the extremely rare mushroom biome.