10. Enchanting, Anvils, and Brewing
In This Chapter
![]() Learn Minecraft’s enchanting ways.
Learn Minecraft’s enchanting ways.
![]() Safely store your hard-earned experience levels.
Safely store your hard-earned experience levels.
![]() Spruce up your weapons, enhance your armor, and improve your tools.
Spruce up your weapons, enhance your armor, and improve your tools.
![]() Hammer something out on the anvil for better repairs.
Hammer something out on the anvil for better repairs.
![]() Mix up some magic in the brewing stand.
Mix up some magic in the brewing stand.
By now, you’ve probably made it all the way to a diamond sword, your base is nothing short of a warlord’s fortress, and you’re so armored up you can take on a corps of creepers without breaking a sweat on your squared-off brow.
All’s good in The Overworld. But it could always be better. This chapter walks you through a few extra skills involving a special crafting table, a very large block of iron, and a few wee drams of potion.
Enchanting Wiles
Experience points (XPs) accrue through the normal course of the game, providing small green nudges to the experience bar shown in your heads-up display (HUD). (Those colored orbs flying toward you after you bravely slay a mob or patiently smelt a batch of iron all devolve into experience points. Don’t forget to run over and pick them up if they drop too far away.) There are quite a few ways to gain XP including smelting, cooking, mining, and fishing, although slaying mobs is one of the most effective. When the bar fills, it delivers an XP level—a type of currency—and promptly resets. Spend that XP wisely through enchantments, and you can power up your weapons, armor, and tools.
Enchantments improve an object’s core abilities. Among other things, they can help a pickaxe mine with more efficiency, make a sword cause more damage and become unbreakable, make your armor practically (although not completely) impregnable, and build up a lot of other vital improvements that will help you in The Nether and End regions.
Enchantments also add capabilities that are a little more mystical: The respiration enchantment can dramatically increase your underwater survivability, a bow with infinity enchantment will never run out of arrows (at least not until the bow breaks), and your enchanted boots will let you leap off tall cliffs with nary a thought for a distinct lack of feathers. Enchantments also have a practical use: They can help your tools gather more resources from every mined block or even pull out whole blocks in their original form instead of just digging out dropped components.
So how do you start enchanting? It’s actually pretty easy, and there are several ways to go about it:
![]() Use an enchantment table to apply a random enchantment to an item, at the cost of XPs.
Use an enchantment table to apply a random enchantment to an item, at the cost of XPs.
![]() Pay a village priest with emeralds in return for a specific enchantment on an item you already have in your inventory. This can also work like a free repair service, where you swap a damaged item for an undamaged, enchanted equivalent.
Pay a village priest with emeralds in return for a specific enchantment on an item you already have in your inventory. This can also work like a free repair service, where you swap a damaged item for an undamaged, enchanted equivalent.
![]() Combine an enchanted book with an item at an anvil. This costs some XPs but at a discounted rate compared to creating the original enchanted book. This is a bargain if you’ve been fortunate enough to find an enchanted book in one of the chests scattered around the world in villages and dungeons and so on. Village librarians will also trade them for other items.
Combine an enchanted book with an item at an anvil. This costs some XPs but at a discounted rate compared to creating the original enchanted book. This is a bargain if you’ve been fortunate enough to find an enchanted book in one of the chests scattered around the world in villages and dungeons and so on. Village librarians will also trade them for other items.
![]() There’s a small chance of gaining an enchanted item by killing a skeleton or zombie that’s carrying one or by fishing.
There’s a small chance of gaining an enchanted item by killing a skeleton or zombie that’s carrying one or by fishing.
![]() Combine an item with an enchanted item of the same type at an anvil. If you combine two items with different but compatible enchantments, the final item gains both enchantments. You can also use anvils to repair and rename items in a process not dissimilar to using them to enchant items.
Combine an item with an enchanted item of the same type at an anvil. If you combine two items with different but compatible enchantments, the final item gains both enchantments. You can also use anvils to repair and rename items in a process not dissimilar to using them to enchant items.
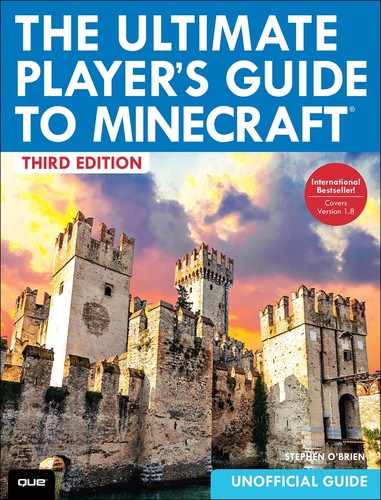
Let’s start with the simplest method: using an enchantment table (see Figure 10.1). We’ll get to the bookshelves surrounding it shortly.
An enchantment table takes up one block, just like a crafting table, but creating one is a little more difficult because it requires two diamond gems, a book, and four obsidian blocks.
Note: Think This Is Hard?
If making an enchantment table seems challenging, I must warn you that it’s a lot easier than creating the brewing stand later in this chapter! Consider this a warm-up for the lavish lava lakes you’ll need to deal with in The Nether dimension.
Of all the ingredients you need here, you might find obsidian the most difficult to obtain. It lurks in some village chests, but otherwise you need to discover it in a natural setting or create it yourself with a steamy combination of water and lava. It’s quite prevalent down in the depths near layer 11, but remember that you’ll need a diamond pickaxe to dig it up.
Creating and Mining Obsidian
Forming obsidian requires flowing water to meet still (not flowing) lava. This is key: Any other variation of water and lava, flowing or not, in either order, just results in cobblestone, and that’s not going to put a spell on anything.
Obsidian is practically indestructible, so it’s a great construction material, but it’s a little risky to mine, given its close proximity to lava and the latter’s proclivity for turning your character into instant Korean barbecue.
But enchantment tables don’t require very much obsidian, and I’ll show you a surefire technique for getting there. Just follow these steps:
1. Fill some buckets with water. You might need only one, but take some backups just in case.
2. Locate a lava pool. If you’re lucky, you’ve spotted these on the surface, but your surest bet is to head down to the lowest levels of your mine, where you’ve probably already stumbled on several. Lava is most common below layer 11, counting up from the unbroken bedrock that exists at layer 0. If you’re still looking, head back down your mine and dig some additional branch lines until you do. It shouldn’t take long.
3. If you find a lava pool with water that has already flowed over some part of it (Figure 10.2 shows an example), you can try to block the water source by fencing it off with cobblestone or any other handy blocks to dry up the flow and then mine the obsidian exposed underneath. Figure 10.3 shows the result. A further border of cobblestone dropped into the lava lake along the obsidian border allows you to mine the obsidian without fear of getting swamped by the molten magma. Don’t forget to use the left Shift key to sneak around the lava so that you don’t fall in.

FIGURE 10.2 A natural lava pool and water flow. The obsidian already formed by the water creates a thin black line under the front edge of the water flow.
1. Flowing water that has already covered some of this lava pool
2. A still (not flowing) lava pool

FIGURE 10.3 Fencing or blocking off the water flow with a cobblestone barrier exposes the obsidian.
1. The flowing water has been blocked off from the still lava pool with cobblestone.
4. If there’s no water nearby, stand back a little and pour water from one of your buckets so that it spills down onto a bordering block and then flows over the lava. The best way to do this is to stand at least one block up. Place a block and jump on it if a block isn’t there already (or if there’s no nearby ledge). This ensures that you won’t be washed toward the lava or back into another danger zone.
Tip: Is the Lava the Only Source of Light?
Place some torches around before you extinguish the lava so that you’re not left standing in the dark.
5. Let the water flow as far as it can, converting the lava lake to an expanse of obsidian, and then fill your bucket from the water source block to remove the water and expose it, as shown in Figure 10.4. If you can’t pick up the water source block, place other blocks around to stop its flow and dry things up.

6. Take your diamond pickaxe in hand and start mining obsidian. Breaking obsidian takes a while, so be patient. There’s also a good chance you’ll expose more lava under the obsidian as you go. Pour some more water on top of that lava to convert any surrounding blocks to obsidian and then scoop the water back up into your bucket to use again. Mine more obsidian than just the 4 blocks you need for the enchantment table. Try to gather at least 14 blocks in all, as you’ll use the remaining 10 to create a Nether portal in Chapter 12, “Playing Through: The Nether and The End.” You’ll need to visit The Nether before creating a brewing stand later in this chapter.
Crafting Books
Books have several uses: for crafting the enchantment table, for boosting its powers with bookshelves, and for storing enchantments. (They can also help you play Minecraft.)
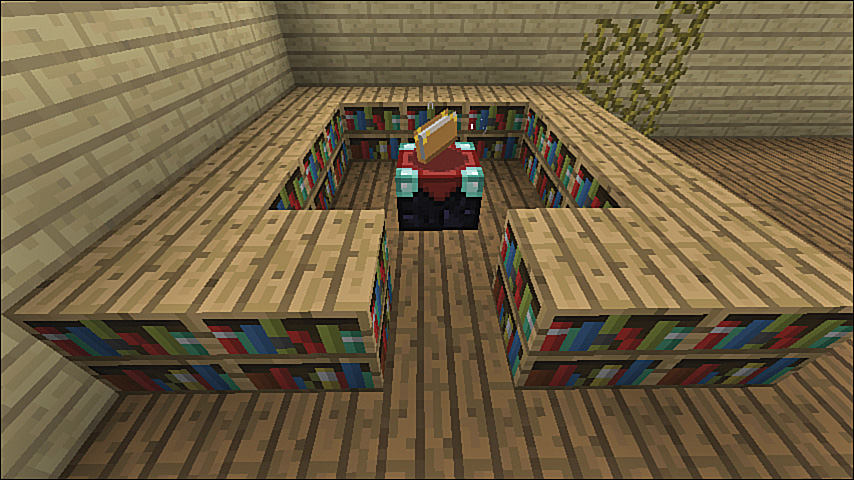
A book requires three pieces of paper and one piece of leather, although on the Pocket Edition you can leave out the leather.
Start by crafting paper from three pieces of sugarcane. Then bind the paper with leather to make a book. Go ahead and make as many as possible, as you’ll need up to 45 books to create a full set of shelves to surround the enchanting table. (Don’t drop everything to do this, though. You can build up to the full set later and get reasonable results with just a few to start.)
Casting Enchantments
Now that you have the raw ingredients, the whole enchantments deal becomes much easier. Follow these steps:
1. Create and place an enchantment table. Leave a perimeter of two clear spaces between the table and any walls for future bookshelves, as shown in Figure 10.1. As you approach the table, the book flips through a few pages in a rather nice animation.
2. Right-click the table to view the enchantment interface.
3. Place the item you want to enchant (a weapon, a tool, armor, or a book) in the empty slot beneath the book. You’ll see a list of three possible enchantments appear to the right, as shown in Figure 10.5. You also need to add one, two, or three pieces of lapis lazuli to the enchantment table, according to the enchantment level. (Gather lapis lazuli by mining the bright blue lapis lazuli ore.)
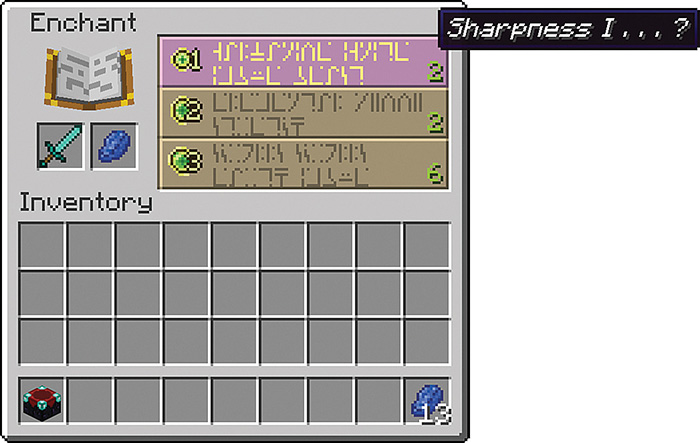
4. The enchantments listed are unreadable and randomly generated. However, the name of one of the enchantments appears as a ToolTip when you hover your mouse over the enchantment label area. The numbering to the left of each enchantment shows the number of pieces of lapis lazuli required to cast it, while the value to the right shows the enchantment levels that will be expended. The enchantment you get is, essentially, up to a roll of the dice. You’ll never know which one actually belongs to the ToolTip. An enchantment can run up 30 XPs in cost, but the higher the level, the better the chance you have of gaining a more powerful enchantment. Any enchantments for which you don’t have sufficient XPs are grayed out, and an enchant table without nearby bookshelves can offer enchantments only up to level 8.
5. Select an enchantment from the list. Stay at the lower levels for now, saving your XPs for additional enchantments. You can also use the anvil to repair an item, but bear in mind that the number of times an item has been repaired attracts an XP penalty that impacts its potential enchantment level.
6. Drag the enchanted item back to your inventory. Hover your mouse over the item to see the enchantments applied.
Tip: Chancy Enchantment Tables
The formulas Minecraft uses for generating the list of enchantments aren’t exactly obvious. Too many random factors are involved to provide a generic table of probabilities. A few sites online use the actual program code to generate a guide. To gain more insight, visit http://www.minecraftenchantmentcalculator.com and select the material, tool, and enchantment level. This neat utility will roll the die 10,000 times, collate the results, and give you a list of possible enchantments, along with their likelihood.
Caution: Repairs and Removing Enchantments
Repairing an enchanted item by combining it with another on the crafting table destroys any attached enchantments. Use the anvil for the repair if you want to retain and combine the enchantments.
Improving Enchantment Chances with Bookshelves
Bookshelves open up higher levels of enchantments. Craft them from three books and six wood plank blocks—any wood will do.

Bookshelves improve the enchantment levels in the following ways:
![]() Each bookshelf unit boosts the level by 1 to 2 points, with 15 bookshelves delivering the highest enchantment level possible.
Each bookshelf unit boosts the level by 1 to 2 points, with 15 bookshelves delivering the highest enchantment level possible.
![]() The shelves must be placed two spaces from the table, with nothing in the intervening space. Torches, snow cover, and anything else will block the boost from the shelf.
The shelves must be placed two spaces from the table, with nothing in the intervening space. Torches, snow cover, and anything else will block the boost from the shelf.
![]() Even with a full set of bookshelves, you’ll continue to see enchantments at the lower power. There’s a random distribution of levels from the lowest to the highest possible between the three enchantment slots.
Even with a full set of bookshelves, you’ll continue to see enchantments at the lower power. There’s a random distribution of levels from the lowest to the highest possible between the three enchantment slots.
![]() The bookshelves must be on the same level as the table or one block higher. A single layer of 15 shelves looks as shown in Figure 10.1, but you can also stack the shelves two blocks high against the walls (see Figure 10.6) to achieve the same power boost and leave the other two sides clear.
The bookshelves must be on the same level as the table or one block higher. A single layer of 15 shelves looks as shown in Figure 10.1, but you can also stack the shelves two blocks high against the walls (see Figure 10.6) to achieve the same power boost and leave the other two sides clear.
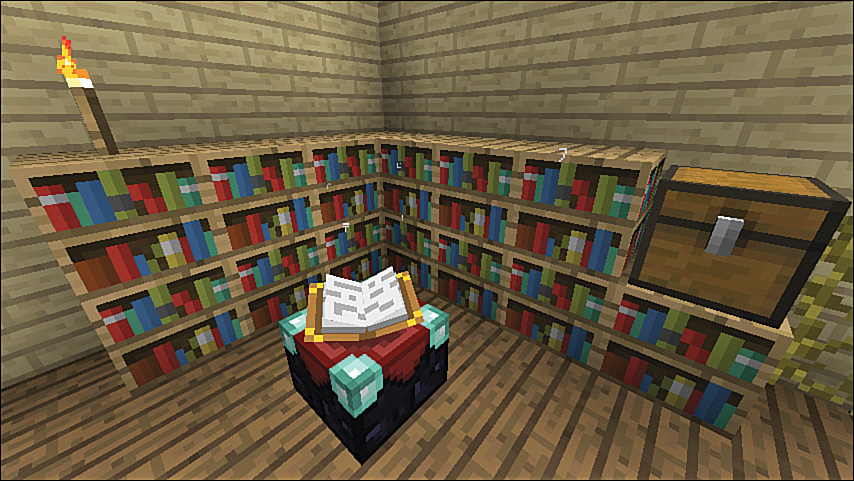
FIGURE 10.6 A slightly different bookshelf layout that still provides the maximum power boost to the table. Objects placed on top don’t reduce a bookshelf’s effectiveness.
![]() Stacking objects such as chests and torches directly on top of the bookshelves won’t block their usefulness. You can also place another bookshelf on the two-wall layout to make the shelves symmetrical, even though this won’t improve the actual enchanting.
Stacking objects such as chests and torches directly on top of the bookshelves won’t block their usefulness. You can also place another bookshelf on the two-wall layout to make the shelves symmetrical, even though this won’t improve the actual enchanting.
Tip: Choosing and Storing Enchantments with Books
Books provide an opportunity to be more selective with the enchantments that are applied to an item. Enchant a book at the table in the usual way. The result is still random until it’s complete, but it carries an identifiable enchantment as soon as you drag it back into your inventory. Combine the one you want with an item at the anvil for a small additional cost in XPs. Store any others in a chest to keep them safe.
Earning and Managing Experience
XPs are earned through different actions and then “spent” through enchanting or using the anvil. What’s the quickest way to gain XPs fast, and how can you maximize your return on XPs? Read on:
![]() Gain XPs by killing mobs, mining, smelting, cooking, fishing, and breeding friendly mobs. (An added bonus is that if you cook the food, it becomes more nutritious.) A quick way to gain lots of XPs is therefore to breed animals to increase the population as quickly as possible and then kill any extras, pick up their dropped meat, and cook it in your furnace. Breeding chickens is easy because the seed is available anywhere there is tall grass, but cows are more useful because you can also use their leather to create books in the PC and console editions. You gain more XPs by killing hostile mobs than friendly ones.
Gain XPs by killing mobs, mining, smelting, cooking, fishing, and breeding friendly mobs. (An added bonus is that if you cook the food, it becomes more nutritious.) A quick way to gain lots of XPs is therefore to breed animals to increase the population as quickly as possible and then kill any extras, pick up their dropped meat, and cook it in your furnace. Breeding chickens is easy because the seed is available anywhere there is tall grass, but cows are more useful because you can also use their leather to create books in the PC and console editions. You gain more XPs by killing hostile mobs than friendly ones.
![]() Try to stay long enough to collect the colored experience orbs that gradually float your way after an XP-earning event.
Try to stay long enough to collect the colored experience orbs that gradually float your way after an XP-earning event.
![]() Enchant gold weapons and armor. Gold benefits the most from enchanting and has a better chance of getting a higher-level enchantment than iron or diamonds.
Enchant gold weapons and armor. Gold benefits the most from enchanting and has a better chance of getting a higher-level enchantment than iron or diamonds.
![]() Pay a priest villager with emeralds to enchant items, and you won’t take a hit to XPs.
Pay a priest villager with emeralds to enchant items, and you won’t take a hit to XPs.
![]() Start with low-level enchantments first, in the 1 to 10 range on the enchantment table. There’s little difference in the enchantments that can be had at the cost of 1 XP to 10 XPs, so stay low and grow.
Start with low-level enchantments first, in the 1 to 10 range on the enchantment table. There’s little difference in the enchantments that can be had at the cost of 1 XP to 10 XPs, so stay low and grow.
![]() The first 16 XP levels are the easiest. At 17 and above, it becomes gradually more difficult to climb each level, so if you want to enchant a lot of items quickly, keep your XP below 17, spend it, and then build it up again.
The first 16 XP levels are the easiest. At 17 and above, it becomes gradually more difficult to climb each level, so if you want to enchant a lot of items quickly, keep your XP below 17, spend it, and then build it up again.
![]() All XP levels disappear on death, and while some experience orbs may drop for collection after your respawn, at best they’ll only be sufficient to build you back up to level 5. If you have spare XPs (say, anything above level 17) but don’t have anything to enchant, use those spare XP levels to enchant books. Store them in a chest so that they survive your death, and you can apply them to new items when you come back from the afterlife.
All XP levels disappear on death, and while some experience orbs may drop for collection after your respawn, at best they’ll only be sufficient to build you back up to level 5. If you have spare XPs (say, anything above level 17) but don’t have anything to enchant, use those spare XP levels to enchant books. Store them in a chest so that they survive your death, and you can apply them to new items when you come back from the afterlife.
Tip: Adding XP Levels with a Cheat
If you’re playing with cheats enabled and want to add some XPs fast, use the cheat command /XP <amount>L to quickly gain any number of XP levels. For example, /XP 30L adds 30 levels of experience to your character. A negative amount subtracts it instead.
Sprucing Up Your Weapons
Show your foes the thin edge of the wedge with a range of powerful weapon enhancements. You’ll be amazed at how quickly you can dispatch a zombie with a sharper blade or how far you can fling a creeper with the knockback enchantment. Table 10.1 shows the full list. All the levels in Minecraft use roman numerals.

Enhancing Your Armor
Iron Man is a trademark, so I won’t run that gauntlet, but armor enchantments do give you the Armor-All of defense, allowing blows to slide off your polished pauldrons like so much Teflon.
All of the “protection” enchantments combine to an upper limit set by the item’s material. Table 10.2 shows the full list. Keep in mind that the upper limit for enchantments runs from lowest to highest as follows: iron, diamond, chain, leather, and gold.

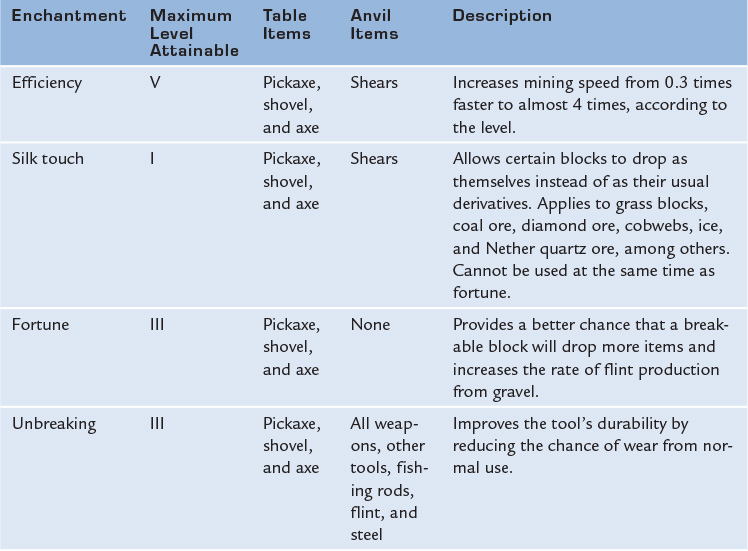
Improving Your Tools
Of all your activities in Minecraft, resource collection is one of the most important. The enchantments described in Table 10.3 provide ways to gather new types of resources, ways to improve their speed and efficiency, and ways to help them last longer.
Enchantments are incredibly useful, but they usually last only for the durability of the item and are lost in their entirety when repaired at the crafting table. What? You’d like to repair an item without losing the enchantment and even add an additional enchantment to it? Meet the anvil.
Hammering It Out with the Anvil
The anvil has many talents. It can repair and rename items, apply enchantments from books, combine two similar enchanted items, and combine the enchantments in two enchanted books, as long as the enchantments are compatible.
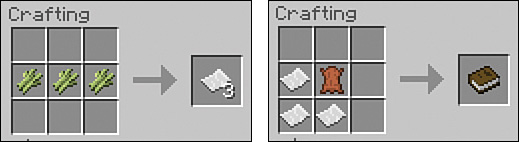
An anvil does, however, require a lot of iron: 31 ingots in all.
Start by crafting 3 blocks from 27 ingots. Then combine the blocks with another 4 ingots to create the anvil.
Place the anvil somewhere handy (see Figure 10.7), and nowhere that it’s likely to drop on your head. Falling anvils do cause damage and, for reasons Wile E. Coyote could well attest, are quite popular in multiplayer traps.
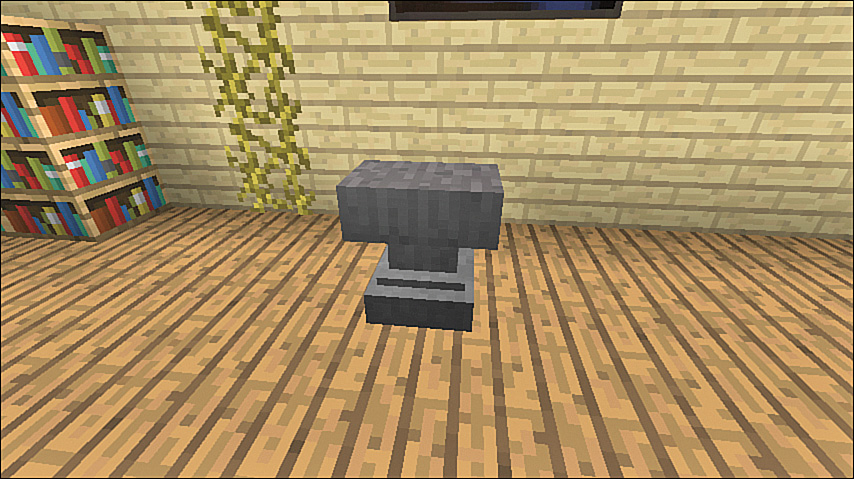
FIGURE 10.7 The anvil is the largest chunk of iron in the game. Fortunately, there’s no damage from stubbing one’s toe.
The anvil provides a single interface for all its different actions. Right-click it to open the Repair & Name window shown in Figure 10.8.
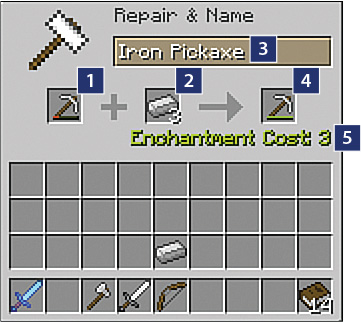
FIGURE 10.8 Repair, combine, or enchant items at the anvil—at a cost.
1. First item slot
2. Second item slot
3. Renaming box
4. Output slot
5. XP level cost to complete
Here’s how you use the anvil:
![]() Repairing an item—Place the item to be repaired in the first item slot and the raw material in the second item slot. The item can be any item with a durability value. Figure 10.8 shows an iron pickaxe being repaired, courtesy of three iron blocks, at a cost of between two and five XP levels. (You may need to place more than one of the raw material in the slot to bring the item back to full or close to full durability.) In the example shown in Figure 10.8, the pick was so worn out it required three iron ingots to be completely restored. Hover over the proposed repaired item to see its resultant durability value. (You may need to press F3+H from the normal view to turn this on.) Don’t over-repair items; you’ll receive no bonus for using additional repairs above the item’s maximum durability level.
Repairing an item—Place the item to be repaired in the first item slot and the raw material in the second item slot. The item can be any item with a durability value. Figure 10.8 shows an iron pickaxe being repaired, courtesy of three iron blocks, at a cost of between two and five XP levels. (You may need to place more than one of the raw material in the slot to bring the item back to full or close to full durability.) In the example shown in Figure 10.8, the pick was so worn out it required three iron ingots to be completely restored. Hover over the proposed repaired item to see its resultant durability value. (You may need to press F3+H from the normal view to turn this on.) Don’t over-repair items; you’ll receive no bonus for using additional repairs above the item’s maximum durability level.
![]() Combining two items—Place the items to be combined in the first and second item slots. To be successful, the items must be compatible, and the total XP cost must be less than 40. This applies to weapons, tools, and armor, as well as enchanted books.
Combining two items—Place the items to be combined in the first and second item slots. To be successful, the items must be compatible, and the total XP cost must be less than 40. This applies to weapons, tools, and armor, as well as enchanted books.
![]() Enchanting items—Place the item to be enchanted in the first slot and the enchanted book in the second slot. The enchantment from the book transfers to the item.
Enchanting items—Place the item to be enchanted in the first slot and the enchanted book in the second slot. The enchantment from the book transfers to the item.
![]() Combining enchantments—Place the enchanted weapons, tool, armor, or books in each slot and pick up the item with the combined enchantments from the output slot.
Combining enchantments—Place the enchanted weapons, tool, armor, or books in each slot and pick up the item with the combined enchantments from the output slot.
![]() Renaming items—Use the renaming box to name an item while carrying out any of the other anvil operations or as a singular operation on its own. Renaming costs just one XP level. A renamed sword with particular enchantments is easier to find when you’re rummaging in a chest among a collection of enchanted swords whose icons are otherwise identical. You can also use the renaming facility to assign names to nametags found in dungeons and Nether fortresses. Attach them to friendly mobs to get yourself a Fido, Killer, Daisy, or whatever you like. The mob’s name is visible up to seven blocks away.
Renaming items—Use the renaming box to name an item while carrying out any of the other anvil operations or as a singular operation on its own. Renaming costs just one XP level. A renamed sword with particular enchantments is easier to find when you’re rummaging in a chest among a collection of enchanted swords whose icons are otherwise identical. You can also use the renaming facility to assign names to nametags found in dungeons and Nether fortresses. Attach them to friendly mobs to get yourself a Fido, Killer, Daisy, or whatever you like. The mob’s name is visible up to seven blocks away.
Brewing Potions
Ready to brew up some trouble? Potions give you an offensive and defensive advantage that will keep limb attached to limb in The Overworld. More importantly, potions help you complete the other regions. Although potions don’t require an eye of newt or toe of frog, they do, like a hell-broth, require a trip to The Nether for some core ingredients.
The first essential ingredient is Nether wart, the starting point for almost all the potions. It generally grows in pits dug around the bases of staircases in Nether fortresses (see Figure 10.9), although you may find it elsewhere. Those planting grounds and The Nether itself also contain the soul sand you’ll need to start a Nether wart farm back home. Fortunately, soul sand is quite plentiful, growing in dull gray tracts around many of the lava lakes you’ll find.

The other elusive component is the blaze rod, which is required for creating the brewing apparatus. Obtain this by defeating a blaze, which is a hostile that inhabits Nether fortresses. This, admittedly, is something of a challenge. You won’t do it in 5 minutes. Chapter 12 will help you prepare for that journey, handle the hostiles, and get you home in at least one piece. If this is your first venture into The Nether, treat it as a quick snatch and grab. You don’t want to spend too much time down there until you’re truly prepared. You will, however, want to get a range of protection enchantments (fire protection is vital) and try to get an enchantment of feather falling for your boots. An unbreaking enchantment on tools will save you some trips back to The Overworld until you’ve had time to create a well-stocked Nether-base.
Head over to Chapter 12 now and come back when you have a blaze rod, Nether wart, and soul sand. You’ll also need some glass blocks (smelted from sand) and a supply of water, although even a single block of water will fill an endless number of bottles. Figure 10.10 shows my own brewing chamber.
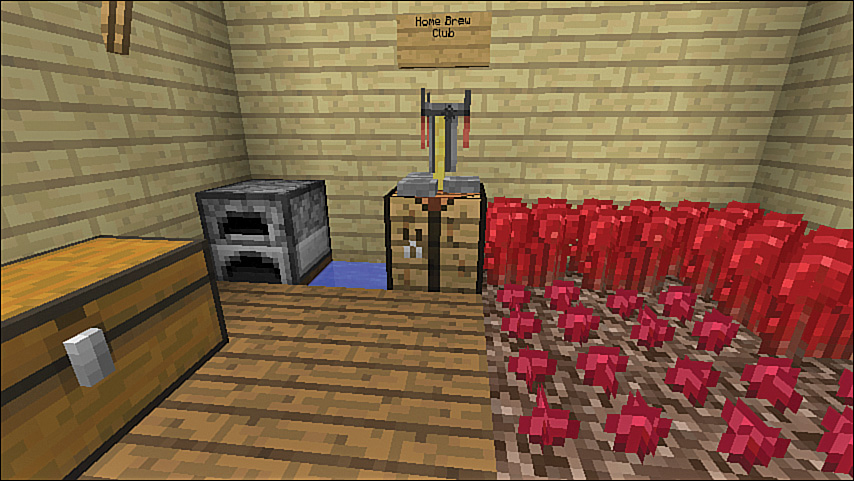
FIGURE 10.10 My “Home Brew Club,” with a brewing stand on a crafting table, a water supply, a Nether wart farm, a furnace for creating glass bottles, and a chest for storing the results.
Try some of the potion recipes that follow in a different world set to Creative to learn how they work and to test the results. Sprint around with a 40% speed boost (it’s quite an exhilaration after the normal plod/sprint) and try some combat at Normal and Hard difficulty. Try swimming across a lava lake with the fire resistance potion. Experiment with the other potions to see their effects firsthand. Minecraft is all about exploration, and you can do this exploration before tackling some of the tougher scenarios on Survival mode.
Tip: Plant Those Nether Warts First
Nether wart grows only in soul sand, but it doesn’t have irrigation or light requirements. Given the challenge in collecting Nether wart, you should use any Nether wart and soul sand you collected from your trip to build a Nether wart farm. Do this before you start using Nether wart for brewing. The simplicity of growing Nether wart means you can put the farm just about anywhere, including inside a small chamber reserved for your potable magic.
Brewing Up a Storm
Brewing up a batch of potions takes some initial work but always delivers rewarding results. You’ve already done the hard part: getting the initial ingredients together. The rest is easy. Creating potions is a useful, easily replicated exercise.
Follow these steps to get start brewing your own potions:
1. Craft a brewing stand from three cobblestone blocks and a blaze rod. Place it somewhere convenient.

2. Create at least a few glass bottles from three glass blocks. Fill the bottles from your water supply.
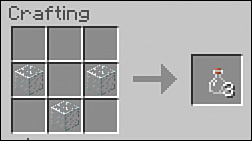
3. Right-click the base of the brewing stand to open the brewing window and then place the glass bottles in the output slots as shown in Figure 10.11. (You can place from one to three bottles, depending on how much of any potion you want to create. In this first instance, you’re creating the base awkward potion. Because this potion is required for most others, it’s efficient to create three of these at a time.)
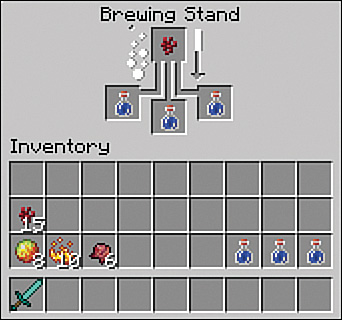
FIGURE 10.11 Drag the brewing ingredient to the top slot and the bottles (water or another potion) to the three output slots.
4. Place one Nether wart in the top of the stand. After a short while and a brief brewing animation, the three water bottles are converted into three bottles of awkward potion. There’s no visual change to the bottles, but when you hover your mouse over them, you see their new name in the ToolTip.
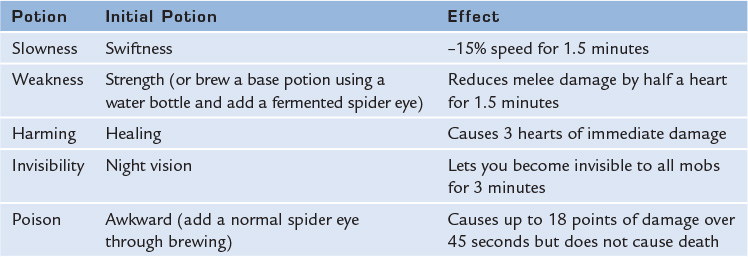
Awkward potion is inert. It’s the wallflower of potions. Turn it into something more outgoing by adding one of the secondary ingredients to create the potions listed in Table 10.4. These potions are usually referred to as positive potions because they have a beneficial effect on the player’s character. There are also negative variants of most of these that you can throw at other mobs to cause damaging effects, with some caveats discussed in the note “When Positive Becomes Negative,” later in this chapter.

Use the potions the same way you eat food: Select the potion and hold down the right mouse button to drink it. The potion of healing takes immediate effect, whereas others last for the specified duration. Open your inventory screen to see all the active potions and their remaining duration, as shown in Figure 10.12. You’ll also see a bubble effect come up in the view through the main gameplay window while any potions are in effect. It’s not possible to pause a potion’s effects, so make the most of them while you can.
FIGURE 10.12 Active potions show their remaining duration in a box to the left of the inventory window.
Enhancing Potions
Potions provide a particular boost over a specified duration. You can add a third brewing cycle to modify their boost or their duration and then convert them into a throwable splash potion, also known as a negative potion:
![]() Glowstone dust—Doubles the effectiveness of the potion where possible, typically at the expense of duration. Applies to swiftness, healing, regeneration, and strength. Replaces the use of redstone dust, as discussed next.
Glowstone dust—Doubles the effectiveness of the potion where possible, typically at the expense of duration. Applies to swiftness, healing, regeneration, and strength. Replaces the use of redstone dust, as discussed next.
![]() Redstone dust—Doubles the duration of the potion but replaces the use of glowstone dust.
Redstone dust—Doubles the duration of the potion but replaces the use of glowstone dust.
![]() Gunpowder—Converts the potion into a splash potion at the cost of a 25% weaker effect. You’ll see the shape of the bottle change so that it looks a little like it’s grown a small hand-grenade pin on the side. Throw splash potions at mobs or down at your feet if you want to get an immediate effect from the potion without taking the time to drink it.
Gunpowder—Converts the potion into a splash potion at the cost of a 25% weaker effect. You’ll see the shape of the bottle change so that it looks a little like it’s grown a small hand-grenade pin on the side. Throw splash potions at mobs or down at your feet if you want to get an immediate effect from the potion without taking the time to drink it.
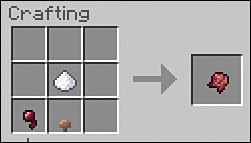
![]() Fermented spider eye—Add this curious crafting to transform the potion into a negative potion. Table 10.5 lists all the ones that are available, along with other negative-effect potions that can be brewed without using a positive-effect potion as the base. Craft this ingredient from a spider eye (dropped by spiders), a brown mushroom, and sugar.
Fermented spider eye—Add this curious crafting to transform the potion into a negative potion. Table 10.5 lists all the ones that are available, along with other negative-effect potions that can be brewed without using a positive-effect potion as the base. Craft this ingredient from a spider eye (dropped by spiders), a brown mushroom, and sugar.
Glowstone and redstone cannot be combined through additional brewing cycles; only the last one used takes effect. However, gunpowder and fermented spider eye definitely are often used together to create a throwable version of a potion that will have negative effects when it affects the enemy. You can add them after glowstone or redstone dust to enhance the effects of any throwable positive or negative potion.
Note: When Positive Becomes Negative
Not all negative potions have deleterious effects on mobs. Throwing a potion of harming at the undead (zombies and skeletons) helps them heal. Whoops! Throw potions of healing instead to cause them harm. This is particularly useful when you’re in a tight battle with these particular mobs because you can just toss a potion of healing at your feet and improve your health while causing harm to any undead currently in close combat.
The Bottom Line
Minecraft’s magical effects are potent and powerful.
Start with enchantments because their toughest barrier to entry is a natural by-product of cooking, smelting, and taking care of mobs. You’ll gain XPs step by step.
Use the anvil to manage your enchantment inventory by storing enchantments in books, repairing items when needed, and combining enchantments for even more powerful results.
Potions provide your final boost, and they are the most powerful enhancements in Minecraft.
The next chapter takes a small step back from combat preparedness but is important nonetheless. Your world contains numerous villages and a host of hidden structures containing items and resources that will help your push into the game’s other dimensions.