11. Villages and Other Structures
In This Chapter
![]() Meet the village people and trade your way up in the game.
Meet the village people and trade your way up in the game.
![]() Learn about the villagers’ professions and the different trades they offer.
Learn about the villagers’ professions and the different trades they offer.
![]() Explore hidden temples, dungeons, and mine shafts.
Explore hidden temples, dungeons, and mine shafts.
![]() Discover witches, warts and all.
Discover witches, warts and all.
![]() Craft a map.
Craft a map.
![]() Clock on and off. It’s easy!
Clock on and off. It’s easy!
In Minecraft, you are never truly alone. There are villages teeming with people, mysterious temples containing hidden treasures, and gigantic structures buried deep in the ground. A village offers the potential bonanza of finding a chest or three packed with useful items. Also, the villagers are more than happy to strike deals for certain resources and items. This chapter takes you on an exploration of the structures in The Overworld and their eccentric inhabitants.
Village Life
Villages are havens of useful resources. Finding a good-sized village early on can provide a significant advantage: chests containing useful items; rows of wheat, carrots, beetroot, and potatoes; and opportunities to trade emeralds for other items from the proboscisally endowed villagers. (Okay, that’s not a real word, but you’ll understand when you see the villagers.)
The only problem with villages is that they are not very common. They only appear in the desert and plains biomes, and not too often at that. They are a lot more prevalent in any world with the Large Biomes option turned on during initial generation, as long as Generate Structures is selected under More World Options. The villages that appear in the two biomes use construction materials native to those biomes, so you’ll see a lot of wood and cobblestone in a village located in the plains (see Figure 11.1) and a lot more sandstone in a village situated in a desert.
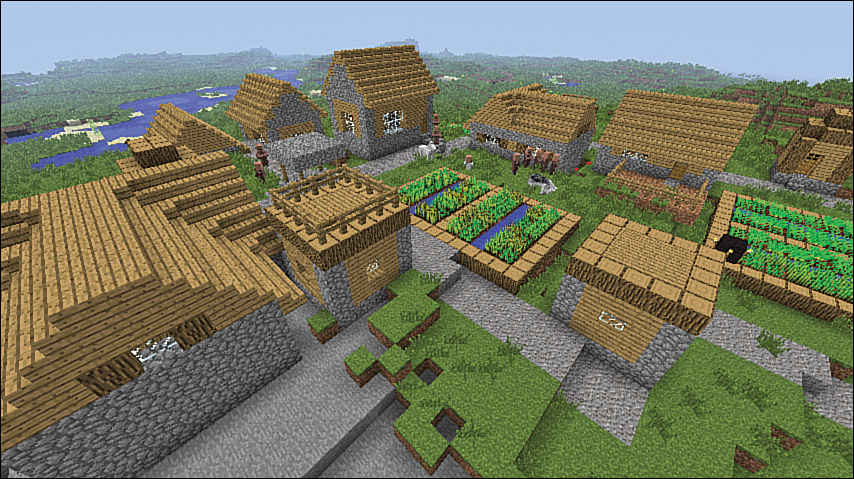
FIGURE 11.1 Villages spawn with a varying number of buildings and inhabitants. This one is located in a plains biome.
Villages add a useful dynamic to the game. They’re not essential, and you can get by just fine without them, but knowing how to make use of them will help you make the most of them.
Here are the essentials:
![]() Villages can appear in almost any form, from a single dwelling to a dozen buildings or more. The buildings are any of 10 different designs, from small huts to large taverns and churches.
Villages can appear in almost any form, from a single dwelling to a dozen buildings or more. The buildings are any of 10 different designs, from small huts to large taverns and churches.
![]() Your interaction with the village’s inhabitants affects your popularity within that village, and attacking a few—or, even worse, killing them—can result in them sending an iron golem to attack you, although golems appear only in larger villages. Villagers won’t attack you back, no matter how mean you are to them.
Your interaction with the village’s inhabitants affects your popularity within that village, and attacking a few—or, even worse, killing them—can result in them sending an iron golem to attack you, although golems appear only in larger villages. Villagers won’t attack you back, no matter how mean you are to them.
![]() Villages are a lodestone for zombies, where zombie sieges can occur, with hordes of zombies swarming the village at night. The zombies spawn anywhere in the village itself, including inside rooms, and attack any villagers present. Dead villagers can then turn into zombie villagers, increasing the havoc (see Figure 11.2).
Villages are a lodestone for zombies, where zombie sieges can occur, with hordes of zombies swarming the village at night. The zombies spawn anywhere in the village itself, including inside rooms, and attack any villagers present. Dead villagers can then turn into zombie villagers, increasing the havoc (see Figure 11.2).
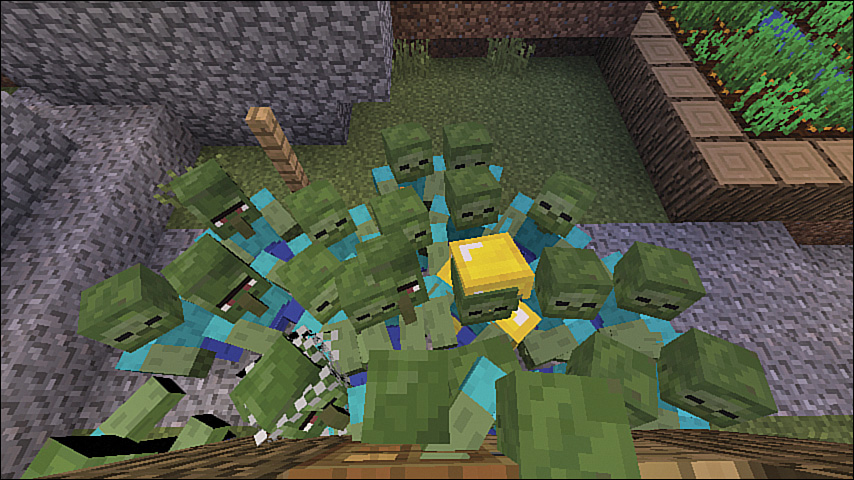
FIGURE 11.2 Zombies can spawn in and around a village at night in large numbers, resulting in scenes like the one shown here—a zombie siege in full swing.
Cure a zombie villager by throwing a weakness potion at him, followed by a golden apple, and try to keep him segregated because the cure takes a few minutes to work. Fortunately, as night falls, you’ll see most villagers scurry for cover to their favored village building. They’ll also do this if it starts to rain. Iron golems fight the good fight by attacking zombies, and they get rid of them very quickly, but iron golems only spawn in villages with a population of 10 villagers and at least 21 houses.
Beds don’t occur naturally in villages, but if you place one and ensure that you sleep through the night, you’ll spare your villagers from a zombie siege. It’s a neat way to keep zombie infections to a minimum.
![]() Villagers trade goods; priest villagers can enchant items; and farmer villagers plant and harvest potato, wheat, and carrot crops. These folks make a village useful to you. Look for a trade where you can obtain emeralds by harvesting wheat and then use the emeralds to pay for other types of items or services. The types of trades available are specific to each villager’s profession. For example, the butchers will trade emeralds for meat. Talk to as many villagers as you can to find the best trade. Some offer rare Minecraft items such as saddles and horse armor. You can also deconstruct bookshelves in a library to obtain books, and you can happily loot any chests you find without dinging your popularity with the villagers.
Villagers trade goods; priest villagers can enchant items; and farmer villagers plant and harvest potato, wheat, and carrot crops. These folks make a village useful to you. Look for a trade where you can obtain emeralds by harvesting wheat and then use the emeralds to pay for other types of items or services. The types of trades available are specific to each villager’s profession. For example, the butchers will trade emeralds for meat. Talk to as many villagers as you can to find the best trade. Some offer rare Minecraft items such as saddles and horse armor. You can also deconstruct bookshelves in a library to obtain books, and you can happily loot any chests you find without dinging your popularity with the villagers.
![]() Villagers manage their population by producing children, but they won’t do so until after they have had a successful trade, and even then there is a limited chance that they will mate. However, as long as two adult villagers are present, you can increase the total population capacity and, therefore, the trading opportunities by adding doors to any structure, where one side of the door is in a clear space, able to receive sunlight. The most efficient method is to add numerous side-by-side doors to a simple box structure. (The formula built into the software results in one villager per 3.5 doors.)
Villagers manage their population by producing children, but they won’t do so until after they have had a successful trade, and even then there is a limited chance that they will mate. However, as long as two adult villagers are present, you can increase the total population capacity and, therefore, the trading opportunities by adding doors to any structure, where one side of the door is in a clear space, able to receive sunlight. The most efficient method is to add numerous side-by-side doors to a simple box structure. (The formula built into the software results in one villager per 3.5 doors.)
![]() There’s no particular technique for finding a village, but if you haven’t found one yet in your world, despite substantial exploration, you can get a taste of the experience by searching for a game seed online. Search for something like “Minecraft village seed.” It should match your version of Minecraft to ensure that the terrain generates correctly. Even though villages can be hard to find, you will find them eventually in your own world. It may just be a small clutch of houses, but there is always a chance you can stumble upon one that’s much larger. If you need a quick refresher on seeds, see the section “Seeding Your World” in Chapter 1, “Getting Started.” Alternatively, starting a superflat world with structures turned on will create villages that you’ll have no trouble spotting from far away.
There’s no particular technique for finding a village, but if you haven’t found one yet in your world, despite substantial exploration, you can get a taste of the experience by searching for a game seed online. Search for something like “Minecraft village seed.” It should match your version of Minecraft to ensure that the terrain generates correctly. Even though villages can be hard to find, you will find them eventually in your own world. It may just be a small clutch of houses, but there is always a chance you can stumble upon one that’s much larger. If you need a quick refresher on seeds, see the section “Seeding Your World” in Chapter 1, “Getting Started.” Alternatively, starting a superflat world with structures turned on will create villages that you’ll have no trouble spotting from far away.
Emerald City: Your Ticket to Trade
Villages contain up to five types of villagers (see Figure 11.3), with each offering a particular set of items for trade, according to their profession and career. Emeralds are the currency in a village.
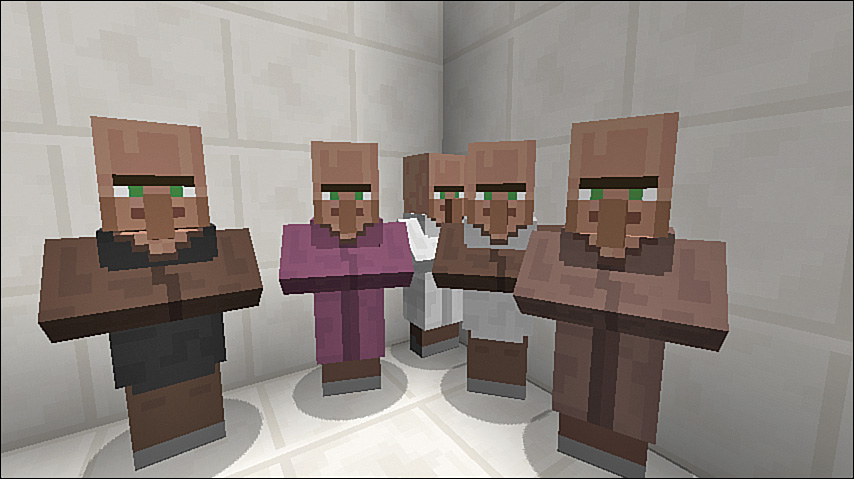
FIGURE 11.3 The village people, from left to right: blacksmith, priest, librarian (this one’s a little shy), butcher, and farmer.
You can recognize a villager by his or her attire; also, the villager’s career title appears at the top of the trading window. Villagers progress in their chosen profession by moving through tiers. As a villager increases his career tier, he has more buying and selling flexibility. Visit the Minecraft wiki to read about villager career and tier specifics: http://bit.ly/1lvgzAL. In the meantime, here’s a quick guide:
![]() Farmers—Dressed in brown, farmers specialize in food products and most often offer up an emerald for 18–21 sheaves of wheat. Their careers span four tiers and four jobs: fletcher, farmer, fisherman, and shepherd.
Farmers—Dressed in brown, farmers specialize in food products and most often offer up an emerald for 18–21 sheaves of wheat. Their careers span four tiers and four jobs: fletcher, farmer, fisherman, and shepherd.
![]() Librarians—A librarian wears a white robe and offers to buy paper, books, and gold. Librarians sell, among other things, bookshelves, enchanted books, compasses, and clocks. Their careers span six tiers.
Librarians—A librarian wears a white robe and offers to buy paper, books, and gold. Librarians sell, among other things, bookshelves, enchanted books, compasses, and clocks. Their careers span six tiers.
![]() Priests—You can recognize a priest by his purple robe. A priest’s career spans three tiers in the “cleric” job role. Priests buy gold and sell Eyes of Ender (pricey, at 7 to 10 emeralds each), redstone, and glowstone, and they are the only source in the game for the Bottle o’ Enchanting, which generates experience orbs when thrown. Priests can also enchant swords, axes, pickaxes, and armor chestplates.
Priests—You can recognize a priest by his purple robe. A priest’s career spans three tiers in the “cleric” job role. Priests buy gold and sell Eyes of Ender (pricey, at 7 to 10 emeralds each), redstone, and glowstone, and they are the only source in the game for the Bottle o’ Enchanting, which generates experience orbs when thrown. Priests can also enchant swords, axes, pickaxes, and armor chestplates.
![]() Blacksmiths—Blacksmiths wear brown clothes with black aprons. Their careers span four tiers in three jobs: tool smith, armorer, and weaponsmith. They buy coal, iron, gold, and diamonds and offer all the metallic items for sale, including chainmail armor, which you can’t craft yourself.
Blacksmiths—Blacksmiths wear brown clothes with black aprons. Their careers span four tiers in three jobs: tool smith, armorer, and weaponsmith. They buy coal, iron, gold, and diamonds and offer all the metallic items for sale, including chainmail armor, which you can’t craft yourself.
![]() Butchers—Butchers have white aprons. Their careers span two or three tiers, depending on whether the butcher is, in fact, a butcher or a leatherworker. They buy raw pork chops and beef, as well as coal and gold, and they sell saddles, leather armor, cooked pork chops, and steak.
Butchers—Butchers have white aprons. Their careers span two or three tiers, depending on whether the butcher is, in fact, a butcher or a leatherworker. They buy raw pork chops and beef, as well as coal and gold, and they sell saddles, leather armor, cooked pork chops, and steak.
You may also spot some villager children running around, but they don’t participate in trading.
Right-click on a villager to open the trading window (see Figure 11.4). Each villager starts with a single trade, either offering to sell you something for emeralds or offering to buy something from you in return for a payment of emeralds. While you can’t haggle on the terms, you’ll find between two and four trades on offer, and the variety will increase after the initial trades.
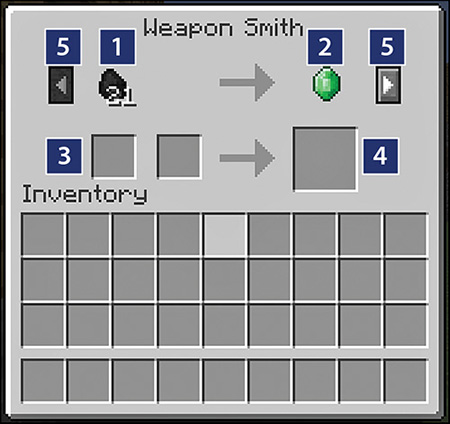
FIGURE 11.4 The goods or payment you need to supply are shown at the top left, and the goods or payment you’ll receive from the villager are shown on the right, with the drop-off and pick-up slots for the trade items directly below.
1. Goods or payment required.
2. Payment or goods to be received.
3. Drop matching items for the goods or payment here.
4. Pick up the reward here.
5. Use the arrow keys to cycle through available offers.
To make a trade, just place the goods or emeralds requested in the empty slot on the left and pick up the payment or goods purchased from the empty one on the right. Trading grants experience points (XPs), so it is a useful way to get a quick bump if you are in need.
The additional slot in the middle is used for trading with priests. Place the item to be enchanted in the leftmost slot and the payment in the middle; then pick up the enchanted item from the right.
Tip: Emerald Farming
You can find emeralds in the ground, but only in the extreme hills biomes, or, if you are very lucky, in the chests hidden inside temples and dungeons, but by far the easiest way to get a decent quantity of them is to either take over the wheat farm in a village or build an even larger farm nearby. There are usually a few farmers willing to buy the wheat you collect in return for emeralds. However, take extra care at night not to get caught on the wrong side of the door if a zombie siege begins. The villagers don’t mind if you move into one of their houses to stay safe or build your own nearby, and you could do them a favor by fortifying their village to help alleviate the effects of a zombie siege and keep other mobs away.
Caution: Not All’s Well with the Well
Village wells are deep, with a lip too high for a standard jump. If you plan to spend a lot of time in a village, consider placing some blocks below the first layer of water in the well. Also, knock out one block from the wall so you can climb out if you happen to fall in. Alternatively, leave the block in place and use the well as a zombie trap. Plenty can fall in during a siege, and the shade from the roof prevents them from burning up during the day, so you can then attack them at your leisure.
Hidden Temples and Other Structures
Most villages have a chest or two tucked away, but your Minecraft world also contains other buildings that provide more valuable treasure troves. Although you will only find Nether fortresses and the End cities and ships in The Nether and The End dimensions, there are many others to explore in The Overworld.
Note: Less Is More: Mojang’s Structures Within
Minecraft has many types of structures that are the results of specific programming code that is separate from the general terrain generation. Some of these are negative structures, adding space to the terrain in ways that expose different types of ore and often provide a geological gasp of wonder. (Caverns, ravines, and basins, I’m looking at you!) Others, such as the rivers that flow between biomes, are a clever combination of several techniques that both add and remove particular blocks, blurring what would otherwise look like jarring edges between the biomes. This note serves no other purpose except to say that this is rather clever coding, particularly the rivers. Cajoling software to create apparently natural geology is tremendously difficult. So, here’s to you, Mojang, for your natural beaches, soaring overhangs, and delightful waterways.
Most of these structures contain chests with all sorts of juicy loot, but they also often contain hostile mob spawners of different types. Disable a spawner by placing a few torches nearby to raise the light level above that required for mob spawning. You can also attack a spawner with a pickaxe to break it apart. With the spawner disabled, you’re free to loot in peace.
Desert Temples
Desert temples appear in the desert biome, looking like stone pyramids, each with two turrets out front (see Figure 11.5), although they are often partially buried under sand dunes. These temples are architecturally interesting, but it’s the four chests hidden beneath the floor of the main chamber that make them useful.
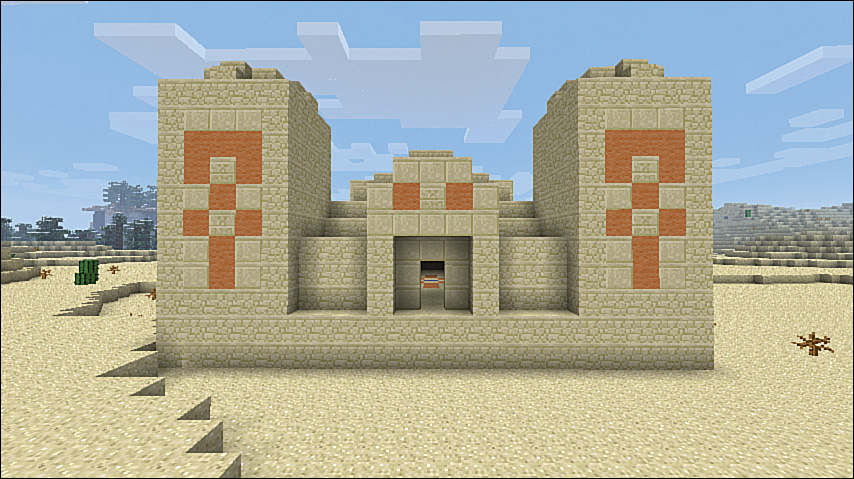
FIGURE 11.5 A desert temple in its full glory. You’re likely to find them partially or even almost completely buried, so keep an eye out for any orange-colored blocks while traipsing through the deserts.
Head toward the central chamber. In the middle is a block of blue-stained clay. The chamber with the chests sits directly beneath this, but so does this structure’s biggest danger: a pressure plate connected to nine TNT blocks. Go back a few blocks and dig out a block to see the chamber. Then dig down one of the walls to get to the base (shown in Figure 11.6), break the pressure plate to make the chamber safe, and raid the chests. While you’re there, you might also want to dig up the floor and retrieve the TNT blocks.
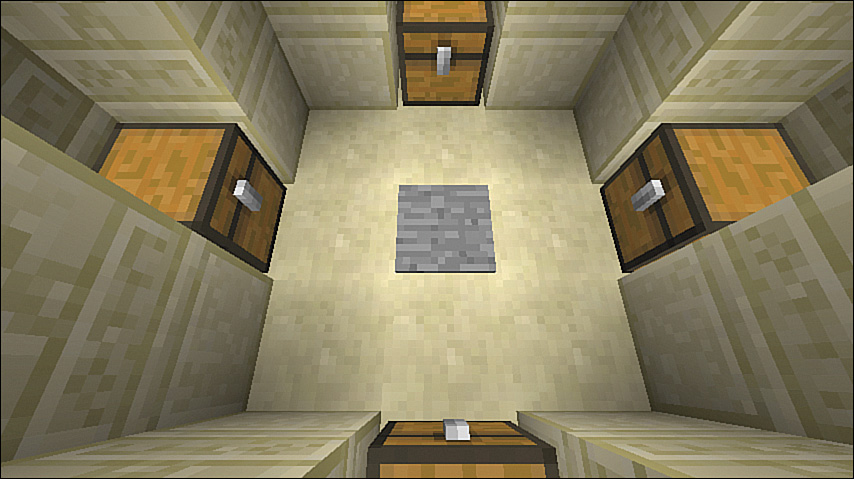
FIGURE 11.6 The treasure room of a desert temple. Be careful of that pressure plate! If you find such a room already blown up, it was probably caused by a mob spawning it and trampling on the plate.
Jungle Temples
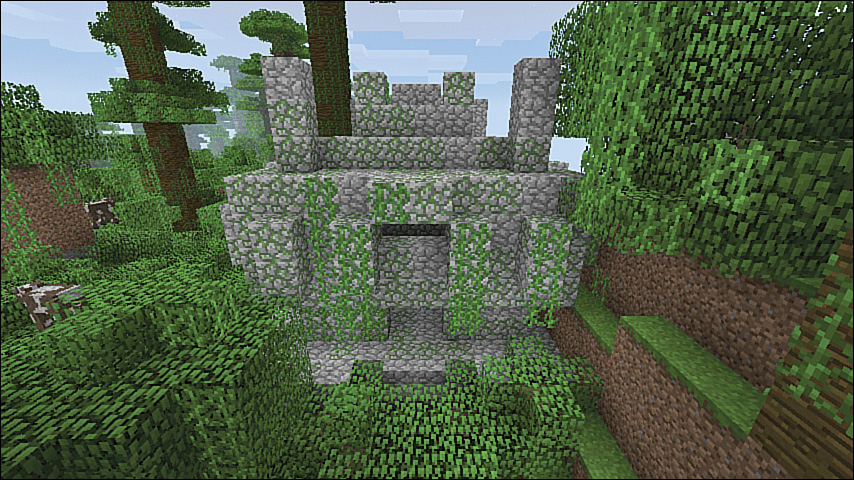
Indiana Jones faced a trap-filled jungle temple in Raiders of the Lost Ark. While not quite as deadly, Minecraft offer its own jungle temples, awaiting exploration. A jungle temple is a mossy vine-laden structure that occurs only in jungle biomes (see Figure 11.7). Each contains two chests, one hidden behind a set of levers and, on the lower level, another protected by two sets of tripwire connected to a couple of arrow-shooting, face-piercing dispensers. Use shears to cut the tripwire and access the first chest, then head back to the levers. These form part of a puzzle that opens a sliding block beside the stairs in the entry level. Jump down to get to the next chest. Alternatively, just smash through the wall behind the levers to get to the chest.
Even if the chests don’t contain anything particularly valuable, the jungle temple’s construction provides many useful blocks and items, including three sticky pistons, two dispensers, arrows, tripwire hooks, redstone, string, and more. Unlike Indy, you won’t need to deal with any giant rolling boulders as you plunder the temple. Bring in the wrecking crew and have a ball.
Witch Huts
Witch huts, shown in Figure 11.8, spawn in swamps and aren’t particularly useful on their own because they don’t contain chests. However, they do sometimes host a witch, complete with prominent wart. You need to take care with these witches because they’re no Glinda the Good. They’ll hurl various potions your way and use other potions to counteract your own. But on death, they can drop a few useful goodies, such as glowstone dust, bottles, spider eyes, and so on, as well as an occasional potion.
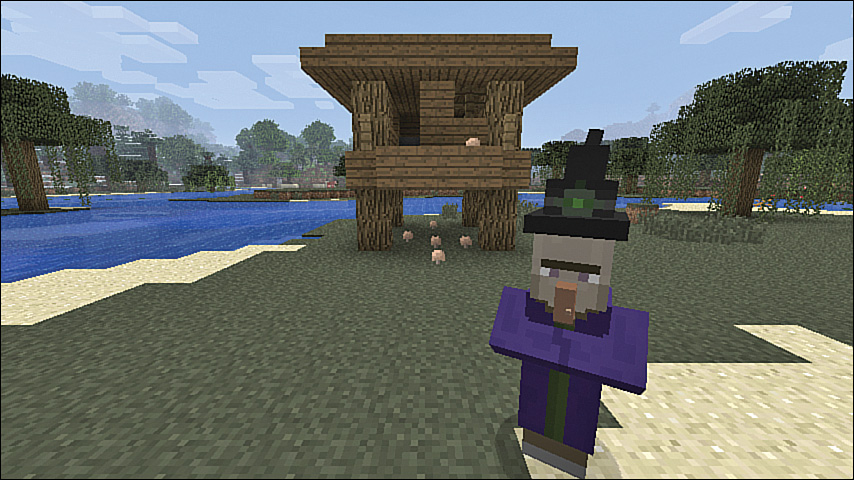
Fight the witches from a distance, out of potion-tossing range, using a bow.
Dungeons
Dungeons are smaller rooms buried underground that house a mob spawner and usually one or two chests. Although they can appear anywhere, they’re most easily spotted when their wall intersects with the side of a large cavern or an abandoned mine shaft. Look out for the greenish moss stone shown in Figure 11.9.
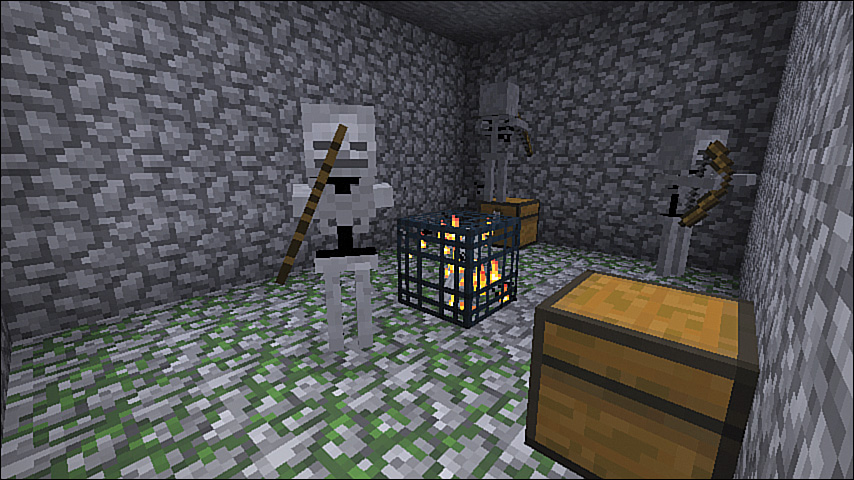
FIGURE 11.9 A dungeon connected to a cave system. Some dungeons are more useful than others. This one’s chests contained enchanted books, a saddle, lots of gunpowder, and more.
The chests can hold a lot of useful loot, so disable the spawner and enjoy.
Abandoned Mine Shafts
I first mentioned mine shafts in Chapter 5, “Combat School” (see page 98). They are quite liberally scattered underground and often intersect caves, which makes them easy to find (see Figure 11.10). Each is different, and these caves often sprawl across huge multilayered levels. Explore them for their chests, rails, and timber but look out for cave spiders while you do so. One small bonus: You’ll find lots of cobwebs near cave spider spawners. (Deactivate a spawner by placing a torch on it or nearby to raise the light level above the spawning threshold.)
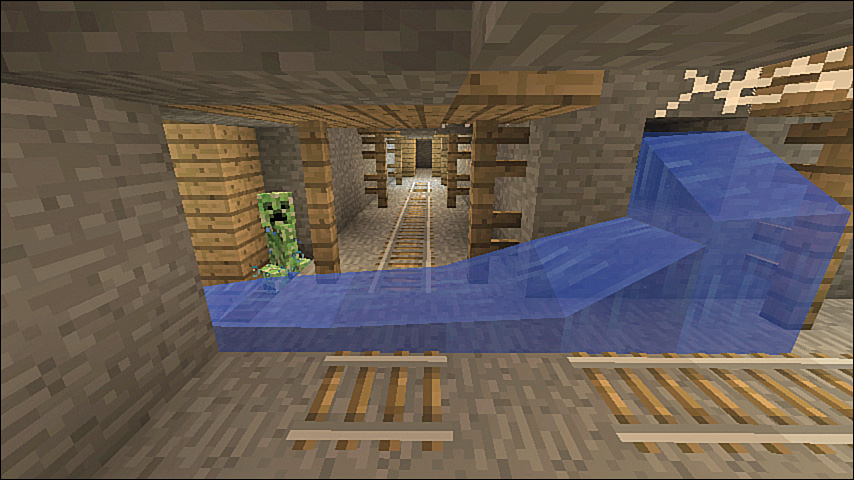
FIGURE 11.10 Abandoned mine shafts are renowned for their cave spiders but can contain all the other Overworld’s hostile mobs, along with water and lava hazards. They’re a great source of rails and wood, as well as other finds from chests.
Harvest the webs with a sword or shears to obtain string or use shears enchanted with silk touch to pull in the cobwebs. Cobwebs slow down all mobs except cave spiders, so they are useful in traps. However, they won’t slow you down if you’re riding a minecart, so you can use them to defend tunnels by slowing down other mobs while you speed ahead.
Strongholds
Strongholds are large underground structures. They come in a variety of sizes, often with numerous rooms and chests. More importantly, they also contain a special portal needed to reach The End region. The portal is protected by a silverfish spawner and must be activated first with Eyes of Ender.
Strongholds are tough to find. They’re usually buried deep, although I have seen them in an ocean biome, where the structure could be seen by looking through the water.
Finding strongholds takes a specific technique. I cover this and the portal in Chapter 12, “Playing Through: The Nether and The End.”
Ocean Monuments
Ocean monuments, which appear in the Deep Ocean biome, provide a fun opportunity to explore underwater and potentially gain some golden treasure. Figure 11.11 shows an example with night vision enabled to make the water more transparent.
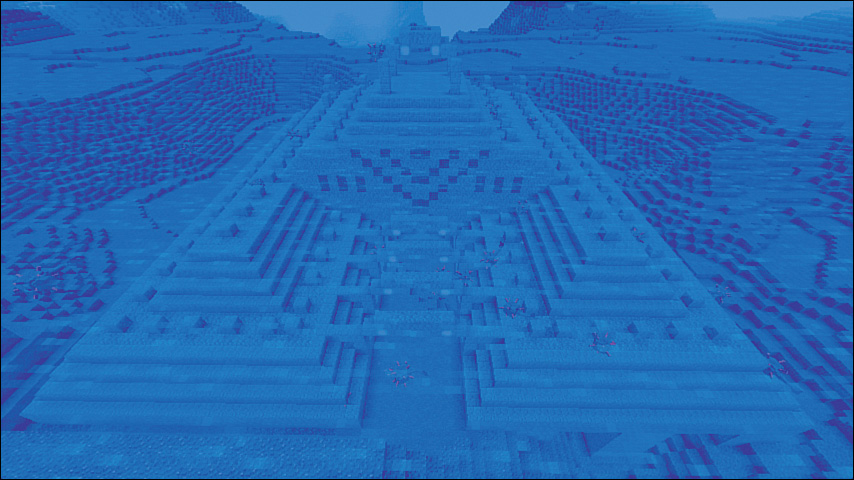
The structure is made of a stone-like material called prismarine and is lit by sea lantern blocks. On average, water dungeons consist of at least six rooms. In my experience, the Sea Lantern blocks are pretty darned dim, so you would be well-advised to make use of glowstone blocks as much as you can to shed some light on these watery corridors.
If you have cheats enabled, you can also give yourself underwater night vision by issuing the following command, replacing playername with your Minecraft login name: /effect playername 16 3600 1 true.
The centerpiece of the ocean monument is the treasure room, typically located in the core of the structure and guarded by several Elder Guardian mobs that act as bosses. The treasure itself consists of eight gold blocks encased in dark prismarine.
The “ordinary” guardian mobs that swim around and through the water templates aren’t the friendliest, that’s for sure. Their main attack mode is a laser beam; they also have a thorn-like attack performed courtesy of their barbed tails. Typically, their drops include prismarine shard, prismarine crystals, and raw fish.
If you’re playing in Survival mode, you’ll need to be adequately equipped to explore a water dungeon. I suggest making use of enchantments and potions wherever possible, including invisibility and the depth strider enchanted boots, which confer the ability to move quickly and breathe underwater.
Note: Fast-Track to an Ocean Monument
The Deep Ocean biome is, well, deep. Thus, you can use your favorite search engine to discover a Minecraft world seed that enables you to reach a water dungeon quickly and easily. For instance, start a new world session (make sure to enable cheats and Creative mode first) by using the seed ID -7185414603555797276. After you’re in the world, use the cheat /tp 1110 60 1692 to teleport to the structure. Have fun!
Nether Fortresses
These fortresses are huge structures that feature exclusively in The Nether region and contain unique ingredients for brewing potions and finding strongholds. They’re packed with chests that can hold some powerful items. But getting to The Nether and surviving there long enough to find a fortress is a journey in itself. I show you how in Chapter 12.
Mapping, or There and Back Again
You’ll likely make some significant tracks as you journey across The Overworld, finding its different structures. If pressing F3 on Windows or fn+F3 on OS X to constantly check coordinates seems a little like cheating, you can instead use one handy tool: maps. If you’re playing on a game console, you have a map in your inventory when you start a new world, and that one map with a little coercion through zooming (see below) can display the entire world. That’s not so on the PC, where the world is so much larger.
Follow these steps to start mapping:
1. Create a compass. The compass on its own isn’t too useful; it always points to your world’s original spawn point. This never changes, even after you change your own spawn point by sleeping in a bed, but if you’ve built your base quite close to that original spawn point, it could be useful. Just keep it in a quick access slot and follow the red needle. But let’s continue on our current path and use the compass instead to make a map.

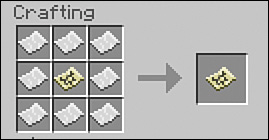
2. Place the compass in the middle of the crafting table and surround it with eight pieces of paper. (Remember: Paper is obtained from sugar cane, so it’s quite easy to make.) Drag the map to a quick access slot. The map hasn’t yet been used, so it shows up as empty.

3. Select the map and right-click it to activate it. The map gradually fills in to show the landscape around you as well as structures such as villages (see Figure 11.12), although you may need to wander a little toward the edges of the map to complete the cartography because it shows only territory you’ve explored. Your last spawn point also shows up as a large black dot. Move your mouse up and down to bring the map to eye level or sink it down again so you can still hold it but see the territory ahead. Your approximate location at the time of activation becomes the permanent center of the map. It’s approximate because maps align to an overall world grid, making it possible to create a series of maps whose edges align. Place them in a grid of item frames on a wall to create a much larger overall view of the world. Any other maps placed in frames elsewhere show up as small squares on every map covering that location, providing a way to pin locations for later reference.
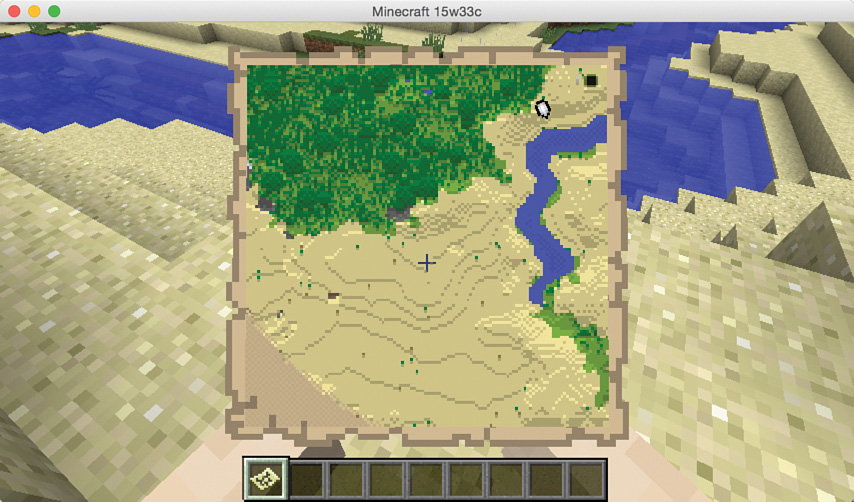
FIGURE 11.12 Your location appears as a white arrow pointing in the direction you are facing. The most recent spawn point appears as a black dot, in this case just above and to the right of the arrow.
Tip: Avoid Map Confusion
Each map you create gets a unique number, and the maps are arranged sequentially from zero. You can see a map number as a ToolTip in the inventory window. This helps you keep the maps organized so you can select the correct one if you’ve created a few.
4. To see where you are located, look for the white arrow. Notice that it changes to a white dot if you move off the map, and this won’t take long because the current map is quite small, covering an area of just 128×128 blocks, mapped as one block per pixel, or a scale of 1:1.
5. To make the map larger, zoom out by placing the map back on the crafting table and then adding another eight sheets of paper. Pick up the new map. Note that this process is not reversible. In other words, you can’t zoom in a zoomed-out map. Maps can zoom out to a scale of 16:1, doubling each time.
6. Place maps into a set of item frames arranged on the wall to create a seamless, much larger map.
Crafting a Clock
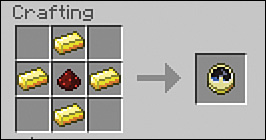
Clocks can help you keep track of time so that you know whether it’s safe to surface while exploring structures underground or working in your mine. Craft a clock with four gold ingots and one piece of redstone.
A clock works anywhere—in your inventory or in a quick access slot—and it even tells the time before you pick it up from the crafting table.
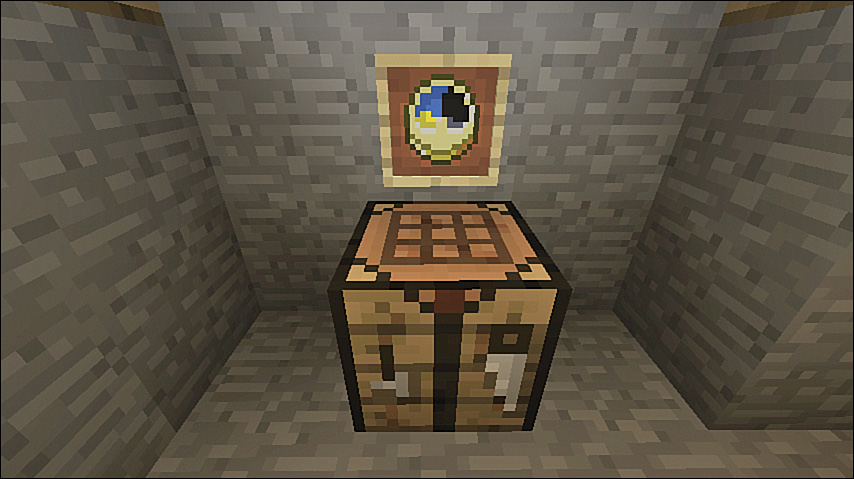
A clock works in a simple manner, rotating clockwise (appropriately enough) between night and day phases, represented by black and blue hemispheres. At midnight, you see the moon located at the 12 o’clock position. The sun rotates to the same location by noon. Figure 11.13 shows a clock mounted in an item frame with sunrise starting to approach, shown by the border between the blue hemisphere starting to push the night disk aside.
The Bottom Line
Minecraft’s worlds are riddled with dungeons, abandoned mine shafts, and strongholds, as well as intricate, lengthy natural cave systems. You’ve probably seen some of this if you’ve done any flying around in Creative mode, where the landscape generates in real time in front of you, starting from the bottom up, giving you temporary x-ray vision. You’ll find the largest structures below ground or under water, but temples do hold some useful bits and pieces, and trading with villages adds a whole new dynamic to the game. You can even treat the trading offers as a quest-generation system, heading out to gather the requirements for any given trade, no matter what, and without breaking the order in which they’re received. Actually, as you’ll see in the next chapter, the trading system can even let you skip the entire Nether region and jump straight to that epic pending battle with the Ender Dragon. Read on to learn how.