
14. Using Android Preferences
Applications are about functionality and data. In this chapter, we explore the simplest way to store, manage, and share application data persistently within Android applications: by using shared preferences. The Android SDK includes a number of helpful APIs for storing and retrieving application preferences in different ways. Preferences are stored as groups of key/value pairs that can be used by the application. Shared preferences are most appropriate for storing simple kinds of data, such as application state and user settings, in a persistent fashion.
Working with Application Preferences
Many applications need a lightweight data storage mechanism called shared preferences for storing application state, simple user information, configuration options, and other such information. The Android SDK provides a simple preferences system for storing primitive application data at the Activity level as well as preferences shared across all of an application’s activities.
![]() Tip
Tip
Many of the code examples provided in this section are taken from the SimplePreferences application. The source code for the SimplePreferences application is provided for download on the book’s website (http://introductiontoandroid.blogspot.com).
Determining When Preferences Are Appropriate
Application preferences are sets of data values that are stored persistently, meaning that the preference data persists across an application’s lifecycle events. In other words, the application or device can be started and stopped—turned on and off—without losing the data.
Many simple data values can be stored as application preferences. For example, your application might want to store the username of the application’s user. The application could use a single preference to store this information, as shown below:
![]() The data type of the preference is a
The data type of the preference is a String.
![]() The key for the stored value is a
The key for the stored value is a String called “UserName”.
![]() The value for the data is the username “HarperLee1926”.
The value for the data is the username “HarperLee1926”.
Storing Different Types of Preference Values
Preferences are stored as groups of key/value pairs. The following data types are supported as preference-setting values:
![]()
Boolean values
![]()
Float values
![]()
Integer values
![]()
Long values
![]()
String values
![]() A
A Set of multiple String values
Preference functionality can be found in the SharedPreferences interface of the android.content package. To add preferences support to your application, you must take the following steps:
1. Retrieve an instance of a SharedPreferences object.
2. Create a SharedPreferences.Editor to modify the preference content.
3. Make changes to the preferences using the Editor.
4. Commit your changes.
Creating Private Preferences for Use by a Single Activity
Individual activities can have their own private preferences, although they are still represented by the SharedPreferences class. These preferences are for the specific Activity only and are not shared with other activities within the application. The Activity gets only one group of private preferences, which are simply named after the Activity class. The following code retrieves an Activity class’s private preferences, called from within the Activity:
import android.content.SharedPreferences;
...
SharedPreferences settingsActivity = getPreferences(MODE_PRIVATE);
You have now retrieved the private preferences for that specific Activity class. Because the underlying name is based on the Activity class, any change to the Activity class will change what preferences are read.
Creating Shared Preferences for Use by Multiple Activities
Creating shared preferences is similar. The only two differences are that we must name our preference set and use a different call to get the preference instance, as shown here:
import android.content.SharedPreferences;
...
SharedPreferences settings =
getSharedPreferences("MyCustomSharedPreferences", MODE_PRIVATE);
You have now retrieved the shared preferences for the application. You can access these shared preferences by name from any Activity in the application. There is no limit to the number of different shared preferences you can create. For example, you could have some shared preferences called “UserNetworkPreferences” and others called “AppDisplayPreferences.” How you organize shared preferences is up to you. However, you should declare the name of your preferences as a variable so that you can reuse the name across multiple activities consistently. Here is an example:
public static final String PREFERENCE_FILENAME = "AppPrefs";
Searching and Reading Preferences
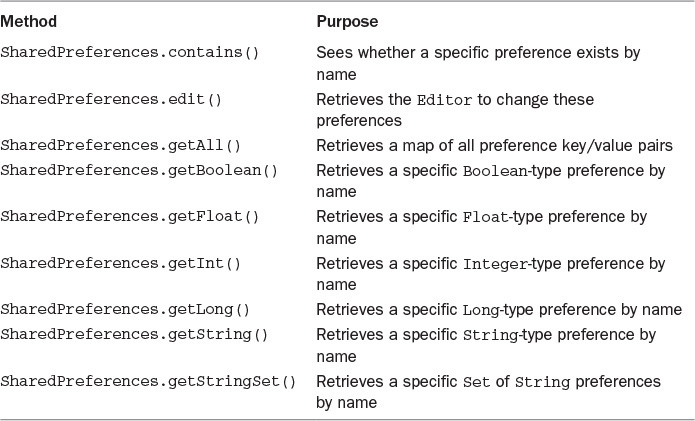
Reading preferences is straightforward. Simply retrieve the SharedPreferences instance you want to read. You can check for a preference by name, retrieve strongly typed preferences, and register to listen for changes to the preferences. Table 14.1 describes some helpful methods in the SharedPreferences interface.
Adding, Updating, and Deleting Preferences
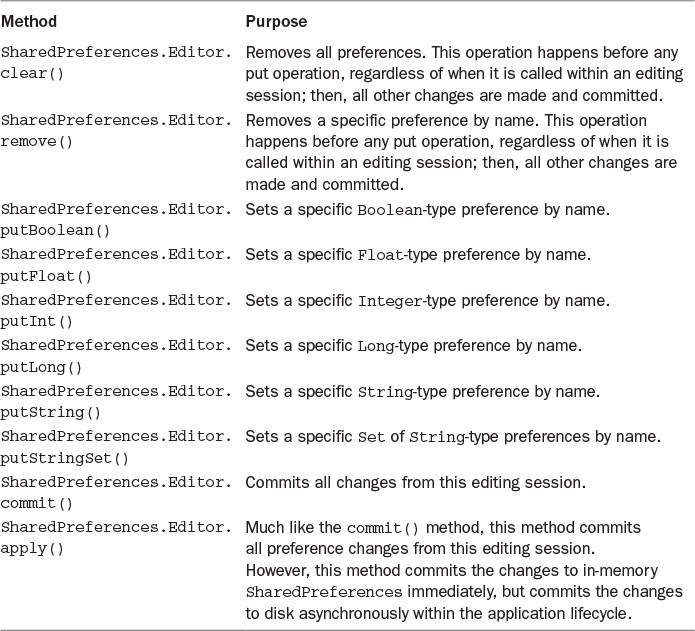
To change preferences, you need to open the preference Editor, make your changes, and commit them. Table 14.2 describes some helpful methods in the SharedPreferences.Editor interface.
The following block of code retrieves an Activity class’s private preferences, opens the preference Editor, adds a Long-type preference called SomeLong, and saves the change:
import android.content.SharedPreferences;
...
SharedPreferences settingsActivity = getPreferences(MODE_PRIVATE);
SharedPreferences.Editor prefEditor = settingsActivity.edit();
prefEditor.putLong("SomeLong", java.lang.Long.MIN_VALUE);
prefEditor.apply();
If you’re targeting devices that run at least API Level 9 (Android 2.3 and higher), you would benefit from using the apply() method instead of the commit() method. However, if you need to support legacy versions of Android, you’ll want to stick with the commit() method, or check at runtime before calling the most appropriate method. Even when you are writing as little as one preference, using apply() could smooth out the operation because any call to the file system may block for a noticeable (and therefore unacceptable) length of time.
Reacting to Preference Changes
Your application can listen for, and react to, changes to shared preferences by implementing a listener and registering it with the specific SharedPreferences object using the registerOnSharedPreferenceChangeListener() and unregisterOnSharedPreferenceChangeListener() methods. This interface class has just one callback, which passes to your code the shared preferences object that changed as well as which specific preference key name changed.
Finding Preferences Data on the File System
Internally, application preferences are stored as XML files. You can access the preferences file using the File Explorer via Android Device Monitor. You find these files on the Android file system in the following directory:
/data/data/<package name>/shared_prefs/<preferences filename>.xml
The preferences filename is the Activity class name for private preferences or the specific name you give for the shared preferences. Here is an example of the XML file contents of a preferences file with some simple values:
<?xml version="1.0" encoding="utf-8" standalone="yes" ?>
<map>
<string name="String_Pref">Test String</string>
<int name="Int_Pref" value="−2147483648" />
<float name="Float_Pref" value="−Infinity" />
<long name="Long_Pref" value="9223372036854775807" />
<boolean name="Boolean_Pref" value="false" />
</map>
Understanding the application preferences file format can be helpful for testing purposes. You can use the Android Device Monitor to copy the preference files to and from the device. Since the shared preferences are just a file, regular file permissions apply. When creating the file, you specify the file’s mode (permissions). This determines if the file is readable outside the existing package.
For more information about using the Android Device Monitor and the File Explorer, please see Appendix C, “Quick-Start: Android Device Monitor.”
Creating Manageable User Preferences
You now understand how to store and retrieve shared preferences programmatically. This works very well for keeping application state but what if you have a set of user settings and you want to create a simple, consistent, and platform-standard way in which the user can edit them? Good news! You can use the handy PreferenceActivity class (android.preference.PreferenceActivity) to easily achieve this goal.
![]() Tip
Tip
Many of the code examples provided in this section are taken from the SimpleUserPrefs application. The source code for the SimpleUserPrefs application is provided for download on the book’s website.
Implementing a PreferenceActivity-based solution requires the following steps:
1. Define the preference set in a preference resource file.
2. Implement a PreferenceFragment class and tie it to the preference resource file. Note that PreferenceFragment will work only on Android 3.0 and above. In the interest of backward compatibility, a PreferenceActivity without the PreferenceFragment can be used to support legacy platform versions as needed.
3. Implement a PreferenceActivity class and add the PreferenceFragment you just created.
4. Hook up the Activity within your application as you normally would. For example, register it in the manifest file, start the Activity as normal, and so on.
Now let’s look at these steps in more detail.
Creating a Preference Resource File
First, you create an XML resource file to define the preferences your users are allowed to edit. A preference resource file contains a root-level <PreferenceScreen> tag, followed by various preference types. These preference types are based on the Preference class (android.preference.Preference) and its subclasses, such as CheckBoxPreference, EditTextPreference, ListPreference, MultiSelectListPreference, and more. Some preferences have been around since the Android SDK was first released, whereas others, such as the MultiSelectListPreference class, were introduced in Android API Level 11 and are not backward compatible with older devices.
Each preference should have some metadata, such as a title and some summary text that will be displayed to the user. You can also specify default values and, for those preferences that launch dialogs, the Dialog prompt. For the specific metadata associated with a given preference type, see its subclass attributes in the Android SDK documentation. Here are some common Preference attributes that most preferences should set:
![]() The
The android:key attribute is used to specify the key name for the shared preference.
![]() The
The android:title attribute is used to specify the friendly name of the preference, as shown on the editing screen.
![]() The
The android:summary attribute is used to give more details about the preference, as shown on the editing screen.
![]() The
The android:defaultValue attribute is used to specify a default value of the preference.
Like any resource files, preference resource files can use raw strings or reference string resources. The following example of a preference resource file does a bit of both (the string array resources are defined elsewhere in the strings.xml resource file):
<?xml version="1.0" encoding="utf-8"?>
<PreferenceScreen
xmlns:android="http://schemas.android.com/apk/res/android">
<EditTextPreference
android:key="username"
android:title="Username"
android:summary="This is your ACME Service username"
android:defaultValue=""
android:dialogTitle="Enter your ACME Service username:" />
<EditTextPreference
android:key="email"
android:title="Configure Email"
android:summary="Enter your email address"
android:defaultValue="[email protected]" />
<PreferenceCategory
android:title="Game Settings">
<CheckBoxPreference
android:key="bSoundOn"
android:title="Enable Sound"
android:summary="Turn sound on and off in the game"
android:defaultValue="true" />
<CheckBoxPreference
android:key="bAllowCheats"
android:title="Enable Cheating"
android:summary="Turn the ability to cheat on and off in the game"
android:defaultValue="false" />
</PreferenceCategory>
<PreferenceCategory
android:title="Game Character Settings">
<ListPreference
android:key="gender"
android:title="Game Character Gender"
android:summary="This is the gender of your game character"
android:entries="@array/char_gender_types"
android:entryValues="@array/char_genders"
android:dialogTitle="Choose a gender for your character:" />
<ListPreference
android:key="race"
android:title="Game Character Race"
android:summary="This is the race of your game character"
android:entries="@array/char_race_types"
android:entryValues="@array/char_races"
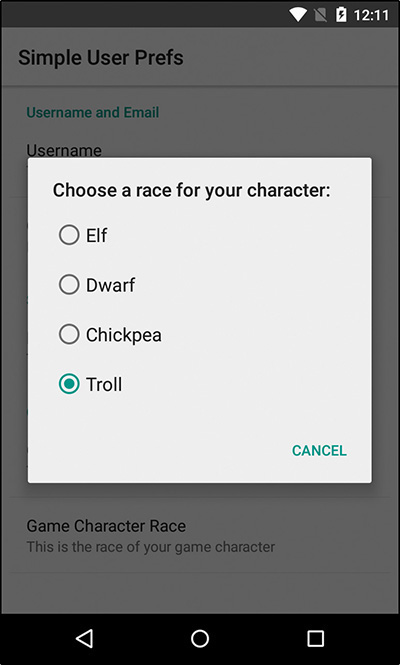
android:dialogTitle="Choose a race for your character:" />
</PreferenceCategory>
</PreferenceScreen>
This XML preference file is organized into two categories and defines fields for collecting several pieces of information, including a username (String), sound setting (boolean), cheat setting (boolean), character gender (fixed String), and character race (fixed String).
For instance, this example uses the CheckBoxPreference type to manage boolean shared preference values, for example, game settings such as whether or not sound is enabled or whether cheating is allowed. Boolean values are checked on and off straight from the screen. The example uses the EditTextPreference type to manage the username, and it uses ListPreference types to allow the user to choose from a list of options. Finally, the settings are organized into categories using <PreferenceCategory> tags.
Next, you need to wire up your PreferenceActivity class and tell it about your preference resource file.
Using the PreferenceActivity Class
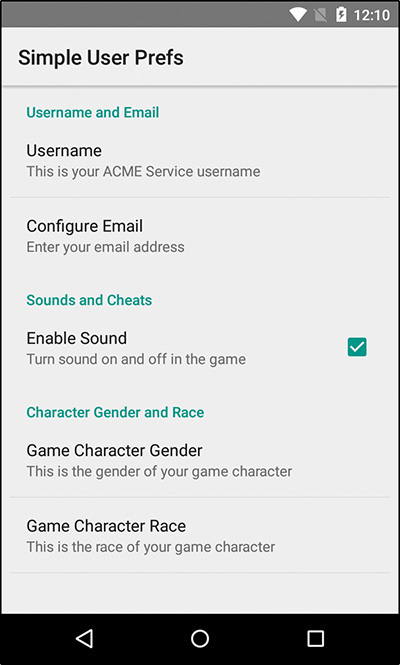
The PreferenceActivity class (android.preference.PreferenceActivity) is a helper class that is capable of displaying a PreferenceFragment. This PreferenceFragment loads up your XML preference resource file and transforms it into a standard settings screen, much as you see in the Android device settings. Figure 14.1 shows what the screen for the preference resource file discussed in the previous section looks like when loaded into a PreferenceActivity class.
To wire up your new preference resource file, create a new class that extends the PreferenceActivity class within your application. Next, override the onCreate() method of your class. Retrieve the FragmentManager for the Activity, start a FragmentTransaction, insert your PreferenceFragment into the Activity, and then call commit(). Tie the preference resource file to the PreferenceFragment class using the addPreferencesFromResource() method. You will also want to retrieve an instance of the PreferenceManager (android.preference.PreferenceManager) and set the name of these preferences for use in the rest of your application at this time, if you’re using a name other than the default. Here is the complete implementation of the SimpleUserPrefsActivity class, which encapsulates these steps:
public class SimpleUserPrefsActivity extends PreferenceActivity {
@Override
public void onCreate(Bundle savedInstanceState) {
super.onCreate(savedInstanceState);
FragmentManager manager = getFragmentManager();
FragmentTransaction transaction = manager.beginTransaction();
transaction.replace(android.R.id.content,
new SimpleUserPrefsFragment());
transaction.commit();
}
public static class SimpleUserPrefsFragment extends PreferenceFragment {
@Override
public void onCreate(Bundle savedInstanceState) {
super.onCreate(savedInstanceState);
PreferenceManager manager = getPreferenceManager();
manager.setSharedPreferencesName("user_prefs");
addPreferencesFromResource(R.xml.userprefs);
}
}
}
Now you can simply wire up the Activity as you normally would. Don’t forget to register it within your application’s Android manifest file. When you run the application and start the UserPrefsActivity, you should see a screen that looks like Figure 14.1. Trying to edit all other preferences will launch a dialog with the appropriate type of prompt (EditText or Spinner control), as shown in Figures 14.2 and 14.3.
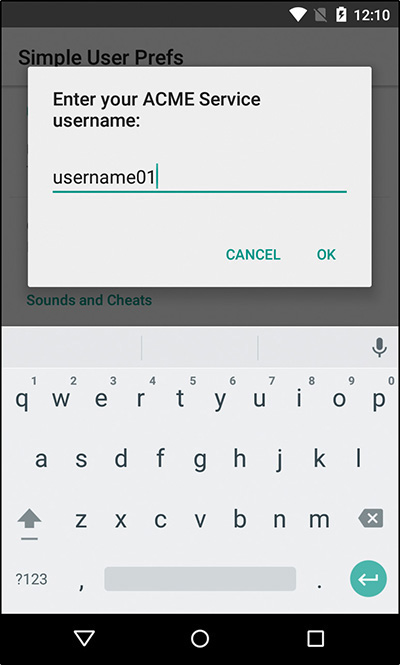
Use the EditTextPreference type to manage String shared preference values, such as username, as shown in Figure 14.2.
Use the ListPreference type to force the user to choose from a list of options, as shown in Figure 14.3.
Organizing Preferences with Headers
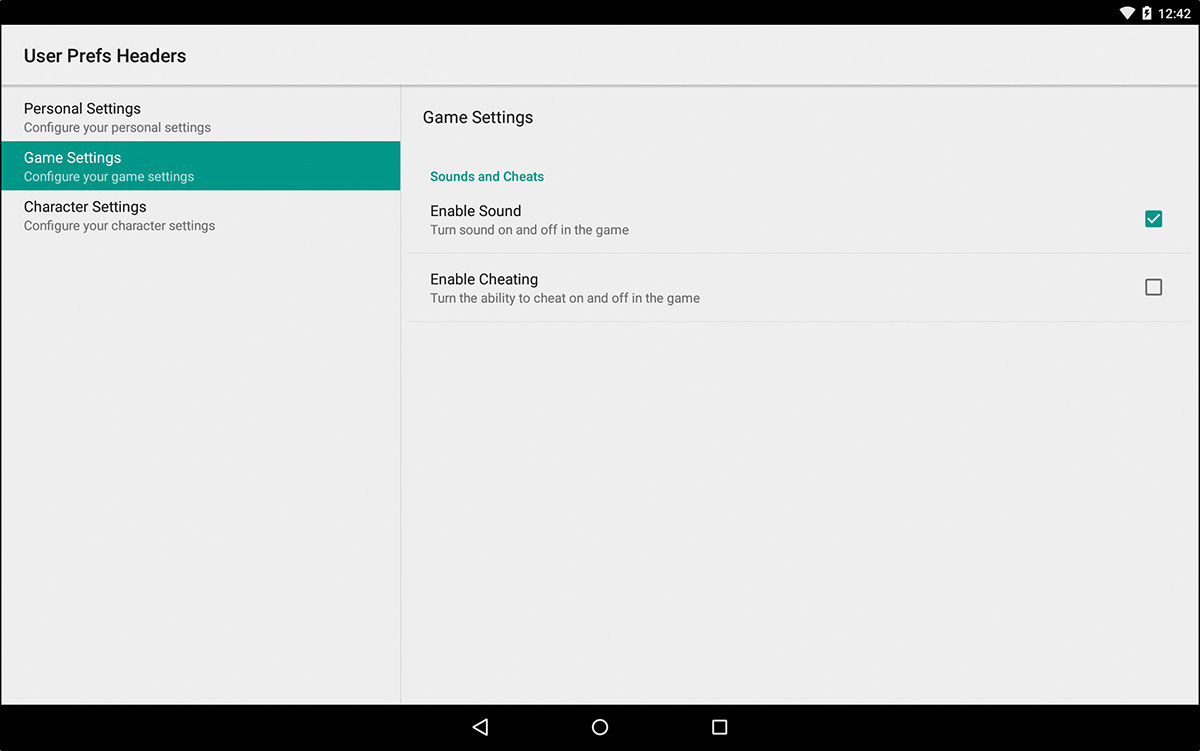
The concept of Preference headers was added in Android 3.0 (API Level 11). The headers feature allows your application to present a list of options for navigating to setting subscreens. A very good example of a system application that uses the headers feature is the Android system Settings application. On large-screen devices, the left pane displays the setting list items and, depending on which setting item is selected, determines what setting options are displayed in the right pane. There are a few setup steps for making your application ready for incorporating the Preference headers feature:
1. Create individual PreferenceFragment classes for each setting collection.
2. Define the header list using the <preference-headers> tag in a new XML file.
3. Create a new PreferenceActivity class that calls the method onBuildHeaders() for loading the headers resource file.
![]() Tip
Tip
Many of the code examples provided in this section are taken from the UserPrefsHeaders application. The source code for the UserPrefsHeaders application is provided for download on the book’s website.
An example of a headers file follows, which groups settings into separate header entries:
<preference-headers xmlns:android="http://schemas.android.com/apk/res/android">
<header
android:fragment=
"com.introtoandroid.userprefs.UserPrefsHeadersActivity$UserNameFrag"
android:title="Personal Settings"
android:summary="Configure your personal settings" />
<header
android:fragment=
"com.introtoandroid.userprefs.UserPrefsHeadersActivity$GameSettingsFrag"
android:title="Game Settings"
android:summary="Configure your game settings" />
<header
android:fragment=
"com.introtoandroid.userprefs.UserPrefsHeadersActivity$CharSettingsFrag"
android:title="Character Settings"
android:summary="Configure your character settings" />
</preference-headers>
Here, we have defined some <header> entries within a <preference-headers> node. Each <header> defines just three attributes: android:fragment, android:title, and android:summary. Here is how our new UserPrefsHeadersActivity class should look:
public class UserPrefsHeadersActivity extends PreferenceActivity {
/** Called when the activity is first created. */
@Override
public void onCreate(Bundle savedInstanceState) {
super.onCreate(savedInstanceState);
}
@Override
public void onBuildHeaders(List<Header> target) {
loadHeadersFromResource(R.xml.preference_headers, target);
}
@Override
protected boolean isValidFragment(String fragmentName) {
return UserNameFragment.class.getName().equals(fragmentName) ||
GameSettingsFragment.class.getName().equals(fragmentName) ||
CharacterSettingsFragment.class.getName().equals(fragmentName);
}
public static class UserNameFrag extends PreferenceFragment {
@Override
public void onCreate(Bundle savedInstanceState) {
super.onCreate(savedInstanceState);
PreferenceManager manager = getPreferenceManager();
manager.setSharedPreferencesName("user_prefs");
addPreferencesFromResource(R.xml.personal_settings);
}
}
public static class GameSettingsFrag extends PreferenceFragment {
@Override
public void onCreate(Bundle savedInstanceState) {
super.onCreate(savedInstanceState);
PreferenceManager manager = getPreferenceManager();
manager.setSharedPreferencesName("user_prefs");
addPreferencesFromResource(R.xml.game_settings);
}
}
public static class CharSettingsFrag extends PreferenceFragment {
@Override
public void onCreate(Bundle savedInstanceState) {
super.onCreate(savedInstanceState);
PreferenceManager manager = getPreferenceManager();
manager.setSharedPreferencesName("user_prefs");
addPreferencesFromResource(R.xml.character_settings);
}
}
}
For the sake of clarity, we will show just one of the <PreferenceScreen> files:
<PreferenceScreen xmlns:android="http://schemas.android.com/apk/res/android">
<PreferenceCategory
android:title="Username and Email">
<EditTextPreference
android:key="username"
android:title="Username"
android:summary="This is your ACME Service username"
android:defaultValue="username01"
android:dialogTitle="Enter your ACME Service username:" />
<EditTextPreference
android:key="email"
android:title="Configure Email"
android:summary="Enter your email address"
android:defaultValue="[email protected]" />
</PreferenceCategory>
</PreferenceScreen>
Now that we have implemented our application, we are able to see the differences in how the settings are displayed on single-pane (see Figure 14.4) and two-pane screens (see Figure 14.5).
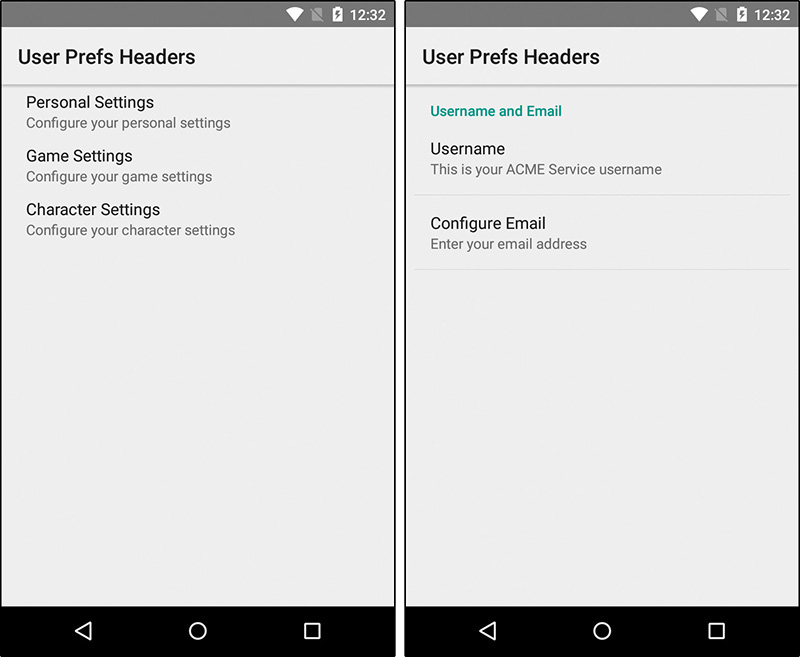
Figure 14.4 Preference headers appear on a small screen as a single-pane layout, showing the headers layout (left) and the settings layout (right).
A headers list displayed on small-screen devices in single-pane mode can be cumbersome to navigate. Instead, it is usually better for smaller-screen devices to present the settings page directly, rather than showing the headers list that groups individual PreferenceScreen items.
Auto Backup for Android Applications
Android Marshmallow introduced a new feature known as Auto Backup for Apps. You can now easily implement a full data backup and restore for your applications that targets Android Marshmallow. This new feature is useful for saving important information for users in case they lose their device, upgrade it, or uninstall and reinstall your application, preserving this important information with very little development effort on your part.
You should consider implementing backup and restore for application preferences. To get your application to backup preference data, you simply add the android:allowBackup attribute set to the value of true and add the android:fullBackupContent attribute to the <application> tag in your Android manifest; then set that value to true or you may even define an XML resource file that specifies the data your application should include or exclude from backup and restore. Setting the allowBackup attribute to false prevents any of your application data from being automatically backed up.
To add the automatic backup functionality to our SimplePreferences application, the <application> tag would look like the following:
<application
android:allowBackup="true"
android:icon="@mipmap/ic_launcher"
android:label="@string/app_name"
android:theme="@style/AppTheme"
android:fullBackupContent="true">
Now, when a user modifies his or her application preferences, your application is capable of backing up the data, which is encrypted and then uploaded to the user’s Google Drive account. Your users may opt out of this feature if they so choose.
Application developers can save a reasonable amount of data (currently 25MB) for their users per Android app with Auto Backup. The data will be backed up every 24 hours, so if your users lose their device or uninstall your application, recovering the data for your users is really easy, as reinstalling will check the users’ Google Drive to see if there is data for your application to restore.
To learn more about the Auto Backup service for configuring what data your application should or should not backup, and for the commands to test out this functionality with the SimplePreferences application, see http://d.android.com/preview/backup/index.html.
Summary
In this chapter, you learned about the variety of different ways to store and manage application data that is available on the Android platform. The method you use depends on what kind of data you need to store. With these skills, you are well on your way to leveraging one of the more powerful and unique features of Android. Use shared preferences to store simple application data, such as strings and numbers, in a persistent manner. You can also use the PreferenceActivity or PreferenceFragment class to simplify the creation of user preference screens within your application that use the standard look and feel of the platform on which your application is running. You learned how to use Preference headers for displaying your application preferences in either a single-pane or two-pane layout. In addition, you learned that you can perform a full data backup and restore for users when your application targets Android Marshmallow and newer.
Quiz Questions
1. What are the different data types supported as preference-setting values?
2. True or false: You use the getPreferences() method to retrieve the private preferences of a specific Activity.
3. What is the directory on the Android file system that stores application Preference XML files?
4. What are the common Preference attributes that most preferences should set?
5. What is the method call for accessing the Preference resource file from within a PreferenceFragment?
6. What is the <application> attribute for configuring Auto Backup for your applications that target Android Marshmallow and future versions?
Exercises
1. Using information gathered from the Android documentation, write a simple code snippet demonstrating how you would configure a preference item to launch an Activity instead of a setting screen.
2. Using the Android documentation, determine the SharedPreferences method call for listening for preference changes.
3. Using the SimpleUserPrefs and UserPrefsHeaders applications, modify the code to display only the <preference-headers> list on large screens in two-pane mode.
http://d.android.com/reference/android/content/SharedPreferences.html
Android SDK Reference regarding the SharedPreferences.Editor interface:
http://d.android.com/reference/android/content/SharedPreferences.Editor.html
Android SDK Reference regarding the PreferenceActivity class:
http://d.android.com/reference/android/preference/PreferenceActivity.html
Android SDK Reference regarding the PreferenceScreen class:
http://d.android.com/reference/android/preference/PreferenceScreen.html
Android SDK Reference regarding the PreferenceCategory class:
http://d.android.com/reference/android/preference/PreferenceCategory.html
Android SDK Reference regarding the Preference class:
http://d.android.com/reference/android/preference/Preference.html
Android SDK Reference regarding the CheckBoxPreference class:
http://d.android.com/reference/android/preference/CheckBoxPreference.html
Android SDK Reference regarding the EditTextPreference class:
http://d.android.com/reference/android/preference/EditTextPreference.html
Android SDK Reference regarding the ListPreference class:
http://d.android.com/reference/android/preference/ListPreference.html
Android Preview regarding Auto Backup for Apps: