
The most robust way to validate a form field in the browser is to write a validation function. You can use validation functions in conjunction with the Constraint Validation API to trigger built-in validation behavior.
But there is a catch, and it is not a small one: The Constraint Validation API has poor support in Apple’s Safari browser.
Despite this oversight, it is important to write code that targets standard behavior and then add a JavaScript library that adds support for noncompliant browsers. (You can read more about this in the section called For the More Curious: The Webshims Library at the end of this chapter.)
Suppose your coffee truck is only for employees of your company, so you want to make sure that the customer is an employee. One way to do this would be to ensure that the email address that is submitted is from your company’s domain.
You could use
a pattern attribute for your emailAddress field.
But this problem is a good one for learning the Constraint Validation API.
(Also, after you work through the next chapter, you could expand
beyond a simple email domain check and query a remote server to find out whether
the email address actually exists.)
Create a new file, scripts/validation.js,
to hold your validation functions. Add a <script> tag in
index.html for your new module.
...
      </div>
    </section>
    <script src="https://cdnjs.cloudflare.com/ajax/libs/jquery/2.1.4/jquery.js"
      charset="utf-8"></script>
    <script src="scripts/validation.js" charset="utf-8"></script>
    <script src="scripts/checklist.js" charset="utf-8"></script>
    <script src="scripts/formhandler.js" charset="utf-8"></script>
    <script src="scripts/datastore.js" charset="utf-8"></script>
    <script src="scripts/truck.js" charset="utf-8"></script>
    <script src="scripts/main.js" charset="utf-8"></script>
  </body>
</html>
Save index.html.
In validation.js, add an IIFE module that creates
an empty object literal, assigns it to a variable named Validation,
and then exports that variable to the App namespace.
(function (window) {
  'use strict';
  var App = window.App || {};

  var Validation = {

  };

  App.Validation = Validation;
  window.App = App;
})(window);
Your new Validation module will only be used
for organizing functions, so it does not need to be a
constructor.
Add a method called isCompanyEmail. This
method will test an email address against a regular expression
and return true or false. (Feel free to change the email domain
specified.)
(function () {
  'use strict';
  var App = window.App || {};

  var Validation = {
    isCompanyEmail: function (email) {
      return /[email protected]$/.test(email);
    }
  };

  App.Validation = Validation;
  window.App = App;
})(window);
You created a literal regular expression by putting a pattern
between the forward slashes, //.
Inside the slashes, you specify a string that consists of one or more characters
(.+), followed by “@bignerdranch.com” – you also
used a backslash to indicate that the period in
bignerdranch.com should be treated as a
literal period. (Normally, a period in a regular
expression is a wildcard that matches any character.)
The “$” at the end of regular expression means that “@bignerdranch.com”
should be at the end of the string – there should be no more
characters that appear after it.
This regular expression is an object and has a
test method. You can pass a string
to the test method, and it will return
a Boolean – true if the regular expression matches
the string and false if not.
(For a list of other regular expression methods, see
developer.mozilla.org/en-US/docs/Web/JavaScript/Reference/Global_Objects/RegExp.)
Test your App.Validation.isCompanyEmail function on the console (Figure 12.3).

You now have a function that can check for valid email addresses. The next thing to do is to connect it to the form.
When should you use this function? There are several events that the input field could trigger while a user is filling out the form. One occurs as the user types each character. Another is when the user removes focus from the field. Or you could run the function when the form is submitted.
The Constraint Validation API requires that invalid fields
be marked prior to submission. If any fields are invalid, the
browser stops short of triggering the submit event. So doing
the check on submit is too late.
The event triggered when the user removes focus from a field is known as a blur
event. It is not
a good choice for validation, either. Suppose the user’s cursor is in
the email input, so that field has focus. If the user then presses
the Return key, this would trigger form submission, but the blur event
would not be triggered and any validation tied to it would not be performed.
So the validation check will need to happen as the user
enters each character.
Update the FormHandler module in
formhandler.js with an
addInputHandler prototype method.
It should add a listener for the input event of the form.
Like the addSubmitHandler method, it should
accept a function argument.
...
  FormHandler.prototype.addSubmitHandler = function (fn) {
    ...
  };

  FormHandler.prototype.addInputHandler = function (fn) {
    console.log('Setting input handler for form');
  };

  App.FormHandler = FormHandler;
  window.App = App;
...
Attach the listener for the input event using jQuery’s
on method. Make sure to use the event
delegation pattern to filter out events created by anything but
the [name="emailAddress"] field.
...
  FormHandler.prototype.addInputHandler = function (fn) {
    console.log('Setting input handler for form');
    this.$formElement.on('input', '[name="emailAddress"]', function (event) {
      // Event handler code will go here
    });
  };

  App.FormHandler = FormHandler;
  window.App = App;
...
Inside the event handler, extract the value of the email field
from the event.target object. Then
console.log the result of running
addInputHandler’s function argument
fn and passing it the value of the email
field.
...
  FormHandler.prototype.addInputHandler = function (fn) {
    console.log('Setting input handler for form');
    this.$formElement.on('input', '[name="emailAddress"]', function (event) {
      // Event handler code will go here
      var emailAddress = event.target.value;
      console.log(fn(emailAddress));
    });
  };

  App.FormHandler = FormHandler;
  window.App = App;
...
Save formhandler.js.
In main.js,
import Validation from the App
namespace and assign it to a local variable.
...
  var Truck = App.Truck;
  var DataStore = App.DataStore;
  var FormHandler = App.FormHandler;
  var Validation = App.Validation;
  var CheckList = App.CheckList;
  var myTruck = new Truck('ncc-1701', new DataStore());
...
With the Validation object imported, you can connect it to FormHandler’s new addInputHandler method.
At the end of main.js, pass Validation.isCompanyEmail to the addInputHandler method of the formHandler instance:
...
  formHandler.addSubmitHandler(function (data) {
    myTruck.createOrder.call(myTruck, data);
    checkList.addRow.call(checkList, data);
  });

  formHandler.addInputHandler(Validation.isCompanyEmail);

})(window);
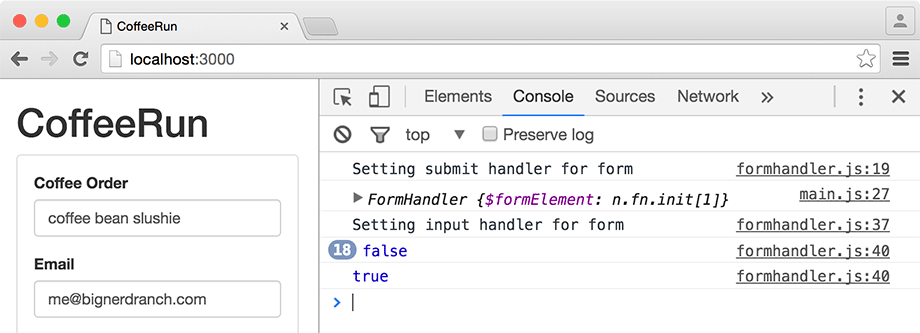
Save and reload. Fill out the email field and see what appears
on the console. As you type a valid email address, the console
will show a number of false results, printed
by the console.log(fn(emailAddress)); line
in FormHandler.prototype.addInputHandler.
When you have finished typing a valid email address,
you will see true printed in the console
(Figure 12.4).
Your validation function is run each time a character is entered (or removed) from the email field. When you have confirmed that it is correctly checking your input, you can use it to show a custom error message.
Now that you can reliably test that the email address is from your company’s domain, you should notify the user if the validation fails. You will use the setCustomValidity method for the event.target to mark it as invalid.
In
formhandler.js, remove the
console.log statement and replace it with a
variable for a warning message and an
if/else clause. If the
fn(emailAddress) call returns
true, clear the custom validity of the field.
If it returns false,
assign the message variable to
a string with the warning message
and set the custom validity
to message.
...
  FormHandler.prototype.addInputHandler = function (fn) {
    console.log('Setting input handler for form');
    this.$formElement.on('input', '[name="emailAddress"]', function (event) {
      var emailAddress = event.target.value;
      console.log(fn(emailAddress));
      var message = '';
      if (fn(emailAddress)) {
        event.target.setCustomValidity('');
      } else {
        message = emailAddress + ' is not an authorized email address!'
        event.target.setCustomValidity(message);
      }
    });
  };
...
You passed in the error message that should be shown to the user. If there is no error, you still have to call setCustomValidity, but with an empty string as the argument. This has the effect of marking the field as valid.
The validation check that occurs as you type only marks the field as valid or invalid. It does not display the error message. When you press the Submit button, the browser checks for invalid fields and displays the validation message if it finds any.
To try it out, submit the form after entering an email address that does not match the domain. Right after you press the Submit button, you should see your custom validation message appear as a warning next to the field (Figure 12.5).
