Section 5: The Need for Speed!
Shooting Ground-to-Air

SNJ-5C Texan Sweet Diane | Shutter Speed: 1/60 sec
Wings Over Wiscasset is very much a small town air show packed with big time fun. Occasionally held in October, in Wiscasset, Maine, the airport is packed with high school bands, hot dog stands, pumpkin pie, and Americana. It’s just a wonderful atmosphere! Whether you’re one of the locals or not, you are instantly brought into the fold, making for a splendid day of fun and excitement. The best part, being a small town airport, is you have intimate access to all the aircraft, whether they are on the ground or in the air, making for great photography—American and aviation. And, the background—it’s that spectacular Maine fall color!
When I was planning our K&M Maine Adventure in the fall of 2011 for the following year, I had no clue that there was a Wings Over Wiscasset. I’m not sure I even knew the town Wiscasset existed back then. I most certainly didn’t know that the Texas Flying Legends Museum (TFLM) often performs at Wings Over Wiscasset. The TFLM was barely a year old in 2011, and it wasn’t until April 2012 that I worked with them for the first time at the Doolittle Raiders Reunion. So, when Bob told me in May of 2012 that when I was in Maine that fall, I needed to make my way to Wiscasset, I was puzzled. He didn’t say that there was an air show, nor that the TFLM would be there; he just said I needed to be in Wiscasset on the 5th. When Bob—a dear friend and my mentor in aviation from the very start, teaching me so much—said be there, I simply said, “Okay.”
With our group from K&M in tow, we arrived at the Wiscasset Municipal Airport at sunrise on the 5th. It just so happened that while our group was there for lighthouses and fall color, they were all into aircraft. With complete access to the TFLM aircraft inside and out, they had a field day shooting! It was pretty darn spectacular with the TFLM aircraft taking off down the strip, and the background’s gorgeous fall color. I’ve never seen another location quite like it. The group had prime seats for all the action, and the day flew by. The new president of TFLM had come over to me and asked if I’d do the TFLM a favor; they wanted to do an air-to-air shoot with the fleet over the Maine coastline at sunset. “Gee,” I said, “I don’t know.” An hour later, we were flying over the Atlantic. My dear friend Kevin, who co-leads K&M Adventures with me, had always wanted to fly a Mustang, and that evening I was able to make that wish come true, as well.

Texas Flying Legends Museum flying over President Bush’s home in Kennebunkport
When we landed, they had one more favor to ask. The Texas Flying Legends Museum has a special relationship with President Bush (41) and had flown a special air show for him at his Kennebunkport home earlier that year. The next morning, they were going to his home at Kennebunkport to present him with a TFLM flight jacket, and they wanted to know if I could go to photograph the presentation of the jacket. It was very much on the QT and I would have to get security clearance—both were no issue for me. I talked it over with Kevin because I was with a group, and we decided we could make it work. The next morning, I sat in the right front seat of the workshop van with a D4S, a 24–70mm, and an SB-900 in my lap, talking with the group. We pulled up to this inn where Kevin stopped the van, and I got out without saying a word. The van made a U-turn, and all I could see were all the wide, quizzical eyes of the group looking at me as they drove off, leaving me behind. Seconds later, a line of four black Suburbans pulled up, I got in, and off I was whisked.
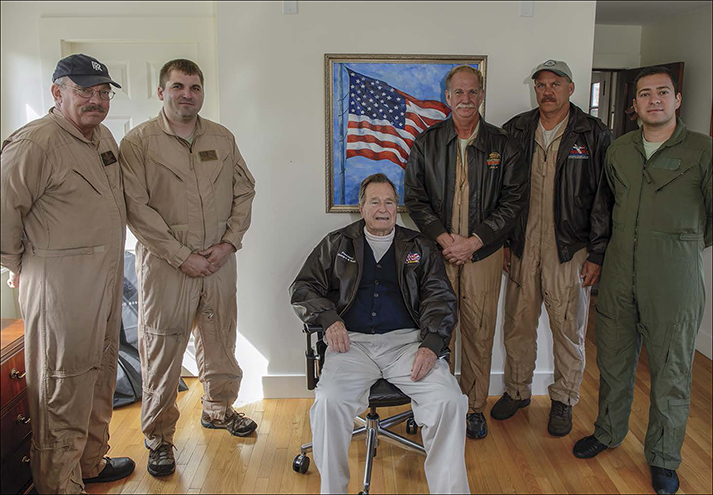
TFLM with President Bush (41) in his Kennebunkport office

© Tyson Voelkel
A special meeting with 41—one I’ll always treasure!
Minutes later, we were in 41’s office at Kennebunkport, making the presentation. The lighting in the office was horrible, with strong southern light streaming in. I bounced the flash off the right wall, made the group shots, and then the individual portraits of each pilot with the president as they walked out of his office. Then, the TFLM president said, “Moose, don’t you want your photo with the president?” And then 41 said, “Of course he does.” After a couple of clicks, I had my photo with 41, and when I looked up, the person who took the photo and my camera had walked out of the office. There I was, all alone with #41. I looked around and said to myself, “Heck, talk to him.” So, we talked for nearly a half hour, a conversation I’ll never forget and will always treasure!
If you look at the group portrait on the previous page, you might notice that the arrangement is a little off. You’ll notice that there is a gap in the group on the left side. This is the missing man portrait that they requested. You see, we had lost Bob—again, my dear friend and mentor, and one of the original TFLM pilots who flew the show at Kennebunkport and who was responsible for my flying with TFLM at Doolittle—a month earlier in a plane tragedy. It’s probably one of the hardest portraits I’ve ever had to make, and it’s one of my most memorable, even though it’s missing the one person responsible for it all. Bob’s last lesson to me was punctuated pretty dramatically and it’s pretty simple: just show up!
What Is Ground-to-Air Photography?
This is not a common phrase in photography, and I have to admit that when this term was first said to me, I thought I would be jumping while shooting. Like most genres of photography, aviation has a few of its own unique terms and this is one of them (and they do love their titles in aviation). You’ve probably already been doing ground-to-air photography, but didn’t know it had a title. It’s really simple: ground-to-air is just the term for photographing planes in flight when you have your feet firmly planted on the ground. The distinction is made because you can also be in the air photographing planes in flight, and that’s called air-to-air. The name for this style of photography arose, I was told, because there are times ground-to-air photos can appear to be air-to-air photos. There are times, because of the angle of the plane to the camera, as well as the proximity of the aircraft, though taken ground-to-air, they appear to have been taken otherwise.
Like we have an official term for photographing planes flying overhead, we also have a very technical and aesthetic set of requirements that go along with it. You could think of this as just as essential for your air show photography as water and sunblock. The goal is not to just get a sharp photo. Many make that sharp photo and think that’s it, often sacrificing the story and romance, which is so important. I wish it was that simple, but there is a lot more to it than just a sharp photo. But, to get there, we have to get that sharp photo first, so here’s a little review with some additional twists:
The Basics—Again!
I’ve been told, more than once, I overemphasize this. Then, in the next breath, I get asked how I get such sharp images. Understand that I give a lot of 24x30” prints to aviators, and the subject must be sharp or you instantly see it in large prints. I can’t emphasize this enough: that technical quality and standard is what will set you apart from other photographers. No matter the brand of camera or the autofocus mode you use, if you don’t give your camera a solid platform on which to operate, you will not have the needed sharpness in your images for success!
As you read in Section 3, there is only one way I know to get a tack sharp image. It’s how I was taught and what I’m passing along to you: proper hand-holding! Again, it starts by grasping the lens with your left hand, palm turned up. It is essential that this awkward-feeling position of your left hand is used all the time, with no exceptions. With your palm facing up, the lens rests in it and gravity forces the camera and lens down into your palm. This bend of the wrist is a must in the technique and can be a strain on the wrist when you’re working with a big piece of glass, like the 200–400 VR II, 200–500 f/5.6, or 500 f/4 VR II, but there’s no way around it; it’s a must!
Quick Brief
Pick up your camera every day and take a couple of clicks of anything at a slow shutter speed. It will improve your photography!
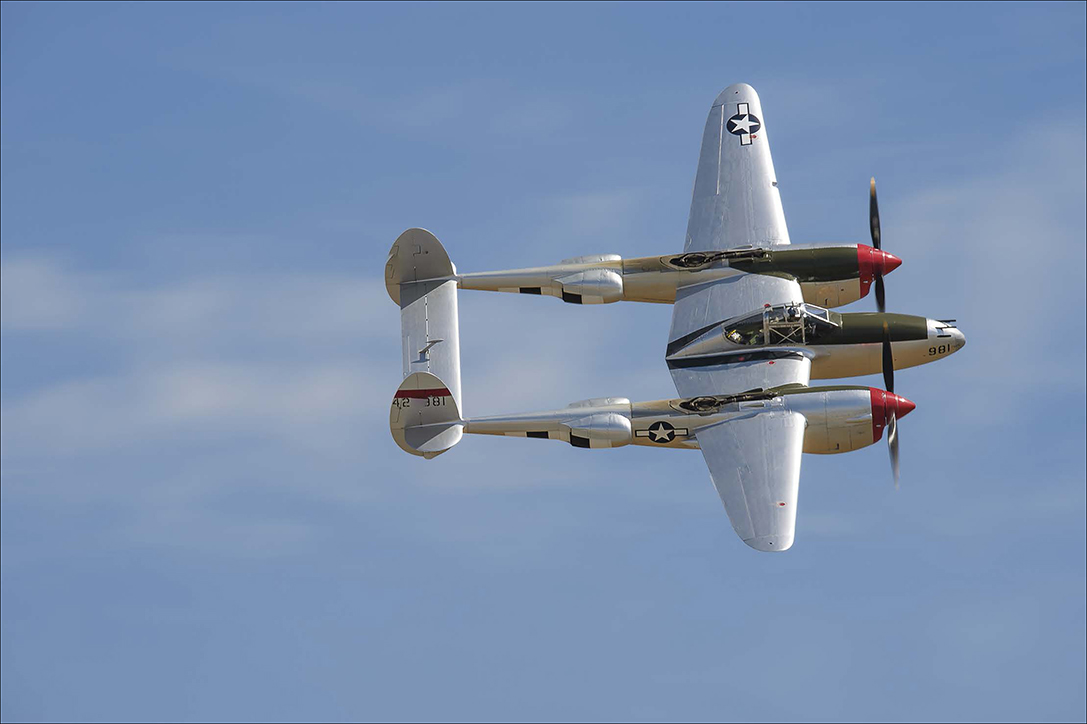
P-38L Lightning
Next, we grasp the camera body with our right hand, tightly. Depending on the size of your hand in comparison to the body, you can wrap your fingers around the body as far as is comfortable in achieving that tight grasp. You need to be comfortable to the point that you can fire the camera without causing any movement in the process. This is why learning to roll your finger to fire the camera is essential. Most photographers “jab” at the shutter release rather than roll their finger, and this creates movement in the camera/lens, which causes images not to be tack sharp.
Then comes my favorite part: bringing your elbows into your sides. It’s my favorite because I get to add to this that some of us have more “sides” than others and that’s a benefit. Lastly, using a rubber eyecup (which is nearly impossible if your wear glasses), press the camera body firmly into your cheek/eye. This completes the three points of contact, providing the camera stability and you the ability to pan while still providing that stability.
Panning is a must in ground-to-air photography! Again, we pan by twisting at the waist, and as we go, the camera goes with us. It is that simple, once you practice it a lot. And, I mean, a lot—all the time! What do you practice? You practice simultaneously twisting at the waist while keeping your AF sensor on the moving subject. This is when you want to be sure you’re using the right autofocus mode, my preference being Auto-area AF (AAA). You want to make sure your camera is set to continuous high firing mode. Making sure you’re using proper hand-holding (which you have been practicing), follow a moving subject in the viewfinder and shoot. Understand that these are the basics you must master! Without these well-ingrained and becoming second nature, you don’t have a platform from which to spring into grander aviation photographs. Because it is from this, we build!

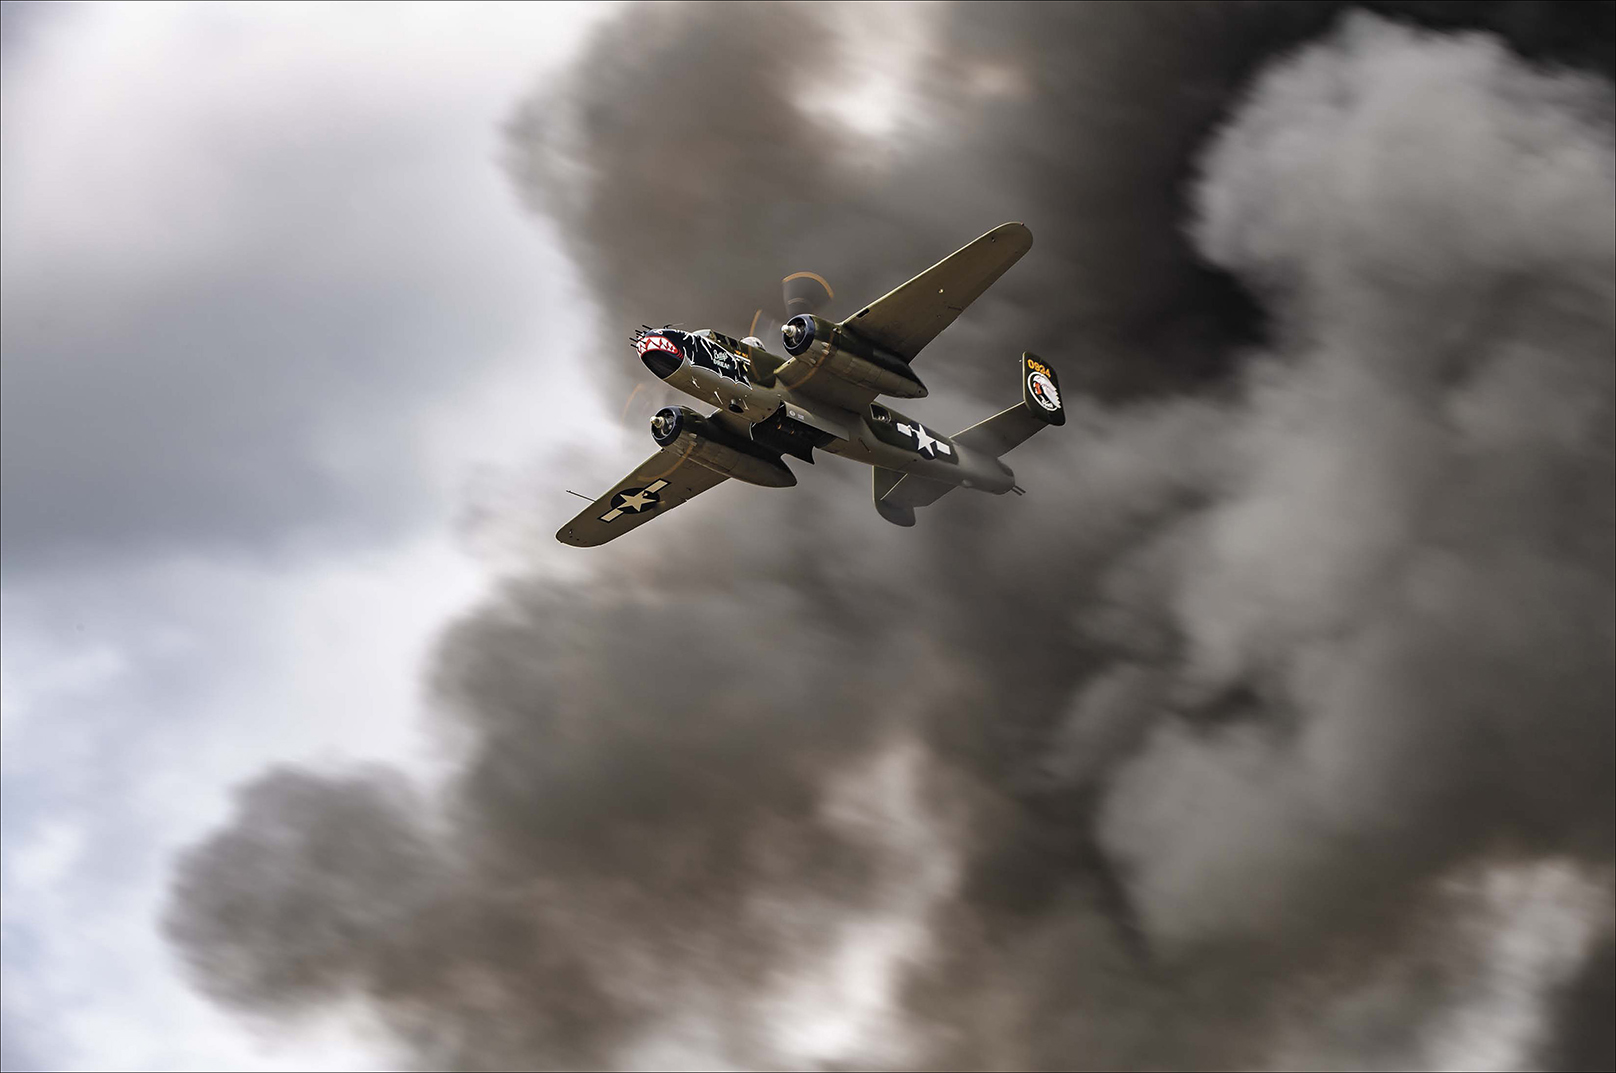
B-25J Betty’s Dream making a bomb run at EAA AirVenture
Quick Brief
You might practice getting the camera up to your eye and ready to shoot, like a gunfighter might have practiced his quick draw. This is an important skill that will save your arm during a long day of shooting!
Focus Basics—Again!
The plane has to be sharp; that’s all there is to it! But, how do you make that happen and happen consistently? You start with the basics of hand-holding and panning, and then you practice, practice, and practice! Nothing impedes progress, nor dampens the soul, like a great image that is not sharp. I will not lie to you, I started out of the gate in aviation with a machine that made this basic, yet essential, task a whole lot easier. I began with the D3 (and now depend on the D5). What makes the difference is their AF system.
For those of you who shoot with a D5, D500, D810, or other current bodies that have this mode, I can recommend this setting to you for all your ground-to-air (and air-to-air) photography. You want to put the camera into Auto-area autofocus mode! This provides you with one giant AF sensor and with “closest subject priority” in the system. With proper hand-holding, smooth panning, and making the most of your camera’s AF system, you can concentrate on those matters that really count in telling that story of flight while shooting ground-to-air. You will have to test and verify what works best for you and your camera for your style of photography. There is no way around this. You have to find what works for you, consistently!
What other settings are part of the focus basics you should be aware of? The firing rate of your camera often kicks the camera into a faster autofocus operation, and shooting in continuous high mode certainly helps. Along with this is AF-C—Continuous-servo AF (autofocus). There are also a number of settings in our Custom Settings menu, like Focus Tracking with Lock-On (mine is set to 2), as well as others that might be a real aid to your focusing. How do you find out what works best for your camera/lens? Get out and shoot! Photograph cars zipping by or test and practice at a small, local airport. Sometimes the answer isn’t obvious, so don’t be surprised if you have to test a number of times.
Quick Brief
Many times, a photographer has come up to me to say the camera isn’t delivering sharp images because of a setting, when in actuality, it’s pilot error (the person behind the camera). Moral: be honest with yourself as to the cause of out-of-focus images, so your photography grows.
This little section would be incomplete if I didn’t define, in some way, what “sharp” is in an aircraft photo. But, we need to step back for a second and define the film plane first. The film plane can be thought of as our sensor in our camera (it actually runs through the sensor in geometry terms). All elements in our photo that are parallel to, and at the same time equal distance from, that plane, will all be sharp (we’re talking geometry and not aircraft planes, here). To put this in relative terms, if the entire aircraft fuselage is parallel to and equal distance from the film plane from nose to tail, then the entire fuselage will be sharp (if it were flat and not rounded). If an aircraft is flying in a straight line, and you photograph it when it is directly in front of you, you could possibly have it sharp from nose to tail. But, more often, the aircraft fuselage will not be perfectly parallel to the film plane all at the same time, so some elements of the fuselage might not be sharp.
You might think that depth of field will help with this, and to a minor extent, it does. But, we have one other factor in aviation you won’t normally encounter complicating this formula and that’s flight altitude. An airplane flies on its longitudinal (roll), lateral (pitch), and vertical (yaw) axes. Any one of these, or a combination of them, takes that fuselage that could be parallel with our film plane and alters it, so certain points of the fuselage are now not parallel to the film plane. The common thing you’ll see in your photos is a tack sharp nose and out-of-focus tail. Or, you’ll see a tack sharp nose and out-of-focus pilot. The first time you see this in your photographs, it will get through to you. And, there is nothing you can do about it because you can’t predict it to correct for it. So, this brings us back to the question, what is the definition of sharp?
Quick Brief
You can vastly increase the autofocusing speed by pre-focusing on an object that will be at the same distance you think your subject will be when it comes time to go click.
For my own photography, the nose and pilot have to be sharp—especially the pilot, as that’s who we ultimately need to make happy. After that, it all depends on what the story is. Wing and tail tip might or might not be tack sharp in my photos. If there are any identification marks on the fuselage behind the wing, if they are large, they need to be sharp. If they are physically small on the fuselage, then not so much. You could say from this there is no right or wrong and you’d be correct. But, with that being said, I have a better or worse for my own images, which I just explained. The harder you are on your own images when it comes to sharpness, the better your photographs will be and the more your photography will grow. This is where that 24x30” print can teach us so much!
“Tips and tails” is a common phrase in aviation photography, and it is part of ground-to-air photography. It refers to our lack of ability to track (pan and focus) the aircraft fast enough, so when we go click, we only get either the nose (tip) or vertical stabilizer (tail) of the aircraft in the frame. The cause is often the speed of our panning not keeping up with the aircraft. The reason our panning is not fast enough is often because we’re trying to acquire focus. This can be a combination of finding the subject in the viewfinder, the camera focusing on the aircraft, or a combination of both. You can avoid this problem when you have the basics down to the subconscious level, and then can make the most of your camera’s AF system. You will still occasionally have tips and tails in your photographs, but they will become a lot fewer the better you get.
Let’s Break with the Norm
Why is horizontal (landscape) the natural way we pan in ground-to-air? There are actually lots of reasons: When planes are flying, they are horizontal, so they naturally and easily fill our viewfinder. Our cameras fit in our hands much more naturally shooting horizontally. Books and magazines are laid out horizontally (in spreads), so it’s the natural way we communicate. Can we take this norm, turn it on its ear, and make it a visual advantage? Can this simple thought actually vastly improve our storytelling while shooting ground-to-air (or air-to-air)? We can go vertical, or some point in between vertical and horizontal, and instantly add drama to our photograph! But, by doing so, we simultaneously complicate the shooting process immensely. Here’s where we start:
Ask I mentioned in Section 3, “level” flight doesn’t mean the aircraft is parallel to the ground. Actually, the majority of the time in level flight, the plane is trimmed, bringing the nose up slightly. If we took a picture of this plane in level flight with our camera parallel to the earth, in the resulting photo, it would appear as if the plane was climbing rather than in level flight. If you want that plane in your photo to appear as though it were in level flight, you need to tilt your camera so that it’s parallel with the plane.

B-17G Flying Fortress
How much do I turn my camera when shooting aircraft? Any point from horizontal to vertical, or simply put, a lot. Turning your camera body is a common and effective method of bringing more drama to the flight of an aircraft. Some call it attitude, I think of it as gesture, but whatever you call it, turning your camera body to accent the flight path works. Hopefully, you’re thinking that this is a lot to keep in mind when shooting ground-to-air. Hand-holding, panning, focus, turning the camera body while placing the elements in the frame where you want them to tell the story—it’s a lot to do at one time!
When it comes to just the shooting process, when we go vertical, we move our shutter release button to a totally awkward place. If you have a camera body that has a built-in vertical firing button, then the problem is solved. If not, then you need to practice your proper hand-holding and panning technique even more to incorporate shooting with that very awkward twist of the wrist. This can be complicated even more because, along with this, you still turn your camera body to match the aircraft just as if you were shooting horizontal.

USAF Thunderbirds F-16 Fighting Falcons
Probably the hardest aspect of shooting vertically is the timing of the shot while panning. When you’re shooting horizontally, you have some time even—if it’s just seconds—to find, track, and follow that plane in the viewfinder. Such is not the case with vertical! When shooting vertically, the aircraft will come in and out of the viewfinder so fast that you’ll end up with lots of tips and tails.

F2G Corsair

FM-2 Wildcat
Quick Brief
Keep a 10-pound weight by your desk and during the day, with your left arm, do a simple 20-curl set with it. It will help you hold that lens all day!
So, how do you get really good at this? There are at least two ways: The first one you already know, and that’s practice. Practice is key to getting fast, smooth, and efficient with your panning. The other is not as obvious until you do it. When you look at most vertical ground-to-air shots, the aircraft are in a bank (how severe, you don’t know because the photographer might have turned the camera body to enhance the banking). This means the aircraft are in a turn, as in making a circle, or what’s often referred to as an orbit, around the photographer. If you want to make the vertical shot or practice making the vertical shot, you have to set yourself up physically to be in the right place to make that shot. So, for example, if you’re at an air show, the location you want to be in is more than likely at one end of the runway and not in the middle. That’s because aircraft will be making their main display pass going straight down the runway, after which they turn and bank to come back down the runway in front of the crowd. You stand there and shoot and shoot and shoot, vertically—the best way to practice. So, vertical is part technical expertise and part being in the right place. After that, the rest of this section applies to vertical shooting just like it does to horizontal.

AT-6 Texans
Lighting Can Be a Real Pickle!
Our light is just as important with ground-to-air photographs as it is with statics or any other photography. But, we have one thing working for us that other photographers don’t. As the planes climb above us in the sky, they change the relationship of the angle of the sun on them in relationship to the camera. While it might be a high-noon shoot at an air show, for example, the change in angle lowers the contrast somewhat and that’s always a plus. We have the same basic lighting patterns in ground-to-air—side, back, and front lighting—and all of them can be just as effective in telling the story and bringing in the romance.

Piper J3C-65 Cub
When you’re shooting ground-to-air, a vast majority of the time you’ll be at an air show or fly-in. This means you really don’t have much control over the aircraft in the air or when and where they fly, and you have to make the most of the light with what aircraft go up. If it’s a bald sky day, just like with statics, you kinda just go for it with a couple of thoughts in the back of your mind.
As the direction of the light changes on the subject, the information you see on the aircraft changes, as well. A high wing, low wing, and bi-wing will all have different shadows—some are pleasant and some just don’t work. You will have to be the judge when it’s time to have the camera to your eye and when not to. Since planes are always moving and making in-flight course corrections, lighting that might be nasty one second, might be perfect the next second. This means the question is not so much when to keep the camera to the eye, but rather keeping it there all the time and learning when to shoot and when not to shoot (your arm muscles will bark at you by the end of a day with this approach).
And, just like with statics, aircraft with a bare metal finish or painted white can really shine anytime in ground-to-air. This is because of the natural reflectivity of their finish. The wings often bounce light into locations on the fuselage that can make for some really cool light. The key is to keep that eye to the viewfinder and when you see the first hint of that reflected light, lay on the shutter release and shoot a burst. Often, the light is fleeting, and if you wait until you see that unique fill light and tell your finger to fire the camera and the camera actually fires, that special moment of light is gone. You can’t forget we are working with moving subjects—really fast moving subjects!

PT-17 Stearmans

PT-17 Stearmans
Another aspect of shooting ground-to-air to think about, especially on bald sky days, is the blue sky itself. Everyone has an idea what color a blue sky should be. The problem is we don’t always capture that blue in our photo! Just changing the lighting pattern on our subject alters the color of the blue sky. This is, in part, because of exposure in combination with how the air particles bounce the directional light back at us. You could have other factors changing the shade of the blue sky, like dust, smog or fog content, or smoke from performers, as well, all of which alone or combined can alter how you see that blue. So, if bald skies weren’t enough of an issue, we have the quality or shade of blue to contend with.
Direction of light plays a part in our photograph when we replace all that blue sky with some clouds. Clouds, or God scrims, by their very nature, diffuse the light and that can be a benefit to us. It lessens the shadows and that can be very pleasing. At the same time, that lessening of the shadows, when we have highly reflective aircraft, make them seem less shiny and that’s not a good thing. These are some of the hoops we have to jump through and think about when our subjects take to the air because it will never be the same twice.
Quick Brief
Want bluer skies? Underexpose an extra 1/3 of a stop.

Piper J3C-65 Cub

F2G-2 Super Corsair
Front and side lighting are by far the preferred lighting patterns in photography. This is, in part, because it’s the easiest for us to work in, with the range of light often being the lowest. And, I admit, these are the lighting patterns I preferred for all my shooting, and so it was with aviation until...until I was taught by the best that this is not the case.
We were in the air, doing the first air-to-air with the #74 F2G-2 Super Corsair, with Bob Odegaard at the stick, and we were flying out to where we were going to shoot the majority of the images. In the direction we were heading, the F2G-2 was backlit and shooting into the sun was a no-win situation, unless you had Bob Odegaard at the stick. He flew so he saw the shadow of the Super Corsair cast on me in the A36 Bonanza. When he did that, he blocked the sun, making photography possible. Simply brilliant! After that experience and seeing the final results, I actually look for backlit opportunities—with aviation, that is.
When you shoot backlit airborne aircraft, your percentage of keepers drops dramatically. This is for many reasons, the main one being simply, you have a black outline of your subject a lot of the time. There are times in your panning that, as the sun is rising or setting, it will simply blast right down your lens barrel and there really is no way of planning for this, unless you’re working directly with the pilot and asking them to cast a shadow on you. Since they are busy taking off or landing, I wouldn’t recommend this. This means then, you plan for the worst and hope for the best.
Here’s an example of one that worked out: We were at Stearman Field, in Benton, KS, which is this great hometown airport. Stearman Field has both grass and blacktop runways, which makes for some cool photo ops. You also can be right on the field and take great shots with just a 70–200mm lens. And, the folks and aircraft are simply the best! The only drawback is the event is held in the middle of summer, so it’s hot—really hot—and I’m not talking about air temps either! The light, for 98% of the day, is just pounding, overhead, hard light! Because of that, I focused on photography during those late, dusk hours. Being a small strip, with huge small town support, planes are flying until the last drop of light is left in the sky.

PT-17 Stearman

Piper J3C-65 Cub
This cute little Piper J3C-65 Cub was selling rides, so it was constantly taking off and landing all day. Its paint was great, perfect for the era of the aircraft, as well as photography. I had practiced on its flight path all day while waiting for sunset. I had one image in mind, just off the ground, only the grass strip below and trees in the background. The problem was there were only one or two clicks of this scenario possible with each pass. On either side were hangars and homes, so I simply watched its pattern and planned my shot.
Once I got the one shot I wanted, I kept thinking about the opportunity and wondering what if I wanted to use that cute outline of a plane, with its great paint scheme, and push the photograph further? Waiting until the sun was down and actually in the frame, I planned my pan. I knew if I got the shot, it would be mostly color and black shapes, but I went for it. I actually like the final result, although I know I can do better, but it just proves that when you go to where you are not comfortable photographically and experiment, you can find results you not only like but also want to take further.
Background—More Important Than Ever!
When it comes to backgrounds, just because our subjects have taken to the air doesn’t mean our job as photographer, storyteller, has gotten any easier. It hasn’t, and in fact, it’s more complicated than ever because we have lost a certain amount of control. Again, the subject is constantly moving and no matter what, the aircraft will never be exactly in the same place twice. I have no idea how many times I’ve seen the perfect background go screaming by in the viewfinder and wishing I’d have it again, knowing I never will. That’s all part of ground-to-air photography!
What kind of backgrounds do we ideally want? Anything but solid gray skies because they are just a really low, low percentage situation. In wildlife photography, there is only one rule I ever follow: when you have gray skies, never photograph a bird in flight. This is because the exposure range and direction of light makes it a no-win situation. At the same time, what is the general mental and emotional response to gray skies? Depressing! So, when we eliminate solid gray skies from our background options, we only improve our ground-to-air photography.
We have a number of options to improve our backgrounds by our own actions. The key is to be what pilots always stress: situationally aware! This means you are always aware of your surroundings, keeping your eyes open from your feet to above your head, left, right, front, and back. Pilots do this for safety reasons. As photographers, we do this for safety, as well as photographic opportunities, and in this case, looking for that great background. Here are a number of examples to keep your eye open for when you’re shooting:

C-47 Skytrain
This C-47 is about to launch, in not particularly great light, but it presents an opportunity if you think about the background. Known as a Gooney Bird, this C-47 is a WWII vet, and we can make the best of the light by blurring that background with a slow shutter speed and solid panning. The darkness of the mountain in the background helps make the C-47 pop in the frame, and the shadow on the ground instantly tells you the plane is taking off. When you add up all those “technics” into one frame, you make a clean shot in otherwise not ideal conditions, and it’s all because of the background we take advantage of.
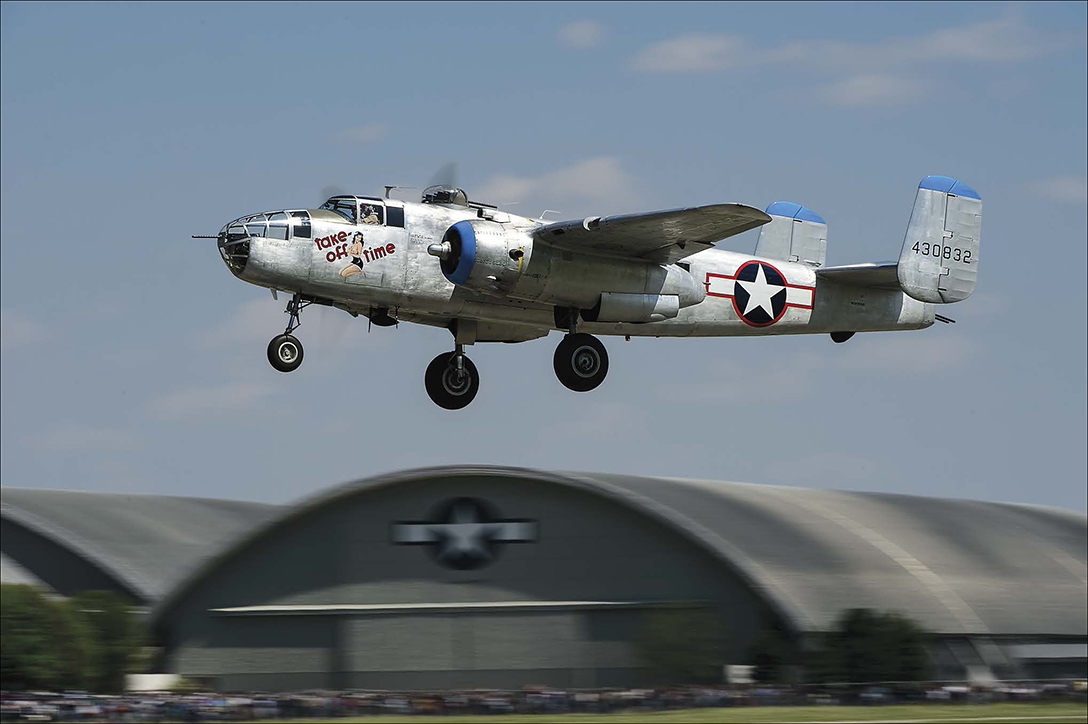
B-25J Take-Off Time
There are times when the background is important in showing place and time. You often know the challenge of this need in your visual storytelling long before you are taking the photograph, but that doesn’t always make it any easier. When wanting to relate the background to an event with a moving aircraft, you have to think through the math very carefully. The B-25J shot is a prime example of such a need and planning the background to tell the story: During the 2012 Doolittle Raiders Reunion at Wright-Patterson AFB, the gathered B-25s were going to be taking off one at a time for the overhead formation flight. To say the location, Wright-Patterson, in the photograph, we needed the distinctive National Museum of the U.S. Air Force hangars in the background. At the same time, we needed to be in the right place, so the B-25s would be at the right altitude when they took off to have the plane and hangar in the photograph. Talking with the pilot of one of the B-25s, we knew the approximate spot on the runway where they would lift off. From there, we figured out where we wanted to physically be to get the shot, all based on the background and story to be told.
Flying, for nearly all pilots, is a thrill and joy to simply be free of terra firma. They fly just for the sheer passion of flight, and it’s something you can find at any small airstrip around the world. Talking visually about this fun of flight requires a background that expresses that joy. What kind of background is that? For this Piper J3C-65 Cub, I chose ordinary countryside with no signs of humanity, just rolling hills that seem to go on and on. What you see here is the same plane, in the same setting/background, but with two different types of light to demonstrate how, with that background and with panning, we can say the same thing but in two distinctive ways. The point: nothing is carved in stone because the story is always up to you, the photographer!

Piper J3C-65 Cub

Piper J3C-65 Cub
That background is the stage in which you are placing that actor in your production. Never forget that, because the background creates the stage where the actor will tell his story. With ground-to-air photography, that story can vary vastly if you keep your eyes open and imagination running wild. As you might imagine, this is just the tip of the iceberg of possibilities!
Clouds and Smoke
Like so many times in my career, I was very fortunate to learn an important lesson in the very beginning, working with aircraft. They call me Mr. Clouds for a reason, but in the beginning, it wasn’t for my aviation photography, it was for my landscapes. Lucky for me, at my first Pylon Racing Seminar in Reno, we had some amazing clouds one afternoon. We were at inner Pylon 4, where the T-6 class comes screaming toward the pylon in a long straightaway prior to making the turn around the pylon. In the afternoon, the T-6 are beautifully frontlit, and in this particular instance, #33 of Buehn Air Racing was coming toward us. That bright yellow paint scheme of the AT-6 against the blue and speckled cloudy sky was simply gorgeous. Because of the background, I zoomed out to take in more sky and less plane. The color contrast made the AT-6 pop out and the background provided a romantic sweep you couldn’t even paint. The response of those seeing that image has always stuck in my mind. So now, Mr. Clouds encompasses my aviation photography, as well as my landscape photography.

P-40K Warhawk Aleutian Tiger
Clouds can be great or simply do nothing for you, depending on how you incorporate them for a background. As we’ve covered, solid gray skies aren’t so good, and solid blue skies aren’t that much better either, but anywhere in between, and the sky’s the limit. Making the most of clouds depends upon the direction of the light, the aircraft, and the story you want to tell. For example, the Texas Flying Legends Museum’s P-40K Aleutian Tiger looks like it’s screamin’ down to make a strafing run because of the slight out-of-focus clouds in the background. Power, ferocity, and attitude speak loudly because of those clouds. Take away the clouds in the background and all you have is a plane flying past.

N-9MB flying wing

N-9MB flying wing
We can change our story with a change in the clouds and the aircraft. With the pattern and shape of the clouds, this photo (at the top) of this amazing N-9MB flying wing is a prime example. The cloud’s shape in the bottom photo mimics the shape of the flying wing while pointing to the direction of flight. You can’t plan on having such clouds for a background. Watching the entire flight path of the N-9MB as it makes the circuit, the background clouds change, as does the profile of the flying wing. Both work together, again, to speak about the flying wing’s shape and light. And, again, if you remove the clouds in either photograph, what kind of photograph have you got left to tell the unique story of this aircraft?

Modified PT-17 Stearman The Ghost
We can’t always count on nature bringing us the clouds when we need them. When you’re at an air show, though, sometimes the next best thing appears: air show performers often use smoke. They do this to bring an additional dimension to their performance, so the imagination can draw a line between the performance and the aircraft doing the performance. Against any sky, this smoke is a great asset we can tap in our photographs.
Is there a trick to working with smoke for a background? First and foremost is to use it as a leading line that takes the eye to the aircraft making the smoke. This might seem obvious and it is, until you put that camera to your eye. This is when turning your camera body to accentuate that line is essential. Doing this gives your image a drama that can be hard to add to your photograph any other way. When including smoke, you might think about having more smoke and less aircraft. The aircraft can be physically smaller in the frame, as the smoke takes the eye right to it, and the smoke trail a more romantic gesture. The examples of smoke making an otherwise boring image one-of-a-kind are endless. Since I love speed in my photographs, the modified Stearman (on page 114) racing down the runway toward me is accentuated by the smoke trail.
B-25J Betty’s Dream
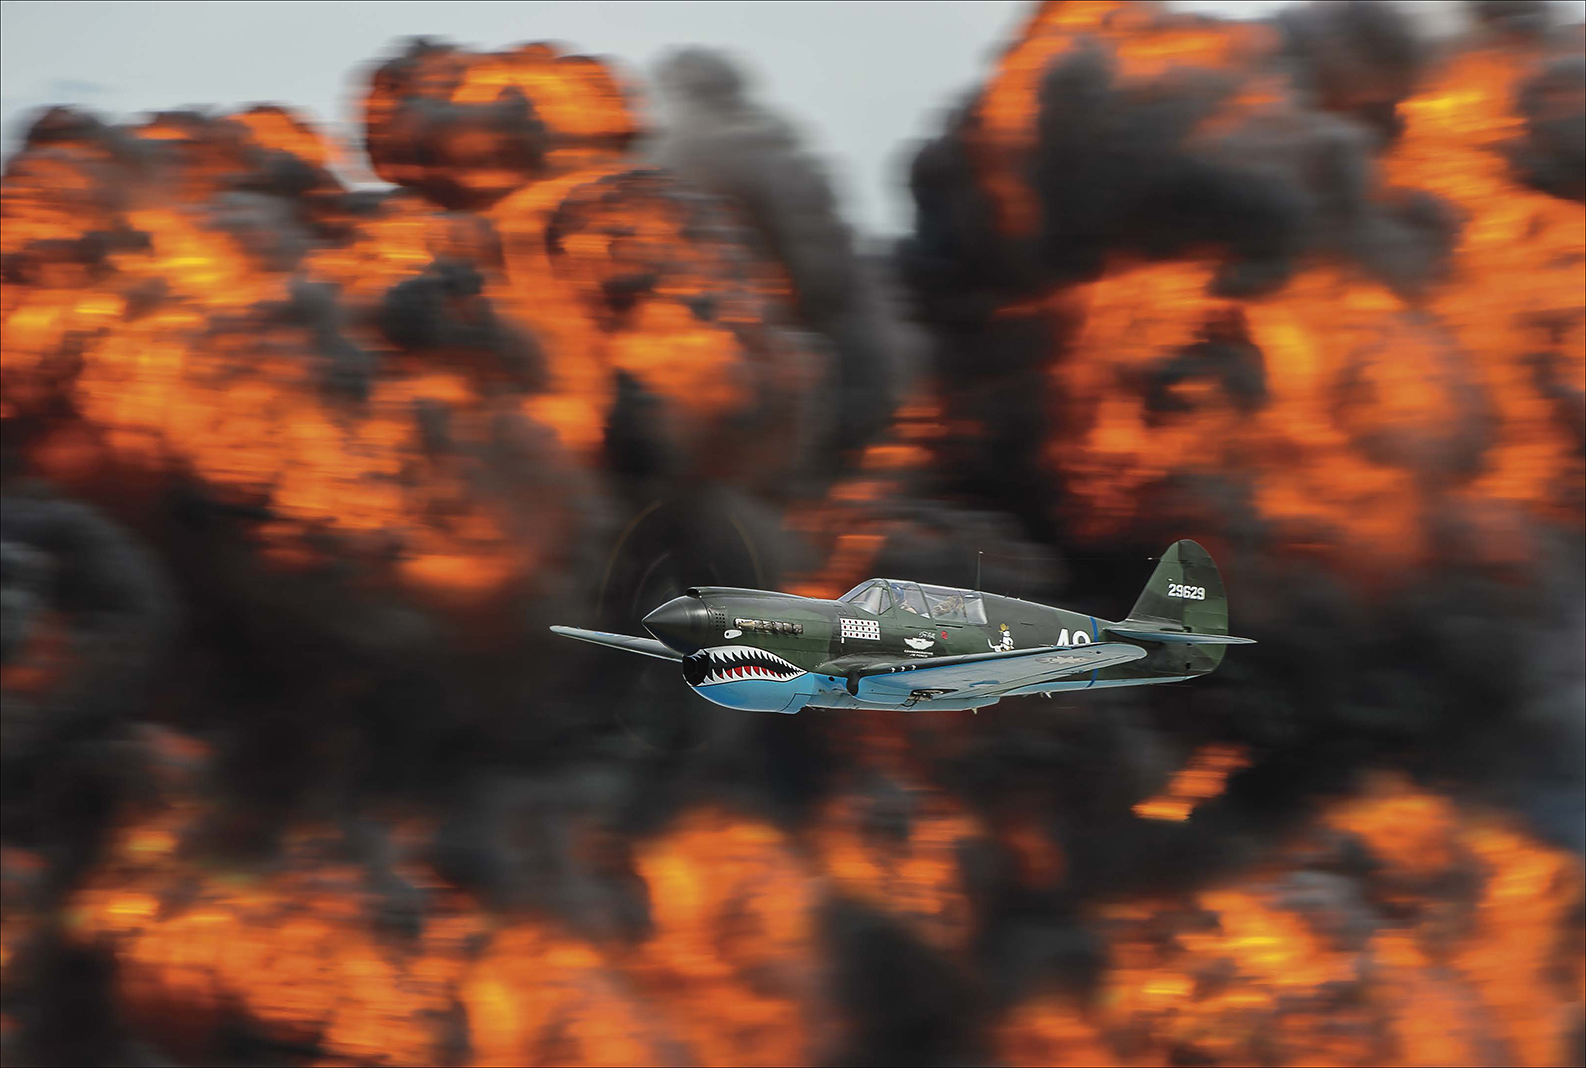
P-40 Warhawk in the Commemorative Air Force’s “Tora! Tora! Tora!” re-creation
As the number of performers continues during a show, the smoke can tend to pile up in the air, changing the skies. On a calm day, the smoke can actually end up being a real photograph killer. But often, we can use it as a means of bringing more drama to the background. Just changing up how much of the aircraft is hidden or revealed flying through the smoke is a simple and effective way of accomplishing this. Performers often use the smoke to create a backdrop for their performance. One of the giant crowd pleasers for doing this is the Commemorative Air Force’s famous “Tora! Tora! Tora!” re-creation. They use pyro to near perfection in their performance, giving us the sound, smell, and sight of battle. They finish their act with what they call the “Wall of Fire,” which just as the name suggests, is a couple-hundred-yard wall of flames that ignites in the same thumping heartbeat. Even with the length, and even with knowing it is going to go off, getting one of the aircraft in front of that wall of fire at the right moment takes a bit of luck. I tried for a while to get “the” shot, and then one time I did. And, you know what? Ever since, I’ve not had the luck again.

Royal Canadian Air Force Snowbirds

Royal Canadian Air Force Snowbirds

Team AeroDynamix
And, this entire time, while you’re working the background, keep in mind you’ve still gotta do that photography thing. How do you expose for those clouds to bring out the drama? How big in the frame does the aircraft need to be or not be, so it is visible and tells the story? Do you need to be in shutter priority or aperture priority? What elements should you include and which ones should you exclude? How do you bring romance into your photograph? While clouds and smoke might make answering these questions easier, you’ve still gotta answer them all for your photographs to be successful.
Illusion of Speed
Can the background do more for us than set the stage? Can it give a sense of place, time, purpose, and speed? I think it can, but we have to start thinking about it and then applying that thought. We’re still working with a subject that moves really, really fast and communicating that with a still image is our challenge. We not only want to communicate that speed, but at the same time, enhance it in our still image. We can do that with the choice of the right backgrounds.
We touched upon this earlier in Section 3 with statics, but now we need to incorporate it into our ground-to-air photography. The easiest and most obvious is putting a background with our aircraft. The EA-6B Prowler photograph is a classic example of this principle. This one, taking off from Nellis AFB is tack sharp—the Prowler, that is. Being a jet, aperture priority might be the obvious selection, especially since all I had been photographing all day were jets. I was in aperture priority as the aircraft were launching, but wanted the background blurred to communicate speed, so I closed the aperture down to f/22 to give me the slowest possible shutter speed for the light on the scene. Between the foreground elements and the background, the Prowler looks like it’s screaming out of there!

F7F Tigercat

Royal Canadian Air Force Snowbirds
Quick Brief
Smoke can leave a color cast you don’t like, but that can easily be removed in post.
And, while the Howard 500 (on the next page) is an incredibly fast aircraft, in a still photograph, where its motion is frozen, we must ask how we are going to say, “as fast as a bat out of hell.” Shooting at a slow shutter speed provided the answer in two important ways: The first is the background is blurred to some extent. It’s not super-blurred because of the physical distance of the background behind the Howard 500, but that slow shutter speed (1/40) created what are called full disks—the blurred rotation of the props. Those full disks say, “screamin’,” and speak of speed in travel in a still photograph better than any other method. But, by combining background and prop blur, you’re reaching out and talking to the viewer of your photograph about this aircraft—the romance of flight!
The more elements you can add to the photograph to communicate speed, the more powerful your image will be. The slower the shutter speed you can pan at while capturing a sharp image, the more blurred the elements will be. This combination is hard to beat in your aviation photography. It sets the viewer’s imagination loose and there is no limit to that. Once you’ve unlocked this, you are well on your way to bringing out the romance in your photography.

Great Lakes Biplane

EA-6B Prowler

Howard 500
Takeoff and Landing
Is there an easy, predictive way of saying speed and flight in your aviation ground-to-air photography? Yes, there is, and it’s a great place to practice and grow. When aircraft are taking off (launching) and landing (recovery), they are in a predictable place, pattern, and speed nearly every time on any given day. This flight path permits you to pre-visualize the background, get your settings set, know where you should be, and learn the repetition to shoot it over and over again (until you get the shot you want?). Here are some examples of what I’m talking about:
The B-25s were landing at Grimes Field in preparation for the Doolittle Raiders Reunion. Access was simply the patio of the diner. We stood there shooting with the 200–400 VR as the B-25s got into the pattern and made their approach. The skies had just enough definition in them to make them interesting. The best part was since they were landing, they were going slower, and on the same straight shot into the runway—easy panning.

PT-17 Stearman
All aircraft prior to launch need to warm up their engines, check mags, and perform other preflight checks. Often, they are temporarily parked at the warm-up area on the ramp. Finding where they are and gaining access is a great way of shooting! In this case, FIFI, a magnificent B-29, had made a stop at a field in Arizona, so we flew over and spent a little time with her. Having flown over, I was on the ramp and was able to take a knee to photograph her while she warmed up before flight. Shooting with a slow shutter speed was a must, otherwise she would have looked like she had frozen props, as she was just parked and not getting ready to launch.
You have to use a really slow shutter speed with these “older” planes. This replica Caudron G.III can be found at the Old Rhinebeck Aerodrome in New York. This is a marvelous place to shoot takeoffs and landings because you are literally right next to the grass strip! The background is perfect, as well, on the north end. The camera was at 1/50 for this photo, but slower would have been better. The one commonality with takeoff photos is that the subject is centered. This is, in part, because we tend to be “out front” of the aircraft, so we see across the entire wingspan. We have a nearly three-dimensional view, and that causes us to put the aircraft centered in our frame.

B-29 FIFI

B-25 Show Me
You can tell the story of an aircraft’s launch in many ways, in one or more frames. If you don’t know what to do or what’s coming next, shoot it all! On the next page is a perfect example from Duxford Aerodrome, in Cambridgeshire, England. It was my first time there, and this was the first launch we’d seen there. The Dragon Rapide sells rides, so it is taking off and landing quite frequently. The first time, though, I had no clue, so I just started to shoot when I saw the shot. They had a long taxi, so by the time they reached the end of the grass strip, they were warmed up and ready to launch. They simply turned into the wind and launched. In situations like this, when you don’t know the field and when it’s a large field, you want to shoot all the opportunities.
What focal length lens do you need to make the shot? This can be a challenge, especially when just starting out. That’s why a zoom can be such a great tool. On page 125, the 70–200mm worked perfectly as #57 F2G-1 Super Corsair came down the runway. When at the far end of the runway, you’re going to be at 200mm, for example. As the Super Corsair begins to roll and gets closer, do you zoom to keep the same subject size or do you let it fill the viewfinder? This is a common question that will go through your mind. Personally, if an aircraft is launching into the light like you see here, I crank the shutter speed slower and let it fill up the frame as much as possible. I want you to feel the corncob engine throb in the photo!

Caudron G.III
There are times you can work with a plane owner at a private airport, and that makes all sorts of things possible that otherwise are not. Here is a prime example: the rare Morane-Saulnier MS.230 that flew in the movie, The Blue Max. Now back in France, it was in Florida after being refitted with its very rare engine when I was able to spend a day with it. Being a private field, I was able to lie on the grass for the launch. You’ve gotta talk with the pilot before doing this because he couldn’t see me once I was lying down. But, from that angle, I take you right back to WWI, and this aircraft launching from grass strips.
There is a point when a plane takes off, just after getting past the “ground effect,” where while the plane is still climbing, it levels off for just a second. The moment between these two can be a very cool photograph. This Porterfield 65 taking off from the grass strip at the Blakesburg Fly-In is a great example of that. It only has a 65-hp engine, so it’s not going fast, but by using a slow shutter speed, the proximity of the background, and this moment in flight, it appears to be just hanging there while going really fast.

Dragon Rapide

Dragon Rapide
Recovery has its great moments, just like launching, but they are fewer and happen a whole lot quicker. For example, the planes don’t need to warm up, so they just appear and land; there is no real warning or prep time. You can watch the windsock and see the direction the wind is blowing, but that is your only hint at what direction they will land. Lastly, the precise spot where they will touch down can vary, so being “Johnny on the spot” can be a challenge. Your best bet is to catch them just before they touch down. This photo of a Harvard was made from a unique vantage point, from above it, shooting down on it landing. Where on a takeoff, you can shoot warm-up, launch, and going around, with landing, you have just this one shot. But, if you plan your angle and shutter speed, it’s a great shot.

#57 FG2-1 Super Corsair

Porterfield 65

Morane-Saulnier MS.230

Canadian Harvard
There is one thing you can almost always count on with recovery: the aircraft will turn off the runway and take a taxiway back to where it parks. That location on the runway, where they make their turn, can be influenced by number of factors. But, if you have access to a field, you will surely have talked to a pilot, and you can coordinate to get this shot. In this case, the TBM Avenger was landing and slowing to make the turn where we were standing. Standing in the drainage ditch along the side of the runway, we were physically lower, so I was able to shoot up on the TBM. The combination of recovery and low angle (along with the clouds in the background) make a simple, yet clean shot.
One thing you need to be aware of is that for prop aircraft, the engine RPMs will be faster on takeoff and slower on landing. That directly affects the shutter speed you might want to select and prop blur you want. If launching or recovery happens into the sun, you want a slower shutter speed, and if not, you can use a faster one. Also, keep in mind that landing gear might or might not be extended. I personally like this variety in photos, which is why I work at getting these shots.
Quick Brief
One of the easiest ways to improve your ground-to-air images is to simply move! Photographers tend to plant in the first place they stop to shoot. Move—it can make a difference!

TBM Avenger
When aircraft are launching, you’ve gotta pan knowing that, once the wheels are off the ground, the aircraft goes faster! This means, if you have a smooth pan, at some point, the plane will leave your viewfinder. You’ll have to speed up your pan, and doing this smoothly takes practice. You might notice during launch and recovery that you often run up against the camera buffer, as you’ll shoot a lot! By the time the aircraft has wheels just leaving the runway (a really cool shot), buffers are often just about full. So, when you get the aircraft off the ground with a really blurred background, the buffer is full. With practice and a little self-restraint, you’ll be able to really work this scenario.
The one thing you often have to watch with takeoffs is the background. I can’t encourage you enough to not get set in one place and be satisfied. Before aircraft are launching, head to the end of the runway where they are taking off and shoot! No matter if there are no aircraft, just pan and shoot, then chimp and look at the results. You will instantly see background elements you want to make sure you avoid.
Landings are different for many reasons: First, your buffer is rarely full and, most likely, empty. Next, the aircraft is in the air to start with, providing you with fewer photographic opportunities in the beginning, and then a ton of them in a last second of panic because they close in to the runway quickly, and then are down. Then, there is their angle of approach. The glide slope on landings tends to give you more time with backgrounds that blur really nicely with slower shutter speeds. On takeoff, planes pop right up, but on landings, they might fly down the runway a few hundred yards while just above the runway prior to setting down.
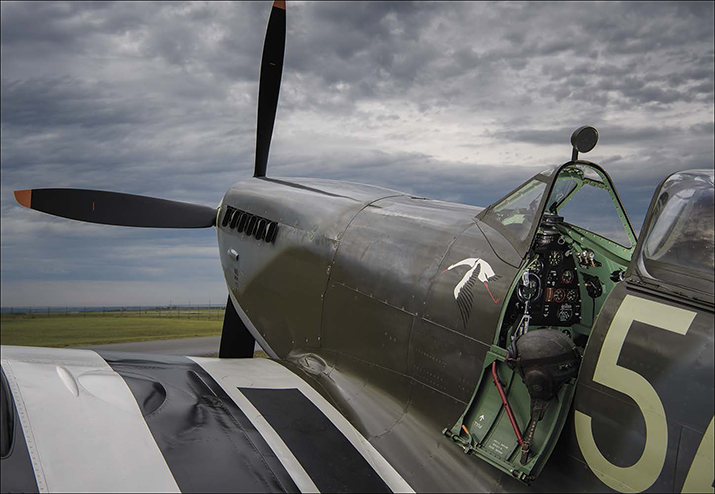
Spitfire Mk. IX
Your shutter speed on landing, though, tends to be a stop or two slower than on takeoff to get some nice prop blur. And, this is only good for a few frames until the aircraft is parallel with you while going down the runway. But, that slower shutter speed translates to greater blurred backgrounds. Backgrounds are still a concern, and there are times when they are just bad. That’s when I get really tight on an aircraft to minimize the background and focus in more on the pilot.
Often on landings, pilots will have their canopy open, which makes for a great photo op. Those cockpits get really hot, really fast, so they get opened for that reason. Combining this human aspect of flight, along with a great blurred background, makes for a great photograph!
Hollywood Effect—Long Lens Compression
A really old technique employed by Hollywood can be used with great success in our ground-to-air photography. The concept is simple: shoot with a really long lens and take advantage of long lens compression to make objects appear closer than they are. The classic example is the car chase scene, where it appears the car in the back is right on top of the car it’s chasing. The two cars seem to be linked, bumper-to-bumper, when in reality, they are quite a distance apart. By shooting with a 1200mm lens, Hollywood can make “movie magic” by putting the cars bumper-to-bumper. We can do the same thing. This shot of the A-4 Skyhawk and F-86 Sabre below is a prime example. Yeah, they were flying in formation, but by shooting with a 200–400mm lens at 400mm, with a 1.7x teleconverter (or 580mm), they look like they are nearly on top of each other.
Another example is making the viewers of your photograph feel like the plane is right on top of them. Standing at the end the runway, this taxiing B-25 conveys the feeling that it’s bearing down on you. This feeling comes from shooting with a 200–400mm lens with a 1.4x teleconverter (or 520mm) and shooting from the knee. Yep, getting down on one knee and shooting up gives the B-25 greater stature and, at the same time, minimizes the background. When shooting on one knee, keep in mind your ability to pan is limited. You don’t have as much swing when rooted to the ground this way. All of this adds up to extra drama and romance.

A-4 Skyhawk and F-86 Sabre

B-25 Pacific Prowler
Quick Brief
This technique requires a solid long-lens technique. Rest the lens barrel in your left hand, press your eye against the eyecup, roll your finger, and pan smoothly. Like everything else, practice makes perfect!
You can use this technique to put the viewer in the cockpit. Especially at air shows, on the crowd line, you can be directly behind an aircraft when it starts its engine. You want to instantly turn your camera vertically and slow down your shutter speed to at least 1/60. Get really tight on the aircraft, so you basically just see the vertical stabilizer and right into the cockpit (check out the shot on the next page). While the plane won’t “feel” as large in the frame, you are right there in the cockpit with the pilot.
Here’s the extreme to this technique, which I really find works like magic: There are times at an air show, for example, when you find yourself running from end to end to end and back for the twentieth time, and you can run no more, the clock has run out. The long lens can help make up for those times when you physically can’t get in place. In 2011, I started to shoot with a 600mm with a 1.4x teleconverter (or 840mm) when I couldn’t get in place with the time I had. Now, shooting with this big of a rig for an hour or two requires a tripod, which at Reno, you just don’t see—you’re simply panning too fast to use a tripod, and you can’t move around a tripod fast enough. That still holds true, but I just changed up shooting habits to make this work because, otherwise, I wouldn’t be able to shoot at all.
What did I change up? To make the 840mm work, I had to “slow down” the panning. It was done by finding a location where the aircraft would “fly” down the lens barrel, and then move off in a bank, limiting how much the lens had to be swung to get the shot. In this case, the aircraft were coming down the Valley of Speed to Pylon 8, and then rounding Pylon 8 toward Home Pylon. We’re physically some distance from Pylon 8 (like a half mile), and we had quite a bit of lead time to follow the aircraft in the viewfinder. They were pretty small at first, and then got really big, really fast. The amount of panning that was actually done was not more than a 15-to-20- degree swing, nothing compared to the normal 90-to-160-degree swing when hand-holding.

F4U-1 Corsair
After taking care of the technical, we need to add in the romance. Never forget that once you have all the basics down, that you need to finish the photograph to bring the viewer in to tell the story. To accentuate the bank around Pylon 8, the camera was turned vertically. Yes, this complicates the whole shooting process, but the final results are worth it. Because I was shooting with 840mm, it didn’t take much panning to blur the background to communicate speed, and with little light on the props, shot at 1/125 to work those elements, while providing some shutter speed to make up for working on a tripod. Finally, the final shot is nice and tight to put the viewer in that bank.
This Will Only Help You If...
Getting the viewer of your photographs involved in your aviation photography requires that you go beyond just a properly exposed, sharp image. When aircraft take to the air, many think our job has been made easier when the opposite is true. The storytelling might be more obvious, thus easier to communicate, but you need to go beyond that. You need to communicate speed, flight, attitude, agility, and pilot skills, all while bringing motion to your still image. You can only do this with practice, practice, practice! This means that the first time you go out, the odds are against you in making that gorgeous shot. Don’t let that slow you down for a second! Every time you go out, no matter how many times you’ve been before, you improve, which means you will always be taking better photographs.

P-51C Mustang Boise Bee