
The top-right area of the toolbar is reserved for the toolbar’s menu. The menu consists of action items (sometimes also referred to as menu items), which can perform an action on the current screen or on the app as a whole. You will add an action item to allow the user to create a new crime.
Your menu will require a few string resources. Add them to strings.xml (Listing 13.3) now. These strings may seem mysterious at this point, but it is good to get them taken care of. When you need them later, they will already be in place, and you will not have to stop what you are doing to add them.
Listing 13.3 Adding strings for menus (res/values/strings.xml)
<resources>
    ...
    <string name="date_picker_title">Date of crime:</string>
    <string name="new_crime">New Crime</string>
    <string name="show_subtitle">Show Subtitle</string>
    <string name="hide_subtitle">Hide Subtitle</string>
    <string name="subtitle_format">%1$d crimes</string>

</resources>
Menus are a type of resource similar to layouts. You create an XML description of a menu and place the file in the res/menu directory of your project. Android generates a resource ID for the menu file that you then use to inflate the menu in code.
In the project tool window, right-click on the res directory and select New → Android resource file. Change the Resource type to Menu, name the menu resource fragment_crime_list, and click OK (Figure 13.3).

Here, you use the same naming convention for menu files as you do for layout files.
Android Studio will generate res/menu/fragment_crime_list.xml, which has the same name as your CrimeListFragment’s layout file but lives in the menu folder.
In the new file, switch to the Text view and add an item element as shown in Listing 13.4.
Listing 13.4 Creating a menu resource for CrimeListFragment (res/menu/fragment_crime_list.xml)
<menu xmlns:android="http://schemas.android.com/apk/res/android"
      xmlns:app="http://schemas.android.com/apk/res-auto">
    <item
        android:id="@+id/new_crime"
        android:icon="@android:drawable/ic_menu_add"
        android:title="@string/new_crime"
        app:showAsAction="ifRoom|withText"/>
</menu>
The showAsAction attribute refers to whether the item will appear in the toolbar itself or in the overflow menu.
You have piped together two values, ifRoom and withText, so the item’s icon and text will appear in the toolbar if there is room.
If there is room for the icon but not the text, then only the icon will be visible.
If there is no room for either, then the item will be relegated to the overflow menu.
If you have items in the overflow menu, those items will be represented by the three dots on the far-right side of the toolbar, as shown in Figure 13.4. You will update your code to add additional menu items in a moment.

Other options for showAsAction include always and never. Using always is not recommended; it is better to use ifRoom and let the OS decide. Using never is a good choice for less-common actions. In general, you should only put action items that users will use frequently in the toolbar to avoid cluttering the screen.
Notice that fragment_crime_list.xml uses the xmlns tag to define a new namespace, app, which is separate from the usual android namespace declaration.
This app namespace is then used to specify the showAsAction attribute.
This unusual namespace declaration exists for legacy reasons with the AppCompat library.
The action bar APIs were first added in Android 3.0.
Originally, the AppCompat library was created to bundle a compatibility version of the action bar into apps supporting earlier versions of Android, so that the action bar would exist on any device, even those that did not support the native action bar.
On devices running Android 2.3 or older, menus and their corresponding XML did exist, but the android:showAsAction attribute was only added with the release of the action bar.
The AppCompat library defines its own custom showAsAction attribute and does not look for the native showAsAction attribute.
In the android:icon attribute, the value @android:drawable/ic_menu_add references a system icon.
A system icon is one that is found on the device rather than in your project’s resources.
In a prototype, referencing a system icon works fine. However, in an app that will be released, it is better to be sure of what your user will see instead of leaving it up to each device. System icons can change drastically across devices and OS versions, and some devices might have system icons that do not fit with the rest of your app’s design.
One alternative is to create your own icons from scratch. You will need to prepare versions for each screen density and possibly for other device configurations. For more information, visit Android’s Icon Design Guidelines at developer.android.com/design/style/iconography.xhtml.
A second alternative is to find system icons that meet your app’s needs and copy them directly into your project’s drawable resources.
System icons can be found in your Android SDK directory.
On a Mac, this is typically /Users/user/Library/Android/sdk.
On Windows, the default location is Usersusersdk.
You can also verify your SDK location by opening the project structure window and selecting the SDK Location option.
In your SDK directory, you will find Android’s resources, including ic_menu_add.
These resources are found in /platforms/android-25/data/res, where 25 represents the API level of the Android version.
The third and easiest alternative is to use the Android Asset Studio, which is included in Android Studio. The Asset Studio allows you to create and customize an image to use in the toolbar.
Right-click on your drawable directory in the project tool window and select New → Image Asset to bring up the Asset Studio (Figure 13.5).
Here, you can generate a few types of icons. In the Icon Type field, choose Action Bar and Tab Icons. Next, name your asset ic_menu_add and set the Asset Type option to Clip Art. Update the Theme to use HOLO_DARK. Since your toolbar uses a dark theme, your image should appear as a light color. These changes are shown in Figure 13.5; note that while we are also showing the clip art you are about to select, your screen will feature the adorable Android logo.
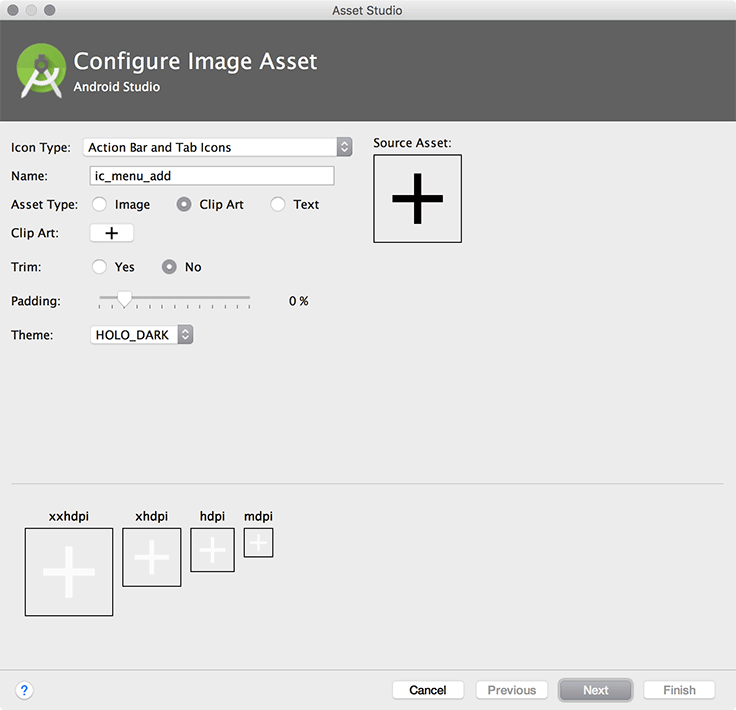
Select the Clip Art button to pick your clip art. In the clip art window, choose the image that looks like a plus sign (Figure 13.6).

Back on the main screen, click Next to move to the last step of the wizard. The Asset Studio will show you a preview of the work that it will do (Figure 13.7). Notice that an hdpi, mdpi, xhdpi, and xxhdpi icon will be created for you. Jim-dandy.
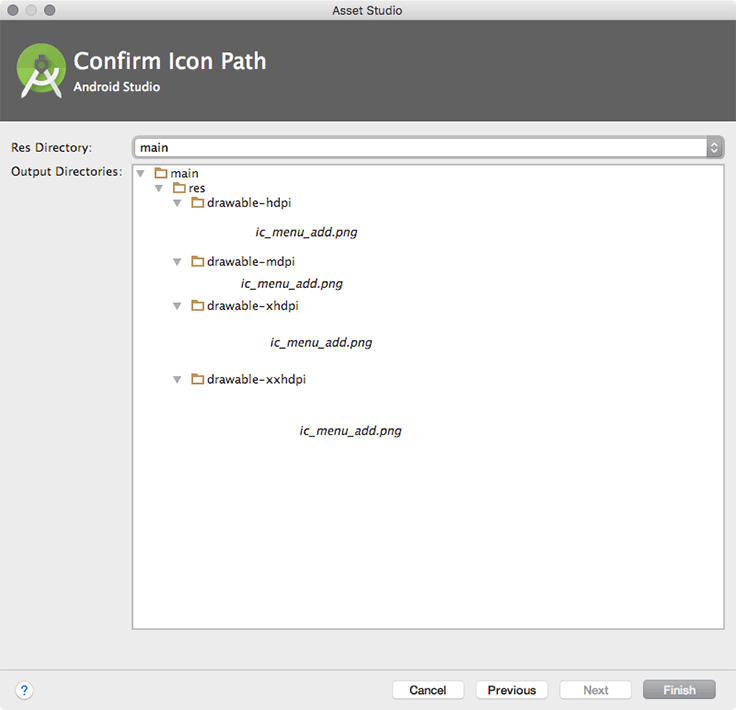
Select Finish to generate the images. Then, in your layout file, modify your icon attribute to reference the new resource in your project.
In code, menus are managed by callbacks from the Activity class. When the menu is needed, Android calls the Activity method onCreateOptionsMenu(Menu).
However, your design calls for code to be implemented in a fragment, not an activity. Fragment comes with its own set of menu callbacks, which you will implement in CrimeListFragment. The methods for creating the menu and responding to the selection of an action item are:
    public void onCreateOptionsMenu(Menu menu, MenuInflater inflater)
    public boolean onOptionsItemSelected(MenuItem item)
In CrimeListFragment.java, override onCreateOptionsMenu(Menu, MenuInflater) to inflate the menu defined in fragment_crime_list.xml.
Listing 13.6 Inflating a menu resource (CrimeListFragment.java)
@Override
public void onResume() {
    super.onResume();
    updateUI();
}

@Override
public void onCreateOptionsMenu(Menu menu, MenuInflater inflater) {
    super.onCreateOptionsMenu(menu, inflater);
    inflater.inflate(R.menu.fragment_crime_list, menu);
}
...
Within this method, you call MenuInflater.inflate(int, Menu) and pass in the resource ID of your menu file. This populates the Menu instance with the items defined in your file.
Notice that you call through to the superclass implementation of onCreateOptionsMenu(…). This is not required, but we recommend calling through as a matter of convention. That way, any menu functionality defined by the superclass will still work. However, it is only a convention – the base Fragment implementation of this method does nothing.
The FragmentManager is responsible for calling Fragment.onCreateOptionsMenu(Menu, MenuInflater) when the activity receives its onCreateOptionsMenu(…) callback from the OS. You must explicitly tell the FragmentManager that your fragment should receive a call to onCreateOptionsMenu(…). You do this by calling the following method:
public void setHasOptionsMenu(boolean hasMenu)
Define CrimeListFragment.onCreate(Bundle) and let the FragmentManager know that CrimeListFragment needs to receive menu callbacks.
Listing 13.7 Receiving menu callbacks (CrimeListFragment.java)
public class CrimeListFragment extends Fragment {

    private RecyclerView mCrimeRecyclerView;
    private CrimeAdapter mAdapter;

    @Override
    public void onCreate(Bundle savedInstanceState) {
        super.onCreate(savedInstanceState);
        setHasOptionsMenu(true);
    }

    @Override
    public View onCreateView(LayoutInflater inflater, ViewGroup container,
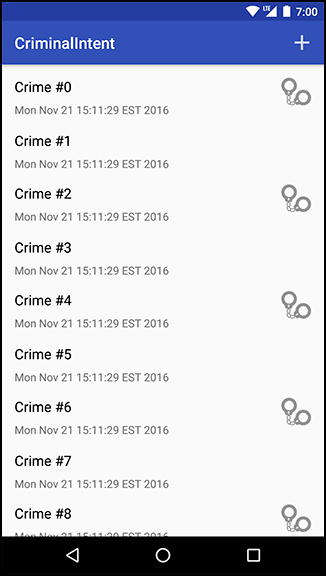
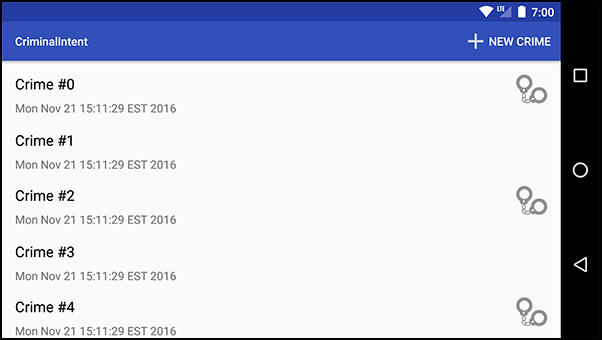
You can run CriminalIntent now to see your menu (Figure 13.8).
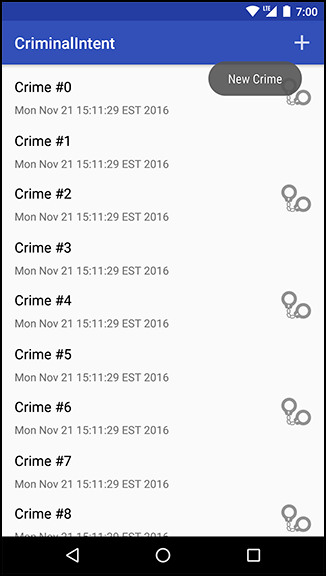
Where is the action item’s text? Most phones only have enough room for the icon in portrait orientation. You can long-press an icon in the toolbar to reveal its title (Figure 13.9).
In landscape orientation, there is room in the toolbar for the icon and the text (Figure 13.10).
To respond to the user pressing the New Crime action item, you need a way to add a new Crime to your list of crimes. In CrimeLab.java, add a method to do this.
Listing 13.8 Adding a new crime (CrimeLab.java)
...
public void addCrime(Crime c) {
    mCrimes.add(c);
}

public List<Crime> getCrimes() {
    return mCrimes;
}
In this brave new world where you will be able to add crimes yourself, the 100 programmatically generated crimes are no longer necessary. Remove the code that generates these crimes from CrimeLab.java.
Listing 13.9 Goodbye, random crimes! (CrimeLab.java)
private CrimeLab(Context context) {
    mCrimes = new ArrayList<>();
    for (int i = 0; i < 100; i++) {
        Crime crime = new Crime();
        crime.setTitle("Crime #" + i);
        crime.setSolved(i % 2 == 0); // Every other one
        mCrimes.add(crime);
    }
}
When the user presses an action item, your fragment receives a callback to the method onOptionsItemSelected(MenuItem). This method receives an instance of MenuItem that describes the user’s selection.
Although your menu only contains one action item, menus often have more than one. You can determine which action item has been selected by checking the ID of the MenuItem and then respond appropriately. This ID corresponds to the ID you assigned to the MenuItem in your menu file.
In CrimeListFragment.java, implement onOptionsItemSelected(MenuItem) to respond to selection of the MenuItem by creating a new Crime, adding it to CrimeLab, and then starting an instance of CrimePagerActivity to edit the new Crime.
Listing 13.10 Responding to menu selection (CrimeListFragment.java)
@Override
public void onCreateOptionsMenu(Menu menu, MenuInflater inflater) {
    super.onCreateOptionsMenu(menu, inflater);
    inflater.inflate(R.menu.fragment_crime_list, menu);
}

@Override
public boolean onOptionsItemSelected(MenuItem item) {
    switch (item.getItemId()) {
        case R.id.new_crime:
            Crime crime = new Crime();
            CrimeLab.get(getActivity()).addCrime(crime);
            Intent intent = CrimePagerActivity
                    .newIntent(getActivity(), crime.getId());
            startActivity(intent);
            return true;
        default:
            return super.onOptionsItemSelected(item);
    }
}
Notice that this method returns a boolean value. Once you have handled the MenuItem, you should return true to indicate that no further processing is necessary.
The default case calls the superclass implementation if the item ID is not in your implementation.
Run CriminalIntent and try out your new menu. Add a few crimes and edit them afterward. (The empty list that you see before you add any crimes can be disconcerting. At the end of this chapter there is a challenge to present a helpful clue when the list is empty.)