For an app to be functional, all you need to do is write your code correctly so that it does not crash. For an app to be a joy to use, though, you need to give it more love than that. You need to make it feel like a real, physical phenomenon playing out on your phone or tablet’s screen.
Real things move. To make your UI move, you animate its elements into new positions.
In this chapter, you will write an app called Sunset that shows a scene of the sun in the sky. When you press on the scene, it will animate the sun down below the horizon, and the sky will change colors like a sunset.
The first step is to build the scene that will be animated.
Create a new project called Sunset.
Make sure that your minSdkVersion is set to 19 and use the empty activity template.
Name your main activity SunsetActivity and add SingleFragmentActivity.java and activity_fragment.xml to your project.
Now, build out your scene. A sunset by the sea should be colorful, so it will help to name a few colors. Add a colors.xml file to your res/values folder, then add the following values to it:
Listing 32.1 Adding sunset colors (res/values/colors.xml)
<resources>
    <color name="colorPrimary">#3F51B5</color>
    <color name="colorPrimaryDark">#303F9F</color>
    <color name="colorAccent">#FF4081</color>

    <color name="bright_sun">#fcfcb7</color>
    <color name="blue_sky">#1e7ac7</color>
    <color name="sunset_sky">#ec8100</color>
    <color name="night_sky">#05192e</color>
    <color name="sea">#224869</color>
</resources>
Rectangular views will make for a fine impression of the sky and the sea. But people will not buy a rectangular sun, no matter how much you argue in favor of its technical simplicity. So, in the res/drawable/ folder, add an oval shape drawable for a circular sun called sun.xml.
Listing 32.2 Adding sun XML drawable (res/drawable/sun.xml)
<shape xmlns:android="http://schemas.android.com/apk/res/android"
    android:shape="oval">
    <solid android:color="@color/bright_sun" />
</shape>
When you display this oval in a square view, you will get a circle. People will nod their heads in approval, and then think about the real sun up in the sky.
Next, build the entire scene out in a layout file. This layout will be used in SunsetFragment, which you will build in a moment, so name it fragment_sunset.xml.
Listing 32.3 Setting up the layout (res/layout/fragment_sunset.xml)
<LinearLayout xmlns:android="http://schemas.android.com/apk/res/android"
    android:orientation="vertical"
    android:layout_width="match_parent"
    android:layout_height="match_parent">
    <FrameLayout
        android:id="@+id/sky"
        android:layout_width="match_parent"
        android:layout_height="0dp"
        android:layout_weight="0.61"
        android:background="@color/blue_sky">
        <ImageView
            android:id="@+id/sun"
            android:layout_width="100dp"
            android:layout_height="100dp"
            android:layout_gravity="center"
            android:src="@drawable/sun" />
    </FrameLayout>

    <View
        android:layout_width="match_parent"
        android:layout_height="0dp"
        android:layout_weight="0.39"
        android:background="@color/sea" />
</LinearLayout>
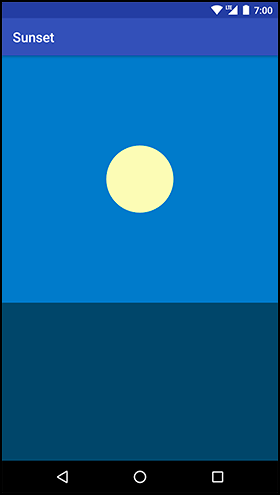
Check out the preview. You should see a daytime scene of the sun in a blue sky over a dark blue sea. You may find yourself thinking about a trip you once took to the beach or aboard a boat.
Time to finally get this thing up and running on a device. Create a fragment called SunsetFragment and add a newInstance() method. In onCreateView(…), inflate the fragment_sunset layout file and return the resulting view.
Listing 32.4 Creating SunsetFragment (SunsetFragment.java)
public class SunsetFragment extends Fragment {

    public static SunsetFragment newInstance() {
        return new SunsetFragment();
    }

    @Override
    public View onCreateView(LayoutInflater inflater, ViewGroup container,
            Bundle savedInstanceState) {
        View view = inflater.inflate(R.layout.fragment_sunset, container, false);

        return view;
    }
}
Now turn SunsetActivity into a SingleFragmentActivity that displays your fragment.
Listing 32.5 Displaying SunsetFragment (SunsetActivity.java)
public class SunsetActivity extends SingleFragmentActivity {

    @Override
    protected Fragment createFragment() {
        return SunsetFragment.newInstance();
    }

    @Override
    protected void onCreate(Bundle savedInstanceState) {
        ...
    }
}
Take a moment to run Sunset to make sure everything is hooked up correctly before moving on. It should look like Figure 32.1. Ahhh.