
Your SupportMapFragment creates a MapView, which is, in turn, a host for the object that does the real work: GoogleMap. So your first step is to acquire a reference to this master object. Do this by calling getMapAsync(OnMapReadyCallback).
Listing 34.9 Getting a GoogleMap (LocatrFragment.java)
public class LocatrFragment extends SupportMapFragment {
    ...
    private static final int REQUEST_LOCATION_PERMISSIONS = 0;

    private GoogleApiClient mClient;
    private GoogleMap mMap;
    private Bitmap mMapImage;
    private GalleryItem mMapItem;
    private Location mCurrentLocation;

    @Override
    public void onCreate(Bundle savedInstanceState) {
        super.onCreate(savedInstanceState);
        setHasOptionsMenu(true);

        mClient = new GoogleApiClient.Builder(getActivity())
                ...
                .build();

        getMapAsync(new OnMapReadyCallback() {
            @Override
            public void onMapReady(GoogleMap googleMap) {
                mMap = googleMap;
            }
        });
    }
SupportMapFragment.getMapAsync(…) does what it says on the tin: It gets a map object asynchronously. If you call this from within your onCreate(Bundle), you will get a reference to a GoogleMap once it is created and initialized.
Now that you have a GoogleMap, you can update the look of that map according to the current state of LocatrFragment. The first thing you will want to do is zoom in on an area of interest. You will want a margin around that area of interest. Add a dimension value for that margin.
Listing 34.10 Adding margin (res/values/dimens.xml)
<resources>
    <!-- Default screen margins, per the Android Design guidelines. -->
    <dimen name="activity_horizontal_margin">16dp</dimen>
    <dimen name="activity_vertical_margin">16dp</dimen>
    <dimen name="map_inset_margin">100dp</dimen>
</resources>
Now add an updateUI() implementation to perform the zoom.
Listing 34.11 Zooming in (LocatrFragment.java)
private boolean hasLocationPermission() {
    ...
}

private void updateUI() {
    if (mMap == null || mMapImage == null) {
        return;
    }

    LatLng itemPoint = new LatLng(mMapItem.getLat(), mMapItem.getLon());
    LatLng myPoint = new LatLng(
            mCurrentLocation.getLatitude(), mCurrentLocation.getLongitude());

    LatLngBounds bounds = new LatLngBounds.Builder()
            .include(itemPoint)
            .include(myPoint)
            .build();

    int margin = getResources().getDimensionPixelSize(R.dimen.map_inset_margin);
    CameraUpdate update = CameraUpdateFactory.newLatLngBounds(bounds, margin);
    mMap.animateCamera(update);
}

private class SearchTask extends AsyncTask<Location,Void,Void> {
Here is what you just did. To move your GoogleMap around, you built a CameraUpdate. CameraUpdateFactory has a variety of static methods to build different kinds of CameraUpdate objects that adjust the position, zoom level, and other properties around what your map is displaying.
Here, you created an update that points the camera at a specific LatLngBounds. You can think of a LatLngBounds as a rectangle around a set of points. You can make one explicitly by saying what the southwest and northeast corners of it should be.
More often, it is easier to provide a list of points that you would like this rectangle to encompass. LatLngBounds.Builder makes it easy to do this: Simply create a LatLngBounds.Builder and call .include(LatLng) for each point your LatLngBounds should encompass (represented by LatLng objects). When you are done, call build(), and you get an appropriately configured LatLngBounds.
With that done, you can update your map in two ways: with moveCamera(CameraUpdate) or animateCamera(CameraUpdate). Animating is more fun, so naturally that is what you used above.
Next, hook up your updateUI() method in two places: when the map is first received and when your search is finished.
Listing 34.12 Hooking up updateUI() (LocatrFragment.java)
@Override
public void onCreate(Bundle savedInstanceState) {
    ...
    getMapAsync(new OnMapReadyCallback() {
        @Override
        public void onMapReady(GoogleMap googleMap) {
            mMap = googleMap;
            updateUI();
        }
    });
}
...
private class SearchTask extends AsyncTask<Location,Void,Void> {
    ...
    @Override
    protected void onPostExecute(Void result) {
        mMapImage = mBitmap;
        mMapItem = mGalleryItem;
        mCurrentLocation = mLocation;

        updateUI();
    }
}
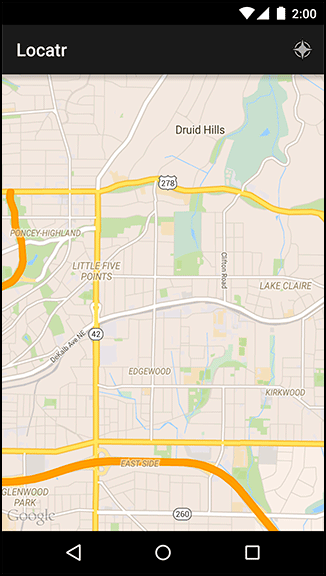
Run Locatr and press the search button. You should see your map zoom in on an area of interest that includes your current location (Figure 34.2). (Emulator users will need to have MockWalker running to get a location fix.)
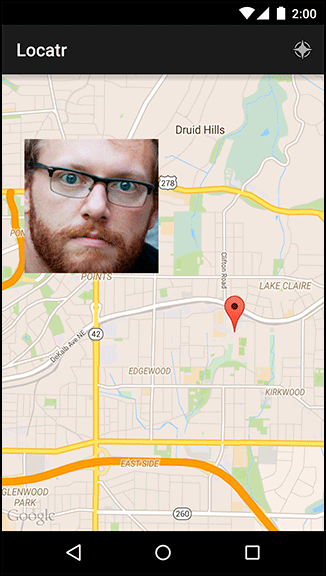
Your map is nice, but a little vague. You know that you are in there somewhere, and you know that the Flickr photo is in there somewhere. But where? Let’s add specificity with some markers.
Drawing on a map is not the same as drawing on a regular view. It is a little easier, in fact. Instead of drawing pixels to the screen, you draw features to a geographic area. And by “drawing,” we mean, “build little objects and add them to your GoogleMap so that it can draw them for you.”
Actually, that is not quite right, either. It is, in fact, the GoogleMap object that makes these objects, not you. Instead, you create objects that describe what you want the GoogleMap to create, called options objects.
Add two markers to your map by creating MarkerOptions objects and then calling mMap.addMarker(MarkerOptions).
Listing 34.13 Adding markers (LocatrFragment.java)
private void updateUI() {
    ...
    LatLng itemPoint = new LatLng(mMapItem.getLat(), mMapItem.getLon());
    LatLng myPoint = new LatLng(
            mCurrentLocation.getLatitude(), mCurrentLocation.getLongitude());

    BitmapDescriptor itemBitmap = BitmapDescriptorFactory.fromBitmap(mMapImage);
    MarkerOptions itemMarker = new MarkerOptions()
            .position(itemPoint)
            .icon(itemBitmap);
    MarkerOptions myMarker = new MarkerOptions()
            .position(myPoint);

    mMap.clear();
    mMap.addMarker(itemMarker);
    mMap.addMarker(myMarker);

    LatLngBounds bounds = new LatLngBounds.Builder()
    ...
}
When you call addMarker(MarkerOptions), the GoogleMap builds a Marker instance and adds it to the map. If you need to remove or modify the marker in the future, you can hold on to this instance. In this case, you will be clearing the map every time you update it. As a result, you do not need to hold on to the Markers.
Run Locatr and press the search button, and you should see your two markers show up (Figure 34.3).
And with that, your little geographic image finder is complete. You learned how to use two Play Services APIs, you tracked your phone’s location, you registered for one of Google’s many web services APIs, and you plotted everything on a map. Perhaps a nap is in order now that your app’s map is in order.