
The steps to create a UI fragment are the same as those you followed to create an activity:
-
compose a UI by defining widgets in a layout file
-
create the class and set its view to be the layout that you defined
-
wire up the widgets inflated from the layout in code
CrimeFragment’s view will display the information contained within an instance of Crime.
First, define the strings that the user will see in res/values/strings.xml.
Listing 7.6 Adding strings (res/values/strings.xml)
<resources>
    <string name="app_name">CriminalIntent</string>
    <string name="crime_title_hint">Enter a title for the crime.</string>
    <string name="crime_title_label">Title</string>
    <string name="crime_details_label">Details</string>
    <string name="crime_solved_label">Solved</string>
</resources>
Next, you will define the UI. The layout for CrimeFragment will consist of a vertical LinearLayout that contains two TextViews, an EditText, a Button, and a Checkbox.
To create a layout file, right-click the res/layout folder in the project tool window and select New → Layout resource file. Name this file fragment_crime.xml and enter LinearLayout as the root element. Click OK and Android Studio will generate the file for you.
When the file opens, navigate to the XML. The wizard has added the LinearLayout for you. Add the widgets that make up the fragment’s layout to fragment_crime.xml.
Listing 7.7 Layout file for fragment’s view (fragment_crime.xml)
<LinearLayout xmlns:android="http://schemas.android.com/apk/res/android"
    android:layout_width="match_parent"
    android:layout_height="match_parent"
    android:layout_margin="16dp"
    android:orientation="vertical">

    <TextView
        style="?android:listSeparatorTextViewStyle"
        android:layout_width="match_parent"
        android:layout_height="wrap_content"
        android:text="@string/crime_title_label"/>

    <EditText
        android:id="@+id/crime_title"
        android:layout_width="match_parent"
        android:layout_height="wrap_content"
        android:hint="@string/crime_title_hint"/>

    <TextView
        style="?android:listSeparatorTextViewStyle"
        android:layout_width="match_parent"
        android:layout_height="wrap_content"
        android:text="@string/crime_details_label"/>

    <Button
        android:id="@+id/crime_date"
        android:layout_width="match_parent"
        android:layout_height="wrap_content"/>

    <CheckBox
        android:id="@+id/crime_solved"
        android:layout_width="match_parent"
        android:layout_height="wrap_content"
        android:text="@string/crime_solved_label"/>

</LinearLayout>
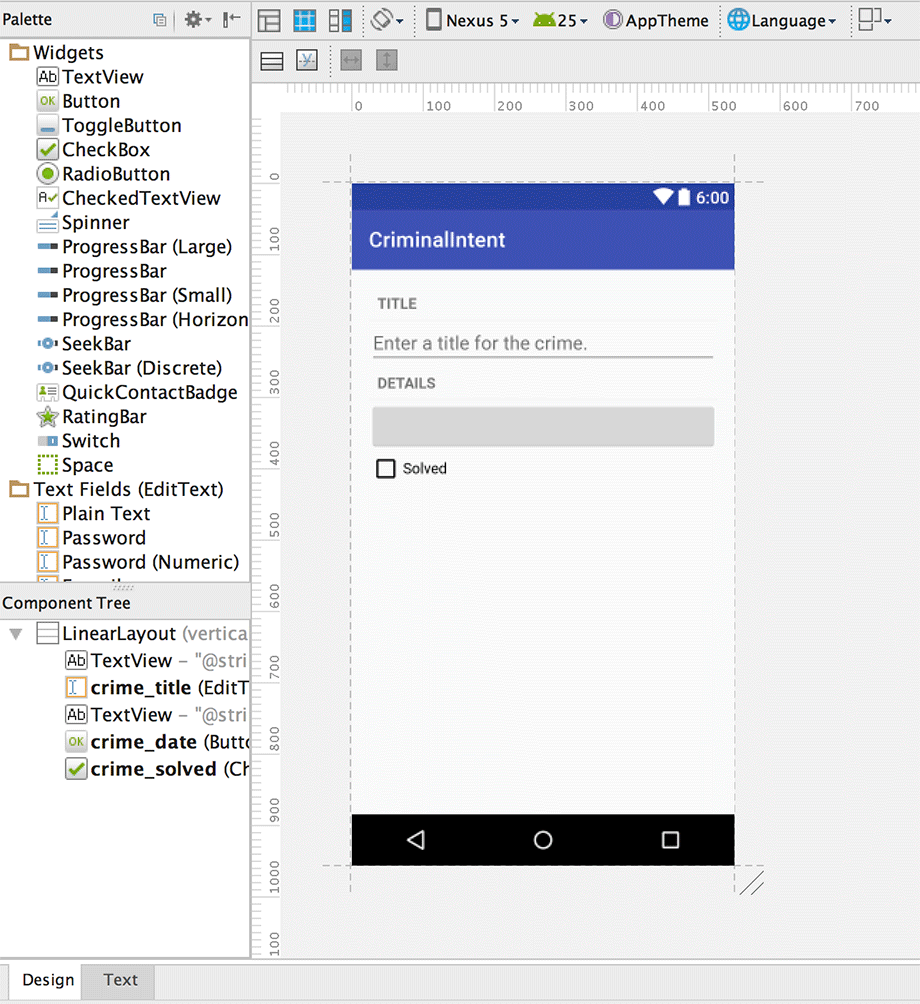
Check the Design view to see a preview of your fragment’s view (Figure 7.14).
(The updated fragment_crime.xml code includes new syntax related to view style: <style="?android:listSeparatorTextViewStyle".
Fear not.
You will learn the meaning behind this syntax in the section called Styles, themes, and theme attributes in Chapter 9.)
Right-click the com.bignerdranch.android.criminalintent package and select New → Java Class. Name the class CrimeFragment and click OK to generate the class.
Now, turn this class into a fragment. Update CrimeFragment to subclass the Fragment class.
Listing 7.8 Subclassing the Fragment class (CrimeFragment.java)
public class CrimeFragment extends Fragment {

}
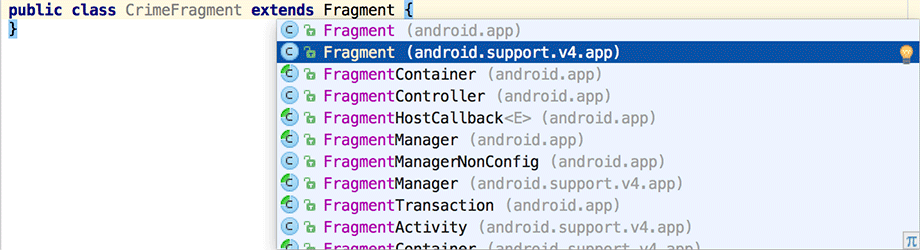
As you subclass the Fragment class, you will notice that Android Studio finds two classes with the Fragment name. You will see Fragment (android.app) and Fragment (android.support.v4.app). The android.app Fragment is the version of fragments built into the Android OS. You will use the support library version, so be sure to select the android.support.v4.app version of the Fragment class when you see the dialog, as shown in Figure 7.15.
Your code should match Listing 7.9.
Listing 7.9 Supporting the Fragment import (CrimeFragment.java)
package com.bignerdranch.android.criminalintent;

import android.support.v4.app.Fragment;

public class CrimeFragment extends Fragment {

}
If you do not see this dialog or the wrong fragment class was imported, you can manually import the correct class. If you have an import for android.app.Fragment, remove that line of code. Import the correct Fragment class with the Option+Return (or Alt+Enter) shortcut. Be sure to select the support version of the Fragment class.
CrimeFragment is a controller that interacts with model and view objects. Its job is to present the details of a specific crime and update those details as the user changes them.
In GeoQuiz, your activities did most of their controller work in activity lifecycle methods. In CriminalIntent, this work will be done by fragments in fragment lifecycle methods. Many of these methods correspond to the Activity methods you already know, such as onCreate(Bundle).
In CrimeFragment.java, add a member variable for the Crime instance and an implementation of Fragment.onCreate(Bundle).
Android Studio can provide some assistance when overriding methods. As you define the onCreate(Bundle) method, type the first few characters of the method name where you want to place the method. Android Studio will provide a list of suggestions, as shown in Figure 7.16.
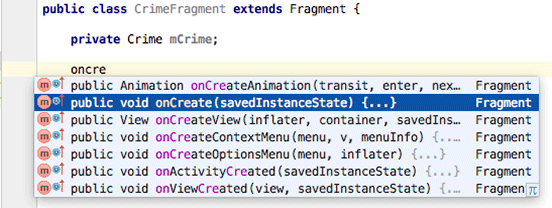
Press Return to select the onCreate(Bundle) method, and Android Studio will create the method declaration for you. Update your code to create a new Crime, matching Listing 7.10.
Listing 7.10 Overriding Fragment.onCreate(Bundle) (CrimeFragment.java)
public class CrimeFragment extends Fragment {
    private Crime mCrime;

    @Override
    public void onCreate(Bundle savedInstanceState) {
        super.onCreate(savedInstanceState);
        mCrime = new Crime();
    }
}
There are a couple of things to notice in this implementation. First, Fragment.onCreate(Bundle) is a public method, whereas Activity.onCreate(Bundle) is protected. Fragment.onCreate(Bundle) and other Fragment lifecycle methods must be public, because they will be called by whatever activity is hosting the fragment.
Second, similar to an activity, a fragment has a bundle to which it saves and retrieves its state. You can override Fragment.onSaveInstanceState(Bundle) for your own purposes just as you can override Activity.onSaveInstanceState(Bundle).
Also, note what does not happen in Fragment.onCreate(Bundle): You do not inflate the fragment’s view. You configure the fragment instance in Fragment.onCreate(Bundle), but you create and configure the fragment’s view in another fragment lifecycle method:
    public View onCreateView(LayoutInflater inflater, ViewGroup container,
        Bundle savedInstanceState)
This method is where you inflate the layout for the fragment’s view and return the inflated View to the hosting activity. The LayoutInflater and ViewGroup parameters are necessary to inflate the layout. The Bundle will contain data that this method can use to re-create the view from a saved state.
In CrimeFragment.java, add an implementation of onCreateView(…) that inflates fragment_crime.xml. You can use the same trick from Figure 7.16 to fill out the method declaration.
Listing 7.11 Overriding onCreateView(…) (CrimeFragment.java)
public class CrimeFragment extends Fragment {
    private Crime mCrime;

    @Override
    public void onCreate(Bundle savedInstanceState) {
        super.onCreate(savedInstanceState);
        mCrime = new Crime();
    }

    @Override
    public View onCreateView(LayoutInflater inflater, ViewGroup container,
            Bundle savedInstanceState) {
        View v = inflater.inflate(R.layout.fragment_crime, container, false);
        return v;
    }
}
Within onCreateView(…), you explicitly inflate the fragment’s view by calling LayoutInflater.inflate(…) and passing in the layout resource ID.
The second parameter is your view’s parent, which is usually needed to configure the widgets properly. The third parameter tells the layout inflater whether to add the inflated view to the view’s parent. You pass in false because you will add the view in the activity’s code.
You are now going to hook up the EditText, Checkbox, and Button in your fragment. The onCreateView(…) method is the place to wire up these widgets.
Start with the EditText. After the view is inflated, get a reference to the EditText and add a listener.
Listing 7.12 Wiring up the EditText widget (CrimeFragment.java)
public class CrimeFragment extends Fragment {
    private Crime mCrime;
    private EditText mTitleField;
    ...
    @Override
    public View onCreateView(LayoutInflater inflater, ViewGroup container,
            Bundle savedInstanceState) {
        View v = inflater.inflate(R.layout.fragment_crime, container, false);

        mTitleField = (EditText) v.findViewById(R.id.crime_title);
        mTitleField.addTextChangedListener(new TextWatcher() {
            @Override
            public void beforeTextChanged(
                CharSequence s, int start, int count, int after) {
                // This space intentionally left blank
            }

            @Override
            public void onTextChanged(
                CharSequence s, int start, int before, int count) {
                mCrime.setTitle(s.toString());
            }

            @Override
            public void afterTextChanged(Editable s) {
                // This one too
            }
        });

        return v;
    }
}
Getting references in Fragment.onCreateView(…) works nearly the same as in Activity.onCreate(Bundle). The only difference is that you call View.findViewById(int) on the fragment’s view. The Activity.findViewById(int) method that you used before is a convenience method that calls View.findViewById(int) behind the scenes. The Fragment class does not have a corresponding convenience method, so you have to call the real thing.
Setting listeners in a fragment works exactly the same as in an activity. In Listing 7.12, you create an anonymous class that implements the verbose TextWatcher interface. TextWatcher has three methods, but you only care about one: onTextChanged(…).
In onTextChanged(…), you call toString() on the CharSequence that is the user’s input. This method returns a string, which you then use to set the Crime’s title.
Next, connect the Button to display the date of the crime, as shown in Listing 7.13.
Listing 7.13 Setting Button text (CrimeFragment.java)
public class CrimeFragment extends Fragment {
    private Crime mCrime;
    private EditText mTitleField;
    private Button mDateButton;
    ...
    @Override
    public View onCreateView(LayoutInflater inflater, ViewGroup container,
            Bundle savedInstanceState) {
        View v = inflater.inflate(R.layout.fragment_crime, container, false);
        ...
        mDateButton = (Button) v.findViewById(R.id.crime_date);
        mDateButton.setText(mCrime.getDate().toString());
        mDateButton.setEnabled(false);

        return v;
    }
}
Disabling the button ensures that it will not respond in any way to the user pressing it. It also changes its appearance to advertise its disabled state. In Chapter 12, you will enable the button and allow the user to choose the date of the crime.
Moving on to the CheckBox, get a reference and set a listener that will update the mSolved field of the Crime, as shown in Listing 7.14.
Listing 7.14 Listening for CheckBox changes (CrimeFragment.java)
public class CrimeFragment extends Fragment {
    private Crime mCrime;
    private EditText mTitleField;
    private Button mDateButton;
    private CheckBox mSolvedCheckBox;
    ...
    @Override
    public View onCreateView(LayoutInflater inflater, ViewGroup container,
            Bundle savedInstanceState) {
        View v = inflater.inflate(R.layout.fragment_crime, container, false);
        ...
        mSolvedCheckBox = (CheckBox)v.findViewById(R.id.crime_solved);
        mSolvedCheckBox.setOnCheckedChangeListener(new OnCheckedChangeListener() {
            @Override
            public void onCheckedChanged(CompoundButton buttonView,
                    boolean isChecked) {
                mCrime.setSolved(isChecked);
            }
        });

        return v;
    }
}
After typing in the code as above, click on OnCheckedChangeListener:
mSolvedCheckBox.setOnCheckedChangeListener(new OnCheckedChangeListener()
and use the Option+Return (Alt+Enter) shortcut to add the necessary import statement. You will be presented with two options. Choose the android.widget.CompoundButton version.
Depending on which version of Android Studio you are using, the autocomplete feature may insert CompoundButton.OnCheckedChangeListener() instead of leaving the code as OnCheckedChangeListener().
Either implementation is fine.
But to remain consistent with the solution presented in this book, click on CompoundButton and hit Option+Return (Alt+Enter).
Select the option to Add on demand static import for 'android.widget.CompoundButton' (Figure 7.17). This will update the code so it matches Listing 7.14.

Your code for CrimeFragment is now complete. It would be great if you could run CriminalIntent now and play with the code you have written. But you cannot. Fragments cannot put their views on screen on their own. To realize your efforts, you first have to add a CrimeFragment to CrimeActivity.