
Now, you want CrimeListFragment to display a list of crimes to the user. To do this, you will use a RecyclerView.
RecyclerView is a subclass of ViewGroup. It displays a list of child View objects, one for each item in your list of items. Depending on the complexity of what you need to display, these child Views can be complex or very simple.
For your first implementation, each item in the list will display the title and date of a Crime. The View object on each row will be a LinearLayout containing two TextViews, as shown in Figure 8.4.
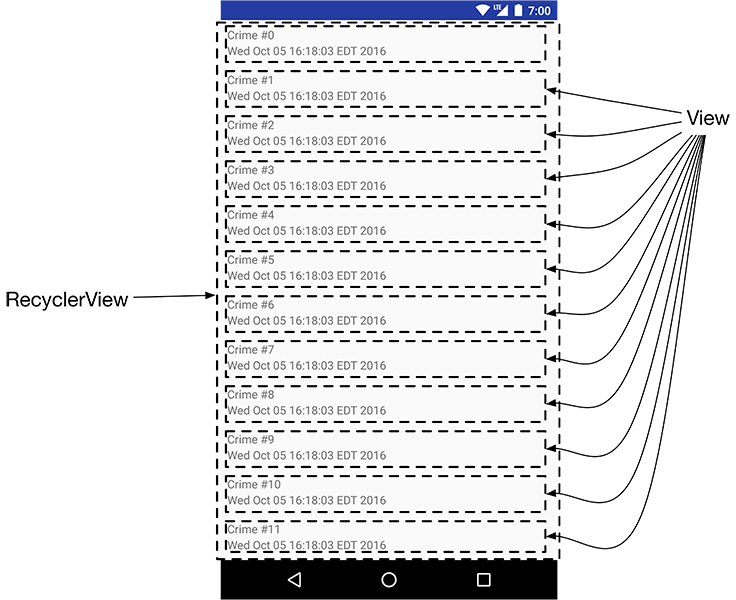
Figure 8.4 shows 12 rows of Views. Later you will be able to run CriminalIntent and swipe to scroll through 100 Views to see all of your Crimes. Does that mean that you have 100 View objects in memory? Thanks to your RecyclerView, no.
Creating a View for every item in the list all at once could easily become unworkable. As you can imagine, a list can have far more than 100 items, and your list items can be much more involved than your simple implementation here. Also, a Crime only needs a View when it is onscreen, so there is no need to have 100 Views ready and waiting. It would make far more sense to create view objects only as you need them.
RecyclerView does just that. Instead of creating 100 Views, it creates 12 – enough to fill the screen. When a view is scrolled off the screen, RecyclerView reuses it rather than throwing it away. In short, it lives up to its name: It recycles views over and over.
The RecyclerView’s only responsibilities are recycling TextViews and positioning them onscreen. To get the TextViews in the first place, it works with two classes that you will build in a moment: an Adapter subclass and a ViewHolder subclass.
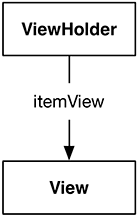
The ViewHolder’s job is small, so let’s talk about it first. The ViewHolder does one thing: It holds on to a View (Figure 8.5).
A small job, but that is what ViewHolders do. A typical ViewHolder subclass looks like this:
Listing 8.13 A typical ViewHolder subclass
public class ListRow extends RecyclerView.ViewHolder {
    public ImageView mThumbnail;

    public ListRow(View view) {
        super(view);

        mThumbnail = (ImageView) view.findViewById(R.id.thumbnail);
    }
}
You can then create a ListRow and access both mThumbnail, which you created yourself, and itemView, a field that your superclass RecyclerView.ViewHolder assigns for you. The itemView field is your ViewHolder’s reason for existing: It holds a reference to the entire View you passed into super(view).
Listing 8.14 Typical usage of a ViewHolder
ListRow row = new ListRow(inflater.inflate(R.layout.list_row, parent, false));
View view = row.itemView;
ImageView thumbnailView = row.mThumbnail;
A RecyclerView never creates Views by themselves. It always creates ViewHolders, which bring their itemViews along for the ride (Figure 8.6).

When the View is simple, ViewHolder has few responsibilities. For more complicated Views, the ViewHolder makes wiring up the different parts of itemView to a Crime simpler and more efficient. You will see how this works later on in this chapter, when you build a complex View yourself.
Figure 8.6 is somewhat simplified. RecyclerView does not create ViewHolders itself. Instead, it asks an adapter. An adapter is a controller object that sits between the RecyclerView and the data set that the RecyclerView should display.
The adapter is responsible for:
-
creating the necessary ViewHolders
-
binding ViewHolders to data from the model layer
To build an adapter, you first define a subclass of RecyclerView.Adapter. Your adapter subclass will wrap the list of crimes you get from CrimeLab.
When the RecyclerView needs a view object to display, it will have a conversation with its adapter. Figure 8.7 shows an example of a conversation that a RecyclerView might initiate.

First, the RecyclerView asks how many objects are in the list by calling the adapter’s getItemCount() method.
Then the RecyclerView calls the adapter’s onCreateViewHolder(ViewGroup, int) method to create a new ViewHolder, along with its juicy payload: a View to display.
Finally, the RecyclerView calls onBindViewHolder(ViewHolder, int). The RecyclerView will pass a ViewHolder into this method along with the position. The adapter will look up the model data for that position and bind it to the ViewHolder’s View. To bind it, the adapter fills in the View to reflect the data in the model object.
After this process is complete, RecyclerView will place a list item on the screen. Note that onCreateViewHolder(ViewGroup, int) will happen a lot less often than onBindViewHolder(ViewHolder, int). Once enough ViewHolders have been created, RecyclerView stops calling onCreateViewHolder(…). Instead, it saves time and memory by recycling old ViewHolders.
Enough talk; time for the implementation. The RecyclerView class lives in one of Google’s many support libraries. The first step to using a RecyclerView is to add the RecyclerView library as a dependency.
Navigate to your project structure window with File → Project Structure.... Select the app module on the left, then the Dependencies tab. Use the + button and choose Library dependency to add a dependency.
Find and select the recyclerview-v7 library and click OK to add the library as a dependency, as shown in Figure 8.8.

Your RecyclerView will live in CrimeListFragment’s layout file. First, you must create the layout file. Right-click on the res/layout directory and select New → Layout resource file. Name the file fragment_crime_list and click OK to create the file.
Open the new fragment_crime_list file and modify the root view to be a RecyclerView and to give it an ID attribute.
Listing 8.15 Adding RecyclerView to a layout file (fragment_crime_list.xml)
<LinearLayout xmlns:android="http://schemas.android.com/apk/res/android"android:orientation="vertical"android:layout_width="match_parent"android:layout_height="match_parent"></LinearLayout><android.support.v7.widget.RecyclerView xmlns:android="http://schemas.android.com/apk/res/android" android:id="@+id/crime_recycler_view" android:layout_width="match_parent" android:layout_height="match_parent"/>
Now that CrimeListFragment’s view is set up, hook up the view to the fragment. Modify CrimeListFragment to use this layout file and to find the RecyclerView in the layout file, as shown in Listing 8.16.
Listing 8.16 Setting up the view for CrimeListFragment (CrimeListFragment.java)
public class CrimeListFragment extends Fragment {

    // Nothing yet
    private RecyclerView mCrimeRecyclerView;

    @Override
    public View onCreateView(LayoutInflater inflater, ViewGroup container,
        Bundle savedInstanceState) {
        View view = inflater.inflate(R.layout.fragment_crime_list, container, false);

        mCrimeRecyclerView = (RecyclerView) view
                .findViewById(R.id.crime_recycler_view);
        mCrimeRecyclerView.setLayoutManager(new LinearLayoutManager(getActivity()));

        return view;
    }

}
Note that as soon as you create your RecyclerView, you give it another object called a LayoutManager. RecyclerView requires a LayoutManager to work. If you forget to give it one, it will crash.
RecyclerView does not position items on the screen itself. It delegates that job to the LayoutManager. The LayoutManager positions every item and also defines how scrolling works. So if RecyclerView tries to do those things when the LayoutManager is not there, the RecyclerView will immediately fall over and die.
There are a few built-in LayoutManagers to choose from, and you can find more as third-party libraries. You are using the LinearLayoutManager, which will position the items in the list vertically. Later on in this book, you will use GridLayoutManager to arrange items in a grid instead.
Run the app. You should again see a blank screen, but now you are looking at an empty RecyclerView. You will not see any Crimes represented on the screen until the Adapter and ViewHolder implementations are defined.
Each item displayed on the RecyclerView will have its own view hierarchy, exactly the way CrimeFragment has a view hierarchy for the entire screen. You create a new layout for a list item view the same way you do for the view of an activity or a fragment. In the project tool window, right-click the res/layout directory and choose New → Layout resource file. In the dialog that appears, name the file list_item_crime and click OK.
Update your layout file to add the two TextViews as shown in Figure 8.9.
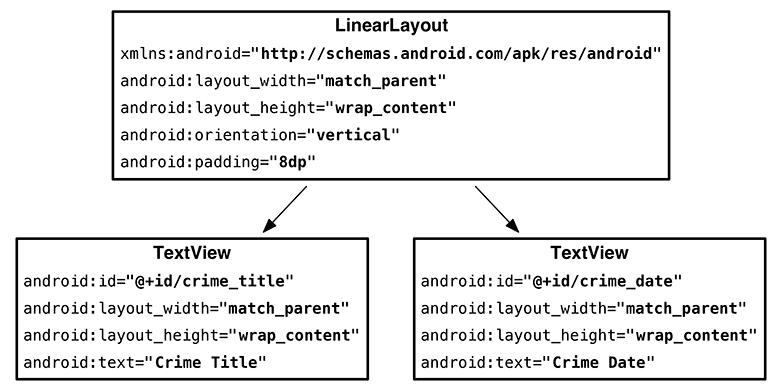
Take a look at the design preview, and you will see that you have created exactly one row of the completed product. In a moment, you will see how RecyclerView will create those rows for you.
The next job is to define the ViewHolder that will inflate and own your layout. Define it as an inner class in CrimeListFragment.
Listing 8.17 The beginnings of a ViewHolder (CrimeListFragment.java)
public class CrimeListFragment extends Fragment {
    ...
     private class CrimeHolder extends RecyclerView.ViewHolder {
        public CrimeHolder(LayoutInflater inflater, ViewGroup parent) {
            super(inflater.inflate(R.layout.list_item_crime, parent, false));
        }
    }
}
In CrimeHolder’s constructor, you inflate list_item_crime.xml. Immediately you pass it into super(…), ViewHolder’s constructor. The base ViewHolder class will then hold on to the fragment_crime_list.xml view hierarchy. If you need that view hierarchy, you can find it in ViewHolder’s itemView field.
CrimeHolder is all skin and bones right now. Later in the chapter, CrimeHolder will beef up as you give it more work to do.
With the ViewHolder defined, create the adapter.
Listing 8.18 The beginnings of an adapter (CrimeListFragment.java)
public class CrimeListFragment extends Fragment {
    ...
    private class CrimeAdapter extends RecyclerView.Adapter<CrimeHolder> {

        private List<Crime> mCrimes;

        public CrimeAdapter(List<Crime> crimes) {
            mCrimes = crimes;
        }
    }
}
(The code in Listing 8.18 will not compile. You will fix this in a moment.)
When the RecyclerView needs to display a new ViewHolder or connect a Crime object to an existing ViewHolder, it will ask this adapter for help by calling a method on it. The RecyclerView itself will not know anything about the Crime object, but the Adapter will know all of Crime’s intimate and personal details.
Next, implement three method overrides in CrimeAdapter.
(You can automatically generate these overrides by putting your cursor on top of extends, keying in Option-Return (Alt+Enter), selecting Implement methods, and clicking OK. Then you only need to fill in the bodies.)
Listing 8.19 Filling out CrimeAdapter (CrimeListFragment.java)
    private class CrimeAdapter extends RecyclerView.Adapter<CrimeHolder> {
        ...
        @Override
        public CrimeHolder onCreateViewHolder(ViewGroup parent, int viewType) {
            LayoutInflater layoutInflater = LayoutInflater.from(getActivity());

            return new CrimeHolder(layoutInflater, parent);
        }

        @Override
        public void onBindViewHolder(CrimeHolder holder, int position) {

        }

        @Override
        public int getItemCount() {
            return mCrimes.size();
        }
    }
onCreateViewHolder is called by the RecyclerView when it needs a new ViewHolder to display an item with. In this method, you create a LayoutInflater and use it to construct a new CrimeHolder.
Your adapter must have an override for onBindViewHolder(…), but for now you can leave it empty. In a moment, you will return to it.
Now that you have an Adapter, connect it to your RecyclerView. Implement a method called updateUI that sets up CrimeListFragment’s UI. For now it will create a CrimeAdapter and set it on the RecyclerView.
Listing 8.20 Setting an Adapter (CrimeListFragment.java)
public class CrimeListFragment extends Fragment {

    private RecyclerView mCrimeRecyclerView;
    private CrimeAdapter mAdapter;

    @Override
    public View onCreateView(LayoutInflater inflater, ViewGroup container,
                             Bundle savedInstanceState) {
        View view = inflater.inflate(R.layout.fragment_crime_list, container, false);

        mCrimeRecyclerView = (RecyclerView) view
                .findViewById(R.id.crime_recycler_view);
        mCrimeRecyclerView.setLayoutManager(new LinearLayoutManager(getActivity()));

        updateUI();

        return view;
    }

    private void updateUI() {
        CrimeLab crimeLab = CrimeLab.get(getActivity());
        List<Crime> crimes = crimeLab.getCrimes();

        mAdapter = new CrimeAdapter(crimes);
        mCrimeRecyclerView.setAdapter(mAdapter);
    }
    ...
}
In later chapters, you will add more to updateUI() as configuring your UI gets more involved.
Run CriminalIntent and scroll through your new RecyclerView, which should look like Figure 8.10.
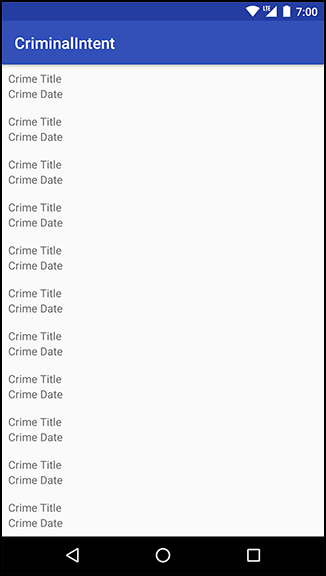
Hmm. Looking a little repetitive there, Mr. RecyclerView. Swipe or drag down, and you will see even more identical views scroll across your screen.
In the screenshot above, there are 11 rows, which means that onCreateViewHolder(…) was called 11 times. If you scroll down, a few more CrimeHolders may be created, but at a certain point RecyclerView will stop creating new CrimeHolders. Instead, it will recycle old CrimeHolders as they scroll off the top of the screen. RecyclerView, you were named well indeed.
For the moment, every row is identical. In your next step, you will fill each CrimeHolder with fresh information as it is recycled by binding to it.