
Dialogs demand attention and input from the user. They are useful for presenting a choice or important information. In this chapter, you will add a dialog in which users can change the date of a crime. Pressing the date button in CrimeFragment will present this dialog on Lollipop and later (Figure 12.1).
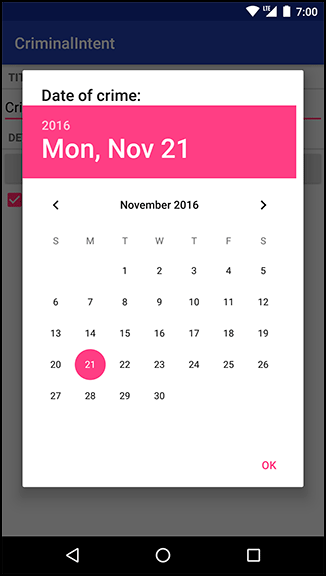
The dialog in Figure 12.1 is an instance of AlertDialog, a subclass of Dialog. AlertDialog is the all-purpose Dialog subclass that you will use most often.
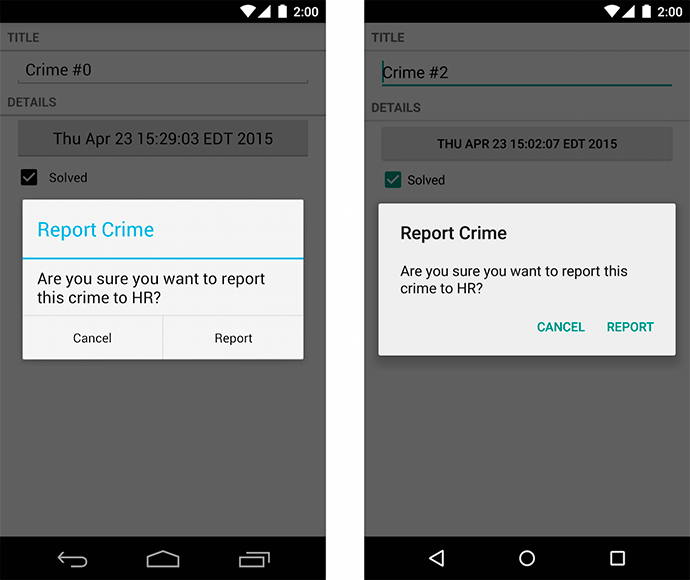
When Lollipop was released, dialogs were given a visual makeover. AlertDialogs on Lollipop automatically use this new style. On earlier versions of Android, AlertDialog will fall back to the older style, shown on the left in Figure 12.2.
Rather than displaying the crusty old dialog style, it would be nice to always show the new dialog style, no matter which version of Android the user’s device is on. And you can do just that with the AppCompat library’s AlertDialog class. This version of AlertDialog is very similar to the one included in the Android OS but, like other AppCompat classes, is compatible with earlier versions. To get the benefits of the AppCompat version, make sure you import android.support.v7.app.AlertDialog when prompted.
When using an AlertDialog, it is a good idea to wrap it in an instance of DialogFragment, a subclass of Fragment. It is possible to display an AlertDialog without a DialogFragment, but it is not recommended. Having the dialog managed by the FragmentManager gives you more options for presenting the dialog.
In addition, a bare AlertDialog will vanish if the device is rotated. If the AlertDialog is wrapped in a fragment, then the dialog will be re-created and put back onscreen after rotation.
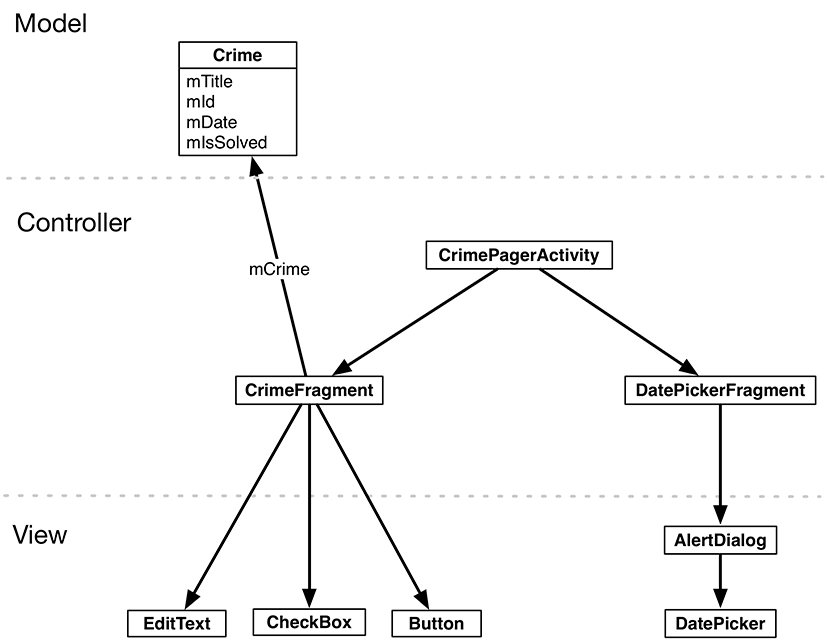
For CriminalIntent, you are going to create a DialogFragment subclass named DatePickerFragment. Within DatePickerFragment, you will create and configure an instance of AlertDialog that displays a DatePicker widget. DatePickerFragment will be hosted by CrimePagerActivity.
Figure 12.3 shows you an overview of these relationships.
Your first tasks are:
-
creating the DatePickerFragment class
-
building an AlertDialog
-
getting the dialog onscreen via the FragmentManager
Later in the chapter, you will wire up the DatePicker and pass the necessary data between CrimeFragment and DatePickerFragment.
Before you get started, add the string resource shown in Listing 12.1.
Listing 12.1 Adding string for dialog title (values/strings.xml)
<resources>
    ...
    <string name="crime_solved_label">Solved</string>
    <string name="date_picker_title">Date of crime:</string>

</resources>
Create a new class named DatePickerFragment and make its superclass DialogFragment. Be sure to choose the support library’s version of DialogFragment: android.support.v4.app.DialogFragment.
DialogFragment includes the following method:
public Dialog onCreateDialog(Bundle savedInstanceState)
The FragmentManager of the hosting activity calls this method as part of putting the DialogFragment onscreen.
In DatePickerFragment.java, add an implementation of onCreateDialog(Bundle) that builds an AlertDialog with a title and one OK button. (You will add the DatePicker widget later.)
Be sure that the version of AlertDialog that you import is the AppCompat version: android.support.v7.app.AlertDialog.
Listing 12.2 Creating a DialogFragment (DatePickerFragment.java)
public class DatePickerFragment extends DialogFragment {
    @Override
    public Dialog onCreateDialog(Bundle savedInstanceState) {
        return new AlertDialog.Builder(getActivity())
            .setTitle(R.string.date_picker_title)
            .setPositiveButton(android.R.string.ok, null)
            .create();
    }
}
In this implementation, you use the AlertDialog.Builder class, which provides a fluent interface for constructing an AlertDialog instance.
First, you pass a Context into the AlertDialog.Builder constructor, which returns an instance of AlertDialog.Builder.
Next, you call two AlertDialog.Builder methods to configure your dialog:
    public AlertDialog.Builder setTitle(int titleId)
    public AlertDialog.Builder setPositiveButton(int textId,
        DialogInterface.OnClickListener listener)
The setPositiveButton(…) method accepts a string resource and an object that implements DialogInterface.OnClickListener. In Listing 12.2, you pass in an Android constant for OK and null for the listener parameter. You will implement a listener later in the chapter.
(A positive button is what the user should press to accept what the dialog presents or to take the dialog’s primary action. There are two other buttons that you can add to an AlertDialog: a negative button and a neutral button. These designations determine the positions of the buttons in the dialog.)
Finally, you finish building the dialog with a call to AlertDialog.Builder.create(), which returns the configured AlertDialog instance.
There is more that you can do with AlertDialog and AlertDialog.Builder, and the details are well covered in the developer documentation. For now, let’s move on to the mechanics of getting your dialog onscreen.
Like all fragments, instances of DialogFragment are managed by the FragmentManager of the hosting activity.
To get a DialogFragment added to the FragmentManager and put onscreen, you can call the following methods on the fragment instance:
    public void show(FragmentManager manager, String tag)
    public void show(FragmentTransaction transaction, String tag)
The string parameter uniquely identifies the DialogFragment in the FragmentManager’s list. Whether you use the FragmentManager or FragmentTransaction version is up to you. If you pass in a FragmentTransaction, you are responsible for creating and committing that transaction. If you pass in a FragmentManager, a transaction will automatically be created and committed for you.
Here, you will pass in a FragmentManager.
In CrimeFragment, add a constant for the DatePickerFragment’s tag. Then, in onCreateView(…), remove the code that disables the date button and set a View.OnClickListener that shows a DatePickerFragment when the date button is pressed.
Listing 12.3 Showing your DialogFragment (CrimeFragment.java)
public class CrimeFragment extends Fragment {

    private static final String ARG_CRIME_ID = "crime_id";
    private static final String DIALOG_DATE = "DialogDate";
    ...
    @Override
    public View onCreateView(LayoutInflater inflater, ViewGroup container,
            Bundle savedInstanceState) {
        ...
        mDateButton = (Button) v.findViewById(R.id.crime_date);
        mDateButton.setText(mCrime.getDate().toString());
        mDateButton.setEnabled(false);
        mDateButton.setOnClickListener(new View.OnClickListener() {
            @Override
            public void onClick(View v) {
                FragmentManager manager = getFragmentManager();
                DatePickerFragment dialog = new DatePickerFragment();
                dialog.show(manager, DIALOG_DATE);
            }
        });

        mSolvedCheckBox = (CheckBox) v.findViewById(R.id.crime_solved);
        ...
        return v;
    }
}
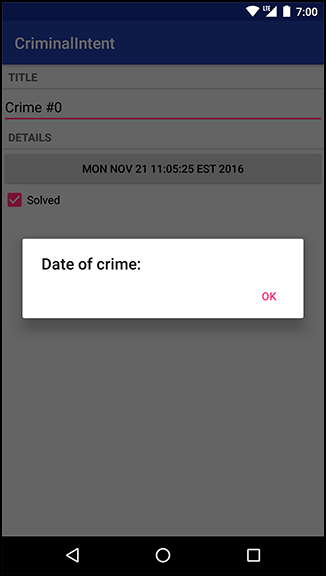
Run CriminalIntent and press the date button to see the dialog (Figure 12.4).
Next, you are going to add a DatePicker widget to your AlertDialog using the following AlertDialog.Builder method:
public AlertDialog.Builder setView(View view)
This method configures the dialog to display the passed-in View object between the dialog’s title and its button(s).
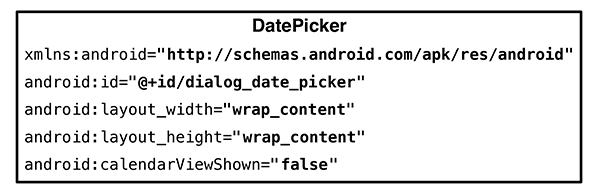
In the project tool window, create a new layout resource file named dialog_date.xml and make its root element DatePicker. This layout will consist of a single View object – a DatePicker – that you will inflate and pass into setView(…).
Configure the DatePicker as shown in Figure 12.5.
In DatePickerFragment.onCreateDialog(Bundle), inflate this view and then set it on the dialog.
Listing 12.4 Adding DatePicker to AlertDialog (DatePickerFragment.java)
@Override
public Dialog onCreateDialog(Bundle savedInstanceState) {
    View v = LayoutInflater.from(getActivity())
        .inflate(R.layout.dialog_date, null);

    return new AlertDialog.Builder(getActivity())
        .setView(v)
        .setTitle(R.string.date_picker_title)
        .setPositiveButton(android.R.string.ok, null)
        .create();
}
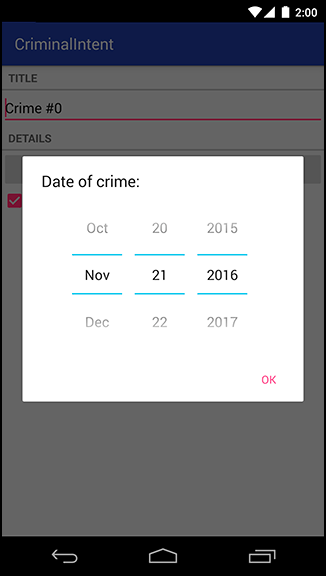
Run CriminalIntent. Press the date button to confirm that the dialog now presents a DatePicker. As long as you are running Lollipop or later, you will see a calendar picker (Figure 12.6).
The calendar picker in Figure 12.6 was introduced along with material design.
This version of the DatePicker widget ignores the calendarViewShown attribute you set in your layout.
If you are running a previous version of Android, however, you will see the old spinner-based DatePicker version that respects that attribute (Figure 12.7).
Either version works fine. The newer one sure is pretty, though.
You may be wondering why you went to the trouble of defining and inflating a layout when you could have created the DatePicker object in code, like this:
@Override
public Dialog onCreateDialog(Bundle savedInstanceState) {
    DatePicker datePicker = new DatePicker(getActivity());

    return new AlertDialog.Builder(getActivity())
        .setView(datePicker)
        ...
        .create();
}
Using a layout makes modifications easy if you change your mind about what the dialog should present. For instance, what if you wanted a TimePicker next to the DatePicker in this dialog? If you are already inflating a layout, you can simply update the layout file and the new view will appear.
Also, the selected date in the DatePicker is automatically preserved across rotation. (Try it.) How does this happen? Remember that Views can save state across configuration changes, but only if they have an ID attribute. When you created the DatePicker in dialog_date.xml you also asked the build tools to generate a unique ID value for that DatePicker.
If you created the DatePicker in code, you would have to programmatically set an ID on the DatePicker for its state saving to work.
Your dialog is onscreen and looks good. In the next section, you will wire it up to present the Crime’s date and allow the user to change it.