
You have passed data between two activities, and you have passed data between two fragment-based activities. Now you need to pass data between two fragments that are hosted by the same activity – CrimeFragment and DatePickerFragment (Figure 12.8).
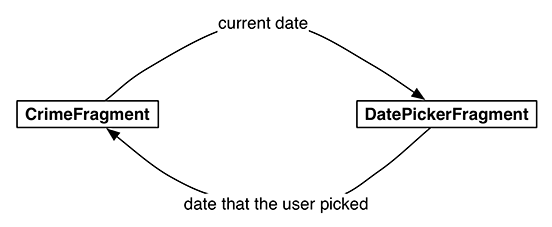
To get the Crime’s date to DatePickerFragment, you are going to write a newInstance(Date) method and make the Date an argument on the fragment.
To get the new date back to the CrimeFragment so that it can update the model layer and its own view, you will package up the date as an extra on an Intent and pass this Intent in a call to CrimeFragment.onActivityResult(…), as shown in Figure 12.9.
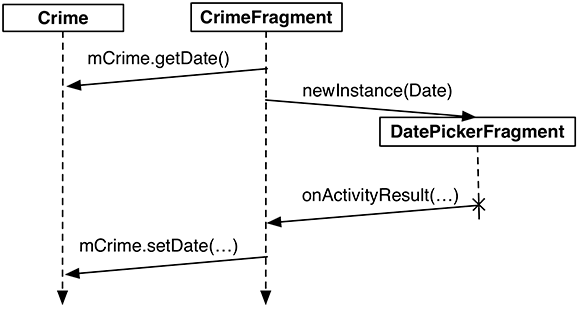
It may seem strange to call Fragment.onActivityResult(…), given that the hosting activity receives no call to Activity.onActivityResult(…) in this interaction. However, using onActivityResult(…) to pass data back from one fragment to another not only works, but also offers some flexibility in how you present a dialog fragment, as you will see later in the chapter.
To get data into your DatePickerFragment, you are going to stash the date in DatePickerFragment’s arguments bundle, where the DatePickerFragment can access it.
Creating and setting fragment arguments is typically done in a newInstance() method that replaces the fragment constructor. In DatePickerFragment.java, add a newInstance(Date) method.
Listing 12.5 Adding a newInstance(Date) method (DatePickerFragment.java)
public class DatePickerFragment extends DialogFragment {

    private static final String ARG_DATE = "date";

    private DatePicker mDatePicker;

    public static DatePickerFragment newInstance(Date date) {
        Bundle args = new Bundle();
        args.putSerializable(ARG_DATE, date);

        DatePickerFragment fragment = new DatePickerFragment();
        fragment.setArguments(args);
        return fragment;
    }
    ...
}
In CrimeFragment, remove the call to the DatePickerFragment constructor and replace it with a call to DatePickerFragment.newInstance(Date).
Listing 12.6 Adding call to newInstance() (CrimeFragment.java)
@Override
public View onCreateView(LayoutInflater inflater, ViewGroup container,
        Bundle savedInstanceState) {
    ...
    mDateButton = (Button)v.findViewById(R.id.crime_date);
    mDateButton.setText(mCrime.getDate().toString());
    mDateButton.setOnClickListener(new View.OnClickListener() {
        @Override
        public void onClick(View v) {
            FragmentManager manager = getFragmentManager();
            DatePickerFragment dialog = new DatePickerFragment();
            DatePickerFragment dialog = DatePickerFragment
                .newInstance(mCrime.getDate());
            dialog.show(manager, DIALOG_DATE);
        }
    });
    ...
    return v;
}
DatePickerFragment needs to initialize the DatePicker using the information held in the Date. However, initializing the DatePicker requires integers for the month, day, and year. Date is more of a timestamp and cannot provide integers like this directly.
To get the integers you need, you must create a Calendar object and use the Date to configure the Calendar. Then you can retrieve the required information from the Calendar.
In onCreateDialog(Bundle), get the Date from the arguments and use it and a Calendar to initialize the DatePicker.
Listing 12.7 Extracting the date and initializing DatePicker (DatePickerFragment.java)
@Override
public Dialog onCreateDialog(Bundle savedInstanceState) {
    Date date = (Date) getArguments().getSerializable(ARG_DATE);

    Calendar calendar = Calendar.getInstance();
    calendar.setTime(date);
    int year = calendar.get(Calendar.YEAR);
    int month = calendar.get(Calendar.MONTH);
    int day = calendar.get(Calendar.DAY_OF_MONTH);

    View v = LayoutInflater.from(getActivity())
            .inflate(R.layout.dialog_date, null);

    mDatePicker = (DatePicker) v.findViewById(R.id.dialog_date_picker);
    mDatePicker.init(year, month, day, null);

    return new AlertDialog.Builder(getActivity())
            .setView(v)
            .setTitle(R.string.date_picker_title)
            .setPositiveButton(android.R.string.ok, null)
            .create();
}
Now CrimeFragment is successfully telling DatePickerFragment what date to show. You can run CriminalIntent and make sure that everything works as before.
To have CrimeFragment receive the date back from DatePickerFragment, you need a way to keep track of the relationship between the two fragments.
With activities, you call startActivityForResult(…), and the ActivityManager keeps track of the parent-child activity relationship. When the child activity dies, the ActivityManager knows which activity should receive the result.
You can create a similar connection by making CrimeFragment the target fragment of DatePickerFragment. This connection is automatically reestablished after both CrimeFragment and DatePickerFragment are destroyed and re-created by the OS. To create this relationship, you call the following Fragment method:
public void setTargetFragment(Fragment fragment, int requestCode)
This method accepts the fragment that will be the target and a request code just like the one you send in startActivityForResult(…). The target fragment can use the request code later to identify which fragment is reporting back.
The FragmentManager keeps track of the target fragment and request code. You can retrieve them by calling getTargetFragment() and getTargetRequestCode() on the fragment that has set the target.
In CrimeFragment.java, create a constant for the request code and then make CrimeFragment the target fragment of the DatePickerFragment instance.
Listing 12.8 Setting target fragment (CrimeFragment.java)
public class CrimeFragment extends Fragment {

    private static final String ARG_CRIME_ID = "crime_id";
    private static final String DIALOG_DATE = "DialogDate";

    private static final int REQUEST_DATE = 0;
    ...
    @Override
    public View onCreateView(LayoutInflater inflater, ViewGroup container,
            Bundle savedInstanceState) {
        ...
        mDateButton.setOnClickListener(new View.OnClickListener() {
            @Override
            public void onClick(View v) {
                FragmentManager manager = getFragmentManager();
                DatePickerFragment dialog = DatePickerFragment
                        .newInstance(mCrime.getDate());
                dialog.setTargetFragment(CrimeFragment.this, REQUEST_DATE);
                dialog.show(manager, DIALOG_DATE);
            }
        });
        ...
        return v;
    }
}
Now that you have a connection between CrimeFragment and DatePickerFragment, you need to send the date back to CrimeFragment. You are going to put the date on an Intent as an extra.
What method will you use to send this intent to the target fragment? Oddly enough, you will have DatePickerFragment pass it into CrimeFragment.onActivityResult(int, int, Intent).
Activity.onActivityResult(…) is the method that the ActivityManager calls on the parent activity after the child activity dies. When dealing with activities, you do not call Activity.onActivityResult(…) yourself; that is the ActivityManager’s job. After the activity has received the call, the activity’s FragmentManager then calls Fragment.onActivityResult(…) on the appropriate fragment.
When dealing with two fragments hosted by the same activity, you can borrow Fragment.onActivityResult(…) and call it directly on the target fragment to pass back data. It has exactly what you need:
-
a request code that matches the code passed into setTargetFragment(…) to tell the target what is returning the result
-
a result code to determine what action to take
-
an Intent that can have extra data
In DatePickerFragment, create a private method that creates an intent, puts the date on it as an extra, and then calls CrimeFragment.onActivityResult(…).
Listing 12.9 Calling back to your target (DatePickerFragment.java)
public class DatePickerFragment extends DialogFragment {

    public static final String EXTRA_DATE =
            "com.bignerdranch.android.criminalintent.date";

    private static final String ARG_DATE = "date";
    ...
    @Override
    public Dialog onCreateDialog(Bundle savedInstanceState) {
        ...
    }

    private void sendResult(int resultCode, Date date) {
        if (getTargetFragment() == null) {
            return;
        }

        Intent intent = new Intent();
        intent.putExtra(EXTRA_DATE, date);

        getTargetFragment()
                .onActivityResult(getTargetRequestCode(), resultCode, intent);
    }
}
Now it is time to use this new sendResult(…) method. When the user presses the positive button in the dialog, you want to retrieve the date from the DatePicker and send the result back to CrimeFragment. In onCreateDialog(…), replace the null parameter of setPositiveButton(…) with an implementation of DialogInterface.OnClickListener that retrieves the selected date and calls sendResult(…).
Listing 12.10 Are you OK? (DatePickerFragment.java)
@Override
public Dialog onCreateDialog(Bundle savedInstanceState) {
    ...
    return new AlertDialog.Builder(getActivity())
        .setView(v)
        .setTitle(R.string.date_picker_title)
        .setPositiveButton(android.R.string.ok, null);
        .setPositiveButton(android.R.string.ok,
                new DialogInterface.OnClickListener() {
                    @Override
                    public void onClick(DialogInterface dialog, int which) {
                        int year = mDatePicker.getYear();
                        int month = mDatePicker.getMonth();
                        int day = mDatePicker.getDayOfMonth();
                        Date date = new GregorianCalendar(year, month, day).getTime();
                        sendResult(Activity.RESULT_OK, date);
                    }
        })
        .create();
}
In CrimeFragment, override onActivityResult(…) to retrieve the extra, set the date on the Crime, and refresh the text of the date button.
Listing 12.11 Responding to the dialog (CrimeFragment.java)
public class CrimeFragment extends Fragment {
    ...
    @Override
    public View onCreateView(LayoutInflater inflater, ViewGroup container,
            Bundle savedInstanceState) {
        ...
    }

    @Override
    public void onActivityResult(int requestCode, int resultCode, Intent data) {
        if (resultCode != Activity.RESULT_OK) {
            return;
        }

        if (requestCode == REQUEST_DATE) {
            Date date = (Date) data
                    .getSerializableExtra(DatePickerFragment.EXTRA_DATE);
            mCrime.setDate(date);
            mDateButton.setText(mCrime.getDate().toString());
        }
    }
}
The code that sets the button’s text is identical to code you call in onCreateView(…). To avoid setting the text in two places, encapsulate this code in a private updateDate() method and then call it in onCreateView(…) and onActivityResult(…).
You could do this by hand or you can have Android Studio do it for you. Highlight the entire line of code that sets mDateButton’s text.
Listing 12.12 Highlighting date button update (CrimeFragment.java)
@Override
public void onActivityResult(int requestCode, int resultCode, Intent data) {
    if (resultCode != Activity.RESULT_OK) {
        return;
    }

    if (requestCode == REQUEST_DATE) {
        Date date = (Date) data
                .getSerializableExtra(DatePickerFragment.EXTRA_DATE);
        mCrime.setDate(date);
        mDateButton.setText(mCrime.getDate().toString());
    }
}
Right-click and select Refactor → Extract → Method... (Figure 12.10).
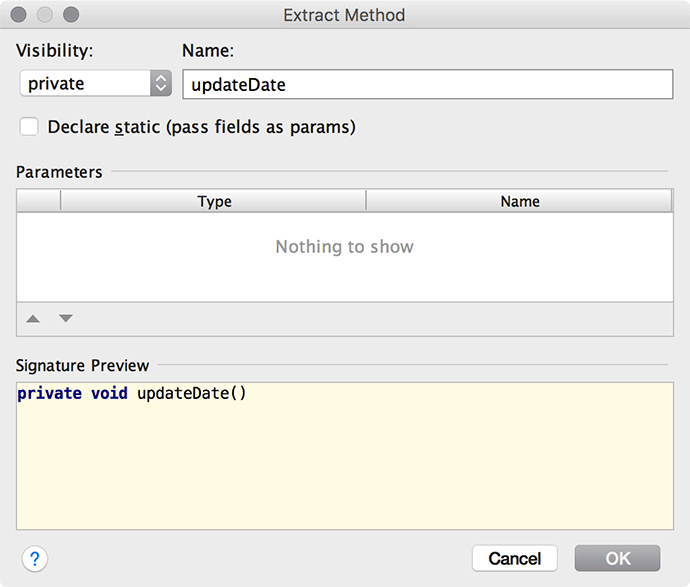
Make the method private and name it updateDate. Click OK and Android Studio will tell you that it has found one other place where this line of code was used. Click Yes to allow Android Studio to update the other reference, then verify that your code is now extracted to a single updateDate() method, as shown in Listing 12.13.
Listing 12.13 Cleaning up with updateDate() (CrimeFragment.java)
public class CrimeFragment extends Fragment {
    ...
    @Override
    public View onCreateView(LayoutInflater inflater, ViewGroup container,
            Bundle savedInstanceState) {
        View v = inflater.inflate(R.layout.fragment_crime, container, false);
        ...
        mDateButton = (Button) v.findViewById(R.id.crime_date);
        updateDate();
        ...
    }

    @Override
    public void onActivityResult(int requestCode, int resultCode, Intent data) {
        if (resultCode != Activity.RESULT_OK) {
            return;
        }

        if (requestCode == REQUEST_DATE) {
            Date date = (Date) data
                    .getSerializableExtra(DatePickerFragment.EXTRA_DATE);
            mCrime.setDate(date);
            updateDate();
        }
    }

    private void updateDate() {
        mDateButton.setText(mCrime.getDate().toString());
    }
}
Now the circle is complete. The dates must flow. He who controls the dates controls time itself. Run CriminalIntent to ensure that you can, in fact, control the dates. Change the date of a Crime and confirm that the new date appears in CrimeFragment’s view. Then return to the list of crimes and check the Crime’s date to ensure that the model layer was updated.
Using onActivityResult(…) to send data back to a target fragment is especially nice when you are writing an app that needs lots of input from the user and more room to ask for it – and you want the app working well on phones and tablets.
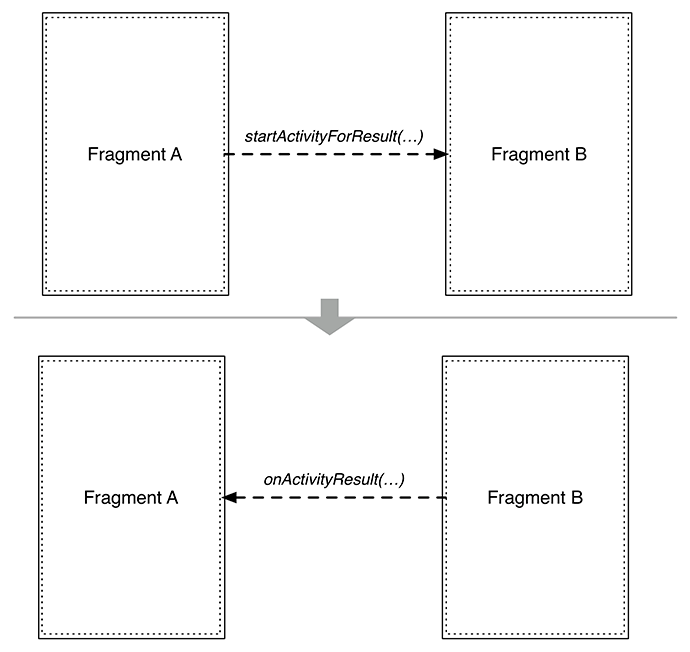
On a phone, you do not have much screen real estate, so you would likely use an activity with a full-screen fragment to ask the user for input. This child activity would be started by a fragment of the parent activity calling startActivityForResult(…). On the death of the child activity, the parent activity would receive a call to onActivityResult(…), which would be forwarded to the fragment that started the child activity (Figure 12.11).
On a tablet, where you have plenty of room, it is often better to present a DialogFragment to the user to get the same input. In this case, you set the target fragment and call show(…) on the dialog fragment. When dismissed, the dialog fragment calls onActivityResult(…) on its target (Figure 12.12).

The fragment’s onActivityResult(…) will always be called, whether the fragment started an activity or showed a dialog. So you can use the same code for different presentations.
When setting things up to use the same code for a full-screen fragment or a dialog fragment, you can override DialogFragment.onCreateView(…) instead of onCreateDialog(…) to prepare for both presentations.