
19
Introduction to Redux
The greatest love story of all time isn’t between Romeo and Juliet. In fact, it’s not even between any characters we’ve seen in books or movies. It’s actually between React and a mysterious unknown straggler from a far-away land, known as Redux.

By now, you know enough about React to understand how it works and why it does some of the things it does. We haven’t talked about Redux at all, though. We need to fix that before we can try to figure out why React and Redux get along so well. In the following sections, we take a deep dive into what Redux is.
What Is Redux?
If we’ve learned one thing in all this time, it is this: Maintaining application state and keeping it consistent with our UI is a major challenge. Solving this is partly why libraries such as React really took off. If you cast a wider net and look beyond just the UI layer, you’ll see that maintaining application state in general is complicated. The typical app has many layers, and each layer has its own dependency on some piece of data that it relies on to do its thing.
Visualizing the relationship between your app’s functionality and its application state often is pretty confusing:

To solve this more general problem of maintaining application state, you have Redux. The easiest way to understand how Redux works is just to walk through the various pieces that go into it. The first thing we need is an app:

This app doesn’t have to be anything special. It can be built in React, Angular, Vue, vanilla JS, or whatever happens to be the hot new library or framework this week. Redux doesn’t care how your app is built. It only cares that your app has a magical way for dealing with application state and storing it. In the Redux world, we store all our application state in a single location that we’ll just call the Store:

The thing about the Store is that reading data from it is easy. Getting information into it is a whole another story. You add a new state to (or modify existing state in) the Store by using a combination of actions, which describe what to change, and a reducer, which determines what the final state will be as a result for a given action. When you throw both of these into the picture, this is what you see:
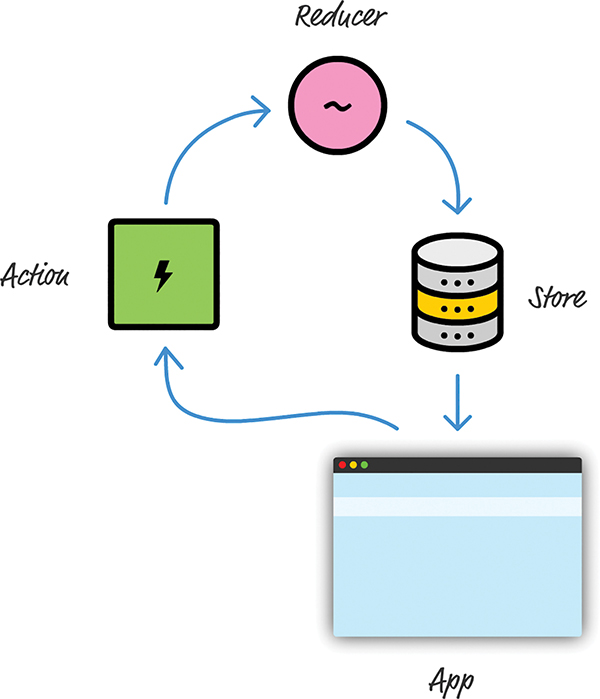
This diagram omits a few more moving pieces, but it’s a good approximation of what happens when our app needs to update the state stored in the Store. Now, looking at this diagram, you’re probably wondering why there’s all this roundaboutness and indirection. Why can’t our app just update the Store directly?

The reason is scalability. Even for simple apps, keeping our application state in-sync with what our app is doing is a chore. For complex apps in which different parts want to access and modify the application state, forget about it! This roundabout way is Redux’s answer for making sure storing application state is easy for both simple apps and complex ones. Beyond just ease, Redux helps make maintaining your application state predictable. Dan Abramov and Andrew Clark, the creators of Redux, interpreted predictable as follows:
1. Your entire application’s state is stored in a single location. You don’t have to search across a variety of data stores to find the part of your state you want to update. Keeping everything stored in a single location also ensures that you don’t have to worry about keeping all of this data in sync.
2. Your state should be read-only and can be modified only through actions. As you saw in the diagram earlier, in a Redux world, you need to ensure that random parts of your app can’t access the Store and modify the state stored inside it. The only way our app can modify what is in the Store is by relying on actions.
3. You specify what the final state should be. To keep things simple, your state is never modified or mutated. You use a reducer to specify what the final result of your state should be.
These three principles might seem a bit abstract, but as you start to write some Redux code, you’ll see them put into practice.
Building a Simple App Using Redux
We’re now going to take all the diagrams and text you saw in the previous section and turn them into code. The app we’re building to highlight how Redux works will be a really simple console-driven app without any UI. This app will store and display a list of favorite colors. From our app, you’ll be able to add colors and remove colors. That’s pretty much it.
This might seem like a step backward from the UI-rich apps we’ve been building, but this app will tie together all this theoretical Redux knowledge to produce some tangible lines of code. The goal is to simply make sense of Redux. We’ll complicate our world by combining Redux with some UI later.
It’s Redux Time
First we need to create a new HTML document and reference the Redux library as part of it. We won’t be using create-react-app or any fancy build system here. This will be just a loose HTML file somewhere that you can view in your browser. Using your favorite code editor, go ahead and create a new file called favoriteColors.html and add the following markup:
<html>
<head>
<title>Favorite Colors!</title>
<script src="https://unpkg.com/redux@latest/dist/redux.js"></script>
</head>
<body>
<script>
</script>
</body>
</html>
As you can see, we have an empty HTML document with only the basic structure defined. We’re referencing a hosted version of the Redux library, which is fine for kicking the tires like we’re doing. For production apps, like the ones you saw with React, you have better approaches to use. We’ll look at those better approaches later, but referencing the library directly is okay for now.
Lights! Camera! Action!
With our Redux library referenced, we need to define our actions. Remember, the action is the only mechanism we have to communicate with our Store. For our app, because we want to add and remove colors, our actions will represent that want in a way the Store will understand.
Inside your script tag, add the following lines:
return {
type: "ADD",
color: value
};
}
function removeColor(value) {
return {
type: "REMOVE",
color: value
};
}
We have two functions, addColor and removeColor. They each take one argument and return an action object as a result. For addColor, the action object is the highlighted two lines:
return {
color: value
}
When defining an action, you have a lot of freedom. Every action object has a type property. This is a keyword that signals what you’re intending to do. Beyond that, any other information you send along with your action is entirely up to you. Because we’re interested in adding or removing a color value from our Store, our action object also has a color property that stores the color we’re interested in.
Let’s get back to our addColor and removeColor functions. Both really serve just one purpose: to return an action. There’s a more formal name for these functions in the Redux world. They’re known as action creators because they, um, create an action.
Our Reducer
Our actions define what we want to do, but the reducer handles the specifics of what happens and how our new state is defined. You can think of the reducer as the intermediary between the Store and the outside world, where it does the following three things:
1. Provides access to the Store’s original state
2. Allows you to inspect the action that was currently fired
3. Allows you to set the Store’s new state
You can see all this when you add a reducer to deal with adding and removing colors from the Store. Add the following code after the point where you’ve defined your action creators:
if (state === undefined) {
state = [];
}
if (action.type === "ADD") {
return state.concat(action.color);
} else if (action.type === "REMOVE") {
return state.filter(function(item) {
return item !== action.color;
});
} else {
return state;
}
}
Take a moment to walk through what this code is doing. First we ensure that we actually have some state to fiddle with:
state = [];
}
if (action.type === "ADD") {
return state.concat(action.color);
} else if (action.type === "REMOVE") {
return state.filter(function(item) {
return item !== action.color;
});
} else {
return state;
}
}
If our state object doesn’t exist, as with the first time we launch our app, we just initialize it as an empty array. You can use any data structure you want, but an array is the right one for what we’re trying to do here.
From there, the rest of our code is responsible for dealing with our actions. Note that the reducer gets the full action object via its action argument. This means you have access to not only the action’s type property, but also anything else you specified earlier as part of defining your actions.
For this example, if our action’s type is ADD, we add the color (specified by the action’s color property) to our state array. If our action’s type is REMOVE, we return a new array with the color in question omitted. Lastly, if our action’s type is something we don’t know, we just return our current state, unmodified:
if (state === undefined) {
state = [];
}
return state.concat(action.color);
} else if (action.type === "REMOVE") {
return state.filter(function(item) {
return item !== action.color;
});
} else {
return state;
}
Pretty simple, right? Be sure to keep one important Redux design choice in mind. The Redux documentation (https://redux.js.org/docs/basics/Reducers.html) describes it best:
Things you should never do inside a reducer:
![]() Mutate its arguments
Mutate its arguments
![]() Perform side effects like API calls and routing transitions
Perform side effects like API calls and routing transitions
![]() Call non-pure functions, e.g. Date.now() or Math.random()
Call non-pure functions, e.g. Date.now() or Math.random()
Given the same arguments, it should calculate the next state and return it. No surprises. No side effects. No API calls. No mutations. Just a calculation.
You can see this in our code. To add new color values to our state array, we used the concat method, which returns an entirely new array made up of both the old values and the new value we’re adding. Using push would give us the same end result, but it violates our goal of not modifying the existing state. To remove color values, we continue to maintain our goal of not modifying our current state. We use the filter method, which returns a brand new array with the value we want to remove omitted.
Also keep the following in mind, as Mark Erikson (@acemarke) reminded me: Redux doesn’t contain any mechanics to prevent us from modifying state and making other poor choices. The creators of Redux have provided some guidelines. It’s up to us to follow them and put those guidelines into practice.
Store Stuff
All that remains now is to tie our actions and the reducer with our Store. First we have to actually create the Store. Below your favoriteColors reducer function, add the following:
Here we’re creating a new Store using the createStore method. The argument we provide is the favoriteColors reducer we created a few moments ago. We’ve now come full circle in using Redux to store application state. We have our store, we have our reducer, and we have actions that tell our reducer what to do.
To see everything fully working, we’re going to add (and remove) some colors to the Store. To do this, we use the dispatch method on our store object that takes an action as its argument. Go ahead and add the following lines:
store.dispatch(addColor("yellow"));
store.dispatch(addColor("green"));
store.dispatch(addColor("red"));
store.dispatch(addColor("gray"));
store.dispatch(addColor("orange"));
store.dispatch(removeColor("gray"));
Each dispatch call sends an action to our reducer. The reducer takes the action and performs the appropriate work to define our new state. To see the Store’s current state, you can just add the following after all the dispatch calls:
As its name implies, the getState method returns the state’s value. If you preview your app in the browser and bring up your browser’s developer tools, you’ll see that the colors we added get displayed in the console:

We’re almost done here; We have just one more really important thing to cover. In real-world scenarios, you want to be notified each time your application’s state is modified. This push model will make your life much easier if you want to update UI or perform other tasks as a result of some change to the Store. To accomplish this, you have the subscribe method for specifying a function (a.k.a. a listener) that gets called each time the contents of the Store are modified. To see the subscribe method in action, just after you defined the store object, add the following highlighted lines:
function render() {
console.log(store.getState());
}
After you’ve done this, preview your app again. This time, whenever you call dispatch to fire another action, the render function gets called when the Store is modified. Phew!
Conclusion
We’ve taken a whirlwind tour of Redux and the major pieces of functionality it brings to the table. We looked at not only the concepts that make Redux really useful for dealing with application state, but also the code to make everything real. The only thing we didn’t get to do was create a more realistic example. Redux is flexible enough to work with any UI framework, and each UI framework has its own magic in working with Redux. Our UI framework of choice is, of course, React! We’ll look at how to tie them together in the next chapter.
Note: If you run into any issues, ask!
If you have any questions or your code isn’t running like you expect, don’t hesitate to ask! Post on the forums at https://forum.kirupa.com and get help from some of the friendliest and most knowledgeable people the Internet has ever brought together!