
20
Using Redux with React
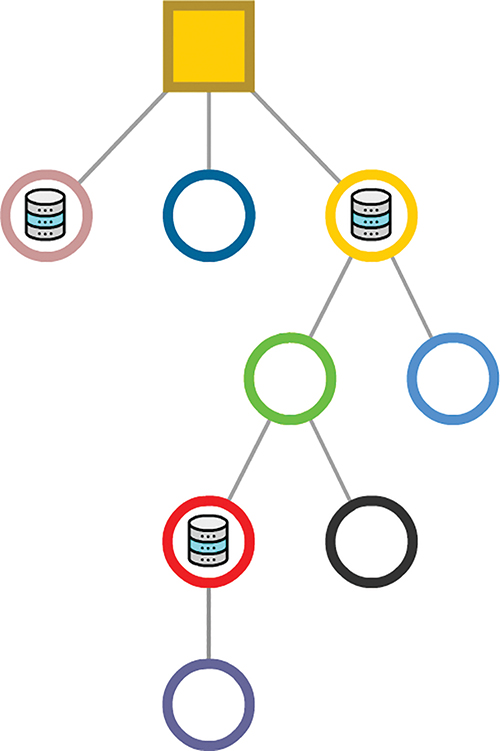
Now that you have a better idea of how Redux works, let’s look at the topic we set out to better understand in the first place. Why is Redux so popular in React projects? To help answer this, take a look at the following component hierarchy for some arbitrary app:

What this app does isn’t very important. The only detail we’ll throw in here is that some of these components are responsible for managing state and transferring some of that state around in the form of props:
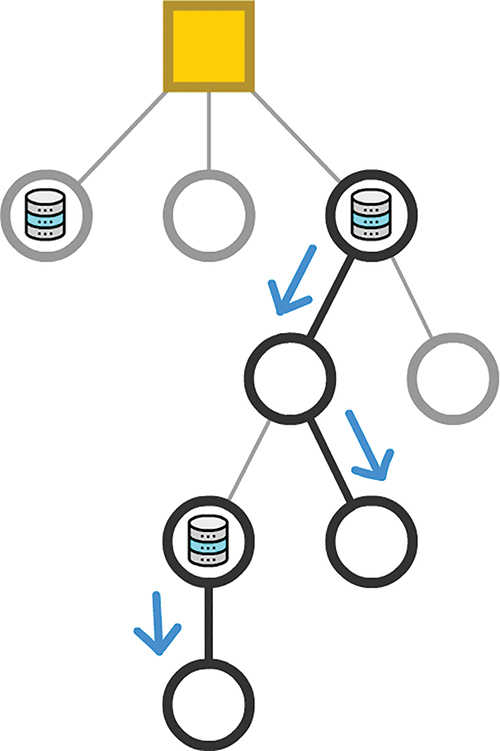
In an ideal setup, the data that each component needs flows neatly down from parent to child:
Unfortunately, outside of simple scenarios, what we want to do isn’t very realistic. Your typical app does a lot of state generating, processing, and transferring. One component might initiate a state change. Another component somewhere else will want to react to it. The props related to this state change might travel both down the tree (yay!) as well as up the tree (no!) to reach whatever component is relying on the data being transferred:
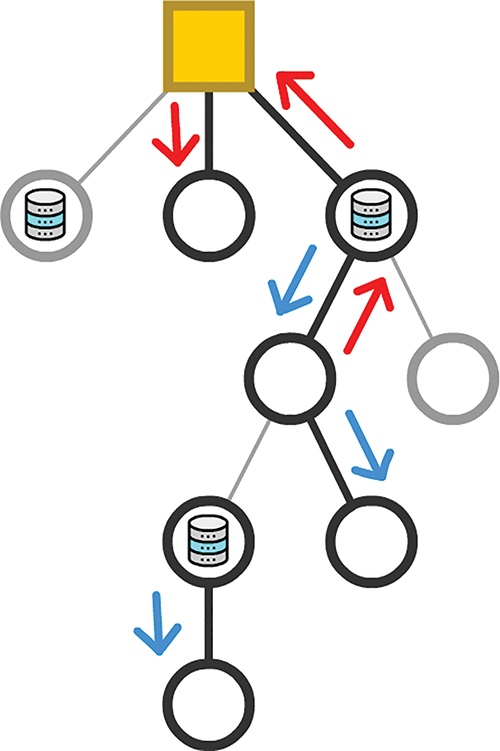
We’ve been guilty of this quite a few times ourselves as part of communicating something (variable value, function/event handler reference, and so on) from child to parent and beyond.
At this point, we need to acknowledge a few problems that can arise from data traveling willy nilly through our components:
1. Dependencies make our code difficult to maintain. React’s stated goal was to avoid spaghetti-like dependencies. When we have data flowing around our app, we end up with exactly what we were supposed to be free from.
2. Each time your state changes or a prop is transmitted, all affected components are asked to re-render. To ensure that your UI is in sync with the current state, this behavior is a good thing. As we mentioned previously, many components are unnecessarily asked to re-render when they’re simply passing a value from parent to child, with no additional input. We looked at ways of minimizing this re-rendering by setting shouldComponentUpdate or relying on PureComponent, but both approaches are a hassle to keep in sync as your app’s data needs evolve.
3. Our component hierarchy mimics the UI, not our data needs. The way we arrange and nest our components helps separate our UI into smaller and manageable pieces. This is the correct approach. Despite the correctness, the components that initiate a state change and the ones that need to react to it are often not in the same parent/child/descendant arrangement (a.k.a. subtree). Similar to what we talked about in #ii, this requires our props to travel great distances, often multiple times per change.
The solution to our problems is Redux. Now, Redux doesn’t fully solve all of these problems, but it gets us really close. Redux allows you to have all of your application’s state live inside its data store instead of being distributed across a bunch of components:
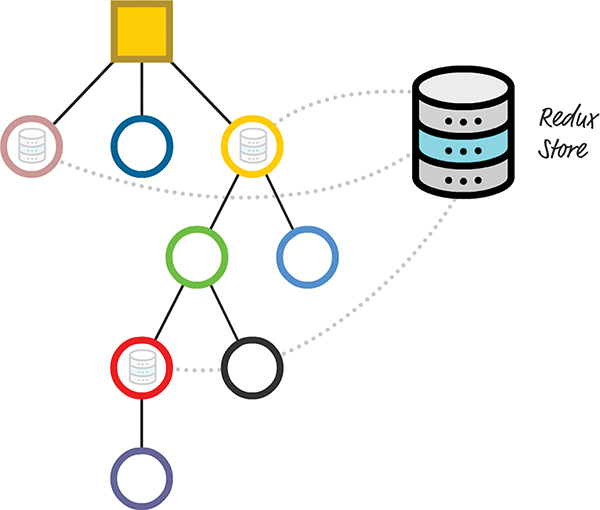
This approach solves several problems. If you want to share data from one part of your app with another, you can do that without having to navigate up and down your component hierarchy:
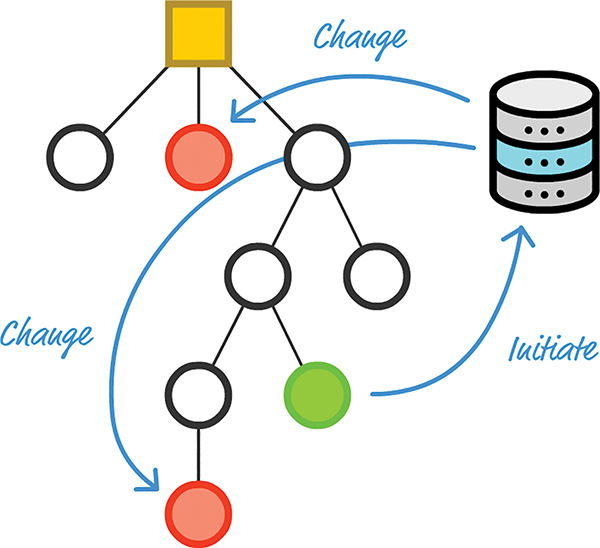
You can initiate a state change and involve only the components that are impacted directly. This directness reduces a lot of overhead you would otherwise have to maintain to ensure that your data (and any changes to it) gets to its intended destination without causing unnecessary renders. Pretty cool, right?
Now let’s go one level higher. From an architectural point of view, the overview of Redux you got in the Introduction still holds:

Besides the Store, we still have to work with actions, reducers, and all the other related pieces that make up the Redux party. The only difference is that our app is built using React, and this difference (and how it plays with Redux) is where we focus our attention here.
Onward!
Managing React State with Redux
The way Redux plugs into your React app is as straightforward as calling a few Redux APIs from your React code. Just two steps are involved:
1. Give your app a reference to the Redux store.
2. Map the action creators, dispatch functions, and state as props to whatever component needs data from the Store.
To see what’s involved in bringing these two steps to life, we’re going to build a simple Counter app that looks as in Figure 20.1:

Figure 20.1 An example of the counter app we will create.
Our app will have a plus button and a minus button to increase or decrease a counter value. That’s it. Nothing else is going on here; this is just the right level of functionality and complexity to help you get your feet wet with combining React and Redux.
How Redux and React Overlap
This is generally where we’d start copying and pasting HTML, CSS, and JavaScript to get our example up and running. We’ll totally get there in a few moments, but first we need to walk through how this app is structured. Ignoring the data and state management side, we’re going to have just two components (Figure 20.2):

Figure 20.2 How our app is currently set up.
We’ll have an App component and a Counter component. Now, a counter isn’t the most complicated of examples to think about. If we had to implement it using plain old state, we would simply create a state object inside Counter and have a variable whose value increases or decreases, depending on what button we press.
When we throw Redux into the mix, our component arrangement gets a little bizarre. It will look as in Figure 20.3:
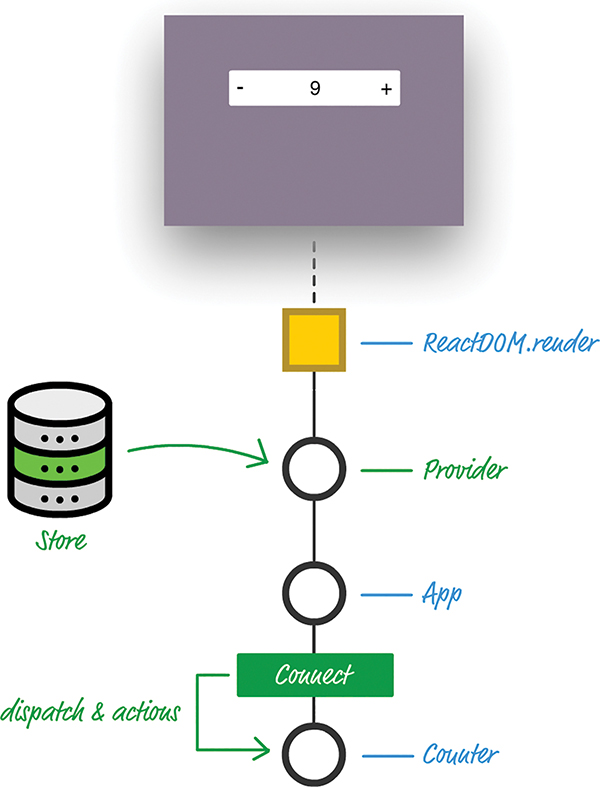
Figure 20.3 What our app’s arrangement will be once we add Redux into the mix.
The items in blue are what we originally had. The items in green are new as part of incorporating Redux into our app. Earlier, we mentioned that adding Redux to our app involved two steps. The green additions mimic those steps closely:
1. The first step of providing access to our Redux store is handled by the Provider component.
2. The second step of granting any interested components access to our dispatch and actions is handled by the Connect component.
Going into a little more detail, the Provider component is the gateway to getting Redux functionality in our React app. It is responsible for storing a reference to the Store and ensuring that all components in our app have a way of accessing it. It is able to do that by being the top-most component in your component hierarchy. That vaulted position allows it to easily pass Redux-related wisdom throughout the entire app.
The Connect component is a bit more interesting. It isn’t a full-blown component in the traditional sense. It’s known as a Higher Order Component (https://reactjs.org/docs/higher-order-components.html), or HOC, as the cool kids say it. HOCs provide a consistent way to extend the functionality of a preexisting component by simply wrapping it and injecting their own additional functionality into it. Think of this as the React-friendly way to mimic what the extends keyword does when working with ES6 classes. Looking at our diagram, the end result is that, thanks to the Connect HOC, our Counter component has access to any actions and dispatch calls needed to work with the Redux Store, without you having to write any special code to access it. The Connect HOC takes care of that.
Both the Provider and Connect HOCs create a symbiotic relationship that gives any old React app the ability to easily work with Redux’s peculiar (yet totally efficient and awesome) way of managing the application state. As we start to build our app, you’ll see how this relationship plays out.
Getting Started
Now that you have an idea of how our app will be structured and some of the Redux-specific constructs we’ll be using, let’s shift gears and start to build our app. To get started, first use create-react-app to create an app we’ll call reduxcounter:
Now let’s install the Redux and React Redux dependencies. From inside your terminal/command-line environment, navigate to the reduxcounter folder and run the following command:
This installs the Redux library so that our app can use the basic building blocks Redux provides for fiddling with application state. After the Redux library has fully installed, we need to deal with one more dependency. Run the following command to bring over all the React Redux content:
When this command has run to completion, we’ll have everything needed to both build our React app and use some Redux magic in it as well. It’s time to start building our app!
Building the App
We first need to clear our package of all unnecessary and extraneous files. Go to your src and public folders, and delete all the contents you see in both locations. Then, create a new file called index.html in your public folder and add the following HTML into it:
<html>
<head>
<title>Redux Counter</title>
</head>
<body>
<div id="container">
</div>
</body>
</html>
The only point to note is that we have a div element with an id value of container.
Next, let’s create the JavaScript that will be the entry point to our app. In the src folder, create a file called index.js and add the following contents into it:
import ReactDOM from "react-dom";
import { createStore } from "redux";
import { Provider } from "react-redux";
import counter from "./reducer";
import App from "./App";
import "./index.css";
var destination = document.querySelector("#container");
// Store
var store = createStore(counter);
ReactDOM.render(
<Provider store={store}>
<App />
</Provider>,
destination
);
Take a moment to look at what we’re doing here. We’re first initializing our Redux store and using our trustworthy createStore method that takes a reducer at its argument. Our reducer is referenced by the counter variable, and if you look at our import statements, it is defined in a file called reducer.js. We’ll deal with that in a few moments.
After creating our Store, we provide it as a prop to our Provider component. The Provider component is intended to be used as the outermost component in our app, to help ensure that every component has access to the Redux Store and related functionality:
);
Next, let’s create our reducer. You already saw that our reducer is referenced by the counter variable and lives inside a file called reducer.js—which doesn’t exist. Let’s fix that by first creating a file called reducer.js in the src folder. After you have created this file, add the following JavaScript into it:
function counter(state, action) {
if (state === undefined) {
return { count: 0 };
}
var count = state.count;
switch (action.type) {
case "increase":
return { count: count + 1 };
case "decrease":
return { count: count - 1 };
default:
return state;
}
}
export default counter;
Our reducer is pretty simple. We have a count variable that we initialize to 0 if our state is empty. This reducer will deal with two action types: increase and decrease. If the action type is increase, we up our count value by 1. If our action type is decrease, we decrease our count value by 1 instead.
At this point, we’re about halfway done building our example (Figure 20.4):
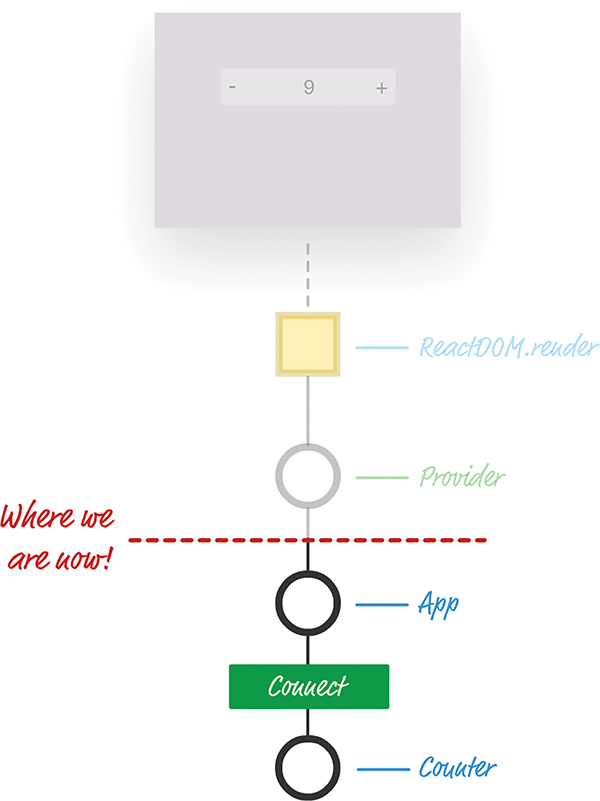
Figure 20.4 We are almost there with getting our app working!
We’re ready to go one level deeper in our app and deal with our App component. Inside the src folder, create a new file called App.js. Inside, add the following:
import Counter from "./Counter";
// Map Redux state to component props
function mapStateToProps(state) {
return {
countValue: state.count;
};
}
// Action
var increaseAction = { type: "increase" };
var decreaseAction = { type: "decrease" };
// Map Redux actions to component props
function mapDispatchToProps(dispatch) {
return {
increaseCount: function() {
return dispatch(increaseAction);
},
decreaseCount: function() {
return dispatch(decreaseAction);
}
};
}
// The HOC
var connectedComponent = connect(
mapStateToProps,
mapDispatchToProps
)(Counter);
export default connectedComponent;
Take a few moments to see what’s going on here. The main purpose of the code here is to turn all the Redux-specific hooks into something we can use in React. More specifically, we provide all those hooks as props that our component can easily consume through two functions, called mapStateToProps and mapDispatchToProps.
First up is our mapStateToProps function:
function mapStateToProps(state) {
return {
countValue: state.count;
};
}
This function subscribes to all Store updates and gets called when anything in our Store changes. It returns an object that contains the Store data you want to transmit as props to a component. In our case, what we’re transmitting is pretty simple: an object that contains a property called countValue whose value is represented by our old count property from the Store.
Providing the Store value as props is only one part of what we need to do. The next part is to give our component access to the action creators and actions, also in the form of props. The following code handles this:
var increaseAction = { type: "increase" };
var decreaseAction = { type: "decrease" };
// Map Redux actions to component props
function mapDispatchToProps(dispatch) {
return {
increaseCount: function() {
return dispatch(increaseAction);
},
decreaseCount: function() {
return dispatch(decreaseAction);
}
};
}
The really interesting stuff happens with mapDispatchToProps. We return an object containing the name of the two functions our component can call to dispatch a change to our Store. The increaseCount function fires off a dispatch with an action type of increase. The decreaseCount function fires off a dispatch with an action type of decrease. If you look at the reducer we added a few moments ago, you can see how either of these function calls will affect the value of count we’re storing in our Store.
All that remains now is to ensure that whatever component we want to provide all these props to has some way of actually receiving them. That is where the magical connect function comes in:
mapStateToProps,
mapDispatchToProps
)(Counter);
This function creates the magical Connect HOC we talked about earlier. It takes our mapStateToProps and mapDispatchToProps functions as arguments, and it passes all of that into the Counter component, which you also specify. The end result of all this code running is the equivalent of rendering the following:
<Counter increaseCount={increaseCount}
decreaseCount={decreaseCount}
countValue={countValue}/>
</Connect>
Our Counter component gets access to increaseCount, decreaseCount, and countValue. The only strange thing is that there’s no render function or equivalent in sight. All of that is handled automatically by React and its treatment of HOC.
We’re almost done! It’s time to get our Counter component up and running. In your src directory, add a file called Counter.js. Put the following into it:
class Counter extends Component {
render() {
return (
<div className="container">
<button className="buttons"
onClick={this.props.decreaseCount}>-</button>
<span>{this.props.countValue}</span>
<button className="buttons"
onClick={this.props.increaseCount}>+</button>
</div>
);
}
}
export default Counter;
This will probably be the most boring component you’ve seen in quite some time. We’ve already talked about how our Connect HOC sends down props and other related shenanigans to our Counter component. You can see those props in use here to display the counter value or call the appropriate function when our plus or minus buttons are clicked.
The last thing we need to do is define our CSS file to style our counter. In the same src folder we’ve been working in all this time, create a file called index.css. Inside this file, add the following style rules:
margin: 0;
padding: 0;
font-family: sans-serif;
display: flex;
justify-content: center;
background-color: #8E7C93;
}
.container {
background-color: #FFF;
margin: 100px;
padding: 10px;
border-radius: 3px;
width: 200px;
display: flex;
align-items: center;
justify-content: space-between;
}
.buttons {
background-color: transparent;
border: none;
font-size: 16px;
font-weight: bold;
border-radius: 3px;
transition: all .15s ease-in;
}
.buttons:hover:nth-child(1) {
background-color: #F45B69;
}
.buttons:hover:nth-child(3) {
background-color: #C0DFA1;
}
At this point, we’re done with our example. If you haven’t done so yet, save your changes across all the files you’ve been working on. If you preview your app in the browser (using npm start), you will see your counter working as expected.
Conclusion
In many ways, Redux is designed to fix some of the shortcomings that React often claims as advantages. We looked at some of these advantages when we examined how data in React is supposed to flow. You could even go further and say that the ideas behind Redux should be formalized as part of React itself so that you get even better integration. But Redux isn’t perfect, either. As with many things in programming, Redux is simply one of many tools you have for accomplishing a task. Not every situation involving data requires Redux; in fact, adding Redux sometimes can create unnecessary complexity in what you’re trying to do. Dan Abramov, one of the creators of Redux, wrote a great article (https://medium.com/@dan_abramov/you-might-not-need-redux-be46360cf367) describing some situations when you probably shouldn’t use Redux to solve your problem. I highly encourage you to read that to get the full picture.
Note: If you run into any issues, ask!
If you have any questions or your code isn’t running like you expect, don’t hesitate to ask! Post on the forums at https://forum.kirupa.com and get help from some of the friendliest and most knowledgeable people the Internet has ever brought together!