
2
Using the Command Line
The command line is an interface to a computer—a way for you (the human) to communicate with the machine. Unlike common graphical interfaces that use “windows, icons, menus, and pointers” (i.e., WIMP), the command line is text-based, meaning you type commands instead of clicking on icons. The command line lets you do everything you would normally do by clicking with a mouse, but by typing in a manner similar to programming! As a data scientist, you will mostly use the command line to manage your files and keep track of your code using a version control system (see Chapter 3).
While the command line is not as friendly or intuitive as a graphical interface, it has the advantage of being both more powerful and more efficient (it’s faster to type than to move a mouse, and you can do lots of “clicks” with a single command). The command line is also necessary when working on remote servers (other computers that often do not have graphical interfaces enabled). Thus, the command line is an essential tool for data scientists, particularly when working with large amounts of data or files.
This chapter provides a brief introduction to basic tasks using the command line—enough to get you comfortable navigating the interface and to enable you to interpret commands.
2.1 Accessing the Command Line
To use the command line, you will need to open a command shell (also known as a command prompt or terminal). This program provides the interface you type commands into. You should have installed a command shell, here also referred to as “the terminal” or the “command line,” as detailed in Chapter 1.
Once you open up the command shell (the Terminal program on Mac, or Git Bash on Windows), you should see something like the screen shown in Figure 2.1.
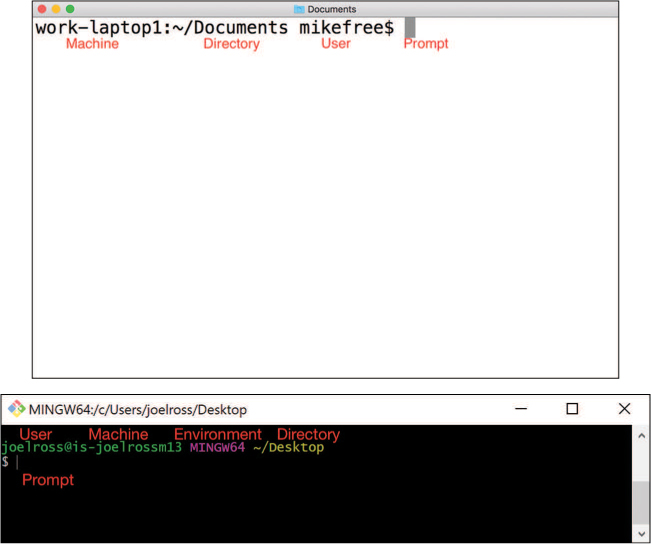
A command shell is the textual equivalent of having opened up Finder or File Explorer and having it display the user’s “Home” folder. While every command shell program has a slightly different interface, most will display at least the following information:
The machine you are currently interfacing with (you can use the command line to control different computers across a network or the internet). In Figure 2.1 the Mac machine (top) is
work-laptop1, and the Windows machine (bottom) isis-joelrossm13.The directory (folder) you are currently looking at. In Figure 2.1 the Mac directory is
~/Documents, while the Windows directory is~/Desktop. The~is a shorthand for the “home directory”:/Users/CURRENT_USER/on a Mac, orC:/Users/CURRENT_USER/on Windows.The user you are logged in as. In Figure 2.1 the users are
mikefree(Mac) andjoelross(Windows).The command prompt (typically denoted as the
$symbol), which is where you will type in your commands.
Remember
Lines of code that begin with a pound symbol (#) are comments: They are included to explain the code to human readers (they will be ignored by your computer!).
2.2 Navigating the File System
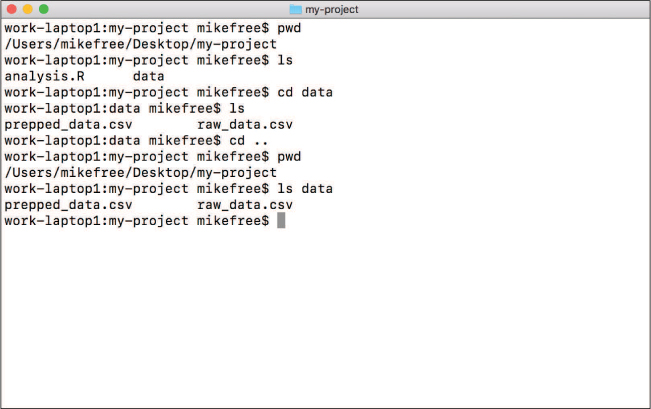
Although the command prompt gives you the name of the folder you are in, you might like more detail about where that folder is. Time to send your first command! At the prompt, type the pwd command:
# Print the working directory (which folder the shell is currently inside)
pwd
This command stands for print working directory (shell commands are highly abbreviated to make them faster to type), and will tell the computer to print the folder you are currently “in.” You can see the results of the pwd command (among others) in Figure 2.2.
Fun Fact
Command line functions like pwd actually start a tiny program (app) that does exactly one thing. In this case, the app prints the working directory. When you run a command, you’re actually executing a tiny program!
Folders on computers are stored in a hierarchy: each folder has more folders inside it, which have more folders inside them. This produces a tree structure similar to the one shown in Figure 2.3.
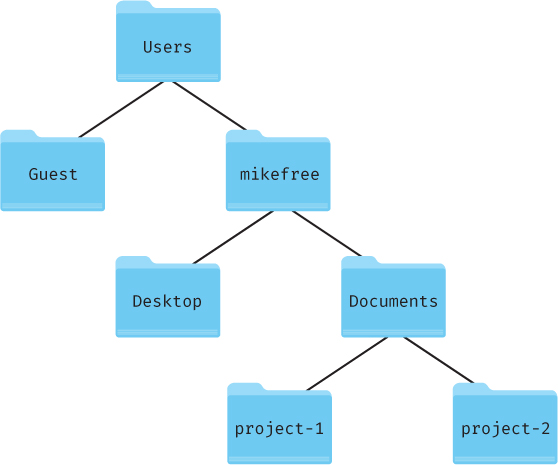
You describe what folder you are in by putting a slash / between each folder in the tree. Thus /Users/mikefree means “the mikefree folder, which is inside the Users folder.” You can optionally include a trailing / at the end of a directory: /Users/mikefree and /Users/mikefree/ are identical. The final / can be useful for indicating that something is a folder, rather than just a file that lacks an extension.
At the very top (or bottom, depending on your point of view) is the root / directory—which has no name, and so is just indicated with that single slash. Thus /Users/mikefree really means “the mikefree folder, which is inside the Users folder, which is inside the root folder.”
2.2.1 Changing Directories
To interact with your files of interest, you will need to change the directory in the command shell. In a graphical system like Finder, you would simply double-click on the folder to open it. On the command line, you perform this type of navigation by typing in commands for what you want to do.
Caution
There is no clicking with the mouse on the command line (at all!). This includes clicking to move the cursor to an earlier part of the command you have typed, which can be frustrating. You will need to use your left and right arrow keys to move the cursor instead. However, you can make the cursor jump over segments of your syntax if you hold down the alt (or option) key when you press the left and right arrow keys.
The command to change your directory is called cd (for change directory). You type this command as:
# Change the working directory to the child folder with the name "FOLDER_NAME"
cd FOLDER_NAME
The first word in this example is the command, or what you want the computer to do. In this case, you’re issuing the cd command.
The second word is an example of an argument, which is a programming term that means “more details about what to do.” In this case, you’re providing a required argument of what folder you want to change to! You will, of course, need to replace FOLDER_NAME with the name of the folder to change to (which need not be in all caps).
For practice, you can try changing to the Desktop folder and printing your current location to confirm that you have moved locations.
Tip
The up and down arrow keys will let you cycle though your previous commands so you don’t need to retype them!
2.2.2 Listing Files
In a graphical system, File Explorer or Finder will show you the contents of a folder. The command line doesn’t do this automatically; instead, you need another command:
# List the contents of the current folder
ls
The ls command says to list the folder contents. If you just issue this command without an argument (as shown in the example), it will list the contents of the current folder. If you include an optional argument (e.g., ls FOLDER_NAME), you can “peek” at the contents of a folder you are not currently in (as in Figure 2.2).
Caution
The command line often gives limited or no feedback for your actions. For example, if there are no files in the folder, then ls will show nothing, so it may seem as if it “didn’t work.” Additionally, when you’re typing a password, the letters you type won’t be displayed (not even as *) as a security measure.
Just because you don’t see any results from your command/typing, that doesn’t mean it didn’t work! Trust in yourself, and use basic commands like ls and pwd to confirm any changes if you’re unsure. Take it slow, one step at a time.
Caution
The ls command is specific to Bash shells, such as Terminal or Git Bash. Other command shells such as the Windows Command Prompt use different commands. This book focuses on the syntax for Bash shells, which are available across all operating systems and are more common on remote servers where the command line becomes a necessity (see Section 2.6).
2.2.3 Paths
Both the cd and ls commands work even for folders that are not “immediately inside” the current directory! You can refer to any file or folder on the computer by specifying its path. A file’s path is “how you get to that file”: the list of folders you would need to click through to get to the file, with each folder separated by a slash (/). For example, user mikefree could navigate to his Desktop by describing the path to that location in his file system:
# Change the directory to the Desktop using an absolute path (from the root)
cd /Users/mikefree/Desktop/
This code says to start at the root directory (that initial /), then go to Users, then go to mikefree, then to Desktop. Because this path starts with a specific directory (the root directory), it is called an absolute path. No matter what folder you currently happen to be in, that path will refer to the correct directory because it always starts on its journey from the root.
Contrast that with the following example:
# Change the directory to `mikefree/Desktop`, relative to the current location
cd mikefree/Desktop/
Because this path doesn’t have the leading slash, it just says to “go to the mikefree/Desktop/ folder from the current location.” This is an example of a relative path: it gives you directions to a file relative to the current folder. As such, the relative path mikefree/Desktop/ will refer to the correct location only if you happen to be in the /Users folder; if you start somewhere else, who knows where you will end up!
Remember
You should always use relative paths, particularly when programming! Because you will almost always be managing multiples files in a project, you should refer to the files relatively within your project. That way, your program can easily work across computers. For example, if your code refers to /Users/YOUR_USER_NAME/PROJECT_NAME/data, it can run only on the YOUR_USER_NAME account. However, if you use a relative path within your code (i.e., PROJECT_NAME/data), the program will run on multiple computers—which is crucial for collaborative projects.
You can refer to the “current folder” by using a single dot (.). So the command
# List the contents of the current directory
ls.
means “list the contents of the current folder” (the same thing you get if you leave off the argument entirely).
If you want to go up a directory, you use two dots (..) to refer to the parent folder (that is, the one that contains this one). So the command
# List the contents of the parent directory
ls ..
means “list the contents of the folder that contains the current folder.”
Note that . and .. act just like folder names, so you can include them anywhere in paths: ../../my_folder says to “go up two directories, and then into my_folder.”
Tip
Most command shells like Terminal and Git Bash support tab-completion. If you type out just the first few letters of a file or folder name and then press the tab key, it will automatically fill in the rest of the name! If the name is ambiguous (e.g., you type Do and there is both a Documents and a Downloads folder), you can press Tab twice to see the list of matching folders. Then add enough letters to distinguish them and press Tab to complete the name. This shortcut will make your life easier.
Additionally, you can use a tilde ~ as shorthand for the absolute path to the home directory of the current user. Just as dot (.) refers to “current folder,” ~ refers to the user’s home directory (usually /Users/USERNAME). And of course, you can use the tilde as part of a path as well (e.g., ~/Desktop is an absolute path to the desktop for the current user).
You can specify a path (relative or absolute) to a file as well as to a folder by including the full filename at the end of the folder path—like the “destination”:
# Use the `cat` command to conCATenate and print the contents of a file
cat ~/Desktop/my_file.txt
Files are sometimes discussed as if they were part of the folder that contains them. For example, telling someone to “go up a directory from ~/Desktop/my_file.txt” is just shorthand for saying “go up a directory from the folder that contains ~/Desktop/my_file.txt” (e.g., from ~/Desktop/ to the ~ home directory).
2.3 Managing Files
Once you’re comfortable navigating folders using the command line, you can start to use it to do all the same things you would do with Finder or File Explorer, simply by using the correct command. Table 2.1 provides some commonly used commands to get you started using the command line, though there are many more.1
1An example list of Unix commands can be found here: http://www.lagmonster.org/docs/unix/intro-137.html
Table 2.1 Basic command line commands
Command |
Behavior |
|
make a directory |
|
remove a file or folder |
|
copy a file from one location to another |
|
open a file or folder (Mac only) |
|
open a file or folder (Windows only) |
|
concatenate (combine) file contents and display the results |
|
show previous commands executed |
|
repeat the previous command |
Caution
The command line makes it dangerously easy to permanently delete multiple files or folders and will not ask you to confirm that you want to delete them (or move them to the “recycling bin”). Be very careful when using the terminal to manage your files, as it is very powerful.
Be aware that many of these commands won’t print anything when you run them. This often means that they worked; they just did so quietly. If it doesn’t work, you will know because you will see a message telling you so (and why, if you read the message). So just because you didn’t get any output, that doesn’t mean you did something wrong—you can use another command (such as ls) to confirm that the files or folders changed in the way you wanted!
2.3.1 Learning New Commands
Given the evolving nature of the data science field, you will frequently have to learn new things. One way to do this is to consult the official written descriptions (generically called the documentation) that explain how the syntax works. This information is available online, but many command shells (though not Git Bash, unfortunately) also include their own manual you can use to look up commands. On the command line, you can use the man command to look up a specific command in the manual:
# View the manual for the `mkdir` command (not available in Git Bash)
man mkdir
This command will display the manual for the mkdir command (shown in Figure 2.4). Because manuals are often long, they are opened up in a command line viewer called less. You can “scroll” up and down by using the arrow keys. Press the q key to quit and return to the command prompt.
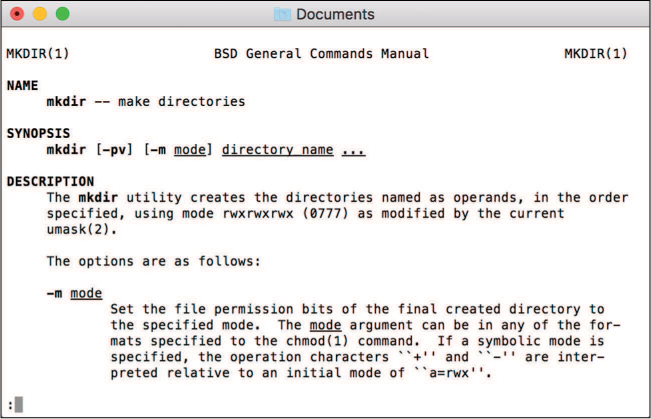
mkdir command, as shown on a Mac Terminal.
If you look under “Synopsis,” you can see a summary of all the different arguments this command understands. A few notes about reading this syntax:
Anything written in brackets
[]is optional. Arguments that are not in brackets (e.g.,directory_name) are required.Underlined arguments are ones you choose: You don’t actually type the word
directory_name, but instead insert your own directory name. Contrast this with the options: if you want to use the-poption, you need to type-pexactly.“Options” (or “flags”) for command line programs are often marked with a leading hyphen
-to distinguish them from file or folder names. Options may change the way a command line program behaves—just as you might set “easy” or “hard” as the mode in a game. You can either write out each option individually or combine them:mkdir -p -vandmkdir -pvare equivalent.Some options may require an additional argument beyond just indicating a particular operation style. In Figure 2.4 you can see that the
-moption requires you to specify an additionalmodeargument; check the details in the “Description” for exactly what that argument should be.
Command line manuals (“man pages”) are often very difficult to read and understand. Start by looking at just the required arguments (which are usually straightforward), and then search for and use a particular option if you want to change a command’s behavior. For practice, read the man page for rm and try to figure out how to delete a folder and not just a single file. Be careful, as this is a good way to unintentionally permanently delete files.
Tip
Manual pages are a good example of the kind of syntax explanations you will find when learning about a particular command, but are not necessarily the best way to actually learn to use a command. To do that, we recommend more focused resources, such as Michael Hartle’s excellent online tutorial Learn Enough Command Line to Be Dangerous.a Try searching online for a particular command to find many different tutorials and examples!
Some other useful commands you could explore are listed in Table 2.2.
Table 2.2 More advanced command line commands
Command |
Behavior |
|
Output first n lines of an input (specified as an argument) |
|
Search the list of inputs for a pattern and output the matches (globally search regular expression and print) |
|
Select portions from input and write them as output |
|
Copy unique input lines to the output (and use the |
|
“Find and replace” content in input (stream editor) |
|
Sort input lines (ascending or descending) |
|
Output word count information |
|
Download content/webpage at a URL (“see URL”—get it?) |
|
Have the computer speak the argument (Mac only) |
2.3.2 Wildcards
One last note about working with files: since you will often work with multiple files, command shells offer some shortcuts for talking about files with similar names. In particular, you can use an asterisk * as a wildcard when referring to files. This symbol acts like a “wild” or “blank” tile in the board game Scrabble—it can be “replaced” by any character (or any set of characters) when determining which file(s) you’re talking about.
*.txtrefers to all files that have.txtat the end.cat *.txtwould output the contents of every.txtfile in the folder.hello*refers to all files whose names start withhello.hello*.txtrefers to all files that start withhelloand end with.txt, no matter how many characters are in the middle (including no characters!).*.*refers to all files that have an extension (usually all files).
As an example, you could remove all files that have the extension .txt by using the following syntax (again, be careful!):
# Remove all files with the extension `.txt` (careful!)
rm *.txt
2.4 Dealing with Errors
The syntax of the command line commands (how you write them out) is rather inflexible. Computers aren’t good at figuring out what you meant if you aren’t really specific; forgetting a space may result in an entirely different action.
Consider another command: echo lets you “echo” (print out) some text. For example, you can echo "Hello World", which is the traditional first computer program written for a new language or environment:
# Echo (print) "Hello world" to the terminal
echo "Hello world"
What happens if you forget the closing quotation mark (")? You keep pressing enter but the shell just shows a > each time!
What’s going on? Because you didn’t “close” the quote, the shell thinks you are still typing the message you want to echo! When you press enter, it adds a line break instead of ending the command, and the > indicates that you’re still going. If you finally close the quote, you will see your multi-line message printed.
Tip
If you ever get stuck in the command line, press ctrl+c (the control and c keys together). This almost always means “cancel” and will “stop” whatever program or command is currently running in the shell so that you can try again. Just remember: “ctrl+c to flee.”
If that doesn’t work, try pressing the esc key, or typing exit, q, or quit. Those commands will cover most command line programs.
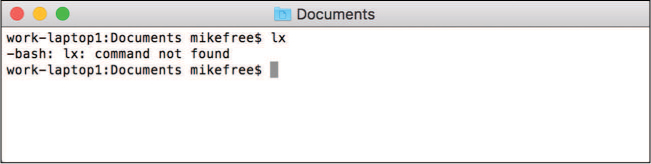
This book discusses a variety of approaches to handling errors in computer programs. Many programs do provide error messages that explain what went wrong, though the density of these messages may make it tempting to disregard them. If you enter an unrecognized command, the shell will inform you of your mistake, as shown in Figure 2.5. In that example, a simple typo (lx instead of ls) is invalid syntax, yielding a fairly helpful error message (command not found—the computer can’t find the lx command you are trying to use).
However, forgetting arguments yields different results. In some cases, there will be a default behavior (consider what happens if you enter cd without any arguments). If some arguments are required to run a command, the shell may provide you with a brief summary of the command’s usage, as shown in Figure 2.6.
![A screenshot shows a command executed without the required arguments. The command reads, mkdir and its output reads, usage: mkdir [-pv] [-m mode] directory.](http://images-20200215.ebookreading.net/9/4/4/9780135159071/9780135159071__programming-skills-for__9780135159071__graphics__02fig06.jpg)
Remember
Whenever the command line (or any other code interpreter, for that matter) provides you with feedback, take the time to read the message and think about what the problem might be before you try again.
2.5 Directing Output
All commands discussed so far have either modified the file system or printed some output to the terminal. But you can also specify that you want the output to go somewhere else (e.g., to save it to a file for later). This is done using redirects. Redirect commands are usually single punctuation marks, because the commands are supposed to be as quick to type (but hard to read!) as possible.
>says “take the output of the command and put it in this file.” For example,echo "Hello World" > hello.txtwill put the outputted text"Hello World"into a file calledhello.txt. Note that this will replace any previous content in the file, or create the file if it doesn’t exist. This is a great way to save the output of your command line work!>>says “take the output of the command and append it to the end of this file.” This will keep you from overwriting previous content.|(the pipe) says “take the output of this command and send it to the next command.” For example,cat hello.txt | lesswould take the output of thehello.txtfile and send it to thelessprogram, which provides the arrow-based “scrolling” interface that man pages use. This is primarily used when you need to “chain” multiple commands together—that is, take the result of one command and send it to the next, and then send the result of that to the next command. This type of sequencing is used inR, as described in Chapter 11.
You might not use this syntax on a regular basis, but it is useful to be familiar with the symbols and concepts. Indeed, you can use them to quickly perform some complex data tasks, such as determining how often a word appears in a set of files. For example, the text of this book was written across a number of different files, all with the extension .Rmd (more on this in Chapter 18). To see how frequently the word “data” appears in these .Rmd files, you could first search for the word using the grep command (using a wildcard to specify all files with that extension), then redirect the output of the search to the wc command to count the words:
# Search .Rmd files for "data", then perform a word count on the results
grep -io data *.Rmd | wc -w
This command shows the value of interest on the command line: The word “data” is used 1897 times! While this example is somewhat dense and requires understanding the different options each command makes available, it demonstrates the potential power of the command line.
2.6 Networking Commands
One of the most common uses of the command line is for accessing and controlling remote computers—that is, machines to which you can connect over the internet. This includes web servers that may host data or reports you wish to share, or cloud-based clusters (such as Microsoft Azure) that may process data much more quickly than your own machine. Because these computers are located somewhere else, you often can’t use a mouse, keyboard, and monitor to control them. The command line is the most effective way to control these machines as if you were actually there.
To access a remote computer, you will most commonly use the ssh (secure shell) command. ssh is a command utility and protocol for securely transferring information over a network. In this case, the information being transferred will be the commands you run on the machine and the output they produce. At the most basic level, you can use the ssh command to connect to a remote machine by specifying the host URL of that machine. For example, if you wanted to connect to a computer at ovid.washington.edu, you would use the command:
# Use the secure shell (ssh) utility to connect to a remote computer
ssh ovid.washington.edu
However, most remote machines don’t let just anyone connect to them for security reasons. Instead, you need to specify your username for that machine. You do this by putting the username followed by an @ symbol at the beginning of the host URL:
# Use the secure shell (ssh) to connect to a remote computer as mikefree
ssh [email protected]
When you give this command, the remote server will prompt you for your password to that machine. Remember that the command line won’t show anything (even *) as you type in the password, but it is being entered nonetheless!
Tip
If you connect to a remote server repeatedly, it can become tedious to constantly retype your password. Instead, you can create and use an ssh key,a which “saves” your authentication information on the server so you don’t need to put in a password each time. Check with the administrator of the remote machine for specific instructions.
ahttps://help.github.com/articles/generating-a-new-ssh-key-and-adding-it-to-the-ssh-agent/
Once you connect to a remote server, you will see the command prompt change to that of the remote server, as shown in Figure 2.7.

ssh command on a Mac Terminal.
At that point, you can use commands like pwd and ls to see where you are on that remote computer, cd to navigate to another folder, and any other command line command you wish—just as if you had opened a terminal on that machine!
Once you are finished working on the remote machine, you can disconnect by using the exit command. Closing the command shell will also usually end your connection, but using exit will more explicitly stop any ongoing processes on a remote machine.
The ssh utility will let you connect to a remote machine and control it as if it were right in front of you. But if you want to move files between your local machine and the remote one, you will need to use the scp (secure copy) command. This command works exactly like the cp command mentioned earlier, but copies files over the secure SSH protocol.
To copy a local file to a location on a remote machine, you need to specify the username and host URL of that machine, similar to what you would use to connect via ssh. In addition, you will need to specify the destination path (which folder to copy the file to) on that remote machine. You can specify a path on a remote machine by including it after a colon (:) following the host URL. For example, to refer to the ~/projects folder on the ovid.washington.edu machine (for user mikefree), you would use
[email protected]:~/projects
Thus to copy a local file to a folder on a remote machine, user mikefree would use a command like this:
# Securely copy the local file data.csv into the projects folder on the
# remote machine
scp data.csv [email protected]:~/projects

# Or more generically:
scp MY_LOCAL_FILE username@hostname:path/to/destination
It is important to note that file paths are relative to the currently connected machine—that is why you need to specify the host URL. For example, if you had connected to a remote server via ssh and wanted to copy a file back to your local machine, you would need to specify the remote path to your computer! Since most personal computers don’t have easily identifiable hostnames, it’s usually easiest to copy a file to a local machine by disconnecting from ssh and making the first scp argument the remote host:
# Run from local machine (not connected through SSH)
# Copies the remote file to the current folder (indicated with the dot .)
scp username@hostname:path/to/destination/file .
Going Further
Overall, being able to use basic terminal commands will allow you to navigate to and interact with a wide variety of machines, and provides you with a quick and powerful interface to your computer. For practice using the command line, see the set of accompanying book exercises.2
2Command line exercises: https://github.com/programming-for-data-science/chapter-02-exercises