
Rotating the device changes the device configuration. The device configuration is a set of characteristics that describe the current state of an individual device. The characteristics that make up the configuration include screen orientation, screen density, screen size, keyboard type, dock mode, language, and more.
Typically, applications provide alternative resources to match device configurations. You saw an example of this when you added multiple arrow icons to your project for different screen densities.
When a runtime configuration change occurs, there may be resources that are a better match for the new configuration. So Android destroys the activity, looks for resources that are the best fit for the new configuration, and then rebuilds a new instance of the activity with those resources. To see this in action, create an alternative resource for Android to find and use when the device’s screen orientation changes to landscape.
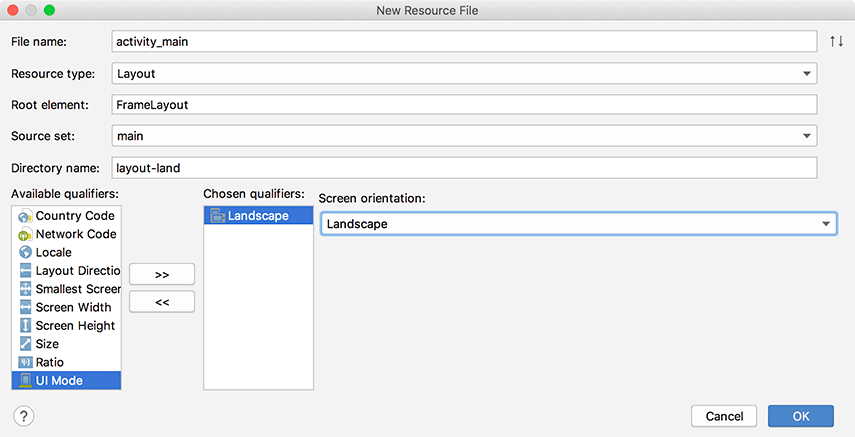
In the project tool window, right-click the res directory and select New → Android Resource File. You should see a window similar to Figure 3.15 that lists the resource types and qualifiers for those types. Type activity_main in the File name field. Select Layout in the Resource type dropdown. Type FrameLayout in the Root element field. Leave the Source set option set to main.

Next, you will choose how the new layout resource will be qualified. Select Orientation in the Available qualifiers list and click the >> button to move Orientation to the Chosen qualifiers section.
Finally, ensure that Landscape is selected in the Screen orientation dropdown, as shown in Figure 3.16. Verify that the Directory name now shows layout-land. While this window looks fancy, its purpose is just to determine the name of the directory where the new resource file will be placed. Click OK.
Android Studio will create the res/layout-land/ folder in your project and place a new layout file named activity_main.xml in the new folder. Switch the project tool window to the Project view to see the files and folders in your project as they actually are. Switch back to the Android view to see the summary of the files.
As you have seen, configuration qualifiers on res subdirectories are how Android identifies which resources best match the current device configuration. The -land suffix is another example of a configuration qualifier. You can find the list of configuration qualifiers that Android recognizes and the aspects of the device configuration that they refer to at developer.android.com/guide/topics/resources/providing-resources.html.
You now have a landscape layout and a default layout. When the device is in landscape orientation, Android will find and use layout resources in the res/layout-land directory. Otherwise, it will stick with the default in res/layout/. Note that the two layout files must have the same filename so that they can be referenced with the same resource ID.
At the moment, res/layout-land/activity_main.xml displays an empty screen. To fix this, copy all the contents except the root LinearLayout open and closing tags from res/layout/activity_main.xml. Paste the code into res/layout-land/activity_main.xml, between the open and closing FrameLayout tags.
Next, make the changes shown in Listing 3.4 to the landscape layout so that it is different from the default.
Listing 3.4 Tweaking the landscape layout (res/layout-land/activity_main.xml)
<FrameLayout xmlns:android="http://schemas.android.com/apk/res/android"
    xmlns:tools="http://schemas.android.com/tools"
    android:layout_width="match_parent"
    android:layout_height="match_parent" >

    <TextView
        android:id="@+id/question_text_view"
        android:layout_width="wrap_content"
        android:layout_height="wrap_content"
        android:gravity="center"
        android:layout_gravity="center_horizontal"
        android:padding="24dp"
        tools:text="@string/question_australia"/>

    <LinearLayout
        android:layout_width="wrap_content"
        android:layout_height="wrap_content"
        android:orientation="horizontal"
        android:layout_gravity="center_vertical|center_horizontal">

        <Button
            .../>

        <Button
            .../>

    </LinearLayout>

    <Button
        android:id="@+id/next_button"
        android:layout_width="wrap_content"
        android:layout_height="wrap_content"
        android:layout_gravity="bottom|right"
        android:text="@string/next_button"
        android:drawableEnd="@drawable/arrow_right"
        android:drawablePadding="4dp"/>

</FrameLayout>
FrameLayout is the simplest ViewGroup and does not arrange its children in any particular manner.
In this layout, child views will be arranged according to their android:layout_gravity attributes.
This is why you added android:layout_gravity to TextView, LinearLayout, and Button – they are all children of the FrameLayout.
The Button children of the nested LinearLayout can stay exactly the same since they are not direct children of the FrameLayout.
Run GeoQuiz again. Rotate the device to landscape to see the new layout (Figure 3.17). Of course, this is not just a new layout – it is a new MainActivity instance as well.
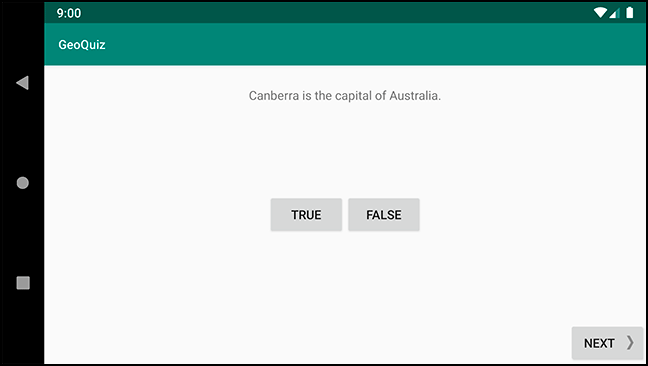
Rotate back to portrait to see the default layout and yet another new MainActivity.
What good is an app that resets itself when the user rotates the device, even if it has a lovely landscape-specific layout? In Chapter 4, you will learn how to fix the GeoQuiz bug caused by the rotation problem.