 Introducing ConstraintLayout
by Kristin Marsicano, Chris Stewart, Bill Phillips
Android Programming: The Big Nerd Ranch Guide, 4th Edition
Introducing ConstraintLayout
by Kristin Marsicano, Chris Stewart, Bill Phillips
Android Programming: The Big Nerd Ranch Guide, 4th Edition
- Title Page
- Dedication
- Acknowledgments
- Table of Contents
- Learning Android
- The Necessary Tools
- 1. Your First Android Application
- 2. Android and Model-View-Controller
- 3. The Activity Lifecycle
- Rotating GeoQuiz
- Activity States and Lifecycle Callbacks
- Logging the Activity Lifecycle
- Exploring How the Activity Lifecycle Responds to User Actions
- Device Configuration Changes and the Activity Lifecycle
- For the More Curious: UI Updates and Multi-Window Mode
- For the More Curious: Log Levels
- Challenge: Preventing Repeat Answers
- Challenge: Graded Quiz
- 4. Persisting UI State
- 5. Debugging Android Apps
- 6. Your Second Activity
- 7. Android SDK Versions and Compatibility
- 8. UI Fragments and the Fragment Manager
- 9. Displaying Lists with RecyclerView
- Adding a New Fragment and ViewModel
- Adding a RecyclerView
- Creating an Item View Layout
- Implementing a ViewHolder
- Implementing an Adapter to Populate the RecyclerView
- Recycling Views
- Cleaning Up Binding List Items
- Responding to Presses
- For the More Curious: ListView and GridView
- Challenge: RecyclerView ViewTypes
- 10. Creating User Interfaces with Layouts and Widgets
- 11. Databases and the Room Library
- 12. Fragment Navigation
- 13. Dialogs
- 14. The App Bar
- 15. Implicit Intents
- 16. Taking Pictures with Intents
- 17. Localization
- 18. Accessibility
- 19. Data Binding and MVVM
- 20. Unit Testing and Audio Playback
- Creating a SoundPool
- Accessing Assets
- Loading Sounds
- Playing Sounds
- Test Dependencies
- Creating a Test Class
- Setting Up Your Test
- Writing Tests
- Data Binding Callbacks
- Unloading Sounds
- For the More Curious: Integration Testing
- For the More Curious: Mocks and Testing
- Challenge: Playback Speed Control
- Challenge: Play Sound Across Rotation
- 21. Styles and Themes
- 22. XML Drawables
- 23. More About Intents and Tasks
- 24. HTTP and Background Tasks
- Creating PhotoGallery
- Networking Basics with Retrofit
- Fetching JSON from Flickr
- Networking Across Configuration Changes
- Displaying Results in RecyclerView
- For the More Curious: Alternate Parsers and Data Formats
- For the More Curious: Canceling Requests
- For the More Curious: Managing Dependencies
- Challenge: Adding a Custom Gson Deserializer
- Challenge: Paging
- Challenge: Dynamically Adjusting the Number of Columns
- 25. Loopers, Handlers, and HandlerThread
- Preparing RecyclerView to Display Images
- Preparing to Download Bytes from a URL
- Downloading Lots of Small Things
- Assembling a Background Thread
- Messages and Message Handlers
- Listening to the View Lifecycle
- Retained Fragments
- For the More Curious: Solving the Image Downloading Problem
- For the More Curious: StrictMode
- Challenge: Observing View LifecycleOwner LiveData
- Challenge: Improving ThumbnailDownloader’s Lifecycle Awareness
- Challenge: Preloading and Caching
- 26. SearchView and SharedPreferences
- 27. WorkManager
- 28. Broadcast Intents
- 29. Browsing the Web and WebView
- One Last Bit of Flickr Data
- The Easy Way: Implicit Intents
- The Harder Way: WebView
- Proper Rotation with WebView
- WebView vs a Custom UI
- For the More Curious: Injecting JavaScript Objects
- For the More Curious: WebView Updates
- For the More Curious: Chrome Custom Tabs (Another Easy Way)
- Challenge: Using the Back Button for Browser History
- 30. Custom Views and Touch Events
- 31. Property Animation
- 32. Afterword
- Index
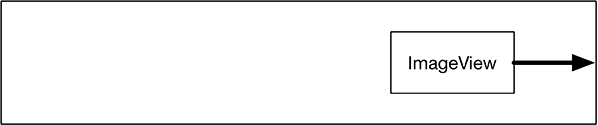
With ConstraintLayout, instead of using nested layouts you add a series of constraints to your layout. A constraint is like a rubber band: It pulls two things toward each other. So, for example, if you have an ImageView, you can attach a constraint from its right edge to the right edge of its parent (the ConstraintLayout itself), as shown in Figure 10.2. The constraint will hold the ImageView to the right.
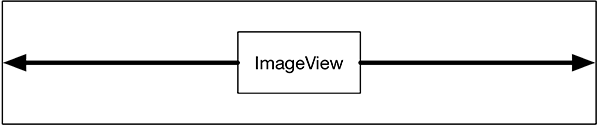
You can create a constraint from all four edges of your ImageView (left, top, right, and bottom). If you have opposing constraints, they will equal out, and your ImageView will be right in the center of the two constraints (Figure 10.3).
So that is the big picture: To place views where you want them to go in a ConstraintLayout, you give them constraints.
What about sizing widgets?
For that, you have three options: Let the widget decide (your old friend wrap_content), decide for yourself, or let your widget expand to fit your constraints.
With those tools, you can achieve a great many layouts with a single ConstraintLayout, no nesting required. As you go through this chapter, you will see how to use constraints with your list_item_crime.xml layout file.
-
No Comment