
4
Compute Services: AWS EC2 Instances
Amazon Elastic Compute Cloud, or the moniker EC2, is a huge topic. The basic EC2 documentation from AWS is currently over a couple of thousand pages because every cloud service AWS offers is powered by some form of compute service, whether it is an instance providing the processing power for your application, a managed service such as the elastic block storage (EBS) storage arrays supporting block storage, or Simple Storage Service (S3) object storage; in the background, there’s always some manner of computer power running in the background.
Compute services are also a key component in auto scaling, load balancing services, and networking services. These are all important topics that are important enough to have their own chapters; in this chapter we’re going to look at the compute instance and how it is built and hosted, how you launch it, and some of its dependencies. We will also look at pricing, which is a complicated category unto itself, and some of the administrative duties required with creating and maintaining instances.
In this chapter, we will learn about what Amazon provides for virtual machines and virtual hard drives. Because we are working in the Amazon cloud, there will be different names for everything. It doesn’t take that long to get used to calling virtual machines instances and virtual hard drives EBS volumes. There is an amazing amount of choice when it comes to choosing the size of your instances and the type of instance. You can even order an instance that is a bare-metal server now, obliterating the earlier National Institute of Standards and Technology (NIST) definitions of cloud. Let’s dig in. The topics for this chapter include the following:
Virtualization at AWS
Instances
Amazon Machine Images
Instance storage options
Instance pricing options
Migration tools
Questions that we will reflect on throughout this chapter regarding the available compute options at AWS are based on our case study Terra Firma:
We have a VMware environment on-premise. How can we use our current images at AWS?
Can we migrate our database to AWS? If we can, what tools are available?
Is there a lot of choice when it comes to virtual machine options?
What if we don’t want to use virtualization? Are there bare-metal servers available?
What’s the hypervisor used at AWS?
We have some developers who want to spin up resources quickly without having to do a lot of work. Are there any managed services that can speed up the provisioning process?
What does AWS mean by the word backup?
How redundant are EBS volumes?
A Short History of EC2 Virtualization
The purpose of this short history lesson on virtualization is to illustrate the amount of change that has occurred over time with the virtualization process and the hypervisors that AWS currently supports. Amazon builds custom bare-metal hardware for the singular use of hosting EC2 instances; as a result, it tunes its data centers and the hardware and software stack for EC2 instances. This tuning includes the ongoing tweaking and customization of the hypervisors used at AWS: both Xen, which is slowly being deprecated, and KVM, a component of the Nitro hypervisor.
For many years, the standard answer for “what hypervisor does AWS deploy?” was a customized version of the Xen hypervisor. Initial versions offered Xen paravirtualization for the Linux operating system and, over time, the hardware virtual machine (HVM) for support of the Windows operating system. Paravirtualization allows the customization of the Linux operating system kernel, which permits the Linux guest operating system running on EC2 instances to access storage and networking using a hypercall, communicating directly to the Xen hypervisor, which in turn called the physical CPU on the bare-metal host carrying out each request.
EC2 instances running Windows were initially hosted differently from Linux using the previously mentioned HVM. HVM virtualization meant that the underlying hardware platform on the host bare-metal server was fully virtualized and accessible by the Windows instance using hardware extensions. Windows clients are completely isolated and unaware of the virtualization process.
Paravirtualization was possible with Linux because it was an open source operating system. On the other hand, Windows remains a closed operating system; therefore, paravirtualization is not possible with Windows EC2 instances. Both of these separate technologies began to be assimilated in 2012.
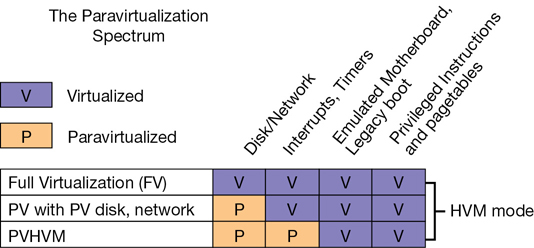
2012—In 2012, the customized version of Xen used by AWS ran in a hybrid model that installed on Intel processors equipped with hardware virtualization (VT-x). These processors offered faster CPU and memory access. They also used paravirtualized drivers to access the network and storage devices as quickly as possible. These two separate virtualization features were beginning to be combined in a hybrid model called PVHVM (paravirtualization and hardware-assisted virtualization technology combined), as shown in Figure 4-1.
2013—At the start of 2013, the Xen hypervisor supported a combination of PVHVM drivers and hardware virtualization for the network interfaces called single-route I/O virtualization (SR-IOV). Several EC2 instances also began to offer support for enhanced networking, using SR-IOV, which offered initial speeds of 10 Gbps. Today speeds can reach 25 Gbps, or 100 Gbps with GPU instances. After testing this new network stack, Netflix published test results showing networking processing speeds of close to 2 million packets per second.
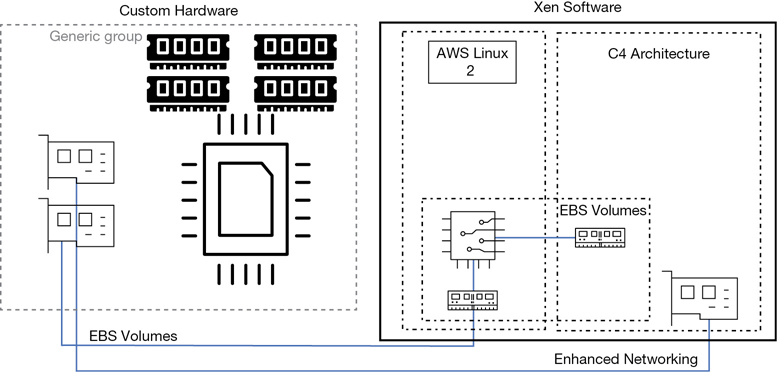
2015—AWS introduced the C4 instance, as shown in Figure 4-2, in 2015. Amazon had been working with a startup company called Annapurna Labs, which created custom semiconductor circuits; it is now an AWS company. AWS was interested in Annapurna Labs’ application-specific integrated circuit (ASIC) chipsets that provided enhanced networking services and several other custom semiconductor designs, which would greatly increase speeds for storage, networking, and encryption. The C4 instance that used the custom chipsets designed with Annapurna offered such a high level of storage and network performance that EBS-optimized volumes were offered by default at no additional charge; in fact, all new instances AWS offered since the C4 instance was released include EBS-optimized volumes at no additional charge.
2016—The X1 instance was released with 128 virtual CPUs (vCPUs) and 2 TB of memory. Custom chipsets allowed access to the high-speed instance storage. An enhanced networking interface that had been specifically designed for EC2 instances was also introduced.
2017—The i3 platform was released in this year. This family of a high-performance instance allowed the offloading of communication, with EBS storage achieving an even higher level of overall performance.
At this point in the redesign cycle, the performance of storage, networking, and management services was vastly improved with the addition of the custom chipsets. Massive increases in speed happened because hardware was replacing software emulation. The next task AWS carried out was replacing the Xen hypervisor with a new lightweight hypervisor called Nitro. I say lightweight because several of the emulation tasks and communication jobs that a typical hypervisor would undertake and manage instead were being performed by hardware chipsets.
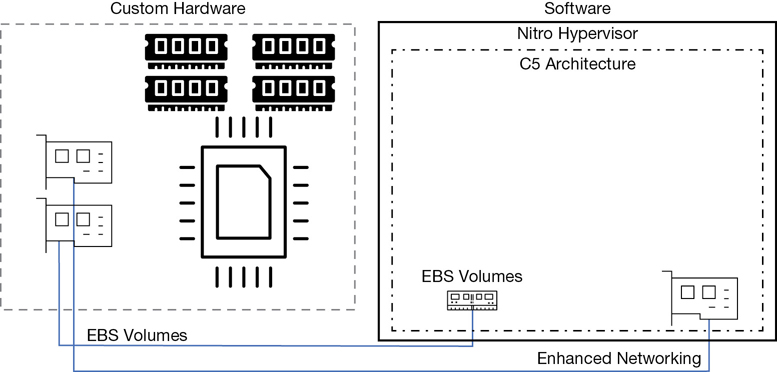
The C5 instance launched in 2017, as shown in Figure 4-3. It was deployed using the Nitro hypervisor and offloaded the networking, storage, and management tasks such as encryption duties to hardware, greatly reducing the duties of the hypervisor and increasing the speed at which operations were carried out. In this new hypervisor design, there is minimal hardware overload for management of storage, networking, and encryption services; these services are carried out with custom hardware chipsets.
The Nitro System
In 2017, the new Nitro hypervisor was launched. As mentioned, the heart of the Nitro hypervisor uses just the KVM core kernel and a streamlined virtual machine manager (VMM). Older KVM emulation components such as QEMU are not used. The term direct metal access has been coined by AWS providing the performance equivalent of a bare-metal server. To achieve this goal, AWS designed custom silicon chipsets that use hardware processes for faster access to storage, networking, interrupts, and carrying out security processes such as encryption.
The EC2 instances and the associated hardware storage devices are isolated at the hardware level, providing an additional layer of security. Over time, Nitro will be the only hypervisor used at AWS, except for the AWS i3.metal instances, which don’t use a hypervisor but are still called instances. Embedded in the hardware of the new bare-metal instances are the Nitro system components, as shown in Figure 4-4.
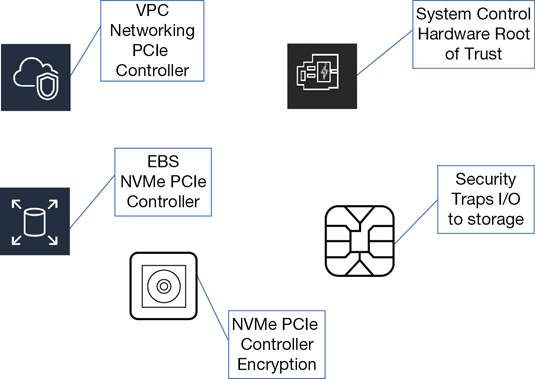
Local NVMe Storage—Custom chipsets provide direct access to high-speed local storage over a Peripheral Component Interconnect (PCI) interface connection, a standard used to connect EC2 instances to the local block storage. All traffic is also transparently encrypted using dedicated local hardware. It’s important to realize that the encryption process is now offloaded from the local CPU to local hardware, the Nitro system, greatly speeding up the encryption process at AWS.
Nitro Security Chip—The main component handling security in this design is the Nitro security chip, which, if you’re familiar with Intel TXT, is carrying out many of the same security functions: protecting the system’s boot process, and monitoring and approving or denying instance request calls for access to the storage resources.
Nitro Networking—Hardware-level networking supports the mapping service for the virtual private cloud (VPC), enhanced networking, and the elastic networking adapter (ENA).
Note
If you are using older versions of Linux, you may still be running virtual machines that require paravirtualization. Although this approach is still possible at AWS, there is only limited support for the older paravirtualization methods, and it is not recommended.
many years, Linux users were encouraged to use paravirtualization. That is not the case today due to design improvements in both the hypervisor and the hardware platform AWS is currently using. Current generation instances now only support hardware virtual machine (HVM) images. If you still want to use paravirtualization, you will not be able to take advantage of the performance gains of the Nitro system and Nitro hypervisor. You can read more about Amazon machine images (AMIs) later in this chapter.
EC2 Instances
Now that you have some knowledge of how Amazon is designing and retro-fitting its hypervisors, EC2 instances, and bare-metal systems, let’s move into a discussion of the instance families at AWS. At AWS, virtual servers are called Elastic Compute Cloud (EC2) instances. At the most basic level, each instance is a virtual server running a version of Windows or Linux. Instances run as a guest operating system hosted by the hypervisor, which in turn is directly installed on a bare-metal server. AWS first launched instances back in August 2006, and there was just one size: the M1.
Note
There are more than 150 instance choices available at AWS.
Each instance is configured at launch with a select amount of memory, vCPU cores, storage, and networking bandwidth. An instance can be sliced and diced in many different patterns and configurations. Regardless of the instance size and type, each configuration has several mandatory parts, as detailed in Figure 4-5.

The following components are part of each configuration:
Built by preconfigured images called Amazon machine images
Authenticated using a unique public/private key pair per instance
Storage options of persistent block storage and temporary storage volumes
A mandatory firewall called a Security Group that protects your network interfaces
Basic or enhanced network adapters
Shared or dedicated hardware options
Instance Families
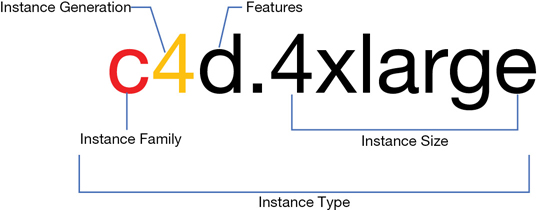
Instances are members of several compute families, whereby instances are grouped and defined by a name and generation designation. For each instance’s name, the first letter that you see is the instance family that it belongs to (see Figure 4-2); this letter describes the resources allocated to the instance and the workloads that the instance is best suited for. The letter also stands for something; for example, the letter C stands for compute, R for RAM, and I for input/output per second (IOPS).
The next number that you see is the generation number. You can think of this number much like a software version number. Therefore, a C5 instance is newer than a C4 instance, and so on. And, interestingly, a newer C5 instance is cheaper than a C4 instance.
Features define the key characteristics of the instance. For example, in c4d; the “d” denotes solid state drives (SSD) for the instance storage. The last component of the instance’s name deals with the size of the instance; sometimes this is called a T-shirt size. Sizes range from small up to 32 times larger than the smallest size, as shown in Figure 4-6. (The size of an instance is based on the amount of vCPU cores, the amount of RAM, and the amount of allocated network bandwidth.) For example, the C4.8xlarge is eight times larger than the c4.large in areas of vCPU cores, RAM, and network bandwidth.
Note
Once an instance has been ordered, the resources (vCPUs, memory, network bandwidth) allocated to an instance are assigned to your account and are never shared with any other AWS customer.
Your on-premise virtual design may overcommit your virtual resources to the available physical resources; therefore, if every virtual machine in your vCenter design was powered on, you possibly wouldn’t have enough physical resources to run all your virtual servers at the same time. At AWS, there is no common pool of compute resources constantly being shared among customers; ordered resources are assigned to the customer’s AWS account until they are deleted.
The older public cloud concept of the “noisy neighbor” has been redesigned by dedicating the assigned resources to each customer. Running a smaller instance at AWS means you have a smaller portion of the physical server assigned to your instance, whereas running an X32-sized instance means you probably have the entire physical server assigned to you. Regardless of the instance ordered, your allotted memory, CPU cores, storage, and network bandwidth remain isolated for each AWS customer. Because customers are virtually isolated from each other, this isolation also forms a key element of security.
What’s a vCPU?
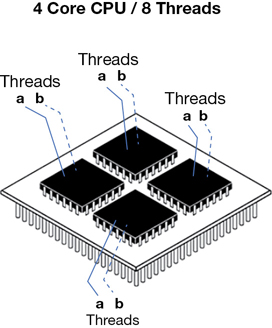
AWS defines the amount of CPU power assigned to each instance as a virtual CPU (vCPU). A vCPU is a part of a physical CPU core. A process called hyperthreading associates two virtual threads to each physical core—an A and a B thread working in a multitasking mode, as shown in Figure 4-7. Think of each physical core as a brain that can be split into two logical brains; each thread is the communication channel linking each instance to a specific amount of processing power. Both Linux and Windows process these virtual threads differently; Linux enumerates the first group of threads (A) before the second group of threads (B); Windows interleaves the threads, selecting first the A and then the B thread. Dividing the vCPU count listed in the EC2 console by 2 will show you the actual physical core count, which might be important if the licensing for your software requires a physical core count, as Oracle databases do.
The required core count of your on-premise applications is something to check for before they are migrated to AWS; if hyperthreading is already disabled for your applications running on-premise, you’ll probably want to disable this process at AWS. If you’re running financial analysis or mechanical design applications, after migrating these types of applications to AWS, you may need to disable hyperthreading on the instance to achieve maximum performance.
Note
To get a listing of the actual core count, visit https://aws.amazon.com/ec2/virtualcores.
Rather than getting overwhelmed by all the choices available in the management console, I suggest you first think of your application and its needs. For initial testing, I’d start with a general-purpose instance that matches your recommended or current specifications for the application. Of course, we must also consider the operating system and its needs. Next, install your application and, if possible, carry out testing on the chosen instance with real user access instead of using a synthetic load-testing tool. Put your instance through its paces as close to a real workload as possible. Remember, you can easily shut off your instance, change its size, and turn it back on and test it again and again until you’re happy.
Note
You can run Lstopo on a virtual instance to get a view of the physical topology of the hardware you are running on, the sockets, the level I to level 3 cache, and the physical core mappings.
EC2 Instance Choices
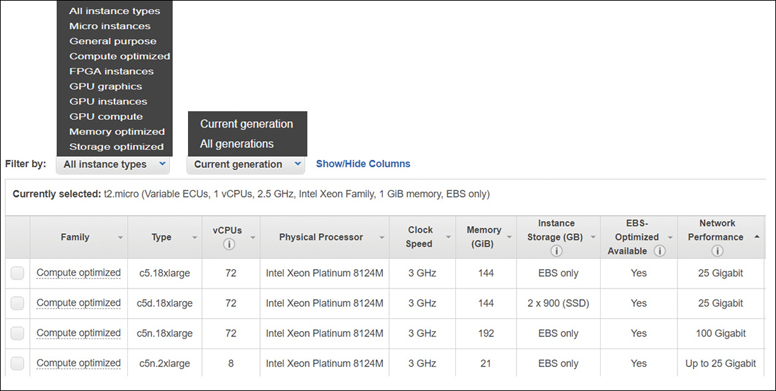
The EC2 console has more than 150 instance types to choose, from general purpose to instances designed for compute, storage, and memory-optimized workloads, as shown in Figure 4-8. There are even bare-metal instances such as an i216xlarge you could consider ordering. After logging into AWS and using the EC2 management console to choose an instance, the initial available choices are defined as “current generation.”
If you want, you can still order the original m1.small instance that AWS offered in 2006, but it’s not recommended to do so. M1 instances should not be used for any workload in production today because there are many more powerful and cost-effective options available. The reality is that AWS rarely deprecates anything; it’s easy to pick an older instance choice. Let’s not start with the cheapest and the smallest instance that you could order.
Note
What also is important is the type of image (AMI) that you use at AWS to build your instance with. The Linux instance types defined as current generation do not support the older paravirtual (PV) images of the past decade. If you still need or still use older PV images, at AWS you are limited to a smaller number of instances that support PV images (c1, c3, hs1, m1, m2, m3, and t1) and a limited number of regions that support PV AMIs, including Tokyo, Singapore, Sydney, Frankfurt, Ireland, São Paulo, North Virginia, Northern California, and Oregon. Windows AMIs support only HVM images.
Micro Instances—There’s only one instance type in this class: the t1.micro with an unidentified processor; that means it’s probably an Intel processor. The clock speed is not identified, but you have .613 GiB of memory with low networking performance. It supports 32- or 64-bit workloads and only shows up in the management console if you search for the All Generation types of instances. Certainly, a small test instance is not meant for production, right? That’s for you to decide. Perhaps you have a micro-service or a logging server that matches up perfectly with the specifications that a micro-service provides.
General-Purpose Instances
General-purpose instances have a deceptively vague name; however, the underlying concept for a general-purpose instance is to provide a baseline of CPU processing, network, and storage.
AWS recommends the general-purpose M5 instance as shown in Table 4-1 as a starting instance to begin testing and learning for Web and application servers, small to medium-sized databases, and other various applications. Keep in mind that there are several versions of the M5 instance type. The overall AWS recommendations for using general-purpose instances are not that exacting. Your definition for the required resources for deploying a small Web server might also vary.
Table 4-1 M5 Instance Specs
Instance Type |
Hypervisor |
Maximum Size |
Storage |
AMI |
|---|---|---|---|---|
m5 |
Nitro |
96 vCPUs with 384 GB of memory and up to 25 Gbps of enhanced networking |
Instance storage offered by M5 instances is fast local NVMe SSD volumes located on the bare-metal server host EBS-optimized storage is provided at no additional cost |
64-bit HVM AMIs that include drivers for enhanced networking and NVMe storage |
m4 |
Xen |
64 vCPUs, 256 GB of memory, up to 25 Gbps of enhanced networking |
Obviously, launching a massive instance with plenty of memory, CPU cores, and high-speed storage will host many different types of applications effortlessly. But remember, when operating in the cloud, you’re paying for everything you use that is running 24/7; the AWS cloud uses different cost variables than what will be used on-premise. Properly sizing the selected instance to match your application needs is of key importance when running production workloads at AWS. But what is also important is the cost of running each instance. Obviously, database instances run 24/7. Application and Web server instances should not be running at a maximum scale all the time—at least not at production scale in the middle of the night. We will look at one of the solutions to this potential problem in Chapter 5, “Planning for Scale and Resiliency.”
Instances Designed to Burst
Some general-purpose models, such as T2 and T3 instances, are designed with the ability to burst above an initial assigned CPU baseline of performance. Using CPU credits that the instance can earn while it is not running under load, these models can burst above their initial CPU baseline as required. T2 instances have the lowest cost per hour at AWS; t2 nano instances cost you half a cent per hour. The use case for these T instances includes applications where the CPU requirements are not constant and fluctuate up and down over a 24-hour period.
When you launch a T2 or T3 instance, depending on the size, you get a baseline of CPU performance ranging from 5% up to maximum, as shown in Table 4-2. The design of a T instance banks CPU credits for the time that your CPU is idle. Banking your CPU credits allows you to use them when your application needs to burst above the assigned performance baseline. The idea is much like this: the typical server doesn’t run flat-out at 100% but instead has peaks and valleys in its performance baseline. Therefore, you can achieve your desired performance when it is necessary using banked CPU credits.
Table 4-2 T Instance Specs
Instance Type |
Hypervisor |
Burst Mode |
Features |
|---|---|---|---|
T3 |
Nitro |
Moderate baseline: unlimited mode allows unlimited CPU bursting |
Intel Xeon–scalable processors ranging from 1 to 8 vCPUs and up to 32 GB of memory; network speed is moderate |
T2 |
Xen |
CPU credits are half the amount earned compared to T3 instances |
EBS-only storage |
T3a |
Nitro |
Unlimited mode by default |
10% cost savings over T3 instances |
At launch of a T instance, there are enough CPU credits allocated to carry out the initial tasks of booting the operating system and running the application. A single CPU credit has the performance of one full CPU core running at 100% for one minute. After a T2 instance is powered on, it earns CPU credits at a defined steady rate determined by the size of the instance; the larger the instance, the more CPU credits are earned up to a defined maximum value. Earned credits expire after 24 hours. If the CPU credits were not used, the running application didn’t need them.
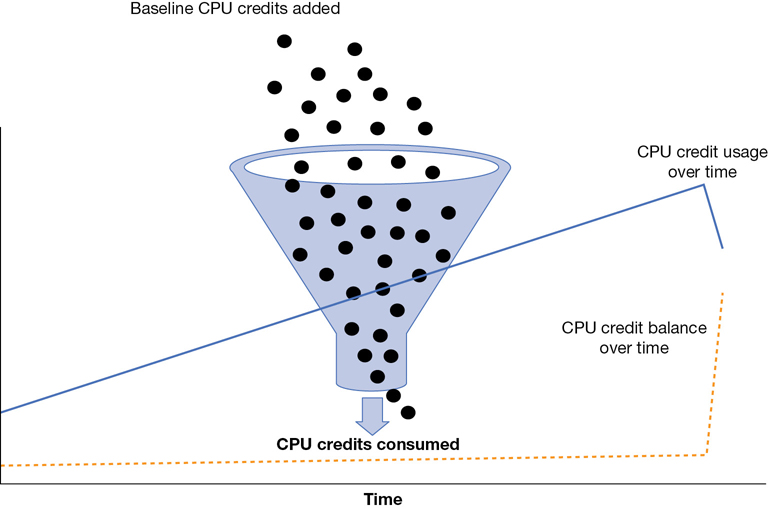
CloudWatch, the built-in monitoring service at AWS, has available metrics allowing you to monitor the credits being used and the current credit balance, as shown in Figure 4-9. The metric CPU credit balance is showing the CPU usage, and the metric CPU credit usage is showing the decrease in CPU credits as the CPU performance increases. When the CPU stops working, over time the credit balance increases once again.
If you run out of CPU credits, your CPU performance is reduced to the assigned CPU baseline based on the type of T instance you are running. Therefore, using a T instance for applications that require maximum CPU performance for unknown lengths of time is not a good design idea. On the other hand, AWS also allows you to choose an unlimited mode of operation for a T2 instance. Therefore, you may be able to use a T2 instance in this mode and pay a flat additional rate based on vCPU usage. AWS documentation details the baseline, breakeven, and maximum CPU utilization details when running T2 instances in unlimited mode. If your T2 instance manages to run under 42% utilization, the unlimited mode will make sense. If you are over this value, it may be more expensive than you think. Pricing is complicated!
Compute-Optimized Instances
Compute-optimized instances are designed for batch processing workloads, media transcoding, and high-performance applications or Web servers. The C5 architecture as shown in Table 4-3 takes advantage of the Nitro system components for enhanced networking. There are no performance constraints on compute-optimized instances.
Table 4-3 C5 Architecture
Instance Type |
Hypervisor |
Maximum Size |
Storage |
AMI |
|---|---|---|---|---|
C5 |
Nitro |
Maximum 72 vCPUs, 144 GB of memory, enhanced networking up to 25 Gbps |
EBS-optimized storage with dedicated EBS bandwidth up to 4,000 Mbps Local instance storage using NVMe solid-state drive (SSD) |
64-bit HVM AMIs that include drivers for enhanced networking and NVMe storage |
C4 |
Nitro |
Maximum size of 36 vCPU and 60 GB of memory, enhanced networking up to 10 Gbps |
Note
For Linux builds, AWS suggests that you use at a minimum the 3.10 kernel, or newer for NVME instances. What is recommended is Ubuntu 14.04 or later, Centos 7 or later, or Windows Server 2008 R2 or later. Don’t expect great performance with an old kernel.
Memory-Optimized Instances
Workloads that need to process vast data sets hosted in memory, such as MySQL and NoSQL databases, or Memcached and Redis in-memory cache stores, should use a memory-optimized instance. Specifications are shown in Table 4-4.
Table 4-4 x1 Architecture
Instance Type |
Hypervisor |
Maximum Size |
Storage |
AMI |
|---|---|---|---|---|
r5 |
Nitro |
96 vCPUs, 769 GB of memory, enhanced networking speeds up to 25 Gbps |
EBS-optimized storage with dedicated EBS bandwidth up to 4,000 Mbps Local instance storage using NVMe SSD 14,000 Mbps of EBS-optimized storage bandwidth |
64-bit HVM AMIs that include drivers for enhanced networking and NVMe storage CPU configuration of both the C-state and the P-state registers is possible on the x8, x16, and x32xlarge models. |
r4 |
Nitro |
16 vCPUs, 488 GB of memory, enhanced networking speeds up to 25 Gbps |
||
x1 |
Nitro |
128 vCPUs, 1952 GB of memory, enhanced networking speeds up to 25 Gbps |
||
x1e |
Nitro |
128 vCPUs, 3904 GB of memory, enhanced networking speeds up to 10 Gbps |
P and C State Control
C states control the power-saving features of your processor. If you need maximum performance, you can control the idle state on your Linux instances and achieve much higher clock frequencies on your CPU. A P state control might be useful for applications that heavily use AVX2 on all cores, such as gaming servers. Make sure to select an instance that allows access to the C and P states, such as c4.8xlarge.
x1 instances—Can have a massive number of assigned resources, including up to 128 vCPUs, 4 TB of dynamic random-access memory (DRAM), and enhanced network speeds up to 25 Gbps. x1 instances are designed for in-memory databases, big data processing projects, and high-performance computing (HPC) workloads.
Each physical processor is wired to a local memory footprint, as shown in Table 4-3. Using a bus called the quick path interconnect (QPI), each physical core can also access all the installed memory in the physical computer, not just its local assigned memory footprint. The larger x1e.32xlarge instance has four physical CPUs, each with 32 vCPU cores. Each physical processor is wired to a 1 TB RAM footprint but also has access to the other remote memory footprints assigned directly to the other physical CPUs.
High-memory instances—Are bare-metal servers featuring up to 224 virtual cores (hyper-threaded as 448 logical processors), 12 TB of memory, enhanced networking up to 25 Gbps, and 14 Gbps EBS-optimized storage running.
z1d instances—Are hosted on the Nitro hypervisor and are designed with sustained all-core frequency using Intel Xeon scalable processors with 48 vCPUs, up to 384 GB memory, and 1.8 TB of instance storage.
Accelerated Computing (GPU)
Accelerated computing instances—Use NVIDIA Tesla GPUs in a variety of designs and are designed for use within a cluster placement group with enhanced networking speeds of up to 100 Gbps of network bandwidth if the p3dn.24xlarge instance is selected. The p3.16large offers 8 NVIDIA Tesla K 80 GPUs, 64 vCPUs Intel Xeon Broadwell processors, 488 GB of memory, and 128 GB of GPU memory.
For high-performance computing or for machine learning application use cases, you can choose a P3 GPU instance, which offers a PetaFLOP of compute performance using an NVIDIA V100 Volta-based GPU chipset.
g3 instances—Are designed for graphic-intensive applications using NVIDIA M 60 graphics processing units (GPUs). g3 instances also can enable the NVIDIA GRID Workstation feature, which has support for four 4096 × 2160 high-resolution monitors and enhanced networking providing up to 25 Gbps of network bandwidth within a cluster placement group. g3 instances can be useful for VDI solutions, including Citrix XenApp and VMware Horizon.
f1 instances—Are deployed with hardware acceleration image (FPGA Image) combined with a custom AMI allowing your application to operate at incredibly fast processing speeds utilizing field-programmable gate arrays (FPGAs). f1 instances are suitable for financial computing, genomics, accelerated search, and image-processing applications.
Storage-Optimized Instances
Storage-optimized instance are designed for workloads that require local SSD storage for large data sets. Performance requirements as shown in Table 4-5 provide continual high sequential read and write access with high IOPS performance due to the local storage.
Table 4-5 Storage Optimized Instances Specifications
Instance Type |
Hypervisor |
Maximum Size |
Processor |
Features |
|---|---|---|---|---|
h1 |
Xen |
64 vCPUs, 256 GB memory, 4 × 200 GB of instance storage, up to 25 Gbps enhanced networking |
Intel Broadwell E5-2686V4 |
1.15 Gbps read-write with 2 MB block size |
d2 |
Xen |
36 vCPUs, 244 GB memory, 24 × 2048 GB of instance storage,10 Gbps enhanced networking |
Intel Xeon E5-2670v2 |
EBS optimized |
i3 |
Nitro |
36 vCPUs, 244 GB memory, 8 ×1900 GB of instance storage, up to 25 Gbps enhanced networking |
Intel Broadwell E5-2686V4 |
1.4 million write IOPS |
Note
Your selected instance size directly affects your overall throughput. The available EBS performance is directly related to network performance. The larger the instance, the larger the available EBS and network bandwidth. Make sure to match your volume size and type to the desired instance.
Bare-Metal Instances
The bare-metal platform at AWS is used to host the VMware cloud on AWS. i3.metal instances have two physical Intel processors connected with a high-speed QPI interconnect bus having 72 vCPU cores. RAM is 512 GB and eight, 1.9 TB SSDs of instant storage, and 25 Gbps enhanced networking connections. For those developers at Terra Firma who like to host databases on bare-metal servers for the maximum amount of performance, bare-metal server might be an acceptable option to consider. Bare-metal instances were first created for VMware to be able to host their environments at AWS. Figure 4-10 details the bare-metal instance architecture.

Dedicated Hosts
Choosing a dedicated host involves choosing a dedicated physical server with a defined EC2 instance capacity just for you. A dedicated host allows you to control the hardware that your instances are running on; you also get to control the affinity, or placement of your instances, on the host that you desire. Dedicated hosts support per-socket, per-core, or per-VM software licenses. There are some AWS limitations and restrictions when ordering and using dedicated hosts:
The instance size and type of instance placed on a dedicated host must be the same type.
Red Hat Enterprise Linux and Windows AMIs cannot be used with dedicated hosts; the only type of AMIs that can be launched on a dedicated host are bring your own license (BYOL) Amazon Linux and Amazon Marketplace AMIs.
Instances hosted on a dedicated host must be launched in a VPC.
Amazon relational database service (RDS), placement groups, and EC2 auto-scaling groups are not supported.
Billing charges are just the hourly charge for each active dedicated host because you’re not billed for instance usage from the dedicated host. Pricing is based on on-demand pricing unless you have set up dedicated host reservation pricing.
Note
A dedicated host is not the same as ordering an i3 bare-metal server; there is still a hypervisor installed on a dedicated host.
Dedicated Instances
You could also choose to use dedicated instances if your compliance rules and regulations require compute instance isolation. Each dedicated instance runs in a VPC on dedicated hardware resources. Dedicated instances have the same performance and security as instances hosted on a dedicated host but also have some limitations to be aware of:
You are not allowed to target your instance’s placement.
No access or control of the sockets and physical cores of the physical host is allowed.
EBS volumes that are attached to a dedicated instance are not running on single-tenant hardware; EBS storage is a shared storage array.
EC2 Network Performance
The type of instance that you select will determine the available network bandwidth. If you’ve selected an instance from the T or m4 families, the reserved network performance is defined vaguely as low, low to moderate, or high. Proper benchmarking is the only guaranteed method of finding out exactly what bandwidth you have on any instance with a vague network performance tag. However, a nano, or micro instance, is in the baseline range of 100 Mbps, and instances with assigned high-network performance max out in the range of 2 Gbps.
All other instance families have a defined level of network performance that either scales up to a defined speed, such as up to 5 Gbps, or a defined figure, such as 10 Gbps. Network speeds at AWS are also showing the outbound and inbound traffic speed. For example, a 10 Gbps or 25 Gbps network speed is the one-way speed for either inbound or outbound traffic. Over time, all advertised network speeds are gradually increasing at AWS.
Until the launch of the C5 instance, default network communication at AWS was performed by the Xen network driver. Because the Xen hypervisor was involved, there were limitations on the maximum speed of the network connections that could be achieved. Network speeds for older instances were using the elastic network interface (ENI) for network communication.
Enhanced networking uses the elastic network adapter (ENA) to greatly increase an instance’s network speed using SR-IOV, where the physical network driver on the bare-metal server is directly exposed to the EC2 instance. The beauty in this design is that the hypervisor does not have to be involved in network communications. Enhanced networking is available on all supported EC2 instance types at no additional cost, but a specialized network driver needs to be installed before enhanced networking can be enabled on the instance.
Note
Enhanced networking may also not be enabled on the instance that you are using, so it’s a good idea to check. Use the CLI command Get-EC2Instance -InstanceId instance-id.Instances. EnaSupport. If enhanced networking is enabled, the response is true.
Enhanced networking is provided when you select instances that support enhanced networking and use an HVM AMI that includes enhanced networking drivers. Both the AWS Linux AMIs support enhanced networking, as does Ubuntu 14.04 and 16.04, and Windows Server 2008 R2 and above. The ENA supports network speeds of up to 25 Gbps for supported instance types; network speeds up to 10 Gbps are supported by the Intel 82559 virtual function (VF) interface.
Note
You can check out all the details of an instance by using the following CLI command: aws ec2 describe-image-attribute --image-id ami_id.
Once you have chosen and enabled enhanced networking, your instance can take advantage of the additional bandwidth for several use cases:
Connections to S3 storage can send and receive at 25 Gbps.
Instance-to-instance communication hosted in the same or different availability zones (AZs) within a single region can communicate up to 5 Gbps for point-to-point communication, or 25 Gbps.
Instance-to-instance communication hosted in a cluster placement group can communicate at 10 Gbps for single-flow traffic, or 25 Gbps for multiflow traffic.
Note
Using a test tool such as iperf can provide your actual network bandwidth speeds at AWS.
Amazon Machine Images (AMIs)
The AMI is the important component to understand when deploying EC2 instances because all instances are created using an AMI. Many folks at AWS pronounce the term AMI as amee, like maamee, but with an a. The precise definition of an AMI is a template, as shown in Figure 4-11, that contains the desired software configuration; an operating system and a root device boot volume at a minimum; and optionally, an application and perhaps some additional supporting software. After selecting an AMI, you choose the instance type where the AMI will be installed.
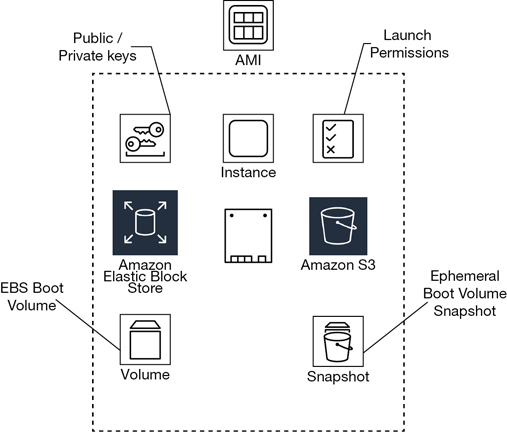
Each AMI contains the necessary technical information required to launch all instances hosted at AWS. You must use an AMI to launch an AWS instance. There are two types of AMI to consider: an EBS-backed AMI providing a persistent block storage boot volume, and a local instance store-backed AMI, which is installed on a local block storage hard drive that is temporary. Your different needs and requirements dictate which type of AMI to create and use; if you want super-fast block storage and your design works with temporary storage volumes, perhaps a local instance store makes sense. If you are used to using virtual hard disks (VHDs) and snapshots, EBS-backed AMIs are widely available. You can also mix and match with an EBS boot volume and additional local ephemeral volumes. Each AMI includes the following components, which are described by the XML manifest file:
Boot volume—Describes what will be used as the root boot volume for the instance: either an EBS boot volume created from a snapshot or a local instance storage volume copied from an S3 bucket.
Launch permissions—Define the AWS accounts that are permitted to use the AMI to launch instances with. Default launch permissions are set to private, which means that only the owner who created the AMI can use it. Permissions can also define a select list of AWS accounts. Switching permissions from private to public means anyone in the overall AWS community will have access.
Volumes to attach—The volumes to attach to the EC2 instance at launch are contained in a block device mapping document. If the initial root device volume is a local instance store volume, it is listed as ephemeral0 to ephemeral23 depending on the number of instance store volumes to be created. Instance stores can be backed by solid-state drives (SSDs) or NVMe available with some of the newer instance types. For EBS volumes to be created, the ID of the snapshot to be used when creating the block device volume will be specified along with the size of the volume to create.
Default location—AMIs are region specific. When you create your AMI, you will be operating in a specific region; therefore, it is stored in the region where it was initially created. You can use an AMI in any of the AZs contained by the region where it was created. When you launch (think create) an instance, you can only select an AMI that’s currently hosted in the current region; however, AMIs can be made available in other regions by copying them to the desired region.
Operating system—The operating system will be a version of Linux or of Windows.
Root device storage—There are two options available: either backed by Amazon EBS or backed by an instance store volume.
The EBS root volume will be created from an EBS snapshot stored in S3.
The instance store volume will have its initial root volume created from a template stored in S3.
Choosing an AMI
There are many prebuilt AMIs available in the Amazon Marketplace and in the EC2 management console.
AWS Linux AMIs
Prebuilt AMIs supplied by Amazon include Amazon Linux 2, as shown in Figure 4-12, and Amazon Linux AMI. Amazon Linux 2 is the latest version of Amazon Linux, and it’s recommended if you want to start with a Linux AMI. Amazon’s Linux distribution is based on Red Hat Enterprise Linux. The Linux 2 AMI supports EC2 instances, including EC2 bare-metal instances and Docker containers. Even more importantly, Amazon Linux 2 can be used on-premise for development and testing purposes because it is available as a virtual machine image for use on many other third-party virtualization environments such as KVM, Oracle VM VirtualBox, Microsoft Hyper-V, and of course VMware ESXi. Amazon Linux 2 can be used on all instance types that support HVM AMIs; it does not support instance types that require paravirtualization functionality.

The Linux 2 AMI also includes a variety of software packages and configurations that seamlessly integrate with many AWS services, such as CloudFront monitoring and the Systems Manager Patch Manager and the MATE GUI desktop environment. Other bundled tools include the AWS CLI, the command-line interface, and cloud-init, which is used for automating user data scripts at boot. Long-term support is provided by AWS until 2023, including updates from a private repository stored within the AWS region where the instance is located.
The older version of Linux that AWS offers is the Amazon Linux AMI. It is supported for use on EC2 instances at AWS but cannot be downloaded for on-premise development and testing. If you are starting out in AWS and want to use a Linux distribution that AWS provides, choose Linux 2.
Linux AMI Virtualization Types
Amazon as a cloud provider has been around since 2006. Virtualization has changed a great deal since then; therefore, there are different virtualization choices available at AWS when launching a Linux instance due to backward compatibility. There are two types of virtualization: PV and HVM. There is also an older hybrid combination of technologies with the HVM embedded with paravirtualized drivers for networking and storage.
When you view the available instance types in the AWS management console, by default, the current generation types are initially displayed, as shown in Figure 4-12. The term current generation means the latest and greatest virtualized choices available; however, changing the view to All Generations reveals that the older virtualization choices still exist. Amazon recommends that you use what are defined as current generation instance types and HVM AMIs.
Even though the earliest AWS instance types are still available, be warned; choosing paravirtualization or selecting an older instance type means your applications will be running much slower at AWS. However, your on-premise builds may be hosted on older versions of Linux or Windows versions, and perhaps they must stay that way. If that’s the case, a variety of instances and regions still support the older paravirtualized builds. Long term, you will be better served by first doing the grunt work of upgrading your on-premise operating system versions to the latest versions. Then you can start with the current generation instance types and HVM AMIs; you’ll be happy, and so will your bosses.
HVM AMIs support enhanced networking and faster GPU processing
PV AMIs cannot take advantage of enhanced networking and faster GPU processing
Windows AMIs
Amazon has worked with Microsoft to make available a library of AMIs, including SharePoint 2010 and Windows Server versions from 2008 to 2016 (just the base operating system or the base operating system bundled with versions of SQL Server Express to SQL Server 2016 Enterprise). License choices include instances that bundle the licensing fees in their cost (Windows Server and SQL Server licenses) and BYOL, or with a feature called License Mobility. License Mobility is available to customers who are covered with Software Assurance (SA) contracts that allow the movement of eligible Microsoft software to EC2 instances. Windows AMIs that AWS offers by default are patched within five days of Microsoft’s patch Tuesday release.
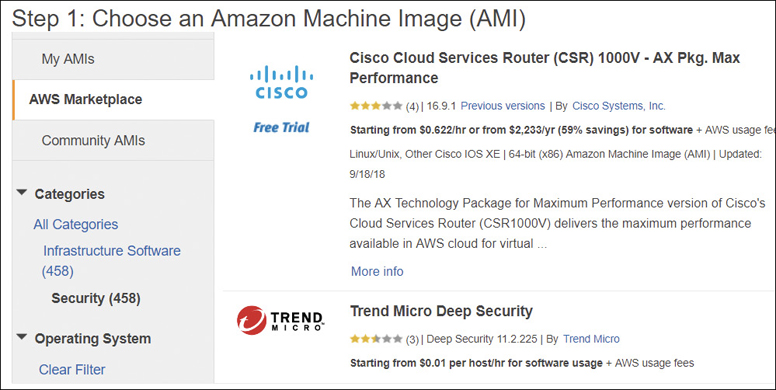
AWS Marketplace
The AWS Marketplace has thousands of AMI options to choose from, as shown in Figure 4-13. Several third-party software appliances are available, such as Cisco, Juniper, F5, and an Open VPN Access server image, to name just a few. After you select a custom AMI from the AWS Marketplace, the typical decisions to be made include licensing, the AWS region, and the size of your instance to deploy the AMI.
Creating a Custom AMI
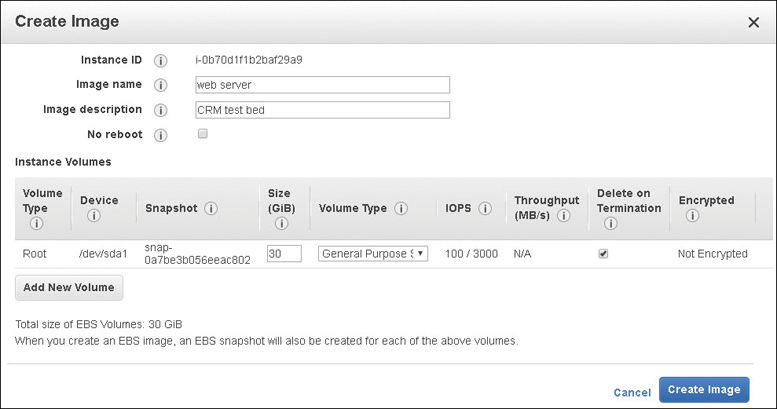
You can create a custom AMI after an instance has booted. Amazon uses the word custom in many situations to indicate that you have created something different from the initial default option. Suggested options to consider before creating a custom AMI are installing additional software and applications, defragmenting your hard drives for faster operations, deleting temporary files, and cleaning up existing user accounts and passwords.
Once the EC2 instance is exactly as desired, power the instance off. Then create the image as shown in Figure 4-14. You can add additional volumes as part of this AMI before the creation process is complete. The block device mapping is created, the launch parameters are documented, and the registration of the AMI and creation of the snapshots are carried out automatically. The EC2 service creates snapshots of the instance’s root volume and any other EBS volumes that are attached. After the AMI has been created, the instance is rebooted to check the file system integrity of the just-created image. Once a custom AMI has been created, it should be considered a golden AMI. This definition means that the image is as perfect as possible; there are no customizations or tweaks that need to be made. If instances stop functioning properly, replace them with their golden AMI instead of trying to troubleshoot the problem.
To access the companion videos, register your book at informit.com/register.
You can choose Windows or Linux AMIs from the following locations:
The EC2 console—Various Windows or Linux AMIs are available.
Amazon Marketplace—Many custom Windows or Linux builds are available.
My AMIs—This is for AMIs you have created that are stored in your account.
Migrated AMI—Using the Server Migration Service, or the VM Import/Export service, on-premise virtual machines can be migrated to custom AMIs that are stored in your account in S3 storage.
To create an EBS-backed Windows or Linux AMI—First choose a compatible Windows or Linux AMI with an EBS boot volume. After you log on and customize the instance software build, you can create a new AMI from the instance. For EBS-backed instances, creating an image is a simple process using the management console, or the CLI. After you customize the instance-making changes and additions as you see fit, an AMI can be created using the management console by selecting Image from the context menu and then Create Image.
To create an instance store–backed Windows or Linux AMI—Choose a compatible Windows or Linux AMI with an instance store boot volume. After you log on and customize the instance software built, you can create a new AMI from the instance. The process for creating instance store-backed AMIs is a little more complicated because it is not a completely automated process. To create an AMI from an instance store-backed Amazon Linux instance, you need to carry out the following tasks:
Install GRUB.
Install the partition management packages.
Install the command-line-based AMI tools and the AWS command-line interface (CLI).
Create a signing certificate using the command openssl genrsa, and save the output to a .pem file.
Run the ec2-bundle-vol command that prepares a bundle, or the temporary copy of your instance store boot drive.
Run the ec2-uploadbundle command that copies the bundle (the instance boot drive) to an S3 bucket, as shown in Figure 4-15.

Figure 4-15 Instance store-backed AMI creation
Custom Instance Store AMIs
The differences between instances backed by Amazon, EBS volumes, and an instance store are shown in Table 4-6. Even though the boot time of an instance store instance is slower, perhaps it’s an option worth considering. The storage is much faster than EBS storage, and there’s one other important point: Web and application instances don’t have locally stored data records in the cloud; data is stored in a database. Therefore, instances should be considered as an engine, the engine of your application. Instances that get into trouble operation wise can be discarded and replaced by a golden AMI.
Table 4-6 Differences in Instance Storage
|
EBS Root Device |
Instance Store Root Device |
|---|---|---|
Boot time |
Fast; under a minute |
Not so fast; approximately five minutes because root drive image must be copied from S3 storage |
Root Drive |
16 TB maximum |
10 GB maximum |
Volume type |
EBS block storage |
Local instance, block storage located on bare-metal server hosting the instance |
Data persistence |
By default, EBS root volumes are deleted when instance terminates |
No persistence when instance store root device turned off or terminated |
Changes |
EBS storage, AMI, and snapshot storage in S3 |
AMI storage in S3 |
State |
When instance is turned off, root volume is persistent EBS |
Can be either in a running or in a terminated state |
Note
AMIs that support the Nitro hypervisor must be HVM in design to be able to support enhanced networking and the ability to boot from EBS storage that uses an NVMe interface. The latest AWS AMIs crafted for Linux and Windows are HVM by design in addition to the latest AMIs of Ubuntu, Debian, Red Hat Enterprise Linux, SUSE Enterprise Linux, CentOS, and FreeBSD.
Proper AMI Design
Just what should you include in an AMI? There’s no definitive answer because each use case for each customer will be different. However, when creating any AMI, you must choose Linux or Windows as the operating system. Of course, the operating system is the only absolute component; you may also be ordering an AMI from the AWS Marketplace that has been preconfigured and designed as a software appliance, such as an F5 load balancer or a Cisco router.
As previously mentioned, after you have installed your additional software components and security patches, a finalized AMI should be thought of as a golden AMI. Think of a golden AMI just like a finely tuned engine that you’re about to place in a racecar. There are no parts that haven’t been tested and approved, and there are no additional parts or changes that are needed. There is no data or configuration stored within the image that can’t be re-created. It’s a good idea to consider the goals of each golden AMI you create.
Base OS-AMI—Limited to building an exact AMI of a particular operating system version.
OS-AMI + Apps + Middleware—Fully baked, including full configuration and installation of all software components and middleware.
AMI-Software Appliance—From the AWS Marketplace.
Base OS-AMI with additional components procured from a management platform such as Chef, Puppet, or Ansible—A bare-bones configuration of an operating system and software must be updated dynamically at first boot. In this example, the instance could take quite a bit of time before it is ready for operation; however, the AMI is being kept up to date by referencing external components that are up to date.
Fully Baked AMI—At launch, an instance created from a fully baked AMI has all the necessary software components ready to go, as shown in Figure 4-16. Because there are no additional components to install, the instance can boot immediately and be placed in operation. The complexity of an application stack may dictate a fully baked design to ensure a proper build every time.

Figure 4-16 Fully baked AMI Hybrid AMI—In a hybrid design as shown in Figure 4-16, a portion of the core software is installed: the operating system and the application, or just the operating system. Required software components are updated after the first boot using a user data script that runs after the successful first boot of the instance. This approach produces a dynamic build of the instance at launch. If your software builds are constantly changing, this is an approach to consider.
Take Me to My Leader AMI—In this design shown in Figure 4-17, sometimes described as a minimalist approach, just the operating system and the third-party configuration management agent are installed. After the system boots for the first time, the agent calls home to its management platform. Included in the first phone call is a stream of consciousness metadata that informs the management platform of the type of instance, the location of the instance, and any other pertinent information. The instances will be ready to serve after the automation services take over and complete the build. Third-party examples could be Ansible, Chef, or Puppet, or Amazon’s own automated solution AWS Systems Manager.

Figure 4-17 Minimalist AMI
AMI Build Considerations
Over time, you will develop a standardized procedure for building and maintaining AMIs. Make no mistake, this is a big job. And it’s an ongoing job because operating system fixes and application fixes are also ongoing in the long term.
Are your instances being placed in an Auto Scaling group? If so, you’ll have to properly time how long it takes for the instance to be launched and ready to go. Read more about auto scaling in Chapter 5.
How static or dynamic are your updates to your workloads?
Are manual configurations necessary for licensing?
How often do you plan to update your AMIs? By default, AMIs supplied by AWS have rolling operating system updates applied. This process can be changed, or locked, which ensures that no further updates will be applied after the initial installation of the AMI.
Designing a proper sequence to ensure a workable workflow when creating golden AMIs is a must. You must also consider when you will decommission AMIs that are no longer up to date with the required updates and fixes. The proper process to consider creating is a defined pipeline for creating, validating, approving or rejecting, distributing, and decommissioning AMIs, as shown in Figure 4-18.

Note
Amazon has released a golden AMI pipeline sample configuration that is available at this GitHub location: https://github.com/aws-samples/aws-golden-ami-pipeline-sample. Here, you will find a readme guide with step-by-step instructions, including cloud formation templates to help you set up a golden AMI pipeline for creation and distribution of AMIs.
AMI Best Practices
There are several best practices for starting to build AMIs that I suggest you follow. Many best practices depend on your circumstances, but the following best practices are certainly worth following over the long term.
Adopted best practices are useful if they match up with what you’re trying to accomplish and maintain. Any adopted best practices must also match up with what your company and its technical staff can realistically carry out. Understand that adopting a best practice is also accepting that changes will occur in how you and your technical staff will carry out your daily tasks moving forward; and if everybody on your team doesn’t change, company-wide, adopting a best practice won’t end up being that useful. AWS best practices are probably best defined as lessons learned from hard experience by many AWS customers. A worthwhile best practice is not meant to sell product; instead, best practices are suggestions to help you achieve success operating at AWS. After you have thoughtfully reviewed these suggestions with your entire technical team, if you have complete buy-in—in agreement and in practice—it will be a success.
Create and maintain AMIs for your Web, application, and database servers on a strict update schedule. Consider whether the schedule for updating an AMI can be driven by the application updates; if your instances are hosted on the private network in private subnets as they should be, security updates could be combined at the same time as application updates. Updating based on security updates will be much more frequent and may be unnecessary.
Both the application and the operating system need to be patched at some point in the future, creating a new golden AMI. What sort of patching policy should you adopt? Should you adopt a patching policy of every three months? Every six months? Let’s think about this. Should you patch the operating system with service pack releases and ignore any hot fixes (unless the hot fix specifically solves an issue that you’re dealing with)? Should you be patching based on your application needs, which may be linked to the operating system fixes that need to be applied?
Don’t embed passwords or security information in the AMI; instead, use IAM roles and AWS Secrets. For more details on security, check out Chapter 7, “Security Services.”
At a minimum, use a standard bootstrapping process with user data scripts. User data scripts allow you to automate processes after the first boot of your instance, including updates and configuration.
Properly tag your AMIs for identification purposes. Tags are used for monitoring, automation, security, and billing.
Adopting a Best Practice: Tags
AWS feels, and I strongly feel, that you should use tags. A tag is a custom piece of metadata that a customer can create as a customer-defined key and value pair that can be attached to most AWS resources. Think of a tag as a custom descriptor of an EC2 instance, such as an Apache web server from a particular department. Up to 50 tags can be assigned to most AWS resources. Departments, organizations, date created, developer names, and more should be tags that every administrator or developer is assigning to every EC2 server instance created. Creating and mandating a tagging strategy also helps you when identifying, scaling, or monitoring your EC2 instances. Tags can also help you separate the costs of resources assigned with the same departmental tag. The possibilities are endless.
I’ll bet you’re nodding your head, but you might not be so excited if you were picked to deploy a tagging strategy because you might not have the time. Tags are a great best practice, but only if there’s companywide buy-in. Let’s look at some of the best practices AWS suggests when it comes to using tags:
Identification tags—These are tags such as technical, ownership, product line, and version.
Billing—Billing is departmental; it alerts when costs are higher than expected.
Automation—If on, turn it off, and scale out or in.
Security—Use tags to control access.
Using Launch Templates
Instead of manually entering all the configuration details every time you create an instance, launch templates can be created that contain the configuration details you wish to use for EC2 instances. Launch templates as shown in Figure 4-19 can be used for a variety of instance types, including when requesting spot instances, which are discussed later in this chapter. Launch templates help you maintain standards when deploying AMIs. These are some of the parameters that can be used in a launch template:
Image creation—AMI ID, instance type, key-pair name, the VPC subnet, and security group
Networking information—Create up to two additional network interfaces, subnet locations, public and private IP addresses, and assigned security groups
Storage volumes—Instance store or EBS volumes, size, IOPS, encryption, and tags
Advanced options—Purchasing options, IAM profile, shutdown behavior, termination protection, detailed monitoring, tenancy, and user data

Figure 4-19 Creating a launch template
Changing the Current Instance Type
During initial testing, your needs will change; your initial EC2 instance will be too small, or too large. The size of your EC2 instance can be changed, as shown in Figure 4-20, but there are some compatibility caveats:
A PV or instance cannot be resized to an HVM instance.
Resizing a 32-bit instance is limited to an instance type that supports a 32-bit AMI.
Older instances that are launched in EC2-Classic networking cannot be resized and placed in a VPC.
ENA drivers must be installed for enhanced networking.
NVMe drivers must be installed for NVMe storage devices.
The AMI must support enhanced networking and NVMe block storage devices.
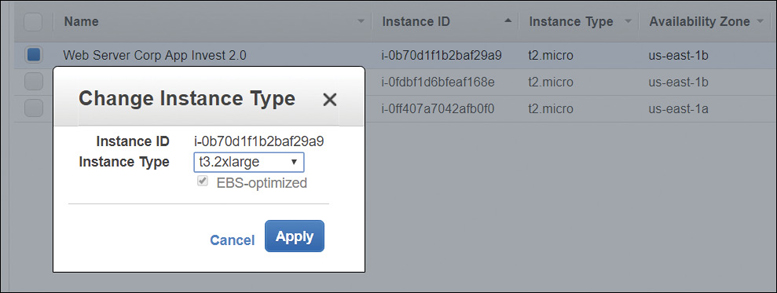
Figure 4-20 Changing current instance type
EC2 Pricing
When you first start with AWS, you won’t even think about it. You will use on-demand pricing for your instances. After all, you’re working with AWS for the first time. Over time, once you move into production, there are a variety of compute pricing options to consider. On-demand pricing has no long-term contract and requires no upfront payments, but it’s the most expensive pricing option. You are billed by the second for Linux instances and by the hour for Windows instances. Each EC2 instance will also have a specific billing cycle during its lifetime of operation.
An EC2 instance that is turned on and assigned to your account will be billed a compute charge while it is powered on.
Once an EC2 instance is turned off, the billing cycle finishes. There is no further compute charge.
The only additional charges that will be associated with an EC2 instance are for the attached EBS storage volumes and any snapshots or AMIs that have been created. Storage charges at AWS are per month per GB of EBS or S3 storage. Note: there is no separate charge for EC2 instance storage. The cost for the local block storage is included in the price of the EC2 instance.
Once you’ve signed up for AWS, you are probably thinking that you can spin up as many EC2 instances as you want; however, you can’t because there are limits. There are limits to what you can do in any data center, particularly in AWS data centers. AWS services generally have a defined default soft limit. For example, many instance types have a default soft limit of 20 per account, per region. There are also soft limits on the number of EBS volumes or snapshots that you can create. You can usually increase soft limits with a simple request from the management console, as shown in Figure 4-21.

Because you’ve probably never talked to AWS support, how are they possibly going to know what you intend to do in the cloud? If you suddenly called up your on-premise data center staff and said, “I need 100 virtual machines right away,” the answer might be, “We can’t do it right now. You’ll have to wait because we don’t have the capacity.” Amazon is no different; it may not have the capacity of the types of instances that you want in your region, unless you reserve your instances with reserved pricing. If you’re running production workloads, especially workloads that need to scale up at a moment’s notice, you’re going to want to guarantee that your EC2 instances are available to scale when required. AWS offers a variety of options to keep the bill as low as possible, including reserved instances, or spot instances. You will definitely be using reserved pricing for production workloads. You also have several other options to consider depending on your use case. Let’s explore RIs and some additional details on reserving instance capacity.
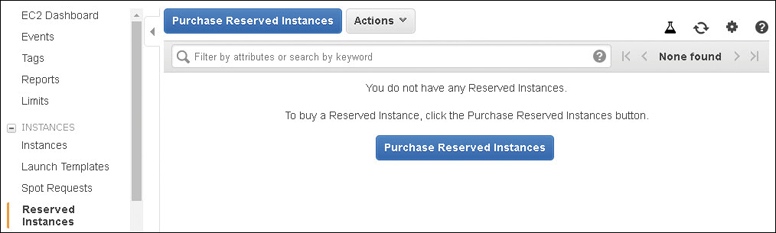
Reserved Instances (RI)
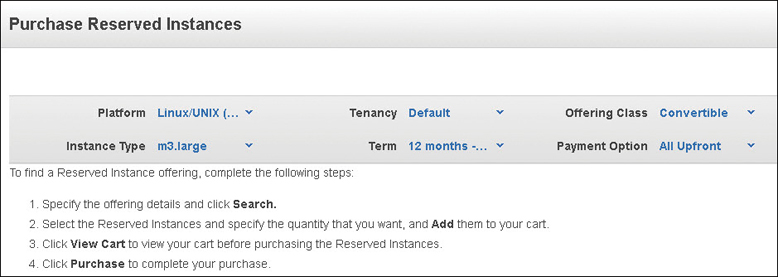
You’re going to want a reduction in your compute price after your first AWS bill. If you have application or Web servers that are on 24/7, and applications that routinely scale out and in a predictable pattern, RI pricing is essential. An RI is not a special type of EC2 instance; it’s merely a billing discount that is supplied to an on-demand instance currently being used or to be used in your account. Let’s suppose you have a C5 instance that is exactly what you want to use except for the on-demand price. The RI discount could be as high as 75% when compared to the on-demand instance price, as shown in Figure 4-22. Each RI is defined by the following attributes:
Instance type—The instance family and the size of the instance
Scope—The region or AZ location of the reserved instance
Tenancy—Shared default hardware or single-tenant, dedicated hardware
Platform—Windows or Linux
If you purchase an RI that matches the attributes of a running C5 instance currently in your account, the RI is applied immediately.
RI pricing is also applied when you launch a new instance with the same specifications as your RI price.
Reserved Instance Limits
The number of regional RIs that you can purchase depends on the current soft limits that have been defined within your AWS account for your on-demand instances. Remember, RIs are simply a discount applied to an on-demand instance in your account.
RIs also have limits based on each region and the number of AZs within the region itself. RIs are defined as regional or zonal—that is, per region or AZ.
For each region, you can purchase RI pricing based on the number of on-demand instances within the selected AWS region and an additional 20 zonal RIs for each AZ within the region. At first, these limits seem more complicated than they really are.
If your soft limit for on-demand instances is 60 instances of a specific instance type, purchasing 60 regional RIs would apply an RI discount to the 60 on-demand instances.
Zonal RIs are an RI discount for a specific AZ within the AWS region. Once you add AZs into your design, the zonal reservation is a capacity reservation for the selected AZ, in addition to the discounted RI price. Therefore, purchasing zonal RIs can increase the number of instances that you can launch in an AZ.
Before you purchase RIs, as previously mentioned, your AWS account also has several predefined soft limits that allow you to only run a certain number of instances within each region. If you’re operating in the N. Virginia region, and you wanted to run c5.large instances, your default soft limit is 20, as shown in Figure 4-23.
For xle.xlarge instances, your default limit in the N. Virginia region is 10. If you want to run xle.8xlarge instances, your limit is probably 0. Apparently, there is no xle.xlarge instance available in N. Virginia at the time I’m writing this chapter. In addition to your on-demand soft limits, there is an RI limit that really should be named a “Zonal Reserved instances” limit because it defines the total number of RIs purchased per AZ in a specific region per month.
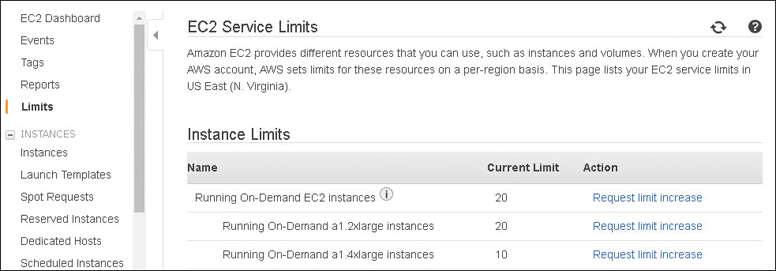
For the N. Virginia region with six AZs, the initial limit is 120 zonal RIs (20 per region limit × 6 regions = 120), plus whatever the current on-demand soft limit is for each instance type you want to launch.
The big takeaway is that your account’s soft limits can be increased, and the RI number you are probably interested in is the zonal number; that is how many RIs can be launched per AZ.
When you’re purchasing reserved EC2 instances, make sure that you are purchasing the type of RI you’re looking for: either a regional or a zonal reservation. Zonal provides you with a capacity guarantee per AZ and a discounted price. A regional reservation does not provide you with a capacity reservation; however, it provides flexibility to use the EC2 instances in any AZ, and it allows you to change the EC2 instance size (for example, the C4 family) within the selected instance family sizes as long as you’re running Linux instances with default shared tenancy.
The pricing for regional reservations is based on a normalization factor, and you may have to be a math major to figure out exactly how regional reservation pricing will be charged to your account. However, there is a discount and a formula fully documented in the AWS documentation for EC2 instances.
Let’s review the steps that you should follow when purchasing instances:
What region are you going to be operating in?
How many AZs are you going to use?
How many EC2 instances do you want to run in each AZ?
What size of EC2 instance are you planning to run?
How many of these EC2 instances need to be running 24/7?
What are my soft limits for each EC2 instance type per AWS region?
Do I need to request a limit increase for each EC2 instance type to match my needs?
Do I need to request an RI limit increase?
Where is my technical calculator?
Note
You can also request reserved EC2 capacity if you need to guarantee that your on-demand instances are always available for use in a specific AZ. It’s important to remember that after you’ve created a capacity reservation, you will be charged for the capacity reservation whether you actually use the instances or not.
Reserved EC2 Instances Types
There are two flavors of RIs: a standard RI and a convertible RI, as shown in Figure 4-24.
Standard Reserved Instance—A standard instance reservation gives you the biggest discount and can be purchased as repeatable one-year terms or a three-year term. After you’ve purchased a standard instance reservation, you can make some changes within your reservation: you can change the AZ you are using, the instance size, and the networking type. After you’ve purchased a standard instance reservation, most likely your needs will change. What to do? Register as a seller and sell your standard instance reservation through the Reserved Instance Marketplace, yet another Amazon store.
Convertible Reserved Instance—If your needs are a little different—for example, you may have to change instance types, operating systems, or want to switch from multitenancy to single tenancy compute operation—then you should consider a convertible RI reservation. The convertible reserved discount could be over 50%. and the term can be a one- or a three-year term. Note that a convertible RI reservation can’t be sold in the Reserved Instance Marketplace. However, a convertible RI reservation has more flexibility because numerous changes can be made during the length of the reserved term.
Once you’ve chosen your RIs option, pay everything up front, make a small payment upfront, or pay nothing upfront. I think you can guess which option gives you the best price. Paying everything up front is the most cost-effective option.
Note
Reserved instances, once expired, do not automatically reapply or renew. Instead, you are charged on-demand prices for continued EC2 usage. Billing alerts can be set up to warn you of any billing changes.
Scheduled Reserved EC2 Instances
A scheduled RI reservation allows you to buy capacity reservations for a daily, weekly, or monthly term. The specific start time, and length of reservation time that can be requested is for a maximum of one year. Once the instances have been reserved as scheduled, you pay for the reserved compute time, regardless of whether the instances are used. You also can’t cancel, modify, or resell your scheduled instance reservation.
Note
Scheduled instances are supported by C3, C4, C5, M4, and R3 instance types.
Spot Instance
A spot instance is spare compute capacity that AWS is not currently using. Potentially, you can save up to 90% of the purchase price; however, when AWS takes your spot instance back, it only gives you a two-minute warning and then, poof; your spot instance is gone. Spot instance pricing is based on supply and demand; the spot instance is available until another AWS account offers a higher spot price for the same type of spot instance in the same region. To counteract this possibility, you can define a maximum spot price that you’re willing to pay; therefore, when spot instance prices are volatile, only when the current spot price rises above your maximum spot price that you’re willing to pay are your spot instances reclaimed by AWS. Over the past year, the options for terminating spot instances have become much more sophisticated.
You can now choose to have your spot instance hibernated or stopped when it is interrupted instead of just being terminated. When your spot instances are hibernated, the data held in RAM is stored on the root EBS drive of the hibernated instance, and your private IP address is held. Spot hibernation is not supported for all instance types and AMIs, so make sure to check the current support levels for hibernated spot instances.
You can now choose a spot instance price based on a guaranteed term of 1 to 6 hours, as shown in Figure 4-25.
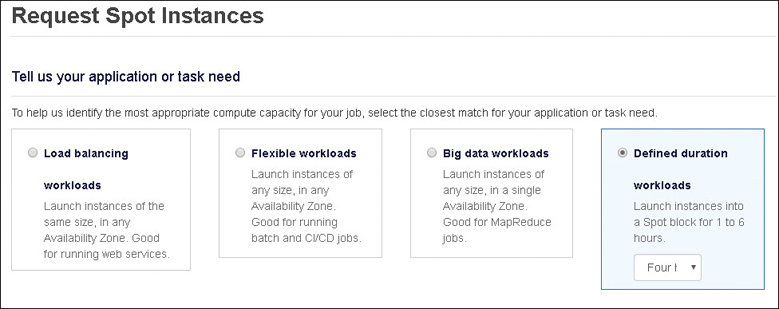
Figure 4-25 Spot instance pricing options
Spot instances have their own language. Let’s define the spot terms AWS uses:
Spot Instance Pool—A current number of unused EC2 instances of the same instance type, operating system, and AZ location
Spot price—The current per-hour price of a spot instance
Spot instance request—The maximum price you’re willing to pay for a spot instance. When your spot price is higher than Amazon’s current price, as long as capacity is available, your spot request continues to be fulfilled. You can request a spot instance as a one-time purchase, as a persistent request, for defining up to a 6-hour duration for the spot instance.
Spot fleet—A number of spot instances are launched based on type and price.
Spot instance interruption—When the spot price exceeds your maximum price or capacity is no longer available, spot instances are terminated, stopped, or hibernated. A spot instance interruption notice, a two-minute warning will be generated before any changes are carried out.
Note
The number of spot instances that you can request depends on your defined spot limit for the region you are operating in.
Spot Fleet
A spot fleet allows you to launch a desired number of instances, called a fleet of instances, based on the desired price and number of spot instances types. You can include additional variables, such as the different instance pricing options of on-demand, reserved instances, and spot instances that you want your fleet pricing to use when calculating the type of instance to launch in your fleet. A spot fleet could be helpful if you want to launch a certain number of instances for a distributed application, a long-running batch processing job, or perhaps a Hadoop cluster.
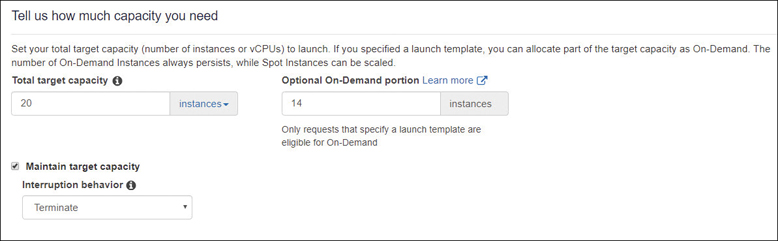
When making a spot fleet request, you first define the desired the total target capacity of your fleet, and how much of your fleet must be on-demand. This is a bit of protection for your workload and ensures that you always have a set amount of capacity available. As shown in Figure 4-26, target capacity is set for 20, on-demand as 14, and the remaining 6 instances will be spot. Each spot fleet request has, by default, a lowest price strategy. Other allocation possibilities include distributing the requested spot instances across all or selected spot capacity pools.
Note
The spot fleet API that had been around since 2015 has been replaced by the EC2 Fleet API.
After you request a spot fleet and indicate the amount of compute capacity required, the EC2 fleet attempts first to meet the desired capacity using your spot instances requests.
You can include multiple launch specifications that can separately define a number of variables, including the EC2 instance type, AMI, AZ, and subnet using a launch template. The EC2 fleet then attempts to select a variety of available spot instances to fulfill your overall capacity request based on the launch’s template specifications.
Spot Capacity Pools
To design resiliency with spot instances, you also can create spot capacity pools, as shown in Figure 4-27. Each pool is a set of unused EC2 instances that has the same instance type, operating system, AZ, and network platform.

To make sure you always have the desired capacity available, even if some of your spot instances are suddenly removed, you can direct Spot Fleet to maintain your desired compute capacity by using on-demand instances if there are not enough spot instances available that match your launch specifications. Spot Fleet attempts to save you money by launching the lowest-priced instance type it can find whether a spot instance or on-demand instance is chosen.
Therefore, your spot capacity pools could have both spot and on-demand instances depending on what spot instances are available at the time of your request.
Once your fleet has been launched, Spot Fleet maintains the desired target compute capacity when there are changes in the spot price or capacity available. The allocation strategy for your defined spot instances is based on the lowest price by default; you can also choose to distribute the available spot instances across the spot instance pools that are being used.
Your fleet of spot instances can be defined for cost optimization or for cost optimization and diversification by designing them to run in multiple pools. If your target capacity was 50 instances, you could request that the spot fleet specifies 5 pools, with 10 spot instances in each capacity pool. For this example, if the spot price changes affecting your spot request, only 20% of the total number of instances would be affected.
Each spot capacity pool can also have a different price point. The built-in automation engine helps you find the most cost-effective capacity across multiple spot capacity pools when you’re using a spot fleet. Both Linux and Windows operating system instances are available as spot instances.
Remember that spot fleets operate within the defined soft limits of your AWS account, which include the number of spot fleets per region, the number of launch specifications per fleet, and the target capacity per spot fleet.
Although spot instances can be terminated with a two-minute warning, according to Amazon’s analysis, most spot instance interruptions are from customers terminating their spot instances once work is completed.
Note
A spot fleet can’t span regions or different subnets within the same AZ.
EC2 Fleet
Amazon EC2 Fleet is an update to Spot Fleet that also allows you to automate the deployment of your EC2 capacity using a target capacity that can be defined by vCPUs. Your target capacity is defined by weights; think of the weight as the preferred choice. The default mode of operation with EC2 Fleet is still based on the lowest instance price available.
For example, if I needed to create a grid of 3,000 parallel processing nodes to carry out risk analysis, an EC2 Fleet request could be created with m4 and m5 instances that have a vCPU-to-memory ratio of 4 GB of memory to 1 vCPU. Weights are defined based on the number of vCPUs per instance that match up to the desired worker node in the parallel processing grid shown in Table 4-7. Two thousand vCPUs are provided with on-demand instances and 1,000 vCPUs with Spot.
If the on-demand price per vCPU for the m5.24xlarge instance is lower than the on-demand price per vCPU for the m4.16xlarge instance, EC2 Fleet launches the needed number of m5.24xlarge instances to hit the desired target of 2000 spot vCPUs. The remaining capacity is launched with the cheapest on-demand instances available. If RI discounts have been purchased for your AWS account, when instances launch that match up, RI discounts are automatically applied.
Table 4-7 EC2 Fleet Instances with Assigned Weights
Instance Size |
vCPU-to-Memory Ratio |
Weight |
|---|---|---|
m5.24xlarge 96/384 ratio 4:1 |
4:1 |
96 |
m4.16xlarge 64/246 ratio 4:1 |
4:1 |
64 |
Using a single CLI command, I can launch the EC2 Fleet, as shown in Figure 4-28. This command can also be automated as a CloudWatch alert building EC2 Fleets when needed based on monitoring metrics. For more details on CloudWatch, see Chapter 5.
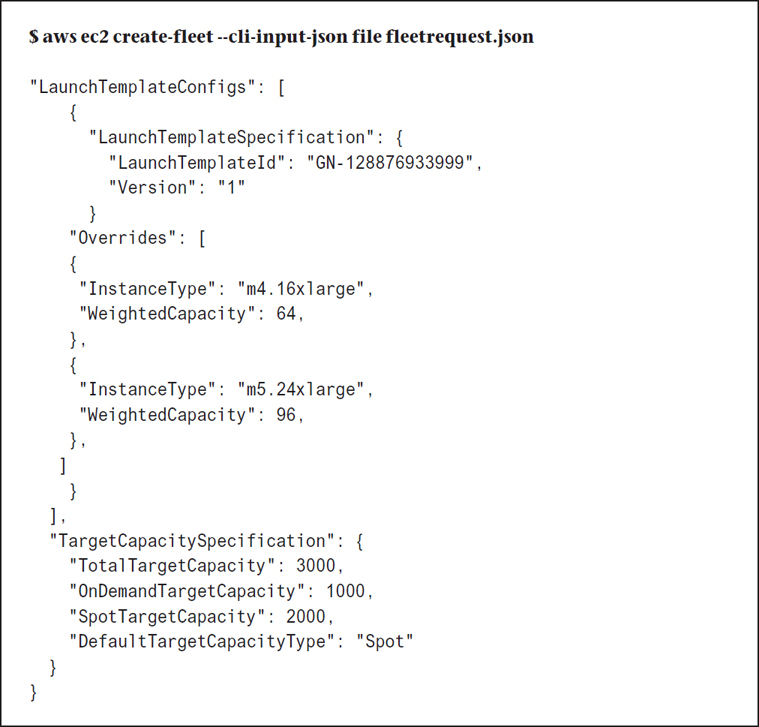
EC2 Instance Storage Options
There are three main types of storage that instances can directly utilize: persistent block storage volumes (elastic block storage, or EBS) and temporary block storage, also called instance or ephemeral storage. There are also shared file storage options, such as the elastic file system, Amazon FSx, and S3 block file storage. EFS, S3, and the other available storage options are fully covered in Chapter 6, “Cloud Storage.”
Local Instance Storage—SSD or Magnetic Disk
An instance store volume is a temporary block storage SSD hard drive that is physically attached to the bare-metal server; the local drive storage is shared between the multiple virtual machines hosted there. Depending on the instance type, there could be one or several SSD hard drive volumes attached that are exposed as local block storage devices to the instances. Instance storage volumes are numbered from 0 to 23 and are labeled as ephemeral 0 to ephemeral 23, as shown in Figure 4-29.
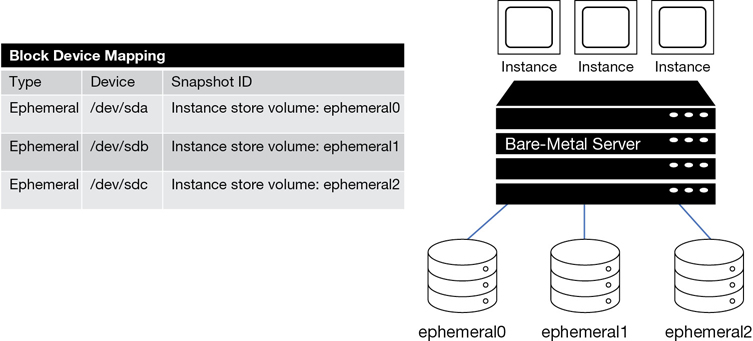
Instance storage volumes are a nonpersistent data store; when your EC2 instance is turned off or terminated, the instance storage is discarded; however, it does survive a reboot. Instance storage data records do not have durability because they are not automatically replicated to another location, and there is no integrated support with the existing EBS snapshots service.
Testing has shown that instance storage is more than 5 times faster than EBS SSD general drives for uncached reads, and more than 10 times faster for writes. Systems with both EBS volumes and ephemeral storage could provide some advantages:
Boot drives could be EBS volumes providing faster boot times, and the ephemeral storage could be used to store cached data or logs of the hosted Web application.
Could be considered for workloads, where you do not need the data records to persist as a Web or application server hosted behind a load balancer.
Another example use case for using instance storage would be if you needed a high-performance database storage instance.
Choosing ephemeral storage, for example, an i2 instance for a large SQL Server database, would provide incredible speed at the local storage level for the database records.
For redundancy, additional EBS magnetic hard drives designed for a further level of throughput optimization could be added as more volumes provide for full and partial backups and transaction logs.
A third-party VSS-aware snapshot utility could be installed locally on the SQL server instance performing backups to the throughput-optimized EBS volumes.
EBS snapshots could then be taken of the EBS volumes for safekeeping.
Note
With proper planning, you could take advantage of instance storage volumes. And ephemeral storage is included in the compute price of each EC2 instance.
EC2 Auto Recovery
On modern instances (C3, C4, C5, M3, M4, R3, R4, T2 and X1 families) that have only EBS volumes attached, you can take advantage of a feature called EC2 auto recovery, as shown in Figure 4-30. Once enabled, in the background the monitoring service CloudWatch has permitted an alarm with an instance metric called StatusCheckFailed_System. If your instance fails, the defined recover instance workflow swings into action. The failed instance is launched on different hardware and retains its instance ID, the instance metadata, private IP and elastic IP addresses, and the EBS volumes that were previously attached.
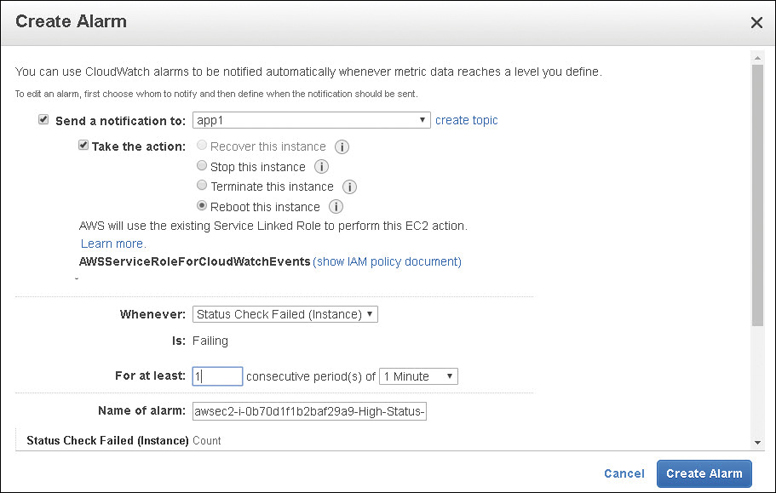
Note
By default, EBS boot volumes that are attached to an EC2 instance are set to be deleted when an instance is selected to be terminated. Data volumes do not follow the same criteria; data volumes by default retain their persistence state.
The key concept with these default EBS boot volume parameters is that you will already have a snapshot of the boot volume because you will have a current AMI of your golden instance. Therefore, when an instance is terminated, you are left with your data volumes. Rebuild an instance with a golden AMI and attach the data volumes, and you’re back in business. The flag Delete on Termination can be set to true when you want select EBS volumes to be deleted when the instance it is attached to is terminated.
Ordering an Instance
Now that you know about instance types, AMIs, snapshots, and data storage volume choices, it’s time to order an instance and see where these components and pieces fit together.
The first step is to log into the management console with a user account with enough permissions to create an EC2 instance.
From the management console, before you click the blue button Launch Instance, check the top-right corner region listing to make sure that you are in the desired region, as shown in Figure 4-31. Then click the EC2 link.

After clicking the blue Launch Instance button, our next choice is to choose an AMI. There are several AMIs that show up by default in the QuickStart section. If you have already created an AMI, select My AMIs and choose your image. Then click Select. You could also choose a prebuilt AMI from the AWS Marketplace or choose an AMI from the AWS Community AMIs. Assuming this is your first time, we will choose the latest Amazon Linux version: Amazon Linux 2 AMI.
Review the Linux 2 AMI for the root device type. Either EBS block storage or instance storage is supported, and the supported virtualization type is HVM, as shown in Figure 4-32.
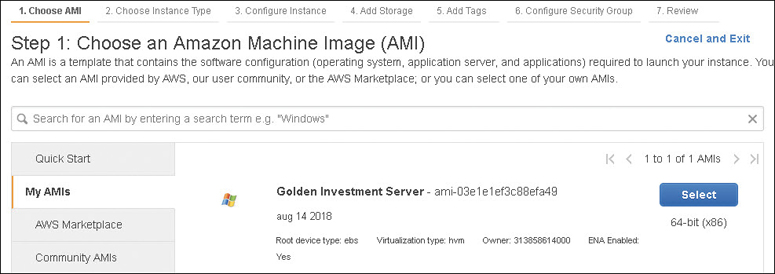
Our next task is to choose an instance type. Scroll down and select the m5.large instance as shown in Figure 4-33, which provides two virtual cores with 8 GB of RAM, an EBS root boot volume, and a network connection that provides up to 10 GB of network speed.
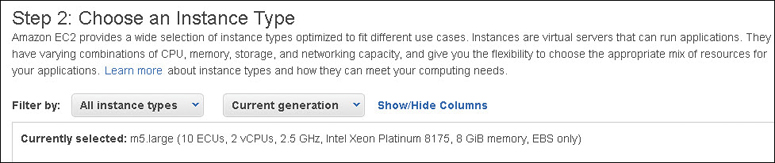
That was the easy part. Now we must make decisions about the hosting details of our EC2 instance. The configuration window shown in Table 4-8 is full of choices that may be difficult to quickly answer without some thought and discussion.
Table 4-8 Configuration Choices
Settings |
Comments |
Optional |
|---|---|---|
Number of instances |
Controlled by AWS account soft limit; depends on instance type selected |
Add instance to an auto scaling group |
Purchasing option |
Can change pricing to spot instance pricing |
Request spot instances |
Network |
Select a specific VPC or the default VPC |
Create a new VPC |
Subnet |
Select desired subnet |
Create new subnet |
Auto-assign Public IP |
Enable auto-assigned public IPv4 address |
Can disable auto-assigned public IPv4 address |
Auto-assigned IPv6 |
Enable auto-assigned public IPv6 address |
Can disable auto-assigned public IPv6 address |
IAM Role |
Define security role for instance |
Can be added later |
Shutdown behavior |
Stop or terminate |
Can be changed later |
Placement group |
Choose placement group installation for maximizing bandwidth |
Selected instance type must support placement groups |
Capacity reservation |
Reserve on-demand instance capacity in a specific AZ |
Depends on soft limits and availability |
T2/T3 Unlimited |
Burst beyond baseline as required |
Only applicable to T2/T3 instances |
Termination protection |
Protect against accidental termination |
Can be changed later |
Monitoring |
Select detailed monitoring |
Monitor at 1-minute intervals including memory |
EBS-optimized instance |
Enable dedicated communication channel for EBS storage |
Must select the supported instance |
Tenancy |
Default is shared compute hardware; can select dedicated hardware or dedicated host |
Must launch instances into a VPC |
Network interface |
Add additional network inter-faces and subnet connection |
Choose primary and secondary IP addresses |
Kernel ID |
Linux instances only |
Only valid for paravirtual AMIs |
RAM disk ID |
Linux instances only |
Only valid for paravirtual AMIs |
Advanced details |
Add user data script for initial customization after first boot |
Add script or link to existing file |
Our next option is to add additional storage. Storage options are detailed in Table 4-9.
Table 4-9 Storage Options During Instance Creation
Settings |
Comments |
Optional |
|---|---|---|
Type |
Instance store or EBS volume |
Depends on instance chosen |
Device |
Select volume to attach |
Shows available volumes |
Snapshot |
Snapshot ID |
Can select public snapshots |
Volume type |
Instance or EBS volume |
Depends on instance chosen |
IOPS |
Provisioned EBS volume |
Up to 32,000 IOPS |
Delete on Termination |
Default for root volume |
Can be changed |
Encrypted |
KMS default encryption key |
Can use customer-supplied keys |
Depending on the instance type chosen, there could be a single EBS volume or one or more ephemeral volumes, as shown in Figure 4-34.
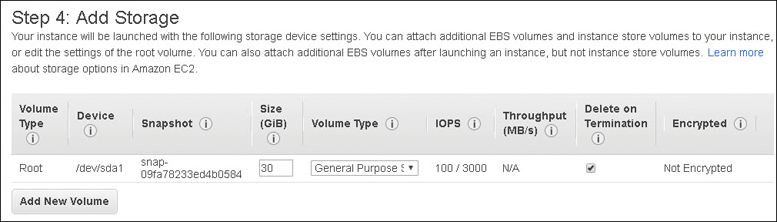
Note that the EBS volume will be created from the associated snapshot listed under Snapshot, and for the m5.large instance, the ephemeral volumes will be NVMe SSD drives. Adding additional storage requires clicking the button Add New Volume and selecting and configuring your volume choice, as shown in Figure 4-35.
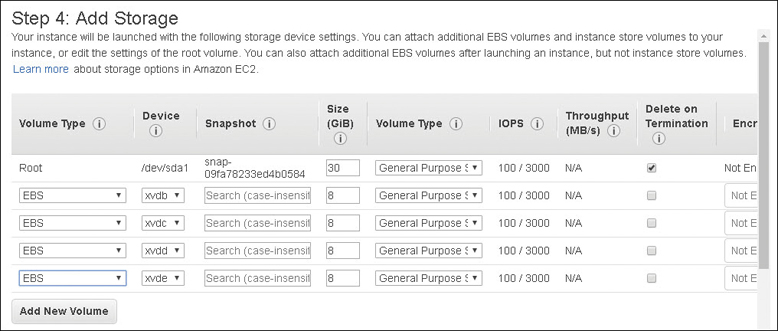
We’re almost ready to launch our instance, but we should add some tags. Tags are an associated, case-sensitive key-value pair. For example, a key value of investment and the value of web server are shown in Figure 4-36. Note that the created tags will be added to the instance and to the EBS volumes associated with the instance.

One of the last tasks that is required is to create a security group, a firewall to protect the network adapter, by clicking Configure Security Group. If we decide to accept the default security group, AWS creates a default security group for us. The default security group initial settings depend on the type of operating system to be installed with the selected AMI. Linux results in a security group allowing us to use Secure Shell (SSH), but a Windows installation results in a security group allowing us to use Remote Desktop Protocol (RDP). The best practice is to create a custom security group. For this example, we will create a security group for administration access, as shown in Figure 4-37.
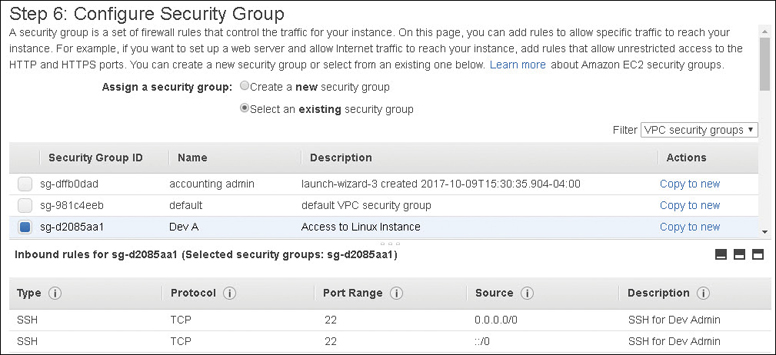
On the final splash screen, all may be well; however, there may be some complaints about your instance’s level of security depending on your choices made when creating or selecting the security group’s open inbound ports, as shown in Figure 4-38. After reviewing the complaints, clicking Launch starts the building and starting up the instance for the first time.
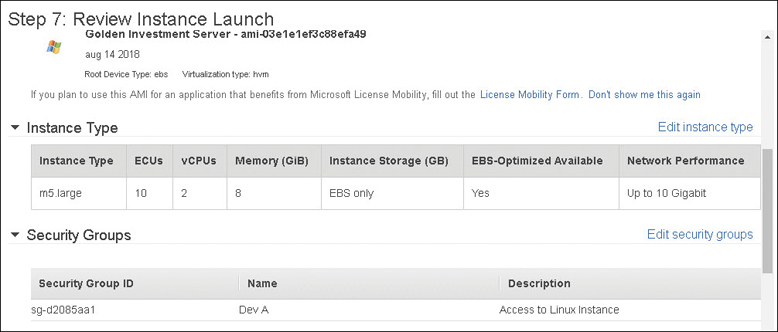
There’s just one more decision to make: what key pair would you like to associate with this instance? If you have not created a key pair, choose Create a New Key Pair and then download the just-created key pair to your local machine, as shown in Figure 4-39. Select the check box that acknowledges that you have a copy of the associated key pair. If you don’t have a copy of the key pair associated with your EC2 instance, your system is safe; no one will ever be able to log in. And perhaps you don’t want to log on to the server; there is a choice that allows you to proceed without associating with a key pair. Click Launch Instance. In a few minutes, you can watch your new instance come to life.
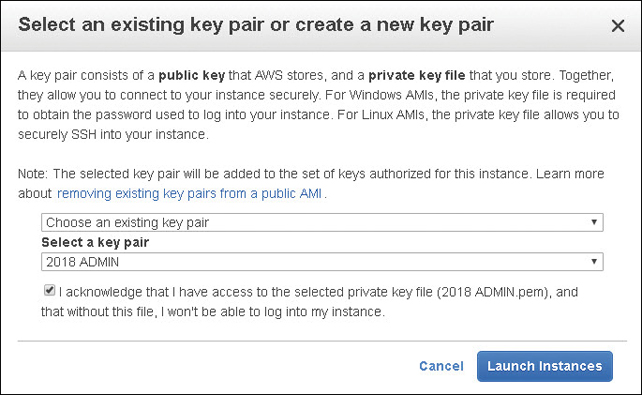
Migrating to AWS
If you’re considering using migration tools to move your application servers and databases to the AWS cloud, there are several AWS and third-party tools available to consider.
For databases, you could use the AWS Database Migration Service to migrate your on-premise database to AWS with no downtime. There are a number of options available; an AWS is focused on getting your data into one of its hosted databases, such as Aurora or DynamoDB, or into its data warehousing service Amazon Redshift.
For VMware and Hyper-V servers, you could use the Server Migration Service.
For migrations of virtual machines and virtual hard drives to AWS from the command prompt, you could use the VM Import/Export Service.
For performing a premigration discovery of existing servers, you could choose the AWS Application Discovery Service, which is included in the AWS Migration Hub.
Third-party migration tools integrated with the AWS Migration Hub’s GUI console include these:
ATDATA ATAmotion—Migrate live workloads directly to a VPC from a physical, virtual, or cloud location.
CloudEndure Live Migration—This provides continuous replication in the background for all workloads, including databases and legacy applications.
River Meadow Server Migration SaaS—Migrate workloads across virtual private network (VPN) or Direct Connect connections.
The listed third-party migration tools are designed for large enterprise organizations with corresponding large budgets. Perhaps the first tool that you should consider reviewing is the AWS Migration Hub. The Migration Hub is integrated with the AWS migration tools, including the AWS Application Discovery Service, the AWS, Server Migration Service, and the AWS Database Migration Service.
Migration Big-Picture Steps
Before we look at the tools, let’s look at the process of migrating a locally hosted blog running on Terra Firma’s local virtualized environment migration to AWS. This is an ideal migration test because the blog and the database server are as simple as things get: a two-tier application stack of an Apache Web server and a back-end MySQL database server, each hosted on its own virtual machine.
Create your AWS environment—At a minimum, you’ll create a single VPC test bed with a public subnet for the Web server and a private subnet for the database server. An Internet gateway would be attached to the VPC to provide Internet access, and the AWS NAT gateway service would be ordered and configured for providing NAT services for the database server. Route tables would need to be updated for both the public and the private subnets to enable access to the Internet gateway and the NAT service. Thinking long term, perhaps subnets will be created in multiple AZs for Web server failover, and master-standby database replication.
Replicate and test your database at AWS—To migrate the MySQL database to AWS, you could use the AWS Database Migration service. The migration service requires a source database, a target database solution, and a replication instance that is created and hosted within your VPC. The replication instance hosts the software that manages the database migration through established connections from the source database to the target database hosted at AWS, transferring data and monitoring the overall migration, as shown in Figure 4-40. Note that the source database can be on-premise, hosted at AWS, or even at another cloud provider. The on-premise MySQL database could also be converted to Aurora, a hosted RDS MySQL-compatible database solution with plenty of power.

Figure 4-40 Database migration
Configure Server Migration Service (SMS) and AWS Security—Both your hypervisor and the SMS need credentials to carry out their appropriate tasks. At AWS, an IAM user needs to be created with the ServerMigrationConnector policy. A service account must also be created in the on premise Active Directory Domain Services for the Server Migration Connector, the AWS software appliance that will migrate the on-premise Apache Web server to an EC2 instance AMI.
Download the SMS appliance—The next task is to download, install, and configure the SMS connector with the IAM user that will be carrying out the migration and the Active Directory service account.
Create a replication job—The first task is to import your virtual machine catalog from on-premise to the SMS connector. Once that task is completed, select the Web server instance in your local VM catalog to migrate, and create a replication job. The time it takes to replicate depends on your bandwidth and the size of the VM being migrated. You can also choose to migrate your entire catalog of VMs to AWS.
Create and launch your Web server—Deploy an EC2 instance, choosing the appropriate size, and select the SMS connector that AMI created. After checking out the new Web server, change the configuration files to point to the new Amazon Aurora database server. After testing and confirming that the application stack works, your final task is changing your DNS information via Route 53 and updating your address records for your blog server.
AWS Migration Hub
Opening the AWS Migration Hub console, you can perform a discovery of your existing servers or applications hosted on servers, as shown in Figure 4-41. After the discovery process has completed, you can separate the discovered servers into groups of applications that should be migrated together.

There is also a fun option to just migrate without discovering. Who wants to wait? Ah, that magical pushbutton approach. We certainly would like a pushbutton that would do it all, but sadly, it isn’t going to work that easily.
To discover your on-premise application servers, you must make a choice about what discovery tool to use. Your choices include the AWS Discovery Connector or the AWS Discovery Agent.
The Discovery Connector is a prebuilt virtual machine with embedded software that carries out the discovery process hosted in your VMware vCenter. Or, optionally, you could install the Discovery agent on every virtual machine or physical server in your environment. If your virtual environment is Hyper-V, you could also choose to use the Server Migration Service.
At first glance, these migration tools sound fantastic; however, I would caution you that pushbutton migrations to the cloud are not going to be successful if your virtual machines are complicated builds, with many tasks and dependencies. A virtual machine defined with a single task might very well migrate successfully to AWS. I don’t mean to suggest these migration services don’t do their job; they certainly do. But what you’re left with won’t be an ideal cloud application server solution in many cases. Let’s look at some of the potential issues you may have to overcome before you begin a migration of your application servers:
Hyper-V environments support Generation 1 VMs (containing 32-bit operating systems), using either VHDS or VHD partitions. Generation 2 VMs must only use VHDX partitions.
VMware environments must use VMDK disk images.
Linux VMs must use 64-bit images.
Linux VMs should use default kernels.
Linux VMs must have 250 MB of disk space on the root volume for installing additional drivers and software. Windows VMs need a fixed page file size and 6 GB of free disk space on the root volume.
IP version 6 addresses are not supported. In addition, public IP addresses are not assigned to any VM migrated into a VPC. This can be solved by associating an elastic IP address with the migrated instance.
Virtual machines that have been created using a P2V conversion tool—that’s from physical to virtual—are not supported.
SMS supports bringing your own license (Linux and Windows) or AWS-applied license (Windows only).
If you can make the appropriate changes to match up with the criteria of the server migration service, technically, your migration job may be a roaring success. However, before you begin, consider the complexity of your existing application stack; are there several or many components that have local dependencies embedded in your design? If so, the migrated image or instance may successfully boot but have an unsuccessful life at AWS for these following reasons:
The failure of a single local component could result in failure.
Multiple local components with local dependencies won’t be able to horizontally scale.
Vertical scaling means your instance is offline while changes are applied.
It will be difficult for a migrated instance to fail over to another AZ without design changes.
AWS Server Migration Services
The SMS is a graphical user interface (GUI) tool that can be accessed from the AWS management console. The VM Import/Export service is accessed at the command line using the AWS CLI, or the EC2 CLI, which can be installed for Linux, Windows, and Mac systems. The AWS SMS allows you to automate the process of importing your VMware or Hyper-V resources to AWS. However, you must use the VM Import/Export service if your images are in Citrix Xen or raw format and if you want to export EC2 instances back to your own environment.
Import/Export Prerequisites
Operating systems—Windows Server (2003 until present), Windows 7 through Windows 10, in 32- or 64-bit flavors. Linux support is for 64-bit versions only and includes the popular variants including RHEL, Ubuntu, SUSE, CentOS, Debian, Oracle Linux, and Fedora Server.
Importing images—OVA Open Virtual Appliance, Stream-optimized ESXvSphere Virtual Machine Disk (VMDK), fixed or dynamic virtual disks (VHD/VHDX) which are compatible with Microsoft Hyper-V and Citrix Xen, or raw.
Instance imports—Windows supports most instance types; Linux doesn’t support as many instance types when importing, so be sure to check the current AWS documentation. Current support includes general purpose, compute, optimized, memory optimized, storage optimized, and accelerated computing instances.
Initial volume types and file systems:
Windows 32- and 64-bit—MBR partitioned volumes formatted with NTFS file system.
Linux 64-bit—MBR partition volumes formatted with ext2, ext3, ext4, Btrfs, JFS, or the XFS file system.
Image and Snapshot Limitations
Boot partitions must use master boot record (MBR) partitions. Extensible Firmware Interface/Unified EFI (EFI/UEFI) BIOS partitions are not supported.
GUID partition tables (GPTs) are supported for nonbootable volumes that are less than 16 TB.
Imported Linux VMs need 250 MB of free disk space on the root volume.
Windows Server VMs need 6 GB of free space and a fixed page file size of 16 GB. Windows Server 2019 needs an additional 7 GB of memory to ensure the updating process doesn’t fail because of a lack of free memory.
Multiple network adapters are not supported.
Public IP addresses must be manually added after import.
Server Migration Big Steps
Download and deploy the prepackaged OVF template and set up the connector (which is a virtual appliance) for the applicable virtual environment you are migrating from. There are some mandatory setup requirements for your virtual environment VMs, including firewall configurations for stateful outbound connections for Dynamic Host Configuration Protocol (DHCP), domain name system (DNS), Hypertext Transfer Protocol Secure (HTTPS), Internet Control Message Protocol (ICMP), and Network Time Protocol (NTP) services.
Import the server catalog and select the server or servers that you want to replicate from the on-premise location to S3. SMS supports up to 50 concurrent VM migrations.
Choose a license type for the AMIs that will be created by the replication job.
Schedule a migration job. Migration jobs can begin immediately, or you can define the date and time for the migration task to start. Each migration job has a maximum amount of time that it can run. The minimum replication frequency cycle is every 12 hours, and the maximum is 24 hours. The entire lifetime of the migration stage is set at 90 days.
Take a snapshot of the selected server, exporting the VM to an Open Virtualization Format (OVF) template.
AMI is uploaded to the selected S3 bucket.
Importing and Exporting Virtual Resources
If you don’t want to reinvent your entire infrastructure, you can selectively choose what to move using the VM Import/Export service importing your VM into AWS as an image, as shown in Figure 4-42.
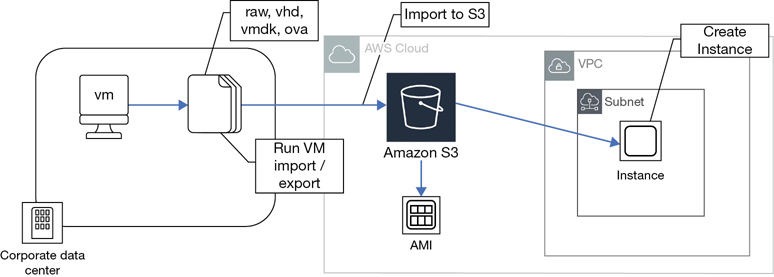
Retaining your VMs as an AMI allows to maintain your current installed software base and its custom configurations. The VM Import/Export service has some decent migration options to consider:
Migrate a local VM to AWS—Import a VM from your own virtualization environment into AWS as an EC2 instance (Amazon Machine Image). You can then create AMIs from the instance.
Import VHDs—Your existing VHDs can be imported into AWS as an elastic block storage (EBS) snapshot stored in an S3 bucket in your account.
Export an existing EC2 instance—Do this from AWS back to your virtualization environment.
Other Ways to Host Workloads at AWS
Virtualized workloads have been around for quite a while with on-premise applications and have been the prime method for hosting workloads in the cloud. You can continue using instances to directly host your Windows and Linux workloads at AWS. However, there are a couple of other compute choices to be aware of. It all depends on the type of application stack you’re trying to build or host. Do you need a full virtual platform that contains multiple services, such as a full LAMP stack? (That’s a Linux instance with an Apache Web service, a MySQL database, and a scripting environment such as JavaScript or Python.)
Your first thought may be that an instance is the way to go; after all, it worked just fine on-premise. However, once you start operating in the cloud, there’s a good chance that over time you’re going to start taking advantage of the hosted services that are present and supplied by AWS. Therefore, in the case of the LAMP application stack, the database could be hosted by AWS using the RDS; the scripting environment would be provided as part of the cloud provider’s operating system environment. That leaves you with a single service: the Apache Web service. What if you could deploy the Web servers in a container instead of an instance?
Containers
Another way of running applications at AWS is by using containers. The concept of containers involves changing the underlying virtualization from a complete emulation of a computer system to just the virtualization of the operating system components that are required for communication: the necessary libraries, system tools, and runtime. A container shares the host operating system’s kernel and its system libraries using a control plane, or in the case of Docker, the Engine allows the application hosted in the container to have read-only access to the host operating systems file system and network stack, as shown in Figure 4-43. The result is less duplication of operating system components to run applications.

The biggest concept to understand about using containers is that they can run anywhere: in the cloud, at AWS, at Azure, at Google, on Microsoft Azure, on-premise, on a Windows 10 laptop, or on a Windows server.
The operating system that hosts the Docker engine can be a bare-metal server or a virtualized operating system allowing you some flexibility in how to host your containers at AWS. You could choose a bare-metal server or a large instance. Both are hosted within your VPC to install the Docker environment. Comparing the operating concepts of containers versus instances, there are some potentially interesting advantages, as detailed in Table 4-10.
Table 4-10 VMs Versus Containers
VMs/Instance |
Containers |
|---|---|
Full stack |
Lightweight |
Each app has its own VM |
Containers share the host OS |
Startup in minutes |
Startup in seconds |
Gigabytes in size |
Megabytes in size |
FIPS 140-2 approved |
FIPS 140-2 validation |
Virtualization technology |
Application delivery technology |
Application server |
Service inside of a container |
There are several different types of containers; one of the first was Linux containers sitting on top of the Linux operating system, allowing for multiple isolated containers on a single physical host. There are also Windows containers, and Kubernetes container environments. The most popular container environment at AWS is Docker. The engineer who created the Docker container environment started with Linux containers as the initial model but has created a container ecosystem with many features, including orchestration and integrated container security bundled into the Docker Enterprise container platform. Docker also has a complete development platform for both Windows and Mac environments to allow developers to build containerized applications on their laptops.
Amazon Elastic Container Service (ECS)
Amazon provides a complete container management system supporting Docker containers and Windows Server containers and is certified conformant with Kubernetes, allowing you to use all third-party plug-ins and customizations from the Kubernetes community. ECS allows you to set up a cluster of EC2 instances running Docker in a selected VPC; it then manages the deployment of the containers across the cluster of instances by managing the placement of the containers throughout the cluster, making sure there are enough resources available to run each container. Containers are launched using a task definition, as shown in Figure 4-44, that defines the following criteria:
The Docker image to be pulled from the private registry for the container
The CPU and memory requirements
Links that need to be established between containers
Data volumes
Network and port settings
IAM security settings
Figure 4-44 Task definition options
The ECS follows what is called a task placement strategy using the defined task definition when launching your containers. For example, your strategy might be to spread the containers that are launched across multiple instances and across multiple AZs. Other task placement strategies can include running a task per EC2 instance and your own custom-designed tasks. ECS also monitors all running tasks and can restart tasks if they fail.
ECS is fully integrated with the monitoring services at AWS (CloudTrail), load-balancing services (ALB), role-based security (IAM), and your own private network (VPC). A private Docker image repository called Amazon ECR is available for storing and encrypting your container images at rest.
AWS Fargate
Fargate is a container management service that allows you to run your applications in containers at AWS but not have to manage the underlying instances and clusters. With Fargate, you have the option to specify the container image and memory and CPU requirements using an ECS task definition. Fargate then takes over scheduling the orchestration, management, and placement of the containers throughout the cluster, providing a highly available operation environment. Optionally, you can still launch your container environment using the traditional EC2 launch patterns of the basic ECS service.
AWS ECS for Kubernetes (EKS)
There are other popular container management services in the cloud, including Kubernetes, which Amazon supports with ECS for Kubernetes (EKS). Similar to the concept of AWS Fargate container management, Amazon deploys and hosts the Kubernetes control plane, which controls clusters of worker nodes hosted across multiple AZs.
EKS has been certified Kubernetes conformant, so any third-party plug-ins or tools that you are using or have developed can be migrated to AWS. AWS is also integrated with Elastic Load Balancing (ELB), IAM security services for authentication, VPC hosting for isolation, and AWS CloudTrail.
As a managed service, EKS monitors and replaces any unhealthy control plane nodes and controls the upgrading and patching of your worker nodes. EKS workload clusters can be deployed on any type of EC2 instance. Currently, EKS supports Kubernetes 1.10.11 and 1.11.5 versions.
Amazon LightSail
Want to deploy an application and have AWS do most of the infrastructure work? LightSail allows you to quickly build an application stack from a preconfigured blueprint installed on an instance, as shown in Figure 4-45. Current choices include the following:
Applications stack—Choose an operating system (Linux or Windows), and then choose an application stack blueprint such as WordPress, a LAMP stack, or Nginx. Compute/storage plans are charged by the month and are based on memory, processing, storage, and data transfer.
Databases—Build a MySQL database in a preferred region and choose a database plan of Standard creating your database in a single AZ, or High Availability, which uses two AZs. Plan pricing is based on memory, processing, storage, and data transfer.
Networking resources—Order a static public IP address, create a DNS zone, or add a load balancer to your LightSail design.
Storage—Create EBS block disk volumes in a selected AZ for your LightSail instances. Pricing is always a monthly charge.
Snapshots—Create snapshots of existing LightSail instances.

Figure 4-45 Using LightSail to order an application stack
Lambda
Although this is not a development book by any stretch, a discussion about compute options at AWS would not be complete without talking about serviceless computing. Serviceless computing is an inappropriate name because there are servers in the background at AWS; they’re just not your servers. Let’s explain.
Imagine you have a node.JS Web server, an instance running at AWS. The job of the server is to carry out a specific task or maybe several specific tasks.
Maybe it runs a batch process several times a day.
Maybe it converts files uploaded to an S3 bucket into three different formats.
Maybe it’s a fully functional Web server that runs a certain number of tasks based on HTTPS inputs.
For each of these use cases, instead of spinning up your own instance, consider uploading and executing each task as a Lambda function or as Lambda functions to Amazon’s hosted instances, as shown in Figure 4-46. Your concern is your custom Lambda function; Amazon’s job is hosting and executing your function. That’s the basic concept of Lambda; here are the big-picture steps:
Upload your function to Lambda as a zip file.
Define how long the function will execute.
Define how much compute and memory the function requires.
Define the trigger that starts the function.
Figure 4-46 Lambda in action
There are many areas in the AWS ecosystem where Lambda is triggered to execute a custom function:
File uploads to an S3 bucket
Information being added to a Dynamo DB table
A CloudWatch alarm or defined event
Infrastructure components that fall out of AWS Config compliance rules
Each of these actions uses a Lambda server farm hosted at AWS (that is load balanced, auto scaled, and monitored following AWS best design practices) to execute a specific function when required. For public cloud providers, serviceless computing is the future. We’ll get into more detail on Lambda and serviceless computing in the final chapter of this book. If Lambda is processing trillions upon trillions of executions per month, perhaps the engine that launched Lambda in 2014 needs a tune-up with AWS Firecracker.
AWS Firecracker
As Lambda has increased in popularity, the compute engine that executes all the functions has a new engine. Underneath the hood of Lambda is a custom virtualization environment using KVM that launches a micro virtual machine in 125 msec.
The combination of the fast startup time and the extremely small memory footprint of less than 5 MB for each microVM allows you to store thousands of microVMs on a single hosting Firecracker machine. Virtual machines of this size begin to offer great flexibility for hosting isolated functions. Although Firecracker is not available in the console yet, once it is available, you will be able to use it to host your micro-services in microVMs
Thinking toward the future, Firecracker VMM is built to run on Intel, AMD, and Arm processors and has been open sourced under Apache version 2.0 to encourage further development.
In Conclusion
There is a lot of detail in this chapter dealing with EC2 instances and their associated bits and pieces, including pricing, images, volumes, snapshots, and migration options. When you look at the available instances, there will be even more choice and more features. Pricing will probably be lower, and change will be constant. That’s just the way it is running workloads in the cloud. Keeping on top of changes that affect your designs is a big job but a necessary one; after all, the changes are probably something that you’ve been looking for. Sit down with your team and start to check off the big-picture discussion points for this chapter. Bring lots of coffee.
Top 10 Big-Picture Discussion Points: Migration and Planning Considerations
What database will we first migrate to AWS for testing purposes?
What virtual machine will we migrate and test first?
What versions of operating systems are we currently using? Are they the latest and greatest versions? If not, why not?
Do our virtualized images require paravirtualization support?
Do we know what instance size and type to choose for our application servers?
Do we know what instance size and type to choose for our database servers?
Are there prebuilt AMIs at AWS that we should start with?
What tagging strategy should we deploy?
What will be our snapshot strategy at AWS?
Do we want to use encryption for EBS volumes? If the answer is yes, is using AWS managed encryption keys compatible with our compliance rules and regulations?