
Chapter 2. Implement and manage storage
Implementing and managing storage is one of the most important aspects of building or deploying a new solution using Azure. There are several services and features available for use, and each has their own place. Azure Storage is the underlying storage for most of the services in Azure. It provides service for the storage and retrieval of files, and has services that are available for storing large volumes of data through tables, as well as a fast and reliable messaging service for application developers with queues. Azure Backup is another critical service that enables simplified disaster recovery for virtual machines by ensuring that data is securely backed up and easily restorable. In this chapter we’ll review how to implement and manage storage with an emphasis on the Azure Storage and Azure Backup services.
We’ll also discuss related services such as Azure Content Delivery Network (CDN), Import/ Export, Azure Data Box, and many of the tools that simplify the management of these services.
Skills covered in this chapter:
Skill 2.1: Create and configure storage accounts
An Azure storage account is an entity you create that is used to store Azure Storage data objects such as blobs, files, queues, tables, and disks. Data in an Azure storage account is durable and highly available, secure, massively scalable, and accessible from anywhere in the world over HTTP or HTTPS.
This section covers how to:
Create and configure a storage account
Azure storage accounts provide a cloud-based storage service that is highly scalable, available, performant and durable. Within each storage account, a number of separate storage services are provided. These services are:
Blobs Provides a highly scalable service for storing arbitrary data objects, such as text or binary data.
Tables Provides a NoSQL-style store for storing structured data. Unlike a relational database, tables in Azure storage do not require a fixed schema, so different entries in the same table can have different fields.
Queues Provides reliable message queueing between application components
Files Provides managed file shares that can be used by Azure VMs or on-premises servers
There are three types of storage blobs: block blobs, append blobs, and page blobs. Page blobs are used to store VHD files when deploying unmanaged disks. (Unmanaged disks are an older disk storage technology for Azure virtual machines. Managed disks are recommended for new deployments.)
When creating a storage account, there are several options that must be selected. These are the performance tier, account kind, replication option and access tier. There are some interactions between these settings, for example only the Standard performance tier allows you to choose the access tier. The following sections describe each of these settings. We then describe how to create storage accounts using the Azure portal, PowerShell, and Azure CLI.
Performance Tiers
When creating a storage account, you must choose between the Standard and Premium performance tiers. This setting cannot be changed later.
Standard This tier supports all storage services: blobs, tables, files, queues, and unmanaged Azure virtual machine disks. It uses magnetic disks to provide cost-efficient and reliable storage.
Premium This tier is designed to support workloads with greater demands on I/O and is backed by high performance SSD disks. They only support page blobs, and do not support the other storage services. In addition, Premium storage accounts only support the locally-redundant (LRS) replication option, and do not support access tiers.
Replication options
When you create a storage account, you can also specify how your data will be replicated for redundancy and resistance to failure. There are four options, as described in Table 2-1.
Table 2-1 Storage account replication options
| Account Type | Description |
| Locally redundant storage (LRS) | Makes three synchronous copies of your data within a single datacenter. Available for general purpose or blob storage accounts, at both the Standard and Premium performance tiers. |
| Zone redundant storage (ZRS) | Makes three synchronous copies of your data across multiple availability zones within a region. Available for general purpose v2 storage accounts only, at the Standard performance tier only. |
| Geographically redundant storage (GRS) | Same as LRS (three copies local), plus three additional asynchronous copies to a second data center hundreds of miles away from the primary region. Data replication typically occurs within 15 minutes, although no SLA is provided. Available for general purpose or blob storage accounts, at the Standard performance tier only. |
| Read-access geographically redundant storage (RA-GRS) | Same capabilities as GRS, plus you have read-only access to the data in the secondary data center. Available for general purpose or blob storage accounts, at the Standard performance tier only. |
Note Specifying Replication and Performance Tier Settings
When creating a storage account via the Azure portal, the replication and performance tier options are specified using separate settings. When creating an account using Azure Power-Shell, the Azure CLI, or via a template, these settings are combined within the Sku setting.
For example, to specify a Standard storage account using locally-redundant storage using the Azure CLI, use --sku Standard_LRS.
Access tiers
Azure blob storage supports three access tiers: Hot, Cool, and Archive. Each represents a tradeoff of performance, availability, and cost. There is no trade-off on the durability (probability of data loss) which is extremely high across all tiers.
Note Blob Storage Only
Access tiers apply to blob storage only. They do not apply to other storage services (tables, queues, and files).
The tiers are as follows:
Hot This access tier is optimized for the frequent access of objects in the storage account. Relative to other tiers, data access costs are low while storage costs are higher.
Cool This access tier is optimized for storing large amounts of data that is infrequently accessed and stored for at least 30 days. The availability SLA is lower than for the hot tier. Relative to the Hot tier, data access costs are higher and storage costs are lower.
Archive This access tier is designed for long-term archiving of infrequently-used data that can tolerate several hours of retrieval latency, and will remain in the Archive tier for at least 180 days. This tier is the most cost-effective option for storing data, but accessing that data is more expensive than accessing data in the Hot or Cool tiers.
There is a fourth tier, Premium, providing high-performance access for frequently-used data, based on solid-state disks. This tier is now available at: https://azure.microsoft.com/blog/azure-premium-block-blob-storage-is-now-generally-available/. It is only available from the Block Blob storage account type.
Note Archive Storage Tier
Data in the Archive storage tier is stored offline and must be rehydrated to the Cool or Hot tier before it can be accessed. This process can take up to 15 hours.
Table 2-2 compares the key features of each of the Hot, Cool, and Archive blob storage access tiers.
Table 2-2 Blob storage access tiers
| Hot tier | Cool tier | Archive tier | |
| Availability SLA | 99.9% (99.99% RA-GRS reads) |
99% (99.9% RA-GRS reads) |
N/A |
| Costs | Higher storage costs, lower access costs | Lower storage costs, higher access costs | Lowest storage costs, highest access costs |
| Latency | milliseconds | milliseconds | Up to 15 hours |
| Minimum storage duration | N/A | 30 days | 180 days |
When using Azure storage, a default access tier is defined at the storage account level. This default must be either the Hot or Cool tier (not the Archive tier). Individual blobs can be assigned to any access tier, regardless of the account-level default. For Archive, there is only support for block blobs without any snapshots (A blob block that has snapshots cannot be re-tiered).
Account Kind
Another storage account setting is the account kind. There are three possible values: general-purpose v1, general-purpose v2, and blob storage. The features of each kind of account are listed in Table 2-3. Key points to remember are:
The blob storage account is a specialized storage account used to store block blobs and append blobs. You can’t store page blobs in these accounts, therefore you can’t use them for unmanaged disks.
Only general-purpose v2 and blob storage accounts support the hot, cool and archive access tiers.
Only general-purpose v2 accounts support zone-redundant (ZRS) storage.
General-purpose v1 and blob storage accounts can both be upgraded to a general-purpose v2 account. This operation is irreversible. No other changes to the account kind are supported.
Table 2-3 Storage account types and their supported features
| General-purpose V2 | General-purpose V1 | Blob storage | |
| Services supported | Blob, File, Queue, Table | Blob, File, Queue, Table | Blob (block blobs and append blobs only) |
| Unmanaged DIsk (page blob) support | Yes | Yes | No |
| Supported Performance Tiers | Standard, Premium | Standard, Premium | Standard |
| Supported Access Tiers | Hot, Cool, Archive | N/A | Hot, Cool, Archive |
| Replication Options | LRS, ZRS, GRS, RA-GRS | LRS, GRS, RA-GRS | LRS, GRS, RA-GRS |
Creating an Azure Storage Account (Portal)
To create a storage account by using the Azure portal, first click Create a resource and then select Storage. Next click Storage account, which will open the Create storage account blade (Figure 2-1). You must choose a unique name for the storage account name. Storage account names are more restrictive than for other resources types—the name must be globally unique, and can contain lower-case characters and digits only. Select the Azure region (Location), the performance tier, the kind of storage account, the replication mode, and the access tier. The blade adjusts based on the settings you choose so that you cannot select an unsupported feature combination.
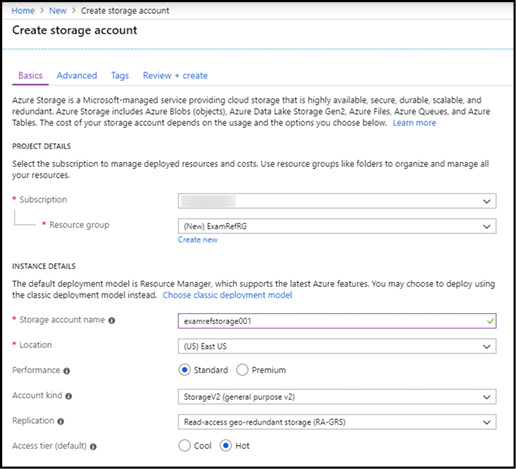
Figure 2-1 Creating an Azure Storage account using the Azure portal
The Advanced tab of the Create storage account blade is shown in Figure 2-2. This tab allows you to specify whether SSL is required for accessing objects in storage, access from all or a specific virtual network, as well as a preview feature for Data Lake Storage integration. Clicking the Tags tab allows you to specify tags on the storage account resource.

Figure 2-2 The advanced properties that can be set when creating an Azure Storage Account using the portal
Creating an Azure Storage Account (PowerShell)
The New-AzStorageAccount cmdlet is used to create a new storage account using Azure PowerShell. The cmdlet requires the ResourceGroupName, Location, and SkuName parameters to be specified, although you can also specify the account kind and access tier using the Kind and AccessTier parameters. If Kind is not specified, a general purpose v1 account is created by default.
The following PowerShell script creates a new resource group called ExamRefRG using the New-AzResourceGroup cmdlet and then creates a new storage account using the New-AzStorageAccount cmdlet.
$resourceGroup = "ExamRefRG"
$accountName   = "mystorage112300"
$location      = "WestUS"
$sku           = "Standard_LRS"
$kind          = "StorageV2"
$tier          = "Hot"
New-AzResourceGroup -Name $resourceGroup -Location $location
New-AzStorageAccount -ResourceGroupName $resourceGroup `
            -Name $accountName `
            -SkuName Standard_LRS `
            -Location $location `
            -Kind $kind `
            -AccessTier $tier
When creating a storage account with PowerShell you can specify several additional options such as custom domains using the CustomDomainName parameter, and optionally also the UseSubDomain switch if using the intermediary method of registering custom domains (for further information, see: https://docs.microsoft.com/azure/storage/blobs/storage-custom-domain-name). You can also specify whether to require HTTPS/SSL by specifying EnableHttpsTrafficOnly, assign a network rule set for virtual network access by passing a set of firewall and network rules using the NetworkRuleSet parameter, and automatically create and assign an identity to manage keys in Azure KeyVault using the AssignIdentity parameter.
More Info Creating a Storage Account with Powershell
You can learn more about the additional parameters here:
https://docs.microsoft.com/powershell/module/az.storage/new-azstorageaccount.
The Set-AzStorageAccount cmdlet is used to update an existing storage account. In this next example the storage account access tier is changed to Cool. The Force parameter is specified to avoid a prompt notifying that changing the access tier may result in price changes.
Set-AzStorageAccount -ResourceGroupName $resourceGroup `
            -Name $accountName `
            -AccessTier Cool `
            -Force
Creating an Azure Storage Account (CLI)
The az storage account create command is used to create an Azure Storage Account using the Azure CLI. This next example shows an Azure CLI script which creates a new resource group called ExamRefRG using the az group create command and then creates a new storage account using the az storage account create command. Note that this won't run in a PowerShell prompt with the Azure CLI installed without Bash variables.
resourceGroup="ExamRefRG"
accountName="mystorage112301"
location="WestUS"
sku="Standard_LRS"
kind="StorageV2"
tier="Hot"
az group create -l $location --name $resourceGroup
az storage account create --name $accountName –resourceg-roup $resourceGroup --location
$location --sku $sku
Similar to creating a storage account using PowerShell, there are several optional parameters that allow you to control additional account options such as custom domains using the custom-domain parameter, whether to require HTTPS/SSL by specifying https-only, and to automatically create and assign an identity to manage keys in Azure KeyVault using the assign-identity parameter.
More Info Creating a Storage Account with The Azure Cli
You can learn more about the additional parameters here: https://docs.microsoft.com/cli/azure/storage/account#az-storage-account-create.
Install and use Azure Storage Explorer.
Azure Storage Explorer is a cross-platform application designed to help you quickly manage one or more Azure storage accounts. It can be used with all storage services: blobs, tables, queues and files. In addition, Azure Storage Explorer also supports the CosmosDB and Azure Data Lake Storage services
You can install Azure Storage Explorer by navigating to its landing page on https://azure.microsoft.com/features/storage-explorer/ and selecting your operating system choice out of Windows, macOS, or Linux.
In addition, a version of Storage Explorer with similar functionality is integrated into the Azure portal. To access, simply click Storage Explorer (Preview) from the storage account blade.
Connecting Storage Explorer to Storage Accounts
After Storage Explorer is installed, you can connect to Azure storage in one of five different ways (shown in Figure 2-3):
Add an Azure Account This option allows you to sign in using a work or Microsoft account and access all of your storage accounts via role-based access control.
Using a connection string This option requires you to have access to the connection string of the storage account. The connection string is retrievable by opening the storage account blade in the Azure portal and clicking on Access keys.
Using a storage account name and key This option requires you to have access to the storage account name and key. These values can also be accessed from the Azure portal under Access keys.
User a shared access signature URI A shared access signature provides access to a storage account without requiring an account key to be shared. Access can be restricted, for example to read-only access for blob storage for one week only.
Attach to a local emulator Allows you to connect to the local Azure storage emulator as part of the Microsoft Azure SDK.
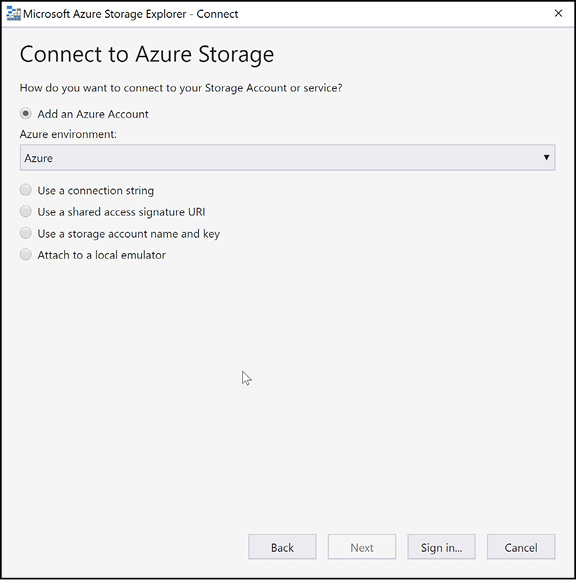
Figure 2-3 Connecting to an Azure Storage Account using Azure Storage Explorer
After connecting, you then filter on which subscriptions to use. Once you select a subscription, all of the supported services within the subscriptions will be made available. Figure 2-4 shows an expanded Azure Storage Account named mystorage112300.
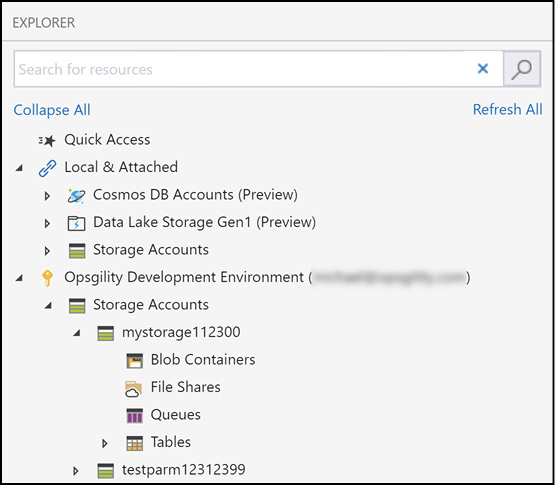
Figure 2-4 Azure Storage Explorer showing an Azure Storage Account beneath the subscription
Using Storage Explorer
Using Storage Explorer, you can manage each of the storage services: blobs, tables, queues and files. Table 2-4 summarizes the supported operations for each service.
Table 2-4 Storage Explorer Operations
| Storage Service | Supported Operations |
| Blob | Blob containers Create, rename, copy, delete, control public access level, manage leases, create and manage shared access signatures and access policies Blobs Upload, download, manage folders, rename and delete blobs, copy blobs, create and manage blob snapshots, change blob access tier, create and manage shared access signatures and access policies |
| Table | Tables Create, rename, copy, delete, create and manage shared access signatures and access policies Table entities Import, export, view, add, edit, delete and query |
| Queue | Queues Create, delete, create and manage shared access signatures and access policies Messages Add, view, dequeue, clear all messages |
| Files | File shares Create, rename, copy, delete, create and manage snapshots, connect VM to file share, create and manage shared access signatures and access policies Files Upload folders or files, download folders or files, manage folders, copy, rename, delete |
In each case Azure Storage Explorer provides an intuitive GUI interface for each operation.
Configure network access to the storage account
Storage accounts are managed through Azure Resource Manager. Management operations are authenticated and authorized using Azure Active Directory and role-based access control. Each storage account service exposes its own endpoint used to manage the data in that storage service (blobs in blob storage, entities in tables, and so on). These service-specific endpoints are not exposed through Azure Resource Manager, instead they are (by default) Internet-facing endpoints.
Access to these Internet-facing storage endpoints must be secured, and Azure Storage provides several ways to do so. In this section, we will review the network-level access controls: the storage firewall and service endpoints. We also discuss blob storage access levels. The following two sections then describe the application-level controls: access keys and shared access signatures.
Storage Firewall
The storage firewall is used to control which IP address and virtual networks can access the storage account. It applies to all storage account services (blobs, tables, queues and files). For example, by limiting access to the IP address range of your company, access from other locations will be blocked.
To configure the storage firewall using the Azure portal, open the storage account blade and click Firewalls And Virtual Networks. Click to allow access from Selected Networks to reveal the firewall and virtual network settings, as shown in Figure 2-5.

Figure 2-5 Configuring a Storage account firewall and virtual network service endpoint access
When accessing the storage account via the Internet, use the storage firewall to specify the Internet-facing source IP addresses that will make the storage requests. You can specify a list of either individual IPv4 addresses or IPv4 CIDR address ranges (CIDR notation is explained in the chapter on Azure Networking).
The storage firewall includes an option to allow access from trusted Microsoft services. These services include Azure Backup, Azure Site Recovery, and Azure Networking, for example to allow access to storage for NSG flow logs. There are also options to allow read-only access to storage metrics and logs.
Virtual Network Service Endpoints
In some scenarios, a storage account is only accessed from within an Azure virtual network. In this case, it is desirable from a security standpoint to block all Internet access. Configuring Virtual Network Service Endpoints for your Azure storage accounts allows you to remove access from the public Internet, and only allow traffic from a virtual network for improved security.
Another benefit of using service endpoints is optimized routing. Service endpoints create a direct network route from the virtual network to the storage service. This is important when forced tunneling is used to direct outbound Internet traffic from the virtual network via an on-premises network security device. Without service endpoints, access from the virtual network to the storage account would also be routed via the on-premises network, adding significant latency. With service endpoints, the direct route to the storage account takes precedence over the on-premises route, so no additional latency is incurred.
Configuring service endpoints requires two steps. First, from the virtual network subnet, specify Microsoft.Storage in the service endpoint settings. This creates the route from the subnet to the storage service but does not restrict which storage account the virtual network can use. Figure 2-6 shows the subnet settings, including the service endpoint configuration.
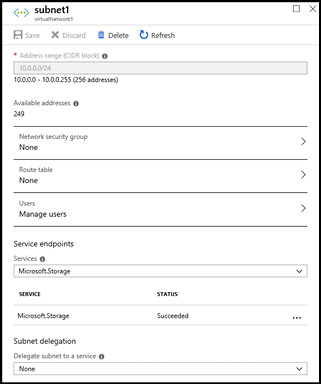
Figure 2-6 Configuring a subnet with a service endpoint for Azure storage
The second step is to configure which virtual networks can access a particular storage account. From the storage account blade click Firewalls And Virtual Networks. Click to allow access from Selected Networks to reveal the firewall and virtual network settings, as already seen in Figure 2-5. Under Virtual networks, select the virtual networks and subnets which should have access to this storage account. To further restrict access, the storage firewall can be configured with private IP addresses of specific virtual machines.
Blob storage access levels
Storage accounts support an additional access control mechanism, limited only to blob storage. By default, no public read access is enabled for anonymous users, and only users with rights granted through role-based access control (RBAC), or with the storage account name and key, will have access to the stored blobs. To enable anonymous user access, you must change the container access level. The supported levels are as follows:
No public read access The container and its blobs can be accessed only by the storage account owner. This is the default for all new containers.
Public read-only access for blobs only Blobs within the container can be read by anonymous request, but container data is not available. Anonymous clients cannot enumerate the blobs within the container.
Full public read-only access All container and blob data can be read by anonymous request. Clients can enumerate blobs within the container by anonymous request but cannot enumerate containers within the storage account.
You can change the access level through the Azure portal, Azure PowerShell, Azure CLI, programmatically using the REST API, or using Azure Storage Explorer. The access level is configured separately on each blob container.
A Shared Access Signature token (SAS token) is a URI query string parameter that grants access to specific containers, blob, queues, and tables. Use a SAS tokens to grant access to a client that should not have access to the entire contents of the storage account (and therefore should not have access to the storage account keys), but still requires secure authentication. By distributing a SAS URI to these clients, you can grant them access to a specific resource, for a specified period of time, with a specified set of permissions.
Manage access keys
The simplest, and most powerful control over access to a storage is account is via the access keys. With the storage account name and an access key of the Azure Storage Account, you have full access to all data in all services within the storage account. You can create, read, update, and delete containers, blobs, tables, queues, and file shares. In addition, you have full administrative access to everything other than the storage account itself (you cannot delete the storage account or change settings on the storage account, such as its type).
Applications will often use the storage account name and key for access to Azure storage. Sometimes this is to grant access by generating a Shared Access Signature token, and sometimes for direct access with the name and key.
To access the storage account name and key, open the storage account from within the Azure portal and click Access keys. Figure 2-7 shows the primary and secondary access keys for the mystorage112300 storage account.

Figure 2-7 Access keys for an Azure storage account
Each storage account has two access keys. This allows you to modify applications to use the second key instead of the first, and then regenerate the first key. This technique is known as key rolling, and it allows you to reset the primary key with no downtime for applications that access storage directly using an access key.
Storage account access keys can be regenerated using the Azure portal or the command line tools. In PowerShell, this is accomplished with the New-AzStorageAccountKey cmdlet, and for the Azure CLI you will use the az storage account keys renew command.
Note Access Keys and Sas Tokens
Rolling a storage account access key will invalidate any Shared Access Signature tokens that were generated using that key.
Managing Access Keys in Azure Key Vault
It is important to protect the storage account access keys because they provide full access to the storage account. Azure Key Vault helps safeguard cryptographic keys and secrets used by cloud applications and services, such as authentication keys, storage account keys, data encryption keys and certificate private keys.
The following example shows how to create an Azure Key Vault and then securely store the key in Azure Key Vault (using software protected keys) using PowerShell.
$vaultName = "[key vault name]"
$rgName = "[resource group name]"
$location = "[location]"
$keyName = "[key name]"
$secretName = "[secret name]"
$storageAccount = "[storage account]"
# create the key vault
New-AzKeyVault -VaultName $vaultName -ResourceGroupName $rgName -Location $location
# create a software managed key
$key = Add-AzKeyVaultKey -VaultName $vaultName -Name $keyName -Destination 'Software'
# retrieve the storage account key (the secret)
$storageKey = Get-AzStorageAccountKey -ResourceGroupName $rgName -Name $storageAccount
# convert the secret to a secure string
$secretvalue = ConvertTo-SecureString $storageKey[0].Value -AsPlainText -Force
# set the secret value
$secret = Set-AzKeyVaultSecret -VaultName $vaultName -Name $secretName -SecretValue
$secretvalue
The same capabilities exist with the Azure CLI tools. In the following example, the az keyvault create command is used to create the Azure KeyVault. From there, the az keyvault key create command is used to create the key. Finally, the az keyvault secret set command is used to set the secret value.
vaultName="[key vault name]"
rgName="[resource group name]"
location="[location]"
keyName="[key name]"
secretName="[secret name]"
storageAccount="[storage account]"
secretValue="[storage account key]"
# create the key vault
az keyvault create --name "$vaultName" --resource-group "$rgName" --location "$location"
# create a software managed key
az keyvault key create --vault-name "$vaultName" --name $keyName --protection "software"
# set the secret value
az keyvault secret set --vault-name "$vaultName" --name "$secretName" --value
"$secretValue"
Keys in Azure Key Vault can be protected in software or by using hardware security modules (HSMs). HSM keys can be generated in place or imported. Importing keys is often referred to as bring your own key, or BYOK.
More Info Using Hsm-Protected Keys for Azure Key Vault
You can learn more about the bring your own key (BYOK) scenario here:
https://docs.microsoft.com/azure/key-vault/key-vault-hsm-protected-keys.
Accessing and unencrypting the stored keys is typically done by a developer, although keys from Key Vault can also be accessed from ARM templates during deployment.
More InfoAccessing Encrypted Keys from Azure Key Vault
You can learn more about how developers securely retrieve and use secrets from Azure Key Vault here:
https://docs.microsoft.com/azure/storage/blobs/storage-encrypt-decrypt-blobs-key-vault.
Generate a shared access signature
You can create SAS tokens using Storage Explorer or the command line tools (or programmatically using the REST APIs/SDK). Figure 2-8 demonstrates how to create a SAS token using Azure Storage Explorer.

Figure 2-8 Creating a Shared Access Signature using Azure Storage Explorer
The following example shows how to create a SAS token for a specific storage blob using the Azure PowerShell cmdlets. The example creates a storage context using the storage account name and key that is used for authentication, and to specify the storage account to use. The context is passed the New-AzStorageBlobSASToken cmdlet, which is also passed the container, blob, and permissions (read, write, and delete), along with the start and end time that the SAS token is valid for. There are alternative cmdlets, such as New-AzStorageAccountSASToken, New-AzStorageContainerSASToken, New-AzStorageTableSASToken, New-AzStorageFileSASToken, New-AzStorageShareSASToken, and New-AzStorageQueueSASToken, to generate SAS tokens for other storage services.
$accountName = "[storage account]"
$rgName = "[resource group name]"
$container = "[storage container name]"
$blob = "[blob path]"

$storageKey = Get-AzStorageAccountKey `
    -ResourceGroupName $rgName `
    -Name $accountName

$context = New-AzStorageContext `
    -StorageAccountName $accountName `
    -StorageAccountKey $storageKey[0].Value

$startTime = Get-Date
$endTime = $startTime.AddHours(4)

New-AzStorageBlobSASToken `
    -Container $container `
    -Blob $blob `
    -Permission "rwd" `
    -StartTime $startTime `
    -ExpiryTime $endTime `
    -Context $context
Figure 2-9 shows the output of the script. After the script executes, notice the SAS token output to the screen.

Figure 2-9 Creating a Shared Access Token
The Azure CLI tools can also be used to create SAS tokens. For example, to create a SAS token for a specific blob, use the az storage blob generate-sas command.
storageAccount="[storage account name]"
container="[storage container name]"
storageAccountKey="[storage account key]"
blobName="[blob name]"
az storage blob generate-sas
    --account-name "storageAccount"
    --account-key "$storageAccountKey"
    --container-name "$container"
    --name "$blobName"
    --permissions r
    --expiry "2019-05-31"
Using shared access signatures
Each SAS token is a query string parameter that can be appended to the full URI of the blob or other storage resource the SAS token was created for. Create the SAS URI by appending the SAS token to the full URI of the blob or other storage resource.
The following example shows the combination in more detail. Suppose the storage account name is ‘examrefstorage’, the blob container name is ‘examrefcontainer1’, and the blob path is ‘sample-file.png’. The full URI to the blob in storage is then:
https://examrefstorage.blob.core.windows.net/examrefcontainer1/sample-file.png
The combined URI with the generated SAS token is:
https://examrefstorage.blob.core.windows.net/examrefcontainer/sample-file.png?sv=2018-
03-28&sr=b&sig=%2B6TEOoJyT5EAL3HF9OhApxnPOXNWHUeAPZosRaBZBG4%3D&st=2018-12-
09T20%3A37%3A01Z&se=2018-12-10T00%3A37%3A01Z&sp=rwd
Using a stored access policy
A standard SAS token incorporates the access parameters (start and end time, permissions, etc) as part of the token. The parameters cannot be changed without generating a new token, and the only way to revoke an existing token before its expiry time is to roll over the storage account key used to generate the token Or to delete the blob. These limitations can make standard SAS tokens difficult to manage in practice.
Stored access policies allow the parameters for a SAS token to be decoupled from the token itself. The access policy specifies the start time, end time and access permissions, and is created independently of the SAS tokens. SAS tokens are generated that reference the stored access policy instead of embedding the access parameters explicitly.
With this arrangement, the parameters of existing tokens can be modified by simply editing the stored access policy. Existing SAS tokens remain valid, and use the updated parameters.
An existing token can be deactivated by simply setting the expiry time in the access policy to a time in the past.
Figure 2-10 shows the Azure Storage Explorer creating two stored access policies.

Figure 2-10 Creating stored access policies using Azure Storage Explorer
To use the created policies, reference them by name during creation of a SAS token using Storage Explorer, or when creating a SAS token using PowerShell or the CLI tools.
Monitor activity log by using Log Analytics
The Azure Activity log is a subscription level log that captures events that range from operational data such as resource creation or deletion, to service health events for a subscription.
More Info Monitor Subscription Activity with The Azure Activity Log
You can learn more about what can be captured and analyzed for your Azure subscriptions here: https://docs.microsoft.com/azure/monitoring-and-diagnostics/monitoring-overview-activity-logs.
There are many options for capturing and analyzing data from the activity log. Figure 2-11 demonstrates several options.
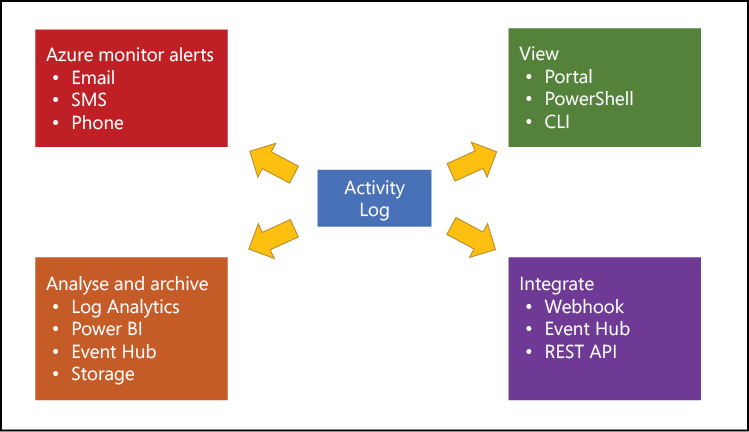
Figure 2-11 Options for extracting data from the Azure Activity Log
For the exam it is important that you understand how to archive Activity Log data to Azure Storage, and then use the Azure Log Analytics service to analyze the resulting Activity Log records.
To get started, access the Activity Log for your subscription by clicking on All Services in the Azure portal. In the resulting view you can find the Activity Log In The Management + Governance section, or you can search for Activity Log in the search box.
In the Activity Log view you will be able to see the recent subscription level events for the subscription, the time, the status, and the user who initiated the event. Clicking on either event allows you to view more about it, such as the reason it failed. In Figure 2-12 you can see that the Delete Virtual Machine event failed and then immediately after a Delete Management Locks event occurred.
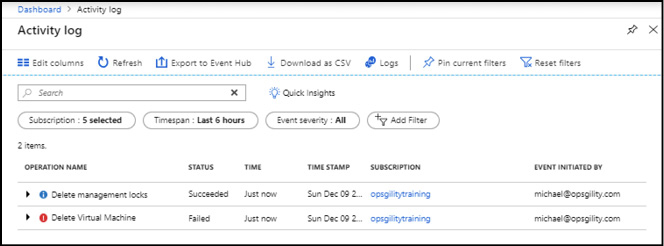
Figure 2-12 The Activity Log view in the Azure portal
Clicking the Logs icon at the top of the Activity Log view allows you to select an existing Log Analytics (OMS) workspace or create a new one. Figure 2-13 demonstrates creating the Azure Log Analytics workspace from the Activity Log view.
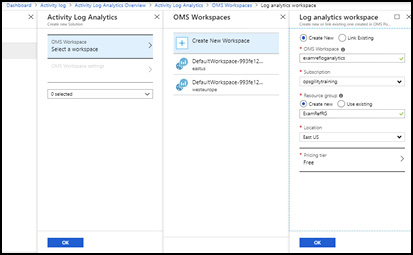
Figure 2-13 Creating a log analytics workspace
After the workspace is created, you are prompted to create the Log Analytics solution. The solution is a set of pre-configured views and queries designed to help analyze your log activity. The solution will automatically import the Activity Log data into the workspace after it is created.
After the data is imported, the Overview Page shows several views of your activity log data, grouping them by status, resource, and resource provider, as shown in Table 2-5.
Table 2-5 Azure Activity Log Blades and what data they contain
| View | Description |
| Azure Activity Log Entries | A bar chart shows the number of activity log entries over time. Beneath the bar chart, a table shows the top 10 callers (the accounts initiating the actions recorded in the activity log). Clicking the bar chart opens a log search blade pre-populated with a query to show the activity log entries for the selected date range. Clicking a caller opens a log search blade pre-populated with a query to show the log entries for that caller. |
| Activity Logs by Status | A doughnut chart shows a breakdown of the activity log entry status—succeeded, failed, and so on. Beneath the bar chart, a table lists the same breakdown. Clicking on the chart opens a log search blade pre-populated with a query to show the activity log entries grouped by status. Clicking on an entry in the table opens a log search blade pre-populated with a query to show the activity log entries with that status. |
| Activity Logs by Resource | The number of unique resources with activity log entries is shown, followed by a table listing the top 10 resource by number of activity log entries. Clicking the number opens a log search blade pre-populated with a query to show the log entries grouped by resource. Clicking a row in the table opens a log search blade pre-populated with a query to show the log entries for that resource. |
| Azure Logs by Resource Provider | The number of resource providers with activity log entries is shown, followed by a table listing the top 10 resource providers by number of activity log entries. Clicking the number opens a log search blade pre-populated with a query to show the log entries grouped by resource provider. Clicking a row in the table opens a log search blade pre-populated with a query to show the log entries for that resource provider. |
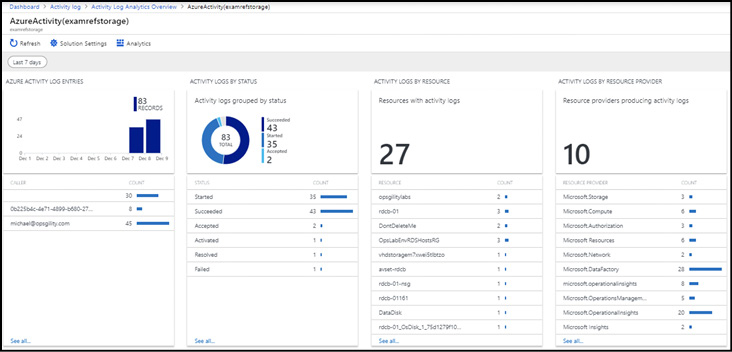
Figure 2-14 The Azure Activity Log Analytics overview
To view the activity related to Azure storage, click the Microsoft.Storage resource provider. The resulting view shows all related activity, such as creating or deleting storage accounts, accessing keys, and so on. Figure 2-15 shows the resulting view, including the query that was used to generate the view. You can modify the query or click Advanced Analytics to go to the full editor.
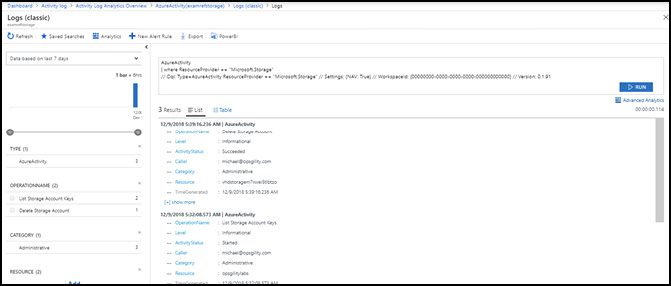
Figure 2-15 Analyzing data from the Microsoft.Storage resource provider using Log Analytics
You can enable alerts on data from the provider by providing your own query or building off the existing view. For example, to create a new alert when the Delete Storage Account action happens again, click the Delete Storage Account operation name and then click New Alert Rule from the top of the screen and configure the alert.
More Info Activity Log with Log Analytics
You can learn more about what about configuring the Log Analytics Activity Log Solution and creating alerts here:
https://docs.microsoft.com/azure/azure-monitor/platform/collect-activity-logs.
Implement Azure storage replication
The data in your Azure storage accounts is always replicated for durability and high availability. The built-in storage replication options were discussed at a high level in Table 2-1. It’s important to understand when each replication option should be used and at what level of availability you require for your scenario. Table 2-6 describes the scenarios and expected availability for each of the replication options.
Table 2-6 Durability and availability for the LRS and ZRS replication options.
| Scenario | LRS | ZRS | GRS | RA-GRS |
| Supported storage account types | GPv21, GPv12, Blob | GPv2 | GPv1, GPv2, Blob | GPv1, GPv2, Blob |
| Server or other failure within a data center | Available | Available | Available | Available |
| Failure impacting an entire data center (e.g. fire) | Not available | Available | Available | Available |
| Failure impacting all data centers in a region (e.g. major hurricane) | Not available | Not available | Microsoft controlled failover | Read access only until failed over |
| Designed durability (probability of data loss) | At least 99.999999999% (11 9’s) | At least 99.9999999999% (12 9’s) | At least 99.99999999999999% (16 9’s) | At least 99.99999999999999% (16 9’s) |
| Availability SLA for read requests | At least 99.9% (99% for cool access tier) | At least 99.9% (99% for cool access tier) | At least 99.9% (99% for cool access tier) | At least 99.99% (99.9% for cool access Tier) |
| Availability SLA for write requests | At least 99.9% (99% for cool access tier) | At least 99.9% (99% for cool access tier) | At least 99.9% (99% for cool access tier) | At least 99.9% (99% for cool access tier) |
Changing storage account replication mode
Storage accounts can be moved freely between the LRS, GRS, and RA-GRS replication modes. Azure will replicate the data asynchronously in the background as required.
Migrating to or from the ZRS replication mode works differently. The recommended approach is to simply copy the data to a new storage account with the desired replication mode, using a tool such as AzCopy. This may require application downtime. Alternatively, you can request a live data migration via Azure Support.
You can set the replication mode for a storage account after it is created through the Azure portal by clicking the Configuration link on the storage account and selecting the Replication Type (see Figure 2-16).
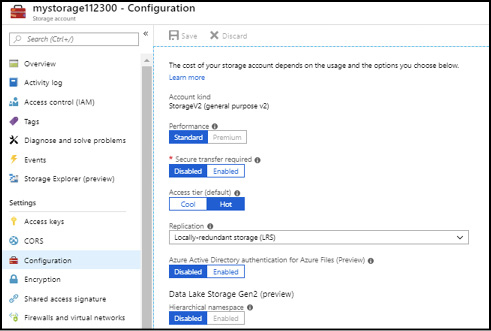
Figure 2-16 The configuration blade of an Azure Storage account
To change replication mode using the Azure PowerShell cmdlets, use the Type Inline code parameter of New-AzStorageAccount (at creation) or the Set-AzStorageAccount cmdlets (after creation), as shown:
$resourceGroup = "[resource group name]"
$accountName = "[storage account name]"
$type        = "Standard_RAGRS"
Set-AzStorageAccount -ResourceGroupName $resourceGroup `
                          -Name $accountName `
                          -SkuName $type
Using the async blob copy service
The async blob copy service is a server-side based service that can copy files you specify from a source location to a destination in an Azure Storage account. The source blob can be located in another Azure Storage account, or it can even be outside of Azure, as long as the storage service can access the blob directly for it to copy. This service does not offer an SLA on when the copy will complete. There are several ways to initiate a blob copy using the async blob copy service.
Async blob copy (PowerShell)
Use the Start-AzStorageBlobCopy cmdlet to copy a file using PowerShell. This cmdlet accepts either the source URI (if it is external), or as the next example next shows, the blob name, container, and storage context to access the source blob in an Azure Storage account. The destination requires the container name, blob name, and a storage context for the destination storage account.
$blobCopyState = Start-AzStorageBlobCopy -SrcBlob $blobName `
                       -SrcContainer $srcContainer `
                       -Context $srcContext `
                       -DestContainer $destContainer `
                       -DestBlob $vhdName `
                       -DestContext $destContext
Let’s review the parameters in the preceding example:
SrcBlob Expects the file name of source file to start copying.
SrcContainer Is the container the source file resides in.
Context Accepts a context object created by the
New-AzStorageContextcmdlet. The context has the storage account name and key for the source storage account and is used for authentication.DestContainer Is the destination container to copy the blob to. The call will fail if this container does not exist on the destination storage account.
DestBlob Is the filename of the blob on the destination storage account. The destination blob name does not have to be the same as the source.
DestContext Also accepts a context object created with the details of the destination storage account, including the authentication key.
Here is a complete example of how to use the Start-AzStorageBlob copy cmdlet to copy a blob between two storage accounts:
# Copy blob between storage accounts
# Source account, blob container, and blob must exist
# Destination account must exist. Destination blob container will be created
$blobName           = "[blob name]"
$srcContainer       = "[source container]"
$destContainer      = "[destination container]"
$srcStorageAccount  = "[source storage]"
$destStorageAccount = "[dest storage]"
$sourceRGName       = "[source resource group name]"
$destRGName         = "[destination resource group name]"
# Get storage account keys (both accounts)
$srcStorageKey = Get-AzStorageAccountKey `
  -ResourceGroupName $sourceRGName `
  -Name $srcStorageAccount

$destStorageKey = Get-AzStorageAccountKey `
  -ResourceGroupName $destRGName `
  -Name $destStorageAccount

# Create storage account context (both accounts)
$srcContext = New-AzStorageContext `
  -StorageAccountName $srcStorageAccount `
  -StorageAccountKey $srcStorageKey.Value[0]

$destContext = New-AzStorageContext `
  -StorageAccountName $destStorageAccount `
  -StorageAccountKey $destStorageKey.Value[0]

# Create new container in destination account
New-AzStorageContainer `
  -Name $destContainer `
  -Context $destContext

# Make the copy
$copiedBlob = Start-AzStorageBlobCopy `
  -SrcBlob $blobName `
  -SrcContainer $srcContainer `
  -Context $srcContext `
  -DestContainer $destContainer `
  -DestBlob $blobName `
  -DestContext $destContext
There are several cmdlets in this example. The Get-AzStorageKey cmdlet accepts the name of a storage account and the resource group it resides in. The return value contains the storage account’s primary and secondary authentication keys in the .Value array of the returned object. These values are passed to the New-AzStorageContext cmdlet, including the storage account name, and the creation of the context object. The New-AzStorageContainer cmdlet is used to create the storage container on the destination storage account. The cmdlet is passed the destination storage account’s context object ($destContext) for authentication.
The final call in the example is the call to Start-AzStorageBlobCopy. To initiate the copy this cmdlet uses the source ($srcContext) and destination context objects ($destContext) for authentication. The return value is a reference to the new blob object on the destination storage account.
Pipe the copied blob object to the Get-AzStorageBlobCopyState cmdlet to monitor the progress of the copy as shown in the following example.
$copiedBlob | Get-AzStorageBlobCopyState
The return value of Get-AzStorageBlobCopyState contains the CopyId, Status, Source, Bytes-Copied, CompletionTime, StatusDescription, and TotalBytes properties. Use these properties to write logic to monitor the status of the copy operation.
More Info More Examples with Powershell
There are many variations for using the async copy service with PowerShell. For more information see the following:
https://docs.microsoft.com/powershell/module/az.storage/start-azstorageblobcopy.
Async blob copy (CLI)
The Azure CLI tools support copying data to storage accounts using the async blob copy service. The following example uses the az storage blob copy start command to copy a blob from one storage account to another. The following script gives an example. For authentication, the command requires the storage account name and key for the source (if the blob is not available via public access) and the destination. The storage account key is retrieved using the az storage account keys list command.
# Copy blob between storage accounts
# Source account, blob container, and blob must exist
# Destination account and blob container must exist
blobName="[file name]"
srcContainer="[source container]"
destContainer="[destination container]"
srcStorageAccount="[source storage]"
destStorageAccount="[destination storage]"
$srcStorageKey="[source account key]"
$destStorageKey="[destination account key]"
az storage blob copy start
  --account-name "$destStorageAccount"
  --account-key "$destStorageKey"
  --destination-blob "$blobName"
  --destination-container "$destContainer"
  --source-account-name "$srcStorageAccount"
  --source-container "$srcContainer"
  --source-blob "$blobName"
    --source-account-key "$srcStorageKey"
After the copy is started, you can monitor the status using the az storage blob show command as shown here:
az storage blob show
   --account-name "$destStorageAccount" --account-key "$destStorageKey"
   --container-name "$destContainer" --name "$blobName"
More Info More Examples with CLI
There are many variations for using the async copy service with the Azure CLI. For more information see the following: https://docs.microsoft.com/cli/azure/storage/blob/copy.
Async blob copy (AzCopy)
The AzCopy application can also be used to copy between storage accounts. The following example shows how to specify the source storage account using the /source parameter and / sourcekey, and the destination storage account and container using the /Dest parameter and / DestKey.
AzCopy /Source:https://[source storage].blob.core.windows.net/[source container]/
/Dest:https://[destination storage].blob.core.windows.net/[destination container]/
/SourceKey:[source key] /DestKey:[destination key] /Pattern:disk1.vhd
AzCopy offers a feature to mitigate the lack of SLA with the async copy service. The /SyncCopy parameter ensures that the copy operation gets consistent speed during a copy. AzCopy performs the synchronous copy by downloading the blobs to copy from the specified source to local memory, and then uploading them to the Blob storage destination.
AzCopy /Source:https://[source storage].blob.core.windows.net/[source container]/
/Dest:https://[destination storage].blob.core.windows.net/[destination container]/
/SourceKey:[source key] /DestKey:[destination key] /Pattern:disk1.vhd /SyncCopy
More Info Azcopy
AzCopy version 10 (in preview) is multi-platform, and works with Windows, Linux and macOS.
For more information on AzCopy see the following:
https://docs.microsoft.com/azure/storage/common/storage-use-azcopy.
Async blob copy (Storage Explorer)
The Azure Storage Explorer application can also take advantage of the async blob copy service. To copy between storage accounts, navigate to the source storage account, select one or more files and click the copy button on the tool bar. Then navigate to the destination storage account, expand the container to copy to, and click Paste from the toolbar. In Figure 2-17, the Workshop List – 2017.xlsx blob was copied from examrefstoragesrccontainer to examrefstorage2destcontainer using this technique.
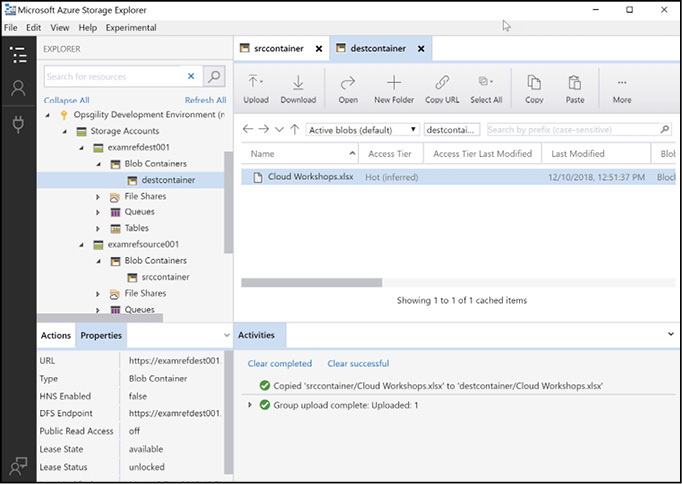
Figure 2-17 Using the async blob copy service with Storage Explorer
Skill 2.2: Import and export data to Azure
If your dataset is large enough, or you have limited or no connectivity from your data to the Internet, you may want to physically ship the data and import it into Microsoft Azure instead of uploading it. There are two solutions that enable this scenario. The first solution is the Azure Import and Export service, which allows you to ship data into or out of an Azure Storage account by physically shipping disks to an Azure datacenter. This service is ideal when it is either not possible, or prohibitively expensive, to upload or download the data directly. The second solution is Azure Data Box, which is a device that Microsoft will send to you that allows you to copy your data to it and then ship it back to Microsoft for uploading to Azure.
This section covers how to:
Configure and use Azure blob storage
This section describes the key features of the blob storage service provided by each storage account. Blob storage is used for large-scale storage of arbitrary data objects, such as media files, log files, or any other objects.
Blob containers
Figure 2-18 shows the layout of the blob storage service. Each storage account can have one or more blob containers and all blobs must be stored within a container. Containers are similar in concept to a hard drive on your computer, in that they provide a storage space for data in your storage account. Within each container you can store blobs, much as you would store files on a hard drive. Blobs can be placed at the root of the container or organized into a folder hierarchy.

Figure 2-18 Azure Storage account entities and hierarchy relationships
Each blob has a unique URL. The format of this URL is as follows:
https://[account name].blob.core.windows.net/[container name]/[blob path and name].
Optionally, you can create a container at the root of the storage account, by specifying the special name $root for the container name. This allows you to store blobs in the root of the storage account and reference them with URLs such as:
https://[account name].blob.core.windows.net/fileinroot.txt.
Understanding blob types
Blobs come in three types, and it is important to understand when each type of blob should be used and what the limitations are for each.
Page blobs A Optimized for random-access read and write operations. Page blobs are used to store virtual disk (VHD) files which using unmanaged disks with Azure virtual machines. The maximize page blob size is 8 TB.
Block blobs Optimized for efficient uploads and downloads, for video, image and other general-purpose file storage. The maximum block blob size is slightly over 4.75 TB.
Append blobs Optimized for append operations, and do not support modification of existing blob contents. Page blobs are most commonly used for log files. Up to 50,000 blocks can be added to each append blob, and each block can be up to 4MB in size, giving a maximum append blob size of slightly over 195 GB.
Blobs of all three types can share a single blob container.
![]() Exam Tip
Exam Tip
The type of the blob is set at creation and cannot be changed after the fact. A common problem that may show up on the exam is if a .vhd file was accidently uploaded as a block blob instead of a page blob. The blob must be deleted first and reuploaded as a page blob before it can be mounted as an OS or Data Disk to an Azure VM.
More Info Blob Types
You can learn more about the intricacies of each blob type here:
https://docs.microsoft.com/rest/api/storageservices/understanding-block-blobs--append-blobs--and-page-blobs.
Managing blobs and containers (Azure portal)
You can create and manage containers through the Azure Management Portal, Azure Storage Explorer, third-party storage tools, or through the command line tools. To create a container in the Azure Management Portal, open a storage account by clicking All Services, then Storage Accounts, and choose your storage account. Within the storage account blade, click the Blobs tile, and then click the + Container button, as shown in Figure 2-19. See Skill 2.1 for more information on setting the public access level.

Figure 2-19 Creating a container using the Azure Management Portal
After a container is created, you can also use the portal to upload blobs to the container as demonstrated in Figure 2-20. Click the Upload button in the container and then browse to the blob to upload. If you click the Advanced button you can select the blob type (Blob, Page or Append), the block size, and optionally a folder to upload the blob to.

Figure 2-20 The Azure Management Portal uploads a blob to a storage account container
Managing blobs and containers (PowerShell)
To create a container using the Azure PowerShell cmdlets, use the New-AzStorageContainer cmdlet. The access tier is specified using the Permission parameter.
To create a blob within an existing container, use the Set-AzStorageBlobContent cmdlet.
Both New-AzStorageContainer and Set-AzStorageBlobContent require a storage context, which specifies the storage account name and authentication credentials (for example access keys or SAS token). A storage context can be created using the New-AzStorageContext cmdlet. The context then can be passed explicitly when accessing the storage account, or implicitly by storing the context using the Set-AzCurrentStorageAccount cmdlet.
The following PowerShell script shows how to use these cmdlets to get the account key, create and store the storage context, then create a container and upload a local file as a blob.
$storageAccount = "[storage account name]"
$resourceGroup = "[resource group name]"
$container = "[blob container name]"
$localFile = "[path to local file]"
$blobName = "[blob path]"

# Get account key
$storageKey = Get-AzStorageAccountKey `
  -Name $storageAccount `
  -ResourceGroupName $resourceGroup

# Create and store the storage context
$context = New-AzStorageContext `
  -StorageAccountName $storageAccount `
  -StorageAccountKey $storageKey.Value[0]

Set-AzCurrentStorageAccount -Context $context

# Create storage container
New-AzStorageContainer -Name $container `
  -Permission Off

# Create storage blob
Set-AzStorageBlobContent -File $localFile `
  -Container $container `
  -Blob $blobName
More Info Managing BLOB Storage with Powershell
The Azure PowerShell cmdlets offer a rich set of capabilities for managing blobs in storage. You can learn more about their capabilities here:
https://docs.microsoft.com/azure/storage/blobs/storage-how-to-use-blobs-powershell.
Managing blobs and containers (CLI)
The Azure CLI tools can also be used to create a storage account container with the az storage container create command. The public-access parameter is used to set the permissions. The supported values are off, blob, and container.
storageaccount="[storage account name]"
containername="[blob container]"
az storage container create --account-name $storageaccount --name $containername
--public-access off
You can use the Azure CLI to upload a file as well using the az storage blob upload command as shown next
container_name="[blob container]"

account_name="[storage account name]"
account_key="[storage account key]"
file_to_upload="[path to local file]"
blob_name="[blob name]"
az storage blob upload --container-name $container_name --account-name $account_name
--account-key $account_key --file $file_to_upload --name $blob_name
More Info Managing BLOB Storage with the Azure CLI
The Azure CLI also offers a rich set of capabilities for managing blobs in storage. You can learn more about their capabilities here:
https://docs.microsoft.com/azure/storage/common/storage-azure-cli.
Managing blobs and containers (Storage Explorer)
Azure Storage Explorer provides rich functionality for managing storage data, including blobs and containers. To create a container, expand the Storage Accounts node, and expand the storage account you want to use, right-clicking on the Blob Containers node. This will open a new menu item where you can create a blob container as shown in Figure 2-21.
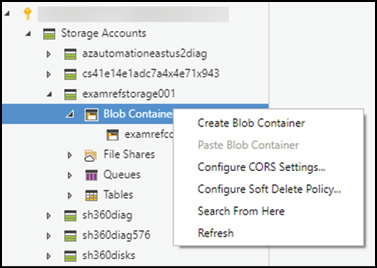
Figure 2-21 Creating a container using the Azure Storage Explorer
Azure Storage Explorer provides the ability to upload a single file or multiple files at once. The Upload Folder feature provides the ability to upload the entire contents of a local folder, recreating the hierarchy in the Azure Storage Account. Figure 2-22 shows the two upload options.
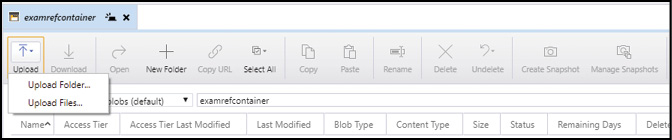
Figure 2-22 Uploading files and folders using Azure Storage Explorer
Managing blobs and containers (AzCopy)
AzCopy is a command line utility that can be used to copy data to and from blob, file, and table storage, and also provides support for copying data between storage accounts. AzCopy is designed for optimal performance, so it is commonly used to automate large transfers of files and folders.
There are currently two versions of AzCopy: one for Windows and one for Linux. The latest preview version, v10, combines Windows, Linux and macOS support in a single release. For more information, see https://docs.microsoft.com/azure/storage/common/storage-use-azcopy-v10.
The following example shows how you can use AzCopy (v10) to download a single blob from a container to a local folder. In this example, a SAS token is used to authorize access.
AzCopy copy "https://[source storage].blob.core.windows.net/[source container]/
[path-to-blob]?[SAS]" "[local file path]"
This example shows how you can switch the order of the source and destination parameters to upload the file instead.
AzCopy copy "[local file path]" "https://[destination storage]
.blob.core.windows.net/[destination container]/[path-to-blob]?[SAS]"
More Info Azcopy Examples
AzCopy provides many capabilities beyond simple uploading and downloading of files. For more information see the following:
Soft delete for Azure storage blobs
The default behavior of deleting a blob is that the blob is deleted and lost forever. Soft delete is a feature that allows you to save and recover your data when blobs or blob snapshots are deleted even in the event of an overwrite. This feature must be enabled on the Azure Storage account and a retention period set for how long the deleted data is available (see Figure 2-23).
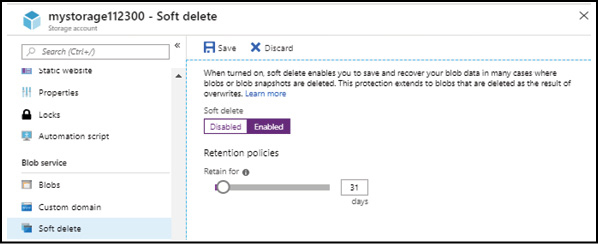
Figure 2-23 Enabling soft delete on an Azure storage account
![]() Exam Tip
Exam Tip
The maximum retention period for soft delete is 365 days.
More Info Soft Delete for Azure Storage Blobs
You can learn more about using soft delete with Azure blob storage here:
https://docs.microsoft.comazure/storage/blobs/storage-blob-soft-delete.
Create export from Azure job
An export job allows you to export large volumes of data from Azure storage to your on-premises environment, by shipping you the data on disk.
To export data, create an export job on the storage account using the management portal. To create an export job, do the following:
Log in to the Azure portal and click All Services then search for and select Import/ Export Jobs.
Click Create Import/Export Job.
On the Basics tab (as shown in Figure 2-24), choose Export From Azure and specify the job name and the resource group to contain the created job.
On the Job Details tab, choose which storage account to export from and choose the blobs to export. You have the following options.
Export All
Selected Containers And Blobs
Export From Blob List file (XML Format)
On the Return Shipping Info tab, specify your carrier information and the address for the disks to be shipped to.
On the Summary tab, click the OK button after confirming the export job.
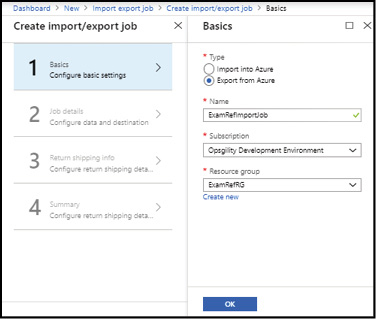
Figure 2-24 The create import/export job blade in the Azure portal
More Info Walkthrough Creating a Data Export JOB
To learn more about creating an import job see the following:
https://docs.microsoft.com/azure/storage/common/storage-import-export-data-from-blobs.
After you receive the disks from Microsoft you will need to retrieve the BitLocker keys from the Azure portal to unlock the disks.
Create import into Azure job
An import job allows you to import large volumes of data to Azure by shipping the data on disk to Microsoft.
The first step to import data using the Azure Import/Export service is to install the Microsoft Azure Import/Export tool.
Note Azure Import/Export Tool
There are two versions of the Azire Import/Export tool. Version 1 is recommended for Azure blob storage, and version 2 for Azure files.
Download links:
Additional requirements and limitations of the Azure Import/Export tool include:
A Windows 7, Windows Server 2008 R2, or a later OS version is required
The tool also requires .NET Framework 4.5.1 and BitLocker
All storage account types are supported (general purpose v1, general purpose v2, and blob storage)
Block, Page, and append blobs are supported for both import and export
The Azure Files service is only supported for import jobs but not export jobs
Table 2-7 lists the disks requirements for sending data to the Import/Export service.
Table 2-7 Supported disks for the Import/Export service
| Disk Type | Size | Supported | Not Supported | ||
| SSD | 2.5” | ||||
| HDD | 3.5” | SATA II, SATA III | External HDD with built-in USB adaptor Disk inside the casing of an external HDD |
![]() Exam Tip
Exam Tip
A single import/export job can have a maximum of 10 HDD/SSDs and a mix of HDD/SSD of any size.
The second step to import data is to prepare your drives using the Microsoft Azure Import/ Export tool (WAImportExport.exe), and copy the data to transfer to the drives.
The first session, when preparing the drive, requires several parameters, such as the destination storage account key, the BitLocker key, and the log directory. The following example (for the v1 tool) shows the syntax of using the Azure Import/Export tool with the PrepImport parameter to prepare the disk for an import job for the first session.
WAImportExport.exe PrepImport /j:<JournalFile> /id:<SessionId> [/logdir:<LogDirectory>]
[/sk:<StorageAccountKey>] /t:<source drive letter> /srcdir:<source folder> /
dstdir:<destination path>
The Azure Import/Export tool creates a journal file that contains the information necessary to restore the files on the drive to the Azure Storage account, such as mapping a folder/file to a container/blob or files. Each drive used in the import job will have a unique journal file on it created by the tool.
Note Using The Import/Export Tool
To add a single file to the drive and journal file, use the /srcfile parameter instead of the / srcdir parameter.
The Azure Import/Export tool supports a number of other parameters. For a full list, see:
Once drive preparation is complete, the third step in the import process is to create an import job through the Azure portal. To create an import job, do the following:
Log in to the Azure portal and click All Services, then Storage, followed by Import/ Export Jobs.
Click Create Import/Export Job.
On the Basics tab, choose Import into Azure and specify the job name and the resource group to contain the created job.
On the Job Details tab, choose the journal file created with the WAImportExport.exe tool and select the destination storage account.
On the Return Shipping Info tab, specify your carrier information and return address for the return disks.
On the Summary tab, click the OK button after confirming the import job.
Having created the import job, the fourth step in the import process is to physically ship the disks to Microsoft and add the courier tracking number to the existing import job. The drives will be returned using the courier information provided in the import job.
Check the job status regularly until it is completed. You can then verify that the data has been uploaded to Azure.
More Info Walkthrough Creating a Data Import Job
To learn more about creating an import job see the following:
Use Azure Data Box
Azure Data Box is a service that provides a device that Microsoft will send to you via a regional courrier that allows you to send terabytes of on-premises data to Azure in a quick, inexpensive, reliable, and secure way.
Like the Import/Export service, use Azure Data Box when you have limited to no connectivity and it is more feasible to ship the data to Azure instead of uploading it directly. Common scenarios include one-time or periodic data migrations, as well as initial data transfers which are followed by incremental updates over the network.
There are three types of Data Box available. The key features of each type are described in Table 2-8.
Table 2-8 Azure Data Box variations
| Data Box Disk | Data Box | Data Box Heavy | |
| Format | Standalone SSDs | Rugged device | Large rugged device |
| Capacity | Up to 35 TB usable | 80 TB usable | 800 TB usable |
| Support | Blobs | Blobs and Files | Blobs and Files |
| Destination storage accounts | 1 only | Up to 10 | Up to 10 |
The workflow to use Azure Data Box is simple:
Order Use the Azure portal to initiate the data box order by creating an Azure Data Box resource. Specify your shipping address and destination storage account. You will receive a shipping tracking ID once the device ships.
Receive Once the device is received, connect it to your network, power on.
Copy data Mount your file shares and copy your data to the device. The client used to copy data will need to run Windows 7 or later, Windows Server 2008 R2 SP1 or later, or a Linux OS supporting NFS4.1 or SMB 2.0 or higher.
Return Prepare the device, and ship it back to Microsoft.
Upload Your data will be uploaded to your storage account and securely erased from the device.
More Info Detailed Walkthrough of Using the Azure Portal with Azure Data Box
To learn more about using Azure Data Box see the following:
https://docs.microsoft.com/azure/databox/data-box-quickstart-portal.
Configure Azure content delivery network (CDN) endpoints
A content delivery network (CDN) is a global network of servers, placed in key locations to provide fast, local access for the majority of Internet users. Web applications use CDNs to cache static content, such as images, at locations close to each user. The CDN retrieves content from origin servers provided by the web application, caching that content for fast delivery.
By retrieving this content from the CDN cache, users benefit from reduced download times and a faster browsing experience. In addition, each request that is served from the Azure CDN means it is not served from your website, which can remove a significant amount of load.
Configuring CDN endpoints
To publish content in a CDN endpoint, first create a new CDN profile. To do this using the Azure portal click Create a resource, then click Web, then select CDN to open the create CDN profile blade (Figure 2-25). Provide a name for the CDN profile, the name of the resource group, along with the region and pricing tier.

Figure 2-25 Creating a CDN profile using the Azure portal
More Info Azure CDN Pricing Tiers
Currently, there are four pricing tiers: Standard Microsoft, Standard Akamai, Standard Verizon, and Premium Verizon. The Azure CDN product feature page has a comprehensive list of the different features and capabilities of the tiers:
https://docs.microsoft.com/azure/cdn/cdn-features.
After the CDN profile is created, add an endpoint to the profile. Add an Endpoint by opening the CDN profile in the portal and click the + Endpoint button. On the creation dialog, specify a unique name for the CDN endpoint, and the configuration for the origin settings, including the type (Storage, Web App, Cloud Service, or Custom), the host header and the origin port for HTTP and HTTPS), and then click the Add button. Figure 2-26 shows an endpoint using an Azure Storage account as the origin type. An endpoint can also be created when creating the CDN profile, and also directly from the blob storage settings of a storage account.
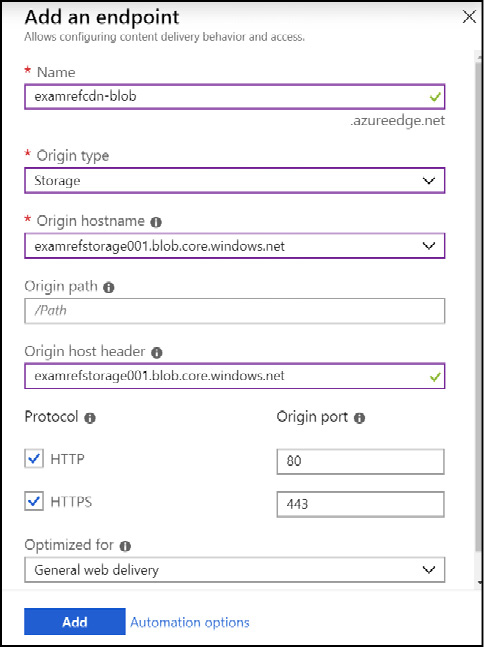
Figure 2-26 Creating a CDN endpoint using the Azure portal
Blobs stored in public access enabled containers are cached in the CDN edge endpoints. To access the content via the CDN, instead of directly from your storage account, change the URL used to access the content to reference the CDN endpoint, as shown in the following example:
Original URL within storage:
New URL accessed through CDN:
How the Azure CDN Works
Figure 2-27 shows how CDN caching works at a high level. In this example, the file logo.png has been hosted in blob storage in West US. A user in the UK can access the file, but due to the physical distance, the user experiences a high latency which slows down their browsing experience.
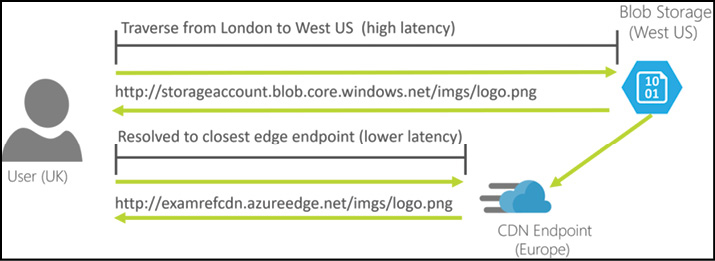
Figure 2-27 Accessing content from a CDN instead of a storage account
To address this, a CDN endpoint is deployed, using the blob storage account as the origin. To access the logo.png from the CDN, the URL for the file is changed from http://storageaccount.blob.core.windows.net/imgs/logo.png to http://examrefcdnh.azureedge.net/imgs/logo.png.
The CDN provides a worldwide network of caching servers. Users accessing the ‘examrefcnd.azureedge.net’ domain are automatically routed to their closest available server cluster, providing low-latency access to the CDN.
When a request for logo.png is received by a CDN server, the server checks to see if the file is available in its local cache. If not, this is called a cache miss, and the CDN will retrieve the file from the origin. The file is then cached locally and returned to the client. Subsequent requests for the same file will result in a ‘cache hit’, and the cached file is returned to the client directly from the CDN, avoiding a round-trip to the origin.
This local caching provides for lower latency and a faster browsing experience for the user.
Cache duration
Content is cached by the CDN until its time-to-live (TTL) elapses. The TTL is determined by the Cache-Control header in the HTTP response from the origin server. You can set the Cache-Control header programmatically in web apps by specifying it in the HTTP header. This setting can be set programmatically when serving up the content, or by setting the configuration of the web app.
You can manage the content expiration directly for blobs served directly from an Azure storage account by setting the time-to-live (TTL) period of the blob itself. Figure 2-28 demonstrates how to use Storage Explorer to set the CacheControl property on the blob files directly. You can also set the property using Windows PowerShell or the CLI tools when uploading to storage.
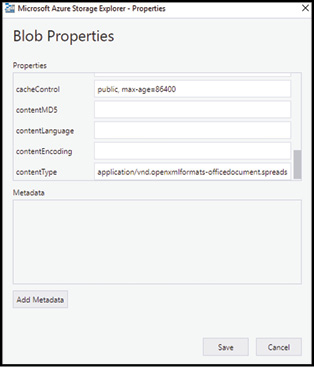
Figure 2-28 Setting the CacheControl property of a blob using Azure Storage Explorer
You can also control the TTL for your blobs using the Azure portal depending on the type of CDN endpoint created (see https://docs.microsoft.com/azure/cdn/cdn-features to compare the different SKU feature sets). In Figure 2-29 you can see the options for setting the cache duration of the Standard Verizon CDN endpoint.
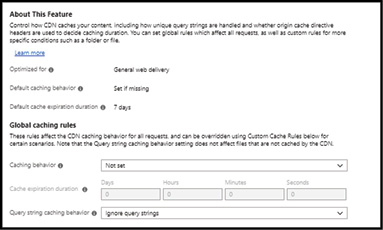
Figure 2-29 Setting global caching rules for the Standard Verizon CDN endpoint
![]() Exam Tip
Exam Tip
You can control the expiration of blob data in the CDN by setting the CacheControl metadata property of blobs. If you do not explicitly set this property, the default value is seven days before the data is refreshed or purged if the original content is deleted.
More Info Managing the Time-to-Live (TTL) of CDN Content
You can learn more about how to programmatically set the CacheControl HTTP header for web apps here: https://docs.microsoft.com/azure/cdn/cdn-manage-expiration-of-cloud-service-content. And learn about using PowerShell and the CLI tools here: https://docs.microsoft.com/azure/cdn/cdn-manage-expiration-of-blob-content.
Versioning assets using query string parameters
To permanently remove content from the Azure CDN, it should first be removed from the origin servers. If the content is stored in storage, you can set the container to private, or delete the content from the container, or even delete the container itself. If the content is in an Azure web app, you can modify the application to no longer serve the content.
Keep in mind that even if the content is deleted from storage, or if it is no longer accessible from your web application, cached copies may remain in the CDN endpoint until the TTL has expired. To immediately remove it from the CDN, purge the content as shown in Figure 2-30.

Figure 2-30 Purging a file from the Azure CDN
![]() Exam Tip
Exam Tip
The Content path of the CDN purge dialog supports specifying regular expressions and wildcards to purge multiple items at once. Purge All and Wildcard Purge are not currently supported by Azure CDN from Akamai. You can see examples of expressions here:
https://docs.microsoft.com/azure/cdn/cdn-purge-endpoint.
Purging content is also used when the content in the origin has changed. Purging the CDN cache of the old content means the CDN will pick up the new content from the origin when the next request for that content is received.
Using query strings is another technique for controlling information cached in the CDN. For instance, suppose your application hosted in Azure cloud services or Azure web apps has a page that generates content dynamically, such as: http://[CDN Endpoint].azureedge.net/chart.aspx. You can configure query string handling to cache multiple versions, depending on the query string that is passed in. The Azure CDN supports three different modes of query string caching:
Ignore query strings This is the default mode. The CDN edge node will pass the query string from the requestor to the origin on the first request and cache the asset. All subsequent requests for that asset that are served from the edge node will ignore the query string until the cached asset expires.
Bypass caching for URL with query strings In this mode, requests with query strings are not cached at the CDN edge node. The edge node retrieves the asset directly from the origin and passes it to the requestor with each request.
Cache every unique URL This mode treats each request with a query string as a unique asset with its own cache. For example, the response from the origin for a request for
foo.ashx?q=baris cached at the edge node and returned for subsequent caches with that same query string. A request forfoo.ashx?q=somethingelseis cached as a separate asset with its own time to live.
Configuring custom domains for storage and CDN
Both an Azure storage account and an Azure CDN endpoint allow you to specify a custom domain for accessing blob content instead of using the default domain name (<account name>. blob.core.windows.net). To configure either service, you must create a new CNAME record with the DNS provider that is hosting your DNS records.
For example, to enable a custom domain blobs.contoso.com foran Azure storage account, create a CNAME record that points from blobs.contoso.com to the Azure storage account [storage account].blob.core.windows.net. Table 2-10 shows an example mapping in DNS.
Table 2-9 Mapping a domain to an Azure Storage account in DNS
| CNAME RECORD | TARGET |
| blobs.contoso.com | contosoblobs.blob.core.windows.net |
Table 2-10 Mapping a domain to an Azure Storage account in DNS with the asverify intermediary domain
| CNAME RECORD | TARGET |
| asverify.blobs.contoso.com | asverify.contosoblobs.blob.core.windows.net |
| blobs.contoso.com | contosoblobs.blob.core.windows.net |
Mapping a domain that is already in use within Azure may result in minor downtime as the DNS entry must be updated before it is registered with the storage account. If necessary, you can avoid the downtime by using a second option to validate the domain. In this approach, you create the DNS record asverify.<your domain> to verify your ownership of your domain, allowing you to register your domain with your storage account without impacting your application. You can then modify the DNS record for your domain to point to the storage account. Because the domain name is already registered with the storage account, traffic will be accepted immediately, avoiding any downtime. The asverify record can then be deleted.
Table 2-11 shows the example DNS records created when using the asverify method.
Table 2-11 Mapping a domain to an Azure CDN endpoint in DNS
| CNAME RECORD | TARGET |
| cdncontent.contoso.com | examrefcdn.azureedge.net |
To enable a custom domain for an Azure CDN endpoint, the process is almost identical. Create a CNAME record that points from cdn.contoso.com to the Azure CDN endpoint [CDN endpoint]. azureedge.net. Table 2-12 shows mapping a custom CNAME DNS record to the CDN endpoint.
Table 2-12 Mapping a domain to an Azure CDN endpoint in DNS with the cdn intermediary domain
| CNAME RECORD | TARGET |
| cdnverify.cdncontent.contoso.com | cdnverify.examrefcdn.azureedge.net |
| cdncontent.contoso.com | examrefcdn.azureedge.net |
The cdnverify intermediate domain can be used just like asverify for storage. Use this intermediate validation if you’re already using the domain with an application because updating the DNS directly can result in downtime. Table 2-13 shows the CNAME DNS records needed for verifying your domain using the cdnverify subdomain.
After the DNS records are created and verified you then associate the custom domain with your CDN endpoint or blob storage account.
![]() Exam Tip
Exam Tip
Azure Storage does not yet natively support HTTPS with custom domains. You can currently use the Azure CDN to access blobs with custom domains over HTTPS.
More Info Configuring Custom Domains for Storage and CDN
You can learn more about configuring custom domains for storage here: https://docs.microsoft.com/azure/storage/blobs/storage-custom-domain-name.
You can learn more about using customer domains with the Azure CDN here: https://docs.microsoft.com/azure/cdn/cdn-map-content-to-custom-domain.
Skill 2.3: Configure Azure files
Azure File Service is a fully managed file share service that offers endpoints for the Server Messaging Block (SMB) protocol, also known as Common Internet File System or CIFS 2.1 and 3.0. This allows you to create one or more file shares in the cloud (up to 5 TB per share) and use the share for similar uses as a regular Windows File Server, such as shared storage or for new uses such as part of a lift and shift migration strategy.
This section covers how to:
Using the Azure File Service
Common use cases for using Azure Files are:
Replace or supplement on-premises file servers In some cases Azure files can be used to completely replace an existing file server. Azure File shares can also be replicated with Azure File Sync to Windows Servers, either on-premises or in the cloud, for performant and distributed caching of the data where it’s being used.
“Lift and shift” migrations In many cases migrating all workloads that use data on an existing on-premises file share to Azure File Service at the same time is not a viable option. Azure File Service with File Sync makes it easy to replicate the data on-premises and in the Azure File Service so it is easily accessible to both on-premises and cloud workloads without the need to reconfigure the on-premises systems until they are migrated.
Simplify cloud development and management Storing common configuration files, installation media and tools, as well as a central repository for application logging, are all great use cases for Azure File Service.
Figure 2-31 shows the hierarchy of files stored in Azure files.
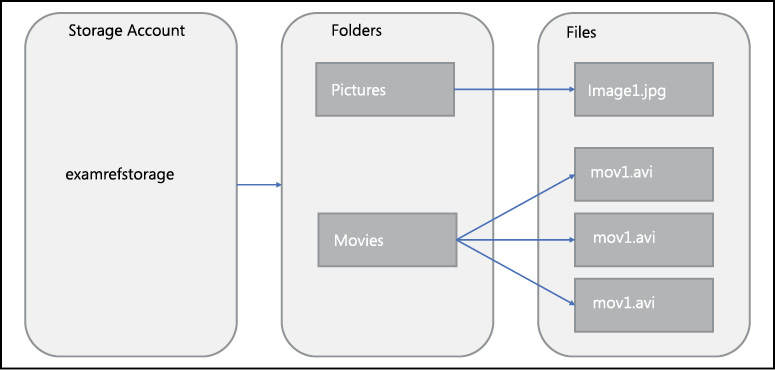
Figure 2-31 Azure files entities and relationship hierarchy
There are several common use cases for using Azure files. A few examples include the following:
Migration of existing applications that require a file share for storage.
Shared storage of files such as web content, log files, application configuration files, or even installation media.
Creating an Azure File Share (Azure portal)
To create a new Azure File using the Azure portal, open a Standard Azure storage account (Premium is not supported), click the Files link, and then click the + File Share button. On the dialog shown in figure 2-32, you must provide the file share name and the quota size, which can go up to 5120 GB.
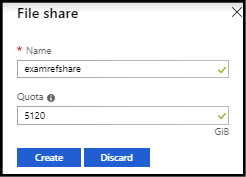
Figure 2-32 Adding a new share with Azure files
Creating an Azure File Share (PowerShell)
To create a share, first create an Azure Storage context object using the New-AzStorageContext cmdlet. This cmdlet requires the name of the storage key, and the access key for the storage account, which is retrieved by calling the Get-AzStoragerAccountKey cmdlet or copying it from the Azure portal. Pass the context object to the New-AzStorageShare cmdlet along with the name of the share to create, as the next example shows.
To create a share using the Azure PowerShell cmdlets, use the following code:
$storageAccount = "[storage account]"
$rgName = "[resource group name]"
$shareName = "contosoweb"
$storageKey = Get-AzStorageAccountKey `
     -ResourceGroupName $rgName `
     -Name $storageAccount
$ctx = New-AzStorageContext -StorageAccountName $storageAccount `
                               -StorageAccountKey $storageKey.Value[0]
New-AzStorageShare -Name $shareName -Context $ctx
Creating an Azure File Share (CLI)
To create an Azure File Share using the CLI, first retrieve the connection string using the az show connection string command, and pass that value to the az storage share create command, as the following example demonstrates.
rgName="[resource group name]"
storageAccountName="[storage account]"
shareName="contosoweb"
constring=$(az storage account show-connection-string -n $storageAccountName
-g $rgName --query 'connectionString' -o tsv)
az storage share create --name $shareName --quota 2048 --connection-string $constring
Connecting to Azure File Service outside of Azure
Because Azure File Service provides support for SMB 3.0 it is possible to connect directly to an Azure File Share from a computer running outside of Azure. In this case, remember to open outbound TCP port 445 in your local network. Some Internet service providers may block port 445, so check with your service provider for details if you have problems connecting.
Connect and mount with Windows File Explorer
There are several ways to mount an Azure File Share from Windows. The first is to use the Map network drive feature within Windows File Explorer. Open File Explorer and find the This PC Node in the explorer view. Right-click This PC, and you can then click the Map Network Drive option, as shown in Figure 2-33.

Figure 2-33 The Map Network Drive option from This PC
When the dialog opens, specify the following configuration options, as shown in Figure 2-34:
Folder \[name of storage account].files.core.windows.net[name of share]
Connect Using Different Credentials Checked
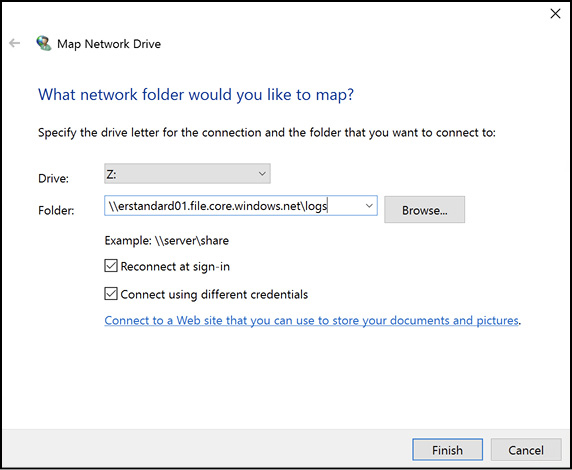
Figure 2-34 Mapping a Network Drive to an Azure File Share
When you click Finish, you see another dialog like the one shown in Figure 2-35 requesting the user name and password to access the file share. The user name should be in the following format: Azure[name of storage account], and the password should be the access key for the Azure storage account.
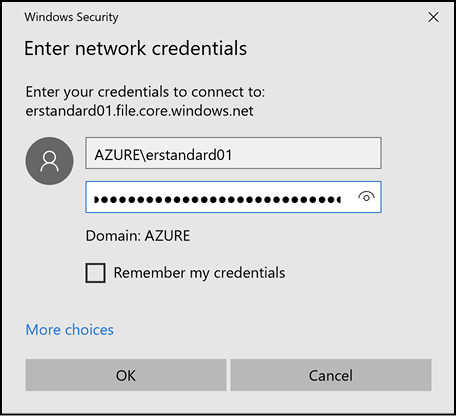
Figure 2-35 Specifying credentials to the Azure File Share
Connect and mount with the net use command
You can also mount the Azure File Share using the Windows net use command as the following example demonstrates.
net use x \erstandard01.file.core.windows.netlogs /u:AZUREerstandard01
r21Dk4qgY1HpcbriySWrBxnXnbedZLmnRK3N49PfaiL1t3ragpQaIB7FqK5zbez/sMnDEzEu/dgA9Nq/W7IF4A==
Connect and mount with PowerShell
You can connect and mount an Azure File using the Azure PowerShell cmdlets. In this example, the storage account key is retrieved using the Get-AzStorageAccountKey cmdlet. The account key is the password to the ConvertTo-SecureString cmdlet to create a secure string, which is required for the PSCredential object. From there, the credentials are passed to the New-PSDrive cmdlet, which maps the drive.
$rgName = "[resource group name]"
$storageName = "[storage account name]"
$storageKey = (Get-AzStorageAccountKey -ResourceGroupName $rgName
-Name $storageName).Value[0]
$acctKey = ConvertTo-SecureString -String "$storageKey" -AsPlainText -Force
$credential = New-Object System.Management.Automation.PSCredential
-ArgumentList "Azure$storageName", $acctKey
New-PSDrive -Name "Z" -PSProvider FileSystem -Root
"\$storageName.file.core.windows.net$shareName" -Credential $credential
Automatically reconnect after reboot in Windows
To make the file share automatically reconnect and map to the drive after Windows is rebooted, use the following command (ensuring you replace the place holder values):
cmdkey /add:<storage-account-name>.file.core.windows.net /user:AZURE<storage-
account-name> /pass:<storage-account-key>
Connect and mount from Linux
Use the mount command (elevated with sudo) to mount an Azure File Share on a Linux virtual machine. In this example, the logs file share would be mapped to the /logs mount point.
sudo mount -t cifs //<storage-account-name>.file.core.windows.net/logs /logs -o
vers=3.0,username=<storage-account-name>.,password=<storage-account
-key>,dir_mode=0777,file_mode=0777,sec=ntlmssp
Create Azure File Sync service
Azure File Sync extends the Azure File service to allow on-premises file services to be extended to Azure while maintaining performance and compatibility.
Some of the key functionality Azure File Sync provides:
Multi-site access The ability to write files across Windows and Azure Files.
Cloud tiering Storage only recently accessed data on local servers.
Azure Backup integration Backup in the cloud.
Fast disaster recovery Restore file metadata immediately and recall as needed.
Create the Azure File Sync Service in the portal by navigating to Create A Resource, then Storage, then Azure File Sync. The creation blade requires the name of the Sync Service, the Subscription, Resource Group, and the region to create as Figure 2-36 demonstrates.
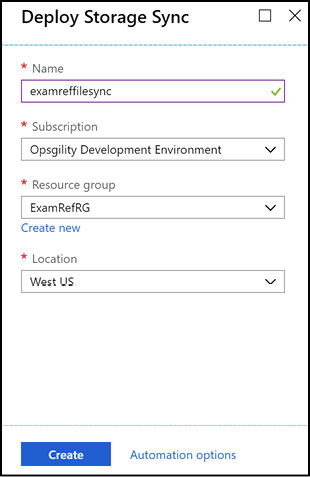
Figure 2-36 Specifying credentials to the Azure File Share
Create Azure sync group
Create a sync group to define the topology for how your file synchronization will take place. Within a sync group you will add server endpoints, which are file servers and paths within the file server you want the sync group to sync with each other. Figure 2-37 shows the settings for creating a sync group using the Azure portal.
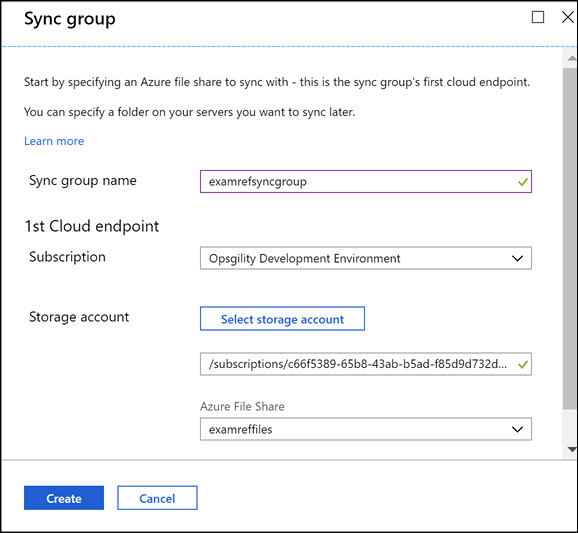
Figure 2-37 Creating a Sync Group and specifying the Azure file share
Deploying the Azure File Sync agent
To add endpoints to your Azure File Sync Group you first need to register a server to the sync group by installing the Azure File Sync agent on each server. The agent can be downloaded from the Microsoft Download Center: https://go.microsoft.com/fwlink/?linkid=858257. The installer is pictured in Figure 2-38.
Prerequisites
Internet Explorer Enhanced Security configuration must be disabled before installing the agent. It can be re-enabled after the initial install.
Install the latest Azure PowerShell module on the server. See the following for installation instructions: https://go.microsoft.com/fwlink/?linkid=856959.
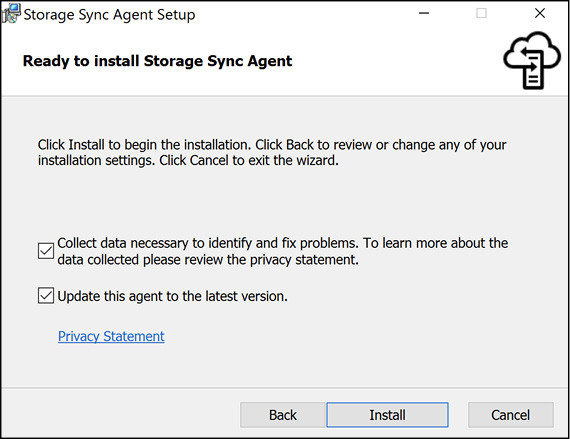
Figure 2-38 Installing the Storage Sync Agent
After the agent is installed, sign in with the Azure credentials for your subscription, as shown in Figure 2-39.
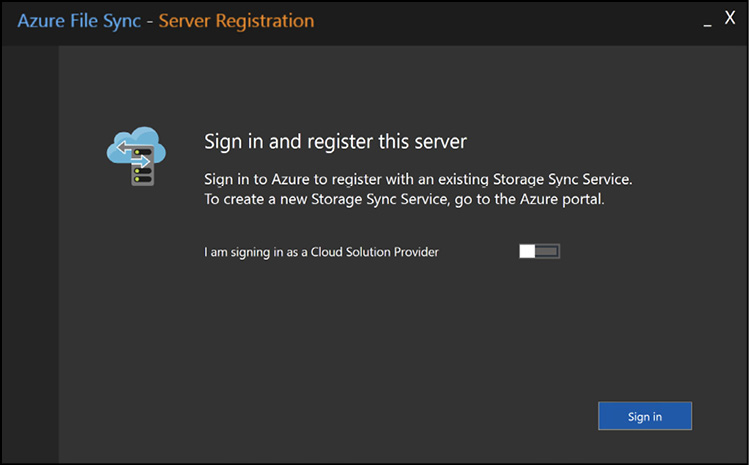
Figure 2-39 Signing into the Azure Storage Sync Agent
Next, register the server with the storage sync service, as shown in Figure 2-40.
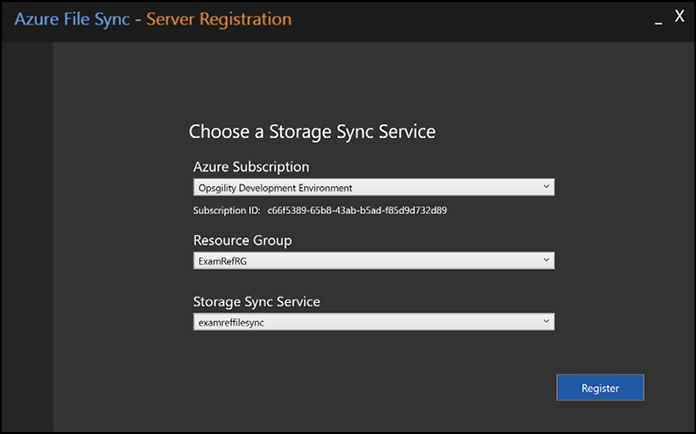
Figure 2-40 Registering the server with the Storage Sync Service
Adding a server endpoint
After the server is registered, you must navigate back to the sync group in the Azure portal and click on Add Server Endpoint. In the registered server dropdown, you will find all the servers that have the agent installed and associated with this sync service.
Enable cloud tiering to only store frequently accessed files locally on the server while all your other files are stored in Azure files. This is an optional feature that is configured by a policy.
More Info Cloud Tiering Overview
You can learn more about configuring cloud tiering here:
https://docs.microsoft.com/azure/storage/files/storage-sync-cloud-tiering.
Figure 2-41 shows the blade in the Azure portal to add the server endpoint. Ensure that you are only synching the location to one sync group at a time and that the path entered exists on the server.
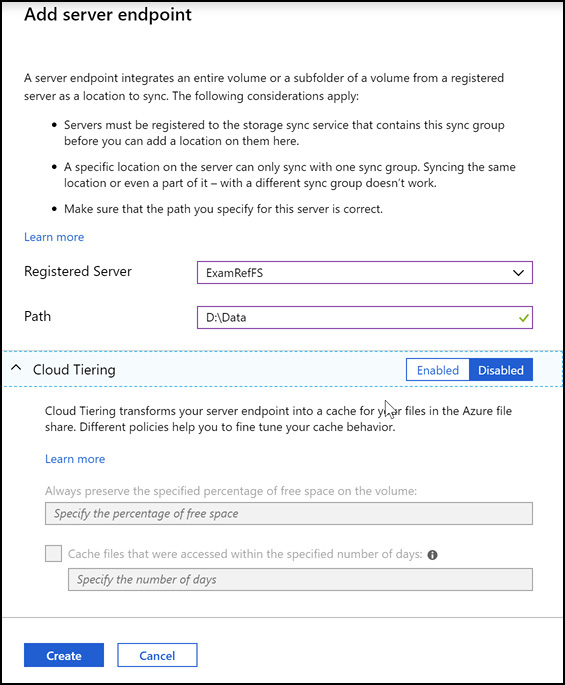
Figure 2-41 Adding a server endpoint to the Azure Storage Sync Service.
Troubleshoot Azure File Sync
In this section we will cover some key topics for collecting logs to identify problems, and some of the common issues and troubleshooting techniques you may run into with Azure File Sync.
Agent installation and server registration
If you run into issues installing the storage sync agent run the following command to generate a log file that may give you better insight into what the failure is:
StorageSyncAgent.msi /l*v AFSInstaller.log
Agent installation fails on Active Director Domain Controller
If you try to install the sync agent on an Active Directory domain controller where the PDC role owner is on a Windows Server 2008R2 or below OS version, you may hit an issue where the sync agent will fail to install. To resolve this, transfer the PDC role to another domain controller running Windows Server 2012R2 or a more recent OS, then install sync.
This server is already registered error
If you need to move the server to a different sync group, or you are troubleshooting why the server does not appear in the list, you may receive the error “This server is already registered during registration.” Run the following commands from PowerShell to remove the server:
Import-Module "C:Program Files
AzureStorageSyncAgentStorageSync.Management.ServerCmdlets.dll"
Reset-StorageSyncServer
![]() Exam Tip
Exam Tip
If the agent is on a cluster, there is a separate command to clean up the cluster configuration during agent removal: Reset-StorageSyncServer -CleanClusterRegistration.
AuthorizationFailed or other permissions issues
If you receive errors creating a cloud endpoint that point to a permissions related problem, ensure that your user account has the following Microsoft.Authorization permissions:
Read Get role definition
Write Create or update custom role definition
Read Get role assignment
Write Create role assignment
The Owner and User Access Administrator roles both have the correct permissions.
Server endpoint creation fails, with this error: “MgmtServerJobFailed” (Error code: -2134375898)
This error occurs because you are enabling cloud tiering on the system volume. Cloud tiering is not supported on the system volume.
Server endpoint deletion fails, with this error: “MgmtServerJobExpired”
This error occurs because the sync service can no longer reach the server due to network connectivity or the server is just offline. See the following for details on removing servers that are no longer available: https://docs.microsoft.com/azure/storage/files/storage-sync-files-server-registration#unregister-the-server-with-storage-sync-service.
Unable to open server endpoint properties page or update cloud tiering policy.
This issue can occur if a management operation on the server endpoint fails. You can update the server endpoint configuration by executing the following PowerShell code from the server:
Import-Module "C:Program Files
AzureStorageSyncAgentStorageSync.Management.PowerShell.Cmdlets.dll"
# Get the server endpoint id based on the server endpoint DisplayName property
Get-AzureRmStorageSyncServerEndpoint `
    -SubscriptionId mysubguid `
    -ResourceGroupName myrgname `
    -StorageSyncServiceName storagesvcname `
    -SyncGroupName mysyncgroup
# Update the free space percent policy for the server endpoint
Set-AzureRmStorageSyncServerEndpoint `
    -Id serverendpointid `
    -CloudTiering true `
    -VolumeFreeSpacePercent 60
Server endpoint has a health status of “No Activity” or “Pending” and the server state on the registered server’s blade is “Appears offline”
This issue occurs when the Storage Sync Monitor process is not able to communicate with the Azure File Sync service. It could be caused by the process is not running, or a proxy or firewall is blocking communication. The following steps can help you resolve this issue:
Ensure that the AzureStorageSyncMonitor.exe process is running by looking in Task Manager on the server. If it is not running try to restart the server or use Microsoft Update to update the Azure File Sync Agent.
If the server is behind a firewall you can use the following code to set application specific proxy settings if you are using version 4.0.1.0 or later:
Import-Module "C:Program Files
AzureStorageSyncAgentStorageSync.Management.ServerCmdlets.dll"
Set-StorageSyncProxyConfiguration -Address <url> -Port <port number>
-ProxyCredential <credentials>
You can set machine-wide proxy settings for earlier versions. For more information on machine-wide proxy settings see the following:
https://docs.microsoft.com/azure/storage/files/storage-sync-files-firewall-and-proxy#proxy.For troubleshooting firewalls, ensure that outbound port 433 (HTTPS) is open and the endpoints documented here are not blocked:
https://docs.microsoft.com/azure/storage/files/storage-sync-files-firewall-and-proxy#firewall.
Server endpoint has a health status of “No Activity” and the server state on the registered servers blade is “Online”
This issue occurs because there is a delay when changes occur because the service is still scanning for changes. Wait for the job to complete and the status should change.
Monitoring synchronization health
Open the sync group in the Azure portal. A health indicator is displayed by each of the server endpoints with green indicating a healthy status. Click on the endpoint to drill in to see stats such as the number of files remaining, size, and any resulting errors.

Figure 2-42 Monitoring the health of a new server endpoint
More Info Troubleshooting Azure File Sync
Keep up with the latest issues and learn more about troubleshooting Azure File Sync here:
https://docs.microsoft.com/azure/storage/files/storage-sync-files-troubleshoot.
Skill 2.4: Implement Azure Backup
Azure Backup is a service that allows you to backup on-premises servers, cloud-based virtual machines, and virtualized workloads such as SQL Server and SharePoint to Microsoft Azure. It also supports backup of Azure storage file shares.
This section covers how to:
Create Recovery Services Vault
Within Azure, a single resource is provisioned for either Azure Backup or Azure Site Recovery. This resource is called a Recovery Services vault. It is also the resource that is used for configuration and management of both Backup and Site Recovery.
Create a Recovery Services vault (Azure portal)
To create a Recovery Services vault from the Azure portal, click Create a resource, and in the marketplace search dialog box enter Backup and Site Recovery (OMS), and click the Backup And Site Recovery (OMS) option. Figure 2-43 shows the search box to find the service.

Figure 2-43 Creating a Recovery Services vault
Within the marketplace page for Backup And Site Recovery (OMS), click Create. Enter the name of the vault and choose or create the resource group where it resides. Next, choose the region where you want to create the resource, and click Create as shown in Figure 2-44.

Figure 2-44 Completing the creation of the vault
Note Operations Management Suite (OMS)
Operations Management Suite is a collection of features that are licensed together as a unit, including Azure Monitoring and Log Analytics, Azure Automation, Azure Security Center, Azure Backup, and Azure Site Recovery.
Create a Recovery Services vault (PowerShell)
To create a Recovery Services vault with PowerShell, start by creating the resource group it should reside in.
New-AzResourceGroup -Name 'ExamRefRG' -Location 'WestUS'
Next, create the vault.
New-AzRecoveryServicesVault -Name 'MyRSVault' -ResourceGroupName 'ExamRefRG' -Location
'WestUS'
The storage redundancy type should be set at this point. The options are Locally Redundant Storage or Geo Redundant Storage. It is a good idea to use Geo Redundant Storage when protecting IaaS virtual machines, because the vault must be in the same region as the VM being backed up. Having the only backup copy in the same region as the item being protected is not wise, so Geo Redundant storage gives you three additional copies of the backed-up data in the sister (paired) region.
$vault1 = Get-AzRecoveryServicesVault –Name 'MyRSVault'
Set-AzRecoveryServicesBackupProperties -Vault $vault1 -BackupStorageRedundancy
GeoRedundant
Create a Recovery Services vault (CLI)
To create a Recovery Services vault with CLI, start by creating the resource group it should reside in.
az group create --location $location --name 'ExamRefRG'
Next, create the vault.
az backup vault create --name 'MyRSVault' --resource-group 'ExamRefRG'
--Location 'WestUS'
Backup and restore data
Having seen how to create a recovery services vault in the previous section, we now look at how to backup and restore data using the vault.
Using a Backup Agent
There are different types of backup agents you can use with Azure Backup. There is the Microsoft Azure Recovery Services (MARS) agent, which is a stand-alone agent used to protect files and folders. There is also the DPM protection agent that is used with Microsoft Azure Backup Server and with System Center Data Protection Manager. Finally, there is the VMSnapshot extension that is installed on Azure VMs to allow snapshots to be taken for full VM backups. The deployment of the DPM protection agent can be automated with either the use of System Center Data Protection Manager or Azure Backup Server. The VMSnapshot or VMSnapshotLinux extensions are also automatically deployed by the Azure fabric controller. The remainder of this section focuses on deploying the MARS agent.
The MARS agent is available for install from within the Recovery Services vault. Click Backup under Getting Started. Under the Where Is Your Workload Running? drop-down menu, select On-Premises, and under What Do You Want To Backup?, choose Files And Folders. Next, click Prepare Infrastructure, and the Recovery Services agent is made available, as shown in Figure 2-45.
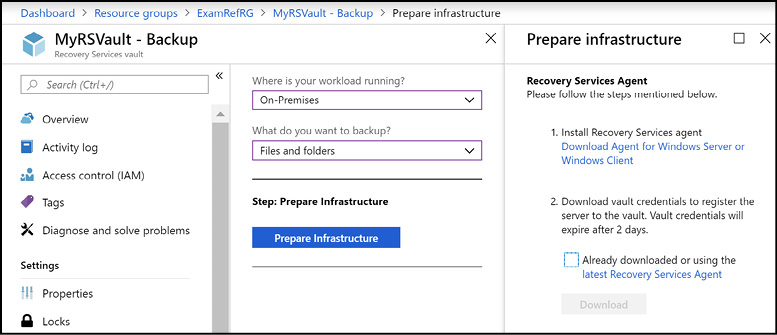
Figure 2-45 Downloading the MARS agent
Notice there is only a Windows agent because the backup of files and folders is only supported on Windows computers. Click the link to download the agent. Before initiating the installation of the MARS agent, also download the vault credentials file, which is right under the download links for the Recovery Services agent. The vault credentials file is needed during the installation of the MARS agent.
Note Vault Credentials Expiration
The vault credentials are only valid for 48 hours from the time of download, so be sure to obtain them only when you are ready to install the MARS agent.
During the MARS agent installation, a cache location must be specified. There must be free disk space within this cache location that is equal to or greater than five percent of the total amount of data to be protected. These configuration options are shown in Figure 2-46.
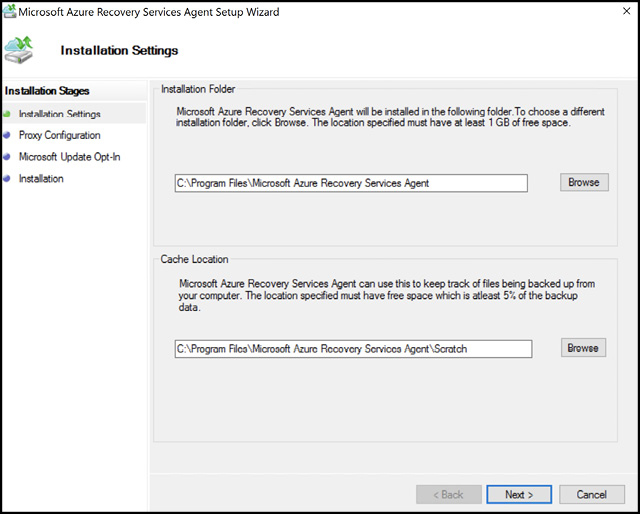
Figure 2-46 Installing the MARS agent
The agent needs to communicate to the Azure Backup service on the Internet, so on the next setup screen, configure any required proxy settings. On the last installation screen, any required Windows features are added to the system where the agent is being installed. After it is complete, the installation prompts you to Proceed to Registration, as shown in Figure 2-47.
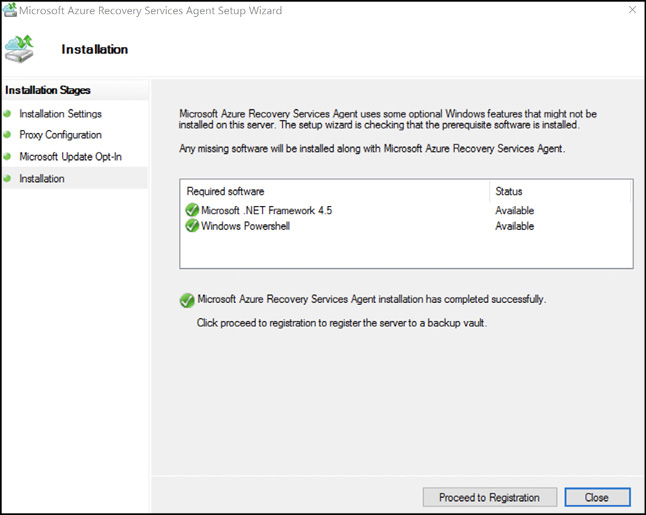
Figure 2-47 Final screen of the MARS agent installation
Click Proceed to Registration to open the agent registration dialog box. Within this dialog box the vault credentials must be provided by browsing to the path of the downloaded file. The next dialog box is one of the most important ones. On the Encryption Settings screen, either specify a passphrase or allow the installation program to generate one. Enter this in twice, and then specify where the passphrase file should be saved. The passphrase file is a text file that contains the passphrase, so store this file securely.
Note Azure Backup Encryption Passphrase
Data protected by Azure Backup is encrypted using the supplied passphrase. If the passphrase is lost or forgotten, any data protected by Azure Backup is not able to be recovered and is lost.
After the agent is registered with the Azure Backup service, it can then be configured to begin protecting data.
In the last section, the MARS agent was installed and registered with the Azure Backup vault. Before data can be protected with the agent, it must be configured with settings such as, when the backups occur, how often they occur, how long the data is retained, and what data is protected. Within the MARS agent interface, click Schedule Backup to begin this configuration process.
Click to move past the Getting Started screen and click Add Items to add files and folders. Exclusions can also be set so that certain file types are not protected, as shown in Figure 2-48.
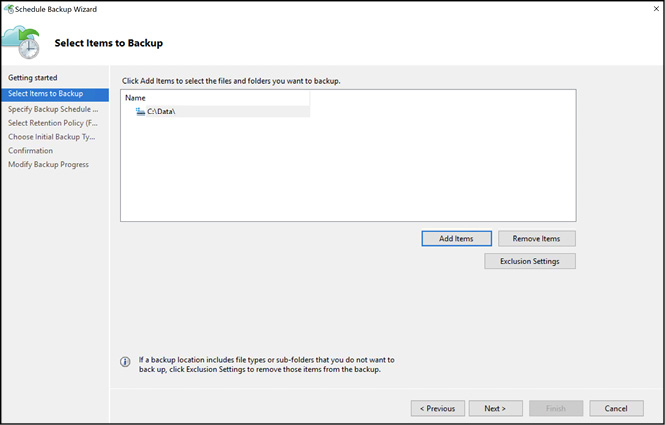
Figure 2-48 Configuring the MARS agent to protect data
Next, schedule how often backups should occur. The agent can be configured to back up daily or weekly, with a maximum of three backups taken per day. Specify the retention you want, and the initial backup type (Over the network or Offline). Confirm the settings to complete the wizard. Backups are now scheduled to occur, but they can also be initiated at any time by clicking Back up now on the main screen of the agent. The dialog showing an active backup is shown in Figure 2-49.

Figure 2-49 Backup Now Wizard
To recover data, click the Recover Data option on the main screen of the MARS agent. This initiates the Recover Data Wizard. Choose which computer to restore the data to. Generally, this is the same computer the data was backed up from. Next, choose the data to recover, the date on which the backup took place, and the time the backup occurred. These choices comprise the recovery point to restore. Click Mount to mount the selected recovery point as a volume, and then choose the location to recover the data. Confirm the options selected and the recovery begins.
Backing up and Restoring an Azure Virtual Machine
In addition to the MARS agent and protecting files and folders with Azure Backup, it is also possible to back up IaaS virtual machines in Azure. This solution provides a way to restore an entire virtual machine, or individual files from the virtual machine, and it is quite easy to set up. To backup an IaaS VM in Azure with Azure backup, navigate to the Recovery Service vault and under Getting Started, click Backup. Select Azure as the location where the workload is running, and Virtual machine as the workload to backup and click Backup, as shown in Figure 2-50.
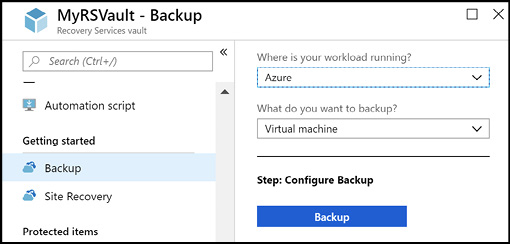
Figure 2-50 Configuring Azure Backup to protect IaaS VMs
The next item to configure is the Backup policy. This policy defines how often backups occur and how long the backups are retained. The default policy accomplishes a daily backup at 06:00am and retains backups for 30 days. No more than one backup can be taken daily and a VM can only be associated with one policy at a time. It is also possible to configure custom Backup policies. In this example, a custom Backup policy is configured that includes daily, weekly, monthly, and yearly backups, each with their own retention values. Figure 2-51 shows the creation of a custom backup policy.
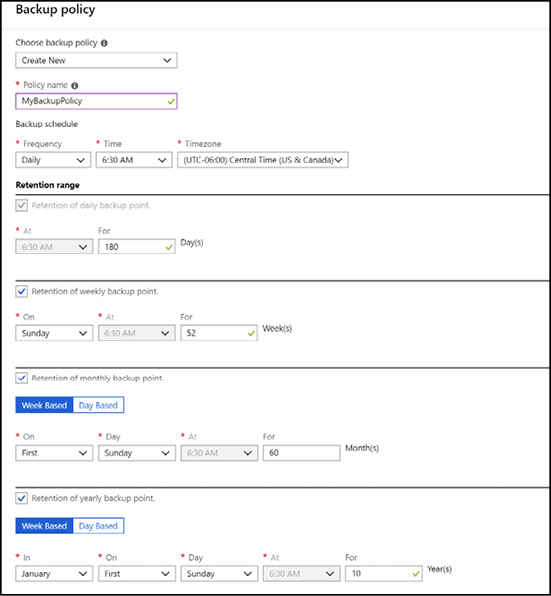
Figure 2-51 Configuring a custom backup policy
Next, choose the VMs to backup. Only VMs within the same region as the Recovery Services vault are available for backup.
Note Azure Iaas VM Protection and Vault Storage Redundancy Type
When protecting IaaS VMs by using Azure Backup, only VMs in the same region as the vault are available for backup. Because of this, it is a best practice to choose Geo-Redundant storage or Read Access Geo-Redundant storage to be associated with the vault. This ensures that, in the case of a regional outage affecting VM access, there is a replicated copy of backups in another region that can be used to restore from.
After the VMs are selected, click Enable Backup, as shown in Figure 2-52.
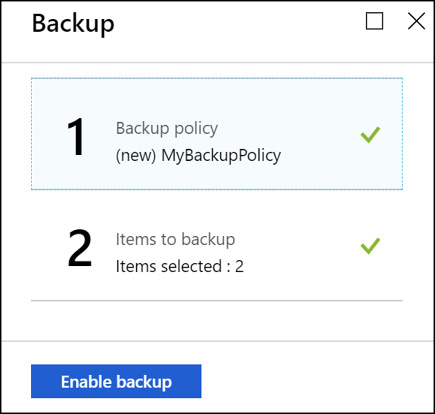
Figure 2-52 Enabling VM backups
When you click the Enable Backup button, behind the scenes the VMSnapshot (for Windows) or VMSnapshotLinux (for Linux) extension is automatically deployed by the Azure fabric controller to the VMs. This allows for snapshot-based backups to occur, meaning that first a snapshot of the VM is taken, and then this snapshot is streamed to the Azure storage associated with the Recovery Services vault. The initial backup is not taken until the day/time configured in the backup policy, however an ad-hock backup can be initiated at any time. To do so, navigate to the Protected Items section of the vault properties, and click Backup items. Then, click Azure Virtual Machine under Backup Management type. The VMs that are enabled for backup are listed here. To begin an ad-hock backup, right-click on a VM and select Backup Now, as shown in Figure 2-53.
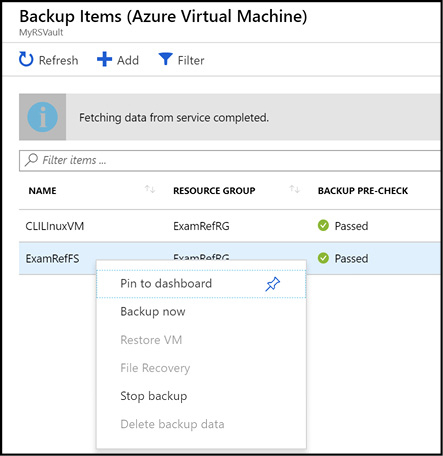
Figure 2-53 Starting an ad-hock backup
Preview Features: Backup support for Azure Files and SQL Server in an Azure VM
Azure Backup also directly supports the ability to backup and restore data from Azure Files and SQL Server in an Azure virtual machine. These two features are currently in preview, but it is still a good idea to have a basic understanding of the capabilities as they may eventually appear on the exam.
More Info Azure Files and Sql Server in an Azure VM
Learn about the current capabilities of Azure Backup support for Azure Files here:
https://docs.microsoft.com/azure/backup/backup-azure-files and SQL Server in an Azure VM here: https://docs.microsoft.com/azure/virtual-machines/windows/sql/virtual-machines-windows-sql-backup-recovery.
When to use Azure Backup Server
Azure Backup Server is a stand-alone service that you install on a Windows Server operating system that stores the backed-up data in a Microsoft Azure Recovery Vault. Azure Backup Server inherits much of the workload backup functionality from Data Protection Manager (DPM). Though Azure Backup Server shares much of the same functionality as DPM, Azure Backup Server does not back up to tape and it does not integrate with System Center.
You should consider using Azure Backup server when you have a requirement to back up the following supported workloads:
Windows Client
Windows Server
Linux Servers
VMWare VMs
Exchange
SharePoint
SQL Server
System State and Bare Metal Recovery
More Info Azure Backup Server Protection Matrix
The entire list of supported workloads and the versions supported for Azure Backup Server can be found here: https://docs.microsoft.com/azure/backup/backup-mabs-protection-matrix.
Configure and review backup reports
Azure Backup Reports provide data visualization from within Power BI from across your Recovery Service vaults and Azure subscriptions to provide insight into your backup activity. This service is currently in preview and at this time reports are supported for Azure virtual machine backup and file and folder backup scenarios when using the MARS agent.
Prerequisites
Create an Azure Storage account that will contain the report related data.
Create a Power BI account if you do not already have one at the following URL: https://powerbi.microsoft.com/landing/signin/. With this account you can view, customize, and create your own reports in the Power BI portal.
Register the Microsoft.Insights resource provider for your subscription if it’s not already registered. To do this using the Azure portal navigate to All Services, Subscriptions, your subscription, then Resource Providers.
After you enable the prerequisites, click Backup Reports, then Turn On Diagnostics to configure diagnostics for the recovery vault (Figure 2-54).
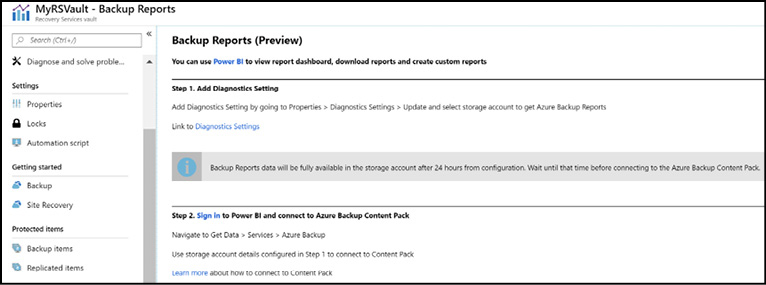
Figure 2-54 Configuring backup reports in the Azure portal
The diagnostics configuration allows you to storage diagnostics data in Azure Storage, Event Hubs or Log Analytics. In Figure 2-55 a storage account is selected and AzureBackupReport data is configured for 30 days retention.

Figure 2-55 Diagnostic settings for the Azure Recovery Vault
Backup report data is not available until 24 hours after configuring the storage account.
View Reports in Power BI
After your data has synchronized you can then login to Power BI at the following URL: https://powerbi.microsoft.com/landing/signin/. After you are signed in, select Get Data and in the More Ways To Create Your Own Content section select Service Content Packs. Search for Azure Backup and then click Get It Now on the returned result.
After selecting Azure Backup, you will be prompted for the storage account name and key created in the previous step. Retrieve these from the Azure portal by navigating to your storage account blade, then Keys.
Having completed the Power BI configuration for Azure Backup, you can now navigate to Power BI to review the status of your backups (Figure 2-56).
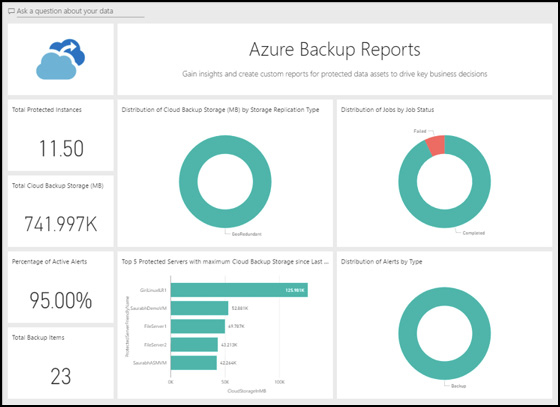
Figure 2-56 Power BI dashboard for Azure Backup Reports
More Info Configuring and Connecting with Power BI
You can learn more about connecting to Azure Backup Reports with Power BI here:
https://docs.microsoft.com/azure/backup/backup-azure-configure-reports.
Create and configure backup policy
In the Backup and restore data section a backup policy was created while performing an ad-hoc backup of an Azure Virtual Machine. You can edit a policy, associate more virtual machines to a policy, and delete unnecessary policies to meet compliance requirements.
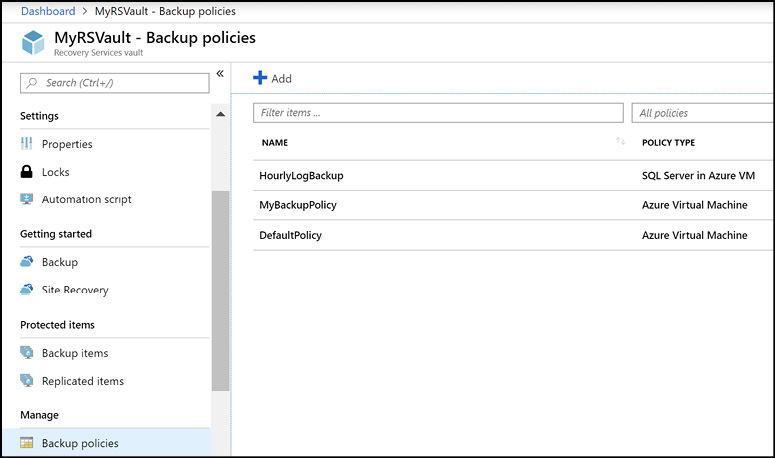
Figure 2-57 Backup policies in a Recovery Services Vault
To view your current backup policies in the Azure portal, navigate to the recovery services vault blade, then click Backup policies (Figure 2-57). Click on an existing policy to view the policy details or click Add to create a new policy. You can create three different types of policies from this view, as depicted in Figure 2-58.
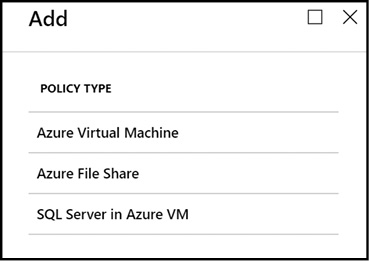
Figure 2-58 Available backup policy options in the Azure portal
Azure Virtual Machine Depicted in Figure 2-51 it allows you to specify the backup frequency, retention period, and the backup point on a weekly, monthly and yearly schedule.
Azure File Share Allows you to schedule a daily backup for an Azure File Share.
SQL Server in Azure VM Allows you to use SQL Server specific backup technology such as full, differential, and log backup with an associated schedule for each option. You can also specify that SQL Backup compression be enabled on the backups.
Thought experiment
In this thought experiment, apply what you have learned about this objective. You can find answers to these questions in the next section.
You are the web administrator for www.contoso.com, which is hosted in virtual machines in the West US Azure region. Several customers from England and China complain that the PDF files for your product brochures take too long to download. Currently, the PDF files are served from the /brochures folder of your website.
What steps should you take to mitigate the download time for your PDFs?
What changes need to happen on the www.contoso.com web site?
Thought experiment answers
This section contains the solution to the thought experiment for the chapter.
To mitigate this problem, move the PDF files closer to the customer locations. This can be solved by moving the PDF files to Azure Storage and then enabling them for CDN.
Create an Azure Storage account and move the PDF files to a container named brochures and enable public access (blob) on the container. Next, you should create a new CDN profile and an endpoint that originates from the blob storage account. From there, pre-load the PDF files into CDN to minimize the content being delayed when the first user requests it.
The website pages will need to change to refer to the URL of the CDN endpoint. For example, if the PDF was previously referenced by www.contoso.com/brochures/product1.pdf, it would now be referenced by contosocdn.azureedge.net/brochures/product1.pdf unless the CDN endpoint was configured for custom domains.
Chapter summary
This chapter covered several key services related to implementing storage in Microsoft Azure. Topics included how to create and manage Azure Storage Accounts, blob storage, files, backup, import and exporting data, Azure Data Box and Azure CDN.
Below are some of the key takeaways from this chapter:
Azure storage accounts provide 4 separate services: blobs, tables, queues and files. Understand the usage scenarios of each service.
The Standard performance tier uses magnetic disks and supports all services. The Premium tier uses solid-state disks and is only used for unmanaged VM disks.
Storage accounts must specify a replication mode. Options are locally-redundant, zone-redundant, geo-redundant and read-access geo-redundant storage.
Blob storage supports three types of blobs (block, page and append blobs), and three access tiers (hot, cool, and archive).
There are 3 kinds of storage account: general purpose v1, general purpose v2 and blob storage. The availability of features varies between storage account kinds.
Azure storage can be managed through several tools directly from Microsoft: the Azure portal, PowerShell, CLI, Storage Explorer, and AzCopy. It’s important to know when to use each tool.
Access to storage accounts can be controlled using several techniques. Among them are: storage account name and key, shared access signature (SAS), SAS with access policy, and using the storage firewalland virtual network service endpoints. Access to blob storage can also be controlled using the public access level of the blob container.
You can also use the async blob copy service to copy files between storage accounts or from outside publicly accessible locations to your Azure storage account.
Azure CDN can be used to improve web site performance by caching static data close to the end users. Blob storage can be used as a CDN origin.
Storage accounts and CDN both support custom domains. Enabling SSL is only supported on custom domains when the blob is accessed via CDN.
Enable diagnostics and alerts to monitor the status of your storage accounts.
Data can be imported into Azure storage when on-premises locations have limited or no connectivity using the Azure Import/Export service or Azure Data Box.
Azure Backup can be used to protect files and folders, applications, and IaaS virtual machines. This cloud-based data protection service helps organizations by providing offsite backups of on-premises servers and protection of VM workloads they have already moved to the cloud.