Configuring Group Policy to support DAC
Configuring User and Device Claims
Configuring Resource Properties
AD RMS certificates and licenses
AD RMS Administrators and Super Users
Trusted User and Publishing Domains
Managing AD RMS with Windows PowerShell
Dynamic Access Control (DAC) provides a way to dynamically assign access permissions to content based on the content’s properties and information about the user and device that are attempting to access the content. Active Directory Rights Management Services (AD RMS) provides a way of securing content through encryption and through rules that are applied to the operating system and applications on what actions the user can perform with that content. Both technologies, if correctly implemented, can minimize the chance of information that should stay within organizational boundaries from finding its way outside of those boundaries.
Dynamic Access Control
If you’ve worked with NTFS permissions for a while, you are most likely aware that they are rarely properly implemented. At first glance, the system seems logical. You create a collection of groups that represent ways of describing a user or computer’s place in the organization. You then use those groups to apply permissions to restrict access to files and folders. This is great in theory, but it requires that security groups are kept up to date and that the permissions themselves are accurately configured. In many organizations, the process of ensuring group membership is erratic and piecemeal, with users only being added to groups after they lodge service desk tickets.
Dynamic Access Control (DAC) allows you to configure security using the properties of a user account or a computer account and the properties of the file. For example, you can configure DAC so that only people who have Don Funk as a manager are able to open files that contain the word Cake. You can do this by setting up classification rules and claims so that every file is checked to see if it contains the word Cake, and if it does, a custom attribute is configured to reflect that status. Another rule can be configured to set permissions on the file so that anyone whose Active Directory user account has the Managed By attribute set to Don Funk has access to open the file. Access is still mediated by NTFS permissions, but those NTFS permissions are configured based on the properties of the file and the accessing user, not using the traditional method of right-clicking the file or parent folder and setting permissions manually.
DAC has the following requirements:
Windows Server 2019, Windows Server 2016, Windows Server 2012 R2, or Windows Server 2012 with the File Server Resource Manager (FSRM) role service installed on the file servers that host files protected through DAC. DAC is not supported on Windows Server 2008 R2 and earlier file servers.
Windows 10, Windows 8.1, or Windows 8 client computers to support device claims. Clients using Windows 7 to access files that have security applied through DAC are still able to access files, but device claims are ignored.
A domain controller running Windows Server 2012, Windows Server 2012 R2, Windows Server 2016, or Windows Server 2019 in the domain. It’s also possible to apply an update to the Active Directory Schema if no Windows Server 2012 domain controllers are present, and all domain controllers are running Windows Server 2008 R2.
Configuring Group Policy to support DAC
Configuring Active Directory to support DAC requires that you configure a Group Policy that applies to all domain controllers in the domain. You can do this in a policy that applies to the domain or just to domain controllers. To enable support for DAC, enable the KDC Support For Claims, Compound Authentication And Kerberos Armoring policy. You can find this policy in the Computer ConfigurationPoliciesAdministrative TemplatesSystemKDC node.
Configuring User and Device Claims
Before you can configure access rules, you need to configure claims. Claims are bits of information about users and computers and are usually derived from Active Directory attributes. You can edit Active Directory attributes by using Active Directory Administrative Center as well as by using other tools. DAC supports the following types of claims:
User Claim. This is information about the user and can be based on a user account’s attributes, such as EmployeeType. You can also use claims related to group membership.
Device Claim. This is information about the computer that the user is accessing the file from. For example, you could edit the computer account’s Location attribute and set it to Secure. This allows you to configure DAC so a user can access a file from a computer that has the Location attribute set to Secure, but cannot access the same file from another computer that does not have the Location attribute set to Secure.
You create claims in Active Directory Administrative Center by navigating to the Claim Types section under the Dynamic Access Control section. When creating a claim type, select an existing Active Directory attribute as the basis for the claim. In Figure 14-1, you can see that the Department attribute forms the basis of a claim type. When you configure a claim, select whether the claim relates to Users or Computers. You can also specify suggested values to associate with the claim. In the case of a claim related to the Department attribute, this might be a list of departments within your organization.

Figure 14-1 Create Claim Type: Department
Configuring Resource Properties
Resource Properties determine the resource attributes that you can use when configuring central access rules. Windows Server 2019 ships with a collection of default resource properties, but you can also add extra resource properties based on available attributes. Figure 14-2 shows a custom resource property named Project and two value options: Hovercraft or Submarine. Resource Properties can be assigned to files either manually or automatically by configuring File Server Resource Manager File Classification Rules.

Figure 14-2 Hovercraft project
The Global Resource Property List, shown in Figure 14-3, is a list of all resource properties that you can use when configuring Central Access Rules. You can add and remove these properties as necessary. When you publish a property list through Active Directory, you can then assign these properties to files and folders either manually or automatically using File Server Resource Manager.

Figure 14-3 Global Resource Property List
You use File Server Resource Manager to apply properties to files through File Classification Rules. You can configure a classification rule to look for a particular string of text in a file and then to assign a particular property to that file based on the string. The example in Figure 14-4 shows that the Submarine value is assigned to the Project property for files that meet the classification requirements, the classification requirements in this case being any file that contains the text string submarine.

Figure 14-4 Create Classification Rule
Central access rules
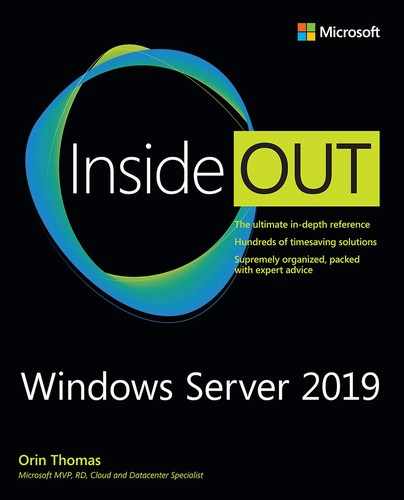
Central access rules include a set of permissions and the conditions under which those permissions are applied. For example, in Figure 14-5, the rule applying the permissions spelled out in the permissions entry is applied to the file or folder if the file or folder has the Project resource property set to Hovercraft. You can have multiple conditions in a central access rule. You can, for example, require that the Project resource property be set to Hovercraft and the Confidentiality resource property be set to High for the permissions configured in the permissions entry to be applied.
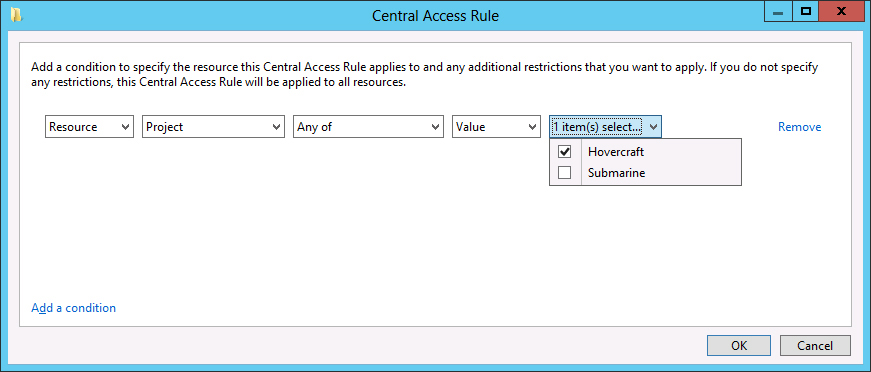
Figure 14-5 Central Access Rule
After you configure the conditions that trigger the Central Access Rule, you can then specify the set of permissions that is applied. Unlike standard NTFS permissions, permission entries allow you to apply permissions that are conditional upon user and device claims. For example, the permissions entry shown in Figure 14-6 is conditional upon the user attempting access to not only be a member of the Hovercraft_Project security group, but also have the EmployeeType attribute in their user account set to the value FTE. If the user’s EmployeeType attribute isn’t set to FTE, the permissions assigned through the user’s Hovercraft_Project group membership are not granted. You can configure multiple conditions based on user and device claims when configuring a permissions entry. For example, in the case of sensitive documents you might also require that the computer account have an attribute set to indicate that it is a secure computer.

Figure 14-6 Permission Entry for Current Permissions
Central access policies
A central access policy is a collection of central access rules. For example, the Contoso Policy Central Access Policy, shown in Figure 14-7, publishes two central access rules: Research_Projects and Secret_Projects. Only file servers running Windows Server 2012, Windows Server 2012 R2, Windows Server 2016, or Windows Server 2019 that are within the scope of the central access policy apply the rules that are contained within the policy.

Figure 14-7 Create Central Access Policy: Contoso Policy
You distribute central access policies through Group Policy. You do this by configuring the Manage Central Access Policies policy, which is located in the Computer ConfigurationPoliciesWindows SettingsSecurity SettingsFile System node. This policy is shown in Figure 14-8.

Figure 14-8 Central Access Policies Configuration
Staging
Staging allows you to configure a set of proposed rather than applied permissions. You use auditing to determine the results of these staged permissions before implementing them. You must enable auditing through Group Policy to determine the results of staged permissions. The policy you need to enable is the Audit Central Access Policy Staging Properties policy, which is located in the Computer ConfigurationPoliciesWindows SettingsSecurity SettingsAdvanced Audit Policy ConfigurationAudit PoliciesObject Access node of a Group Policy Object (GPO).
You configure staged permissions in the Proposed area of a Central Access Rule by selecting the Enable Permission Staging Configuration option, as shown in Figure 14-9. You can verify the functionality of the proposed permissions by checking the Security event log. To do this, sign in to the file server that hosts the files and search for events with event ID 4818.

Figure 14-9 Proposed permissions.
Access Denied Assistance
Access Denied Assistance is a feature available to Windows 10, Windows 8.1, and Windows 8 clients that provides an informational dialog box explaining to users that they are unable to access a file because they do not have appropriate permissions. It’s also possible to configure Access Denied Assistance so that an email can be forwarded to the support desk if the help desk’s assistance is needed to untangle permissions and allow the user access to a file.
You configure the Access Denied Assistance by configuring the Customize Message For Access Denied Errors policy, as shown in Figure 14-10. This policy is located in the Computer ConfigurationPoliciesAdministrative TemplatesSystemAccess-Denied Assistance node of a GPO.

Figure 14-10 Customized Message For Access Denied Errors
Installing AD RMS
AD RMS uses the term “cluster” to describe an AD RMS deployment, even though it has nothing to do with failover clustering or network load balancing. When you deploy AD RMS, you first deploy a root cluster. An AD RMS root cluster is responsible for managing all the AD RMS licensing and certificate traffic for the forest in which it is installed. You should only have one AD RMS root cluster per forest. Organizations that have multiple forests should deploy multiple AD RMS root clusters. After you have deployed a root cluster, you can configure additional licensing-only clusters. Licensing-only clusters distribute licenses that clients use to consume and publish content.
Installing AD RMS involves performing the following steps:
Specifying the database that AD RMS uses to store configuration information. You can use a Microsoft SQL Server instance to perform this role or deploy the Windows Internal Database. You should only use Microsoft SQL Server in large AD RMS deployments. AD RMS can use any supported version of SQL Server 2008.
Specifying a service account. This account needs to be a domain account, and best practice is to use a specially configured group managed service account for this role. Using a group managed service account ensures that the account password is managed by Active Directory and does not need to be manually updated on a periodic basis by an administrator.
Choose a cryptographic mode. Mode 2 uses RSA 2048-bit keys and SHA-256 hashes. Mode 1 uses RSA 1024-bit keys and SHA-1 hashes. Mode 2 is more secure than mode 1 and is therefore the recommended choice.
Specify Cluster Key Storage. This determines where the cluster key is stored. The default is to have the key stored within AD RMS, although you can also use a cryptographic service provider (CSP) if one is available. When you use a CSP, you must perform manual key distribution when adding additional AD RMS servers.
Specify a cluster key password. This password is used to encrypt the cluster key. You need to provide this password when joining additional AD RMS servers to the cluster and when recovering an AD RMS cluster from backup.
Input the cluster address. This is a website address in FQDN format that is usually hosted on the AD RMS server. Best practice is to configure an SSL certificate with the FQDN of the AD RMS server. Although it is possible to specify a non-SSL protected address, doing so removes the ability to use AD RMS with identity federation. The cluster address and port cannot be altered after you deploy AD RMS.
Specify a Licensor certificate name. This is the name used with the licensor certificate and should represent the certificate’s functionality.
Determine whether to register the service connection point (SCP) in Active Directory. The SCP allows domain members to locate the AD RMS cluster automatically. A user account must be a member of the Enterprise Admins security group to register an SCP. SCP registration can occur after AD RMS is deployed if the account used to deploy AD RMS is not a member of this security group.
AD RMS certificates and licenses
AD RMS uses four specific types of certificates. These certificates have the following functions:
Server licensor certificate (SLC). This certificate is created when you install the AD RMS role on the first server in the AD RMS cluster. This certificate is valid for 7150 days and is used to issue the following certificates and licenses:
SLCs to additional servers that join the cluster
Rights account certificates
Client licensor certificates
Publishing licenses
Use licenses
Rights policy templates
AD RMS machine certificate. This certificate identifies a trusted device. The machine certificate public key encrypts Rights Account Certificate private keys, and the machine certificate private key decrypts Rights Account Certificates.
Rights account certificate (RAC). This certificate identifies a user. AD RMS can only issue RACs to AD DS users whose user accounts are configured with an email address. By default, a RAC has a validity of 365 days. Temporary RACs are issued when a user accesses content from a device that is not a member of a trusted forest and has a validity of 15 minutes.
Client licensor certificate. This certificate allows AD RMS–protected content to be published to computers that cannot connect directly to the AD RMS cluster. These certificates are tied to a user RAC. Other computer users are unable to publish AD RMS–protected documents until a new connection to the AD RMS cluster is established from the computer.
In addition to the four certificate types, AD RMS uses two license types:
Publishing license. A publishing license determines the rights that apply to AD RMS content. This license contains the content key, URL, and digital signature of the AD RMS server.
End-user license. The end-user license allows a user to access AD RMS–protected content. An end-user license is issued per user, per document. End-user licenses are cached by default, although it’s possible to disable caching, so that an end-user license must be obtained each time the user attempts to access protected content.
AD RMS Templates
Rights Policy Templates allow you to apply rights policies to documents. When an author creates a document or sends an email message, the author can apply a template to that document. It’s also possible to use File Server Resource Manager to automatically apply templates to documents based on the properties of those documents, such as the document having a particular resource property or containing a specific text string.
Rights Policy Templates are created by using the AD RMS Management Console. When creating a template, you can enable the following rights on a per user group or per user basis, with any right not granted unavailable to the user:
Full Control. The user has full control over the AD RMS–protected content.
View. Gives the user the ability to view the AD RMS–protected content.
Edit. Allows the user to modify the AD RMS–protected content.
Save. Allows the user to save the AD RMS–protected content.
Export. Allows the user to use the Save As function with the AD RMS–protected content.
Print. Allows the user to print the AD RMS–protected content.
Forward. Used with Microsoft Exchange, allows the user to forward a protected message.
Reply. Used with Microsoft Exchange, allows the user to reply to a protected message.
Reply All. Used with Microsoft Exchange, allows the recipient of a protected message to use the Reply All function.
Extract. Allows a user to copy data from the AD RMS–protected content.
Allow Macros. Allows the user to use macros with the AD RMS–protected content.
View Rights. Allows the user to view rights assigned to the AD RMS–protected content.
Edit Rights. Allows the user to modify rights assigned to the AD RMS–protected content.
Figure 14-11 shows the rights assigned to the [email protected] group. You can assign different rights to multiple groups. If a user is a member of more than one group, the rights are cumulative.
Figure 14-11 Create Distributed Rights Policy Template
When configuring an AD RMS Template, you can configure content expiration settings. Content expiration settings allow you to have content expire either on a certain date or after a certain number of days. The example in Figure 14-12 shows content expiration configured to expire 14 days after content publication. An additional setting allows you to configure use license expiration, which allows you to configure how often a user must connect to the AD RMS cluster to obtain a new license to access the content.

Figure 14-12 Create Distributed Rights Policy Template
The Extended Policy settings, as shown in Figure 14-13, allow you to configure whether AD RMS content can be viewed using a browser add-on and whether a new license must be obtained each time content is consumed.

Figure 14-13 Configure browser and content settings.
AD RMS Administrators and Super Users
There are three separate local groups on an AD RMS server that you can add users to when you want to assign them privileges within AD RMS. These groups are as follows:
AD RMS Enterprise Administrators. Members of this group can perform any task within AD RMS, including enabling the AD RMS Super Users group.
AD RMS Template Administrators. Users who are members of this group can configure and manage AD RMS templates.
AD RMS Auditors. Users who are members of this group are not able to modify AD RMS server settings and templates but can view the properties of the server and templates.
The AD RMS Super Users group is a special group that you can configure and enable on the AD RMS server. Members of the AD RMS Super Users group have full owner rights over all use licenses issued by the AD RMS cluster. Members of the Super Users group can:
Recover expired content
Recover content when a template is deleted
Recover content without requiring author credentials
Because members of this group have access to all content, you should have strict policies about managing and auditing this group’s membership. A Super Users group is not configured by default, and the group that you configure as the Super Users group must have an associated email address, as shown in Figure 14-14.

Figure 14-14 Super User Group
Trusted User and Publishing Domains
Trusted User Domains (TUDs) allow you to configure an AD RMS cluster to manage requests for CLCs for users who have been issued RACs from a different AD RMS cluster. For example, if an organization has two separate Active Directory forests, and each forest has its own AD RMS deployment, you’d configure Trusted User Domains so that clients from one forest can issue CLCs to clients with RACs issued from the other forest. TUDs can be one-way or bidirectional. When configuring TUDs, you must export the TUD from the partner before importing the TUD locally.
Trusted Publishing Domains (TPDs) allow the AD RMS cluster in one forest to issue end-user licenses to content published with licenses issued from an AD RMS cluster in another forest. You must export the TPD file and have it imported by the partner AD RMS cluster before the AD RMS cluster in the partner forest can issue end-user licenses to local AD RMS clients.
Exclusion policies
Exclusion policies allow you to deny specific entities the ability to interact with AD RMS. You can configure exclusions on the basis of application, user, and lockbox version. Exclusion works in the following ways:
User Exclusion. You can exclude a user based on email address or based on the public key assigned to the user’s RAC. Use email-based exclusions for users in the forest and public key-based exclusions for external users.
Lockbox Exclusion. Lockbox exclusion allows you to exclude specific client operating systems. Each version of the Windows operating system has a specific lockbox identity. If you want to block clients running Windows 7 from interacting with AD RMS, configure an exclusion where the minimum lockbox version to the version available is Windows 8.
Application Exclusion. This allows you to exclude specific applications from interacting with AD RMS. You must specify the application file name, the minimum version, and the maximum version.
When you configure an exclusion, the exclusion only applies to new certificate or licensing requests. Licenses and certificates that were issued during the exclusion period still exclude the application, user, or lockbox version. If you remove an exclusion, the removal only applies to new licenses or certificates.
Apply AD RMS templates automatically
You can use File Server Resource Manager to automatically apply AD RMS templates to files. You do this by performing the following general steps:
Create a new file management task with an appropriate name related to the template.
On the Scope tab, set the scope of the task to the folders that host the files to which you want to apply the AD RMS template.
On the Condition tab, specify the condition that allows the rule to recognize the files that you want to apply the AD RMS template to. For example, you can create a rule that is triggered if the file contains the text “SECRET.”
On the Action tab of the Create File Management Task dialog box, shown in Figure 14-15, specify RMS Encryption as the action type and the AD RMS template that you want to apply to the file.

Figure 14-15 Create File Management Task
On the Schedule tab, configure how often the file management task should run and whether it should classify only new files or periodically attempt to reclassify existing files.
Managing AD RMS with Windows PowerShell
AD RMS PowerShell cmdlets are available in the ADRMS and ADRMSADMIN Windows PowerShell module. The functionality of these cmdlets is described in Table 14-1.
Table 14-1 AD RMS PowerShell cmdlets
Noun |
Verbs |
Function |
ADRMS |
Install, Uninstall, Update |
Install, remove, and update AD RMS after the binaries have been installed on the target server |
RmsCertChain |
Get |
Generates a report detailing information on the certificate chain of a specific user request on the AD RMS server |
RmsCertInfo |
Get |
Generates a report about a specific certificate used in a user request for the AD RMS cluster |
RmsChildCert |
Get |
Returns all child certificates from a parent certificate used in a user request to an AD RMS cluster |
RmsCluster |
Update |
Updates RMS cluster information |
RmsCryptoMode2 |
Initialize |
Configure an RMS cluster to transition to cryptographic mode 2 |
RmsEncryptedIL |
Get |
Determine use-license information from an issuance license associated with a user request |
RmsMfgEnrollment |
Install, Update, Uninstall |
Configure Microsoft Federation Gateway service enrollment |
RmsMfgSupport |
Install, Uninstall |
Install or remove Microsoft Federation Gateway configuration |
RmsReportDefinitionLanguage |
Export |
Export AD RMS report definition files |
RmsRequestInfo |
Get |
Generate a report on a specific user request |
RmsSvcAccount |
Set, Get |
Configure RMS service account |
RmsSystemHealthReport |
Get |
View RMS system health |
RmsTPD |
Export, Import |
Import and export trusted publishing domain information |
RmsTUD |
Import, Export |
Import and export trusted user domain |
RmsUserRequestReport |
Get |
View information about an RMS user request |
Dynamic Access Control cmdlets
You can use the cmdlets listed in Table 8-6 to manage Dynamic Access Control.
Table 14-2 Dynamic Access Control cmdlets
Noun |
Verb |
Function |
ADCentralAccessPolicy |
Get, New, Remove, Set |
Manage central access policies |
ADCentralAccessPolicyMember |
Add. Remove |
Add and remove central access rules to a central access policy in AD DS |
ADCentralAccessRule |
Get, New, Remove, Set |
Manages central access rules |
ADClaimType |
Get, New, Remove, Set |
Manage claim types |
ADResourceProperty |
Get, New, Remove, Set |
Manage resource properties |
ADResourcePropertyList |
Get, New, Remove, Set |
Manage resource property lists |
ADResourcePropertyListMember |
Add, Remove |
Manage resource properties in a resource property list |
ADResourcePropertyValueType |
Get |
View resource property value type |