Chapter 6. Modeling users
In Chapter 5, we ended with a stub page for creating new users (Section 5.4). Over the course of the next six chapters, we’ll fulfill the promise implicit in this incipient signup page. In this chapter, we’ll take the first critical step by creating a data model for users of our site, together with a way to store that data. In Chapter 7, we’ll give users the ability to sign up for our site and create a user profile page. Once users can sign up, we’ll let them log in and log out as well (Chapter 8 and Chapter 9), and in Chapter 10 (Section 10.2.1) we’ll learn how to protect pages from improper access. Finally, in Chapter 11 and Chapter 12 we’ll add account activations (thereby confirming a valid email address) and password resets. Taken together, the material in Chapter 6 through Chapter 12 develops a full Rails login and authentication system. As you may know, there are various pre-built authentication solutions for Rails; Box 6.1 explains why, at least at first, it’s probably a better idea to roll your own.
Box 6.1. Rolling your own authentication system
Virtually all web applications require a login and authentication system of some sort. As a result, most web frameworks end up with one or more standardized libraries for doing so, and Rails is no exception. In particular, the Devise gem has emerged as a robust solution for a wide variety of uses, and represents a strong choice for professional-grade applications.
Nevertheless, I believe it is a mistake to use a pre-built system like Devise in a tutorial like this one. Off-the-shelf systems can be “black boxes” with potentially mysterious innards, and the complicated data models used by such systems would be utterly overwhelming for beginners (or even for experienced developers not familiar with data modeling). For learning purposes, it’s essential to introduce the subject more gradually.
Happily, Rails makes it possible to take such a gradual approach while still developing an industrial-strength login and authentication system suitable for production applications. This way, even if you do end up using a third-party system later on, you’ll be in a much better position to understand and modify it to meet your particular needs.
6.1 User model
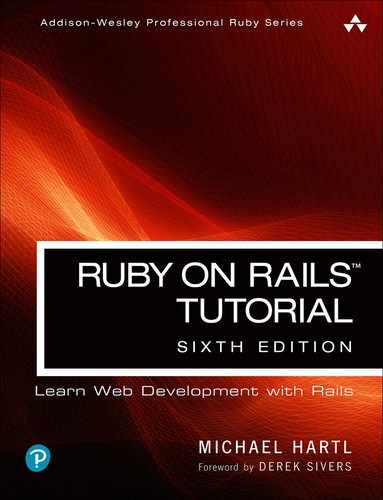
Although the ultimate goal of the next three chapters is to make a signup page for our site (as mocked up in Figure 6.1), it would do little good now to accept information for new users: we don’t currently have any place to put it. Thus, the first step in signing up users is to make a data structure to capture and store their information.
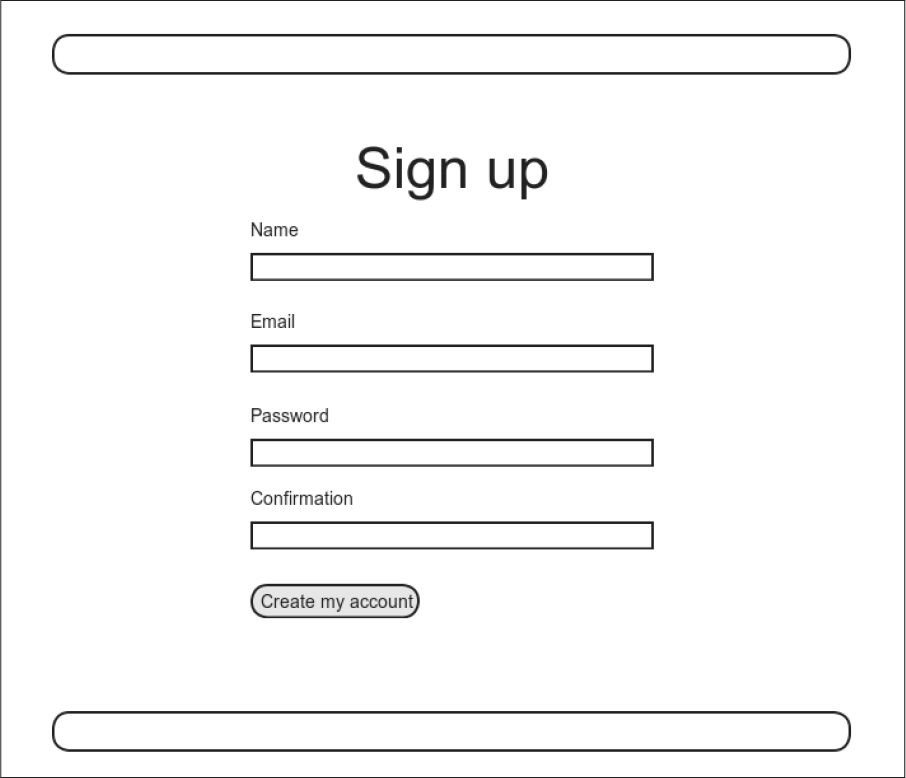
Figure 6.1: A mockup of the user signup page.
In Rails, the default data structure for a data model is called, naturally enough, a model (the M in MVC from Section 1.2.3). The default Rails solution to the problem of persistence is to use a database for long-term data storage, and the default library for interacting with the database is called Active Record.1 Active Record comes with a host of methods for creating, saving, and finding data objects, all without having to use the structured query language (SQL)2 used by relational databases. Moreover, Rails has a feature called migrations to allow data definitions to be written in pure Ruby, without having to learn an SQL data definition language (DDL). The effect is that Rails insulates you almost entirely from the details of the database. In this book, by using SQLite for development and PostgreSQL (via Heroku) for deployment (Section 1.4), we have developed this theme even further, to the point where we barely ever have to think about how Rails stores data, even for production applications.
1 The name comes from the “active record pattern”, identified and named in Patterns of Enterprise Application Architecture by Martin Fowler.
2 Officially pronounced “ess-cue-ell”, though the alternate pronunciation “sequel” is also common. You can differentiate an individual author’s preference by the choice of indefinite article: those who write “a SQL database” prefer “sequel”, whereas those who write “an SQL database” prefer “ess-cue-ell”. As you’ll soon see, I prefer the latter.
As usual, if you’re following along using Git for version control, now would be a good time to make a topic branch for modeling users:
$ git checkout -b modeling-users
6.1.1 Database migrations
You may recall from Section 4.4.5 that we have already encountered, via a custom-built User class, user objects with name and email attributes. That class served as a useful example, but it lacked the critical property of persistence: when we created a User object at the Rails console, it disappeared as soon as we exited. Our goal in this section is to create a model for users that won’t disappear quite so easily.
As with the User class in Section 4.4.5, we’ll start by modeling a user with two attributes, a name and an email address, the latter of which we’ll use as a unique username.3 (We’ll add an attribute for passwords in Section 6.3.) In Listing 4.17, we did this with Ruby’s attr_accessor method:
3 By using an email address as the username, we open the possibility of communicating with our users at a future date (Chapter 11 and Chapter 12).
class User
  attr_accessor :name, :email .
  .
  .
end
In contrast, when using Rails to model users we don’t need to identify the attributes explicitly. As noted briefly above, to store data Rails uses a relational database by default, which consists of tables composed of data rows, where each row has columns of data attributes. For example, to store users with names and email addresses, we’ll create a users table with name and email columns (with each row corresponding to one user). An example of such a table appears in Figure 6.2, corresponding to the data model shown in Figure 6.3. (Figure 6.3 is just a sketch; the full data model appears in Figure 6.4.) By naming the columns name and email, we’ll let Active Record figure out the User object attributes for us.
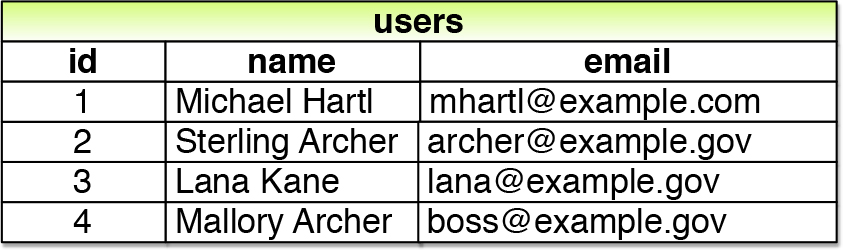
Figure 6.2: A diagram of sample data in a users table.
Figure 6.3: A sketch of the User data model.
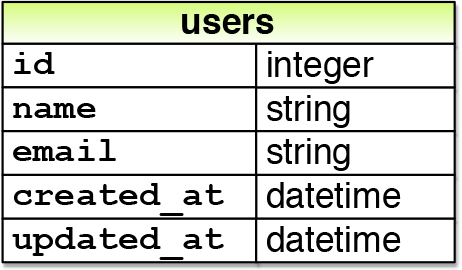
Figure 6.4: The User data model produced by Listing 6.2.
You may recall from Listing 5.38 that we created a Users controller (along with a new action) using the command
$ rails generate controller Users new
The analogous command for making a model is generate model, which we can use to generate a User model with name and email attributes, as shown in Listing 6.1.
Listing 6.1: Generating a User model.
$ rails generate model User name:string email:string
      invoke active_record
      create   db/migrate/20160523010738_create_users.rb
      create   app/models/user.rb
      invoke   test_unit
      create     test/models/user_test.rb
      create     test/fixtures/users.yml
(Note that, in contrast to the plural convention for controller names, model names are singular: a Users controller, but a User model.) By passing the optional parameters name:string and email:string, we tell Rails about the two attributes we want, along with which types those attributes should be (in this case, string). Compare this with including the action names in Listing 3.7 and Listing 5.38.
One of the results of the generate command in Listing 6.1 is a new file called a migration. Migrations provide a way to alter the structure of the database incrementally, so that our data model can adapt to changing requirements. In the case of the User model, the migration is created automatically by the model generation script; it creates a users table with two columns, name and email, as shown in Listing 6.2. (We’ll see starting in Section 6.2.5 how to make a migration from scratch.)
Listing 6.2: Migration for the User model (to create a users table).
db/migrate/[timestamp]_create_users.rb
class CreateUsers < ActiveRecord::Migration[6.0]
  def change
    create_table :users do |t|
      t.string :name
      t.string :email

      t.timestamps
    end
  end
end
Note that the name of the migration file is prefixed by a timestamp based on when the migration was generated. In the early days of migrations, the file-names were prefixed with incrementing integers, which caused conflicts for collaborating teams if multiple programmers had migrations with the same number. Barring the improbable scenario of migrations generated the same second, using timestamps conveniently avoids such collisions.
The migration itself consists of a change method that determines the change to be made to the database. In the case of Listing 6.2, change uses a Rails method called create_table to create a table in the database for storing users. The create_table method accepts a block (Section 4.3.2) with one block variable, in this case called t (for “table”). Inside the block, the create_table method uses the t object to create name and email columns in the database, both of type string.4 Here the table name is plural (users) even though the model name is singular (User), which reflects a linguistic convention followed by Rails: a model represents a single user, whereas a database table consists of many users. The final line in the block, t.timestamps, is a special command that creates two magic columns called created_at and updated_at, which are timestamps that automatically record when a given user is created and updated. (We’ll see concrete examples of the magic columns starting in Section 6.1.3.) The full data model represented by the migration in Listing 6.2 is shown in Figure 6.4. (Note the addition of the magic columns, which weren’t present in the sketch shown in Figure 6.3.)
$ rails db:migrate
4 Don’t worry about exactly how the t object manages to do this; the beauty of abstraction layers is that we don’t have to know. We can just trust the t object to do its job.
We can run the migration, known as “migrating up”, using the db:migrate command as follows:
(You may recall that we ran this command in a similar context in Section 2.2.) The first time db:migrate is run, it creates a file called db/development.-sqlite3, which is an SQLite5 database. We can see the structure of the database by opening development.sqlite3 with DB Browser for SQLite. (If you’re using the cloud IDE, you should first download the database file to the local disk, as shown in Figure 6.5.) The result appears in Figure 6.6; compare with the diagram in Figure 6.4. You might note that there’s one column in Figure 6.6 not accounted for in the migration: the id column. As noted briefly in Section 2.2, this column is created automatically, and is used by Rails to identify each row uniquely.

Figure 6.5: Downloading a file from the cloud IDE.
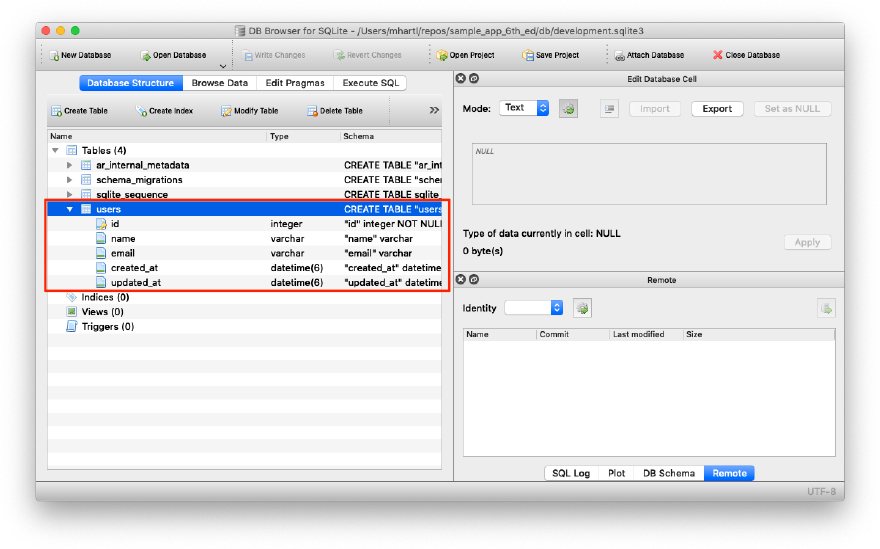
Figure 6.6: DB Browser with our new users table.
5 Officially pronounced “ess-cue-ell-ite”, although the (mis)pronunciation “sequel-ite” is also common.
Exercises
Solutions to the exercises are available to all Rails Tutorial purchasers here.
To see other people’s answers and to record your own, subscribe to the Rails Tutorial course or to the Learn Enough All Access Bundle.
1. Rails uses a file called schema.rb in the db/ directory to keep track of the structure of the database (called the schema, hence the filename). Examine your local copy of db/schema.rb and compare its contents to the migration code in Listing 6.2.
2. Most migrations (including all the ones in this tutorial) are reversible, which means we can “migrate down” and undo them with a single command, called db:rollback:
$ rails db:rollback
After running this command, examine db/schema.rb to confirm that the rollback was successful. (See Box 3.1 for another technique useful for reversing migrations.) Under the hood, this command executes the drop_table command to remove the users table from the database. The reason this works is that the change method knows that drop_table is the inverse of create_table, which means that the rollback migration can be easily inferred. In the case of an irreversible migration, such as one to remove a database column, it is necessary to define separate up and down methods in place of the single change method. Read about migrations in the Rails Guides for more information.
3. Re-run the migration by executing rails db:migrate again. Confirm that the contents of db/schema.rb have been restored.
6.1.2 The model file
We’ve seen how the User model generation in Listing 6.1 generated a migration file (Listing 6.2), and we saw in Figure 6.6 the results of running this migration: it updated a file called development.sqlite3 by creating a table users with columns id, name, email, created_at, and updated_at. Listing 6.1 also created the model itself. The rest of this section is dedicated to understanding it.
We begin by looking at the code for the User model, which lives in the file user.rb inside the app/models/ directory. It is, to put it mildly, very compact (Listing 6.3).
Listing 6.3: The brand new User model.
app/models/user.rb
class User < ApplicationRecord
end
Recall from Section 4.4.2 that the syntax class User < Application-Record means that the User class inherits from the ApplicationRecord class, which in turn inherits from ActiveRecord::Base (Figure 2.19), so that the User model automatically has all the functionality of the ActiveRecord::Base class. Of course, this knowledge doesn’t do us any good unless we know what ActiveRecord::Base contains, so let’s get started with some concrete examples.
Exercises
Solutions to the exercises are available to all Rails Tutorial purchasers here.
To see other people’s answers and to record your own, subscribe to the Rails Tutorial course or to the Learn Enough All Access Bundle.
1. In a Rails console, use the technique from Section 4.4.4 to confirm that User.new is of class User and inherits from ApplicationRecord.
2. Confirm that ApplicationRecord inherits from ActiveRecord::-Base.
6.1.3 Creating user objects
As in Chapter 4, our tool of choice for exploring data models is the Rails console. Since we don’t (yet) want to make any changes to our database, we’ll start the console in a sandbox:
$ rails console --sandbox
Loading development environment in sandbox
Any modifications you make will be rolled back on exit
>>
As indicated by the helpful message “Any modifications you make will be rolled back on exit”, when started in a sandbox the console will “roll back” (i.e., undo) any database changes introduced during the session.
In the console session in Section 4.4.5, we created a new user object with User.new, which we had access to only after requiring the example user file in Listing 4.17. With models, the situation is different; as you may recall from Section 4.4.4, the Rails console automatically loads the Rails environment, which includes the models. This means that we can make a new user object without any further work:
>> User.new
=> #<User id: nil, name: nil, email: nil, created_at: nil, updated_at: nil>
We see here the default console representation of a user object.
When called with no arguments, User.new returns an object with all nil attributes. In Section 4.4.5, we designed the example User class to take an initialization hash to set the object attributes; that design choice was motivated by Active Record, which allows objects to be initialized in the same way:
>> user = User.new(name: "Michael Hartl", email: "[email protected]")
=> #<User id: nil, name: "Michael Hartl", email: "[email protected]",
created_at: nil, updated_at: nil>
Here we see that the name and email attributes have been set as expected.
The notion of validity is important for understanding Active Record model objects. We’ll explore this subject in more depth in Section 6.2, but for now it’s worth noting that our initial user object is valid, which we can verify by calling the boolean valid? method on it:
>> user.valid?
true
So far, we haven’t touched the database: User.new only creates an object in memory, while user.valid? merely checks to see if the object is valid. In order to save the User object to the database, we need to call the save method on the user variable:
>> user.save
    (0.1ms) SAVEPOINT active_record_1
  SQL (0.8ms) INSERT INTO "users" ("name", "email", "created_at",
  "updated_at") VALUES (?, ?, ?, ?) [["name", "Michael Hartl"],
  ["email", "[email protected]"], ["created_at", "2019-08-22 01:51:03.453035"],
  ["updated_at", "2019-08-22 01:51:03.453035"]]
    (0.1ms) RELEASE SAVEPOINT active_record_1
=> true
The save method returns true if it succeeds and false otherwise. (Currently, all saves should succeed because there are as yet no validations; we’ll see cases in Section 6.2 when some will fail.) For reference, the Rails console also shows the SQL command corresponding to user.save (namely, INSERT INTO "users"…). We’ll hardly ever need raw SQL in this book,6 and I’ll omit discussion of the SQL commands from now on, but you can learn a lot by reading the SQL corresponding to Active Record commands.
6 The only exception is in Section 14.3.3.
You may have noticed that the new user object had nil values for the id and the magic columns created_at and updated_at attributes. Let’s see if our save changed anything:
>> user
=> #<User id: 1, name: "Michael Hartl", email: "[email protected]",
created_at: "2019-08-22 01:51:03", updated_at: "2019-08-22 01:51:03">
We see that the id has been assigned a value of 1, while the magic columns have been assigned the current time and date.7 Currently, the created and updated timestamps are identical; we’ll see them differ in Section 6.1.5.
7 The timestamps are recorded in Coordinated Universal Time (UTC), which for most practical purposes is the same as Greenwich Mean Time. But why call it UTC? From the NIST Time and Frequency FAQ: Q: Why is UTC used as the acronym for Coordinated Universal Time instead of CUT? A: In 1970 the Coordinated Universal Time system was devised by an international advisory group of technical experts within the International Telecommunication Union (ITU). The ITU felt it was best to designate a single abbreviation for use in all languages in order to minimize confusion. Since unanimous agreement could not be achieved on using either the English word order, CUT, or the French word order, TUC, the acronym UTC was chosen as a compromise.
As with the User class in Section 4.4.5, instances of the User model allow access to their attributes using a dot notation:
>> user.name
=> "Michael Hartl"
>> user.email
=> "[email protected]"
>> user.updated_at
=> Thu, 22 Aug 2019 01:51:03 UTC +00:00
As we’ll see in Chapter 7, it’s often convenient to make and save a model in two steps as we have above, but Active Record also lets you combine them into one step with User.create:
>> User.create(name: "A Nother", email: "[email protected]")
#<User id: 2, name: "A Nother", email: "[email protected]", created_at:
"2019-08-22 01:53:22", updated_at: "2019-08-22 01:53:22">
>> foo = User.create(name: "Foo", email: "[email protected]")
#<User id: 3, name: "Foo", email: "[email protected]", created_at: "2019-08-22
01:54:03", updated_at: "2019-08-22 01:54:03">
Note that User.create, rather than returning true or false, returns the User object itself, which we can optionally assign to a variable (such as foo in the second command above).
The inverse of create is destroy:
>> foo.destroy
   (0.1ms) SAVEPOINT active_record_1
  SQL (0.2ms) DELETE FROM "users" WHERE "users"."id" = ? [["id", 3]]
  (0.1ms) RELEASE SAVEPOINT active_record_1
=> #<User id: 3, name: "Foo", email: "[email protected]", created_at: "2019-08-22
01:54:03", updated_at: "2019-08-22 01:54:03">
Like create, destroy returns the object in question, though I can’t recall ever having used the return value of destroy. In addition, the destroyed object still exists in memory:
>> foo
=> #<User id: 3, name: "Foo", email: "[email protected]", created_at: "2019-08-22
01:54:03", updated_at: "2019-08-22 01:54:03">
So how do we know if we really destroyed an object? And for saved and non-destroyed objects, how can we retrieve users from the database? To answer these questions, we need to learn how to use Active Record to find user objects.
Exercises
Solutions to the exercises are available to all Rails Tutorial purchasers here.
To see other people’s answers and to record your own, subscribe to the Rails Tutorial course or to the Learn Enough All Access Bundle.
1. Confirm that user.name and user.email are of class String.
2. Of what class are the created_at and updated_at attributes?
6.1.4 Finding user objects
Active Record provides several options for finding objects. Let’s use them to find the first user we created while verifying that the third user (foo) has been destroyed. We’ll start with the existing user:
>> User.find(1)
=> #<User id: 1, name: "Michael Hartl", email: "[email protected]",
created_at: "2019-08-22 01:51:03", updated_at: "2019-08-22 01:51:03">
Here we’ve passed the id of the user to User.find; Active Record returns the user with that id.
Let’s see if the user with an id of 3 still exists in the database:
>> User.find(3)
ActiveRecord::RecordNotFound: Couldn't find User with ID=3
Since we destroyed our third user in Section 6.1.3, Active Record can’t find it in the database. Instead, find raises an exception, which is a way of indicating an exceptional event in the execution of a program—in this case, a nonexistent Active Record id, leading find to raise an ActiveRecord::RecordNotFound exception.8
8 Exceptions and exception handling are somewhat advanced Ruby subjects, and we won’t need them much in this book. They are important, though, and I suggest learning about them using one of the Ruby books recommended in Section 14.4.1.
In addition to the generic find, Active Record also allows us to find users by specific attributes:
>> User.find_by(email: "[email protected]")
=> #<User id: 1, name: "Michael Hartl", email: "[email protected]",
created_at: "2019-08-22 01:51:03", updated_at: "2019-08-22 01:51:03">
Since we will be using email addresses as usernames, this sort of find will be useful when we learn how to let users log in to our site (Chapter 7). If you’re worried that find_by will be inefficient if there are a large number of users, you’re ahead of the game; we’ll cover this issue, and its solution via database indices, in Section 6.2.5.
We’ll end with a couple of more general ways of finding users. First, there’s first:
>> User.first
=> #<User id: 1, name: "Michael Hartl", email: "[email protected]",
created_at: "2019-08-22 01:51:03", updated_at: "2019-08-22 01:51:03">
Naturally, first just returns the first user in the database. There’s also all:
>> User.all
=> #<ActiveRecord::Relation [#<User id: 1, name: "Michael Hartl", email:
"[email protected]", created_at: "2019-08-22 01:51:03", updated_at:
"2019-08-22 01:51:03">, #<User id: 2, name: "A Nother", email:
"[email protected]", created_at: "2019-08-22 01:53:22", updated_at:
"2019-08-22 01:53:22">]>
As you can see from the console output, User.all returns all the users in the database as an object of class ActiveRecord::Relation, which is effectively an array (Section 4.3.1).
Exercises
Solutions to the exercises are available to all Rails Tutorial purchasers here.
To see other people’s answers and to record your own, subscribe to the Rails Tutorial course or to the Learn Enough All Access Bundle.
1. Find the user by name. Confirm that find_by_name works as well. (You will often encounter this older style of find_by in legacy Rails applications.)
2. For most practical purposes, User.all acts like an array, but confirm that in fact it’s of class User::ActiveRecord_Relation.
3. Confirm that you can find the length of User.all by passing it the length method (Section 4.2.2). Ruby’s ability to manipulate objects based on how they act rather than on their formal class type is called duck typing, based on the aphorism that “If it looks like a duck, and it quacks like a duck, it’s probably a duck.”
6.1.5 Updating user objects
Once we’ve created objects, we often want to update them. There are two basic ways to do this. First, we can assign attributes individually, as we did in Section 4.4.5:
>> user           # Just a reminder about our user's attributes
=> #<User id: 1, name: "Michael Hartl", email: "[email protected]",
created_at: "2019-08-22 01:51:03", updated_at: "2019-08-22 01:51:03">
>> user.email = "[email protected]"
=> "[email protected]"
>> user.save
=> true
Note that the final step is necessary to write the changes to the database. We can see what happens without a save by using reload, which reloads the object based on the database information:
>> user.email
=> "[email protected]"
>> user.email = "[email protected]"
=> "[email protected]"
>> user.reload.email
=> "[email protected]"
Now that we’ve updated the user by running user.save, the magic columns differ, as promised in Section 6.1.3:
>> user.created_at
=> Thu, 22 Aug 2019 01:51:03 UTC +00:00
>> user.updated_at
=> Thu, 22 Aug 2019 01:58:08 UTC +00:00
The second main way to update multiple attributes is to use update:9
9 Formerly update_attributes.
>> user.update(name: "The Dude", email: "[email protected]")
=> true
>> user.name
=> "The Dude"
>> user.email
=> "[email protected]"
The update method accepts a hash of attributes, and on success performs both the update and the save in one step (returning true to indicate that the save went through). Note that if any of the validations fail, such as when a password is required to save a record (as implemented in Section 6.3), the call to update will fail. If we need to update only a single attribute, using the singular update_attribute bypasses this restriction by skipping the validations:
>> user.update_attribute(:name, "El Duderino")
=> true
>> user.name
=> "El Duderino"
Exercises
Solutions to the exercises are available to all Rails Tutorial purchasers here.
To see other people’s answers and to record your own, subscribe to the Rails Tutorial course or to the Learn Enough All Access Bundle.
1. Update the user’s name using assignment and a call to save.
2. Update the user’s email address using a call to update.
3. Confirm that you can change the magic columns directly by updating the created_at column using assignment and a save. Use the value 1.year.ago, which is a Rails way to create a timestamp one year before the present time.
6.2 User validations
The User model we created in Section 6.1 now has working name and email attributes, but they are completely generic: any string (including an empty one) is currently valid in either case. And yet, names and email addresses are more specific than this. For example, name should be non-blank, and email should match the specific format characteristic of email addresses. Moreover, since we’ll be using email addresses as unique usernames when users log in, we shouldn’t allow email duplicates in the database.
In short, we shouldn’t allow name and email to be just any strings; we should enforce certain constraints on their values. Active Record allows us to impose such constraints using validations (seen briefly before in Section 2.3.2). In this section, we’ll cover several of the most common cases, validating presence, length, format and uniqueness. In Section 6.3.2 we’ll add a final common validation, confirmation. And we’ll see in Section 7.3 how validations give us convenient error messages when users make submissions that violate them.
6.2.1 A validity test
As noted in Box 3.3, test-driven development isn’t always the right tool for the job, but model validations are exactly the kind of features for which TDD is a perfect fit. It’s difficult to be confident that a given validation is doing exactly what we expect it to without writing a failing test and then getting it to pass.
Our method will be to start with a valid model object, set one of its attributes to something we want to be invalid, and then test that it in fact is invalid. As a safety net, we’ll first write a test to make sure the initial model object is valid. This way, when the validation tests fail we’ll know it’s for the right reason (and not because the initial object was invalid in the first place).
In what follows, and when doing TDD generally, it’s convenenient to work with your editor split into two panes, with test code on the left and application code on the right. My preferred setup with the cloud IDE is shown in Figure 6.7.

Figure 6.7: TDD with a split pane.
To get us started, the command in Listing 6.1 produced an initial test for testing users, though in this case it’s practically blank (Listing 6.4).
Listing 6.4: The practically blank default User test.
test/models/user_test.rb
require 'test_helper'

class UserTest < ActiveSupport::TestCase
  # test "the truth" do
  #   assert true
  # end
end
To write a test for a valid object, we’ll create an initially valid User model object @user using the special setup method (discussed briefly in the Chapter 3 exercises), which automatically gets run before each test. Because @user is an instance variable, it’s automatically available in all the tests, and we can test its validity using the valid? method (Section 6.1.3). The result appears in Listing 6.5.
Listing 6.5: A test for an initially valid user. green
test/models/user_test.rb
require 'test_helper'

class UserTest < ActiveSupport::TestCase

  def setup
    @user = User.new(name: "Example User", email: "[email protected]")
  end

  test "should be valid" do
    assert @user.valid?
  end
end
Listing 6.5 uses the plain assert method, which in this case succeeds if @user.valid? returns true and fails if it returns false.
Because our User model doesn’t currently have any validations, the initial test should pass:
Listing 6.6: green
$ rails test:models
Here we’ve used rails test:models to run just the model tests (compare to rails test:integration from Section 5.3.4).
Exercises
Solutions to the exercises are available to all Rails Tutorial purchasers here.
To see other people’s answers and to record your own, subscribe to the Rails Tutorial course or to the Learn Enough All Access Bundle.
1. In the console, confirm that a new user is currently valid.
2. Confirm that the user created in Section 6.1.3 is also valid.
6.2.2 Validating presence
Perhaps the most elementary validation is presence, which simply verifies that a given attribute is present. For example, in this section we’ll ensure that both the name and email fields are present before a user gets saved to the database. In Section 7.3.3, we’ll see how to propagate this requirement up to the signup form for creating new users.
We’ll start with a test for the presence of a name attribute by building on the test in Listing 6.5. As seen in Listing 6.7, all we need to do is set the @user variable’s name attribute to a blank string (in this case, a string of spaces) and then check (using the assert_not method) that the resulting User object is not valid.
Listing 6.7: A test for validation of the name attribute. red
test/models/user_test.rb
require 'test_helper'

class UserTest < ActiveSupport::TestCase

  def setup
    @user = User.new(name: "Example User", email: "[email protected]")
  end

  test "should be valid" do
    assert @user.valid?
  end

  test "name should be present" do
    @user.name = " "
    assert_not @user.valid?
  end
end
At this point, the model tests should be red:
Listing 6.8: red
$ rails test:models
As we saw briefly before in the Chapter 2 exercises, the way to validate the presence of the name attribute is to use the validates method with argument presence: true, as shown in Listing 6.9. The presence: true argument is a one-element options hash; recall from Section 4.3.4 that curly braces are optional when passing hashes as the final argument in a method. (As noted in Section 5.1.1, the use of options hashes is a recurring theme in Rails.)
Listing 6.9: Validating the presence of a name attribute. green
app/models/user.rb
class User < ApplicationRecord
  validates :name, presence: true
end
Listing 6.9 may look like magic, but validates is just a method. An equivalent formulation of Listing 6.9 using parentheses is as follows:
class User < ApplicationRecord
  validates(:name, presence: true)
end
Let’s drop into the console to see the effects of adding a validation to our User model:10
10 I’ll omit the output of console commands when they are not particularly instructive—for example, the results of User.new.
$ rails console --sandbox
>> user = User.new(name: "", email: "[email protected]")
>>user.valid?
=> false
Here we check the validity of the user variable using the valid? method, which returns false when the object fails one or more validations, and true when all validations pass. In this case, we only have one validation, so we know which one failed, but it can still be helpful to check using the errors object generated on failure:
>> user.errors.full_messages
=> ["Name can't be blank"]
(The error message is a hint that Rails validates the presence of an attribute using the blank? method, which we saw at the end of Section 4.4.3.)
Because the user isn’t valid, an attempt to save the user to the database automatically fails:
>> user.save
=> false
As a result, the test in Listing 6.7 should now be green:
Listing 6.10: green
$ rails test:models
Following the model in Listing 6.7, writing a test for email attribute presence is easy (Listing 6.11), as is the application code to get it to pass (Listing 6.12).
Listing 6.11: A test for validation of the email attribute. red
test/models/user_test.rb
require 'test_helper'

class UserTest < ActiveSupport::TestCase

  def setup
    @user = User.new(name: "Example User", email: "[email protected]")
  end

  test "should be valid" do
    assert @user.valid?
  end

  test "name should be present" do
    @user.name = ""
    assert_not @user.valid?
  end

  test "email should be present" do
    @user.email = " "
    assert_not @user.valid?
  end
end
Listing 6.12: Validating the presence of an email attribute. green
app/models/user.rb
class User < ApplicationRecord
  validates :name, presence: true
  validates :email, presence: true
end
At this point, the presence validations are complete, and the test suite should be green:
Listing 6.13: green
$ rails test
Exercises
Solutions to the exercises are available to all Rails Tutorial purchasers here.
To see other people’s answers and to record your own, subscribe to the Rails Tutorial course or to the Learn Enough All Access Bundle.
1. Make a new user called u and confirm that it’s initially invalid. What are the full error messages?
2. Confirm that u.errors.messages is a hash of errors. How would you access just the email errors?
6.2.3 Length validation
We’ve constrained our User model to require a name for each user, but we should go further: the user’s names will be displayed on the sample site, so we should enforce some limit on their length. With all the work we did in Section 6.2.2, this step is easy.
There’s no science to picking a maximum length; we’ll just pull 50 out of thin air as a reasonable upper bound, which means verifying that names of 51 characters are too long. In addition, although it’s unlikely ever to be a problem, there’s a chance that a user’s email address could overrun the maximum length of strings, which for many databases is 255. Because the format validation in Section 6.2.4 won’t enforce such a constraint, we’ll add one in this section for completeness. Listing 6.14 shows the resulting tests.
Listing 6.14: Tests for name and email length validations. red
test/models/user_test.rb
require 'test_helper'

class UserTest < ActiveSupport::TestCase

  def setup
    @user = User.new(name: "Example User", email: "[email protected]")
  end
  .
  .
  .
  test "name should not be too long" do
    @user.name = "a" * 51
    assert_not @user.valid?
  end

  test "email should not be too long" do
    @user.email = "a" * 244 + "@example.com"
    assert_not @user.valid?
  end
end
For convenience, we’ve used “string multiplication” in Listing 6.14 to make a string 51 characters long. We can see how this works using the console:
>> "a" * 51
=> "aaaaaaaaaaaaaaaaaaaaaaaaaaaaaaaaaaaaaaaaaaaaaaaaaaa"
>> ("a" * 51).length
=> 51
The email length validation arranges to make a valid email address that’s one character too long:
>> "a" * 244 + "@example.com"
=> "aaaaaaaaaaaaaaaaaaaaaaaaaaaaaaaaaaaaaaaaaaaaaaaaaaaaaaaaaaaaaaaaaaaaaaaaaaaaaaaaaaaaaaaaaaaaaaaaaaaaaaaaaaaaaaaaaaaaaaaaaaaaaaaaaaaaaaaaaaaaaaaaaaaaaaaaaaaaaaaaaaaaaaaaaaaaaaaaaaaaaaaaaaaaaaaaaaaaaaaaaaaaaaaaaaaaaaaaaaaaaaaaaaaaaaaaaaaaaaaaaaaa@example.com"
>> ("a" * 244 + "@example.com").length
=> 256
At this point, the tests in Listing 6.14 should be red:
Listing 6.15: red
$ rails test
To get them to pass, we need to use the validation argument to constrain length, which is just length, along with the maximum parameter to enforce the upper bound (Listing 6.16).
Listing 6.16: Adding a length validation for the name attribute. green
app/models/user.rb
class User < ApplicationRecord
  validates :name,  presence: true, length: { maximum: 50 }
  validates :email, presence: true, length: { maximum: 255 }
end
Now the tests should be green:
Listing 6.17: green
$ rails test
With our test suite passing again, we can move on to a more challenging validation: email format.
Exercises
Solutions to the exercises are available to all Rails Tutorial purchasers here.
To see other people’s answers and to record your own, subscribe to the Rails Tutorial course or to the Learn Enough All Access Bundle.
1. Make a new user with too-long name and email and confirm that it’s not valid.
2. What are the error messages generated by the length validation?
6.2.4 Format validation
Our validations for the name attribute enforce only minimal constraints—any non-blank name under 51 characters will do—but of course the email attribute must satisfy the more stringent requirement of being a valid email address. So far we’ve only rejected blank email addresses; in this section, we’ll require email addresses to conform to the familiar pattern [email protected].
Neither the tests nor the validation will be exhaustive, just good enough to accept most valid email addresses and reject most invalid ones. We’ll start with a couple of tests involving collections of valid and invalid addresses. To make these collections, it’s worth knowing about the useful %w[] technique for making arrays of strings, as seen in this console session:
>> %w[foo bar baz]
=> ["foo", "bar", "baz"]
>> addresses = %w[[email protected] [email protected] [email protected]]
=> ["[email protected]", "[email protected]", "[email protected]"]
>> addresses.each do |address|
?>   puts address
>> end
[email protected]
[email protected]
[email protected]
Here we’ve iterated over the elements of the addresses array using the each method (Section 4.3.2). With this technique in hand, we’re ready to write some basic email format validation tests.
Because email format validation is tricky and error-prone, we’ll start with some passing tests for valid email addresses to catch any errors in the validation. In other words, we want to make sure not just that invalid email addresses like user@example,com are rejected, but also that valid addresses like [email protected] are accepted, even after we impose the validation constraint. (Right now they’ll be accepted because all non-blank email addresses are currently valid.) The result for a representative sample of valid email addresses appears in Listing 6.18.
Listing 6.18: Tests for valid email formats. green
test/models/user_test.rb
require 'test_helper'

class UserTest < ActiveSupport::TestCase

  def setup
    @user = User.new(name: "Example User", email: "[email protected]")
  end
  .
  .
  .
  test "email validation should accept valid addresses" do
    valid_addresses = %w[[email protected] [email protected] [email protected]
                         [email protected] [email protected]]
    valid_addresses.each do |valid_address|
      @user.email = valid_address
      assert @user.valid?, "#{valid_address.inspect} should be valid"
    end
  end
end
Note that we’ve included an optional second argument to the assertion with a custom error message, which in this case identifies the address causing the test to fail:
assert @user.valid?, "#{valid_address.inspect} should be valid"
(This uses the interpolated inspect method mentioned in Section 4.3.3.) Including the specific address that causes any failure is especially useful in a test with an each loop like Listing 6.18; otherwise, any failure would merely identify the line number, which is the same for all the email addresses, and which wouldn’t be sufficient to identify the source of the problem.
Next we’ll add tests for the invalidity of a variety of invalid email addresses, such as user@example,com (comma in place of dot) and user_at_foo.org (missing the ‘@’ sign). As in Listing 6.18, Listing 6.19 includes a custom error message to identify the exact address causing any failure.
Listing 6.19: Tests for email format validation. red
test/models/user_test.rb
require 'test_helper'

class UserTest < ActiveSupport::TestCase

  def setup
    @user = User.new(name: "Example User", email: "[email protected]")
  end
  .
  .
  .
  test "email validation should reject invalid addresses" do
    invalid_addresses = %w[user@example,com user_at_foo.org user.name@example.
                           foo@bar_baz.com foo@bar+baz.com]
    invalid_addresses.each do |invalid_address|
      @user.email = invalid_address
      assert_not @user.valid?, "#{invalid_address.inspect} should be invalid"
    end
  end
end
At this point, the tests should be red:
Listing 6.20: red
$ rails test
The application code for email format validation uses the format validation, which works like this:
validates :email, format: { with: /<regular expression>/ }
This validates the attribute with the given regular expression (or regex), which is a powerful (and often cryptic) language for matching patterns in strings. This means we need to construct a regular expression to match valid email addresses while not matching invalid ones.
There actually exists a full regex for matching email addresses according to the official email standard, but it’s enormous, obscure, and quite possibly counter-productive.11 In this tutorial, we’ll adopt a more pragmatic regex that has proven to be robust in practice. Here’s what it looks like:
VALID_EMAIL_REGEX = /A[w+-.]+@[a-zd-.]+.[a-z]+z/i
11 For example, did you know that "Michael Hartl"@example.com, with quotation marks and a space in the middle, is a valid email address according to the standard? Incredibly, it is—but it’s absurd.
To help understand where this comes from, Table 6.1 breaks it into bite-sized pieces.12
12 Note that, in Table 6.1, “letter” really means “lower-case letter”, but the i at the end of the regex enforces case-insensitive matching.
Although you can learn a lot by studying Table 6.1, to really understand regular expressions I consider using an interactive regular expression matcher like Rubular to be essential (Figure 6.8).13 The Rubular website has a beautiful interactive interface for making regular expressions, along with a handy regex quick reference. I encourage you to study Table 6.1 with a browser window open to Rubular—no amount of reading about regular expressions can replace playing with them interactively. (Note: If you use the regex from Table 6.1 in Rubular, I recommend leaving off the A and z characters so that you can match more than one email address at a time in the given test string. Also note that the regex consists of the characters inside the slashes /.../, so you should omit those when using Rubular.)
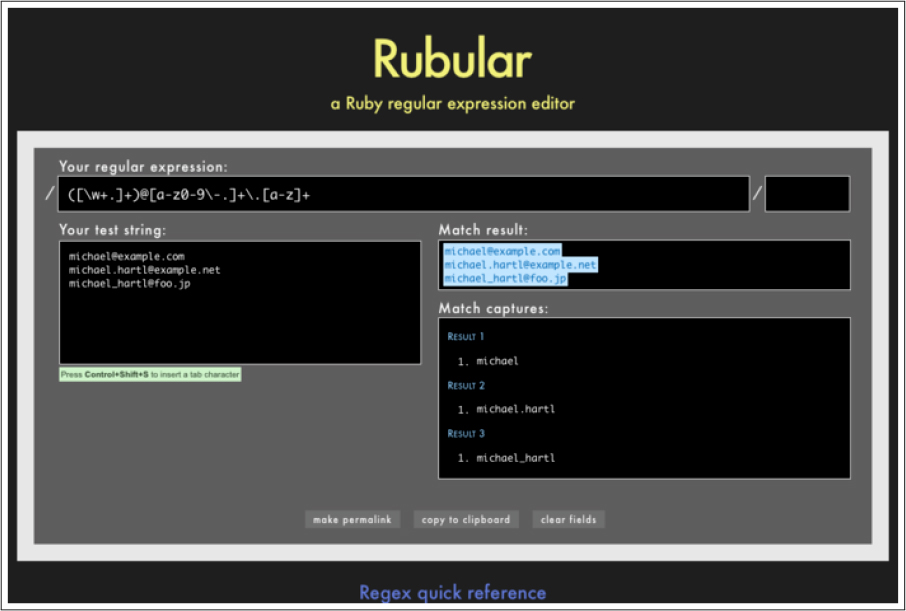
Figure 6.8: The awesome Rubular regular expression editor.
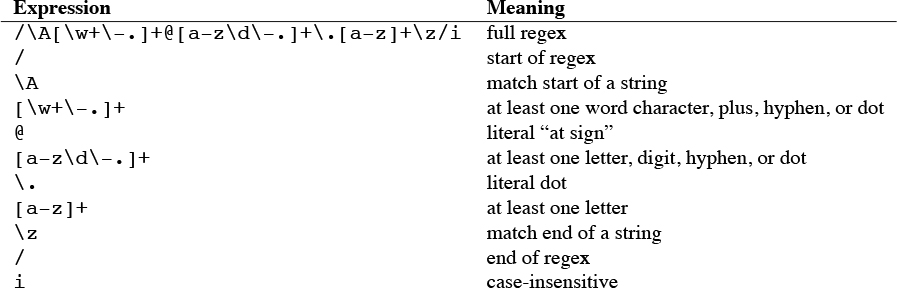
Table 6.1: Breaking down the valid email regex.
13 If you find it as useful as I do, I encourage you to donate to Rubular to reward developer Michael Lovitt for his wonderful work.
Applying the regular expression from Table 6.1 to the email format validation yields the code in Listing 6.21.
Listing 6.21: Validating the email format with a regular expression. green
app/models/user.rb
class User < ApplicationRecord
  validates :name, presence: true, length: { maximum: 50 }
  VALID_EMAIL_REGEX = /A[w+-.]+@[a-zd-.]+.[a-z]+z/i
  validates :email, presence: true, length: { maximum: 255 },
                    format: { with: VALID_EMAIL_REGEX }
end
Here the regex VALID_EMAIL_REGEX is a constant, indicated in Ruby by a name starting with a capital letter. The code
VALID_EMAIL_REGEX = /A[w+-.]+@[a-zd-.]+.[a-z]+z/i
validates :email, presence: true, length: { maximum: 255 },
                  format: { with: VALID_EMAIL_REGEX }
ensures that only email addresses that match the pattern will be considered valid. (The expression above has one minor weakness: it allows invalid addresses that contain consecutive dots, such as [email protected]. Updating the regex in Listing 6.21 to fix this blemish is left as an exercise (Section 6.2.4).)
At this point, the tests should be green:
Listing 6.22: green
$ rails test:models
This means that there’s only one constraint left: enforcing email uniqueness.
Exercises
Solutions to the exercises are available to all Rails Tutorial purchasers here.
To see other people’s answers and to record your own, subscribe to the Rails Tutorial course or to the Learn Enough All Access Bundle.
1. By pasting in the valid addresses from Listing 6.18 and invalid addresses from Listing 6.19 into the test string area at Rubular, confirm that the regex from Listing 6.21 matches all of the valid addresses and none of the invalid ones.
2. As noted above, the email regex in Listing 6.21 allows invalid email addresses with consecutive dots in the domain name, i.e., addresses of the form [email protected]. Add this address to the list of invalid addresses in Listing 6.19 to get a failing test, and then use the more complicated regex shown in Listing 6.23 to get the test to pass.
3. Add [email protected] to the list of addresses at Rubular, and confirm that the regex shown in Listing 6.23 matches all the valid addresses and none of the invalid ones.
Listing 6.23: Disallowing double dots in email domain names. green
app/models/user.rb
class User < ApplicationRecord
  validates :name, presence: true, length: { maximum: 50 }
  VALID_EMAIL_REGEX = /A[w+-.]+@[a-zd-]+(.[a-zd-]+)*.[a-z]+z/i
  validates :email, presence: true, length: { maximum: 255 },
                    format: { with: VALID_EMAIL_REGEX }
end
6.2.5 Uniqueness validation
To enforce uniqueness of email addresses (so that we can use them as user-names), we’ll be using the :uniqueness option to the validates method. But be warned: there’s a major caveat, so don’t just skim this section—read it carefully.
We’ll start with some short tests. In our previous model tests, we’ve mainly used User.new, which just creates a Ruby object in memory, but for uniqueness tests we actually need to put a record into the database.14 The initial duplicate email test appears in Listing 6.24.
14 As noted briefly in the introduction to this section, there is a dedicated test database, db/test.sqlite3, for this purpose.
Listing 6.24: A test for the rejection of duplicate email addresses. red
test/models/user_test.rb
require 'test_helper'

class UserTest < ActiveSupport::TestCase

  def setup
    @user = User.new(name: "Example User", email: "[email protected]")
  end
  .
  .
  .
  test "email addresses should be unique" do
    duplicate_user = @user.dup
    @user.save
    assert_not duplicate_user.valid?
  end
end
The method here is to make a user with the same email address as @user using @user.dup, which creates a duplicate user with the same attributes. Since we then save @user, the duplicate user has an email address that already exists in the database, and hence should not be valid.
We can get the new test in Listing 6.24 to pass by adding uniqueness: true to the email validation, as shown in Listing 6.25.
Listing 6.25: Validating the uniqueness of email addresses. green
app/models/user.rb
class User < ApplicationRecord
  validates :name, presence: true, length: { maximum: 50 }
  VALID_EMAIL_REGEX = /A[w+-.]+@[a-zd-.]+.[a-z]+z/i
  validates :email, presence: true, length: { maximum: 255 },
                    format: { with: VALID_EMAIL_REGEX },
                    uniqueness: true
end
We’re not quite done, though. Email addresses are typically processed as if they were case-insensitive—i.e., [email protected] is treated the same as [email protected] or [email protected]—so our validation should incorporate this as well.15 It’s thus important to test for case-insensitivity, which we do with the code in Listing 6.26.
15 Technically, only the domain part of the email address is case-insensitive: [email protected] is actually different from [email protected]. In practice, though, it is a bad idea to rely on this fact; as noted at about.com, “Since the case sensitivity of email addresses can create a lot of confusion, interoperability problems and widespread headaches, it would be foolish to require email addresses to be typed with the correct case. Hardly any email service or ISP does enforce case sensitive email addresses, returning messages whose recipient’s email address was not typed correctly (in all upper case, for example).” Thanks to reader Riley Moses for pointing this out.
Listing 6.26: Testing case-insensitive email uniqueness. red
test/models/user_test.rb
require 'test_helper'
class UserTest < ActiveSupport::TestCase

  def setup
    @user = User.new(name: "Example User", email: "[email protected]")
  end
  .
  .
  .
  test "email addresses should be unique" do
    duplicate_user = @user.dup
    duplicate_user.email = @user.email.upcase
    @user.save
    assert_not duplicate_user.valid?
  end
end
Here we are using the upcase method on strings (seen briefly in Section 4.3.2). This test does the same thing as the initial duplicate email test, but with an uppercase email address instead. If this test feels a little abstract, go ahead and fire up the console:
$ rails console --sandbox
>> user = User.create(name: "Example User", email: "[email protected]")
>> user.email.upcase
=> "[email protected]"
>> duplicate_user = user.dup
>> duplicate_user.email = user.email.upcase
>> duplicate_user.valid?
=> true
Of course, duplicate_user.valid? is currently true because the uniqueness validation is case-sensitive, but we want it to be false. Fortunately, :uniqueness accepts an option, :case_sensitive, for just this purpose (Listing 6.27).
Listing 6.27: Validating the uniqueness of email addresses, ignoring case. green
app/models/user.rb
class User < ApplicationRecord
  validates :name, presence: true, length: { maximum: 50 }
  VALID_EMAIL_REGEX = /A[w+-.]+@[a-zd-.]+.[a-z]+z/i
  validates :email, presence: true, length: { maximum: 255 },
                    format: { with: VALID_EMAIL_REGEX },
                    uniqueness: { case_sensitive: false }
end
Note that we have simply replaced true in Listing 6.25 with case_sensitive: false in Listing 6.27. (Rails infers that uniqueness should be true as well.)
At this point, our application—with an important caveat—enforces email uniqueness, and our test suite should pass:
Listing 6.28: green
$ rails test
There’s just one small problem, which is that the Active Record uniqueness validation does not guarantee uniqueness at the database level. Here’s a scenario that explains why:
1. Alice signs up for the sample app, with address [email protected].
2. Alice accidentally clicks on “Submit” twice, sending two requests in quick succession.
3. The following sequence occurs: request 1 creates a user in memory that passes validation, request 2 does the same, request 1’s user gets saved, request 2’s user gets saved.
4. Result: two user records with the exact same email address, despite the uniqueness validation
If the above sequence seems implausible, believe me, it isn’t: it can happen on any Rails website with significant traffic (which I once learned the hard way). Luckily, the solution is straightforward to implement: we just need to enforce uniqueness at the database level as well as at the model level. Our method is to create a database index on the email column (Box 6.2), and then require that the index be unique.
Box 6.2. Database indices
When creating a column in a database, it is important to consider whether we will need to find records by that column. Consider, for example, the email attribute created by the migration in Listing 6.2. When we allow users to log in to the sample app starting in Chapter 7, we will need to find the user record corresponding to the submitted email address. Unfortunately, based on the naïve data model, the only way to find a user by email address is to look through each user row in the database and compare its email attribute to the given email—which means we might have to examine every row (since the user could be the last one in the database). This is known in the database business as a full-table scan, and for a real site with thousands of users it is a Bad Thing.
Putting an index on the email column fixes the problem. To understand a database index, it’s helpful to consider the analogy of a book index. In a book, to find all the occurrences of a given string, say “foobar”, you would have to scan each page for “foobar”—the paper version of a full-table scan. With a book index, on the other hand, you can just look up “foobar” in the index to see all the pages containing “foobar”. A database index works essentially the same way.
The email index represents an update to our data modeling requirements, which (as discussed in Section 6.1.1) is handled in Rails using migrations. We saw in Section 6.1.1 that generating the User model automatically created a new migration (Listing 6.2); in the present case, we are adding structure to an existing model, so we need to create a migration directly using the migration generator:
$ rails generate migration add_index_to_users_email
Unlike the migration for users, the email uniqueness migration is not predefined, so we need to fill in its contents with Listing 6.29.16
16 Of course, we could just edit the migration file for the users table in Listing 6.2, but that would require rolling back and then migrating back up. The Rails Way™ is to use migrations every time we discover that our data model needs to change.
Listing 6.29: The migration for enforcing email uniqueness.
db/migrate/[timestamp]_add_index_to_users_email.rb
class AddIndexToUsersEmail < ActiveRecord::Migration[6.0]
  def change
    add_index :users, :email, unique: true
  end
end
This uses a Rails method called add_index to add an index on the email column of the users table. The index by itself doesn’t enforce uniqueness, but the option unique: true does.
The final step is to migrate the database:
$ rails db:migrate
(If the migration fails, make sure to exit any running sandbox console sessions, which can lock the database and prevent migrations.)
At this point, the test suite should be red due to a violation of the uniqueness constraint in the fixtures, which contain sample data for the test database. User fixtures were generated automatically in Listing 6.1, and as shown in Listing 6.30 the email addresses are not unique. (They’re not valid either, but fixture data doesn’t get run through the validations.)
Listing 6.30: The default user fixtures. red
test/fixtures/users.yml
# Read about fixtures at https://api.rubyonrails.org/classes/ActiveRecord/
# FixtureSet.html

one:
  name: MyString
  email: MyString

two:
  name: MyString
  email: MyString
Because we won’t need fixtures until Chapter 8, for now we’ll just remove them, leaving an empty fixtures file (Listing 6.31).
Listing 6.31: An empty fixtures file. green
test/fixtures/users.yml
# empty
Having addressed the uniqueness caveat, there’s one more change we need to make to be assured of email uniqueness. Some database adapters use case-sensitive indices, considering the strings “[email protected]” and “[email protected]” to be distinct, but our application treats those addresses as the same. To avoid this incompatibility, we’ll standardize on all lower-case addresses, converting “[email protected]” to “[email protected]” before saving it to the database. The way to do this is with a callback, which is a method that gets invoked at a particular point in the lifecycle of an Active Record object.
In the present case, that point is before the object is saved, so we’ll use a before_save callback to downcase the email attribute before saving the user.17 The result appears in Listing 6.32. (This is just a first implementation; we’ll discuss this subject again in Section 11.1, where we’ll use the preferred method reference convention for defining callbacks.)
17 See the Rails API entry on callbacks for more information on which callbacks Rails supports.
Listing 6.32: Ensuring email uniqueness by downcasing the email attribute. red
app/models/user.rb
class User < ApplicationRecord
  before_save { self.email = email.downcase }
  validates :name, presence: true, length: { maximum: 50 }
  VALID_EMAIL_REGEX = /A[w+-.]+@[a-zd-.]+.[a-z]+z/i
  validates :email, presence: true, length: { maximum: 255 },
                  format: { with: VALID_EMAIL_REGEX },
                  uniqueness: true
end
The code in Listing 6.32 passes a block to the before_save callback and sets the user’s email address to a lower-case version of its current value using the downcase string method. Note also that Listing 6.32 reverts the uniqueness constraint back to true, since case-sensitive matching works fine if all of the emails are lower-case. Indeed, this practice prevents problems applying the database index from Listing 6.29, since many databases have difficulty using an index when combined with a case-insensitive match.18
18 Thanks to reader Alex Friedman for pointing this out.
Restoring the original constraint does break the test in Listing 6.26, but that’s easy to fix by reverting the test to its previous form from Listing 6.24, as shown again in Listing 6.33.
Listing 6.33: Restoring the original email uniqueness test. green
test/models/user_test.rb
require 'test_helper'

class UserTest < ActiveSupport::TestCase

  def setup
    @user = User.new(name: "Example User", email: "[email protected]")
  end
  .
  .
  .
  test "email addresses should be unique" do
    duplicate_user = @user.dup
    @user.save
    assert_not duplicate_user.valid?
  end
end
By the way, in Listing 6.32 we could have written the assignment as
self.email = self.email.downcase
(where self refers to the current user), but inside the User model the self keyword is optional on the right-hand side:
self.email = email.downcase
We encountered this idea briefly in the context of reverse in the palindrome method (Section 4.4.2), which also noted that self is not optional in an assignment, so
email = email.downcase
wouldn’t work. (We’ll discuss this subject in more depth in Section 9.1.)
At this point, the Alice scenario above will work fine: the database will save a user record based on the first request, and it will reject the second save because the duplicate email address violates the uniqueness constraint. (An error will appear in the Rails log, but that doesn’t do any harm.) Moreover, adding this index on the email attribute accomplishes a second goal, alluded to briefly in Section 6.1.4: as noted in Box 6.2, the index on the email attribute fixes a potential efficiency problem by preventing a full-table scan when finding users by email address.
Exercises
Solutions to the exercises are available to all Rails Tutorial purchasers here.
To see other people’s answers and to record your own, subscribe to the Rails Tutorial course or to the Learn Enough All Access Bundle.
1. Add a test for the email downcasing from Listing 6.32, as shown in Listing 6.34. This test uses the reload method for reloading a value from the database and the assert_equal method for testing equality. To verify that Listing 6.34 tests the right thing, comment out the before_save line to get to red, then uncomment it to get to green.
2. By running the test suite, verify that the before_save callback can be written using the “bang” method email.downcase! to modify the email attribute directly, as shown in Listing 6.35.
Listing 6.34: A test for the email downcasing from Listing 6.32.
test/models/user_test.rb
require 'test_helper'

class UserTest < ActiveSupport::TestCase

  def setup
    @user = User.new(name: "Example User", email: "[email protected]")
  end
  .
  .
  .
  test "email addresses should be unique" do
    duplicate_user = @user.dup
    duplicate_user.email = @user.email.upcase
    @user.save
    assert_not duplicate_user.valid?
  end

  test "email addresses should be saved as lower-case" do
    mixed_case_email = "[email protected]"
    @user.email = mixed_case_email
    @user.save
    assert_equal mixed_case_email.downcase, @user.reload.email
  end
end
Listing 6.35: An alternate callback implementation. green
app/models/user.rb
class User < ApplicationRecord
  before_save { email.downcase! }
  validates :name, presence: true, length: { maximum: 50 }
  VALID_EMAIL_REGEX = /A[w+-.]+@[a-zd-.]+.[a-z]+z/i
  validates :email, presence: true, length: { maximum: 255 },
                    format: { with: VALID_EMAIL_REGEX },
                    uniqueness: true
end
6.3 Adding a secure password
Now that we’ve defined validations for the name and email fields, we’re ready to add the last of the basic User attributes: a secure password. The method is to require each user to have a password (with a password confirmation), and then store a hashed version of the password in the database. (There is some potential for confusion here. In the present context, a hash refers not to the Ruby data structure from Section 4.3.3 but rather to the result of applying an irreversible hash function to input data.) We’ll also add a way to authenticate a user based on a given password, a method we’ll use in Chapter 8 to allow users to log in to the site.
The method for authenticating users will be to take a submitted password, hash it, and compare the result to the hashed value stored in the database. If the two match, then the submitted password is correct and the user is authenticated. By comparing hashed values instead of raw passwords, we will be able to authenticate users without storing the passwords themselves. This means that, even if our database is compromised, our users’ passwords will still be secure.
6.3.1 A hashed password
Most of the secure password machinery will be implemented using a single Rails method called has_secure_password, which we’ll include in the User model as follows:
class User < ApplicationRecord
  .
  .
  .
  has_secure_password
end
When included in a model as above, this one method adds the following functionality:
• The ability to save a securely hashed password_digest attribute to the database
• A pair of virtual attributes19 (password and password_confirmation), including presence validations upon object creation and a validation requiring that they match
• An authenticate method that returns the user when the password is correct (and false otherwise)
19 In this context, virtual means that the attributes exist on the model object but do not correspond to columns in the database.
The only requirement for has_secure_password to work its magic is for the corresponding model to have an attribute called password_digest. (The name digest comes from the terminology of cryptographic hash functions. In this context, hashed password and password digest are synonyms.)20 In the case of the User model, this leads to the data model shown in Figure 6.9.
20 Hashed password digests are often erroneously referred to as encrypted passwords. For example, the source code of has_secure_password makes this mistake, as did the first two editions of this tutorial. This terminology is wrong because by design encryption is reversible—the ability to encrypt implies the ability to decrypt as well. In contrast, the whole point of calculating a password’s hash digest is to be irreversible, so that it is computationally intractable to infer the original password from the digest. (Thanks to reader Andy Philips for pointing out this issue and for encouraging me to fix the broken terminology.)
To implement the data model in Figure 6.9 , we first generate an appropriate migration for the password_digest column. We can choose any migration name we want, but it’s convenient to end the name with to_users, since in this case Rails automatically constructs a migration to add columns to the users table. The result, with migration name add_password_digest_to_users, appears as follows:

Figure 6.9: The User data model with an added password_digest attribute.
$ rails generate migration add_password_digest_to_users password_digest:string
Here we’ve also supplied the argument password_digest:string with the name and type of attribute we want to create. (Compare this to the original generation of the users table in Listing 6.1, which included the arguments name:-string and email:string.) By including password_digest:string, we’ve given Rails enough information to construct the entire migration for us, as seen in Listing 6.36.
Listing 6.36: The migration to add a password_digest column.
db/migrate/[timestamp]_add_password_digest_to_users.rb
class AddPasswordDigestToUsers < ActiveRecord::Migration[6.0]
  def change
    add_column :users, :password_digest, :string
  end
end
Listing 6.36 uses the add_column method to add a password_digest column to the users table. To apply it, we just migrate the database:
$ rails db:migrate
To make the password digest, has_secure_password uses a state-of-theart hash function called bcrypt. By hashing the password with bcrypt, we ensure that an attacker won’t be able to log in to the site even if they manage to obtain a copy of the database. To use bcrypt in the sample application, we need to add the bcrypt gem to our Gemfile (Listing 6.37).21
21 As always, you should use the version numbers listed at gemfiles-6th-ed.railstutorial.org instead of the ones listed here.
Listing 6.37: Adding bcrypt to the Gemfile.
source 'https://rubygems.org'

gem 'rails',          '6.0.0'
gem 'bcrypt',         '3.1.13'
gem 'bootstrap-sass', '3.4.1'
.
.
.
Then run bundle install as usual:
$ bundle install
6.3.2 User has secure password
Now that we’ve supplied the User model with the required password_digest attribute and installed bcrypt, we’re ready to add has_secure_password to the User model, as shown in Listing 6.38.
Listing 6.38: Adding has_secure_password to the User model. red
app/models/user.rb
class User < ApplicationRecord
  before_save { self.email = email.downcase }
  validates :name, presence: true, length: { maximum: 50 }
  VALID_EMAIL_REGEX = /A[w+-.]+@[a-zd-.]+.[a-z]+z/i
  validates :email, presence: true, length: { maximum: 255 },
                    format: { with: VALID_EMAIL_REGEX },
                    uniqueness: true
  has_secure_password
end
As indicated by the red indicator in Listing 6.38, the tests are now failing, as you can confirm at the command line:
Listing 6.39: red
$ rails test
The reason is that, as noted in Section 6.3.1, has_secure_password enforces validations on the virtual password and password_confirmation attributes, but the tests in Listing 6.26 create an @user variable without these attributes:
def setup
  @user = User.new(name: "Example User", email: "[email protected]")
end
So, to get the test suite passing again, we just need to add a password and its confirmation, as shown in Listing 6.40.
Listing 6.40: Adding a password and its confirmation. green
test/models/user_test.rb
require 'test_helper'

class UserTest < ActiveSupport::TestCase

  def setup
    @user = User.new(name: "Example User", email: "[email protected]",
                     password: "foobar", password_confirmation: "foobar")
  end
  .
  .
  .
end
Note that the first line inside the setup method includes an additional comma at the end, as required by Ruby’s hash syntax (Section 4.3.3). Leaving this comma off will produce a syntax error, and you should use your technical sophistication (Box 1.2) to identify and resolve such errors if (or, more realistically, when) they occur.
At this point the tests should be green:
Listing 6.41: green
$ rails test
We’ll see in just a moment the benefits of adding has_secure_password to the User model (Section 6.3.4), but first we’ll add a minimal requirement on password security.
Exercises
Solutions to the exercises are available to all Rails Tutorial purchasers here.
To see other people’s answers and to record your own, subscribe to the Rails Tutorial course or to the Learn Enough All Access Bundle.
1. Confirm that a user with valid name and email still isn’t valid overall.
2. What are the error messages for a user with no password?
6.3.3 Minimum password standards
It’s good practice in general to enforce some minimum standards on passwords to make them harder to guess. There are many options for enforcing password strength in Rails, but for simplicity we’ll just enforce a minimum length and the requirement that the password not be blank. Picking a length of 6 as a reasonable minimum leads to the validation test shown in Listing 6.42.
Listing 6.42: Testing for a minimum password length. red
test/models/user_test.rb
require 'test_helper'

class UserTest < ActiveSupport::TestCase

  def setup
  @user = User.new(name: "Example User", email: "[email protected]",
                   password: "foobar", password_confirmation: "foobar")
end
.
.
.
test "password should be present (nonblank)" do
  @user.password = @user.password_confirmation = " " * 6
  assert_not @user.valid?
end

  test "password should have a minimum length" do
    @user.password = @user.password_confirmation = "a" * 5
    assert_not @user.valid?
  end
end
Note the use of the compact multiple assignment
@user.password = @user.password_confirmation = "a" * 5
in Listing 6.42. This arranges to assign a particular value to the password and its confirmation at the same time (in this case, a string of length 5, constructed using string multiplication as in Listing 6.14).
You may be able to guess the code for enforcing a minimum length constraint by referring to the corresponding maximum validation for the user’s name (Listing 6.16):
validates :password, length: { minimum: 6 }
Combining this with a presence validation (Section 6.2.2) to ensure nonblank passwords, this leads to the User model shown in Listing 6.43. (It turns out the has_secure_password method includes a presence validation, but unfortunately it only applies to records with empty passwords, which allows users to create invalid passwords like ' ' (six spaces).)
Listing 6.43: The complete implementation for secure passwords. green
app/models/user.rb
class User < ApplicationRecord
  before_save { self.email = email.downcase }
  validates :name, presence: true, length: { maximum: 50 }
  VALID_EMAIL_REGEX = /A[w+-.]+@[a-zd-.]+.[a-z]+z/i
  validates :email, presence: true, length: { maximum: 255 },
                  format: { with: VALID_EMAIL_REGEX },
                  uniqueness: true
  has_secure_password
  validates :password, presence: true, length: { minimum: 6 }
end
At this point, the tests should be green:
Listing 6.44: green
$ rails test:models
Exercises
Solutions to the exercises are available to all Rails Tutorial purchasers here.
To see other people’s answers and to record your own, subscribe to the Rails Tutorial course or to the Learn Enough All Access Bundle.
1. Confirm that a user with valid name and email but a too-short password isn’t valid.
2. What are the associated error messages?
6.3.4 Creating and authenticating a user
Now that the basic User model is complete, we’ll create a user in the database as preparation for making a page to show the user’s information in Section 7.1. We’ll also take a more concrete look at the effects of adding has_secure_-password to the User model, including an examination of the important authenticate method.
Since users can’t yet sign up for the sample application through the web— that’s the goal of Chapter 7—we’ll use the Rails console to create a new user by hand. For convenience, we’ll use the create method discussed in Section 6.1.3, but in the present case we’ll take care not to start in a sandbox so that the resulting user will be saved to the database. This means starting an ordinary rails console session and then creating a user with a valid name and email address together with a valid password and matching confirmation:
$ rails console
>> User.create(name: "Michael Hartl", email: "[email protected]",
?>             password: "foobar", password_confirmation: "foobar")
=> #<User id: 1, name: "Michael Hartl", email: "[email protected]",
created_at: "2019-08-22 03:15:38", updated_at: "2019-08-22 03:15:38",
password_digest: [FILTERED]>
To check that this worked, let’s look at the resulting users table in the development database using DB Browser for SQLite, as shown in Figure 6.10.22 (If you’re using the cloud IDE, you should download the database file as in Figure 6.5.) Note that the columns correspond to the attributes of the data model defined in Figure 6.9.
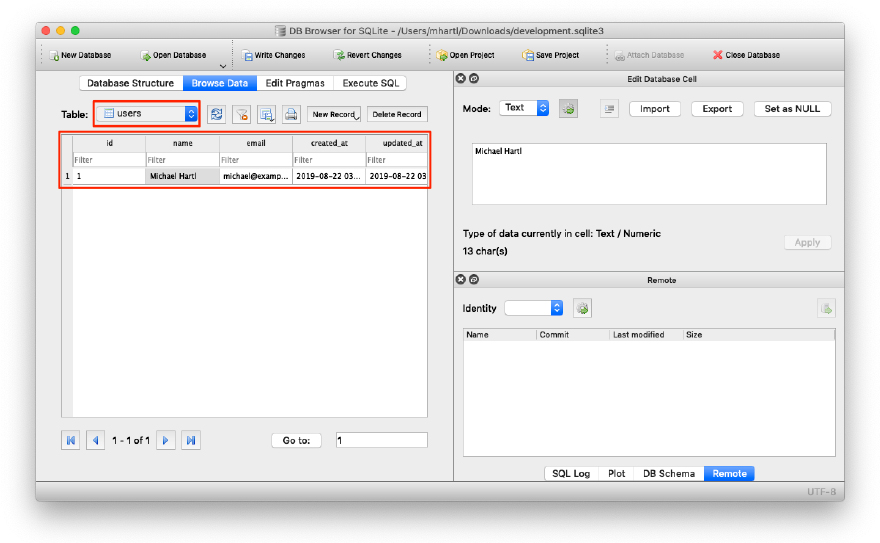
Figure 6.10: A user row in the SQLite database db/development.sqlite3.
22 If for any reason something went wrong, you can always reset the database as follows:
1. Quit the console.
2. Run $ rm -f development.sqlite3 at the command line to remove the database. (We’ll learn a more elegant method for doing this in Chapter 7.)
3. Re-run the migrations using $ rails db:migrate.
4. Restart the console.
Returning to the console, we can see the effect of has_secure_password from Listing 6.43 by looking at the password_digest attribute:
>> user = User.find_by(email: "[email protected]")
>> user.password_digest
=> "$2a$12$WgjER5ovLFjC2hmCItmbTe6nAXzT3bO66GiAQ83Ev03eVp32zyNYG"
This is the hashed version of the password ("foobar") used to initialize the user object. Because it’s constructed using bcrypt, it is computationally impractical to use the digest to discover the original password.23
23 By design, the bcrypt algorithm produces a salted hash, which protects against two important classes of attacks (dictionary attacks and rainbow table attacks).
As noted in Section 6.3.1, has_secure_password automatically adds an authenticate method to the corresponding model objects. This method determines if a given password is valid for a particular user by computing its digest and comparing the result to password_digest in the database. In the case of the user we just created, we can try a couple of invalid passwords as follows:
>> user.authenticate("not_the_right_password")
false
>> user.authenticate("foobaz")
false
Here user.authenticate returns false for invalid password. If we instead authenticate with the correct password, authenticate returns the user itself:
>> user.authenticate("foobar")
=> #<User id: 1, name: "Michael Hartl", email: "[email protected]",
created_at: "2019-08-22 03:15:38", updated_at: "2019-08-22 03:15:38",
password_digest: [FILTERED]>
In Chapter 8, we’ll use the authenticate method to sign registered users into our site. In fact, it will turn out not to be important to us that authenticate returns the user itself; all that will matter is that it returns a value that is true in a boolean context. Recalling from Section 4.2.2 that !! converts an object to its corresponding boolean value, we can see that user.authenticate does the job nicely:
>> !!user.authenticate("foobar")
=> true
Exercises
Solutions to the exercises are available to all Rails Tutorial purchasers here.
To see other people’s answers and to record your own, subscribe to the Rails Tutorial course or to the Learn Enough All Access Bundle.
1. Quit and restart the console, and then find the user created in this section.
2. Try changing the name by assigning a new name and calling save. Why didn’t it work?
3. Update user’s name to use your name. Hint: The necessary technique is covered in Section 6.1.5.
6.4 Conclusion
Starting from scratch, in this chapter we created a working User model with name, email, and password attributes, together with validations enforcing several important constraints on their values. In addition, we have the ability to securely authenticate users using a given password. This is a remarkable amount of functionality for only twelve lines of code.
In Chapter 7, we’ll make a working signup form to create new users, together with a page to display each user’s information. In Chapter 8, we’ll then use the authentication machinery from Section 6.3 to let users log into the site.
If you’re using Git, now would be a good time to commit if you haven’t done so in a while:
$ rails test
$ git add -A
$ git commit -m "Make a basic User model (including secure passwords)"
Then merge back into the master branch and push to the remote repository:
$ git checkout master
$ git merge modeling-users
$ git push
To get the User model working in production, we need to run the migrations at Heroku, which we can do with heroku run:
$ rails test
$ git push heroku
$ heroku run rails db:migrate
We can verify that this worked by running a console in production:
$ heroku run rails console --sandbox
>> User.create(name: "Michael Hartl", email: "[email protected]",
?>             password: "foobar", password_confirmation: "foobar")
=> #<User id: 1, name: "Michael Hartl", email: "[email protected]",
created_at: "2019-08-22 03:20:06", updated_at: "2019-08-22 03:20:06",
password_digest: [FILTERED]>
6.4.1 What we learned in this chapter
• Migrations allow us to modify our application’s data model.
• Active Record comes with a large number of methods for creating and manipulating data models.
• Active Record validations allow us to place constraints on the data in our models.
• Common validations include presence, length, and format.
• Regular expressions are cryptic but powerful.
• Defining a database index improves lookup efficiency while allowing enforcement of uniqueness at the database level.
• We can add a secure password to a model using the built-in has_secure_password method.