Chapter 2. Configure Key Expressway Settings
This chapter covers the following topics:
![]() Cisco Expressway Deployment on VM: This topic will provide an overview and requirements of the Virtual Machine deployment of the Cisco Expressway.
Cisco Expressway Deployment on VM: This topic will provide an overview and requirements of the Virtual Machine deployment of the Cisco Expressway.
![]() Setup Wizard through Web Interface: This topic will cover the Setup Wizard for the Cisco Expressway performed through the web interface.
Setup Wizard through Web Interface: This topic will cover the Setup Wizard for the Cisco Expressway performed through the web interface.
![]() Setting Menu Options: This topic will explain the key setup settings required for the Cisco Expressway; to include DNS, network interfaces, and network firewall rules.
Setting Menu Options: This topic will explain the key setup settings required for the Cisco Expressway; to include DNS, network interfaces, and network firewall rules.
![]() Expressway Backup and Restore Procedure: This topic will provide the backup and restore procedures for the Cisco Expressway in both stand-alone and with cluster deployments.
Expressway Backup and Restore Procedure: This topic will provide the backup and restore procedures for the Cisco Expressway in both stand-alone and with cluster deployments.
Chapter 2 focuses on the initial Setup Wizard for the Cisco Expressway via a web browser. During the Setup Wizard, we will apply menu settings that are crucial the initializing Cisco Expressway within the network environment it is intended for. This chapter will also cover the Cisco Expressway backup and restore procedures; both stand-alone and cluster backup and restore procedures.
This chapter covers the following objectives from the Implementing Cisco Collaboration Cloud and Edge Solutions (CLCEI) exam 300-820:
![]() 1.8.a Describe key Expressway settings: DNS
1.8.a Describe key Expressway settings: DNS
![]() 1.8.b Describe key Expressway settings: Network interfaces
1.8.b Describe key Expressway settings: Network interfaces
![]() 1.8.d Describe key Expressway settings: QoS
1.8.d Describe key Expressway settings: QoS
![]() 1.8.f Describe key Expressway settings: Network firewall rules
1.8.f Describe key Expressway settings: Network firewall rules
![]() 1.9. Describe key Expressway settings: Describe Expressway backup and restore procedure
1.9. Describe key Expressway settings: Describe Expressway backup and restore procedure
![]() 2.1 Configure key Expressway settings
2.1 Configure key Expressway settings
![]() 2.1.a Configure key Expressway settings: DNS
2.1.a Configure key Expressway settings: DNS
![]() 2.1.b Configure key Expressway settings: Network interfaces
2.1.b Configure key Expressway settings: Network interfaces
![]() 2.1.d Configure key Expressway settings: QoS
2.1.d Configure key Expressway settings: QoS
![]() 2.1.f Configure key Expressway settings: Clustering
2.1.f Configure key Expressway settings: Clustering
“Do I Know This Already?” Quiz
The “Do I Know This Already?” quiz allows you to assess whether you should read this entire chapter thoroughly or jump to the “Exam Preparation Tasks” section. If you are in doubt about your answers to these questions or your own assessment of your knowledge of the topics, read the entire chapter. Table 2-1 lists the major headings in this chapter and their corresponding “Do I Know This Already?” quiz questions. You can find the answers in Appendix A, “Answers to the ‘Do I Know This Already?’ Quizzes.”
Table 2-1 ”Do I Know This Already?” Section-to-Question Mapping

Caution
The goal of self-assessment is to gauge your mastery of the topics in this chapter. If you do not know the answer to a question or are only partially sure of the answer, you should mark that question as wrong for purposes of the self-assessment. Giving yourself credit for an answer you correctly guess skews your self-assessment results and might provide you with a false sense of security.
1. What is the minimum virtual hardware required to host virtual Expressway Deployments?
a. ESXi 6.5
b. ESXi 7.0
c. ESXi 6.7
d. ESXi 6.0
2. Through what interface can the Service Setup Wizard be utilized?
a. HTTP(S)
b. CLI
c. API
d. TMS
3. What licensing does Cisco Expressway utilize?
a. VLSC
b. APSL
c. PAK
d. CUWL
e. Smart Licensing
4. How many DNS servers can be added to the Cisco Expressway?
a. 4
b. 6
c. 8
d. 5
5. Which two of the following is correct regarding resolvable DNS addresses?
a. The Expressway-C is configured with DNS servers which are located on the external network.
b. The Expressway-C is configured with DNS servers which are located on the internal network.
c. The Expressway-C is configured with DNS servers which are publicly routable.
d. The Expressway-E is configured with DNS servers which are publicly routable.
6. What default file extension is the Cisco Expressway backup?
a. sql.gz.enc
b. .crx
c. tar.gz.enc
d. .bak
7. In what situation should be preform a backup for the Cisco Expressway?
a. Before performing an upgrade.
b. Before powering off
c. Before performing a system restore.
d. Before applying licenses
e. Before firewall traversal
Foundation Topics
Cisco Expressway Deployment on VM
The Expressway ova virtual appliances are designed to meet the minimum deployment requirements. Do not change the ova configuration after installation, as Cisco may no longer be able to support your deployment. The minimum virtual hardware required to host virtual Expressway deployments is VMware ESXi 6.5. Cisco does not support Expressway VMs hosted on ESXi 6.0 or earlier (these versions are no longer supported by VMware). New installations of Expressway OVAs will not run on any host version before ESXi 6.5.
The following are the ESXi supported versions for X12.7. For new Expressway VM deployments, the Expressway OVAs must be installed on any of the following versions. If you have existing VM deployments running on an ESXi 6.0 or earlier versions, upgrade the host to any of the following versions before you install the new Expressway software.
![]() ESXi 6.5 Update 2
ESXi 6.5 Update 2
![]() ESXi 6.7 Update 1 from X12.5.2, and Update 2 - for Large VMs only - from X12.5.4
ESXi 6.7 Update 1 from X12.5.2, and Update 2 - for Large VMs only - from X12.5.4
![]() ESXi 6.7 Update 3 from X12.6.1 for Large and Medium VMs
ESXi 6.7 Update 3 from X12.6.1 for Large and Medium VMs
![]() ESXi 6.7 Update 3 from X12.6.3 for Small VMs
ESXi 6.7 Update 3 from X12.6.3 for Small VMs
![]() ESXi 7.0
ESXi 7.0
Make sure that the following requirements are in place:
![]() VT is enabled in the BIOS before you install VMware ESXi.
VT is enabled in the BIOS before you install VMware ESXi.
![]() The VM host “Virtual Machine Startup/Shutdown” setting is configured to “Allow Virtual machines to start and stop automatically with the system”, and the VM Expressway has been moved to the Automatic startup section.
The VM host “Virtual Machine Startup/Shutdown” setting is configured to “Allow Virtual machines to start and stop automatically with the system”, and the VM Expressway has been moved to the Automatic startup section.
The Expressway can co-reside with applications (any other VMs occupying same host) subject to the following conditions:
![]() No oversubscription of CPU. You need one-to-one allocation of vCPU to physical cores.
No oversubscription of CPU. You need one-to-one allocation of vCPU to physical cores.
![]() No oversubscription of RAM. You need one-to-one allocation of vRAM to physical memory
No oversubscription of RAM. You need one-to-one allocation of vRAM to physical memory
![]() No oversubscription of NIC. The Expressway handles large volumes of data, much of which is for real-time communications, and it needs dedicated access to all the bandwidth specified for its interfaces.
No oversubscription of NIC. The Expressway handles large volumes of data, much of which is for real-time communications, and it needs dedicated access to all the bandwidth specified for its interfaces.
![]() For example, you should not assume that four co-resident small Expressway VMs can handle the expected load if there is only a 1 Gbps physical interface on the host. In this case none of the VMs meet the required minimum specification.
For example, you should not assume that four co-resident small Expressway VMs can handle the expected load if there is only a 1 Gbps physical interface on the host. In this case none of the VMs meet the required minimum specification.
![]() Sharing disk storage subsystem is supported, subject to correct performance (latency, bandwidth) characteristics.
Sharing disk storage subsystem is supported, subject to correct performance (latency, bandwidth) characteristics.
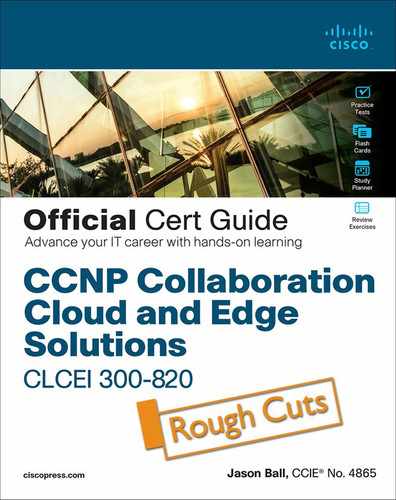
If you use a UCS Tested Reference Configuration or specifications-based system, the minimum requirements are listed in Table 2-2:
Table 2-2 Requirements for UCS Tested Reference Configuration or Specifications-based System
Two Large Expressway VMs can co-reside on a UCS server with two eight core 3.2 GHz processors all dedicated to Expressway, when hyperthreading is enabled. To allow for hypervisor overhead, the CPU reservation is set to 16000 MHz, but the full allocation of 8x 3.2 GHz CPU cores must be made available to each Large Expressway VM. The reservation does not limit maximum Expressway CPU speed, as the Expressway can use the headroom provided by the higher specification host.
Increasing the capacity of a VM-based Expressway from a smaller deployment size to a larger deployment (Small -> Medium -> Large) or decreasing the capacity from a larger deployment to a smaller one (Large -> Medium -> Small) cannot be done by simply increasing or decreasing the underlying vCPUs and memory hardware resources of the VM. The correct method to upgrade or downgrade is to deploy a new VM of the required deployment size, and then restore the existing configuration (smaller VM for upgrade and larger VM for downgrade) onto the new one.
Do not change the MAC address of the VM. The serial number of a virtual Expressway is based on the virtual machine’s MAC address. The serial number is used to validate Expressway licenses and to identify Expressways that are registered to the Cisco Webex cloud. Do not change the MAC address of the Expressway virtual machine when using VMware tools, or you risk losing service.
The VM Expressway is licensed using information that is generated at the time of the .ova file installation. If the .ova was installed a second time, new licensing information would be created, and to use the new VM, new release and license keys would need to be purchased. To upgrade a VM Expressway, follow the procedure under Upgrading or Downgrading an Expressway VM, using the .tar.gz version of the Expressway software. After the VM installation is complete, we recommend that you take a backup of the configuration. Do not take VMware snapshots of Cisco Expressway systems. The process interferes with database timing and negatively impacts performance.
Please follow the Cisco Expressway on Virtual Machine Installation Guide (for your specific version) on cisco.com for the exact installation steps relative to your organization’s deployment.
Setup Wizard through Web Interface
The Service Setup Wizard makes it easier to configure the Expressway system for its chosen purpose in your environment. It also simplifies the user interface for the administrator applying configurations. The wizard starts when you first launch the web user interface. In the wizard, you select the system series (Expressway series or VCS series) and system type (Expressway-C or Expressway-E). Based on the series and type, you select the services. Note, if you use PAK-based licensing, you also apply the relevant option keys for your licenses.
You can use the wizard to review and edit the Expressway basic network settings (typically already configured during initial installation). When you restart, the user interface is tailored to match your service selections and you only see menus and pages for the services you chose. Examples of Cisco Expressway services include:
![]() Cisco Webex Hybrid Services (renamed from Cisco Spark Hybrid Services)
Cisco Webex Hybrid Services (renamed from Cisco Spark Hybrid Services)
![]() Mobile and Remote Access including Meeting Server Web Proxy
Mobile and Remote Access including Meeting Server Web Proxy
![]() Jabber Guest Services
Jabber Guest Services
![]() Microsoft gateway service*
Microsoft gateway service*
![]() Registrar
Registrar
![]() Collaboration Meeting Rooms (CMR) Cloud
Collaboration Meeting Rooms (CMR) Cloud
![]() Business to business calls
Business to business calls
*Note: This service is only for when you want this system to adapt between Microsoft SIP and standards-based SIP variants. If a different system (such as Cisco Meeting Server) is doing that adaptation in your deployment, you do not need this service.
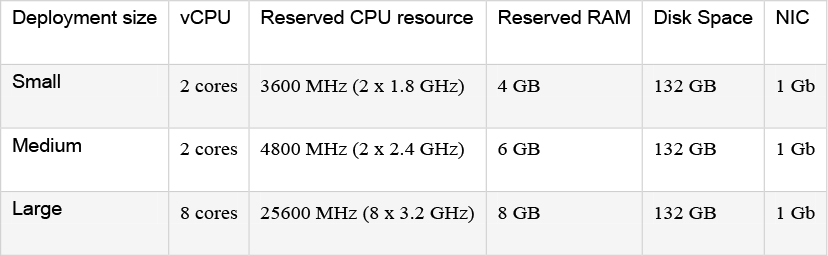
Some services are incompatible and cannot be selected together. Table 2-3 provides a matrix of compatible services. The matrix specifies which services you can use together on the same system or cluster.
Table 2-3 Services That can Be Hosted Together
Before we begin any configurations, the basic prerequisites are inherently assumed. This would include that the static IP address has assigned, the default passwords have been changed, and an Ethernet connection to a LAN which can route HTTP(S) traffic to the Expressway. Also, if there is a desire to not utilize the Setup Wizard, a skip option does exist. If you change your mind later, you can go back and run it at any time under the Status > Overview page. If you opt to skip the wizard, you need to deal with the Expressway licensing setup requirements manually before you start the configuration tasks in this guide. Also, the user interface is not customized to reflect your specific service selections.
System configuration is normally carried out through the web interface. To use the web interface:
Step 1. Open a browser window and in the address bar type the IP address or the FQDN of the Cisco Expressway system.
Step 2. Enter a valid administrator Username and Password and click Login (see the user accounts section for details on setting up administrator accounts). The Overview page is displayed.
If you receive a warning message regarding Expressway’s security certificate, you can ignore this until you are ready to secure the system.
The first time you log in to the Expressway web user interface you will automatically see the Service Setup Wizard. (For subsequent log ins you will see the Status > Overview page, and from that page you can click Run service setup at any time.) To navigate the wizard:
![]() Click Continue to save and move to the next wizard page.
Click Continue to save and move to the next wizard page.
![]() Click Back to return to the previous wizard page.
Click Back to return to the previous wizard page.
![]() Click Skip Service Setup Wizard if you want to back out of the wizard completely.
Click Skip Service Setup Wizard if you want to back out of the wizard completely.
If you use Smart Licensing, you cannot change the Series setting from the Service Selection page/wizard (to convert an Expressway to a VCS product) as shown in Figure 2-1. Instead, this process must start with a factory reset (to disable Smart Licensing because it is not supported on VCS). Some of the other settings shown in this example are unnecessary with Smart Licensing and do not appear in the wizard on Expressways that use Smart Licensing. bearing on SIP registrations. Additionally, multiple SIP endpoints can register with the same alias on an Expressway without any routing issues.

Figure 2-1 Service Selection Page
While we are on the topic of licensing, the process varies on the whether the system uses the classic (PAK-Based) licensing or Smart Licensing. Both processes will be highlighted, but ultimately use the appropriate process for your deployment’s licensing method.
This process applies for deployments that use Classic (PAK-based) Licensing:
Step 1. Choose Expressway series in Select Series.
Step 2. Choose Expressway-C or Expressway-E in Select Type. We recommend that you select Expressway-C first and run the wizard for it. Then run the wizard on the Expressway-E.
The list of services changes to match what is available on your chosen Series and Type.
Step 3. Select Services. Check the boxes next to the services you want to use on this system. For the compatible services that you can use together on the same system or cluster, reference the earlier Table 2-3.
If you want to keep all the menu options, or if you want to use the wizard for applying licenses but do not want to choose services yet, check Proceed without selecting services.
Step 4. Click Continue to move to the Option keys page of the wizard, shown in Figure 2-2. This page helps you to identify and acquire the appropriate licenses for your chosen selections. The Licensing help section at the top of the page explains how to use the Product Authorization Key (PAK) in the Cisco Product License Registration Portal. The License status section at the bottom of the page lists the actual licenses that you need and their status (loaded / not loaded). The exact entries vary by deployment - this example is for the Cisco Expressway-C Registrar service:

Figure 2-2 Option Keys Page
Step 5. On the Option keys page:
a. Copy the serial number, which you need for the next step.
b. Click the Product License Registration Portal link to go to the licensing portal. (For this step you need to work away from the wizard to obtain the necessary licenses.) In the licensing portal, enter the necessary details for the required licenses. For example, if you want to register desktop systems like the EX90, you will need to add Desktop System registration licenses. Detailed information about using the licensing portal is in the online help or the Expressway Administrator Guide. An ordering guide for Cisco products is available on the Cisco Collaboration Ordering Guides page.
Step 6. Paste the text from the option keys email into the text area. The system reads the option keys out of the pasted text and displays them next to the text area.
Step 7. Add new text areas if you have more email text to paste in, such as your room or desktop system registration license keys.
Step 8. Click Add Keys.
The License status table groups the keys that are possible on this system and indicates whether they are loaded or not loaded. The keys are grouped as follows:
![]() Required: If any keys in this section are not yet loaded, you see status Required and will not be able to continue through the wizard.
Required: If any keys in this section are not yet loaded, you see status Required and will not be able to continue through the wizard.
![]() Optional: Shows keys that may or may not be useful but are not strictly required for the services you chose.
Optional: Shows keys that may or may not be useful but are not strictly required for the services you chose.
![]() Unrelated: These keys will not harm the system if they are loaded but will not provide any benefit for the services you chose.
Unrelated: These keys will not harm the system if they are loaded but will not provide any benefit for the services you chose.
![]() Incompatible: These keys cannot work with the selected services. You must remove them or choose different services before you can continue.
Incompatible: These keys cannot work with the selected services. You must remove them or choose different services before you can continue.
Step 9. Click Continue.
Step 10. Review the network configuration and modify the settings if necessary. Save any changes before you continue the wizard.
Step 11. Click Finish.
Step 12. Restart the system when prompted.
Result: When you log in, the user interface is tailored to match your service selections. You only see menus and pages for the services you chose.
This process applies for deployments that use Smart Licensing:
Step 1. Choose Expressway series in Select Series.
Step 2. Choose Expressway-C or Expressway-E in Select Type. We recommend that you select Expressway-C first and run the wizard for it. Then run the wizard on the Expressway-E.
The list of services changes to match what is available on your chosen Series and Type.
Step 3. Select Services. Check the boxes next to the services you want to use on this system. For the compatible services that you can use together on the same system or cluster, reference the earlier Table 2-3.
If you want to keep all the menu options, or if you want to use the wizard for applying licenses but do not want to choose services yet, check Proceed without selecting services.
Step 4. You now need to configure Smart Licensing for the Expressway. To do this please follow the instructions in the Expressway Administrator Guide section “Configure Smart Licensing”.
Step 5. Click Continue.
Step 6. Review the network configuration and modify the settings if necessary. Save any changes before you continue the wizard.
Step 7. Click Finish.
Step 8. Restart the system when prompted.
Result: When you log in, the user interface is tailored to match your service selections. You only see menus and pages for the services you chose.
Once the wizard is complete for the Expressway-C system you will need to run it on the Expressway-E. For typical deployments with the Expressway-E the services you are most likely to select with the wizard include Mobile and remote access and Business to business calls.
Expressway System Configuration
After completing the Service Setup Wizard for both the Expressway-C and the Expressway-E, we then can complete the System Configuration settings. This begins with setting the System name. The System name defines the name of the Expressway. It appears in various places in the web interface and is also used by Cisco TMS. We recommend using a name that lets you easily and uniquely identify the Expressway.
To configure the System name:
Step 1. Go to System > Administration.
Step 2. Figure 2-3 shows an example system name, configure the System name similar to the following example for unique identification:


Figure 2-3 System Name
Step 3. Click Save.

Next, we will configure the DNS settings for the Cisco Expressway. The System host name defines the DNS hostname that this system is known by. This is not the fully-qualified domain name, just the host label portion. Note that <System host name>.<Domain name> = FQDN of this Expressway. To configure the System host name:
Step 1. Go to System > DNS.
Step 2. Configure the System host name similar the following example for unique identification:

Step 3. Click Save.
Continuing the DNS settings, we will apply the Domain name. The Domain name is the name to append to an unqualified host name before querying the DNS server. To configure the Domain name:
Step 1. Go to System > DNS.
Step 2. Configure the Domain name similar the following example for unique identification:

Step 3. Click Save.
The fully qualified domain name for the Expressway-C is now expc.internal-domain.net
The fully qualified domain name for the Expressway-E is now expe.example.com
To finish the DNS settings, lastly, we must specify the IP addresses of up to five domain name servers to be used for resolving domain names. In either of the following cases, you must specify at least one default DNS server for address resolution:
![]() To use fully qualified domain names instead of IP addresses when specifying external addresses. For example, for LDAP and NTP servers, neighbor zones and peers.
To use fully qualified domain names instead of IP addresses when specifying external addresses. For example, for LDAP and NTP servers, neighbor zones and peers.
![]() To use features such as URI dialing or ENUM dialing.
To use features such as URI dialing or ENUM dialing.
The Expressway queries one server at a time. If that server is unavailable the Expressway tries another server from the list.
In the example deployment two DNS servers are configured for each Expressway, which provides a level of DNS server redundancy. The Expressway-C is configured with DNS servers which are located on the internal network.
The Expressway-E is configured with DNS servers which are publicly routable.
To configure the Default DNS server addresses:
Step 1. Go to System > DNS.
Step 2. Configure the DNS server Address similar the following example:

Step 3. Click Save.
Expressway-C has a fully qualified domain name of expc.internal-domain.net
Expressway-E has a fully qualified domain name of expe.example.com
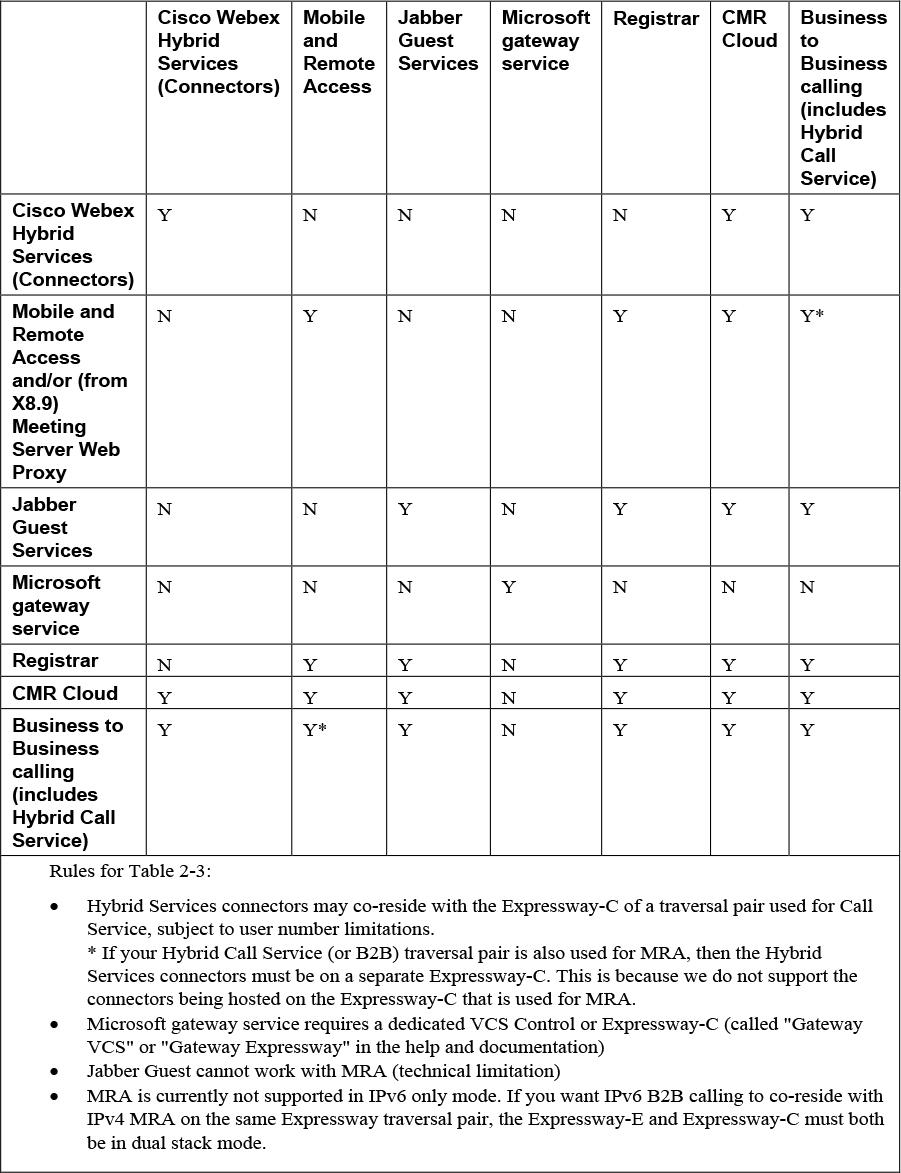
Following the DNS settings, we can configure the NTP settings. The NTP server address fields set the IP addresses or Fully Qualified Domain Names (FQDNs) of the NTP servers to be used to synchronize system time. The Time zone sets the local time zone of the Expressway.
Note
You can synchronize the Expressway-C and Expressway-E with different NTP servers, if the result is that the Expressway traversal pair are synchronized.
To configure the NTP server address and time zone:
Step 1. Go to System > Time.
Step 2. Configure the fields similar to the following example, on both Expressway-C and Expressway-E:


Step 3. Click Save. Your configuration should be similar to the example in Figure 2-4.
Figure 2-4 NTP Configuration Page
The last step of the Cisco Expressway system configuration we will cover will be the configuration of SIP domains. The Expressway acts as a SIP Registrar for configured SIP domains, accepting registration requests for any SIP endpoints attempting to register with an alias that includes these domains. To configure a SIP domain:
Step 1. Go to Configuration > Domains.
Step 2. Click New.
Step 3. Enter the domain name into the Name field (on both Expressway-C and Expressway-E):

Step 4. Click Create domain.
Step 5. The Domains page displays all configured SIP domain names (Figure 2-5).

Figure 2-5 SIP Domain Page
In addition to the system configurations covered, there is potentially more configuration steps, depending on the complexity of the deployment. These configuration task can include:
![]() Configuring Routes to a Neighbor Zone
Configuring Routes to a Neighbor Zone
![]() Configuring Cisco TMS
Configuring Cisco TMS
![]() Configuring Logging
Configuring Logging
![]() Configuring Registration Restriction Policy
Configuring Registration Restriction Policy
![]() Configuring Device Authentication Policy
Configuring Device Authentication Policy
![]() Configuring Registration by Remote Endpoints
Configuring Registration by Remote Endpoints
![]() Configuring B2B Federation for Video Call
Configuring B2B Federation for Video Call
![]() Restricting Access to ISDN Gateways
Restricting Access to ISDN Gateways
From X8.9, the Expressway supports improved DSCP (Differentiated Service Code Point) packet marking for traffic passing through the firewall, including Mobile and Remote Access. DSCP is a measure of the Quality of Service (QoS) level of the packet. To provide more granular control of traffic prioritization, DSCP values are set (marked) for these individual traffic types, as shown in Table 2-4:
Table 2-4 Set DSCP Values
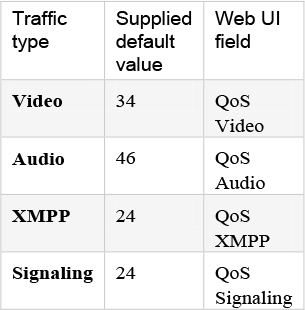
Before X8.9 you had to apply DSCP values to all signaling and media traffic collectively. You can now optionally change the default DSCP values from the System > Quality of Service web page (or the CLI).
Notes for QoS/DSCP:
![]() DSCP value “0” specifies standard best-effort service.
DSCP value “0” specifies standard best-effort service.
![]() DSCP marking is applied to SIP and H.323 traffic.
DSCP marking is applied to SIP and H.323 traffic.
![]() DSCP marking is applied to TURN media, providing the TURN traffic is actually handled by the Expressway.
DSCP marking is applied to TURN media, providing the TURN traffic is actually handled by the Expressway.
![]() Traffic type “Video” is assigned by default if the media type cannot be identified. (For example, if different media types are multiplexed on the same port.)
Traffic type “Video” is assigned by default if the media type cannot be identified. (For example, if different media types are multiplexed on the same port.)
![]() From X8.9 we no longer support the previous methods to specify QoS/DSCP values. The former web GUI settings QoS Mode and QoS Value, CLI commands xConfiguration IP QoS Mode and xConfiguration IP QoS Value and corresponding API are now discontinued. Do not use these commands.
From X8.9 we no longer support the previous methods to specify QoS/DSCP values. The former web GUI settings QoS Mode and QoS Value, CLI commands xConfiguration IP QoS Mode and xConfiguration IP QoS Value and corresponding API are now discontinued. Do not use these commands.
• If you are currently using these commands then when you upgrade the Expressway, any existing QoS value you have defined is automatically applied to the new fields and replaces the supplied defaults. For example, if you had a value of 20 defined, all four DSCP settings (QoS Audio, QoS Video, QoS XMPP, QoS Signaling) are set to 20 also.
• We don’t support downgrades. If you need to revert to your pre-upgrade software version, the QoS settings are reset to their original supplied defaults. So QoS Mode is set to None and QoS Value is set to 0. You will need to manually redefine the values you want to use.
With the current networks positioned with more security through the years, we also want to make our Expressway not just secure, but functional with firewalls. Here are some points to keep in mind when you are configuring your firewalls to permit the connections described in this document:
![]() If you have a cluster of Expressways, ensure that the destination ports to the public IP address of each Expressway peer are open on the external firewall.
If you have a cluster of Expressways, ensure that the destination ports to the public IP address of each Expressway peer are open on the external firewall.
![]() Sometimes there are different connection types that could be used to achieve the same task. You do not need to always open every port shown in the diagrams and tables. We recommend that you close any that you are not using.
Sometimes there are different connection types that could be used to achieve the same task. You do not need to always open every port shown in the diagrams and tables. We recommend that you close any that you are not using.
For example, if your web administration port is TCP 7443 but you only ever use SSH to configure the Expressway, you can close 7443 and leave TCP 22 open. Management ports should only be open to connections originating from inside the network.
![]() Some firewalls actively close connections that appear inactive, which could interfere with the operation of your video infrastructure.
Some firewalls actively close connections that appear inactive, which could interfere with the operation of your video infrastructure.
For example, TCP port 1720 is used for H.323 call signaling but may be inactive during the call. If this is prematurely closed by the firewall, the H.323 endpoint could interpret that as a dropped call and respond by tearing down the call.
We recommend extending inactivity timeouts on the known ports to at least two hours, particularly if you are seeing calls fail after a specific duration.
![]() Firewalls that contain ALG (Application Layer Gateway) for SIP / H.323 protocols may not work as expected with Expressway-E.
Firewalls that contain ALG (Application Layer Gateway) for SIP / H.323 protocols may not work as expected with Expressway-E.
We strongly recommend that you disable SIP or H.323 ALG inspection / awareness on the NAT firewall. We may not be able to support your configuration if you cannot make this change.
![]() In some deployments, media packets can hairpin on the Expressway-E external NIC. Some firewalls cannot allow for hairpinning, and mistrust packets that are destined to their own source.
In some deployments, media packets can hairpin on the Expressway-E external NIC. Some firewalls cannot allow for hairpinning, and mistrust packets that are destined to their own source.
We recommend configuring an exception to allow hairpinning on the Expressway-E public interface, if your deployment requires it.
![]() If you want to use the static NAT feature of Expressway-E, we strongly recommend using two NICs. Dedicating one NIC to the external interface and the other to the internal interface is much better for your network than using one NIC with the static NAT enabled.
If you want to use the static NAT feature of Expressway-E, we strongly recommend using two NICs. Dedicating one NIC to the external interface and the other to the internal interface is much better for your network than using one NIC with the static NAT enabled.
While on this discussion we can also cover the Advanced Networking deployment. This begins with the enabling of the Advanced Networking option to allow static NAT or two LAN interfaces. This is available on the Expressway-E (not on the Expressway-C). In the recommended dual NIC deployment, configure the External LAN interface setting on the IP configuration page to be LAN2.
Figure 2-6 illustrates the recommended deployment. It shows the typical DMZ configuration where the internal and external firewalls cannot route directly to each other, and dual-NIC devices such as Expressway-E are required to validate and forward the traffic between the isolated subnets. The Expressway-E has both NICs enabled, and static NAT enabled on its outward-facing LAN interface. The Expressway-C inside the network is a traversal client of the Expressway-E in the DMZ.

Figure 2-6 Dual Network Interfaces Deployment
This deployment consists of:
![]() DMZ subnet 1 – 10.0.10.0/24, containing:
DMZ subnet 1 – 10.0.10.0/24, containing:
![]() the internal interface of Firewall A – 10.0.10.1
the internal interface of Firewall A – 10.0.10.1
![]() the LAN2 interface of the Expressway-E – 10.0.10.2
the LAN2 interface of the Expressway-E – 10.0.10.2
![]() DMZ subnet 2 – 10.0.20.0/24, containing:
DMZ subnet 2 – 10.0.20.0/24, containing:
![]() the external interface of Firewall B – 10.0.20.1
the external interface of Firewall B – 10.0.20.1
![]() the LAN1 interface of the Expressway-E – 10.0.20.2
the LAN1 interface of the Expressway-E – 10.0.20.2
![]() LAN subnet – 10.0.30.0/24, containing:
LAN subnet – 10.0.30.0/24, containing:
![]() the internal interface of Firewall B – 10.0.30.1
the internal interface of Firewall B – 10.0.30.1
![]() the LAN1 interface of the Expressway-C – 10.0.30.2
the LAN1 interface of the Expressway-C – 10.0.30.2
![]() the network interface of the Cisco TMS server – 10.0.30.3
the network interface of the Cisco TMS server – 10.0.30.3
![]() Firewall A is the outward-facing firewall; it is configured with a NAT IP (public IP) of 64.100.0.10 which is statically NATed to 10.0.10.2 (the LAN2 interface address of the Expressway-E)
Firewall A is the outward-facing firewall; it is configured with a NAT IP (public IP) of 64.100.0.10 which is statically NATed to 10.0.10.2 (the LAN2 interface address of the Expressway-E)
![]() Firewall B is the internally-facing firewall
Firewall B is the internally-facing firewall
![]() Expressway-E LAN1 has static NAT mode disabled
Expressway-E LAN1 has static NAT mode disabled
![]() Expressway-E LAN2 has static NAT mode enabled with Static NAT address 64.100.0.10
Expressway-E LAN2 has static NAT mode enabled with Static NAT address 64.100.0.10
![]() Expressway-C has a traversal client zone pointing to 10.0.20.2 (LAN1 of the Expressway-E)
Expressway-C has a traversal client zone pointing to 10.0.20.2 (LAN1 of the Expressway-E)
![]() Cisco TMS has Expressway-E added with IP address 10.0.20.2
Cisco TMS has Expressway-E added with IP address 10.0.20.2
With the above deployment, there is no regular routing between the 10.0.20.0/24 and 10.0.10.0/24 subnets. The Expressway-E bridges these subnets and acts as a proxy for SIP/H.323 signaling and RTP/RTCP media.
With this Dual Network Interfaces Deployment, you would typically configure the private address of the external firewall (10.0.10.1 in the figure) as the default gateway of the Expressway-E. Traffic that has no more specific route is sent out from either Expressway-E interface to 10.0.10.1.
![]() If the internal firewall (B) is doing NAT for traffic from the internal network (subnet 10.0.30.0 in diagram) to LAN1 of the Expressway-E (such as traversal client traffic from Expressway-C), that traffic is recognized as being from the same subnet (10.0.20.0 from Figure 2-8) as it reaches LAN1 of the Expressway-E. The Expressway-E can therefore reply to this traffic through its LAN1 interface. MRA limitation: Due to Expressway-E security mechanisms, Mobile & Remote Access (MRA) is not compatible with this scenario. If there is source NAT on the packets from Expressway-C then edge login requests will fail (destination NAT is unaffected).
If the internal firewall (B) is doing NAT for traffic from the internal network (subnet 10.0.30.0 in diagram) to LAN1 of the Expressway-E (such as traversal client traffic from Expressway-C), that traffic is recognized as being from the same subnet (10.0.20.0 from Figure 2-8) as it reaches LAN1 of the Expressway-E. The Expressway-E can therefore reply to this traffic through its LAN1 interface. MRA limitation: Due to Expressway-E security mechanisms, Mobile & Remote Access (MRA) is not compatible with this scenario. If there is source NAT on the packets from Expressway-C then edge login requests will fail (destination NAT is unaffected).
![]() If the internal firewall (B) is not doing NAT for traffic from the internal network (subnet 10.0.30.0 in diagram) to LAN1 of the Expressway-E (such as traversal client traffic from Expressway-C), that traffic still has the originating IP address (for example, 10.0.30.2 for traffic from Expressway-C in the diagram). You must create a static route towards that source from LAN1 on the Expressway-E, or the return traffic will go to the default gateway (10.0.10.1). You can do this on the web UI (System > Network interfaces > Static routes) or using xCommand RouteAdd at the CLI. If the Expressway-E needs to communicate with other devices behind the internal firewall (for example, to reach network services such as NTP, DNS, LDAP/AD and syslog servers) you also need to add static routes from Expressway-E LAN1 to those devices/subnets.
If the internal firewall (B) is not doing NAT for traffic from the internal network (subnet 10.0.30.0 in diagram) to LAN1 of the Expressway-E (such as traversal client traffic from Expressway-C), that traffic still has the originating IP address (for example, 10.0.30.2 for traffic from Expressway-C in the diagram). You must create a static route towards that source from LAN1 on the Expressway-E, or the return traffic will go to the default gateway (10.0.10.1). You can do this on the web UI (System > Network interfaces > Static routes) or using xCommand RouteAdd at the CLI. If the Expressway-E needs to communicate with other devices behind the internal firewall (for example, to reach network services such as NTP, DNS, LDAP/AD and syslog servers) you also need to add static routes from Expressway-E LAN1 to those devices/subnets.
In Figure 2-7, we want to tell the Expressway-E that it can reach the 10.0.30.0/24 subnet behind the 10.0.20.1 firewall (router), which is reachable via the LAN1 interface. This is accomplished using the Static routes configuration page or using the following xCommand RouteAdd syntax (the Interface parameter could also be set to Auto as the gateway address - 10.0.20.1 - is only reachable via LAN1):
xCommand RouteAdd Address: 10.0.30.0 PrefixLength: 24 Gateway: 10.0.20.1 Interface: LAN1
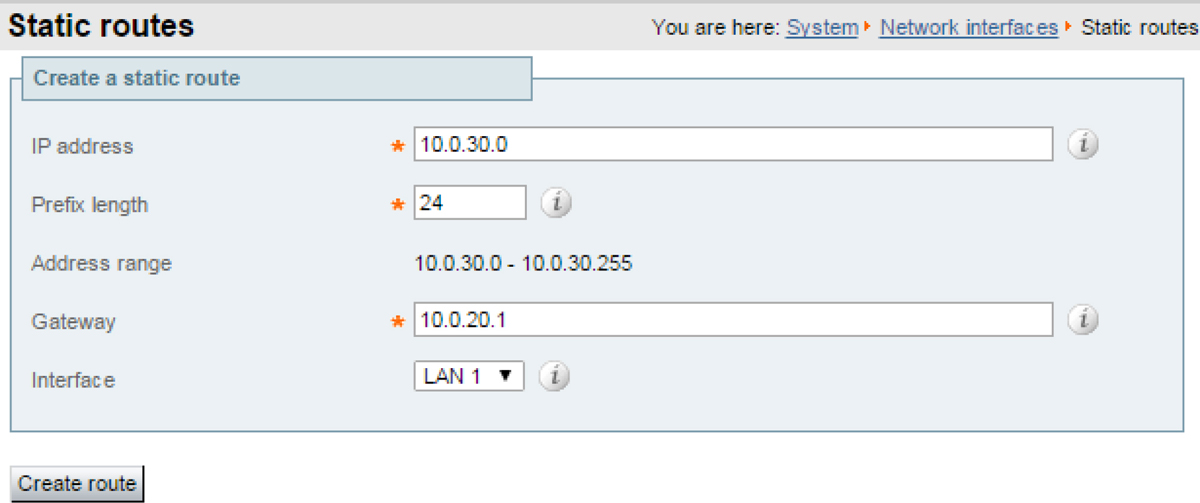
Figure 2-7 Web UI for Creating Static Route
Some routers and firewalls have SIP and H.323 ALG capabilities. ALG is also referred to as Fixup, Inspection, Application Awareness, Stateful Packet Inspection, Deep Packet Inspection and so forth. This means that the router/firewall is able to identify SIP and H.323 traffic as it passes through and inspect, and in some cases modify, the payload of the SIP and H.323 messages. The purpose of modifying the payload is to help the H.323 or SIP application from which the message originated to traverse NAT. That is, to perform a similar process to what the Expressway-E does. The challenge with router/firewall-based SIP and H.323 ALGs is that these were originally intended to aid relatively basic H.323 and SIP applications to traverse NAT, and these applications had, for the most part, very basic functionality and often only supported audio. Over the years, many H.323 and SIP implementations have become more complex, supporting multiple video streams and application sharing (H.239, BFCP), encryption/security features (H.235, DES/AES), firewall traversal (Assent, H.460) and other extensions of the SIP and H.323 standards.
For a router/firewall to properly perform ALG functions for SIP and H.323 traffic, it is therefore of utmost importance that the router/firewall understands and properly interprets the full content of the payload it is inspecting. Since H.323 and SIP are standards/recommendations which are in constant development, it is not likely that the router/firewall will meet these requirements, resulting in unexpected behavior when using H.323 and SIP applications in combination with such routers/firewalls. There are also scenarios where the router/firewall normally will not be able to inspect the traffic at all, for example when using SIP over TLS, where the communication is end-to-end secure and encrypted as it passes through the router/firewall. You should disable SIP and H.323 ALGs on routers/firewalls carrying network traffic to or from a Expressway-E. We do not support this functionality, as, when enabled, it is frequently found to negatively affect the built-in firewall/NAT traversal functionality of the Expressway-E itself.
We strongly recommend that you use the recommended Dual NIC Static NAT Deployment, although there other deployment models like Single Subnet DMZ Using Single Expressway-E LAN Interface and Static NAT or 3-port Firewall DMZ Using Single Expressway-E LAN Interface that will not be covered.
Expressway Backup and Restore Procedure
Use the Backup and restore page (Maintenance > Backup and restore) to create backup files of Expressway data and to restore the Expressway to a previous, saved configuration.
We recommend creating regular backups, and always in the following situations:
![]() Before performing an upgrade.
Before performing an upgrade.
![]() Before performing a system restore.
Before performing a system restore.
![]() In demonstration and test environments, if you want to be able to restore the Expressway to a known configuration.
In demonstration and test environments, if you want to be able to restore the Expressway to a known configuration.
Backup files are always encrypted from version X8.11. In particular, because they include the bootstrap key, and authentication data and other sensitive information. Backups can only be restored to a system that is running the same version of software from which the backup was made. You can create a backup on one Expressway and restore it to a different Expressway. For example, if the original system has failed. Before the restore, you must install the same option keys on the new system that were present on the old one. If you try to restore a backup made on a different Expressway, you receive a warning message, but you will be allowed to continue. (If you use FIPS140-2 cryptographic mode) You can’t restore a backup made on a non-FIPS system, onto a system that’s running in FIPS mode. You can restore a backup from a FIPS-enabled system onto a non-FIPS system. Do not use backups to copy data between Expressways. If you do so, system-specific information will be duplicated (like IP addresses). Because backup files contain sensitive information, you should not send them to Cisco in relation to technical support cases. Use snapshot and diagnostic files instead.
All backups must be password protected. If you restore to a previous backup, and the administrator account password has changed since the backup was done, you must also provide the old account password when you first log in after the restore. Active Directory credentials are not included in system backup files. If you use NTLM device authentication, you must provide the Active Directory password to rejoin the Active Directory domain after any restore. For backup and restore purposes, emergency account passwords are handled the same as standard administrator account passwords.
To create a backup of the Expressway system data:
Step 1. Go to Maintenance > Backup and restore.
Step 2. Enter an Encryption password to encrypt the backup file. (The password will be required in future if you ever want to restore the backup file.)
Step 3. Click Create system backup file.
Step 4. Wait for the backup file to be created. This may take several minutes. Do not navigate away from this page while the file is being prepared.
Step 5. When the backup is ready, you are prompted to save it. The default filename uses format:<software version>_<hardware serial number>_<date>_<time>_backup.tar.gz.enc. Or if you use Internet Explorer, the default extension is .tar.gz.gz. (These different filename extensions have no operational impact, and you can create and restore backups using any supported browser.)
Step 6. Save the backup file to a secure location.
For restoring a previous backup, you will need the password for the backup file from which you intend to restore. If you are restoring a backup file from a different Expressway, you need to apply the same set of license keys as exist on the system from which you intend to restore. We recommend that you take the Expressway unit out of service before doing a restore. The restore process involves doing a factory reset back to the original software version. Then upgrading to the same software version that was running when you took the backup. If the backup is out of date (made on an earlier version than the version you want) these extra steps are needed after the restore:
![]() Upgrade the software version to the required later version.
Upgrade the software version to the required later version.
![]() Manually redo any configuration changes made since the backup was taken.
Manually redo any configuration changes made since the backup was taken.
If you use FIPS140-2 cryptographic mode, you can’t restore a backup made on a non-FIPS system, onto a system that’s running in FIPS mode. You can restore a backup from a FIPS-enabled system onto a non-FIPS system. You can’t restore data to an Expressway while it’s part of a cluster.
To restore the Expressway to a previous configuration of system data:
Step 1. First do a factory reset. This removes your configuration data and reverts the system back to its original state. The reset maintains your current software version if you have upgraded since the system was first set up.
Step 2. Upgrade the system to the software version that was running when you made the backup.
Step 3. Now you can restore the system from the backup, as follows:
a. Go to Maintenance > Backup and restore.
b. In the Restore section, click Browse and navigate to the backup file that you want to restore.
c. In the Decryption password field, enter the password used to create the backup file.
d. Click Upload system backup file.
e. The Expressway checks the file and takes you to the Restore confirmation page.
1. If the backup file is invalid or the decryption password was entered incorrectly, an error message is displayed at the top of the Backup and restore page.
2. The current software version and the number of calls and registrations is displayed.
f. Read the warning messages that appear, before you continue.
g. Click Continue with system restore to proceed with the restore. This will restart the system, so make sure that no active calls exist.
h. When the system restarts, the Login page is displayed.
Step 4. This step only applies if the backup file is out of date. That is, the software version was upgraded, or system configuration changes were made after the backup was done. In this case:
a. Upgrade the system again, this time to the required software version for the system.
b. Redo any configuration changes made after the backup (assuming you still need them on the restored system).
Use the backup and restore process to save cluster configuration information. The backup process saves all configuration information for the cluster, regardless of the Expressway used to make the backup.
Do not take VMware snapshots of Cisco Expressway systems. The process interferes with database timing and negatively impacts performance.
It is important to know that you cannot restore data to an Expressway that is part of a cluster. As described here, first remove the Expressway peer from the cluster. Then do the restore. (After the restore you need to build a new cluster.) To restore previously backed up cluster configuration data, follow this process.
Step 1. Remove the Expressway peer from the cluster so that it becomes a standalone Expressway.
Step 2. Restore the configuration data to the standalone Expressway.
Step 3. Build a new cluster using the Expressway that now has the restored data.
Step 4. Take each of the other peers out of their previous cluster and add them to the new cluster.
No additional steps are required if you are using FQDN’s and have a valid cluster address mapping configured. Mappings will be configured on a restore action.
Exam Preparation Tasks
As mentioned in the section “How to Use This Book” in the Introduction, you have a couple of choices for exam preparation: the exercises here, Chapter 22, “Final Preparation,” and the exam simulation questions in the Pearson Test Prep Software Online.
Review All Key Topics
Review the most important topics in this chapter, noted with the Key Topics icon in the outer margin of the page. Table 2-5 lists a reference of these key topics and the page numbers on which each is found.
Table 2-5 Key Topics for Chapter 2

Complete Tables and Lists from Memory
There are no Memory Lists or Tables for this chapter.
Define Key Terms
Define the following key terms from this chapter and check your answers in the glossary:
HyperText Transfer Protocol (HTTP)
Secure HyperText Transfer Protocol (HTTPS)
Lightweight Directory Access Protocol (LDAP)
Mobile and Remote Access (MRA)
Network Address Translation (NAT)
Product Authorization Key (PAK)
Real-time Transport Protocol (RTP)
Real-time Transport Control Protocol (RTCP)
Session Initiation Protocol (SIP)
Transport Layer Security (TLS)
Telepresence Management Suite (TMS)
Uniform Resource Indicator (URI)
Video Communications Sever (VCS)
Q&A
The answers to these questions appear in Appendix A. For more practice with exam format questions, use the Pearson Test Prep Software Online.
1. What does the Dual Network Interface Deployment consist of?
2. What are the steps to restore an Expressway that is part of a cluster?
Answers
1. This deployment consists of:
• DMZ subnet
i. internal interface of Firewall A
ii. LAN2 interface of the Expressway-E
• DMZ subnet containing:
i. the external interface of Firewall B
ii. the LAN1 interface of the Expressway-E
• LAN subnet containing:
i. the internal interface of Firewall B
ii. the LAN1 interface of the Expressway-C
iii. the network interface of the Cisco TMS server
• Firewall A is the outward-facing firewall; it is configured with a public NAT IP which is statically NATed to the LAN2 interface address of the Expressway-E
• Firewall B is the internally-facing firewall
• Expressway-E LAN1 has static NAT mode disabled
• Expressway-E LAN2 has static NAT mode enabled with Static NAT
• Expressway-C has a traversal client zone pointing to LAN1 of the Expressway-E
• Cisco TMS has Expressway-E added
2. Expressway Cluster Restore steps
• Remove the Expressway peer from the cluster so that it becomes a standalone Expressway.
• Restore the configuration data to the standalone Expressway.
• Build a new cluster using the Expressway that now has the restored data.
• Take each of the other peers out of their previous cluster and add them to the new cluster.