Chapter 17. Configure Webex Hybrid Directory Service
This chapter covers the following topics:
![]() Deployment Model: This topic will explain the deployment overview of the Hybrid Directory Service.
Deployment Model: This topic will explain the deployment overview of the Hybrid Directory Service.
![]() Deployment Requirements: This topic will explain the high-level requirements prior to implementing and deploying Webex Hybrid Directory Service.
Deployment Requirements: This topic will explain the high-level requirements prior to implementing and deploying Webex Hybrid Directory Service.
![]() Infrastructure Requirements: This topic will provide the infrastructure requirements and provide the proxy options available to the Cisco Directory Connector.
Infrastructure Requirements: This topic will provide the infrastructure requirements and provide the proxy options available to the Cisco Directory Connector.
![]() Active Directory Configuration and Synchronization: This topic provides and overview of the configuration of the AD, Directory Connector, and the Webex Cloud. This topic also covers the methods of synchronization and the behavior of adding, modifying and deletion of users.
Active Directory Configuration and Synchronization: This topic provides and overview of the configuration of the AD, Directory Connector, and the Webex Cloud. This topic also covers the methods of synchronization and the behavior of adding, modifying and deletion of users.
![]() Webex User Service Assignment: This topic covers the Webex user’s services that can be assigned in the Webex Control Hub.
Webex User Service Assignment: This topic covers the Webex user’s services that can be assigned in the Webex Control Hub.
Chapter 17 focused on the synchronization of Microsoft Active Directory users into Webex Control Hub (creating, updating, deleting) so that user account information is always current in the cloud. The Active Directory remains the single source for all user account information that is mirrored in Control Hub to simplify day-to-day administration and management tasks.
This chapter covers the following objectives from the Implementing Cisco Collaboration Cloud and Edge Solutions (CLCEI) exam 300-820:
![]() 4.2.c Directory Services
4.2.c Directory Services
“Do I Know This Already?” Quiz
The “Do I Know This Already?” quiz allows you to assess whether you should read this entire chapter thoroughly or jump to the “Exam Preparation Tasks” section. If you are in doubt about your answers to these questions or your own assessment of your knowledge of the topics, read the entire chapter. Table 17-1 lists the major headings in this chapter and their corresponding “Do I Know This Already?” quiz questions. You can find the answers in Appendix A, “Answers to the ‘Do I Know This Already?’ Quizzes.”
Table 17-1 ”Do I Know This Already?” Section-to-Question Mapping

Caution
The goal of self-assessment is to gauge your mastery of the topics in this chapter. If you do not know the answer to a question or are only partially sure of the answer, you should mark that question as wrong for purposes of the self-assessment. Giving yourself credit for an answer you correctly guess skews your self-assessment results and might provide you with a false sense of security.
1. The core components for Cisco Webex Hybrid Directory Service include which of the following? (Select 2)
a. Key Management Service
b. Cisco Directory Connector
c. Cisco Unified Communications Manager
d. Automatic Certificate Management Environment
e. Microsoft Active Directory
2. Where can I download the Cisco Directory Connector software installation package?
b. Cisco Expressway
3. What is the limit for how many Active Directory objects can be synchronized to the cloud using Cisco Directory Connector?
a. 5000
b. 10000
c. 500
d. No limit
4. You can map attributes from your local Active Directory to corresponding attributes in the cloud. The only required field is uid, a unique identifier for each user account in the cloud identity service. What format must the attribute be presented as?
a. Numeric
b. Date
c. Alphabetical
d. Email
5. A site administrator would like to set a user’s privileges. Which Webex Plan is required?
a. Enterprise Plan
b. Business Plan
c. Starter Plan
d. Free Plan
Foundation Topics
Deployment Model
Deploying Cisco Webex Hybrid Directory Service simplifies the administrator’s experience. It takes the hassle out of updating user information in the cloud by automatically synchronizing it with the Microsoft Active Directory or Azure Active Directory on your premises. Cisco Webex Hybrid Directory Service supports Cisco Webex Meetings, Webex, and Webex Calling capabilities.
For administrators, Hybrid Directory Service simplifies not only the Cisco Webex onboarding experience, but also the day-to-day operations. Without Hybrid Directory Service, administrators must either manually add, delete, and edit Cisco Webex users through Cisco Webex Control Hub or upload a Comma-Separated Value (CSV) file every time they need to add or change a user that has changed in the Microsoft Active Directory. The Cisco Webex Hybrid Directory Service automatically synchronizes an organization’s on-premises Microsoft Active Directory users to Cisco Webex. And Hybrid Directory Service securely eliminates the need to manage multiple directory databases. When an employee leaves the company, the user is deleted from Microsoft Active Directory their Cisco Webex account is deactivated as soon as it is replicated. The user will no longer be able to log in to Cisco Webex and will be removed from all spaces and services.
For end users, Hybrid Directory Service provides accurate and up-to-date directory content for all Cisco Webex. And because profile data in Cisco Webex is synchronized with the premises (verified names, email addresses, and company avatars), it can help ensure that your users are communicating with the right people.
The core components for Cisco Webex Hybrid Directory Service include:
![]() Microsoft Active Directory
Microsoft Active Directory
Microsoft Active Directory is the enterprise resource and user repository and the single source of validation for that information. The directory administrator maintains the enterprise resource and user information contained within the directory with moves, adds, changes, and deletions. This enables synchronization not only of users but also of resources such as enterprise room systems. Any updates to this information in Active Directory are propagated to the Cisco Directory Connector (and in turn to Webex) during synchronization. Cisco Directory Connector plays the role of synchronization agent between the corporate Microsoft Active Directory and the organization’s identity store in Webex. The Directory Connector initially populates Webex with user and resource information from the Active Directory and maintains this information with subsequent synchronizations to update the organization’s Webex identity store with the latest moves, adds, changes, and deletions occurring on the enterprise Active Directory. Cisco Directory Connector relies on Microsoft Active Directory application programming interfaces (APIs) to pull user information from the Microsoft Active Directory. The APIs are based on the Microsoft .NET framework. Directory Connector uses Secure HyperText Transfer Protocol (HTTPS) to push user information to the organization’s Webex identity store.
Deployment Requirements
Prior to implementing and deploying Webex Hybrid Directory Service, perform the following high-level requirements:
![]() Deploy Microsoft Active Directory within the organization and populate it with user information.
Deploy Microsoft Active Directory within the organization and populate it with user information.
![]() Make sure Cisco Unified Communications Manager (Unified CM) is fully integrated with Microsoft Active Directory (directory synchronization and authentication).
Make sure Cisco Unified Communications Manager (Unified CM) is fully integrated with Microsoft Active Directory (directory synchronization and authentication).
![]() If the on-premises network is behind a firewall, ensure that outbound access to the Internet through HTTPS on port 443 is available either directly or by way of an HTTP proxy.
If the on-premises network is behind a firewall, ensure that outbound access to the Internet through HTTPS on port 443 is available either directly or by way of an HTTP proxy.

Figure 17-1 shows the high-level steps required to deploy Webex Hybrid Directory Service.
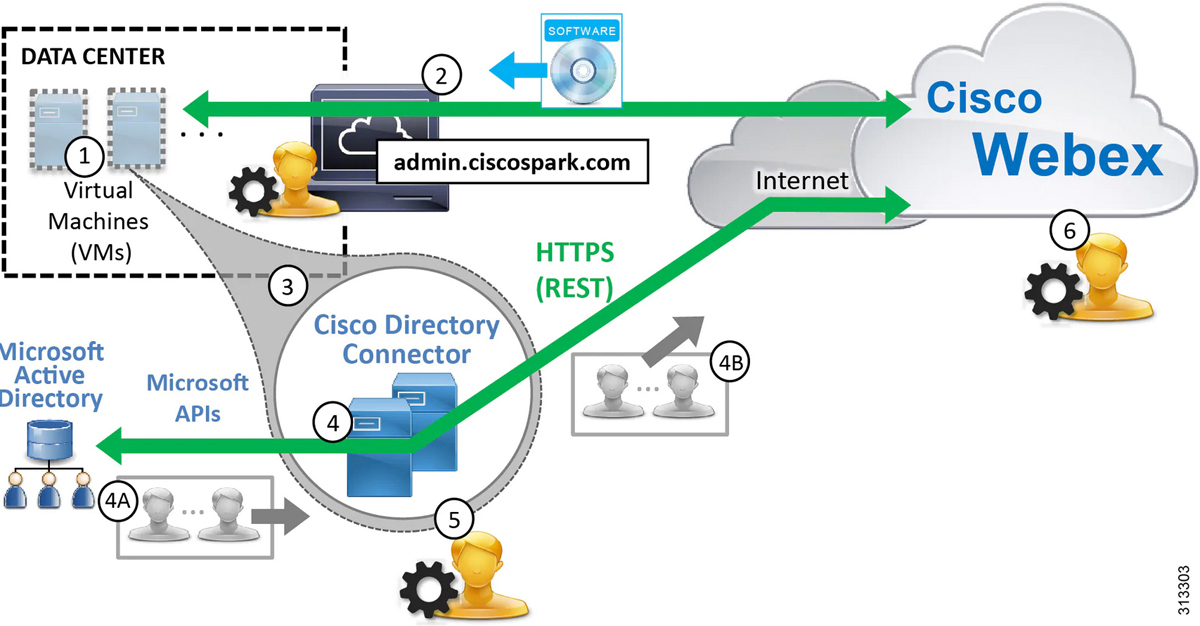
Figure 17-1 Deployment of Webex Hybrid Directory Service
1. Virtual Microsoft Windows Servers are created and deployed in the enterprise data center.
2. After the Windows servers are deployed, the administrator logs into the Webex Control Hub at https://admin.webex.com to enable directory synchronization and download the Cisco Directory Connector software installation package.
3. Next, Directory Connector is installed on the Windows servers (refer to the next section, Infrastructure Requirements for hardware requirements).
4. After Directory Connector is installed, the administrator configures the connector, and an initial synchronization occurs between Microsoft Active Directory and the Directory Connector (step 4A) and between the Directory Connector and Webex (step 4B).
5. Once the initial synchronization completes, the administrator configures the schedule for periodic incremental and full synchronizations.
6. After that, the administrator manages users and provisions them for cloud services as appropriate.
For high availability, two Cisco Directory Connectors are deployed as seen in Figure 17-2. These Windows Servers virtual machines are deployed on separate hosts in separate buildings or data centers to provide high availability and redundancy.

Figure 17-2 Webex Hybrid Directory Service High Availability
Directory Connectors are deployed as a pair, and both are capable of synchronizing directory information between the enterprise directory and the cloud. However, under normal operation, one Directory Connector (primary) handles directory synchronization while the other (backup) maintains connectivity to Webex but does not perform any synchronization. If the primary Directory Connector fails, the backup Directory Connector will continue to handle synchronization operations based on the configured failover interval.
In cases where only a single Cisco Directory Connector is deployed (non-redundant deployments), if the Directory Connector fails, user information is no longer synchronized between Active Directory and the Webex identity store. The administrator is able to manage existing users and to provision them for services while the Directory Connector is down, but no users or resources can be added or removed from the Webex identity store until the Directory Connector is returned to service.
In addition to Cisco Directory Connector high availability considerations, also consider providing redundancy for other aspects of the integration such as the Active Directory services, connectivity to Webex (HTTPS), and availability of cloud services. Microsoft components (Active Directory, Domain Controllers, and other Microsoft enterprise network services) should be deployed in a redundant fashion. Consult Microsoft product documentation for information on high availability. Highly available network connectivity to the Internet is also required to ensure that Webex and other Webex services are reachable from the enterprise. Redundant physical Internet connections, preferably from different providers, are recommended. Webex services are highly available because those services and components are deployed across multiple physical data centers on elastic compute platforms.
The primary sizing and scalability considerations for Webex Hybrid Directory Service is the size of the synchronization. The larger the enterprise directory and the search base in terms of number of resources and users, the longer a synchronization will take to complete. For this reason, it is important to monitor synchronization operations initially to ensure that both incremental and full synchronizations are completing prior to the beginning of the next synchronization period. We recommend running the Directory Connector on a dedicated Windows server host. Additional load on the Windows server can reduce performance and increase overall system response and synchronization times.
Infrastructure Requirements
You can install Cisco Directory Connector on these supported Windows Servers:
![]() Windows Server 2019
Windows Server 2019
![]() Windows Server 2016
Windows Server 2016
![]() Windows Server 2012 R2
Windows Server 2012 R2
![]() Windows Server 2012
Windows Server 2012
![]() Windows Server 2008 R2
Windows Server 2008 R2
![]() Windows Server 2003
Windows Server 2003
To address a cookie issue, we recommend that you upgrade your domain controller to a release that contains the fix, either Windows Server 2012 R2 or 2016.
You must install Cisco Directory Connector on a computer with these minimum hardware requirements:
![]() 8 GB of RAM
8 GB of RAM
![]() 50 GB of storage
50 GB of storage
![]() No minimum for the CPU
No minimum for the CPU
Cisco Directory Connector is supported with the following Active Directory services:
![]() Active Directory 2016
Active Directory 2016
![]() (Cisco Directory Connector is supported when using the latest version of Active Directory on Windows Server 2019)
(Cisco Directory Connector is supported when using the latest version of Active Directory on Windows Server 2019)
![]() Active Directory 2012
Active Directory 2012
![]() Active Directory 2008 R2
Active Directory 2008 R2
![]() Active Directory 2008
Active Directory 2008
Note the following additional requirements:
![]() Cisco Directory Connector requires TLS1.2. You must install the following:
Cisco Directory Connector requires TLS1.2. You must install the following:
![]() .NET Framework v3.5 (required for the Cisco Directory Connector application. If you run into any issues, use the directions in Enable .NET Framework 3.5 by using the Add Roles and Features Wizard.)
.NET Framework v3.5 (required for the Cisco Directory Connector application. If you run into any issues, use the directions in Enable .NET Framework 3.5 by using the Add Roles and Features Wizard.)
![]() .NET Framework v.4.5 (required for TLS1.2)
.NET Framework v.4.5 (required for TLS1.2)
![]() Active Directory forest functional level 2 (Windows Server 2003) or higher is required. (See What Are Active Directory Functional Levels? for more information.)
Active Directory forest functional level 2 (Windows Server 2003) or higher is required. (See What Are Active Directory Functional Levels? for more information.)
If your network is behind a firewall, ensure that your system has HTTPS (port 443) access to the internet.
To access the Cisco Directory Connector software from Cisco Webex Control Hub, you will require a Cisco Webex organization with a trial or any paid subscription. Optional, if you want new Webex user accounts to be Active before they sign in for the first time, it is recommended that you do the following:
![]() Add, verify, and optionally claim domains that contain the user email addresses you want to synchronize into the cloud.
Add, verify, and optionally claim domains that contain the user email addresses you want to synchronize into the cloud.
![]() Preform a single sign-on (SSO) integration of your Identity Provider (IdP) with your Webex organization.
Preform a single sign-on (SSO) integration of your Identity Provider (IdP) with your Webex organization.
![]() Suppress automatic email invites, so that new users will not receive the automatic email invitation and you can do your own email campaign. (This feature requires the SSO integration.)
Suppress automatic email invites, so that new users will not receive the automatic email invitation and you can do your own email campaign. (This feature requires the SSO integration.)
For a multiple domain environment (either single forest or multiple forests), you must install one Cisco Directory Connector for each Active Directory domain. If you want to synchronize a new domain (B) while maintaining the synchronized user data on another existing domain (A), ensure that you have a separate supported Windows server to install Directory Connector for domain (B) synchronization. For the sign-in to the connector, we do not require an administrative account in Active Directory. We require a local user account that is the same user as a full admin account in Cisco Webex Control Hub. This local user must have privileges on that Windows machine to connect to the Domain Controller and read Active Directory user objects. The machine login account should be a computer administrator with privileges to install software on the local machine. This also applies to a Virtual Machine login. Also, make sure that Windows Safe dynamic link library (DLL) search mode is enabled. If you use Microsoft Active Directory Lightweight Directory Services (AD LDS) for multiple domains on a single forest, we recommend that you install Cisco Directory Connector and Active Directory Domain Service/Active Directory Lightweight Directory Services (AD DS/AD LDS) on separate machines.
Cisco Directory Connector works as a bridge between the on-premises Active Directory and the Webex cloud. As such, the connector does not have an upper limit for how many Active Directory objects can be synchronized to the cloud. Any limits on premises directory objects are tied to the specific version of and specifications for the Active Directory environment that is being synchronized to the cloud, not the connector itself. A few factors can affect the speed of the synchronization:
![]() The total number Active Directory objects. (A 5000-user sync job will not take as long as 50000.)
The total number Active Directory objects. (A 5000-user sync job will not take as long as 50000.)
![]() Network speed and bandwidth.
Network speed and bandwidth.
![]() System workload and specifications.
System workload and specifications.
If web proxy authentication is enabled in your environment, you can still use Cisco Directory Connector. If your organization uses a transparent web proxy, it does not support authentication. The connector successfully connects and synchronizes users. You can take one of these approaches:
![]() Explicit web proxy through Internet Explorer (the connector inherits the web proxy settings)
Explicit web proxy through Internet Explorer (the connector inherits the web proxy settings)
![]() Explicit web proxy through a .pac file (the connector inherits enterprise-specific proxy settings)
Explicit web proxy through a .pac file (the connector inherits enterprise-specific proxy settings)
![]() Transparent Proxy that works with the connector without any changes
Transparent Proxy that works with the connector without any changes
You can set up Cisco Directory Connector to use a web proxy through Internet Explorer. If the Cisco DirSync Service runs from a different account than the currently signed in user, you also need to sign in with this account and configure web proxy.
Step 1. From Internet Explorer, go to Internet Options, click Connections, and then choose LAN Settings.
Step 2. Point the Windows instance where the connector is installed at your web proxy. The connector inherits these web proxy settings.
Step 3. If your environment uses proxy authentication, add these Uniform Resource Locators (URLs) to your allowed list:
![]() cloudconnector.webex.com for synchronization.
cloudconnector.webex.com for synchronization.
![]() idbroker.webex.com for authentication.
idbroker.webex.com for authentication.
You may perform this either site-wide (for all hosts) or just for the host that has the connector. Note that if you add these URLs to an allowed list to completely bypass your web proxy, make sure your firewall’s Access Control List (ACL) table is updated to permit the connector host to access the URLs directly.
You can configure a client browser to use a .pac file. This file supplies the web proxy address and port information. Cisco Directory Connector directly inherits the enterprise-specific web proxy configuration.
Step 1. For the connector to successfully connect and sync user information to the Cisco Webex cloud, make sure proxy authentication is disabled for cloudconnector.webex.com in the .pac file configuration for the host where the connector is installed.
Step 2. If your environment uses proxy authentication, add these URLs to your allowed list:
![]() cloudconnector.webex.com for synchronization.
cloudconnector.webex.com for synchronization.
![]() idbroker.webex.com for authentication.
idbroker.webex.com for authentication.
You may perform this either site-wide (for all hosts) or just for the host that has the connector. Note that if you add these URLs to an allowed list to completely bypass your web proxy, make sure your firewall ACL table is updated to permit the connector host to access the URLs directly.
Cisco Directory Connector supports NT LAN Manager (NTLM). NTLM is one approach to support Windows authentication among the domain devices and ensure their security. In most cases, a user wants to access another workstation’s resources through a client PC, which can be difficult to do in a secure way. Generally, the technical design of NTLM is based on a mechanism of “Challenge” and “Response”:
1. A user signs into a client PC through a Windows account and password. The password is never saved locally. Instead of a plain text password, a hash value of the password is stored locally. When a user signs in through the password to the client, Windows OS compares the stored hash value and hashed value from the input password. If both are the same, the authentication passes. When the user wants to access any resource in another server, the client sends a request to the server with the account name in plain text.
2. When the server receives the request, the server generates a 16-bit random key. The key is called Challenge (or Nonce). Before the server sends back to the client, the challenge is stored in the server. And then the server sends the challenge to the client in plain text.
3. As soon as the client receives the challenge sent from server, the client encrypts the challenge by the hash value that was mentioned in Step 1. After encryption, the value is sent back to the server.
4. When the server receives the encrypted value from the client, the server sends it to the domain controller for verification. The request includes: the account name, encrypted challenge which the client sent, and the original plain challenge.
5. The domain controller can retrieve the hash values of password according to account name. And then the domain controller can encrypt on the original challenge. The domain controller can then compare with the received hash value and the encrypted hash value. If they are same, the verification is successful.
Windows has security authentication built into the operating system, making it easier for applications to support security authentication. As a result, you do not need to complete further configurations.
In a transparent proxy scenario, the browser is unaware that a transparent web proxy is intercepting HyperText Transfer Protocol (HTTP) requests (port 80/port 443) and no client-side configuration is required.
1. Deploy a transparent proxy, so that the connector can connect and synchronize users.
2. Confirm that the proxy is successful – you see an expected browser authentication popup window when starting the connector.
If you are setting up Proxy Authentication, add the URL cloudconnector.webex.com to your allowed list by creating an Access Control List (ACL) on your enterprise firewall server. Apply this ACL to the appropriate firewall interface, which is only applicable for this single connector host. For example:
access-list 2000 acl-inside extended permit TCP [IP of the connector] cloudconnector.webex.com eq https
Ensure that the rest of the hosts in your enterprise are still required to use your web proxy by configuring the appropriate implicit deny statement.
Before following the next tasks in Cisco Directory Connector deployment, keep the following requirements and recommendations in mind if you are going to synchronize Active Directory information from multiple domains into the cloud:
![]() A separate instance of Cisco Directory Connector is required for each domain.
A separate instance of Cisco Directory Connector is required for each domain.
![]() The Cisco Directory Connector software must run on a host that is on the same domain that it will synchronize.
The Cisco Directory Connector software must run on a host that is on the same domain that it will synchronize.
![]() We recommend that you verify or claim your domains in Cisco Webex Control Hub.
We recommend that you verify or claim your domains in Cisco Webex Control Hub.
![]() If you want to synchronize more than 50 domains, you must open a ticket to get your organization moved to a large org list.
If you want to synchronize more than 50 domains, you must open a ticket to get your organization moved to a large org list.
![]() If desired, you can synchronize room resource information along with user accounts.
If desired, you can synchronize room resource information along with user accounts.
If you are synchronizing more than 50000 users, it is highly recommended that you use a second connector for failover and redundancy.
Active Directory Configuration and Synchronization
Cisco Webex Control Hub initially shows directory synchronization as disabled. To turn on directory synchronization for your organization, you must install and configure Cisco Directory Connector, and then successfully perform a full synchronization. You must install one connector for each Active Directory domain that you want to synchronize. A single Cisco Directory Connector instance can only serve a single domain. If you authenticate through a proxy server, ensure that you have your proxy credentials. For proxy basic-auth, you will enter the username and password after you install an instance of the connector. Internet Explorer proxy configuration is also required for basic-auth. For proxy NTLM, you may see an error when you open the connector for the first time; the required steps are listed later in this section.
Step 1. From the customer view in https://admin.webex.com, go to Users, click Manage Users, click Enable Directory Synchronization, and then choose Next.
Step 2. Click the Download and Install link to save the latest version of the connector installation .zip file to your VMware or Windows server. You can obtain the .zip file directly from this link, but you must have full administrative access to a Control Hub organization for this software to work. For a new installation, get the latest version of the software so that you are using the latest features and bug fixes. After you install the software, upgrades are reported through the software and automatically install when available.
Step 3. On the VMware or Windows server, unzip and run the .msi file in the setup folder to launch the setup wizard.
Step 4. Click Next, check the box to accept the license agreement, and then click Next until you see the account type screen.
Step 5. Choose the type of service account that you want to use and perform the installation with an admin account:
![]() Local System – The default option. You can use this option if you have a proxy configured through Internet Explorer.
Local System – The default option. You can use this option if you have a proxy configured through Internet Explorer.
![]() Domain Account – Use this option if the computer is part of the domain. Directory Connector must interact with network services to access domain resources. You can enter the account information and click OK. When entering the Username, use the format: {domain}{user_name}
Domain Account – Use this option if the computer is part of the domain. Directory Connector must interact with network services to access domain resources. You can enter the account information and click OK. When entering the Username, use the format: {domain}{user_name}
For a proxy that integrates with AD (NTLMv2 or Kerberos), you must use the domain account option. The account used to run Directory Connector Service must have enough privilege to pass proxy and access AD.
To avoid errors, make sure the following privileges are in place:
![]() The server is part of the domain.
The server is part of the domain.
![]() The domain account can access the on-premises AD data and avatars data. The account must also have the local Administrator Role as it must access files under C:Program Files.
The domain account can access the on-premises AD data and avatars data. The account must also have the local Administrator Role as it must access files under C:Program Files.
![]() For a Virtual Machine login, the admin account privilege must at least be able to read domain information.
For a Virtual Machine login, the admin account privilege must at least be able to read domain information.
Step 6. Click Install. After the network test runs and if prompted, enter your proxy basic credentials, click OK, and then click Finish.
It is recommended that you reboot the server after installation. The dry run report cannot show the correct result when the data was not released. While rebooting the machine, all data is refreshed to show an exact result in the report. If you are synchronizing multiple domains, repeat these steps on a different Windows machine and install one connector per domain.
Ensure that you have your proxy credentials as for proxy basic-auth, you will enter the username and password after you open the connector for the first time. For proxy NTLM, open Internet Explorer, click the gear icon, go to Internet options > Connections > LAN settings, ensure the proxy server information is added, and then click OK. Follow these steps:
Step 1. Open the connector, and then add https://idbroker.webex.com to your list of trusted sites if you see a prompt.
Step 2. If prompted, sign in in with your proxy authentication credentials, and then sign into Cisco Webex using your admin account and click Next.
Step 3. Confirm your organization and domain.
![]() If you choose AD DS, check LDAP over SSL to use the secure LDAP (LDAPS) as the connection protocol, choose the domain that you want to synchronize from, and then click Confirm. If you do not check LDAP over SSL, DirSync will continue to use the LDAP connection protocol. Lightweight Directory Application Protocol (LDAP) and Secure LDAP (LDAPS) are the connection protocols used between an application and the Domain Controller within the infrastructure. LDAPS communication is encrypted and secure.
If you choose AD DS, check LDAP over SSL to use the secure LDAP (LDAPS) as the connection protocol, choose the domain that you want to synchronize from, and then click Confirm. If you do not check LDAP over SSL, DirSync will continue to use the LDAP connection protocol. Lightweight Directory Application Protocol (LDAP) and Secure LDAP (LDAPS) are the connection protocols used between an application and the Domain Controller within the infrastructure. LDAPS communication is encrypted and secure.
![]() If you choose AD LDS, enter the host, domain, and port, and then click Refresh to load all application partitions. Then select the partition from the drop-down list and click Confirm. In addition, open the CloudConnectorCommon.dll.config file, make sure you add the ADAuthLevel setting to the appSetting node, like this:
If you choose AD LDS, enter the host, domain, and port, and then click Refresh to load all application partitions. Then select the partition from the drop-down list and click Confirm. In addition, open the CloudConnectorCommon.dll.config file, make sure you add the ADAuthLevel setting to the appSetting node, like this:
<appSettings>
<add key=“ConnectorServiceURI” value=“https://cloudconnector.webex.com/SynchronizationService-v1_0/?orgId=GLOBAL” />
<add key=“ADAuthLevel” value=“1” />
</appSettings>
Step 4. After the Confirm Organization screen appears, click Confirm. If you already bound AD DS/AD LDS, the Confirm Organization screen appears.
Step 5. Click Confirm.
Step 6. Choose one, depending on the number of Active Directory domains you want to bind to Directory Connector:
![]() If you have a single domain that is AD LDS, bind to the existing AD LDS source, and then click Confirm.
If you have a single domain that is AD LDS, bind to the existing AD LDS source, and then click Confirm.
![]() If you have a single domain that is AD DS, either bind to the existing domain or to a new domain. If you choose Bind to a new domain, click Next. Because the existing source type is AD DS, you cannot select AD LDS for the new binding.
If you have a single domain that is AD DS, either bind to the existing domain or to a new domain. If you choose Bind to a new domain, click Next. Because the existing source type is AD DS, you cannot select AD LDS for the new binding.
![]() If you have more than one domain, choose an existing domain from the list or Bind to a new domain and then click Next. Because you have more than one domain, the existing source type must be AD DS. If you choose Bind to a new domain and click Next, you cannot select AD LDS for the new binding.
If you have more than one domain, choose an existing domain from the list or Bind to a new domain and then click Next. Because you have more than one domain, the existing source type must be AD DS. If you choose Bind to a new domain and click Next, you cannot select AD LDS for the new binding.
After you sign in, you are prompted to perform a dry run synchronization.
During the process to onboard users from different domains, you must decide whether to retain or delete the user objects which might already exist in the Cisco Webex cloud. For example, to test accounts from a trial. With Cisco Directory Connector, the goal is to have an exact match between your Active Directories and the Cisco Webex cloud. You may already have some Cisco Webex users in Control Hub before you used Cisco Directory Connector. Among the users in the cloud, some might match on-premises Active Directory object and be assigned licenses for services. But some may be test users that you want to delete while doing a synchronization. You must create an exact match between your Active Directory and Control Hub.
If you have multiple domains in a single forest or multiple forests, you must do this step on each of the Cisco Directory Connector instances you have installed for each Active Directory domain.
Step 7. Choose one:
![]() After first-time sign in, click Yes on the prompt to perform a dry run.
After first-time sign in, click Yes on the prompt to perform a dry run.
![]() If you miss a reminder to perform a dry run, at any time from Cisco Directory Connector, click Dashboard, choose Sync Dry Run, and then click OK to start a dry run synchronization.
If you miss a reminder to perform a dry run, at any time from Cisco Directory Connector, click Dashboard, choose Sync Dry Run, and then click OK to start a dry run synchronization.
The dry run identifies the users by comparing them with domain users. The application can identify the users if they belong to the current domain. In the next step, you must decide whether to delete the objects or retain them. The mismatched objects are identified as already existing in the Cisco Webex cloud but not existing in the on-premises Active Directory.
Step 8. Review the dry run results and then choose an option depending on whether you use a single domain or multiple domains:
![]() Single domain – Decide whether you want to keep the mismatched users. If you want to keep them, choose No, retain objects; if you do not, choose Yes, delete objects. After you do these steps and manually run a full sync so that there is an exact match between the premises and cloud, Cisco Directory Connector automatically enables scheduled auto sync tasks.
Single domain – Decide whether you want to keep the mismatched users. If you want to keep them, choose No, retain objects; if you do not, choose Yes, delete objects. After you do these steps and manually run a full sync so that there is an exact match between the premises and cloud, Cisco Directory Connector automatically enables scheduled auto sync tasks.
![]() Multiple domains – For an organization with Domain A and Domain B, first do a dry run for Domain A. If you want to keep mismatched users, choose No, retain objects. (These mismatched users might be members of Domain B.) If you want to delete, choose Yes, delete objects.
Multiple domains – For an organization with Domain A and Domain B, first do a dry run for Domain A. If you want to keep mismatched users, choose No, retain objects. (These mismatched users might be members of Domain B.) If you want to delete, choose Yes, delete objects.
If you keep the users, run a full sync for Domain A first, and then do a dry run for Domain B. If there are still mismatched users, add those users in Active Directory and then do a full sync for Domain B. When there is an exact match between the premises and cloud, Cisco Directory Connector automatically enables scheduled auto sync tasks.
Step 9. In the Confirm Dry Run prompt, click Yes to redo the dry run synchronization and view the dashboard to see the results. Any accounts that were successfully synchronized in the dry run appear under Objects Matched. If a user in the cloud does not have a corresponding user with the same email in Active Directory, the entry is listed under Users Deleted. To avoid this delete flag, you can add a user in Active Directory with the same email address. To view the details of the items that were synchronized, click the corresponding tab for specific items or Objects Matched. To save the summary information, click Save Results to File.
Perform a dry run before you enable full synchronization, or when you change the synchronization parameters. If the dry run was initiated by a configuration change, you can save the settings after the dry run is complete. If you have already added users manually, performing an Active Directory synchronization may cause previously added users to be removed. You can check the Cisco Directory Connector Dry Run Reports to verify that all expected users are present before you fully synchronize to the cloud.
To get the last features, bug fixes, and security updates, it is always important to keep your Cisco Directory Connector software up to date to the latest version. We recommend that you use this procedure to allow new versions of the connector software to be installed silently and automatically when they are available.
Step 1. From Cisco Directory Connector, select Configuration, then General, and then check Automatically upgrade to the new Cisco Directory Connector version.
Step 2. Click Apply to save your changes.
If for some reason it is elected to not have automatic upgrades, there is a procedure to manually update the Cisco Directory Connector. It is recommended to perform an upgrade at your earliest convenience during a maintenance window. Prepare at least one hour for the upgrade and note that provisioning and deprovisioning will not work during this time.
Step 3. Either click on the notification in the Windows taskbar, or right-click on the Cisco Directory Connector icon in the Windows taskbar to start the upgrade process.
Step 4. Follow the instructions to complete the upgrade.
Step 5. Relaunch the connector and sign in with your admin credentials.
Step 6. Verify the version number of the software under Help > About.
By default, Cisco Directory Connector synchronizes all users that are not computers and all groups that are not critical system objects for a domain. For more control over what objects get synchronized, you can select specific users to synchronize and specify LDAP filters by using the Object Selection page in the Cisco Directory Connector.
Step 1. From Cisco Directory Connector, go to Configuration, and then click Object Selection.
Step 2. In the Object Type section, check Users, and consider limiting the number of searchable containers for users. If you want to synchronize just users in a certain group, for example, you must enter an LDAP filter in the Users LDAP filters field. If you want to sync users that are in the Example-manager group, use a filter like this one:
(&(sAMAccountName=*)(memberOf=cn=Example-manager,ou=Example,ou=Security Group,dc=COMPANY))
Step 3. Check Identify Room to separate room data from user data. Click Customize if you want to set up additional attributes to identify user data as room data. Use this setting if you want to synchronize on-premises room information from Active Directory into the Cisco Webex cloud. After you synchronize the room information, the on-premises room devices with a configured, mapped SIP address show up as searchable entries on cloud-registered room devices. For more information, see Synchronize On-Premises Room Information to the Cisco Webex Cloud.
Step 4. Check Groups if you want to synchronize your Active Directory user groups to the cloud. Do not add a user sync LDAP filter to the Groups field. You should only use the Groups field to sync the group data itself to the cloud. In Cisco Directory Connector, you must check Groups if you are using Hybrid Data Security to configure a trial group for pilot users. See Cisco’s Deployment Guide for Hybrid Data Security for guidance. This Cisco Directory Connector setting does not affect other user synchronization into the cloud.
Step 5. Configure the LDAP filters. You can add extended filters by providing a valid LDAP filter.
Step 6. Specify the On Premises Base DNs to Synchronize by clicking Select to see the tree structure of your Active Directory. From here, you can select or deselect which containers to search on.
Step 7. Check that the objects you want to add for this configuration and click Select. You can select individual or parent containers to use for synchronization. Select a parent container to enable all child containers. If you select a child container, the parent container shows a gray check mark that indicates a child has been checked. You can then click Select to accept the Active Directory containers that you checked. If your organization places all users and groups in the Users container, you do not have to search other containers. If your organization is divided into organization units, make sure that you select OUs.
Step 8. Click Apply. Choose an option:
![]() Apply Config Changes
Apply Config Changes
![]() Dry Run
Dry Run
![]() Cancel
Cancel
You can map attributes from your local Active Directory to corresponding attributes in the cloud. The only required field is the *uid, a unique identifier for each user account in the cloud identity service. You can choose what Active Directory attribute to map to the cloud. For example, you can map firstName lastName in Active Directory or a custom attribute expression to displayName in the cloud. Accounts in Active Directory must have an email address; the uid maps by default to the ad field of mail (not sAMAccountName). If you choose to have the preferred language come from your Active Directory, then Active Directory is the single source of truth: users will not be able to change their language setting in Cisco Webex Settings and administrators won’t be able to change the setting in Cisco Webex Control Hub.
Step 9. From Cisco Directory Connector, click Configuration, and then choose User Attribute Mapping. This page shows the attribute names for Active Directory (on the left) and the Cisco Webex cloud (on the right). All required attributes are marked with a red asterisk.
Step 10. Scroll down to the bottom of Active Directory Attribute Names, and then choose one of these Active Directory attributes to map to the cloud attribute uid:
![]() mail - Used by most deployments for email format.
mail - Used by most deployments for email format.
![]() userPrincipalName - An alternative choice if your mail attribute is used for other purposes in Active Directory. This attribute must be in email format.
userPrincipalName - An alternative choice if your mail attribute is used for other purposes in Active Directory. This attribute must be in email format.
You can map any of the other Active Directory attributes to uid, but we recommend that you use mail or userPrincipalName, as indicated. For the synchronization to work, you must make sure the Active Directory attribute that you choose is in email format. Cisco Directory Connector shows a pop up to remind you if you do not choose one of the recommended attributes.
Step 11. If the predefined Active Directory attributes do not work for your deployment, click the attribute drop-down, scroll to the bottom, and then choose Customize Attribute to open a window that lets you define an attribute expression. Click the Help button to get more information about the expressions and see examples of how expressions work. Cisco Directory Connector verifies the attribute value of uid in the identity service and retrieves available users under the current user filter options. Cisco Directory Connector shows an information message stating to ensure all users have a valid email format. If the attribute cannot be verified, you will see a following warning and can return to Active Directory to check and fix the user data.
Step 12. (Optional) Choose mappings for mobile and telephoneNumber if you want mobile and work numbers to appear, for example, in the user’s contact card in the Webex app. The phone number data appears in Webex when a user hovers over another user’s profile picture. For more information on calling from a user’s contact card, see Calling in Webex (Unified CM) Deployment Guide for admins.
Step 13. Choose additional mappings for more data to appear in the contact card:
![]() departmentNumber
departmentNumber
![]() displayName
displayName
![]() given
given
![]() employeeType
employeeType
![]() manager
manager
![]() title
title
Once the attributes are mapped, the information appears when a user hovers over another user’s profile picture. After these attributes are synchronized to each user account, you can also turn on People Insights in Control Hub. This feature allows Webex users to share more information in their profiles and learn more about each other.
Step 14. After you make your choices, click Apply.
Any user data that is contained in Active Directory overwrites the data in the cloud that corresponds to that user. For example, if you created a user manually in Cisco Webex Control Hub, the user’s email address must be identical to the email in Active Directory. Any user without a corresponding email address in Active Directory is deleted. Deleted users are kept in the cloud identity service for 7 days before they are permanently deleted.
You can synchronize your users’ directory avatars to the cloud so that each avatar appears when they sign into the Cisco Webex app. Use this procedure to synchronize raw avatar data from an Active Directory attribute.
Step 1. From Cisco Directory Connector, go to Configuration, click Avatar, and then check Enable.
Step 2. For Get avatar from, choose AD attribute, and then choose the Avatar attribute that contains the raw avatar data that you want to synchronize to the cloud.
Step 3. To verify that the avatar is accessed correctly, enter a user’s email address, and then click Get user’s avatar. The avatar appears to the right.
Step 4. After you verify that the avatar appeared correctly, click Apply to save your changes.
The images that are synchronized become the default avatar for users in the Cisco Webex app. Users are not allowed to set their own avatar after this feature is enabled from Cisco Directory Connector. The user avatars synchronize over to any matching accounts on the Webex site.
You can also synchronize your users’ directory avatars to the cloud so that each avatar appears when they sign into the Cisco Webex app. Use this procedure to synchronize avatars from a resource server. The avatar URI pattern and the server where the avatars reside must be reachable from the Cisco Directory Connector application. The connector needs http or https access to the images, but the images do not need to be publicly accessible on the internet. The avatar data synchronization is separated from the Active Directory user profiles. If you run a proxy, you must ensure that avatar data can be accessed by NTLM authentication or basic-auth. The URI pattern and variable value in this procedure are examples. You must use actual URLs where your directory avatars are located.
Step 1. From Cisco Directory Connector, go to Configuration, click Avatar, and then check Enable.
Step 2. For Get avatar from, choose Resource server and then enter the Avatar URI Pattern – For example, http://www.example.com/dir/photo/zoom/{mail: .*?(?=@.*)}.jpg
Let’s look at each part of the avatar URI pattern and what they mean:
![]() http://www.example.com/dir/photo/zoom/ – The path to where all of the photos that will be synced is located. It has to be a URL which the Cisco Directory Connector service on your server must be able to reach.
http://www.example.com/dir/photo/zoom/ – The path to where all of the photos that will be synced is located. It has to be a URL which the Cisco Directory Connector service on your server must be able to reach.
![]() mail: – Tells Cisco Directory Connector to get the value of the mail attribute from Active Directory
mail: – Tells Cisco Directory Connector to get the value of the mail attribute from Active Directory
![]() .*?(?=@.*) – A regex syntax that performs these functions:
.*?(?=@.*) – A regex syntax that performs these functions:
• .* – Any character, repeating zero or more times.
• ? – Tells the preceding variable to match as few characters as possible.
• (?= ... ) – Matches a group after the main expression without including it in the result. Directory Connector looks for a match and doesn’t include it in the output.
• @.* – The at-symbol, followed by any character, repeating zero or more times.
![]() .jpg – The file extension for your users’ avatars. See supported file types in this document and change the extension accordingly.
.jpg – The file extension for your users’ avatars. See supported file types in this document and change the extension accordingly.
Step 3. (Optional) If your resource server requires credentials, check Set user credential for avatar, then either choose Use current service logon user or Use this user and enter the password.
Step 4. Enter the Variable Value – For example: [email protected].
Step 5. Click Test to make sure the avatar URI pattern works correctly.
Example: In this example, if the mail value for one AD entry is [email protected] and jpg images were being synchronized, the Final Avatar URI is http://www.example.com/dir/photo/zoom/abcd.jpg
Step 6. After the URI information is verified and looks correct, click Apply. For detailed information about using regular expressions, see the Microsoft Regular Expression Language Quick Reference.
The images that are synchronized become the default avatar for users in the Cisco Webex app. Users are not allowed to set their own avatar after this feature is enabled from Cisco Directory Connector. The user avatars synchronize over to any matching accounts on the Webex site.
In some cases, organizations will want to synchronize on-premises room information from Active Directory into the Cisco Webex cloud. After you synchronize the room information, the on-premises room devices with a configured, mapped SIP address show up as searchable entries on cloud-registered Webex devices (Room, Desk, and Board).
Step 1. From the Cisco Directory Connector, go to Configuration, and then choose Object Selection.
Step 2. Check Identify Room to separate the room data from the user data so it is identified properly. When this setting is disabled, room data is treated the same way as user synchronized data.
Step 3. Go to User Attribute Mapping, and then change the attribute mapping for the cloud attribute sipAddresses;type=enterprise.
![]() Choose MSRTCSIP-PrimaryUserAddress if available.
Choose MSRTCSIP-PrimaryUserAddress if available.
![]() If you don’t have the MSRTCSIP-PrimaryUserAddress attribute in your Active Directory schema, use another field such as ipPhone.
If you don’t have the MSRTCSIP-PrimaryUserAddress attribute in your Active Directory schema, use another field such as ipPhone.
Step 4. Create a Room Resource mailbox in Exchange. This adds the msExchResourceMetaData;ResourceType:Room attribute which the connector then uses to identify rooms.
Step 5. From Active Directory users and computers, navigate to and edit properties of the Room. Add the Fully Qualified SIP URI with a prefix of sip:
Step 6. Do a dry run sync and then a full run sync in the connector. The new room objects are listed Objects Added and matched room objects appear in Objects Matched in the dry run report. Any room objects flagged for deletion are under Rooms Deleted. The dry run results show any room resources that were matched. This setting separates the Active Directory room data (including the room’s attribute) from user data. After the synchronization finishes, the cloud statistics on the connector dashboard show room data that was synchronized to the cloud.
Now that you have done these steps, when you do a search on a Webex cloud-registered device, you will see the synchronized room entries that are configured with SIP addresses. When you place a call from the Webex device on that entry, a call is placed to the SIP address that was been configured for the room. Know that the endpoint cannot loop a call back to Cisco Webex. For test dialing devices, these devices must be registered as a SIP URI on-premises or somewhere other than Webex. If the Active Directory room system that you are searching for is registered to Webex and the same email address is on the Webex Room Device, Desk device, or Webex Board for Calendar Service, then the search results will not show the duplicate entry. The Room, Desk, or Board device is dialed directly in Webex, and a SIP call is not made.
By default, the organization contacts or administrators always receive email notifications. With this setting, you can customize who should receive email notifications that summarize directory synchronization reports.
Step 1. From Cisco Directory Connector, click Configuration, and then choose Notification.
Step 2. Check Enable notification if you want to override the default notification behavior and add one or more email recipients.
Step 3. Click Add and then enter an email address. If you enter an email address with an invalid format, a message pops up telling you to correct the issue before you can save and apply the changes.
Step 4. If you need to edit any email addresses that you entered, double-click the email entry in the left column and then make any changes you need to.
Step 5. After you added all the valid email addresses, click Apply.
If you decided that you want to remove email addresses, you can click an email to highlight that entry and then click Remove.
While we have focused on the dry run and configurations of mapping attributes. They will not be replicated to Cisco Cloud until a synchronization is performed. There are two synchronization types:
![]() Do a Full Synchronization of Active Directory Users into the Cloud for when you first synchronize new users to the cloud. You do so from Actions > Sync Now > Full, and then users from the current domain are synchronized.
Do a Full Synchronization of Active Directory Users into the Cloud for when you first synchronize new users to the cloud. You do so from Actions > Sync Now > Full, and then users from the current domain are synchronized.
![]() Set the Connector Schedule and Run an Incremental Synchronization after you run a full synchronization and if you want to pick up changes after the initial synchronization. This type of synchronization is recommended to pick up on small changes made to the Active Directory user source.
Set the Connector Schedule and Run an Incremental Synchronization after you run a full synchronization and if you want to pick up changes after the initial synchronization. This type of synchronization is recommended to pick up on small changes made to the Active Directory user source.
By default, an incremental synchronization is set to occur every 30 minutes (on versions 3.4 and earlier) or every 4 hours (on versions 3.5 and later), but you can change this value. The incremental synchronization does not occur until you initially perform a full synchronization.
When you run a full synchronization, the connector service sends all filtered objects from your Active Directory (AD) to the cloud. The connector service then updates the identity store with your AD entries. If you created an auto-assign license template, you could assign that to the newly synchronized users. If you have multiple domains, you must do this step on each of the Cisco Directory Connector instances you have installed for each Active Directory domain. Cisco Directory Connector synchronizes the user account state in Active Directory, any users that are marked as disabled also appear as inactive in the cloud.
If you want the Cisco Webex user accounts to be in Active status after the full synchronization and before users sign in for the first time, you must complete these steps to bypass the email validation:
![]() Integrate Single Sign-On with your Cisco Webex organization.
Integrate Single Sign-On with your Cisco Webex organization.
![]() Use Cisco Webex Control Hub to verify and optionally claim domains contained in the email addresses.
Use Cisco Webex Control Hub to verify and optionally claim domains contained in the email addresses.
![]() Suppress automatic email invites in Control Hub, so that new users won’t receive the automatic email invitation to Webex. If emails aren’t suppressed, an email is sent to each user with an invite to join and download Cisco Webex. (You can do your own email campaign if desired.)
Suppress automatic email invites in Control Hub, so that new users won’t receive the automatic email invitation to Webex. If emails aren’t suppressed, an email is sent to each user with an invite to join and download Cisco Webex. (You can do your own email campaign if desired.)
You must set up an auto-assign license template in Control Hub before you use it on new Cisco Webex users that you synchronized from Active Directory. The auto-assign license template only works on new synched users. If you update any user, you must remove those users and add them back in for the template to apply to them.
Step 1. Choose one:
![]() After first-time sign in, if the dry run is complete and looks correct for all domains, click Enable Now to allow automatic synchronization to occur.
After first-time sign in, if the dry run is complete and looks correct for all domains, click Enable Now to allow automatic synchronization to occur.
![]() From Cisco Directory Connector, go to the Dashboard, click Actions, choose Synchronization Mode > Enable Synchronization, and then click Sync Now > Full to start the synchronization.
From Cisco Directory Connector, go to the Dashboard, click Actions, choose Synchronization Mode > Enable Synchronization, and then click Sync Now > Full to start the synchronization.
Step 2. Confirm the start of the synchronization. For any changes that you make to users in Active Directory (for example, display name), Cisco Webex Control Hub reflects the change immediately when you refresh the user view, but the Cisco Webex app reflects the changes up to 72 hours after you perform the synchronization.
![]() During the synchronization, the dashboard shows the synchronization progress; this may include the type of synchronization, the time it started, and what phase in which the synchronization is currently running.
During the synchronization, the dashboard shows the synchronization progress; this may include the type of synchronization, the time it started, and what phase in which the synchronization is currently running.
![]() After synchronization, the Last Synchronization and Cloud Statistics sections are updated with the new information. User data is synchronized to the cloud.
After synchronization, the Last Synchronization and Cloud Statistics sections are updated with the new information. User data is synchronized to the cloud.
![]() If errors occur during the synchronization, the status indicator ball turns red.
If errors occur during the synchronization, the status indicator ball turns red.
Step 3. Click Refresh if you want to update the status of the synchronization. (Synchronized items appear under Cloud Statistics.)
Step 4. For information about errors, select the Launch Event Viewer from the Actions toolbar to view the error logs.
Step 5. (Optional) To set a synchronization schedule for ongoing incremental syncs to the cloud, click Configuration, and then choose Schedule.
Step 6. Specify the Incremental Synchronization Interval in minutes. By default, an incremental synchronization is set to occur every 30 minutes. The full incremental synchronization does not occur until you initially perform a full synchronization.
Step 7. Change the Send Reports per… time value if you want the change how often reports are sent.
Step 8. Check Enable Full Sync Schedule to specify the days and times on which you want a full synchronization to occur.
Step 9. Specify the Failover Interval in minutes.
Step 10. Click Apply.
After full synchronization is completed, the status for directory synchronization updates from Disabled to Operational on the Settings page in Cisco Webex Control Hub. When all data is matched between on-premises and cloud, Cisco Directory Connector changes from manual mode to automatic synchronization mode. Unless you integrate single sign-on, verify domains, and optionally claim domains for the email accounts that you synchronized, and suppress automated emails, the Cisco Webex user accounts remain in a Not Verified state until users sign in to Cisco Webex for the first time to confirm their accounts. If you have multiple domains, do this step on any other Cisco Directory Connector that you have installed. After synchronization, the users on all domains you added are listed in Cisco Webex Control Hub. If you integrated Single Sign-On with Cisco Webex and suppressed email notifications, the email invitations are not sent out to the newly synchronized users. You cannot manually add users in Cisco Webex Control Hub after the Cisco Directory Connector is enabled. Once enabled, user management is performed from Cisco Directory Connector and Active Directory is the single source of truth.
When you remove a user from Active Directory, the user is soft-deleted after the next synchronization. The user becomes Inactive but the cloud identity profile is kept for seven days (to allow for recovery from accidental deletion). When you check Account is disabled in Active Directory, the user becomes Inactive after the next synchronization. The cloud identity profile is not deleted after seven days, in case you want to enable the user again. Note these exceptions to an incremental synchronization (follow the full synchronization steps previously provided):
![]() In the case of an updated avatar but no other attribute change, incremental sync will not update the user’s avatar to the cloud.
In the case of an updated avatar but no other attribute change, incremental sync will not update the user’s avatar to the cloud.
![]() Configuration changes on attribute mapping, base DN, filter, and avatar setting require a full synchronization.
Configuration changes on attribute mapping, base DN, filter, and avatar setting require a full synchronization.
After you complete a full user synchronization from Cisco Directory Connector in to Cisco Webex Control Hub, you can use Cisco Webex Control Hub to assign the same Cisco Webex service licenses to all your users at once or add additional licenses to new users if you already configured an auto-assigned license template. You can make individual user account changes after this initial step.
When you assign a license to a Cisco Webex user, that user receives an email confirming the assignment, by default. The email is sent by a notification service in Cisco Webex Control Hub. If you integrated Single Sign-On (SSO) with your Cisco Webex organization, you could also suppress these automatic email notifications in Control Hub if you prefer to contact your users directly.
At the time of full synchronization, the user is created in the cloud, no service assignments are added, and no activation email is sent. If emails are not suppressed, the new users receive an activation email when you assign services to users by a standard user management method in Control Hub, such as CSV import, manual user update, or through successful auto-assignment completion.
Step 1. From the customer view in https://admin.webex.com, go to Users, click Manage Users, choose Modify all synchronized users, and then click Next.
Step 2. If you suppressed email notifications, read the prompt that appears and then click Next.
Step 3. On Sync Status, click the refresh arrow to reload the list, click Next, and then choose one:
![]() Check the Cisco Webex services that you want to apply initially to all of the synchronized users.
Check the Cisco Webex services that you want to apply initially to all of the synchronized users.
![]() If the license template has already been configured and activated, Cisco Webex services from the template are applied to the newly synchronized users.
If the license template has already been configured and activated, Cisco Webex services from the template are applied to the newly synchronized users.
If you selected the same Cisco Webex services for all your users, afterwards you can change license assigned individually or in bulk in Cisco Webex Control Hub.
Webex User Service Assignment
Site administrators can manage Webex users from Control Hub and can individually or bulk assign privileges to people in their organization. Take note that Site administrators can only set a user’s privileges if the user has Cisco Webex Enterprise Edition.
Step 1. From the customer view in https://admin.webex.com, go to Users, and select the user whose privileges you would like to change.
Step 2. Under Services, select Meeting.
Step 3. Under Webex Meeting Sites, select the Webex site to update privileges.
Step 4. Select User Privileges and choose to:
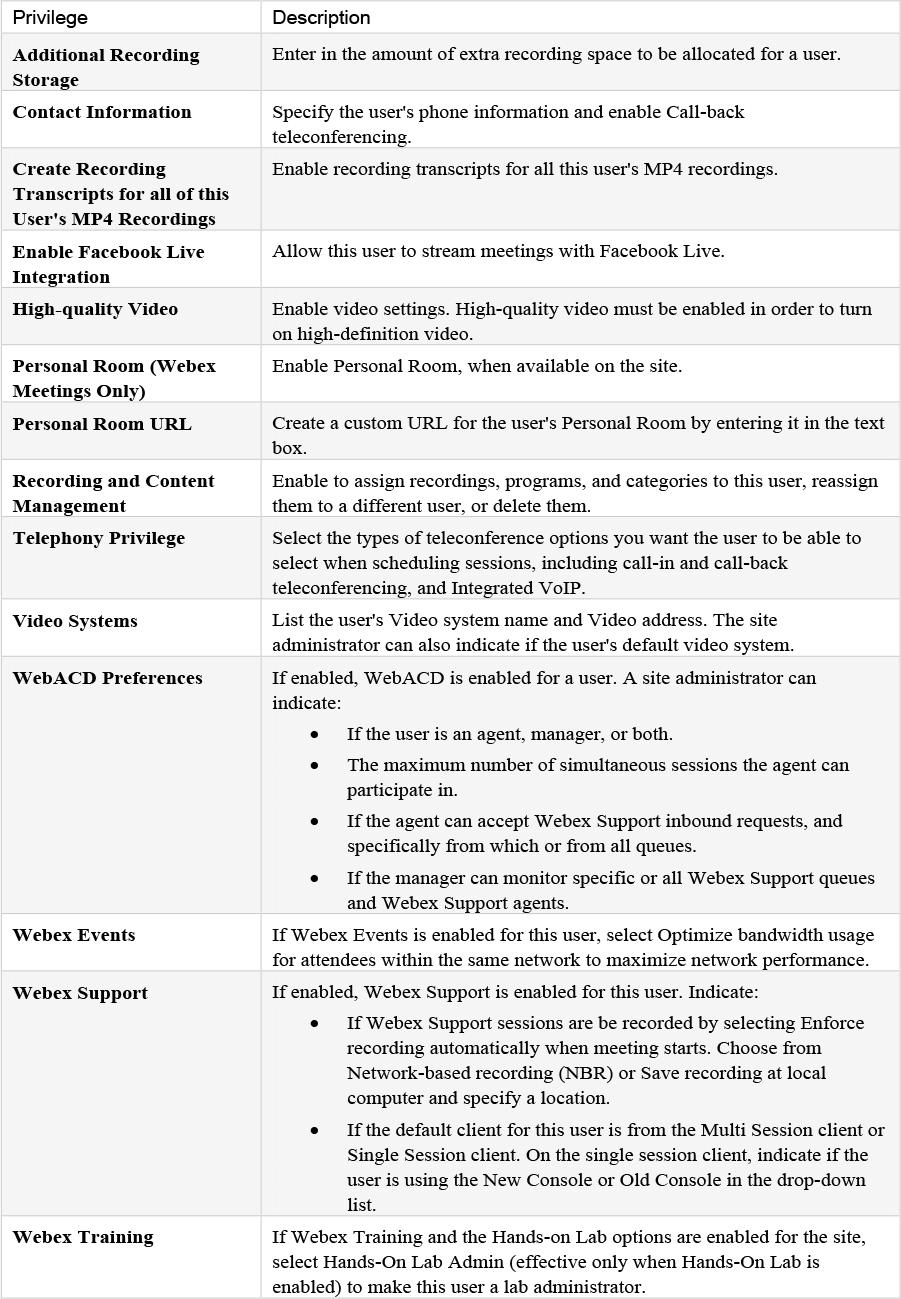
![]() View and adjust the user’s basic privileges, such as telephony privileges for hosting a meeting, privileges for personal room, high-quality video, and high-definition video. Select Advanced Settings to configure the user’s more detailed privileges and settings. Utilize Table 17-2 for advanced user privileges and click Update after making changes in the advanced settings page.
View and adjust the user’s basic privileges, such as telephony privileges for hosting a meeting, privileges for personal room, high-quality video, and high-definition video. Select Advanced Settings to configure the user’s more detailed privileges and settings. Utilize Table 17-2 for advanced user privileges and click Update after making changes in the advanced settings page.
Table 17-2 Advanced User Setting Options
Step 5. When complete, select Save.
You can leave the Display Name field empty (default) so that users’ first and last names appear in meetings and reports or you can overwrite their official names by entering their preferred names in the Display Name field. To update Display Names in bulk, modify user attributes with CSV File Imports. To manually update an individual user’s Display Name in Control Hub, follow these instructions:
Step 1. From the customer view in https://admin.webex.com/, go to Management > Users, and select the user that you’d like to give a display name.
Step 2. Select the edit icon by the user’s name to open the user details.
Step 3. Add a Display Name and click Save.
To edit multiple users’ services, go to Users, click Manage Users, select Export and import users with a CSV file, and then click Export. In the file that you download, simply add True for the services you want to assign to each of your users. Import the completed file, click Add and remove services, and then click Submit.
Exam Preparation Tasks
As mentioned in the section “How to Use This Book” in the Introduction, you have a couple of choices for exam preparation: the exercises here, Chapter 24, “Final Preparation,” and the exam simulation questions in the Pearson Test Prep Software Online.
Review All Key Topics
Review the most important topics in this chapter, noted with the Key Topics icon in the outer margin of the page. Table 17-3 lists a reference of these key topics and the page numbers on which each is found.
Table 17-3 Key Topics for Chapter 17

Complete Tables and Lists from Memory
There are no Memory Tables in Chapter 17.
Define Key Terms
Define the following key terms from this chapter and check your answers in the glossary:
Microsoft Active Directory Lightweight Directory Services (AD LDS)
Application Programmer Interface (API)
HyperText Transfer Protocol (HTTP)
Secure HyperText Transfer Protocol (HTTPS)
Lightweight Directory Access Protocol (LDAP)
Uniform Resource Locator (URL)
Q&A
The answers to these questions appear in Appendix A. For more practice with exam format questions, use the Pearson Test Prep Software Online.
1. What are the requirements and recommendations for synchronizing Active Directory information from multiple domains into the Webex cloud?
2. What are the high-level steps required to deploy Webex Hybrid Directory Service?
Answers
1. For a Cisco Directory Connector deployment, keep the following requirements and recommendations in mind if you are going to synchronize Active Directory information from multiple domains into the cloud:
![]() A separate instance of Cisco Directory Connector is required for each domain.
A separate instance of Cisco Directory Connector is required for each domain.
![]() The Cisco Directory Connector software must run on a host that is on the same domain that it will synchronize.
The Cisco Directory Connector software must run on a host that is on the same domain that it will synchronize.
![]() We recommend that you verify or claim your domains in Cisco Webex Control Hub.
We recommend that you verify or claim your domains in Cisco Webex Control Hub.
![]() If you want to synchronize more than 50 domains, you must open a ticket to get your organization moved to a large org list.
If you want to synchronize more than 50 domains, you must open a ticket to get your organization moved to a large org list.
![]() If desired, you can synchronize room resource information along with user accounts.
If desired, you can synchronize room resource information along with user accounts.
2. The following are the high-level steps required:
1. Virtual Microsoft Windows Servers are created and deployed in the enterprise data center. After the Windows servers are deployed, the administrator logs into the Webex Control Hub at https://admin.webex.com to enable directory synchronization and download the Cisco Directory Connector software installation package.
2. Next, Directory Connector is installed on the Windows servers.
3. After Directory Connector is installed, the administrator configures the connector, and an initial synchronization occurs between Microsoft Active Directory and the Directory Connector and between the Directory Connector and Webex.
4. Once the initial synchronization completes, the administrator configures the schedule for periodic incremental and full synchronizations.
5. After that, the administrator manages users and provisions them for cloud services as appropriate.