
8
Storing data

What you will learn
You might find this surprising, but you’ve already learned most of what you need to know to tell a computer what to do. You can write a program that gets data from the user, stores it, makes decisions based on data values, and repeats behaviors using loop constructions. You also know how to use functions to break a solution down into components. These are the fundamentals of programming, and all programs are built on these core capabilities.
However, there is one more thing you need to know before you can write most any kind of program. You need to be able to write programs that can manage large amounts of data. In this chapter, you’ll learn just that, along with some extremely powerful JavaScript techniques for working with the HTML Document Object Model (DOM) that underpins the display of a page.
Use the debugger to see code run
Highlight the best and worst sales locations
Collections of data
Your fame as a programmer is beginning to spread far and wide. Now the owner of an ice-cream parlor comes to you and asks that you write a program to help her track sales results. She currently has six stands around the city selling ice cream treats. What she wants is quite simple—she wants a program where she can enter the sales value from each stand and then get the total sales from all of them, as well as the best and worst sales. She wants to use this analysis to help her plan the location of her stands and reward the best sellers. If you get this right, you might be getting some free ice cream, so you agree to help.
As usual, the starting point for your program is a design that shows how the application should look. Figure 8-1 shows what the customer has drawn up. She wants to enter the sales values and then press a Calculate button to display the analysis. Because you have read Chapter 7 and you know about error handling, you ask her about the upper and lower limits on the data values and what the program should do if any of the values are out of range. Your customer hasn’t thought of this, but you discuss the application and agree on some additions to the design as shown in Figure 8-2.
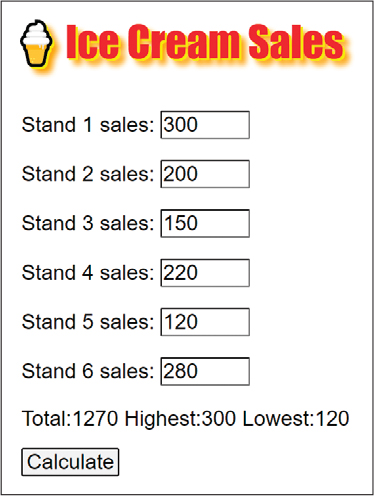
Figure 8-1 Ice cream calculator

Figure 8-2 Ice cream calculator errors
Ice cream sales
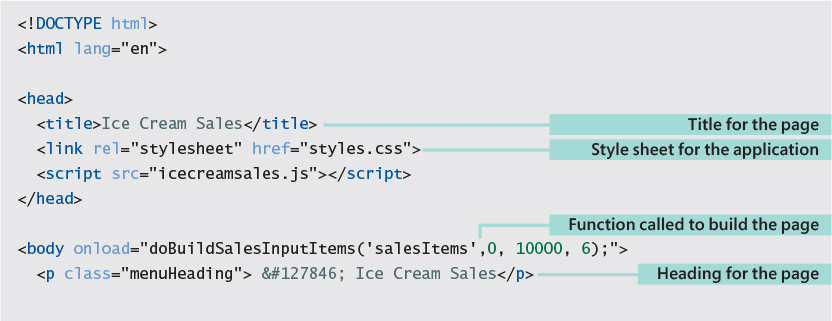
Now that you have a specification, all you must do now is write the actual program itself. The program will need variables to hold the sales values entered by the user, and it can use logical expressions to compare sales values and choose the largest (so that it can find the biggest and smallest sales). You also know from earlier chapters how to display results to the user by setting the innerText of a paragraph in the page. We could start with the HTML for the application:
<!DOCTYPE html> <html lang="en"> <head> <title>Ice Cream Sales</title> <link rel="stylesheet" href="styles.css"> <script src="icecreamsales.js"></script> </head> <body> <p class="menuHeading"> 🍦 Ice Cream Sales</p> <p> <label class="menuLabel" for="s1SalesText">Stand 1 sales (0-10000):</label> <input class="menuInput" type="number" id="s1SalesText" value="0" min="0" max="10000"> </p> <p> <label class="menuLabel" for="s2SalesText">Stand 2 sales (0-10000):</label> <input class="menuInput" type="number" id="s3SalesText" value="0" min="0" max="10000"> </p> <p class="menuText" id="outputParagraph"> </p> <p> <button class="menuText" onclick="doCalc()">Calculate</button> </p> </body> </html>
This HTML contains an input field for each of the six sales that are to be entered by the user. (The listing above only shows the first two to save space.) Each input field has an id attribute so that the program can find it and load the value stored in it. The input field uses a new feature of HTML that we have not seem before, the label, as shown in Figure 8-3.
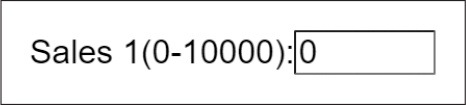
Figure 8-3 Single data entry element
Labeling HTML input elements
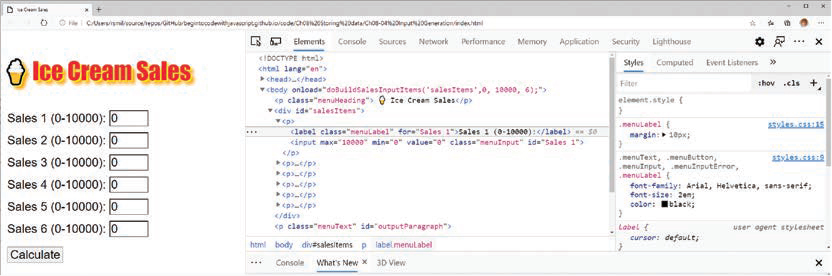
Each of the elements on the application has a label next to it. In Figure 8-3, the label shows that the input is for the sales of ice cream stand number 1. In earlier programs, we have just displayed text next to the input element to label it, but it turns out that there is a better way to label inputs on an HTML page. We can use the label element to explicitly link a label with an input.
<p>
  <label class="menuLabel" for="s1SalesText">Stand 1 sales (0-10000):</label>
  <input class="menuInput" type="number" id="s1SalesText" value="0" min="0"
  max="10000">
</p>
The label and the input are held inside a paragraph. The label contains the label text for the input. It also contains a for attribute that matches the id of the target of the label. Both the label and the input are assigned style sheet classes to manage their appearance on the page.
Calculate total ice cream sales
The HTML contains a button that the user presses to perform the calculation. When this is pressed, the JavaScript function doCalc is called. This function must get the values from the input elements on the HTML page and then calculate the results that the user wants to see.
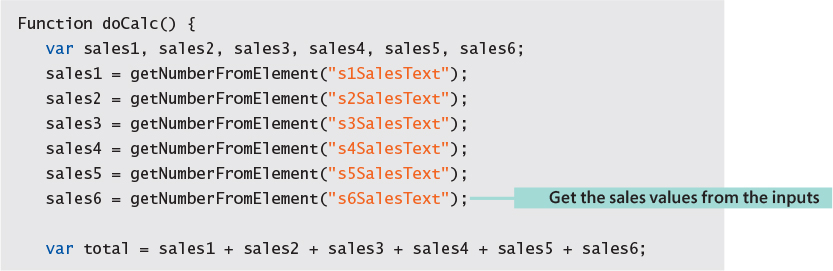
This is the first part of the function doCalc. The function runs when the user presses the Calculate button. It calls another function with the name getNumberFromElement that we created in the “The customizable dice app” section in Chapter 7. This function is supplied with a string containing the id of the element in the HTML, and it returns the value that the element contains. Once each sales value has been obtained, the program then works out the total sales value by adding all the sales together.
Find the highest ice cream sales
Finding the total sales was easy, so now we need to add the code to find the highest and the lowest sales. Fortunately, we know about the use of relational operators to compare values and logical expressions to combine the comparisons. You can refresh you understanding of these in Chapter 5 in the “Boolean expressions” section. With that knowledge, we can write a JavaScript statement that can determine whether the sales from ice cream stand 1 are the largest:

The code above uses an if construction to decide whether the sales from stand 1 are the largest. The sales from stand 1 are largest if sales1 is greater than the sales values from the other five stands. The logical expression checks to see whether the sales from stand 1 are greater than the sales from stand 2, stand 3, stand 4, and stand 5. The expression sets the variable highestSales to the value in sales1 if sales1 is the largest value.
One problem with this design is that our program needs a test like this for all six sales values, so we need to write five more tests. Then we need another six tests to determine the lowest sales value, and if the ice cream parlor owner sets up more ice cream stands, this would make our program even more complex.
We have hit this problem because we have started from the wrong place. Sometimes, it is a good idea to use an existing program as the basis of a new one, but we have discovered that a design created to work with two values (the maximum and minimum values for a random number) does not scale up very well. We must do a lot of work to extend this structure to read in and manipulate six values.
I’ve watched a lot of people learn to program, and I’ve seen quite a few work much harder than they needed to because they took something that they know how to do and tried to extend it to do a different task. This is a bit like trying to dig the foundations of a house with a spoon just because you know how use a spoon but don’t fancy learning how to drive the mechanical digger. We have already decided that the best programmers are “creatively lazy.” This might be a good point to try for some creative laziness. If you find yourself having to repeat chunks of code, you might want to stop and think about a better way of doing this. If you really want to do this the hard way, I’ve put my partially completed version of the program in the Ch08 Storing dataCh08-01 Unworkable Ice Cream Sales folder.
Creating an array
JavaScript also provides an array component that can be used to create indexed storage of a collection of data values. Each item in an array is called an element. A program addresses a particular element in the array by using an indexer, which is a number that identifies the element in the array. Some programmers refer to an indexer as a subscript. Let’s investigate how arrays work.
MAKE SOMETHING HAPPEN
Investigating arrays
Start by opening the application in the Ch08 Storing dataCh08-02 Array Ice Cream Sales folder in the example code. This application works, so you can enter some data and check the results. We are just going to investigate arrays from the developer console. Open the Developer View by pressing the function key F12. Now we can start typing commands into the JavaScript command prompt. The first thing we are going to do is create an empty array. Type in the statement below:
> var sales = [];
When you press Enter, the JavaScript console creates an empty array with the identifier sales. This action does not return a result, so the console displays the message undefined:
> var sales = [];
<- undefined
We can ask the JavaScript console to show the contents of any variable by entering the name of that variable. This works with an array, too. Type in the identifier sales and press Enter.
> sales
<- []
The console shows us that the sales array is empty by displaying two brackets with nothing between them. Now lets store a sales value in the array. This statement will add an element at the start of the array:
> sales[0] = 100;
When you press the Enter key, JavaScript must store the value 100 in the array element with the index 0.
> sales[0] = 100;
<- 100
This element does not exist, so JavaScript adds it to the array automatically. Because an assignment statement returns the value that is assigned, the console displays the value 100, which is what was assigned to the array element. We can view the contents of the array again to see what has changed. Type in the identifier sales and press Enter.
> sales
<- [100]
The console shows us that the sales array now contains a single value. We can use an array element as we would use any other variable. What do you think the following statement would do? Type it in and find out.
> sales[0] = sales[0] + 1;
<- 101
This statement adds 1 to the element at the start of the array. Let’s add a second element to the array. We create the new element just by storing something in it.
> sales[1] = 150;
<- 150
This element does not exist, so JavaScript adds it to the array automatically. Because an assignment statement returns the value assigned, the console displays the value 150. Let’s see what has changed in the array. Type in the identifier sales and press Enter.
> sales
<- [101, 150]
JavaScript shows us the element at the start of the array (which has 101 in it) and the next element (which has 150 in it). JavaScript will add new elements to the array each time whenever it needs to. You can think of the array as “stretching” to hold whatever items it needs to.
The JavaScript in the Ch08 Storing dataCh08-02 Array Ice Cream Sales example program uses arrays to store the sales values. Below, you can see the statements in the program that get the data into the array for analysis.
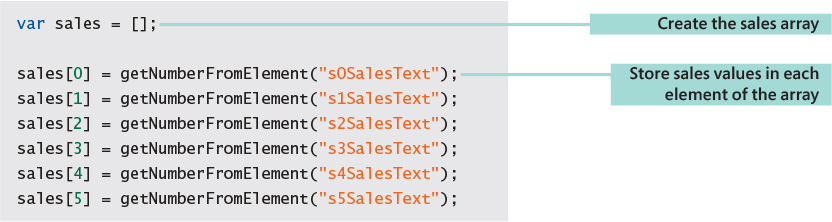
The statements above create an array called sales and then set elements in the array with the sales values from the elements on the HTML page. Note that because the array elements are indexed from 0, I’ve changed the IDs for the input elements to match. In other words, the element at the start of the array has an index value of 0 and is assigned a value from an element with an ID that matches.
sales[0] = getNumberFromElement("s0SalesText");
Processing data in an array
Storing the sales in an array makes it easy for a program to work through the elements in it. We can access individual elements by using index values, or we can use the for-of loop to work through the elements.

The statements above work through the sales array and calculate the total number of sales. The great thing about this code is that it would work for any size of array.
Finding the highest and lowest sales values
Another request the customer made was for the program to find the highest and lowest sales in the set of results. Before you write the code to do this, it’s worth thinking about the algorithm to use. In this case, the program can implement an approach very similar to one that a human would use. If you gave me some numbers and asked me to find the highest value, I would compare each number with the highest value I had seen so far and update the current highest value each time I found a larger one. In programming terms, this algorithm would look a bit like the following. (This is not JavaScript as such; a description like this is sometimes called pseudocode. It looks something like a program, but it is there to express an algorithm, not to run inside a computer.)
if(new value > highest I've seen)
   highest I've seen = new value
At the start, we set the “highest I’ve seen” value to the value of the element at the start of the array because this is the highest we’ve seen at the start of the process. I can put this behavior into a function that will calculate the highest value in any array that is passed into it.

A program can use the getHighest function to get the highest value from any array of values. We can create helper functions called getHighest, getLowest, and getTotal to use in our application.
function doCalc() {

    var sales = [];

    sales[0] = getNumberFromElement("s0SalesText");
    sales[1] = getNumberFromElement("s1SalesText");
    sales[2] = getNumberFromElement("s2SalesText");
    sales[3] = getNumberFromElement("s3SalesText");
    sales[4] = getNumberFromElement("s4SalesText");
    sales[5] = getNumberFromElement("s5SalesText");

    var totalSales = getTotal(sales);
    var highestSales = getHighest(sales);
    var lowestSales = getLowest(sales);

    var result = "Total:" + totalSales + " Highest:" + highestSales +
                 " Lowest:" + lowestSales ;

    var outputElement = document.getElementById('outputParagraph');

    outputElement.textContent = result;
}
The completed version of doCalc is shown above. It creates a sales array, uses the analysis functions to create the results, and then displays them. You can find this version of the program in the Ch08 Storing dataCh08-02 Array Ice Cream Sales examples folder.
WHAT COULD GO WRONG
Detecting invalid sales values
The ice cream sales application configures the input elements in the HTML document to have an input type of number.
<input class="menuInput" type="number" id="s0SalesText" value="0" min="0" max="10000">
However, using this input type would not stop the user from directly entering invalid values:

In this case, the user has accidentally pressed the minus key when typing in the number and entered a negative value. The good news is that the getNumberFromElement function that the program is using to read the sales value will return a result of NaN (not a number) when it reads a value outside the min and max settings for an element. (You can learn more about how this works in Chapter 7 in the section “Add error handling to an application.”)
The bad news is that our program will not handle this correctly. We can fix the problem by using the way that JavaScript works with numbers. Remember that any mathematical calculation involving the value “not a number” will return a result of “not a number.” So if the total of all the sales values is not a number this means that at least one of the sales values is not a number. This is something our program can test for.
var totalSales= getTotal(sales);

var result;

if (isNaN(totalSales)) {
    result = "Please enter numbers in the correct range"
}
else {
    var highestSales = getHighest(sales);
    var lowestSales = getLowest(sales);

    result = "Total:" + totalSales + "Highest:" + highestSales +
             "Lowest:" + lowestSales;
}
The code above shows how this works. If the totalSales value is not a number, the result variable is set to an error message. Otherwise, result is set to the calculated values. You can find this version of the program in the example folder Ch08 Storing dataCh08-03 Error handling Ice Cream Sales.
Build a user interface
The program that we have created meets the specification set by the customer. Which makes the next phone call from our customer rather unwelcome. She says she has some good news. Her company has just got another two ice cream stands. This means that we will have to add two extra elements to the HTML for the application and then make sure that the data analysis program loads these new values in correctly.
A way to make our lives easier, in terms of both creating the HTML data entry page and processing the data, is to make more use of the Document Object Model (DOM) that underpins the application. In Chapter 6, in the “Building web pages from code” section, we made some use of this when we created the Multiplication Table Generator application, which generates HTML output elements using a for loop and adds the elements to the document for display to the user. If you are not sure how this works, take a look at the Code Analysis section “Building HTML from JavaScript” in Chapter 6.

This is the HTML page for a version of the ice cream sales program that automatically generates the input paragraphs. The paragraphs will be generated by the doBuildSalesInputItems method, which is connected to the onload event. We first saw the onload event in Chapter 3 in the “Create a ticking clock” section when we used onload to start the clock ticking when the clock page was loaded.
For the ice cream sales application, the onload event will trigger the creation of the input items when the page is loaded. The input items will be added as children of the div element with the salesItems ID. A div element is an HTML element that is used to group things. We first saw div in Chapter 3 in the “Formatting parts of a document using div and span” section.
doBuildSalesInputItems ('salesItems',0, 10000, 6);
The doBuildSalesInputItems function is called with four arguments:
The ID string of the element that will contain the input items to be created. The input items will be added to the children of that element.
The minimum value that can be input to this element. This value is used to create the input element. In the case of our application, the smallest number of sales is 0.
The maximum value that can be input to this element. In the case of our application, the customer has said that sales of more than 10,000 are impossible.
The number of input paragraphs that are to be created. The statement above will create six input elements.
Now that we’ve seen how the doBuildSalesInputItems function is called, let’s look at the function code itself.

The function uses a for loop to generate each input paragraph in turn by calling the function makeInputPar. The end point of the loop is determined by the noOfItems parameter. The values of the min and max parameters are passed into the function makeInputPar. Let’s have a look at how this works.
Create an input paragraph
The program must build the HTML elements into which the user will enter the data. I’ve created this as a function so that we can use it anywhere we want to read a value from a user. Figure 8-3 shows the display that the input paragraph should produce. This reads in the sales for ice cream stand number 1.
The HTML that describes this input paragraph is shown below:
<p>
  <label class="menuLabel" for="s1SalesText">Stand 1 sales (0-10000):</label>
  <input class="menuInput" type="number" id="s1SalesText" value="0" min="0" max="10000">
</p>
The input paragraph is composed of a label element that contains the Stand 1 sales (0-10000) label and an input element to receive the data. The label and the input elements are assigned style classes to make it easy to manage their appearance. The input element has min and max attributes that are used by the browser to limit the values that the user can enter.
In our first version of this application, the input paragraphs were defined in the HTML file for the application. There were six such paragraphs, one for each of the ice cream stands. However, we can simplify the application by using JavaScript to make the input paragraphs.
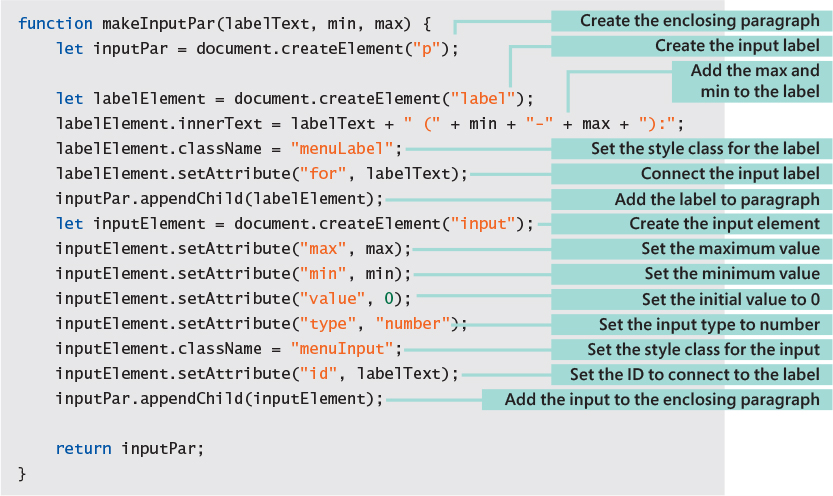
The function makeInputPar uses the createElement function provided by the document object to create a paragraph element (inputPar) and give the paragraph two child elements. The children are a label element (labelElement) and an input element (inputElement). The makeInputPar function is supplied with three parameters:
The label to be used for the input
The maximum input value
The minimum input value
A program could make the input element for the first ice cream stand by making the following call:
var stand1input = makeInputPar("Sales 1", 0, 10000);
However, we are not going to do this because we are using a loop to create the inputs and add them to a container.
CODE ANALYSIS
Input generation
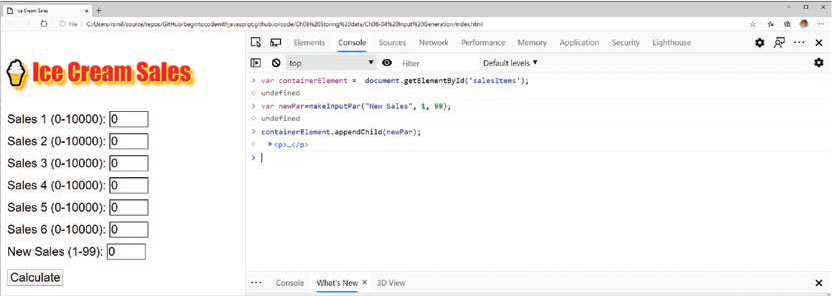
We can see this input generation in action by using the JavaScript console. We might also have some questions about it. Start by opening the application in the Ch08 Storing dataCh08-04 Input Generation folder in the example code. This application contains an HTML page which has been generated by the doBuildSalesInputItems function. Open the Developer View by pressing F12.
> var containerElement = document.getElementById('salesItems');
> var newPar=makeInputPar("New Sales", 1, 99);
> containerElement.appendChild(newPar);
doBuildSalesInputItems('salesItems',0, 10000, 6);
Now we need to move on to how we can make a JavaScript program that can process the data that has been entered. To do that, we need to write some code to create a sales array from the contents of the input elements in the document.
Read back the values
In the previous version of the ice cream program, we had a separate statement that created an array element for each sales value. Below is the statement that got the sales for the initial two ice cream stands.
sales[0] = getNumberFromElement("s0SalesText");
sales[1] = getNumberFromElement("s1SalesText");
If the customer added more stands, we would then have to modify the program and add more statements. For 12 ice cream stands, we would need 12 of these statements. There is a better way to do this. We can use a loop to read the values from the HMTL elements. The loop will work through all the input paragraphs on the page. The input paragraphs are children of the sales item element.
Figure 8-4 shows how these elements are structured. On the left, we have the div element with the ID salesElements that contains all the elements. The div element contains six paragraphs, one for each ice cream stand. The first paragraph gets the input for ice cream stand 1. It contains a label and an input item. To get the user input, the program must work through the sales items and extract the data from the input element.
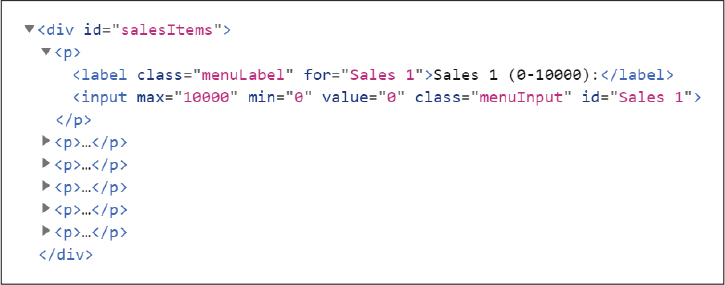
Figure 8-4 Input paragraphs
The program can use a for–of loop to work through the children and extract the value of each item. The code above shows how this works.
CODE ANALYSIS
Reading numbers

let salesValue = getNumberFromElement(item.children[1]);
This version of the getNumberFromElement function is supplied with a reference to the element it is reading, so it fetches the value input and returns the result as a number.
MAKE SOMETHING HAPPEN
Use the debugger to see code run
You might be finding the code above a little hard to follow. You might be thinking that it would be wonderful to be able to watch it execute and see what each statement does. It turns out that you can do just that by using the debugger which is built into the Developer View in the browser. In this case we are not debugging the program because there’s something wrong with it; we just want to see how it works. Start by opening the application in the Ch08 Storing dataCh08-04 Input Generation folder in the example code. This application contains an HTML page which has been generated by the doBuildSalesInputItems function. Enter some sales figures for the ice cream stands and then open the Developer View by pressing F12. Select the Sources tab in the Developer View.
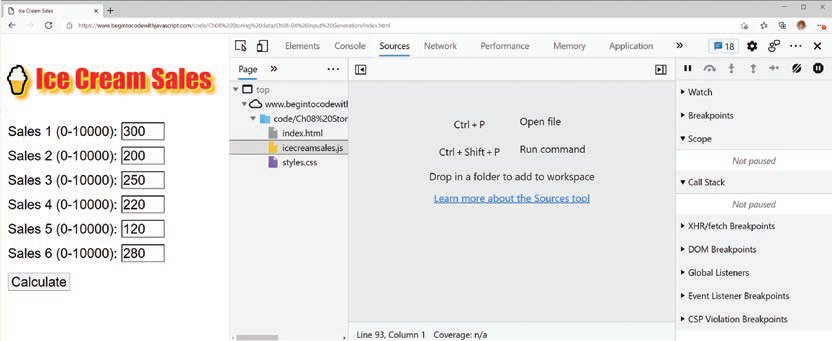
The Sources tab will show you all the files that make up the application. Note that the browser display that you see might not match the one above. I’ve changed the arrangement of the windows in the browser and zoomed in on the Developer View to make it clearer for the book. However, you can drag the window borders around to get a similar view.
We want to take a look at the JavaScript code which is in the file icecreamsales.js. Click this file name (it is highlighted in darker gray in the figure above).
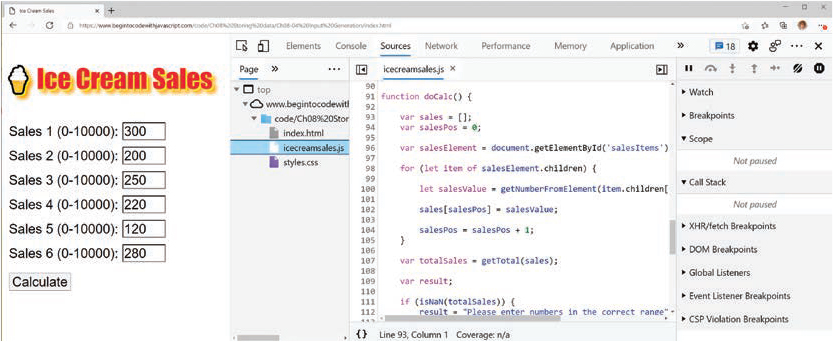
The Sources view now shows us the JavaScript code in a window. Use the scroll bars to move down the code to find the doCalc function. This function is called from the HTML when the Calculate button is pressed. We are going to put a breakpoint at the first statement of this function. When the program reaches the breakpoint, it will “takes a break.” It will pause and we will be able to investigate what the function is doing and even run through the statements one at a time. We set a breakpoint by clicking just to the left of the line number in the listing.
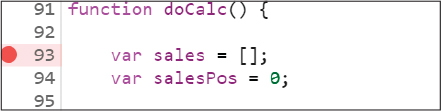
The display will show a red dot at that position as shown above. Click to add a breakpoint. If you click in the wrong place, you can remove a breakpoint by clicking the red dot. Once you have set the breakpoint, click the Calculate button in the application to run the function. The browser will call the doCalc function and then pause when it hits the breakpoint.
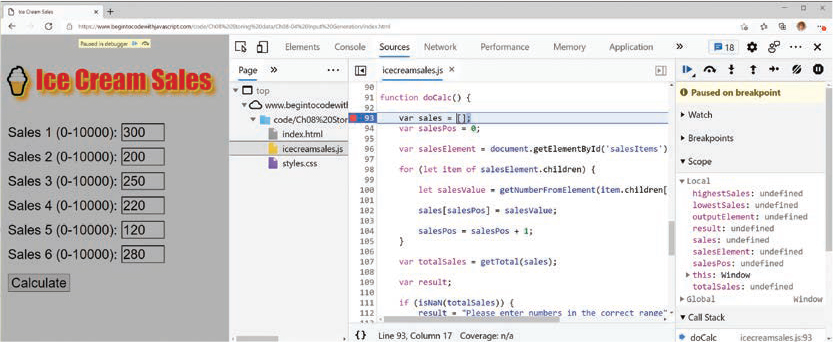
The program is paused at the statement where we set the breakpoint. You can see it highlighted in blue. We can use the transport controls to make the program run one statement at a time.

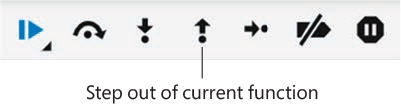
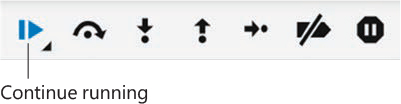
The transport controls look a bit like Egyptian hieroglyphics. They are in the top right-hand area of the screen in my browser, but they might be somewhere else on yours. We will find out more about each control as we go. For now, we want to use the Step control, which is indicated above. Click this, and the program will execute the indicated statement and then move on to the next one.
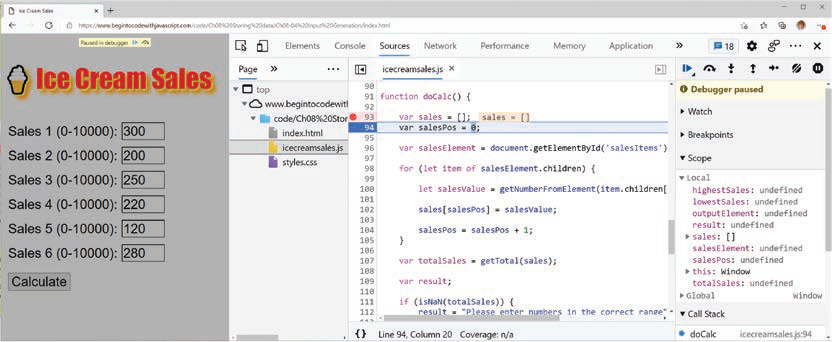
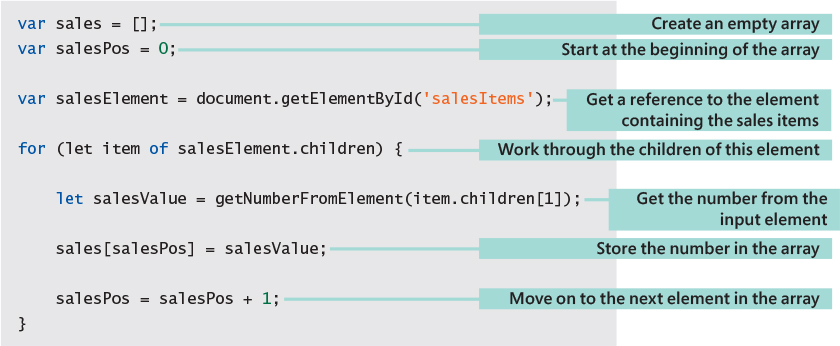
Note that the content of the sales array is shown for you. If you press the Step button again you are shown the contents of the salePos variable. You can keep pressing the button (or use the function key F9) to step through the program. You can watch the program get a reference to the sales element and then enter the for loop, which will work through the elements. When the program calls the getElement function you will find that the view moves into that function and you step through the statements in that.
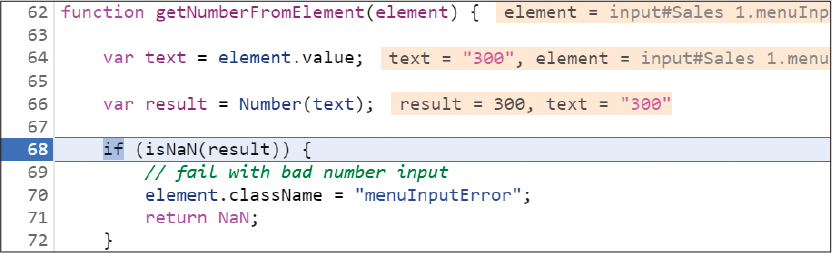
The getNumberFromElement function reads the text from an input element and converts it into a number. Here, you can see that the text is 300 as a string, and the result is 300 as a value. If you look back at the application you will find that the first sale value is 300.
You can use another transport button to step out of the getNumberFromElement function and return to where it was called.
When you have seen enough you can press the transport control that resumes normal program execution. If you leave the breakpoint set, you will find that if you press the Calculate button in the application, it will stop at the breakpoint the next time around.
You can spend as much time as you like working through code. You can also use this technique to put breakpoints in any of the other sample programs and watch what they do, too.
Now that you know how the program works, you can make the change that adds two new ice cream stands to the system. The good news is that you only have to change the value 6 to the value 8 somewhere in the application. You can find my version in the examples in the Ch08 Storing dataCh08-05 Eight Stand Version folder.
Your customer has had another idea. Rather than the application asking for the sales of Stand 1, she would like the application to show named locations, as shown in Figure 8-5.
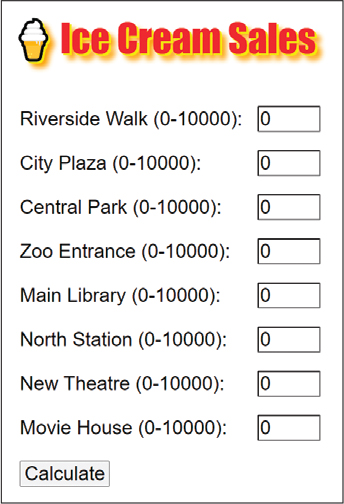
Figure 8-5 Named stands
Arrays as lookup tables
This looks like it might be quite hard to achieve, but it turns out that we can use arrays to help. In this case, we are going to use an array to hold a list of place names. When we first created an array, we used the following statement:
var newArray=[];
The characters [ and ] mark the start and end of the array that is being created. This statement creates an empty array, because there is nothing between the [ and the ]. We set the values into an array when we create it by putting values here:
var newArray=[1,2];
This statement creates an array called newArray that contains two numbers. The element at the start of the array contains the value 1, and the next element contains the value 2. This statement is exactly equivalent to these three:
var newArray=[];
newArray[0]=1;
newArray[1]=2;
We can also create arrays of strings. Consider the following statement:
var standNames = ['Riverside Walk','City Plaza','Central Park','Zoo Entrance',
    'Main Library','North Station','New Theatre','Movie House'];
This statement creates a variable called standNames that contains the names of all the stands. The item on the right of the assignment is the actual array. We can also use arrays like this in function calls:
doBuildSalesInputItems('salesItems',0, 10000,
  ['Riverside Walk', 'City Plaza', 'Central Park', 'Zoo Entrance',
  'Main Library','North Station','New Theatre','Movie House']);
This statement calls the function doBuildSalesItems. The final parameter to this call is an array that contains the names of all the ice cream stand locations. This version of the function can then use these names to build the HTML page:

Rather than creating the name “Sales x,” where x is the number of the stand, this version of the function just works through the place names and feeds each name in turn into the makeInputPar function. The function doBuildSalesInputItems is called from the HTML when the page is loaded by the browser. The function call is triggered by the onload event:
<body onload="var standNames = doBuildSalesInputItems('salesItems',0, 10000,
  ['Riverside Walk', 'City Plaza', 'Central Park','Zoo Entrance',
    'Main Library','North Station','New Theatre','Movie House']);">
The text above comes from the HTML file for the application. The body element can contain an attribute called onload, which contains a string of JavaScript to be obeyed when the page is loaded by the browser. For this application, the string of JavaScript calls the doBuildInputSalesItems to create the input paragraphs for the sales values. You can find this function used in the example program in the Ch08 Storing dataCh08-06 Named Stands folder.
CODE ANALYSIS
Creating named ice cream stands
This is all rather clever stuff. But you might have some questions:
function changeArrayElement(inputArray)
{
    inputArray[0]=99;
}
var testArray = [0];
changeArrayElement(testArray);
Creating fixed width layouts
If you run the program in the Ch08 Storing dataCh08-06 Named Stands folder, you will notice that it works perfectly well, but the layout of the input elements is not very consistent, as you can see in Figure 8-6.
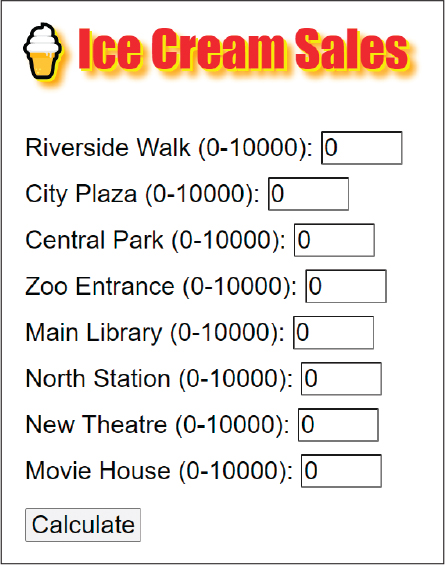
Figure 8-6 Poor layout
The input elements are not lined up vertically because the names of the different locations are of different lengths. This is not a programming problem, so we don’t need to make changes to the JavaScript, but it would be useful to be able to modify the style of the labels for each item so that they are the same size.

The CSS text above is the definition of the menuLabel style class, which is used to style the menu label (hence the name). I’ve added two new attributes to the style definition. The first tells the browser that this element is a block that should be displayed inline with enclosing elements. The second item sets the width of the element to 12 characters. If we make these changes to the style sheet, the input display matches what the customer requested in Figure 8-6. You can find this version of the application in the Ch08 Storing dataCh08-07 Named Stands fixed width example folder.
MAKE SOMETHING HAPPEN
Highlight the best and worst sales locations
Your customer (who, by now, has given you a lot of ice cream) has one final request. She would like the program to highlight the best and worst sales locations in the display. She would like the highest sales to be highlighted yellow and the lowest to be highlighted in blue.
Hint: to do this the program must make a second pass through the sales elements after it has determined the highest and lowest values. Any sales elements with a sales value that matches the highest can be assigned a yellow style class. Any sales elements with a sales value that matches the lowest can be assigned a blue style class. This is the best way to do it because it is possible to have several sales values that are the highest or the lowest. You can find my version in the examples in the folder Ch08 Storing dataCh08-08 Highlight High and Low.
Interactive Multiplication Tables Tester
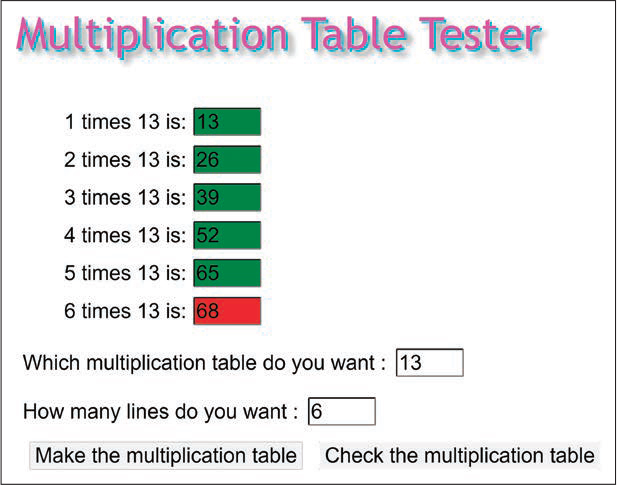
We can use our new skills to improve the multiplication table tester application that we created in Chapter 6. The version above generates a multiplication table for any value and then checks what the user enters. You can find the working application in the Ch08 Storing dataCh08-08 Multiplication Table Tester example folder.
It has been suggested that the program could be improved if it displayed the scores at the end:

To make this work, you have to add a new paragraph to the HTML to display the result and then work through the program to find out where the table is scored. Have a go yourself and then take a look at my version in the Ch08 Storing dataCh08-09 Multiplication Table Tester with scores example folder.
What you have learned
In this chapter, you discovered how a program can use arrays to store large amounts of data. You’ve also built on your knowledge of how a JavaScript program can generate document elements and display them.
A variable can be declared as an array and acts as a container for multiple values. Each value in an array is stored in an element, and a particular element can be identified by an index value. An index is sometimes called a subscript.
Elements in an array with a particular index value are created when a value is assigned to that element. There is no need to specify the size of an array when it is created.
An array value exposes a length property that gives the number of elements in the array.
Element index values start at 0 and extend up to the value of (length-1). This range of index values is called the bounds of the array. There is no element with an index value of the length of the array.
If a program uses an index value outside the bounds of the array, a value of
undefinedis returned.A program can use the
for–ofloop construction to work through the elements in an array. A program can also work through elements of an array by creating a variable that counts through the index values in the array.An array with a number of elements can be created using a single statement.
Inputs in an HTML document can be assigned
labelelements that display a prompt for that input.The Developer Console in the browser can be used to step through JavaScript programs and view the contents of variables held in them.
Here are some questions that you might like to ponder about the use of functions in programs:
How do I find out the size of an array?
An array variable provides a property called length, which contains the number of elements in the array.
Does every element in an array have to be the same kind of data?
No. An array can contain numbers, strings, and references to other objects.
Do I have to put a value into every element?
No. For example, you could create an element with index 0 and another element with index 5. All the elements in the middle (meaning those with index values 1, 2, 3, and 4) would be set to undefined.
Can I store a table of data as an array?
A JavaScript array has only one dimension—the length of the array. You can think of it as a row. Some programming languages allow you to create “two-dimensional arrays.” You can think of these as a grid with width and height. JavaScript does not allow you to create two-dimensional arrays. However, you could create a table data structure by creating an array that has an array as each element.
What happens to my program if I used an index value outside the range of the array?
If the program is storing data in this location, the array will be extended to hold the value at the new index. If the program is reading data from this location, the array access will return the value undefined.
Can I use indexes on other data items?
Yes. You can use an index to obtain the individual characters in a string.
What happens if I don’t initialize the elements in a new array?
Any elements that you don’t initialize are set to the undefined value.
What happens if I add two arrays together using the + operator?
It would be nice if adding two arrays together created a long array with one set of elements appended to the other. Unfortunately, this does not happen. Instead Java JavaScript creates the string version of each array and then appends one string to the other. However, JavaScript array objects provide a concat method that can be used to concatenate (add) an array onto the end of another.
Can I use an image as a label for an input item?
Yes, you can. The content of a label can be an image or some text and an image.
What is the difference between the children of an HTML element and a JavaScript array?
They are implemented in slightly different ways, but you can use an index to access values in each, and they both expose a length property. You can also use the for–of loop construction to work through the elements in either.
Can I use an array to allow a function to return more than one value?
What a good question. Yes, a program can return an array, which can contain multiple values. However, the function and the caller would have to agree on what was in each of the array elements. In the next chapter, we will discover a much neater way of creating objects that contain named data items.
Can I use the JavaScript debugger to debug the JavaScript in any web page?
Yes. If you press F12 when viewing your favorite web page, you can then open up the JavaScript files and take a look at them.