6. API Modeling
You can use an eraser on the drafting table or a sledgehammer on the construction site.
Frank Lloyd Wright
Developers are often tempted to start writing code immediately. Code is the primary tool for developers. It is everything – the hammer, screwdriver, ruler, and the saw. When code is seen as the one and only tool to design an API, the quality of the API design can suffer. The march to produce code for production becomes more valued than the outcomes the API is meant to produce.
Of course, code produces value when it is used to explore a specific area of a solution to reduce risk. It is also valuable to use code to experiment, surface unknowns, or explore a new technology. The term tracer bullet was applied to software by David Thomas and Andrew Hunt in their book “The Pragmatic Programmer”. The term is used to describe the use of code as a means of exploration and risk reduction. Tracer bullet code delivers value through learning rather than through production-ready code.
API modeling is a tracer bullet for API design. It is a technique for exploring the necessary elements of an API prior to the design and delivery process. API modeling (see Figure 6.1) helps to bring together the insights and artifacts from the previous steps into an API profile that describes the scope and intent of the APIs needed to deliver the desired outcomes of end users.

Figure 6.1 The final step of the Define Phase is to create API profiles, in preparation for transitioning to the Design Phase.
What is API Modeling?
Just as a beautiful web design begins from a wireframe, a great API design begins with an API model that helps define its scope and responsibilities. The goal of API modeling is to fully understand and validate the needs of developers and end users. Unlike a wireframe, which focuses strictly on end user interaction, API modeling focuses on both developer and end user goals. Often these goals are aligned, but sometimes they are not. API modeling helps to surface issues quickly so that they may be resolved prior to writing code.
API modeling uses job stories, activities, and activity steps as inputs to produce a cohesive view of each API, called an API profile. An API profile captures characteristics about the API, including its name, scope, operations, and emitted events that will be used to deliver desired outcomes. API modeling is used prior to designing and developing APIs while the cost of change is significantly lower.
After completing API modeling, teams will be ready to migrate the API profiles produced into an API design. API modeling can be used as input for a single API design style of choice, such as REST, GraphQL, or gRPC. It may also be used to inform the design of an API that uses a combination of these API styles to support the various digital channels for customers and partner integration needs.
The API Profile Structure
API profiles capture all necessary information about an API, independent of the API style or styles that it will expose, e.g., REST and GraphQL. The API profile is used to drive the design of an API, but also provides the beginnings of the API documentation effort during the early stages of API definition.
An API profile captures the following details about each API:
■ The name and a short description of the API
■ The scope of the API (internal, public, partner, etc.)
■ API operations with input and output message details
■ Participants allowed to perform each operation, in preparation for securing the API
■ Events generated by each API operation, to drive extensibility beyond the APIs original intent
■ (Optional) architectural requirements identified, such as a service-level agreement (SLA)
A spreadsheet or document is sufficient to capture each API profile. Using a collaborative spreadsheet allows teams to capture and refine API profiles without the need to email changes between team members. Some teams prefer to use tools such as wikis for capturing API profiles. No matter what tool is selected, be sure that anyone in the organization has access to read and comment on the API profiles produced. Using a tool that is only provisioned for a subset of the organization is not recommended.
Figure 6.2 shows a template that is easy to read and fits both spreadsheet and document formats.

Figure 6.2 A template for capturing API profiles in a spreadsheet or document.
What About Using the OpenAPI Specification (OAS)?
The OpenAPI Specification (OAS) is a machine-readable format used to capture the description of REST-based and RPC-based APIs. The format was designed to aid in the generation of API reference documentation and boilerplate code. As such, the OAS structure is rooted in URL paths. Since API modeling is prior to a complete API design that includes resource paths, OAS isn’t an appropriate format for API profiles. However, API profiles will help accelerate the creation of OAS-based API descriptions later in the design process.
API teams have found that using the ALPS specification, detailed in Chapter 13, is a useful way to produce a machine-readable API profile that may be used to accelerate the API modeling and design process independent of the chosen API style(s).
The specifics about using the OpenAPI Specification to capture the API description of a REST-based API design is addressed in Chapter 7.
The API Modeling Process
The goal of the API modeling process is to produce one or more API profiles, one for each API identified during modeling. The modeling process is divided into five quick steps. Each step adds additional detail to the API profile that results in a blueprint of the API to emerge.
For those that have produced the artifacts from the previous ADDR Process steps, they will typically complete the API modeling process in under two hours. For those that skipped some of the steps, API modeling may take several hours to complete.
Step 1: Capture API Profile Summary
The first step in the process is to fill out the basic details of the API profile including the API name, a short description, and the scope of the API. The scope of the API should correspond to the scopes that the organization supports, which are typically internal, public, and partner. Remember that these details can be changed as the team gains more understanding about the purpose and responsibilities of each API.
Next, capture the API operation names and participants based on the activities and activity steps captured previously. For each activity step identified previously, convert it into an operation name that uses a consistent naming format. It is suggested to use lowerCamelCase as it makes it easier for the team to explore the API model using sequence diagrams, as recommended later in this chapter.
Figure 6.3 demonstrates how to capture the start of an API profile using JSON’s Bookstore’s Shopping API, previously identified during the Align phase of the design process.

Figure 6.3 JSON’s Bookstore’s Shopping API with a name, description, scope, and operation names filled in using the details from the bounded context exercise in Chapter 5.
Step 2: Identify the Resources
The next step is to use the API profile to identify resources for the API. Resources are often domain entities that will be operated upon by the API. Finding the target for each operation helps to identify the initial set of resources. This is often a difficult task when first starting an API design. However, the Align and Define phases of the process provides sufficient understanding to inform designers of an initial set of candidate resources.
Using the Shopping API example to illustrate the resource identification process, Figure 6.4 shows that the Book and Cart resources are used by the operations and are therefore resource candidates.
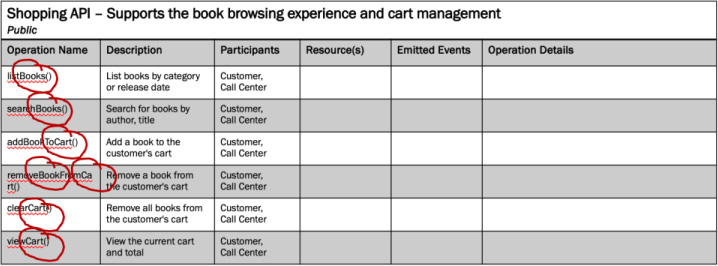
Figure 6.4 Identifying the Book and Cart resources for JSON’s Bookstore’s Shopping API profile.
For each candidate resource, create a table that captures the resource name and any properties that are currently known. Including a description helps to align understanding and will be useful when moving into the API design phase.
When creating an API profile, focus on capturing only essential properties. This may include properties that are essential to the operation. So doing will speed up the modeling process and ensure the focus remains on the API profile rather than implementation details.
Figure 6.5 shows the Shopping API resources, including a new resource called Book Author that was discovered while enumerating the properties for the Book Resource.

Figure 6.5 Capturing each resource for the Shopping API, along with some basic details about each one as a starting point.
A Word of Caution on Resource Identification
While it may be tempting to use a database schema as the starting point for resource identification, keep in mind that API designs should not leak internal implementation details. A database schema reflects optimizations for transactional read and write operations rather than exposing business domain concepts over a network API.
It is best to work top-down when modeling an API to avoid leaking internal data model decisions into the API design. If the implementation phase demonstrates a one-to-one relationship between resources and a database schema, then it becomes a “happy accident”, as painter Bob Ross would say.
Step 3: Define the Resource Taxonomy
Once the resources have been identified, it is time to find the relationships between resources to define the API taxonomy. A taxonomy is a classification of concepts and how they are arranged. An API taxonomy captures the set of resources the API will offer and their relationships to other resources.
There are three relationship types that resources may have between one another:
■ Independent: The resources exist stand-alone and do not require another resource’s existence. Independent resources may reference other independent or dependent resources.
■ Dependent: One resource cannot exist without the existence of a parent resource. Be sure not to confuse a dependent resource relationship with one resource referencing another. This is a very specific case and not frequently encountered.
■ Associative: The resources may exist independently, however their relationship requires additional properties to describe it. The result is a third resource that represents the relationship between the two resources. The third resource may have an independent or dependent relationship between each of the other two resources.
Figure 6.6 shows the resources identified for the Shopping API, along with possible relationships. The relationship between a Book resource and Book Author resource is independent. There may be a reference between them but each one exists independently of the other.
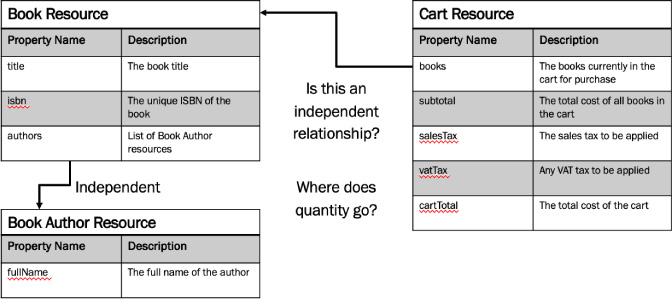
Figure 6.6 Reviewing the resource relationships introduces a challenge: where does the quantity of books belong?
Notice in Figure 6.6 that there is a question that needs to be addressed regarding where the quantity is specified when a book is added to a cart. This needs to be explored further. When a Book is added to a Cart, there are additional details that may be important including the quantity and the price of each Book. This indicates an associative relationship that requires a new resource, in this case a Cart Item. The result is shown in Figure 6.7.

Figure 6.7 A new resource, Cart Item, is added due to the associative relationship between Book and Cart.
The operation addBookToCart() is renamed addItemToCart() and removeBookFromCart() is renamed removeItemFromCart() to reflect the introduction of the Cart Item resource, as shown in Figure 6.8.
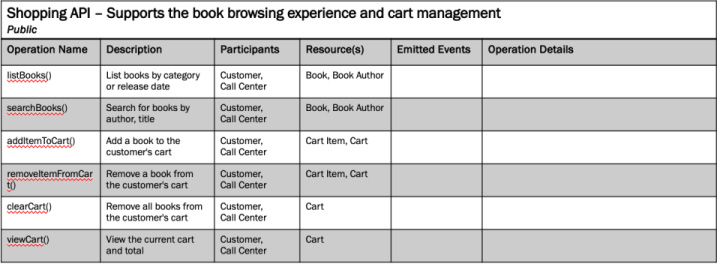
Figure 6.8 The Shopping API profile, revised to reflect the introduction of the Cart Item resource.
Step 4: Add Operation Events
Next, expand each API operation with the significant events that it will emit. These events may be used for data analytics purposes or as events that other systems may react to when they occur because of the operation.
The EventStorming canvas, created during the Align Phase of the project, will provide a starting point for important business events that were captured using the orange sticky notes. If you didn’t use EventStorming, capture the events as they are identified during the modeling process.
Event names should use past-tense naming and should apply the preferred standards and practices used within the organization. Figure 6.9 expands the previous model with events that each operation will emit. Notice the past-tense naming in the Emitted Events column.
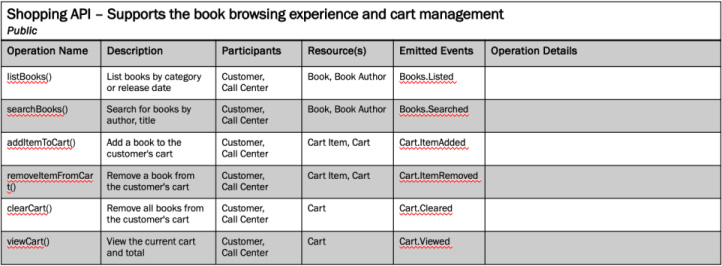
Figure 6.9 JSON’s Bookstore’s Shopping API, now with emitted events added for each operation in the API profile.
The API profile now reflects the events that the identified operations will emit. Some operations may only emit one event, some more than one event, and some may not need to emit any event at all.
Step 5: Expand Operation Details
Finally, expand the details of each operation to include important input and output details. Don’t be too concerned with capturing everything at this point as that is not necessary. Focus on the essential input and output resources and parameters necessary to convey understanding across the team. There is no need to capture the type of each property or define a schema in the API model at this stage. Avoid being overly concerned with finding every parameter as there will be plenty of time during the design phase to capture the complete design. If necessary, use a “parking lot” to capture important items that will need to be addressed as the design emerges.
An additional level of detail that is used to inform the upcoming API design is the matter of operations being synchronous or asynchronous. Synchronous APIs will operate in a traditional request/response manner common to HTTP. Asynchronous APIs operate in the background rather than providing an immediate result. Asynchronous APIs are discussed in detail in Chapter 9. For now, note the synchronous nature of each operation.
An often-overlooked detail for operations is safety. Safety and idempotence are important concerns when selecting the appropriate HTTP method. Each HTTP method specification describes the safety and idempotence that a server must implement. Safety classifications are also important for clients to consider as part of their error handling code.
There are three classifications of safety for HTTP operations:
■ Safe – the operation does not make any state changes to the target resource(s). This is assigned to all read-based (GET) operations.
■ Idempotent – the operation makes state changes to the target resource(s), but if the operation is executed with the same input, it will produce the same result. This is important as it informs API clients if they can re-issue a request that previously failed, without additional side effects. This is assigned to replace and delete operations (PUT and DELETE).
■ Unsafe – the operation makes state changes to the target resource(s) and is not able to guarantee the same results if called multiple times with the same input. This is typically assigned to create and update (POST and PATCH) operations.
Review each operation to determine the safety classification type that is required of the operation. Doing so during API modeling will provide additional insights during the design process.
Figure 6.10 shows the Shopping API example, expanded to include input and output details for each operation, synchronicity, and safety classification.

Figure 6.10 JSON’s Bookstore Shopping API with operation details added to the API profile.
The API profile may then be finalized by capturing any architectural requirements, such as service-level agreements (SLAs) that may be required to support consumers and industry standards that may need to be considered during design (e.g., adherence to an open banking standard).
Refer to the API workshop examples repository available on GitHub for API profile templates and examples to help jumpstart the effort.
Validating the API Model with Sequence Diagrams
The API design team has a responsibility to ensure the APIs will meet the requirements of everyone using it. This requires two final actions: validating the API model to ensure no gaps exist and gathering feedback from stakeholders.
Validate the API profiles against the previously produced original job stories and activities to validate that all requirements have been met. To validate the API model, create sequence diagrams that demonstrate typical usage scenarios. These scenarios may be sourced from the EventStorming canvas, job stories, and other sources. Figure 6.11 shows an example scenario that supports a shopping and checkout experience using the modeled APIs.

Figure 6.11 JSON’s Bookstore’s Place an Order job story, represented as a sequence diagram to ensure all operations were identified as part of the API modeling process to implement job story outcomes and associated activities.
During the validation process, clarify all details to ensure full alignment and definition of the API scope and operations. If operations are missing to complete the scenario, revisit the modeling steps to capture the missing operations.
Once the model has been validated, share the model with all stakeholders and obtain feedback. If API modeling was performed with the entire team, including business and product stakeholders, then feedback was obtained during the process. Otherwise, share the produced assets and seek to incorporate feedback prior to moving into the design phase of the process.
Evaluating API Priority and Reuse
Not every API has equal weight in the delivery schedule. A sizing exercise is an optional step prior to moving into API design. The results of this exercise help teams avoid building APIs unnecessarily or in the wrong priority order.
First, assess the business and competitive value that the API offers. Ask the following questions to assess the value that each API brings:
■ Does the API help provide a competitive advantage over other market offerings?
■ Does the API reduce the cost of doing business, perhaps by reducing manual processes?
■ Does the API create a new revenue stream or improve an existing revenue stream?
■ Is the API producing business intelligence, market insights, or decisioning factors?
■ Does the API automate repetitive tasks that free the organization for more critical business functions?
If the answer to all the questions is ‘no’, then the value produced is low. Answering yes to one or more questions results in the API offering value to the business or marketplace.
Next, size the effort to build each API from scratch. One approach is to use a relative sizing approach by classifying them as small, medium, or large. Consider the details surfaced during EventStorming and writing activity steps to roughly estimate the size and complexity to build the API from the ground-up.
Finally, determine if there are existing APIs that could be leveraged or extended. These APIs may be commercial off the shelf (COTS) APIs, internal APIs produced by another team, or open-source solutions that could be leveraged to speed delivery. Organizations often forget this step, resulting in wasted time and effort building duplicate or non-core APIs. Performing this step encourages organizations to reuse APIs first and build new APIs only when necessary.
Figure 6.12 shows a tabular format that captures examples of these details for JSON’s Bookstore API profiles modeled in this chapter.
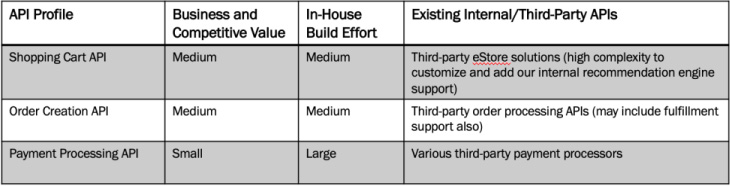
Figure 6.12 A sizing and prioritization effort for the current set of JSON’s Bookstore’s API profiles captured during API modeling.
Summary
API modeling helps to bring together the insights and artifacts produced in the Align phase of the design process into a model that describes the scope and intent of the APIs required. Review the following checklist to ensure nothing was missed:
■ Resource taxonomies that identify the properties of each resource along with the relationships and dependencies between them
■ API profiles are created that offer a high-level specification of each API, independent of how the APIs will be designed and implemented
■ Sequence diagrams help to validate how the APIs deliver the outcomes captured in the job stories
■ Sizing and prioritization help to ensure that APIs are reused when possible and built when necessary
By spending time modeling APIs, teams can clearly articulate the needs of each API. They are also able to identify the effort involved in building them from scratch and consider internal or third-party APIs that may meet requirements. Reusing existing APIs saves weeks or months of delivery effort.
With API modeling complete, the Define Phase of the design process has reached an end. The API Design Phase is next. This phase migrates the API profiles into a specific API style. The next chapter will show how to use API profiles to inform the design of a REST-based API. If the target API style is not REST, feel free to jump to the appropriate chapter.