
Hour 16. Particle Systems
What You’ll Learn in This Hour:
► The basics of particle systems
► How to work with modules
► How to use the Curves Editor
In this hour, you’ll learn how to use Unity’s particle system. You’ll start by learning about particle systems in general and how they work. You’ll experiment with the many different particle system modules. You’ll wrap up the hour by experimenting with the Unity Curves Editor.
Particle Systems
A particle system is basically an object or component that emits other objects, commonly referred to as particles. These particles can be fast, slow, flat, shaped, small, large, and so on. The definition is very generic because these systems can achieve a great variety of effects with the proper settings. They can make jets of fire, plumes of billowing smoke, fireflies, rain, fog, or anything else you can think of. These effects are commonly referred to as particle effects.
Particles
A particle is a single entity that is emitted by a particle system. Because many particles are generally emitted quickly, it is important for particles to be as efficient as possible. This is the reason that most particles are 2D billboards. A billboard is a flat image that always faces the camera. This gives the illusion that billboards are 3D, while still giving great performance.
Unity Particle Systems
To create a particle system in a scene, you can either create a particle system object or add a particle system component to an existing object. To create a particle system object, select GameObject > Effects > Particle System. To add a particle system component to an existing object, select the object and click Add Component > Effects > Particle System.
Try it Yourself
Creating a Particle System
Follow these steps to create a particle system object in a scene:
1. Create a new project or scene.
2. Add a particle system by selecting GameObject > Effects > Particle System.
3. Notice how the particle system emits white particles in the Scene view (see Figure 16.1). This is the basic particle system. Try rotating and scaling the particle system to see how it reacts.
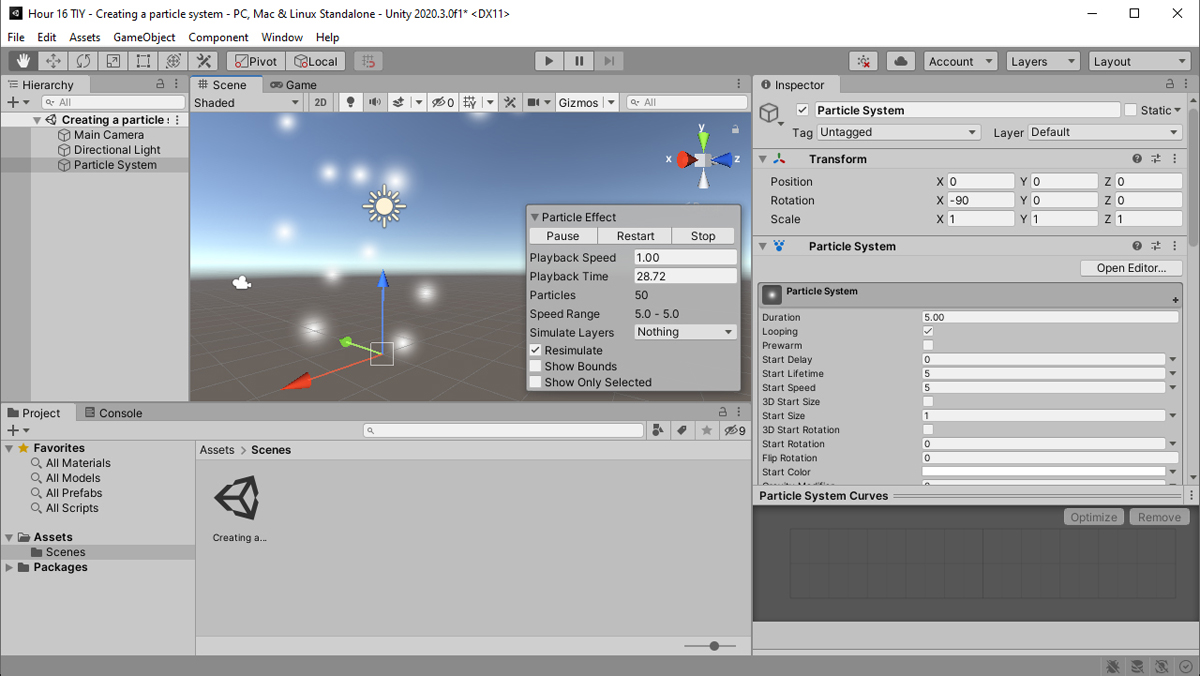
FIGURE 16.1
The basic particle system.
Particle System Controls
You might have noticed that when you added a particle system to your scene, it began emitting particles in the Scene view. You may also have noticed that particle effect controls appeared (see Figure 16.2). These controls allow you to pause, stop, and restart the particle animation in a scene. This can be very helpful when tweaking the behavioral components of a particle system.
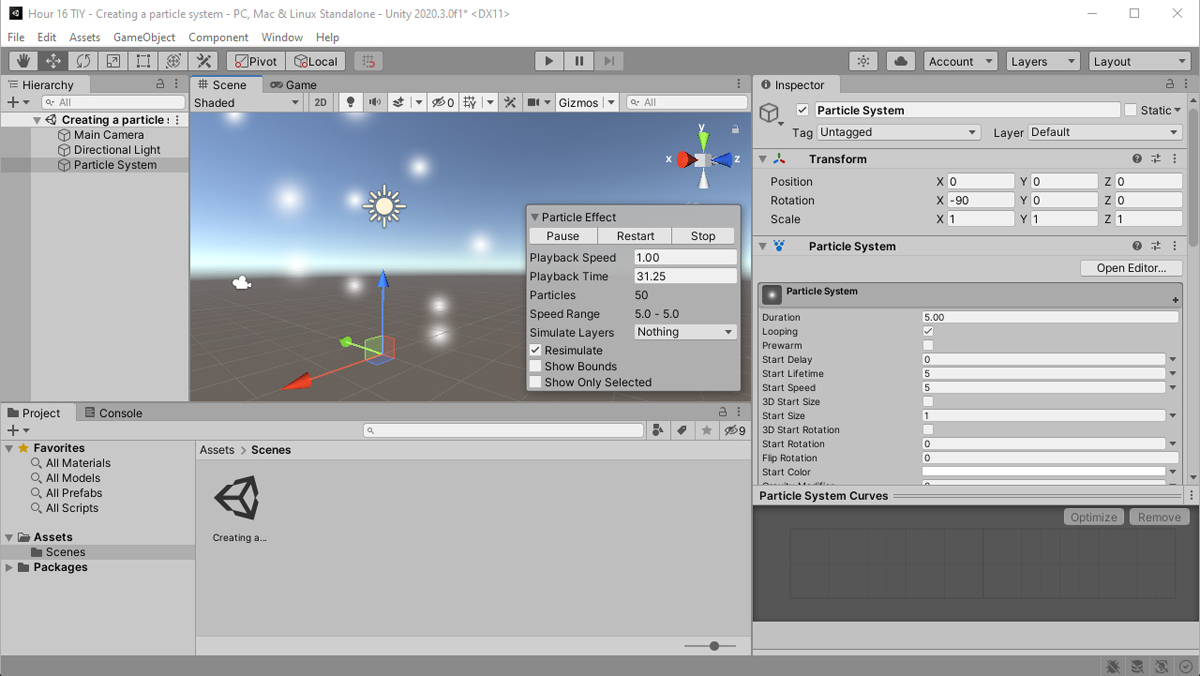
FIGURE 16.2
The particle effect control.
These controls also allow you to speed up the playback and tell you how long an effect has been playing. This can be very useful when testing duration effects. Note that the controls show the playback speed and playback time only when the game is stopped.
Particle System Modules
At its root, a particle system is just a point in space that emits particle objects. How particles look and behave and the effects they cause are all determined by modules. Modules are various properties that define some form of behavior. In Unity’s particle system, modules are an integrated and essential component. This section lists the modules and explains briefly what each one does.
Note that with the exception of the default module (covered first), all modules can be turned on and off. To turn modules on or off, put a check mark by the module’s name. To hide or show modules, click the plus sign (+) next to Particle System (see Figure 16.3). You can also click the name of a particle system in the list to toggle its visibility. By default, all modules are visible, and only the Emission, Shape, and Renderer modules are enabled. To expand a module, simply click its title.

FIGURE 16.3
Showing all modules.
Default Module
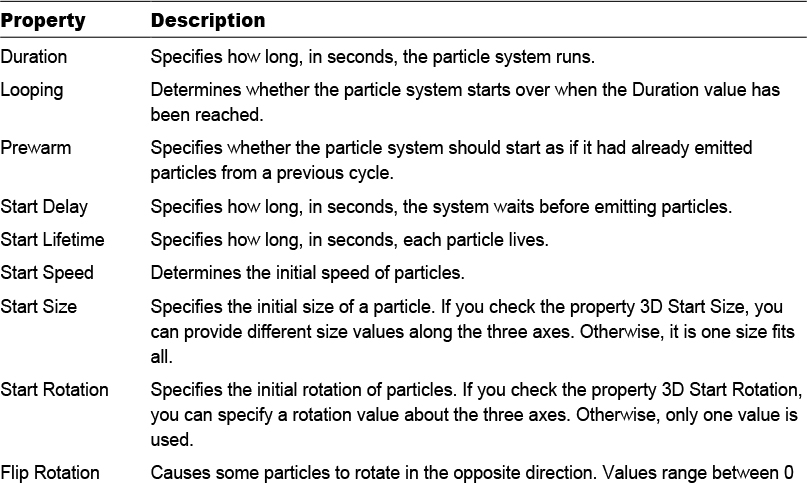
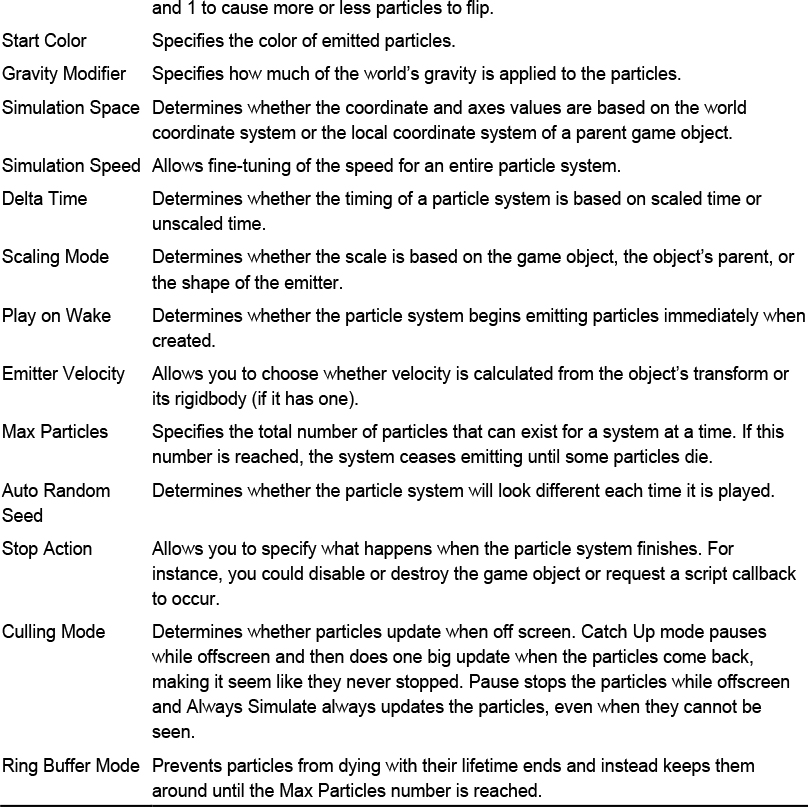
The default module is simply labeled Particle System. This module contains all the specific information that every particle system requires. Table 16.1 describes the properties of the default module.
TABLE 16.1 Default Module Properties
Emission Module
The Emission module is used to determine the rate at which particles are emitted. Using this module, you can dictate whether particles stream at a constant rate, in bursts, or somewhere in between. Table 16.2 describes the Emission module properties.
TABLE 16.2 Emission Module Properties
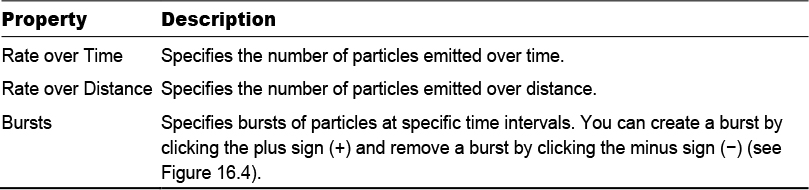
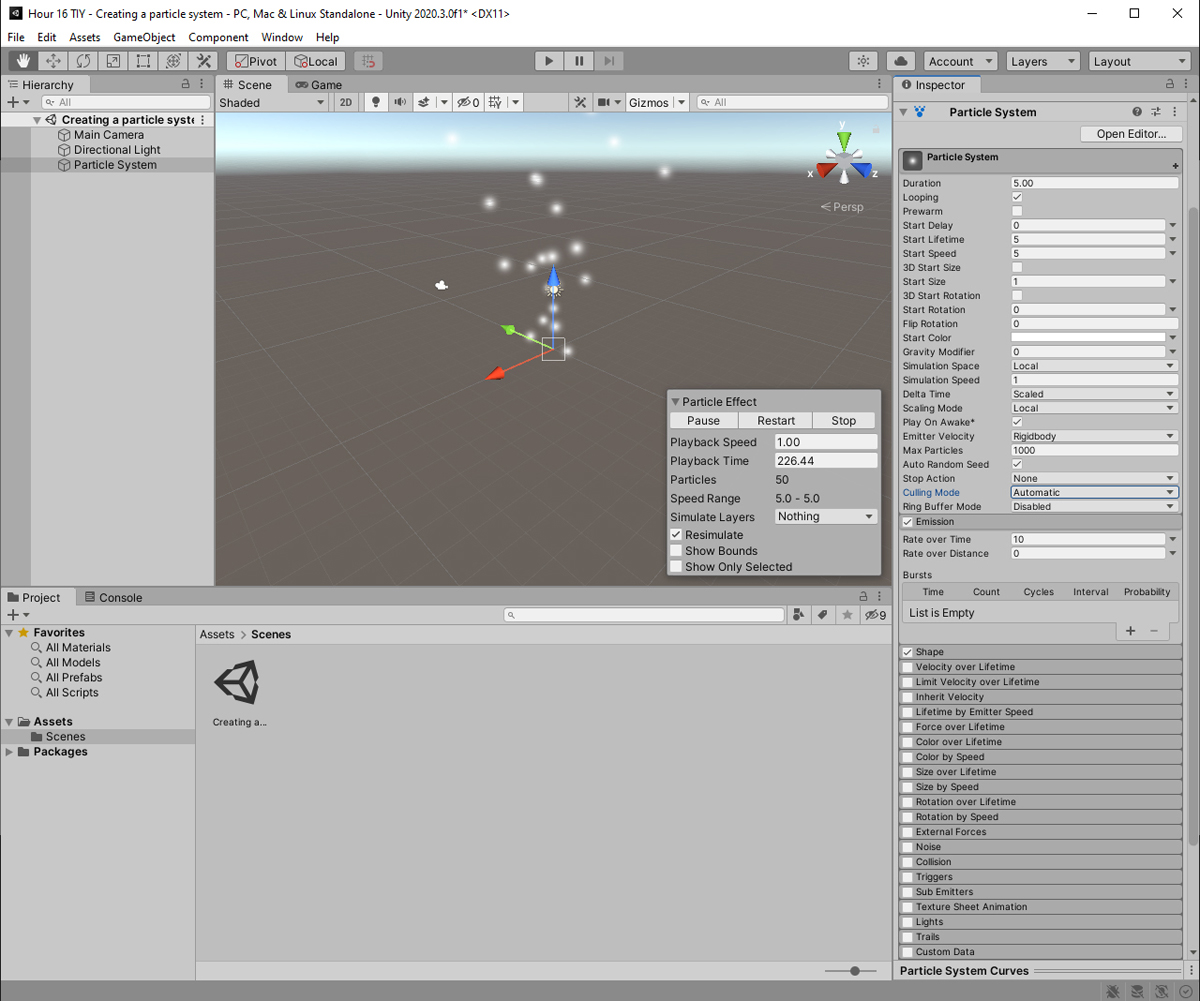
FIGURE 16.4
The Emission module.
Shape Module
Just as its name implies, the Shape module determines the shape formed by the emitted particles. The shape options are Sphere, Hemisphere, Cone, Donut, Box, Mesh, Mesh Renderer, Skinned Mesh Renderer, Circle, and Edge (whew!). In addition, each shape has a set of properties used to define it, such as radius for cones and spheres. These properties are fairly self-explanatory, so they are not covered here.
Velocity over Lifetime Module
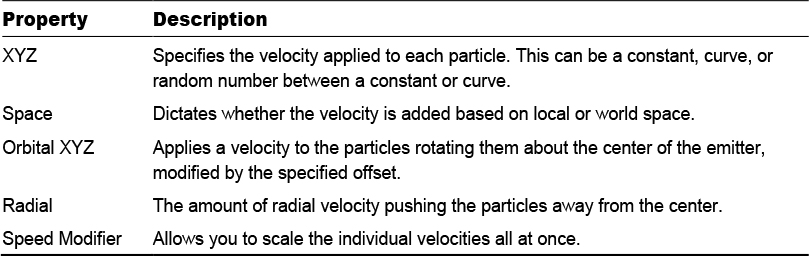
The Velocity over Lifetime module directly animates each particle by applying an x, y, and z axis velocity to it. Note that this is a velocity change of each particle over the lifetime of the particle, not over the lifetime of the particle system. Table 16.3 describes the properties of the Velocity over Lifetime module.
TABLE 16.3 Velocity over Lifetime Module Properties
Limit Velocity over Lifetime Module
This long-named module can be used to dampen or clamp the velocity of a particle. Basically, it prevents, or slows down, particles that exceed a threshold speed on one or all of the axes. Table 16.4 describes the properties for the Limit Velocity over Lifetime module.
TABLE 16.4 Limit Velocity over Lifetime Module Properties

Inherit Velocity Module
The Inherit Velocity Module is very simple and determines how much, if any, of the velocity of the emitter should be applied to the particle. The first property, Mode, specifies if only the initial velocity is applied or if the particle should continue receiving the velocity of the emitter. Finally, the Multiplier property determines the proportion of velocity to apply.
Lifetime by Emitter Speed
The Lifetime by Emitter Speed Module controls the lifetime of each particle based on the speed the emitter was traveling when the particle was spawned. The first property, Multiplayer, determines the value to multiply the default lifetime by based on the second property, Speed Range.
Force over Lifetime Module
The Force over Lifetime module is similar to the Velocity over Lifetime module. The difference is that this module applies a force, not a velocity, to each particle. This means the particle will continue to accelerate in the specified direction. This module also allows you to randomize the force each frame, as opposed to all up front.
Color over Lifetime Module
The Color over Lifetime module allows you to change the color of a particle as time passes. This is useful for creating effects like sparks, which start out bright orange and end a dark red before disappearing. To use this module, you must specify a gradient of color. You can also specify two gradients and have Unity randomly pick a color between them. Gradients can be edited using Unity’s Gradient Editor (see Figure 16.5).
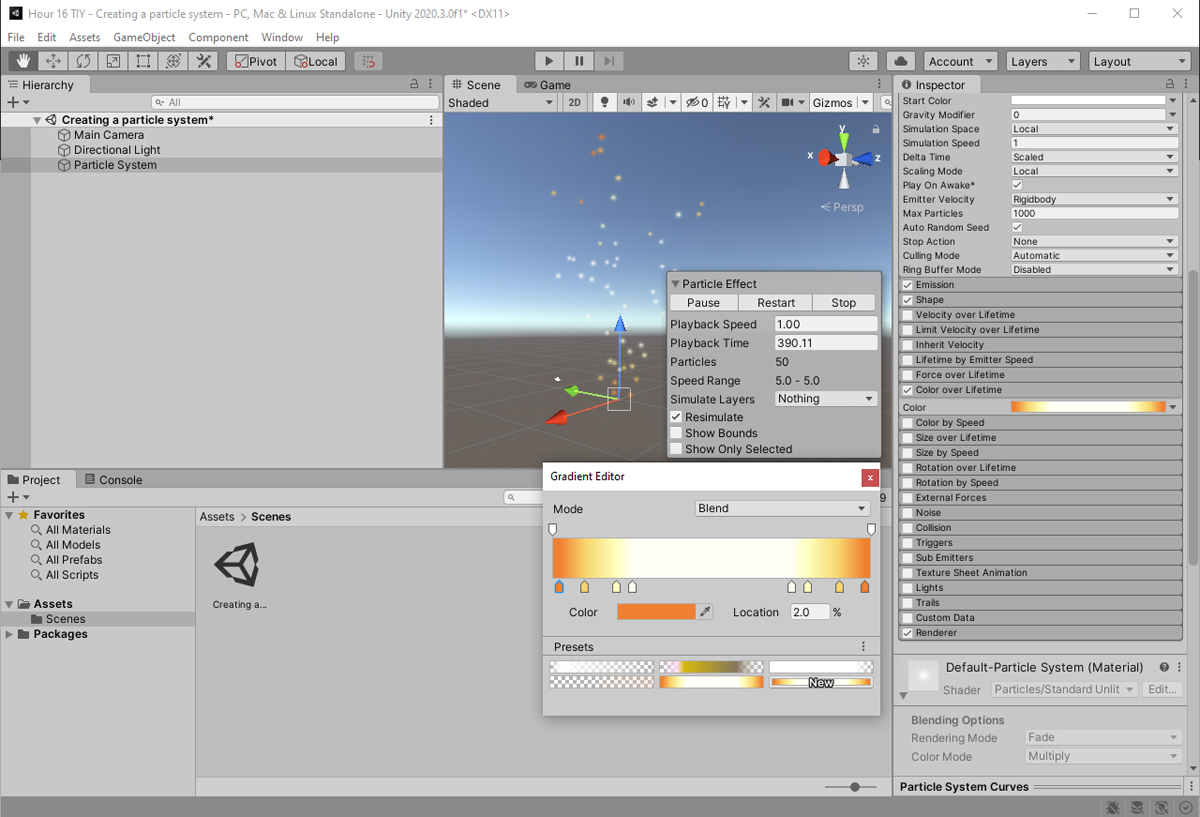
FIGURE 16.5
The Gradient Editor.
Note that the color of the gradient is multiplied by the Start Color property of the default module. Therefore, if your start color is black, the Color over Lifetime module will have no effect.
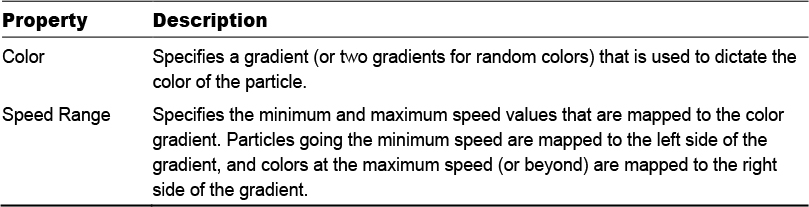
Color by Speed Module
The Color by Speed module allows you to change the color of a particle based on its speed. Table 16.5 describes the properties of the Color by Speed module.
TABLE 16.5 Color by Speed Module Properties
Size over Lifetime Module
The Size over Lifetime module allows you to specify a change in the size of a particle. The size value must be a curve, and it dictates whether the particle grows or shrinks as time elapses.
Size by Speed Module
Much like the Color by Speed module, the Size by Speed module changes the size of a particle based on its speed between minimum and maximum values.
Rotation over Lifetime Module
The Rotation over Lifetime module allows you to specify a rotation over the life of a particle. Note that the rotation is of the particle itself, not a curve in the world coordinate system. This means that if your particle is a plain circle, you will not be able to see the rotation. If the particle has some detail, however, you will notice it spin. The values for the rotation can be given as a constant, curve, or random number.
Rotation by Speed Module
The Rotation by Speed module is the same as the Rotation over Lifetime module except that it changes values based on the speed of the particle. Rotation changes based on minimum and maximum speed values.
External Forces Module
The External Forces module allows you to apply a multiplier to any forces that exist outside the particle system. A good example of this is any wind forces that exist in a scene. The Multiplier property scales the forces either up or down, depending on its value.
Noise Module
The Noise module is a relatively new module for Unity’s particle system. This module allows you to apply some randomization to the movement of a particle (think lightning bolts, for example). It accomplishes this by generating a Perlin noise image to use as a lookup table. You can see the noise being used in the Preview window of the module. Table 16.6 lists the properties of the Noise module.
TABLE 16.6 Noise Module Properties

Collision Module
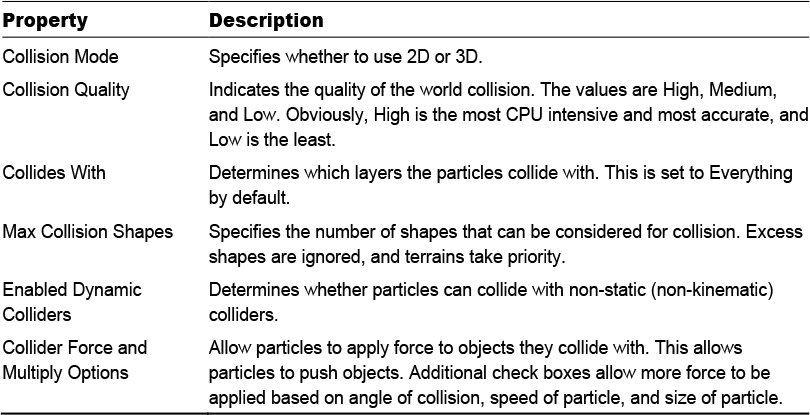
The Collision module allows you to set up collisions for particles. This is useful for all sorts of collision effects, like fire rolling off a wall or rain hitting the ground. You can set the collision to work with predetermined planes (Planes mode is the most efficient) or with objects in the scene (World mode slows performance). The Collision module has some common properties and some unique properties, depending on the collision type chosen. Table 16.7 describes the common properties of the Collision module. Tables 16.8 and 16.9 describe the properties of Planes mode and World mode, respectively.
TABLE 16.7 Common Collision Module Properties
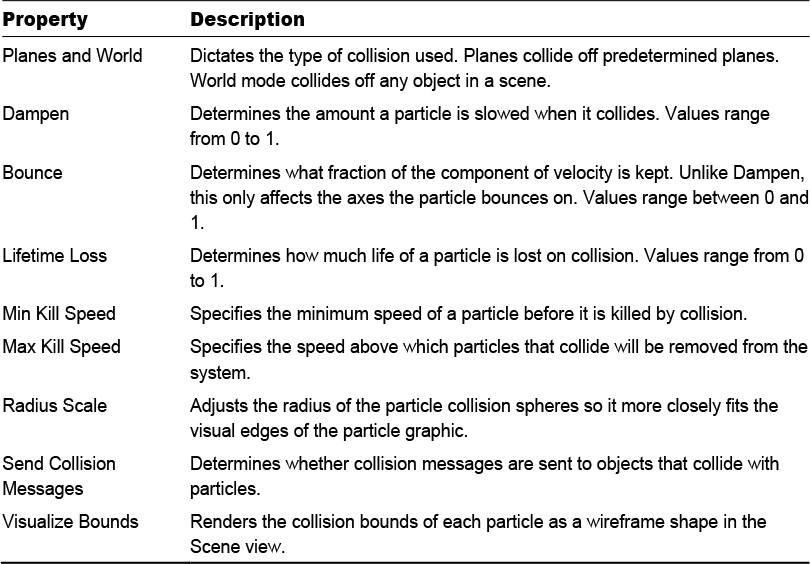
TABLE 16.8 Planes Mode Properties

TABLE 16.9 World Mode Properties
Try it Yourself
Making Particles Collide
In this exercise, you’ll set up collision with a particle system. This exercise uses both Planes and World collision modes. Follow these steps:
1. Create a new project or scene. Add a sphere to the scene and place it at (0, 5, 0) with a scale of (3, 3, 3). Give the sphere a Rigidbody component.
2. Add a particle system to the scene and place it at (0, 0, 0). Under the Emission module in the Inspector, set Rate over Time to 100.
3. Enable the Collision module by clicking the checkbox next to its name. Set Type to World and set Collider Force to 20 (see Figure 16.6). Notice how the particles are already bouncing off the sphere.

FIGURE 16.6
Adding a plane transform.
4. Enter Play mode and notice how the sphere is buoyed by the particles.
5. Experiment with the various emission, shape, and collision settings. See how long you can keep the sphere in the air.
Triggers Module
The Triggers module “triggers” a response to a particle entering a collider volume. You can respond to the event of a particle being inside a volume, outside a volume, entering a volume, and exiting a volume. When any of these happens, you can ignore the event, destroy the particle, or call a method in some code and define custom behavior.
Sub Emitter Module
The Sub Emitter module is an incredibly powerful module that enables you to spawn a new particle system at certain events for each particle of the current system. You can create a new particle system every time a particle is created, dies, or collides. In doing this, you can generate complex and intricate effects, such as fireworks. This module has three properties: Birth, Death, and Collision. Each of these properties holds zero or more particle systems to be created on the respective events.
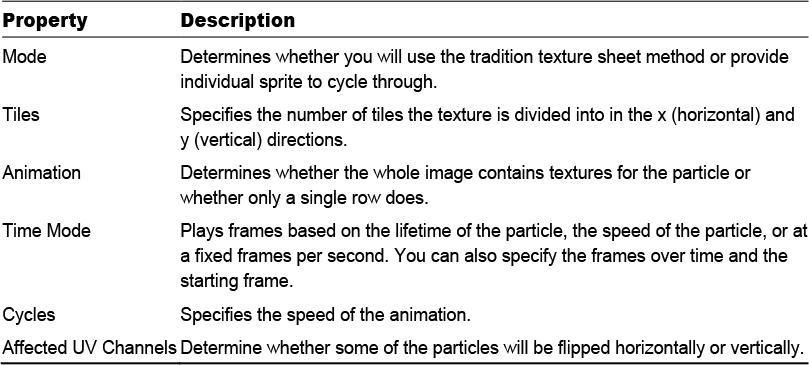
Texture Sheet Animation Module
The Texture Sheet Animation module allows you to change the texture coordinates used for a particle over the life of the particle. In essence, this means you can put several textures for a particle in a single image and then switch between them during the life of a particle (as you did with the sprite animation in Hour 15, “Game 3: Captain Blaster”). Table 16.10 describes the properties of the Texture Sheet module.
TABLE 16.10 Texture Sheet Module Properties
Lights Module
The Lights module allows a portion of the particles to also contain a point light. This allows the particle systems to add illumination to a scene (think of a torch effect, for example). Most of the properties for this module are self-explanatory, but a very important one is the Ratio property. A value of 0 means that no particles will have a light, and a value of 1 means that all will have a light. It is important to note that adding lights to too many particles will greatly slow down your scene, so use this module sparingly.
Trails Module
The Trails module allows particles to leave a trail behind them. Using the module is a great way to create streaked effects, such as fireworks or lightning bolts. Almost all properties of this module have been covered in other modules or are self-explanatory. The only property that needs to be covered here is the Minimum Vertex Distance property. This property determines how far a particle needs to travel before its trail gets a new vertex. Lower numbers make for smoother trails but are also less efficient.
Custom Data Module
The Custom Data module is really beyond the scope of this book because it performs a very technical and very powerful function. Essentially, this module allows you to pass data from the particle system into a custom shader you’ve written to utilize that data.
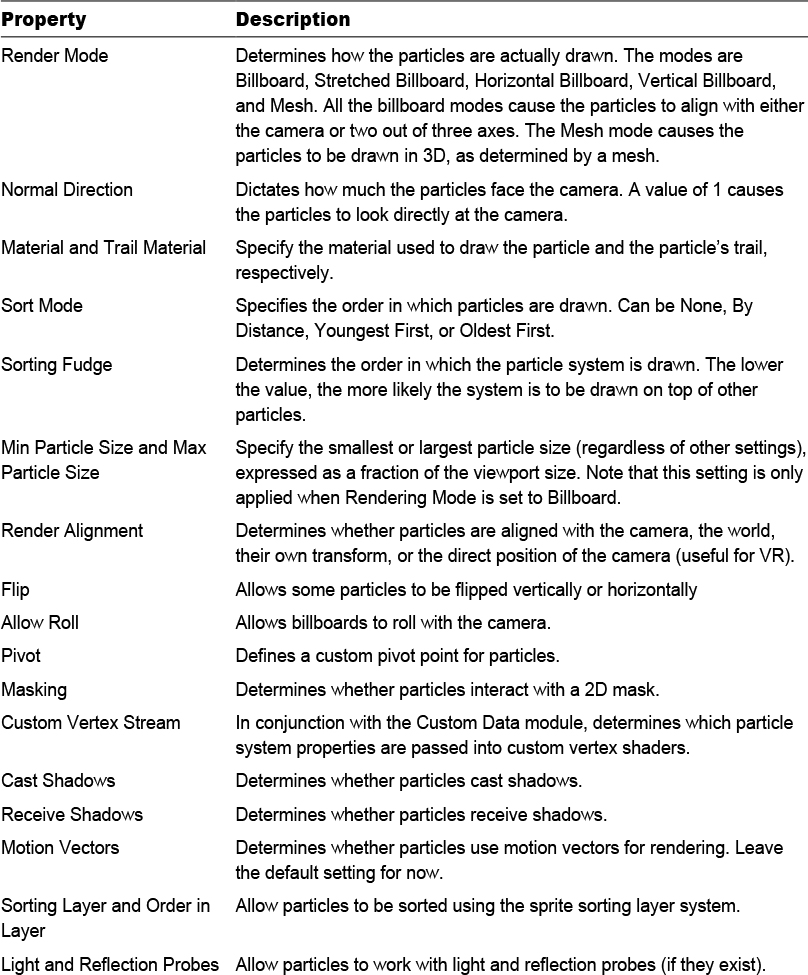
Renderer Module
The Renderer module dictates how the particles are actually drawn. It is here that you can specify the texture used for the particles and their other drawing properties. Table 16.11 describes some of the properties of the Renderer module.
TABLE 16.11 Renderer Module Properties
The Curves Editor
Several values in the various modules listed previously can be set as Constant or Curve. The Constant option is fairly self-explanatory: You give it a value, and it is that value. What if you want that value to change over a period of time, though? That is where the curve system comes in very handy. This feature gives you a very fine level of control over how a value behaves. You can see the Curves Editor at the bottom of the Inspector view (see Figure 16.7). You may need to drag it up by the horizontal handle.

FIGURE 16.7
The Curves Editor in the Inspector.
The title of the curve is whatever value you are determining. In Figure 16.7, the value is for the force applied along the x axis in the Force over Lifetime module. The range dictates the minimum and maximum values available. This can be changed to allow for a greater or lesser range. The curve is the values themselves over a given course of time, and the presets are generic shapes that you can give to the curve.
The curve is movable at any of the key points. These key points are show as visible points along the curve. By default, there are only two key points: one at the beginning and one at the end. You can add a new key point anywhere on the curve by right-clicking it and choosing Add Key Point or by double-clicking the curve.
You can get an even larger Curves Editor by clicking the Open Editor button at the top right of the Particle System component or by right-clicking the title bar of the Curves Editor.
Try it Yourself
Using the Curves Editor
To get familiar with the Curves Editor, in this exercise, you’ll change the size of the particles emitted over the duration of one cycle of the particle system. Follow these steps:
1. Create a new project or scene. Add a particle system and position it at (0, 0, 0).
2. Click the drop-down arrow next to the Start Size property and choose Curve.
3. Change the range of the curve from 1.0 to 2.0 by changing the value in the top left of the Curves Editor.
4. Right-click the curve at about the midpoint and add a key. Now drag the start and end points of the curve down to 0 (see Figure 16.8). Notice how the particles emitted change in size over the 5-second cycle of the particle system.

FIGURE 16.8
Start Size curve settings.
Summary
In this hour, you have learned the basics of particles and particle systems in Unity. You have also learned about the many modules that make up the Unity particle system. You wrapped up the hour by looking at the functionality of the Curves Editor.
Q&A
Q. Are particle systems inefficient?
A. They can be, depending on the settings you give them. A good rule of thumb is to use a particle system only if it provides some value to you. Particle systems can be great visually, but don’t overdo it.
Workshop
Take some time to work through the questions here to ensure that you have a firm grasp of the material.
Quiz
1. What is the term for a 2D image that always faces the camera?
2. How do you open a larger particle effect editor window?
3. Which module controls how a particle is drawn?
4. True or False: The Curves Editor is used for creating curves that change values over time.
Answers
1. Billboard
2. Click the Open Editor button at the top of the Particle System component in the Inspector.
3. Renderer module
4. True
Exercise
In this exercise, you’ll experiment with some exciting particle effects provided as standard packages with Unity. This exercise is a chance both to play around with existing effects and to create your own. There is no correct solution for you to look at. Just follow the steps here and use your imagination:
1. Import the particle effects package ParticleSystems.unitypackage from the book files for Hour 16. Be sure to leave all assets checked and click Import.
2. Navigate to AssetsParticleSystemsPrefabs. Click and drag the FireComplex and Smoke prefabs into the Hierarchy view. Experiment with the positioning and settings of these effects. Click Play to see the effects.
3. Continue experimenting with the rest of the provided particle effects. (Be sure to check out the Explosion and Fireworks effects at least.)
4. Now that you have seen what is possible, see what you can create yourself. Try out the various modules and try to come up with your own custom effects.