Chapter 3
Configure storage and connectivity
Computing devices do not typically work in isolation. Usually, devices are connected to networks to enable users to access services and resources. It’s therefore important that you know how to connect devices to networks and how to configure network settings.
Users need to access data stored on file servers, in network-attached storage, and on other computers. You’ll need to know how to enable this access. You’ll also need to know how to manage and protect data by using file- and folder-level data protection.
Cloud technologies continue to improve in terms of both speed and reliability, and more users will start to rely on Microsoft OneDrive and other cloud services for their file storage. During this transition to the cloud, you must understand how to configure and manage the storage hardware in Windows 10.
Skills covered in this chapter:
Skill 3.1: Configure networking
The ability to connect devices running Windows 10 to both wired and wireless networks is important, whether this is a home network or your organization’s network infrastructure. To configure networking settings correctly, you must understand fundamental IP settings and know how to configure name resolution.
It is also important to know how to configure virtual private networks (VPNs) to enable remote connectivity to your organization’s network infrastructure. In addition, Exam MD-100: Windows 10 also covers network troubleshooting issues, and it is, therefore, important to know how to use Windows 10 networking tools to investigate and resolve network-related problems.
Configure client IP settings
Before you can configure any other network settings, such as name resolution or firewall settings, you must have a grasp of the underlying fundamentals of networking and how to configure both Internet Protocol version 4 (IPv4) and Internet Protocol version 6 (IPv6) network settings.
Overview of IPv4
IPv4 is a mature networking protocol and is widely used on most internet-connected client devices. Each client on an IPv4 network is assigned a unique IPv4 configuration that identifies that client device. This configuration is based on a number of elements:
An IPv4 address IPv4 uses a 32-bit binary address, which is divided into four octets (or groups of eight digits), each of which is converted to a decimal number. Thus, 11000000101010000001000100000001 becomes 11000000.10101000.00010001.00000001 and converts to 192.168.17.1.
A subnet mask A subnet mask is also a 32-bit binary string, entered as four decimal digits; it is used to indicate the client’s unique identity, known as the host ID, and the subnet where the client resides, known as the network ID.
A default gateway address To facilitate communications between network segments, or subnets, each client device is assigned the IPv4 address of a router in the local network that is used to forward network traffic destined for devices in other subnets.
A Domain Name System (DNS) server address DNS enables the client computer to resolve names into IPv4 or IPv6 addresses.
Need More Review? IPV4 Addressing
To review further details about IPv4 addressing fundamentals, refer to the Microsoft website at https://docs.microsoft.com/en-us/previous-versions/windows/it-pro/windows-server-2008-R2-and-2008/dd379547(v=ws.10).
Subnets
A subnet is a network segment. One or more routers separate the subnet from other subnets. Each subnet on an internet has a unique ID, just as each host within a subnet has a unique ID. You must use the 32 bits of an IPv4 address to define both the host’s ID and the subnet ID in which that host resides.
Simple networks
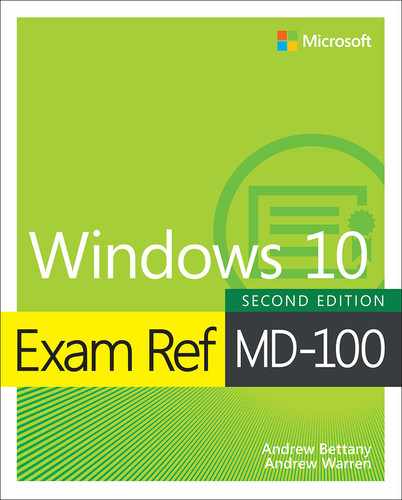
Remember that each 32-bit IPv4 address is divided into four octets. In simple IPv4 subnetting, whole octets are reserved for defining the subnet portion of the IPv4 address, as shown in Figure 3-1; consequently, the remaining whole octets are available for defining the host portion of the address.
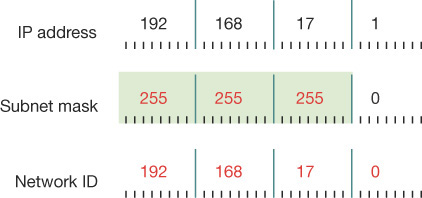
FIGURE 3-1 An IPv4 address using a simple Class C network addressing scheme
This simple subnetting is referred to as classful addressing, by which the address class, A, B, or C, defines the number of octets reserved for host and subnet IDs. Table 3-1 shows how this works.
TABLE 3-1 Characteristics of the default IPv4 address classes
Class |
First Octet |
Default Subnet Mask |
Number of Networks |
Number of Hosts per Network |
|---|---|---|---|---|
A |
1 to 127 |
255.0.0.0 |
126 |
16,777,214 |
B |
128 to 191 |
255.255.0.0 |
16,384 |
65,534 |
C |
192 to 223 |
255.255.255.0 |
2,097,152 |
254 |
Note Other Address Classes
There are also class D and class E addresses. Class D addresses are used for multicasting when a client device is part of a group. Class E addresses are reserved and are not used for hosts or subnets.
Complex networks
For some situations, using a classful addressing scheme can be ideal. But for many situations, it might be important to have more flexibility over the number of bits allocated to the subnet address portion of an IPv4 address. For example, instead of using 8, 16, or 24 bits for the subnet, you can use 12 or 18.
Bear in mind that the more bits you allocate to subnetting, the fewer bits remain for the host portion of the IPv4 address. That is, you can have more subnets, each containing fewer hosts, or you can have few subnets, each containing many hosts. Figure 3-2 shows how changing the subnet mask changes the subnet ID without changing the octets that define the whole IPv4 address. This scheme is often referred to as classless addressing, or Classless Interdomain Routing (CIDR).
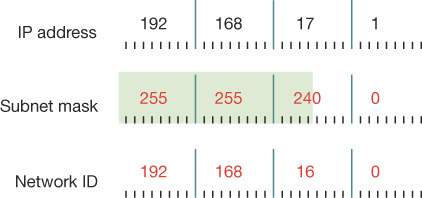
FIGURE 3-2 An IPv4 address using a classless network addressing scheme
In Figure 3-2, notice how changing the subnet mask from 255.255.255.0 to 255.255.240.0 shifts the device from subnet 192.168.17.0 to 192.168.16.0. In this case, by shifting the mask to the left, we have allocated more bits to describe hosts in each subnet, with correspondingly fewer subnets. You can see that to express a host’s IPv4 configuration properly, not only must you state the IPv4 address, but you must also state the subnet mask. For example, in Figure 3-2 this host has an IPv4 configuration of 192.168.17.1/255.255.240.0.
 Exam Tip
You will often see devices with IPv4 configurations shown as 192.168.17.1/20. The number after the slash denotes the number of sequential binary 1s in the subnet mask (20 in this instance). If the mask were 255.255.248.0, that would be represented as /21.
Need More Review? IPV4 Routing
To review further details about IPv4 subnetting and routing, refer to the Microsoft website at https://docs.microsoft.com/en-us/previous-versions/windows/it-pro/windows-server-2008-R2-and-2008/dd379495(v=ws.10).
Public and private addressing
Devices that connect directly to the internet require a unique public IPv4 configuration. However, because of the limitation of the 32-bit addressing scheme of IPv4, there is a limit to the number of hosts that can be connected to the internet using a public configuration. To alleviate this potential but significant problem, many organizations use private IPv4 configurations for their network clients, only using public IPv4 configurations for internet-facing devices, such as routers.
The Internet Assigned Numbers Authority (IANA) has defined the address ranges shown in Table 3-2 as being available for private use. A technology such as network address translation (NAT) is used to enable devices using private IPv4 configurations to communicate with the internet.
TABLE 3-2 Private IPv4 address ranges
Class |
Mask |
Range |
|---|---|---|
A |
10.0.0.0/8 |
10.0.0.0–10.255.255.255 |
B |
172.16.0.0/12 |
172.16.0.0–172.31.255.255 |
C |
192.168.0.0/16 |
192.168.0.0–192.168.255.255 |
Configuring an IPv4 connection
Devices running Windows 10 are configured to obtain an IPv4 configuration automatically by default, as shown in Figure 3-3.
FIGURE 3-3The Internet Protocol Version 4 (TCP/IPv4) Properties dialog box
Typically, Windows 10-based devices obtain their IPv4 configurations from a Dynamic Host Configuration Protocol (DHCP) service, perhaps running on a Windows Server 2019 server computer, or provided as a service on a device such as a router or wireless access point (wireless AP).
Exam Tip
If a Windows 10–based device fails to obtain an IPv4 configuration from a DHCP server, it reverts to using an Automatic Private IP Address (APIPA). If your computer has an IPv4 address that starts with 169.254. X.Y, it is using an APIPA address. APIPA enables only local, subnet-based communications at best. You can override this behavior by selecting the Alternative Configuration tab in the Internet Protocol Version 4 (TCP/IPv4) Properties dialog box, shown in Figure 3-3, and choosing User Configured. Then specify the IPv4 configuration to use when DHCP is unavailable.
To view or configure the IPv4 settings on your computer, perform the following procedure:
Right-click the network icon in the system tray and then select Open Network & Internet settings.
Select Change adapter options.
Right-click the appropriate network adapter and then select Properties.
Double-click Internet Protocol Version 4 (TCP/IPv4).
You can then configure the IPv4 settings. Select Use The Following IP Address and then specify the following: IP Address, Subnet Mask, Default Gateway, Preferred DNS Server, and Alternative DNS Server (Optional).
You can also configure a number of options from the Advanced TCP/IP Settings dialog box. In the Internet Protocol Version 4 (TCP/IPv4) Properties dialog box, select Advanced to open the Advanced TCP/IP Settings dialog box, shown in Figure 3-4.
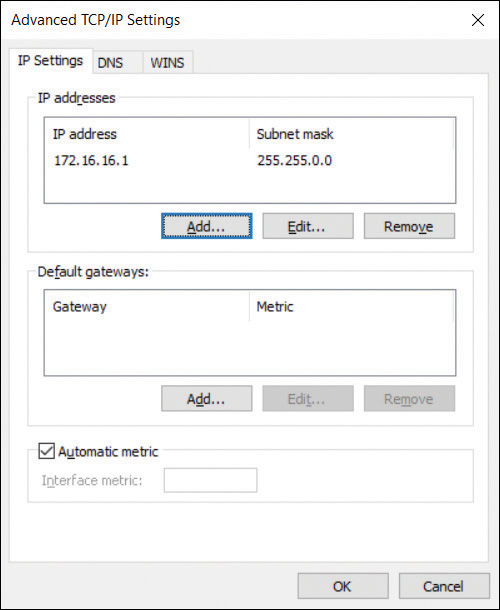
FIGURE 3-4 The IP Settings tab of the Advanced TCP/IP Settings dialog box
Configure the options on the following tabs:
IP Settings Enables you to configure additional IPv4 addresses and default gateways manually for this network interface.
DNS You can define additional DNS server addresses for name resolution and additional DNS suffix processing options.
WINS The Windows Internet Name Service (WINS) is an older name resolution service used by earlier versions of Windows and Windows Server. Generally, you do not need to configure anything here.
Configuring IPv4 from the command line and by using Windows PowerShell
In addition to configuring IPv4 settings from the user interface, you can use the Netsh.exe command-line tool and Windows PowerShell cmdlets. You can use the Netsh.exe command-line tool to reconfigure many network-related settings. For example, the following command reconfigures the IPv4 settings:
Netsh interface ipv4 set address name="Ethernet" source=static addr=192.168.17.1
mask=255.255.240.0 gateway=192.168.31.254
There are numerous Windows PowerShell cmdlets that you can use to view and configure network settings, some of which are described in Table 3-3.
TABLE 3-3 Windows PowerShell IPv4 networking-related cmdlets
Cmdlet |
Purpose |
|---|---|
Get-NetIPAddress |
Displays information about the IP address configuration |
Get-NetIPv4Protocol |
Displays information about the IPv4 protocol configuration |
Set-NetIPAddress |
Changes the IP address configuration |
Set-NetIPv4Protocol |
Changes the IPv4 protocol configuration |
For example, to change the IPv4 configuration for a network connection with Windows PowerShell, use the following cmdlet:
Set-NetIPAddress -InterfaceAlias Ethernet -IPAddress 192.168.17.1
Overview of IPv6
It’s still the case that almost all computers and other devices connect to the internet by using an IPv4 configuration. However, more network services and devices now require an IPv6 configuration, so it’s important to understand the IPv6 fundamentals, including how to configure IPv6. There are a number of reasons to consider IPv6. These include:
Services that require IPv6 Services, such as DirectAccess, use IPv6 to facilitate remote connections.
Larger address space IPv6 uses a 128-bit address space, providing a vast increase in the availability of addresses for devices on the internet.
Hierarchical addressing IPv6 uses a structured address space, which is more efficient for routers, helping to optimize network communications.
Support for stateless and stateful autoconfiguration You can configure your IPv6 devices to use DHCPv6 to obtain a stateful configuration, or you can rely on router discovery to use a stateless configuration, simplifying the process of enabling IPv6 on your network devices.
IPv6 addressing
As mentioned, IPv6 uses a 128-bit addressing scheme. This is usually written in hexadecimal. The following is an example of an IPv6 address:
2001:CD8:1F2D::2BB:FF:EF82:1C3B
IPv6 uses the following three address types:
Unicast addresses Packets are delivered to a single interface.
Multicast addresses Packets are delivered to multiple interfaces.
Anycast addresses Packets are delivered to multiple interfaces that are the closest in routing distance.
Unlike IPv4, IPv6 does not use broadcast messages. Instead, unicast and anycast addresses in IPv6 can have the following scopes:
Link-local IPv6 hosts on the same subnet
Site-local IPv6 hosts in the same organization, also known as private site addressing
Global IPv6 internet addresses
Exam Tip
Unicast site-local addresses are similar to IPv4 private addresses and have the FEC0::/64 prefix. Unicast link-local addresses are similar to IPv4 APIPA addresses and have the FE80::/64 prefix.
Configuring an IPv6 connection
Configuring IPv6 is almost identical to the process of configuring IPv4. By default, Windows 10 uses automatic IPv6 configuration. If a DHCPv6 server is available, it obtains its configuration from that service; otherwise, it will use stateless autoconfiguration.
As with IPv4, you can use the Windows user interface to configure IPv6, as shown in Figure 3-5, or you can use Netsh.exe or Windows PowerShell.

FIGURE 3-5 The Internet Protocol Version 6 (TCP/IPv6) Properties dialog box
To review or configure the IPv6 settings on your computer, perform the following procedure:
Right-click the network icon in the system tray and then select Open Network & Internet Settings.
Select Change Adapter Options.
Right-click the appropriate network adapter and then select Properties.
Double-click Internet Protocol Version 6 (TCP/IPv6).
Numerous Windows PowerShell cmdlets are available that you can use to review and configure IPv6 network settings, some of which are described in Table 3-4.
TABLE 3-4 Windows PowerShell IPv6 networking-related cmdlets
Cmdlet |
Purpose |
|---|---|
Get-NetIPAddress |
Displays information about the IP address configuration |
Get-NetIPv6Protocol |
Displays information about the IPv6 protocol configuration |
Set-NetIPAddress |
Changes the IP address configuration |
Set-NetIPv6Protocol |
Changes the IPv6 protocol configuration |
For example, to change the IPv6 configuration for a network connection with Windows PowerShell, use the following cmdlet:
Set-NetIPAddress -IPAddress 2001:CD8:1F2D::2BB:FF:EF82:1C3B -PrefixLength 64
Configure name resolution
Devices running Windows 10 communicate over networks by using names rather than IPv4 or IPv6 network addresses. A service on the Windows 10–based device, known as a client resolver, resolves names into IPv4 or IPv6 addresses. To configure Windows 10 networking, you must know how to configure name resolution.
Although IP addressing is not especially complex, it is generally easier for users to work with host names rather than with the IPv4 or IPv6 addresses of hosts, such as websites, to which they want to connect. When an application, such as Microsoft Edge, references a website name, the name is converted to the underlying IP address by using a process known as name resolution. Windows 10–based devices can use two types of names:
Host names A host name, up to 255 characters in length, contains only alphanumeric characters, periods, and hyphens. A host name is an alias combined with a fully qualified domain name (FQDN). For example, the alias computer1 is prefixed to the domain name contoso.com to create the host name, or FQDN, of computer1.contoso.com.
NetBIOS names Less relevant today, NetBIOS names use a nonhierarchical structure based on a 16-character name. The sixteenth character identifies a particular service running on the computer named by the preceding 15 characters. Thus, LON-SVR1[20h] is the NetBIOS server service on the computer called LON-SVR1.
The way a client computer resolves names varies based on its configuration but is typically resolved as indicated in Figure 3-6.
![A diagram represents the three typical stages of name resolution for a Windows 10[en]based client computer. A computer running Windows 10 occupies the center of the image, with an arrow curved around to show the flow of the process. The arrow passes stage 1: the query of the local host name; stage 2: the check against resolver cache; and stage 3: the query of a DNS server. A piece of paper is shown adjacent to stage 2 to represent the copying of the Hosts file contents to the resolver cache.](https://imgdetail.ebookreading.net/202109/2/9780137472185/9780137472185__9780137472185__files__graphics__03fig06.jpg)
FIGURE 3-6 Typical stages of name resolution in a Windows 10 client
The following process identifies the typical stages of name resolution for Windows 10–based devices.
Determine whether the queried host name is the same as the local host name.
Search the local DNS resolver cache for the queried host name. Windows 10 updates the cache when records are successfully resolved. In addition, Windows adds the contents of the local Hosts file to the resolver cache.
Petition a DNS server for the required host name.
Exam Tip
Windows 10 devices also use Link-Local Multicast Name Resolution for networks that do not provide DNS. You can find out more on the Microsoft Press Store website at https://www.microsoftpressstore.com/articles/article.aspx?p=2217263&seqNum=8.
Need More Review? IPV4 Name Resolution
To review further details about IPv4 name resolution, refer to the Microsoft website at https://docs.microsoft.com/en-us/previous-versions/windows/it-pro/windows-server-2008-R2-and-2008/dd379505(v=ws.10).
Configure DNS settings
To configure DNS settings for either IPv4 or IPv6, perform the following procedure:
Right-click the network icon in the system tray and then select Open Network & Internet settings.
Select Change adapter options.
Right-click the appropriate network adapter and then select Properties.
Double-click either Internet Protocol Version 4 (TCP/IPv4) or Internet Protocol Version 6 (TCP/IPv6).
Select Use the following DNS server addresses and then enter a valid IPv4 or IPv6 address for a DNS server that is accessible to the client.
You can also configure DNS settings by using Netsh.exe, as follows:
netsh interface ip set dns name="Ethernet" static 192.168.16.1
Alternatively, you can use Windows PowerShell to configure the DNS client settings:
Set-DNSClientServerAddress -interfaceIndex 12 -ServerAddresses ('192.168.16.1')
Configure advanced DNS settings
In addition to configuring the basic DNS client settings, you can configure advanced DNS settings, as displayed in Figure 3-7. To configure these settings, from either the Internet Protocol Version 4 (TCP/IPv4) Properties dialog box or the Internet Protocol Version 6 (TCP/IPv6) Properties dialog box, select Advanced and then select the DNS tab.
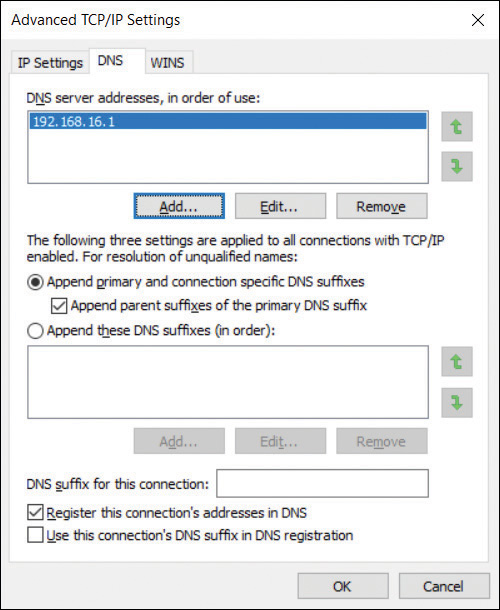
FIGURE 3-7 The DNS tab of the Advanced TCP/IP Settings dialog box
The advanced DNS settings are as follows:
Append primary and connection-specific DNS suffixes This option controls how the DNS resolver on the local client appends the DNS suffixes during queries. For example, if you query www and your computer’s primary suffix is contoso.com, the contoso.com suffix is appended to your query to make www.contoso.com.
Append parent suffixes of the primary DNS suffix In this example, the parent suffix of contoso.com is com. This option determines whether, after attempting www.contoso.com, the DNS resolver tries www.com.
Append these DNS suffixes (in order) This option enables you to define suffixes and order them for queries.
DNS suffix for this connection You can define a DNS suffix for each network interface card installed in your device.
Register this connection’s address in DNS Windows-based devices can register their IPv4 addresses with DNS servers that support dynamic updates of host records, such as the DNS server role service in Windows Server.
Use this connection’s DNS suffix in DNS registration This option determines whether the IP addresses and the connection-specific domain name of this connection are registered with DNS.
Configure mobile networking
With users increasingly working from home and other locations, it’s becoming ever more important to enable them to use their mobile devices for connectivity to their workplace resources. Windows 10 supports a number of mobile networking features to help make this possible.
Set up Windows 10 for a cellular data plan
Some devices with Windows 10 installed can support connectivity by using cellular networks. This is useful for users who cannot always connect to Wi-Fi networks but who still need access to corporate services and resources.
To enable and configure cellular remote access in Windows 10, you must obtain a cellular data plan from a telecom provider. Microsoft can provide this service.
Need More Review? Get Online with Paid Cellular Data
To find out more about getting online with Microsoft cellular data packages, refer to the Microsoft website at https://support.microsoft.com/en-us/help/4027933/windows-10-get-online-with-paid-cellular-data.
Typically, your telecom provider must provide you with a suitable SIM card for your Windows 10 device. The SIM size might vary depending on the vendor of the device you intend to use. For example, if you or your users are intending to connect using a Microsoft Surface Pro device, you must obtain a Nano SIM from your telecom provider. Note that you can use the SIM card from your cellphone for this, but it must be the right size. Some hardware vendors, including Microsoft, support a built-in SIM, or Embedded SIM (eSIM). This enables you to use cellular data without obtaining a separate, physical SIM from a telecom provider. You can also combine the use of an external SIM and an eSIM, effectively creating a device that has two data plans; perhaps one for business and one for personal use—much like some users use their cellphones with dual-SIM.
After you have installed the SIM into your Windows device, you must configure Windows 10 to connect using cellular data. If you use a Microsoft data plan, you can configure network access simply by running the Mobile Plans app. This app is built into Windows 10. The app detects your eSIM (or SIM) and then guides you through the setup process. To set up cellular network access, use the following procedure:
Connect to the internet using a wired or wireless connection.
Select the Network symbol on the taskbar, look for Get Connected beneath the name of your mobile operator, and then select Connect with a data plan. This will open the Mobile Plans app.
In Mobile Plans, do one of the following, depending on what your computer displays on the screen:
On the Connect your device page, enter your cellphone number, and then select Find my mobile operator. This enables you to determine if your telecom provider offers any plans.
If they do, select Continue. A webpage opens on your telecom provider’s website. Sign in (using your existing mobile account details) or create a new account if needed, and then follow the steps to add your device to your account.
If your provider doesn’t offer plans, select Choose from a list of mobile operators. Choose a new provider, and then select Continue to go to the telecom provider’s website to set up a new account and plan.
On the Select a mobile operator to get online now page, select a telecom provider, select Continue to go to their site, sign in, and then choose a plan.
When you want to use your mobile data connection, use the following procedure to connect:
Select the Network icon in the system tray.
In the list of available networks, choose the mobile network.
If you experience any problems with your cellular connections, use the following steps to troubleshoot your connection:
Open the Settings app.
Select Network & Internet.
Assuming you have an eSIM or compatible SIM, you should see a Mobile tab on the left. Select the Mobile tab.
If you have multiple SIMs, then select whichever SIM you want to use for a given data plan, and select Use this SIM for mobile data.
Open the Mobile Plans app and choose a mobile operator from those listed.
Follow the previous instructions to set up a plan with your telecom provider.
Set up Windows 10 as a mobile hotspot
Windows 10 devices are becoming lighter and more mobile. Often, users have multiple connected devices, including laptops, tablets, and cellphones. Virtually ubiquitous internet connectivity enables users to adopt an “always on” lifestyle. When users face situations where traditional connections, such as corporate Wi-Fi or Ethernet, are not available, they will look for other forms of connectivity, such as Wi-Fi hotspots; they also might use their mobile devices to connect to the internet.
Broadband tethering, referred to as a Windows 10 mobile hotspot, enables users to share their own internet connections with others by enabling the device to function as a wireless “hotspot.” Similarly, users can connect to other users’ shared personal “hotspots,” provided they have the necessary credentials.
To connect to a shared mobile hotspot connection, follow these steps:
In Settings, select Network & Internet.
As shown in Figure 3-8, select the Mobile hotspot tab.
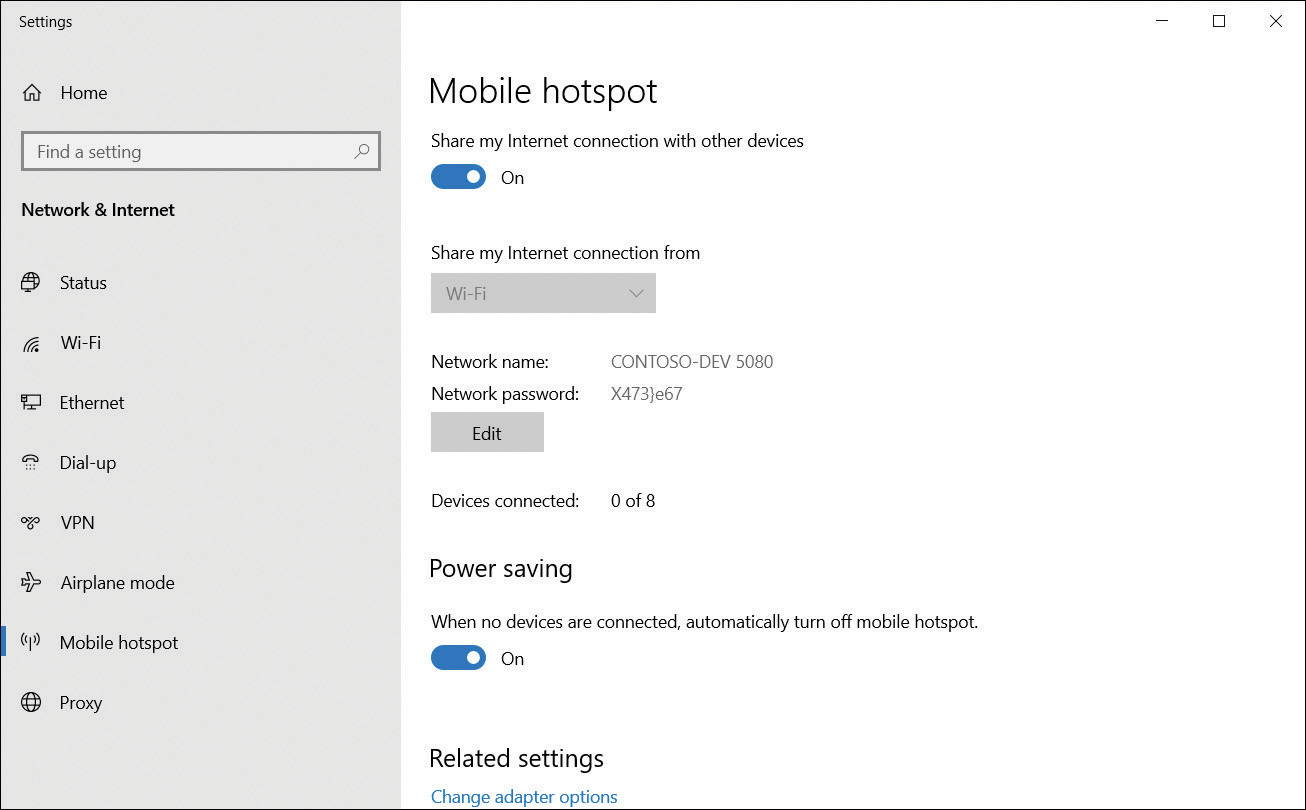
FIGURE 3-8 Enabling a mobile hotspot
In the Share my internet connection from list, choose the appropriate network connection.
Select Edit and enter a Network name and Network password. These are used by other users that connect to your device.
Finally, enable the Share my Internet connection with other devices option.
Configure VPN client
In Windows 10, creating a VPN enables data to be transferred through a virtual private network using a secured connection (known as a tunnel) over a public network, such as the internet, as shown in Figure 3-9.
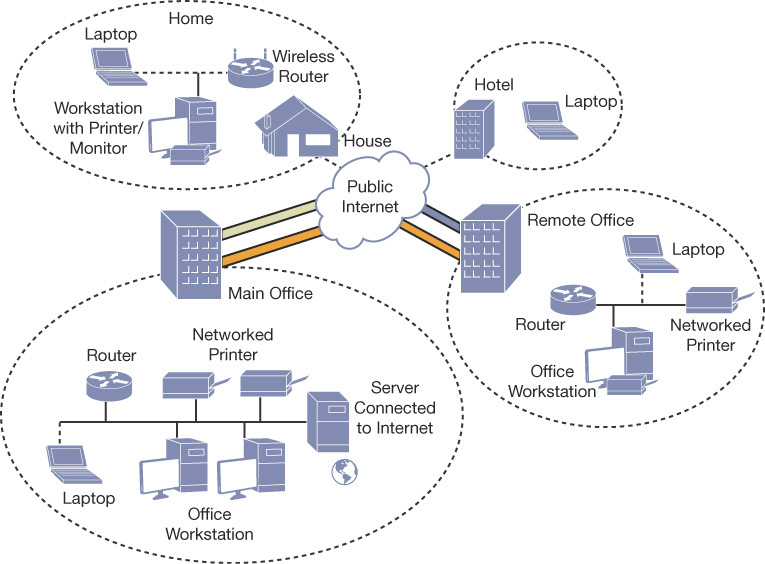
FIGURE 3-9 Using a VPN to connect locations securely over the internet
Except in a few specialized scenarios, nearly all dial-up remote connections have been replaced by broadband-enabled VPN communications. Windows 10 still supports Point-to-Point Protocol (PPP), which can be used with a dial-up connection. This is an old protocol, but because it creates a direct connection and maintains a dedicated link between the two points, it is used as the starting point for most dial-up and PPP connections.
VPN protocols
Windows 10 supports four commonly used VPN protocols. Each protocol offers different characteristics and age, as described next. Typically, the newest protocol will be the most secure.
Point-to-Point Tunneling Protocol (PPTP) PPTP is the oldest and what is considered one of the least secure of all supported VPN protocols. However, it can be used successfully in low-security scenarios because it is very easy to set up and still offers more protection than using PPP over the internet. PPTP creates the tunnel and then can use several authentication methods, including the Microsoft Challenge Handshake Authentication Protocol versions 1 and 2 (MS-CHAP v1 and MS-CHAP v2), Extensible Authentication Protocol (EAP), and Protected Extensible Authentication Protocol (PEAP). If EAP is used, certificates can be used with PPTP; otherwise, they are not necessary.
Layer 2 Tunneling Protocol (L2TP) This protocol uses the IP security extensions (IPsec) for encryption and encapsulation. L2TP encapsulates the messages with IPsec, and then encrypts the contents using the Data Encryption Standard (DES) or Triple DES (3DES) algorithm. The encryption keys are provided by IPsec using Internet Key Exchange (IKE). L2TP/IPsec can use preshared keys or certificates for authentication. Using a preshared key is useful during testing and evaluation but should be replaced with a certificate in a production environment.
Secure Socket Tunneling Protocol (SSTP) This is a recent protocol introduced with Windows Server 2008 and supported on Vista SP1 or later. It encapsulates PPP traffic using the Secure Sockets Layer (SSL) protocol, which is widely supported on the internet and passes through TCP port 443, which is the same as SSL. Using the Extensible Authentication Protocol-Transport Layer Security (EAP-TLS) authentication protocol together with certificates makes SSTP a versatile and widely used protocol.
Internet Key Exchange, Version 2 (IKEv2) IKEv2 is most useful for mobile users and is the default protocol for Windows 10 and Windows 8.1 when trying to connect to remote access servers. This protocol is partially supported on Windows 7 and later versions of Windows and provides support for IPv6 traffic and the IKEv2 Mobility and Multi-homing (MOBIKE) protocol through the Windows VPN Reconnect feature, which allows automatic reconnection if a VPN connection is lost. Authentication is offered using EAP, PEAP, EAP-MS-CHAPv2, and smart cards. IKEv2 will not support older authentication methods, such as Password Authentication Protocol (PAP) and Challenge-Handshake Authentication Protocol (CHAP), which offer little protection.
Authenticating remote users
Windows users authenticate using Kerberos when accessing the local network, but for remote authentication, this protocol is not suitable; a separate protocol, which protects against network intrusion, must be used. During the initial negotiation sequence (using PPP) when a client connects to the remote computer, each party must agree on a shared authentication protocol to use. By default, Windows 10 will use the strongest protocol that both parties have in common.
In the Add A VPN Connection Wizard, Windows 10 offers three sign-in options when configuring a VPN, such as:
Username and password
Smart card
One-time password
In addition to these options, you can configure Windows 10 to use the common authentication protocols:
EAP-MS-CHAPv2 This protocol uses Extensible Authentication Protocol (EAP), which offers the default and most flexible authentication option for Windows 10 clients. It provides the strongest password-based mechanism for the client side, with certificates used on the server side. Authentication can be negotiated based on certificates or smart cards, and EAP-MS-CHAPv2 is likely to be further extended and developed as technology advances. Windows 10 will aim to use this method for authentication connections where possible. IKEv2 connections must use EAP-MS-CHAPv2 or a certificate.
PAP This is the least secure protocol since it uses plaintext passwords. It should be used only when other authentication methods cannot be negotiated.
CHAP CHAP is used for down-level client compatibility and has been surpassed by MS-CHAP v2. This protocol uses a preshared key between the client and server to enable encryption to take place.
MS-CHAP v2 This protocol is stronger than the CHAP protocol, with significantly improved security when partnered with EAP to enable encryption of the password.
Creating a VPN connection in Network And Sharing Center
To create a VPN in Windows 10, from the Network And Sharing Center, under Change your network settings, select Set up a new connection or network and then select Connect to a workplace.
To configure your VPN connection, in the Connect to a Workplace Wizard, provide the following information.
How do you want to connect? You can connect by using an existing internet connection or by dialing directly to your workplace.
Internet address This is the name or IP address of the computer that you connect to at your workplace, as shown in Figure 3-10. Typically, this is an FQDN, such as remote.adatum.com.

FIGURE 3-10 The Connect To A Workplace Wizard
Destination name This is the name of your VPN connection.
After you have created the VPN connection, from the Network And Sharing Center, select Change adapter settings, right-click your VPN connection, and select Properties. As shown in Figure 3-11, you can then configure additional options as required by your organization’s network infrastructure.
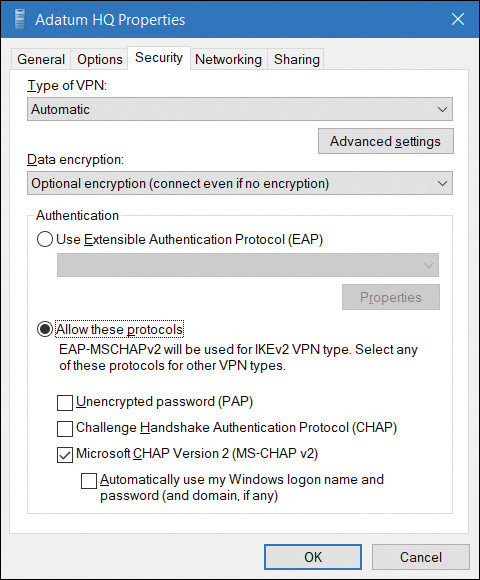
FIGURE 3-11 The Security tab of a VPN connection
These settings must match the remote access device that your device connects to, and includes the following options:
Type of VPN Point-to-Point Tunneling Protocol (PPTP), Layer Two Tunneling Protocol with IPsec (L2TP/IPsec), Secure Socket Tunneling Protocol (SSTP), or Internet Key Exchange version 2 (IKEv2)
Data encryption None, Optional, Required, or Maximum Strength
In the Authentication section, you choose either Use Extensible Authentication Protocol (EAP) or Allow These Protocols. If you choose to use EAP, you then configure one of the following:
Microsoft: EAP-AKA (Encryption Enabled)
Microsoft: EAP-SIM (Encryption Enabled)
Microsoft: EAP-TTLS (Encryption Enabled)
Microsoft: Protected EAP (PEAP) (Encryption Enabled)
Microsoft: Secured Password (EAP-MSCHAP v2) (Encryption Enabled)
Microsoft: Smart Card Or Other Certificate (Encryption Enabled)
If you choose Allow These Protocols, you then configure the following options:
Unencrypted Password (PAP)
Challenge Handshake Authentication Protocol (CHAP)
Microsoft CHAP Version 2 (MS-CHAP v2)
Automatically Use My Windows Log-on Name And Password (And Domain, If Any)
Using the Settings app to create and configure a VPN
You can also use the Settings app to create and configure VPN connections. Use the following procedure:
Select Start and then select Settings.
In Settings, select Network & Internet.
Select the VPN tab, and then, in the details pane, select Add a VPN connection.
On the Add a VPN connection page, enter the following information:
VPN provider: Windows (Built-In)
Connection name
Server name or address
VPN type: Automatic (Default). You can also choose PPTP, L2TP/IPsec with certificate, L2TP/IPsec with pre-shared key, SSTP, or IKEv2.
Type of sign-in info: Username and password, Smart card, One-off password, or Certificate.
Username and password, although these options are only configurable if you selected username or password as the Type of sign-in info.
Select Save.
After you have created the VPN, you can manage it from Network Connections in Control Panel. Alternatively, on the VPN page in the Network & Internet node in Settings, you can select the VPN and then choose Advanced Options. From there, you can reconfigure the VPN’s settings.
VPN profiles
Although manually configuring VPN connections is relatively simple, completing the process on many computers, with the same or similar settings, is very time-consuming. In these circumstances, it makes sense to create a VPN profile and then distribute the profile to your users’ computers.
When you use VPN profiles in Windows 10, you can take advantage of a number of advanced features:
Always On This feature enables Windows to automatically connect to a VPN. The Always On feature can be triggered by sign-in when the desktop is unlocked, and on network changes. When the Always On profile is configured, the VPN remains always connected unless the user disconnects manually or logs off the device. The profile is optimized for power and performance, and the profiles can be pushed and managed on devices using mobile device management (MDM) tools.
App-Triggered VPN You can configure the VPN profile to respond to a specific set of apps; if a defined app loads, then the VPN initiates.
Traffic Filters To protect the server from a remote attack, an administrator can configure policies on a Windows 10 device to inspect and, if necessary, filter VPN traffic before it is enabled to travel over the VPN. Two types of Traffic Filter rules are available:
App-based rules An app-based rule will only enable VPN traffic originating from applications that have been marked as being allowed to traverse the VPN interface.
Traffic-based rules Enterprise-level traffic-based rules enable fine-tuning of the type of traffic allowed. By using the industry-standard rules covered by five tuple policies (protocol, source IP address, destination IP address, source port, and destination port), administrators can be very specific on the type of network traffic that is allowed to travel over the VPN interface.
An administrator can combine both app-based rules and traffic-based rules.
LockDown VPN The LockDown VPN profile is used to enforce the use of the VPN interface. In this scenario, the device is secured to only allow network traffic over the VPN, which is automatically always on and can never be disconnected. If the VPN is unable to connect, then no network traffic will be allowed. The LockDown profile overrides all other VPN profiles and must be deleted before other profiles can be added, removed, or connected.
You can create and distribute Windows 10 VPN profiles with these advanced settings by using Microsoft Intune and/or Endpoint Configuration Manager.
Need More Review? VPN Connections in Microsoft Intune
To review further details about VPN connections in Microsoft Intune, refer to the Microsoft website at https://docs.microsoft.com/intune/vpn-settings-configure.
Need More Review? How to Create VPN Profiles in Configuration Manager
To review further details about creating VPN profiles in Configuration Manager, refer to the Microsoft website at https://docs.microsoft.com/en-us/sccm/mdm/deploy-use/create-vpn-profiles.
Enable VPN Reconnect
VPN Reconnect uses the IKEv2 protocol with the MOBIKE extension to automatically reestablish a lost VPN connection without user intervention. For mobile users, the prevalence of dropped Wi-Fi or LTE connections can be frequent because of volatile signal strength. It is best to use and configure VPN Reconnect for your mobile users because doing so reduces the frustration of having to reconnect manually, and it will also increase productivity.
The network outage time can be configured from 5 minutes up to an interruption of 8 hours. To enable VPN Reconnect, follow these steps:
On the taskbar, in the search box, enter VPN.
Select VPN settings from the returned list.
In the Settings app, select Change adapter options.
Select the appropriate VPN adapter, and then select Change settings of this connection, as shown in Figure 3-12.

FIGURE 3-12 Configuring the Network Outage Time for VPN Reconnect
Select the Security tab in the VPN Properties dialog box, and select Advanced settings.
In the Advanced Properties dialog box, select the Mobility option on the IKEv2 tab.
Modify the Network outage time as necessary.
Select OK twice.
Troubleshoot networking
Windows 10 is a reliable and robust operating system, and the networking technologies built into it are tried and tested. However, networking is an inherently complex area, and problems might occur on your network.
When you are facing a networking problem, use an appropriate procedure for troubleshooting the issue. This procedure might include the following steps:
Determine the scope of the problem. Knowing how many users are affected can help you determine possible causes.
Determine the IP configuration. Verify that the network configuration of affected devices is correct.
Determine the network’s hardware configuration. Determine whether any problems exist with the networking hardware or device drivers for that hardware.
Test communications. Perform a series of tests that help you pinpoint the nature of the problem. Tests might include:
Verifying basic communications
Checking the routing and firewall configuration of your network
Testing name resolution
Testing connectivity to specific applications on servers
It’s important that you know how to troubleshoot network-related problems that occur on your network to minimize disruption to your users.
Network troubleshooting tools
Windows 10 provides a number of tools that you can use to diagnose and resolve many network-related issues. These tools are described in Table 3-5.
TABLE 3-5 Windows 10 network troubleshooting tools
Tool |
Purpose |
|---|---|
Event Viewer |
Windows collects information about system activity into event logs. For example, the System log stores information about IP conflicts and network-related service failures. |
Windows Network Diagnostics |
You can use Diagnose Connection Problems to help you diagnose and repair a network issue. Windows Network Diagnostics presents possible descriptions of the issue and suggests a potential solution. You can access this tool by clicking Troubleshoot Problems in Network And Sharing Center. |
IPConfig |
Use this command-line tool to display the current TCP/IP configuration of your Windows 10–based device. You can use the command with the following switches: ipconfig /all View detailed configuration information. ipconfig /release Release the leased configuration back to the DHCP server. ipconfig /renew Renew the leased configuration. ipconfig /displaydns View the DNS resolver cache entries. ipconfig /flushdns Purge the DNS resolver cache. ipconfig /registerdns Register or update the client’s host name with the DNS server. |
Ping |
This command-line tool can be used to verify connectivity to a target computer system by sending a series of network packets to that target system. Consider that many firewalls block the ICMP packets Ping uses, so you might receive false negatives. Type ping www.contoso.com. |
Tracert |
Use this tool to determine the path that packets take to a designated target computer system, which helps you diagnose routing-related problems. |
NSLookup |
Use this tool to troubleshoot name resolution. |
Pathping |
This traces a network route similar to how the Tracert tool works but provides more statistics on the hops through the network. |
Windows PowerShell |
In addition to the configuration cmdlets referred to earlier, a number of Windows PowerShell cmdlets are available that you can use to troubleshoot and test network connectivity. For example, the test-connection cmdlet behaves in a way similar to Ping.exe. Enter test-connection www.contoso.com. |
Network Troubleshooter |
You can use the Network Troubleshooter tool from within Network & Internet in the Settings app. On the Status tab, select Network Troubleshooter. A wizard starts that scans the network configuration for problems and, where possible, makes suggestions about fixes. This is very similar to the Windows Network Diagnostics tool mentioned earlier. |
Network Reset |
You can use the network reset tool from within Network & Internet in the Settings app. On the Status tab, select Network Reset. Note that you should use Network Reset as a last resort. This is because it removes and then reinstalls your network adapters and related settings. Network Reset can help restore your internet connection, but it might result in additional configuration work after the reset has been performed. |
Troubleshoot name resolution
Many network failures can be caused by a failure in name resolution, such as when the wrong server IP address is returned or a service has not registered itself with a DNS server correctly (or at all). When troubleshooting name resolution issues, use a suitable procedure, which might consist of the following steps:
Clear the DNS resolver cache. Use the Ipconfig /flushdns command from an elevated command prompt. Clearing the cache ensures that all subsequent name resolution attempts are performed rather than being satisfied from DNS resolver cache. You can also use the Clear-DnsClientCache Windows PowerShell cmdlet to achieve the same thing.
Attempt to verify basic connectivity by using an IP address. Use the Ping command, or the test-connection Windows PowerShell cmdlet, to verify communications to an IP address; for example, type test-connection 172.16.16.1.
Attempt to verify connectivity to a host name. Using the same tools, check whether you can communicate with a host by using its name, for example, test-connection LON-DC1. If this is successful, it is likely that your problem is not related to name resolution.
If the test is not successful, edit the Hosts file. Add the correct IP address and name to your hosts file. For example, add the line 172.16.16.1 LON-DC1.adatum.com to C:WindowsSystem32DriversEtcHosts. Repeat the procedure to verify connectivity to a host name. Name resolution should now be successful.
Display the resolver cache. Use the Get-DnsClientCache cmdlet (or use IPConfig /displaydns) to verify that the entry appears in a resolved cache. You have proven that the problem is likely a name resolution issue. Remove the entry from the Hosts file and clear the resolver cache.
Test the name server by performing a query against it by using the Resolve-dnsname lon-DC1.adatum.com cmdlet. Alternatively, use the NSLookup .exe -d2 LON-cl1.adatum.com command. You can review the partial output from the Resolve-dnsname cmdlet in Figure 3-13.
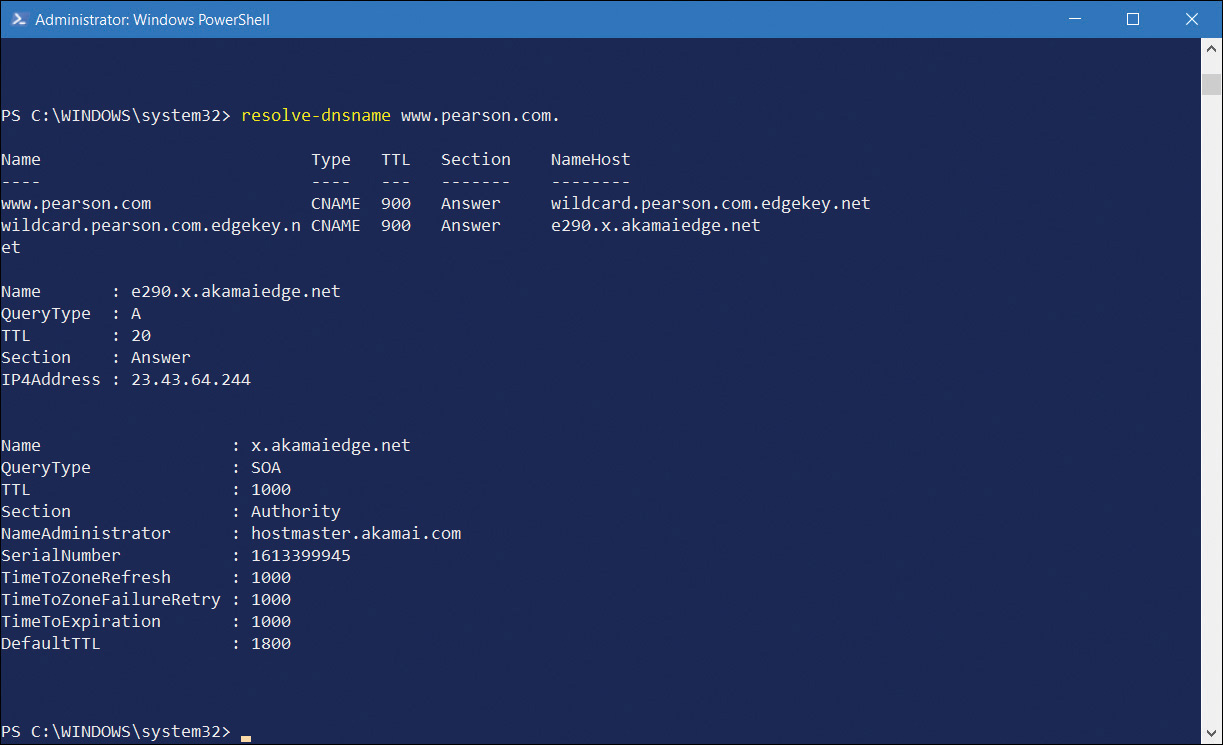
FIGURE 3-13 Using Resolve-dnsname to test name resolution
The information returned from the name server test shows IP addresses of the server you queried against. It also shows which name servers provided the response. It is important to know how to interpret this returned information to diagnose any failures or faults properly.
Need More Review? Diagnosing Name Resolution Problems
To find out more about troubleshooting name resolution, refer to the Microsoft website at https://technet.microsoft.com/library/cc959340.aspx.
Configure Wi-Fi profiles
You can configure wireless networks by using one of several modes to suit your requirements and using one of a number of standards to secure the network and achieve compatibility between your wireless devices.
Modes
Wireless networking can be configured in one of three modes:
Ad-hoc This setting enables you to configure a wireless connection between devices in a peer-to-peer manner without requiring a wireless access point (AP).
Wi-Fi Direct This setting is a wireless networking standard that you can use to connect your wireless devices without a wireless AP. Similar to ad hoc wireless networking, it is typically used to connect to peripherals such as printers and media players.
Infrastructure Based on wireless APs, infrastructure networks consist of wireless local area networks to enable communications between wireless client devices.
Standards
To ensure compatibility between wireless networked devices, a number of standards have evolved. The 802.11x wireless standards are described in Table 3-6.
TABLE 3-6 802.11 wireless standards
Standard |
Definition |
|---|---|
802.11a |
Provides up to 54 megabits per second (mbps) and uses the 5 gigahertz (GHz) range. Not compatible with 802.11b. Sometimes referred to as Wi-Fi 2. |
802.11b |
Provides 11 mbps and uses the 2.4 GHz range. Sometimes referred to as Wi-Fi 1. |
802.11e |
Defines Quality of Service and multimedia support. |
802.11g |
For use over short distances at speeds up to 54 Mbps. Backward compatible with 802.11b and uses the 2.4 GHz range. Often referred to as Wi-Fi 3. |
802.11n |
Increases data throughput at speeds up to 100 Mbps, and it uses both 2.4 GHz and 5 GHz ranges. Often referred to as Wi-Fi 4. |
802.11ac |
Builds on 802.11n to achieve data rates of 433 Mbps. 802.11ac uses the 5 GHz frequency range. Often referred to as Wi-Fi 5. |
802.11ax |
Improves on 802.11ac and designed to operate between 1 and 6 GHz at data rates of around 10 Gbps. Usually referred to as Wi-Fi 6. |
Security
It is comparatively easy to gain access to a wireless network, so it is important to secure network traffic on your wireless network infrastructure. A number of wireless security standards exist that can help, as described in Table 3-7. When choosing a security method, ensure that your wireless devices and infrastructure support that method.
TABLE 3-7 Wireless security standards
Standard |
Explanation |
|---|---|
Wired Equivalent Privacy (WEP) |
WEP is an old wireless security standard, and a number of documented security issues surround it. Use WEP only if there is no choice. |
Wi-Fi Protected Access (WPA) |
WPA has two variations: WPA-Personal: Easier to implement than WPA Enterprise and, therefore, ideal for smaller networks. Authentication is based on a password. The password and the network service set identifier (SSID) generate encryption keys for each wireless device. WPA-Enterprise: Designed for larger networks and requires the use of a Remote Authentication Dial-In User Service (RADIUS) server to provide for authentication. |
WPA2 |
An improved version of WPA that is the de facto Wi-Fi security standard. It employs larger encryption key sizes than WPA. |
Configure wireless settings
After you have selected the appropriate wireless infrastructure components and chosen your wireless security standard, you must set up and configure your wireless network in Windows 10.
Connect to a wireless network
To connect to a wireless network, in the system tray select the network icon to review a list of available wireless networks. Select the appropriate network and then select Connect. Enter the required security information as displayed in Figure 3-14 and select Next.
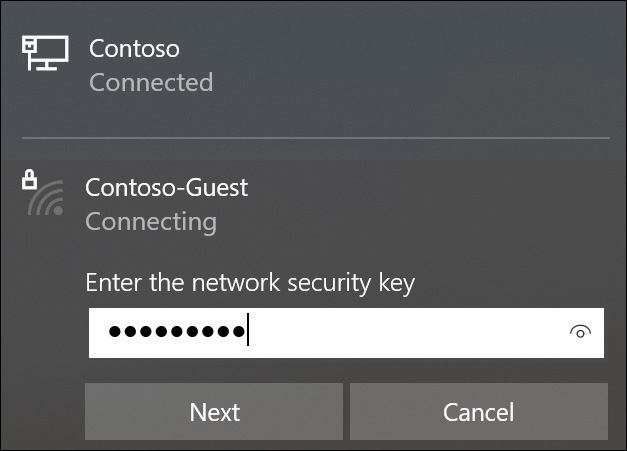
FIGURE 3-14 Connecting to a wireless network
Configure existing wireless networks
To review or edit your existing wireless networks, from Settings select Network & Internet. On the Wi-Fi tab, displayed in Figure 3-15, you can configure the following options:
Show available networks Enables you to review the currently available Wi-Fi networks within range of your device.
Hardware properties Enables you to review the properties of your Wi-Fi connection, including SSID, Protocol, Security type, Network band, Network channel, IPv4 and IPv6 configuration, and details about your Wi-Fi adapter.
Manage known networks Enables you to review, configure, or forget any Wi-Fi networks to which your device has connected. To forget a Wi-Fi connection, select it, and then select Forget. To configure a Wi-Fi network, select it, and then select Properties. You can then review or configure the following:
Connect Automatically When In Range
Network Profile: Public Or Private. This option is only available when you are connected to the specific Wi-Fi network.
Set As Metered Connection
Random hardware addresses Enables your computer to use a different hardware address for each network to which it connects. This can help secure your device by making it harder to track your device’s location.
Hotspot 2.0 networks Under this heading, you can enable the following option:
Let Me Use Online Sign-Up To Get Connected
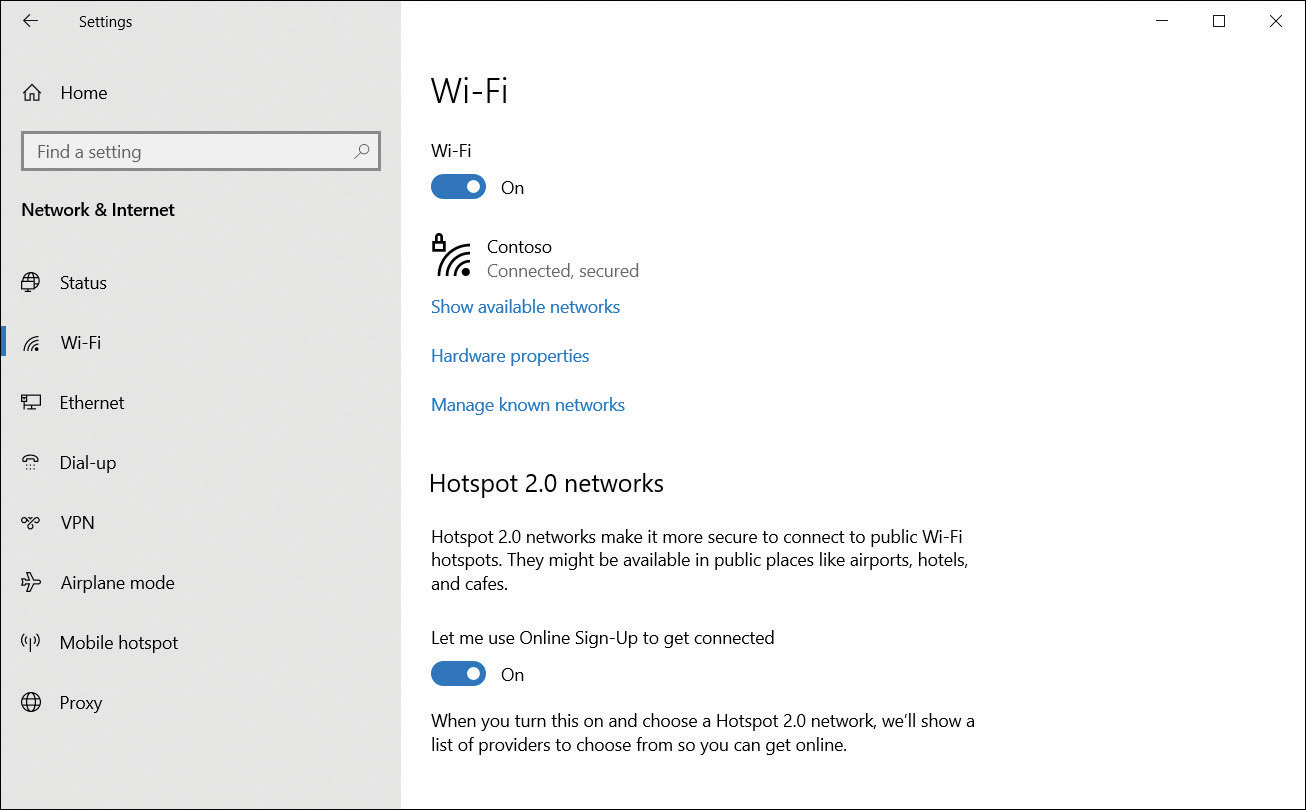
FIGURE 3-15 Managing Wi-Fi settings
Hotspot 2.0 Networks
For connecting to public Wi-Fi networks, Windows 10 supports the Hotspot 2.0 wireless 802.11u Wi-Fi standard. This makes connecting to hotspots in public places, such as airports, or coffee shops, easier and more secure.
Your device will attempt to connect you to available public hotspots automatically, in a similar fashion to cellular-style “roaming.”
There are several benefits to using Hotspot 2.0:
Public hotspots become easier and more secure. Your device will detect which Wi-Fi network is authentic and connect automatically.
Network providers can partner with other providers. This will allow great network coverage and allow cellular-style “roaming.”
Encryption is enforced and utilizes enterprise-grade WPA2 encryption.
When you attempt to join a Hotspot 2.0 network for the first time, Windows 10 presents an Online Sign-Up screen with a list of available network providers. After you have set up an account with one of the providers, your device will be able to connect to other Hotspot 2.0 networks automatically in the future.
Advanced settings
To configure advanced wireless settings, from the Network And Sharing Center, under View Your Active Networks, select the wireless network you want to configure, as shown in Figure 3-16. Then, in the Wi-Fi Status dialog box, click Wireless Properties. You can then view the security settings for your wireless network connection.
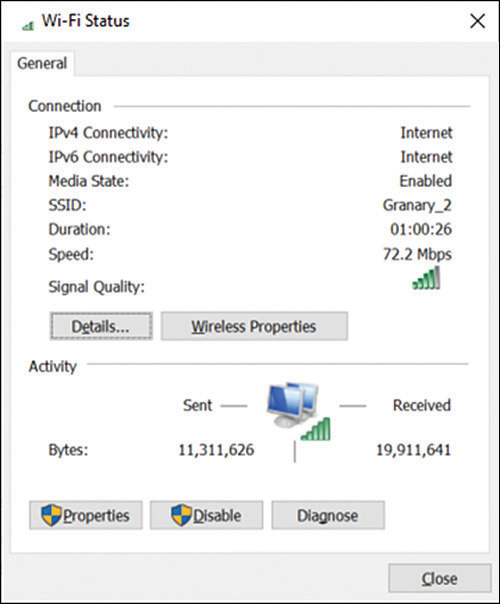
FIGURE 3-16 Managing advanced Wi-Fi settings
You can also manage wireless networks by using Netsh.exe. For example, to list the wireless network profiles on your computer, type:
Netsh wlan show profile
Need More Review? Using Netsh.Exe to Manage Wireless Networks
To find out more about managing Wi-Fi settings by using Netsh.exe, refer to the Microsoft website at https://docs.microsoft.com/en-us/previous-versions/windows/it-pro/windows-server-2008-R2-and-2008/dd744890(v=ws.10).
Configuring Wi-Fi Direct
Wi-Fi Direct is a standard developed with the Wi-Fi Alliance, is fully supported by Windows 10, and enables Wi-Fi Direct devices to connect seamlessly to one another. This can be achieved by using Miracast over Infrastructure (which uses Ethernet if a network access point or secure ad hoc Wi-Fi network is available) or over a private ad hoc wireless network as and when required.
Wi-Fi Direct enables you to interact with other hardware—for example, to print to a wireless printer or to send your PowerPoint presentation to an external display.
Devices that are utilizing Wi-Fi Direct include mobile phones, cameras, printers, TVs, PCs, and gaming devices, such as Xbox One.
Wi-Fi Direct is similar to Bluetooth, but 10 times faster. Wi-Fi Direct transfers data at up to 250 Mbps, whereas Bluetooth 4.0 transfers data at up to 25 Mbps.
As the technology continues to mature, Microsoft has upgraded and enhanced the application programming interface (API) support with Windows 10 for developers to use when writing their software. Original equipment manufacturer (OEM) vendors are gradually incorporating Wi-Fi Direct into their devices, such as printers utilizing Wi-Fi Direct. Unlike with Bluetooth, only one device needs to support Wi-Fi Direct, though they will still pair in much the same way as Bluetooth. For example, Miracast enables a Windows device to wirelessly display on to a projected screen, such as a TV or projector. Miracast is ideal for enabling screens that do not have built-in support for Wi-Fi Direct because it uses a High-Definition Multimedia Interface (HDMI) adapter, which plugs into the remote screen. Windows 10 can wirelessly connect to the Miracast adapter.
To use the Wi-Fi Direct technology, a user will turn on or enable the Wi-Fi Direct device, such as a Miracast adapter or printer, and Windows 10 will locate the device wirelessly and connect. Once the device is connected, application files that are required for the user interface, such as display or printer dialog screens, are received directly from the Wi-Fi Direct device.
Some characteristics of Wi-Fi Direct are as follows:
Distance between devices (ad hoc Wi-Fi) Compared with Bluetooth, which creates a personal area network of just a few feet, Wi-Fi Alliance states that Wi-Fi Direct devices can reach each other over a maximum distance of up to 656 feet.
Security Wi-Fi Direct uses either WPA2-PSK or WPA2-Enterprise security, which uses AES 256-bit encryption with a key-based encryption and authentication method.
Speed Wi-Fi Direct claims device-to-device transfer speeds of up to 250 Mbps.
Services Wi-Fi Direct Send, Wi-Fi Direct Print, Wi-Fi Direct for DLNA, Miracast, and Miracast over Infrastructure are the five services that currently utilize the Wi-Fi Direct standard.
To set up Wi-Fi Direct in Windows 10, you need a compatible network adapter. Type ipconfig /all at the command line and verify that one of the network adapters listed returns the Description value Microsoft Wi-Fi Direct Virtual Adapter, as shown in Figure 3-17.

FIGURE 3-17 Viewing available network adapters with ipconfig
After you have checked that your wireless network adapter supports Wi-Fi Direct, use the Netsh.exe command-line tool to set up your Wi-Fi Direct network. You can use the following command to start the process of enabling Wi-Fi Direct:
netsh wlan set hostednetwork mode=allow ssid=Wi-Fidirect key=passphrase
Use the following command to start Wi-Fi Direct:
netsh wlan start hostednetwork
To stop the Wi-Fi Direct network, use this:
netsh wlan stop hostednetwork
Skill 3.2: Configure data access and protection
Being able to access your data from anywhere is a key feature of Windows 10, whether in a small workgroup, in a large enterprise across a LAN, or when mobile using the internet. This skill discusses multiple methods of sharing configuration and setting access permissions on the share so that you are in control of who can see or edit the data. This skill also describes how you can configure online storage using Microsoft OneDrive and OneDrive for Business.
This skill covers how to:
Configure file and folder permissions
Although permissions have been part of NTFS and earlier versions of Windows, for your exam preparation you must ensure that you are familiar with NTFS and the security features it offers.
Most users are familiar with using the File Explorer tool to view and manage files and folders. When administering shared files and folders over a network, File Explorer is still the primary tool to configure file- and folder-level permissions.
Select file systems
Windows 10 supports many file systems, including NTFS, ReFS, exFat, FAT32, and FAT, which are described in Table 3-8. The most commonly used file systems are NTFS and FAT32, with ReFS becoming popular for servers and storage applications.
TABLE 3-8 File formats commonly used with Windows 10
File System |
Description |
|---|---|
NTFS |
Enterprise-class file system, used by Windows for over 30 years. |
ReFS |
Similar characteristics to NTFS. Not seen as a replacement for NTFS, but rather an improvement over NTFS for specific purposes. Designed for large volumes requiring additional resilience. |
exFat |
Designed by Microsoft for flash storage devices. Extended file allocation table. Supported on Windows since Vista SP1. Volume size limit of 256 terabytes (TB). File size up to 16 EB. Supports more than 1,000 files per directory. |
FAT32 |
Supported by Windows 95 SP2 and later versions; extended FAT16 to allow larger number of files per partition. File size limit of 4 GB. Volume size limit of 32 GB. |
FAT |
Sometimes referred to as FAT16. Introduced in 1981 and supported by DOS, OS/2, Linux, Windows 3.x, and later versions. Volume size limit of 4 GB. |
Note Fat File System
FAT is a simple file system and offers no native file-level encryption, compression, or local security for FAT or FAT32. Anyone with access to the file can read, change, or delete any file stored on a FAT partition.
NTFS
NTFS is the native file system Windows 10 uses and is widely used across most Windows operating systems; it offers you the ability to protect and secure files. NTFS offers the following characteristics:
File-level compression
Per-user volume quotas
Symbolic links and junction points
Volume sizes up to 256 TB
Up to 232 – 1 files per volume
Maximum implemented file size is 256 TB minus 64 KB, or 281,474,976,645,120 bytes
File names and total path size limited to 255 characters
Enterprise-level file and folder encryption
Metadata transactional logging to ensure that file structure can be repaired
Limited self-healing capabilities
ReFS
Windows 10 includes support for the more recent Resilient File System (ReFS), which has been designed to respond to the increased scale, access speed, and distributed nature of storage currently available. ReFS is not intended to replace NTFS but offers benefits to users such as storage stability, flexibility, scalability, and availability.
Note ReFS
ReFS is only available on Windows 10 Enterprise and Windows 10 Pro for Workstation editions.
ReFS offers enhanced data integrity and self-healing capabilities with the intention that repairs can be made while the operating system remains online.
Storage Spaces uses ReFS and is covered later in this chapter. When Storage Spaces is configured to use ReFS, it can automatically repair corrupted data to ensure that data is always available and resilient during drive failures.
Some ReFS characteristics are:
Maximum file size of 16 exabytes (EB)
Maximum volume size of 1 yottabyte (YB)
Compatibility with existing APIs and technologies
Does not support NTFS compression or Encrypting File System (EFS)
Cannot boot Windows 10 from an ReFS volume
Built-in resilience:
Transactional write model—Offers protection against power failures
Proactive repairing/self-healing—Corruption detection, automatic repairs
Data integrity—Reduces disk corruption through checksums employed on metadata
Improved availability—Repairs ReFS volumes while still online
Scalability—Works with extremely large datasets, in excess of 1 petabyte (PB)
ReFS supports long file names and file paths, with the total path size limited to 32,768 characters.
Use File Explorer to manage files and folders
The most common tool used to manage files and folders is File Explorer, which is located on the taskbar and on the Start screen. Typical functions provided through File Explorer include:
Creating new folders and files
Viewing and accessing files and folders
Searching for files and information contained in files
Managing properties of files and folders
Previewing contents or thumbnails of files and folders
The Quick Access area is new in Windows 10 and appears at the uppermost left area of the File Explorer navigation pane; it includes pinned shortcuts for frequently used files and folders such as the Desktop, Downloads, Documents, Pictures, and Music. As you browse and access files in other folders on your computer, folder shortcuts for these items appear in the right navigation pane under Frequent Folders or Recent Files. You can modify the behavior of Quick Access by right-clicking Quick Access and selecting Options to open the Folder Options dialog box displayed in Figure 3-18.

FIGURE 3-18 File Explorer Quick Access
On a shared computer, you might want to clear the check boxes for Show Recently Used Files In Quick Access and Show Frequently Used Folders In Quick Access.
Set file and folder permissions
Volumes formatted using either NTFS or the more recent ReFS enable you to configure file and folder permissions. File permissions are robust, reliable, and effective, and they enable you to configure granular permissions on both files and folders that determine how individual users and groups can use the objects.
The creator of the resource, such as a file or folder, is automatically assigned the special status of creator-owner, and the creator can grant or deny permissions to it. Administrators and anyone given the Full Control permission also can modify permissions for that file or folder.
To modify permissions to a file or folder, select the Security tab in the object’s properties, as displayed in Figure 3-19.
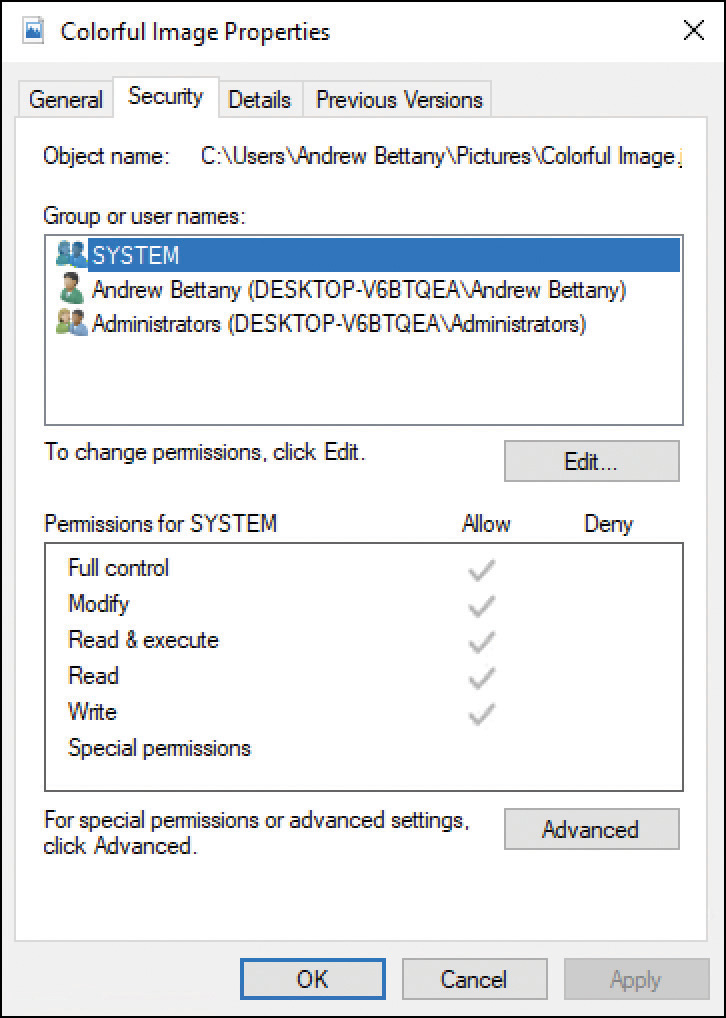
FIGURE 3-19 Security permissions for a file
If a user leaves your organization or their account is deleted, an administrator can take ownership of the users’ files and folders to modify permissions by changing the Owner principal found in the Advanced settings in Properties.
If you have the permission to modify the security settings in the access control list (ACL), you can add or remove users or groups and then grant or deny a specific permission level. In organizations, you assign permissions to groups rather than to multiple users because doing so minimizes administrative effort.
Review the abbreviations relating to objects that you might use when applying security permissions, as shown in Table 3-9.
TABLE 3-9 Security permission abbreviations
Name |
Abbreviation |
Description |
|---|---|---|
Access control list |
ACL |
A list of trustees (users and groups) with permissions for the object. |
Access control entry |
ACE |
Identifies specific permissions granted to a user or group. Each ACE identifies the trustee and specifies the access rights allowed, denied, or audited for that trustee. |
Discretionary access control list |
DACL |
Specifies which trustees are allowed or denied access to an object. |
System access control list |
SACL |
Specifies which users and groups will be audited when they perform actions, such as creating, modifying, or deleting objects. |
When configuring permissions for files and folders, you can configure basic or advanced permissions. Unless you are seeking a very fine degree of control to a resource, you typically work with basic permissions and assign them to groups and users, as described in Table 3-10.
TABLE 3-10 Basic file and folder permissions for NTFS and ReFS
File permission |
Description |
|---|---|
Full Control |
Complete authority and control of all file or folder permissions. |
Modify |
Ability to read a file, write changes to it, and modify permissions. |
Read & Execute |
Ability to see folder content, read files and attributes, and start programs. |
Read |
Ability to read a file but not make any changes to it. |
Write |
Ability to change folder or file content and create new files. |
Special Permissions |
Indication of whether additional advanced permissions have been configured for the file or folder. |
Note Basic and Advanced Permissions
If you are familiar with older versions of Windows, you might notice that Windows 10 uses the modern naming for permissions as follows: Standard Permissions has been changed to Basic Permissions, and Special Permissions has been changed to Advanced Permissions.
Basic permissions are easier to manage and document. Under the hood, a basic permission is made from a combination of individual advanced special permissions. Consider that permissions for folders can have a different effect on files, as described in Table 3-11.
TABLE 3-11 Basic NTFS file and folder permissions
Basic Permission |
Description: When Applied to a Folder |
Description: When Applied to a File |
|---|---|---|
Full Control |
Permits reading, writing, changing, and deletion of files and subfolders. Allows the modification of permissions on folders. |
Permits reading, writing, changing, and deletion of the file. Allows modification of permissions on files. |
Modify |
Permits reading, writing, changing, and deletion of files and subfolders. Does not allow changes to permissions on folders. |
Permits reading, writing, changing, and deletion of the file. Does not allow changes to the permissions on files. |
Read & Execute |
Allows the content of the folder to be accessed and executed. |
Allows the file to be accessed and executed (run). |
List Folder Contents |
Allows the contents of the folder to be viewed. |
Does not apply to files. |
Read |
Allows content to be read. |
Allows access to the contents. Does not allow files to be executed. |
Write |
Allows addition of files and subfolders to the folder. |
Allows a user to modify but not delete a file. |
Behind the basic permissions is a matrix of 13 advanced permissions that can also be applied to files and folders. Each basic permission is a collection of one or more advanced permissions, as described in Table 3-12.
TABLE 3-12 Basic and advanced permissions
Advanced Permission |
Full Control |
Modify |
Read & Execute |
List Folder Contents |
Read |
Write |
|---|---|---|---|---|---|---|
Traverse Folder/ Execute File |
X |
X |
X |
X |
||
List Folder/Read Data |
X |
X |
X |
X |
X |
|
Read Attributes |
X |
X |
X |
X |
X |
|
Read Extended Attributes |
X |
X |
X |
X |
X |
|
Create Files/Write Data |
X |
X |
X |
|||
Create Folders/Append Data |
X |
X |
X |
|||
Write Attributes |
X |
X |
X |
|||
Write Extended Attributes |
X |
X |
X |
|||
Delete Subfolders And Files |
X |
|||||
Delete |
X |
X |
||||
Read Permissions |
X |
X |
X |
X |
X |
X |
Change Permissions |
X |
|||||
Take Ownership |
X |
We recommend that you use basic permissions unless there is a clear requirement for setting advanced permissions; otherwise, the permissions can become complex and difficult to troubleshoot. If you do use the advanced permissions, it is best practice to document any modifications so that you can review the configuration and, if necessary, reverse the settings.
Many inexperienced users who configure file permissions can complicate the settings on files by setting advanced permissions (frequently using deny permissions) and setting permissions for individual users instead of setting permissions for groups. There is a strict canonical order or hierarchy of how Deny and Allow permissions can interoperate, and the general rule is that a Deny setting prevents an Allow setting.
Exam Tip
Remember the principle of least administration when applying NTFS or ReFS permissions. If you want to prevent a user or group from having any access to a resource, you could set no permissions. If neither Allow nor Deny permission is explicitly configured or inherited on a resource, users are prevented from accessing the file or folder.
Review Table 3-13 to understand the relationship between Deny and Allow settings and how the behavior changes, depending on how the setting is applied.
TABLE 3-13 Allow and Deny NTFS permissions
Permission Type |
Description |
Check Box Status |
|---|---|---|
Explicit Deny |
The user is denied the permission on the file or folder. |
The check box is selected. |
Explicit Allow |
The user is allowed the permission on the file or folder. |
The check box is selected. |
Inherited Deny |
Deny permission is applied to the file or subfolder by permissions given to the parent folder. |
The check box is dimmed but selected. |
Not configured |
When no permissions are assigned, the user has no permission to access the file or folder. |
The check box is cleared. |
Inherited Allow |
Allow permission is applied to the file or subfolder by permissions given to the parent folder. |
The check box is dimmed but selected. |
Note When Allow Overrides Deny
When applying permissions to groups and allowing inheritance, sometimes one group has an explicit Allow setting and another group has an inherited Deny setting. If a user is a member of both groups, the explicit Allow setting will override the implicit Deny.
Although most administrators will use File Explorer to set individual ACLs for files and folders, you can also use Windows PowerShell or the ICACLS command-line utility.
Windows PowerShell offers two cmdlets that you can use to manage file and folder permissions: Get-Acl and Set-Acl. For additional information and examples of how to use these cmdlets, type Get-Help Get-Acl or Get-Help Set-Acl.
ICACLS enables you to configure and view permissions on files and folders on a local computer. Some of the most common ICACLS parameters and permission masks are described in Table 3-14.
TABLE 3-14 Common ICACLS parameters and permission masks
Parameter/ Permission Mask |
Description |
|---|---|
|
Grants specific user access rights. Permissions replace previously granted explicit permissions. |
|
Explicitly denies specified user access rights. An explicit Deny ACE is added for the stated permissions, and the same permissions in any explicit grant are removed. |
|
Replaces ACLs with default inherited ACLs for all matching files. |
|
Full access. |
|
Modify access. |
|
Read and execute access. |
|
Read-only access. |
|
Write-only access. |
|
Object inherit. |
|
Do not propagate inherit. |
To grant a permission, use the /grant switch, as the following example on an existing file called My New Files in C:Working Folder shows:
Open File Explorer.
Navigate to the folder on which you want to set permissions.
Select File and then select Open Windows PowerShell as administrator.
Run the following command:
Icacls 'My new files.rtf' /grant 'Demo:(OI)(M)'
Enter Icacls 'My new files.rtf' to review the permissions.
Need More Review? ICACLS
This Microsoft resource provides additional information for you to review relating to ICACLS. Visit https://docs.microsoft.com/windows-server/administration/windows-commands/icacls.
Understand permissions inheritance
Setting file permissions on hundreds of files and folders would take a long time, especially if each setting were configured manually. Fortunately, you don’t need to because, by default, NTFS and ReFS security permissions are inherited from their parent folder. In this way, permissions “flow” from top to bottom and follow the folder hierarchy. By default, inheritance is enabled because this facilitates more efficient administration. NTFS enables you to disable inheritance from flowing from a parent folder to the child.
You can review the inheritance status of a file or folder in File Explorer by following these steps:
Open File Explorer.
Navigate to the folder whose inheritance settings you want to review.
Right-click the file or folder, and select Properties and then select Advanced.
On the Permissions tab, review the permission entries and notice the Inherited from column, as shown in Figure 3-20.

FIGURE 3-20 NTFS inheritance
Figure 3-20 shows a Disable Inheritance button. If you select this button, you are presented with two choices, as shown in Figure 3-21.

FIGURE 3-21 Blocking inheritance
In the Block Inheritance dialog box, there are two options:
Convert inherited permissions into explicit permissions on this object Prevents inherited permissions from being able to “flow” from top folders to the subfolders. Current inherited permissions are changed by the system from implicit permissions to explicit permissions. This can result in hundreds or thousands of inherited permissions being changed into explicit permissions.
Remove all inherited permissions from this object Removes all permissions and gives you a folder structure with no permissions set. Care needs to be taken with this option because it is very easy to remove all access—even system access—to the file structure.
The option to convert inherited permissions to explicit permissions stops inheritance from flowing from the parent folders and changes the permissions on all child items from implicit permissions to explicit permissions. You can then modify the permissions.
If you choose the second option, Remove All Inherited Permissions From This Object, you completely remove all permissions. This provides you with a folder structure with no permissions at all.
Both options are powerful and can have far-reaching effects. Best practice recommends employing inheritance wherever possible to ease administration. You should also document and test your outline folder structure before it becomes too large. A big change on a small structure is simple to put in place, whereas modifying a large, established file structure could be cumbersome.
Understanding move, copy, and permissions inheritance
When you have to move or copy a folder from one location to another, you should understand how NTFS will perform the task with respect to how permissions on the resource are modified. Table 3-15 describes the behavior that NTFS adopts when copying files from one folder to another folder, and between partitions.
TABLE 3-15 Effect of moving or copying NTFS files
Action |
Effect |
|---|---|
Copy or move a file or folder to a different volume |
Inherits the permissions from the destination (new location) folder. |
Copy or move a file or folder within the same NTFS volume |
Inherits the permissions from the new parent folder, and explicitly assigned permissions are retained and merged with the inherited permissions. |
Copy a file or folder to a non-NTFS volume |
The copy of the folder or file loses all permissions. |
Note What Happens when you Move an NTFS-Protected File to a Fat Volume?
If you’re moving a file or folder from NTFS to a non-NTFS partition, such as a FAT32 volume, all NTFS file and folder permissions will be lost because FAT32 does not support file and folder permissions. Only Creator Owners and users with the Modify permission (and administrators) can perform this task because they have permission to move files and folders. When moving files to a FAT32 volume, the process involves saving the object onto the new file system, losing the original file permissions in the process, and then deleting the original object.
When you copy a file or folder within the same volume or between volumes, the user must have Read permission for the source folder and Write permission for the destination folder.
When you move a file or folder within the same volume or between volumes, you need to have both Write permission for the destination folder as well as Modify permission for the source file or folder. This is because Windows 10 will move the resources (Write) and then delete (Modify) the resources from the source folder once it has completed the copy to the destination folder.
View Effective Access
You might be required to determine the access that a user has to a resource. Within the Advanced options of an object’s Security settings, you will find the Effective Access tab (previously called Effective Permissions), as displayed in Figure 3-22. When setting permissions in a corporate environment, you should verify that NTFS permissions are applied correctly and use the Effective Access feature to ensure that the results are as expected.
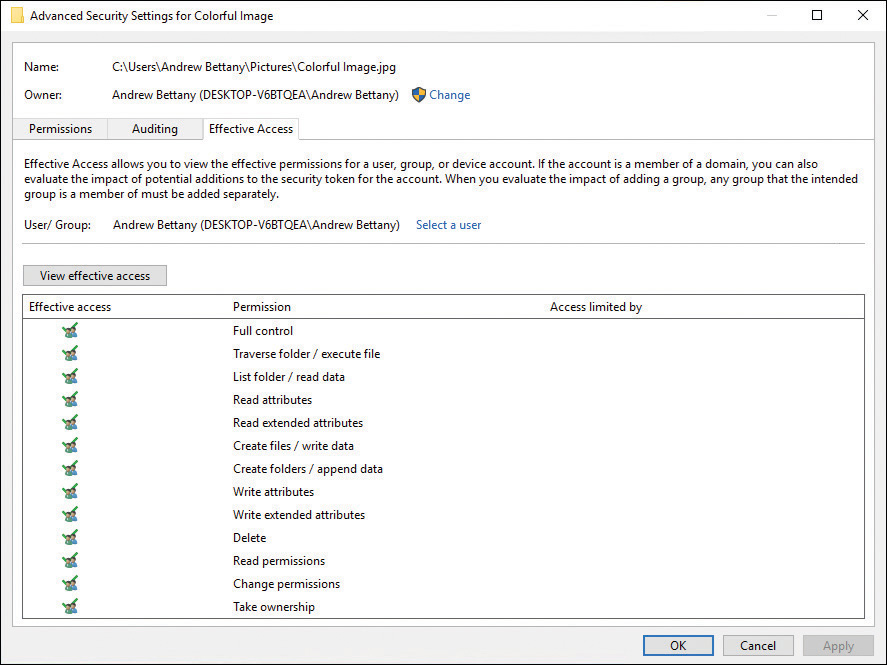
FIGURE 3-22 Determining effective access
For example, for a resource, if you assign a user the Read permission and assign the Modify permission to a group that the same user is a member of, the effective access permissions are a combination of the Read permission and the Modify permission, which is the Modify permission.
When you combine permissions that include Deny permissions, NTFS will evaluate the Deny permissions before the Allow permissions that are set on the same resource, with explicit Deny taking precedence over all Allow permissions.
If Deny and Allow permissions are set at different levels within a folder structure, or nested within each other, that can create unexpected results. For example, if Deny is set at the top-level folder and an Allow permission is set at its subfolder, Allow can take precedence and override Deny because the Allow permission is explicit and not implicit.
When assigning permissions to several groups, remember that the security settings have a cumulative effect; you should review the effective permissions obtained for the user by following these steps:
Open Windows Explorer.
Navigate to the file or folder whose effective permissions you want to view.
Right-click the file or folder, select Properties, and select the Security tab.
Select Advanced and then select the Effective Access tab.
Next to User/Group, select Select a user.
In the Select User or Group dialog box, click in the Enter the object name to select (examples) box, enter the name of a user or group, and then select OK.
Select View effective access.
You should now be able to review the detailed effective permissions of the user or group for that file or folder.
Be careful when using the Effective Access tool and reviewing permissions on folders that you own since the permissions given to the Creator Owner of the object are not taken into account.
Take ownership of resources
It is possible to remove access to a particular user or group on an object, such as a folder. Sometimes, this happens accidentally when configuring permissions, but typically, it will happen when the user who originally created the resource leaves the organization and the resource is then said to be “orphaned.”
In the Advanced Security Settings dialog box for an object, you will find the Effective Access tab, and at the top of this screen, as shown in Figure 3-22, is an option to change the object owner. As long as you have administrative privileges, you can take ownership of the object and allocate it to another user or group. You can reset the permissions of all the folders, files and subfolders using the command icacls <file name> /reset, using an elevated command prompt.
Resolve file permission issues
The type of security that can be configured on Windows 10 is determined by the file system in place. NTFS, the default underlying file system, offers several security options, but you may also encounter removable drives or legacy systems that use FAT, FAT32, or exFAT, none of which offers file security.
It has been many years since NTFS was established as the default file system of choice for all recent Windows client and server operating systems. NTFS file permissions offer administrators a powerful tool for granting, controlling, auditing, and denying access to resources. Unlike share-level permissions, NTFS operates at the file level, which means NTFS permissions are applicable to resources shared over a network or accessed locally.
When troubleshooting resource access issues, you must determine the following:
Is the file system in NTFS?
Are the files and folders being accessed locally or over the network?
It is easy to test if the file system is using NTFS by checking to see if there is a Security tab on the volume on which the resource resides, as shown in Figure 3-23. The Security tab relates to NTFS permissions.
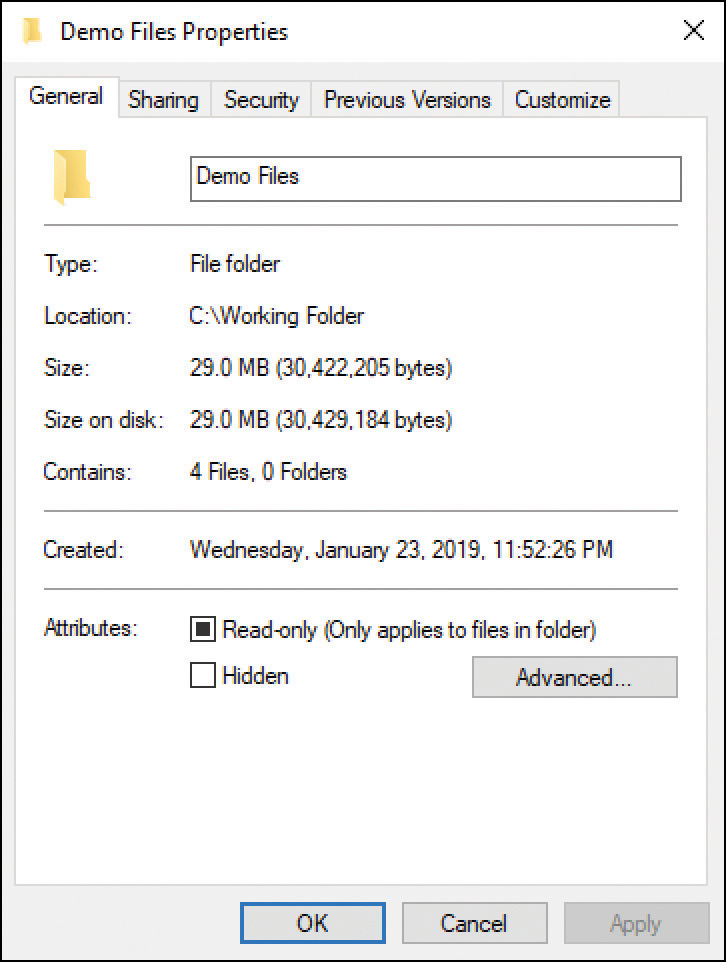
FIGURE 3-23 An NTFS-formatted volume displaying a Security tab
File and folder permissions can be complex and sometimes difficult to manage, especially for an inexperienced administrator. Often the most challenging environment is one in which a newly hired administrator must adopt an existing organization, which has an existing problematic NTFS permission infrastructure in place that has very little documentation. Required small changes can sometimes have unintended consequences, which pose security risks.
The role of the system administrator is to optimize data security and to make sure that data is accessible to the right users. If users are denied access to files to which they have rights or are given access to privileged files, it is a major problem that needs immediate remediation.
Note NEW VERSUS LEGACY FOLDER STRUCTURE
Sometimes when adopting an existing NTFS permission infrastructure, it is better to design and re-create the file and folder permission structure rather than adopt a legacy environment.
File and folder permissions are cumulative, which means a user may have been given various group memberships as well as explicit permissions to resources that they are able to access. If a user has not been given any implicit or explicit permissions, they will not have access. If a combination of permissions for a resource has been set, you’ll need to calculate the cumulative effect of all permissions.
Faced with an issue resulting from lack of access or over privilege, you need to start troubleshooting the problem by determining the effective permissions for the files or folders in question. Establish the scope. For example, who does this problem affect, and is it confined to a single user or a group of users? Establishing the effective permissions will allow you to quickly determine permissions that apply and provide you with a starting point.
User-effective permissions are based on the total of all permissions that they have been granted or denied. Take special care to look for any Deny permissions because these are infrequently set. However, when Deny permissions are set, they are powerful because any explicit Deny permission will have precedence over Allow entries.
Real World DOCUMENT ALL CHANGES
The best practice when configuring file and folder permissions is to document a plan for how the permissions will be applied to the predefined users, groups, and folders. Ensure that all new users, groups, and folders are created according to the plan, and then apply permissions to this structure. After the file permissions plan has been created, repeat for the Share permissions. Once permissions have been configured, continue to the testing phase where you perform tests for selected users to establish whether their effective access to resources matches the intended objectives of the plan. Over time, your NTFS change log will prove extremely useful when troubleshooting file permission access issues.
Configure shared permissions
Data is often shared in an organization, perhaps within a team for project work or between you and your boss. You must know how this can be achieved in Windows 10 within a networked environment, whether that is at home or in a larger workplace network. You must be able to manage shared files and printers.
File and printer sharing is disabled by default, and it is automatically turned on when you share the first folder on a Windows 10 device. If you want to configure this setting manually, you can do so in the advanced sharing settings in the Network And Sharing Center in Control Panel.
Another consideration is that when sharing is enabled, the Windows Defender Firewall is automatically configured to allow users to access shares on a computer in the network. This is a potential security risk. Although the firewall settings are configured automatically when you first share a folder, they are not returned to their default status even if you remove all shared folders.
Configure folder shares
When you share a folder, other users can connect to the shared folder and its contents across the network. Shared folders available on the network are no different from normal folders, and they can contain applications, corporate data, or private data.
When creating a network share, be careful that you do not accidentally provide access to a user or group of users who should not have access. By default, everyone on the network is given read access to the share, although you can change this setting.
Normally, a shared folder is located on a file server, but in a small network environment, the sharing can be located on a Windows 10–based computer or network-attached storage (NAS) device. When you’re choosing the device or server, keep in mind that the resources should be available whenever the users need them and that, often, this means the server is always on.
By providing a central location for shared folders to reside on, you enable the following features:
Simplification of management
User familiarity
Ease in backing up data
Consistent location and availability
When a user tries to use resources accessed on a shared folder, the access permissions are determined by taking into consideration both the share permission and the NTFS security permissions. The most restrictive set of permissions prevail.
Ensure that you do not create shared folders where the share permissions (SMB) become the primary access security mechanism. They are more restrictive than the NTFS permissions because users gaining access to the resource locally or by logging on through Remote Desktop would completely bypass SMB permissions. It is therefore essential for NTFS permissions to be configured independently to protect the resource.
To allow access to a locally stored folder across a network, first share the folder. Files contained in folders are also shared, but files cannot be specifically shared independently, except from within a user profile.
Server Message Block
Shares are provided by the Server Message Block (SMB) application-layer network protocol and not by NTFS. You can see what version of SMB your Windows 10 operating system is using by following these steps:
Sign in to your computer by using an administrative user account.
Open File Explorer and navigate to a shared or mapped folder on the network so that the shared files are visible in the right navigation pane.
On the File Explorer menu, select File and then select Open Windows PowerShell As Administrator.
Accept UAC if prompted.
Enter the Windows PowerShell cmdlet Get-SmbConnection.
Windows PowerShell should report the SMB version (dialect) in use, as shown in Figure 3-24.
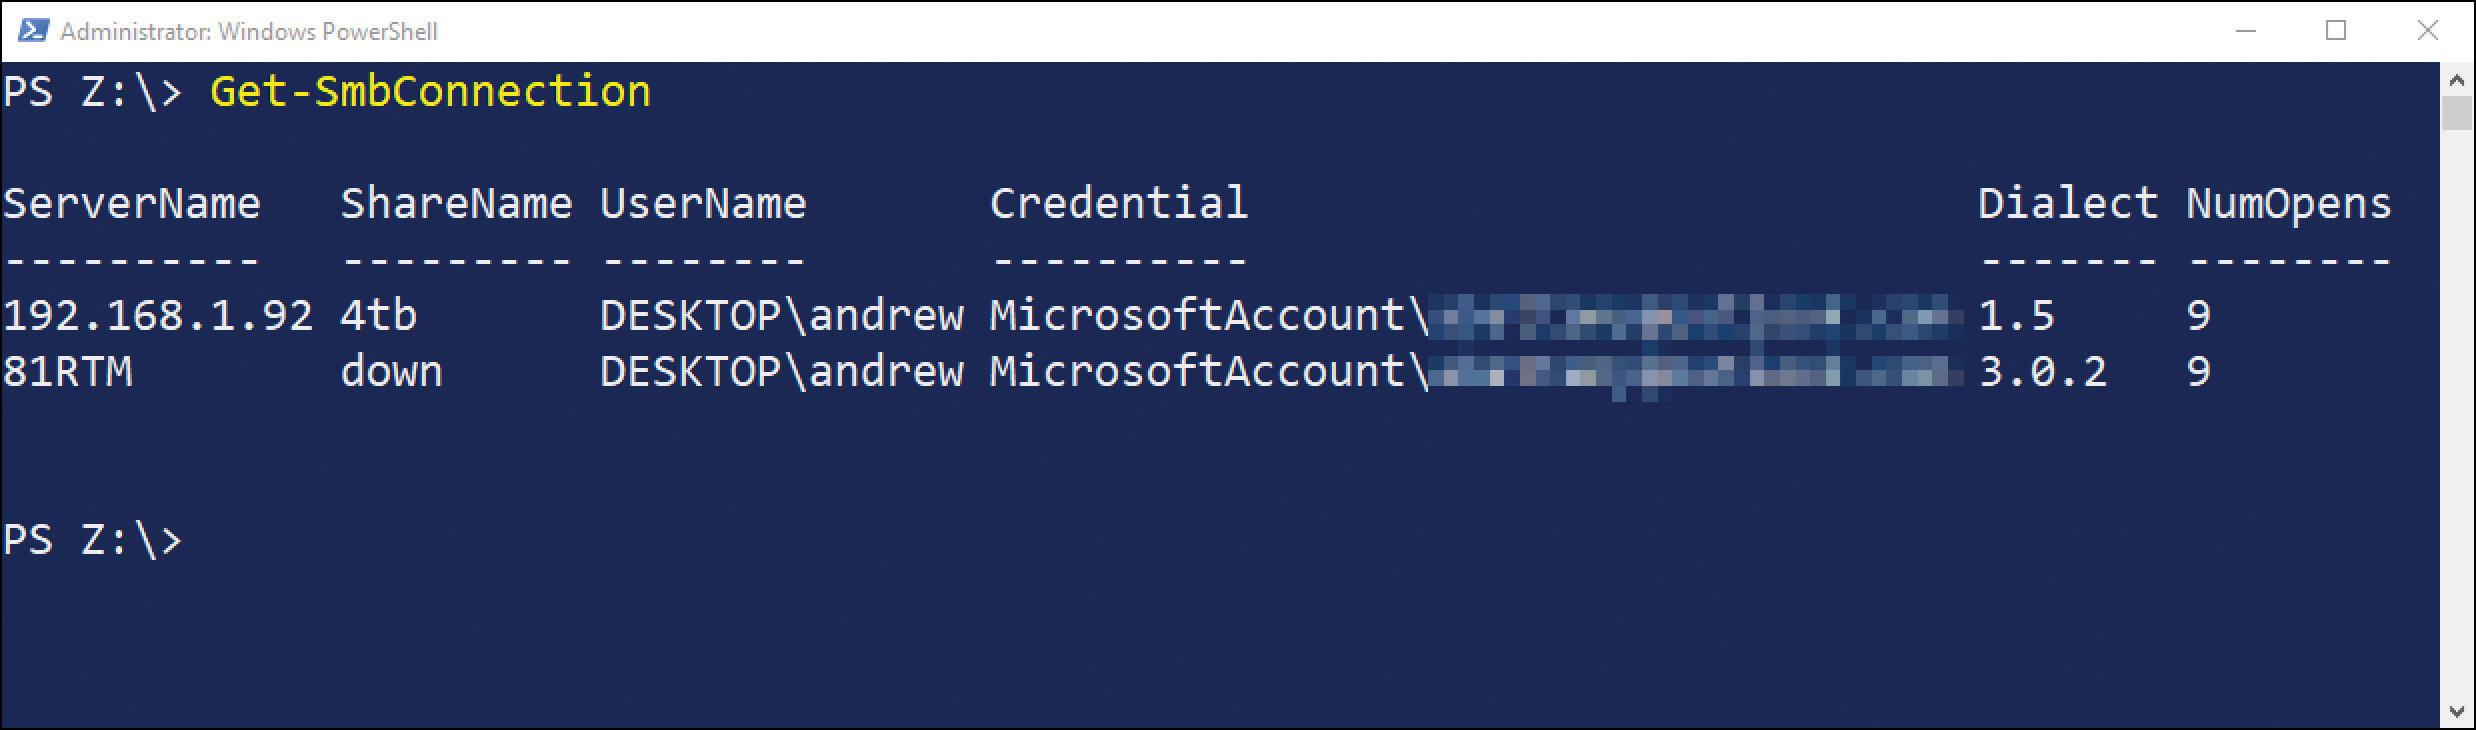
FIGURE 3-24 Windows 10 SMB version
Need More Review? SMB 3.0 OVERVIEW
This Microsoft resource, although focused on Windows Server and SMB 3.0, offers useful information about the benefits of using the latest version of SMB compared to previous versions. Visit https://docs.microsoft.com/windows-server/storage/file-server/file-server-smb-overview.
Configure Network Discovery
The network discovery feature was introduced in Windows Vista and uses a new layer 2-level protocol called Link Layer Topology Discovery (LLTD). It allows Windows to identify other devices present on the local subnet and, when possible, establish the quality of service (QoS) bandwidth capabilities of the network.
Knowing what is on the network increases the communication between devices. One downside of this increased awareness capability is that the firewall security settings are slightly relaxed. This means that not only does your computer see other network computers and devices, it also becomes discoverable on the network by other Windows clients.
Exam Tip
Administrators working in a domain environment can manage the settings of the two network discovery settings, LLTD Mapper (LLTDIO) and Responder (RSPNDR), in Group Policy settings. The Group Policy settings can be found here: Computer ConfigurationPoliciesAdministrative TemplatesNetworkLink Layer Topology Discovery.
Network discovery is tightly linked to network location profiles and to Windows Defender Firewall configuration. As you have seen, by default, network discovery is enabled for devices connecting to networks that are assigned the Domain or Private network location profile, but network discovery is disabled on public networks.
To change network discovery settings, from the Network And Sharing Center, select Change Advanced Sharing Settings. As shown in Figure 3-25, you can then configure network discovery for each network location profile.
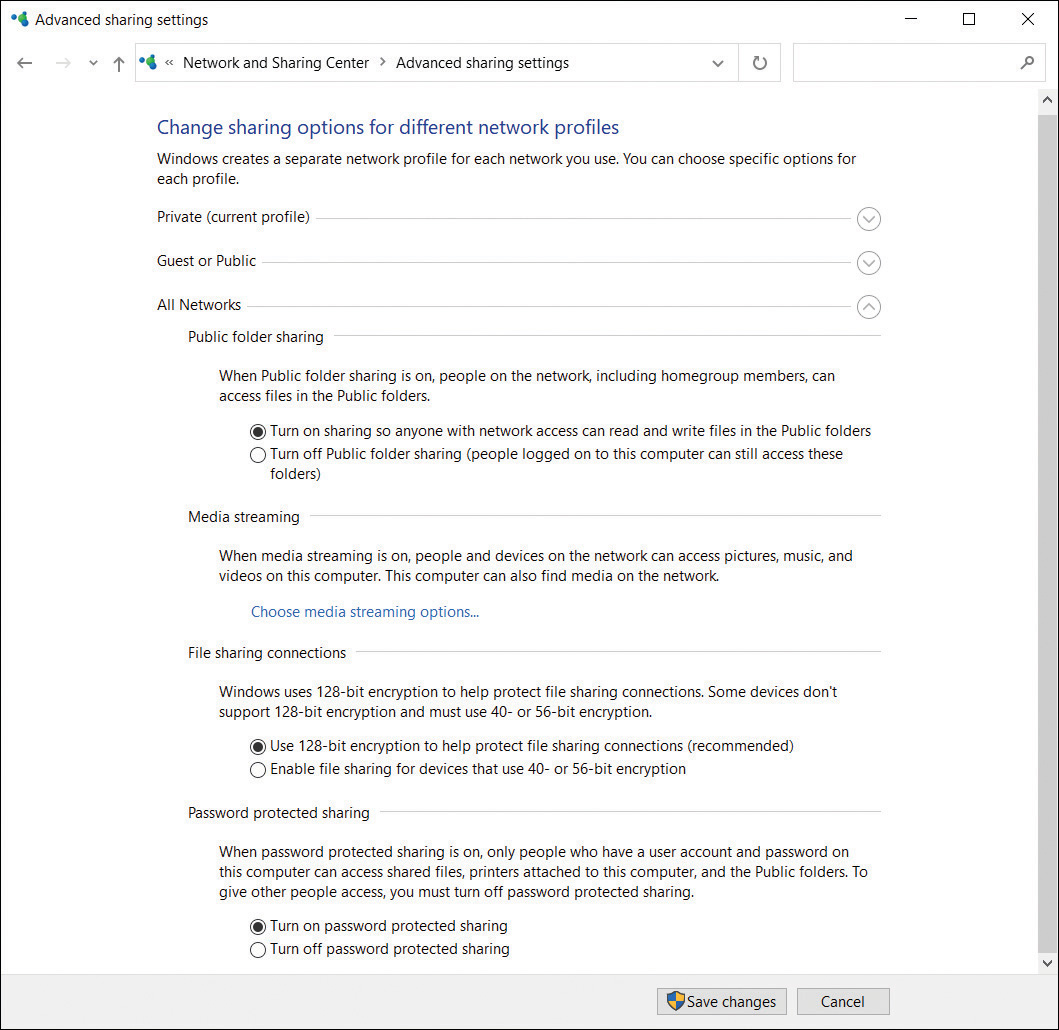
FIGURE 3-25 Advanced Sharing Settings
Create a share by using the Shared Folders snap-In
You can create and manage file shares centrally on your computer by using the Shared Folders snap-in, which can be loaded into an empty Microsoft Management Console (MMC). You can also use the snap-in found in Computer Management.
When you create a new share in the Shared Folders snap-in, the Create A Shared Folder Wizard appears and guides you through specifying the folder path, share name, description, and other settings, as shown in Figure 3-26.

FIGURE 3-26 The Computer Management Create A Shared Folder Wizard
By default, the share name will be the same as the folder name, and permissions for the share are set at read-only access for the Everyone group, but you can choose other options or full customization by completing the underlying Share Permissions DACL page.
The Shared Folders snap-in enables you to view existing shares and modify their properties, including settings such as offline file status, share permissions, and even the NTFS security permissions.
Exam Tip
To launch the Create A Shared Folder Wizard directly from a command prompt, use Shrpubw.exe.
Share folders by using File Explorer
There are multiple methods of sharing a folder using File Explorer:
Use the Share with option, found on the Share tab on the ribbon bar (also called Network File And Folder Sharing).
Select Advanced security from the Share tab on the ribbon bar.
Use the Sharing tab in the Properties dialog box.
Use the Give access to context menu by right-clicking a folder to be shared.
All the methods present you with slightly different GUIs and wizards from which to choose the sharing options. Although they all result in sharing folders that can be accessed across the network, the main difference between each method is the speed and simplicity that some offer the novice.
In practice, most home users and small businesses prefer to use the sharing wizards found on the ribbon bar, but more experienced users seek the advanced level of control that can be gained through the Sharing tab in the Properties dialog box.
Exam Tip
Review the options for configuring shares and pay attention to the limitations of the wizard-based methods. The wizards configure the file system permissions automatically, based on the limited choices they present.
The Share tab in File Explorer enables you to launch the File Sharing Wizard and provides the same functionality as the Share With shortcut menu. Next to this is Advanced Security, which enables you to fine-tune the sharing beyond the limitations of the File Sharing Wizard.
When you configure basic sharing permissions, you have one of two simplified options:
Read Users and groups can open but cannot modify or delete files.
Read/Write Users and groups can open, modify, or delete a file and modify permissions.
After you create a share, all users see the share name over the network. Only users who have at least the Read permission can view its content.
Note Administrators can Share Files and Folders
To share a file or folder across the network in Windows 10, you must be a member of the Administrators group or provide UAC credentials for an administrator.
Share folders from the command prompt
The command prompt enables you to share a folder by using the net share command. To create a simple share, you would use the following example:
net share MyShareName=c:TempData /remark:"Temp Work Area"
This command shares the C:TempData folder with the share name MyShareName and includes a description of Temp Work Area. You must have administrative privileges to create a shared folder by using net share.
Review the additional command-line options that you can use with net share, as shown in Table 3-16.
TABLE 3-16 net share command-line options
Option |
Description |
|---|---|
/Grant:user permission |
Enables you to specify Read, Change, or Full Share permissions for the specified user |
/Users:number |
Enables you to limit the number of users who can connect to the share concurrently (default and maximum for Windows 10 is 20 users) |
/Remark:"text" |
Enables you to add a description to the share |
/Cache:option |
Enables you to specify the offline files caching options for the share |
sharename /Delete |
Enables you to remove an existing share |
Note Sharing Caution
The net share command will not create a folder and share it. You can only share folders that already exist on the computer.
Share folders by using Windows PowerShell
If you need to script the creation of shares, Windows PowerShell is the most appropriate choice and provides several cmdlets that enable you to manage shares in Windows 10. PowerShell offers more in both scope and functionality than net share and will continue to expand in the future.
Here is an example command for creating a share:
New-SmbShare -Name MyShareName -Path c:TempData
Other PowerShell cmdlets used in the administration of shares are described in Table 3-17.
TABLE 3-17 Windows PowerShell Share cmdlets
Cmdlet |
Description |
|---|---|
Get-SmbShare |
Lists the existing shares on the computer |
Get-SmbShareAccess |
Lists the access control list of the SMB share |
New-SmbShare |
Creates a new SMB share |
Set-SmbShare |
Modifies the properties for an existing share |
Remove-SmbShare |
Deletes an existing share |
Grant-SmbShareAccess |
Sets the share permissions on an existing share |
Get-SmbShareAccess |
Lists the current share permissions for a share |
Note Multiple Shares
Sometimes you might want to provide different groups access to the same shared resources. You can share the same folder multiple times and use a different share name and share permission settings for each instance. Each group should only be able to access the share that they have permission for.
Share Files by using File Explorer
Files typically cannot be shared without first sharing the parent folder. In Windows 10, files that reside in the user profile, such as Documents, Downloads, and Pictures folders, can be shared. To do this, follow these steps:
Sign in to your computer using an administrative user account.
Open File Explorer and navigate to the user profile.
Right-click a folder, such as Pictures, in the user’s profile.
Select Give access to and then select Specific people, as shown in Figure 3-27.
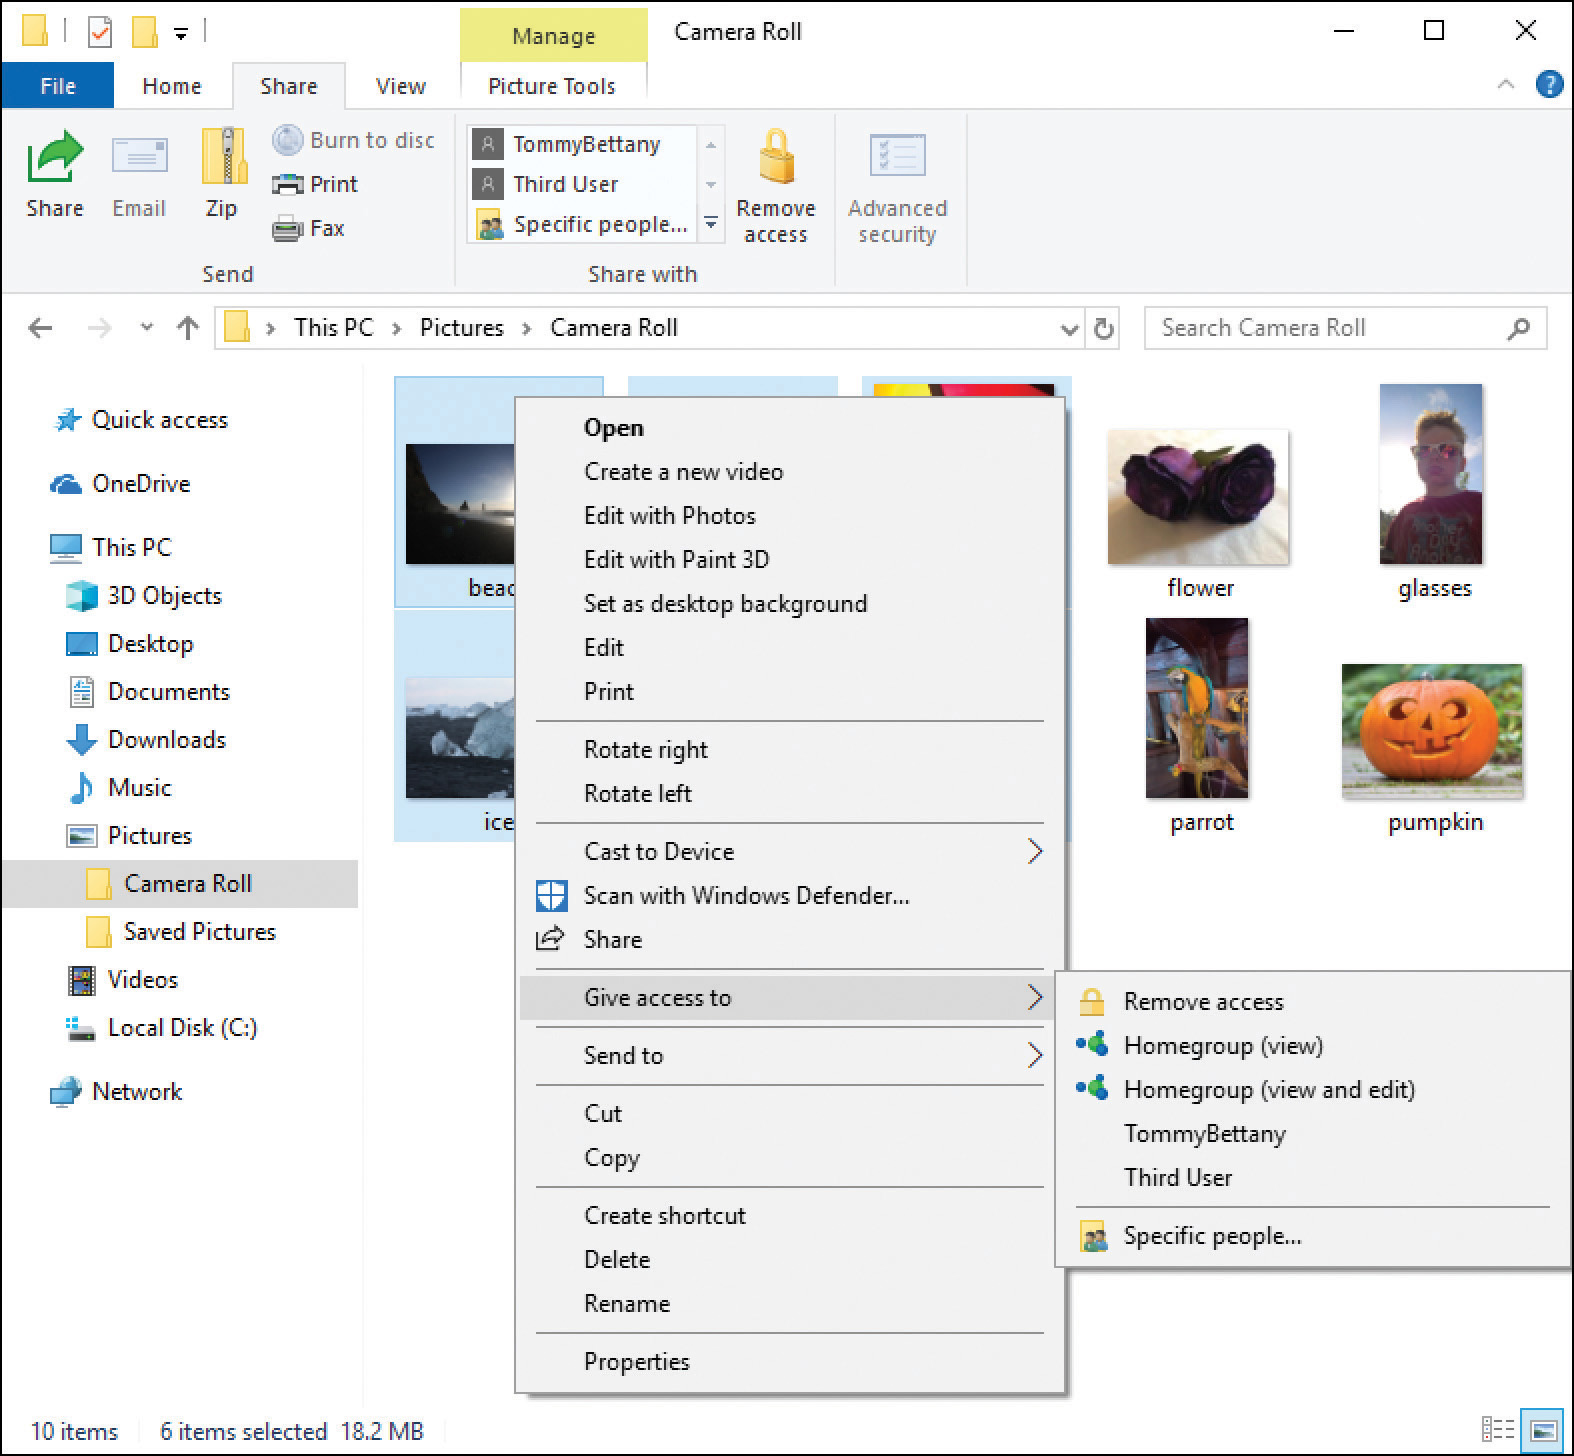
FIGURE 3-27 Share, using the sharing wizard
In the Choose people to share with dialog box, enter a user or group and select Add.
Set Permission Level to Read or Read/Write and select Share.
Note that you are sharing. The File Sharing Wizard completes, and the files are shared.
Optionally, you can use the links in the File Sharing Wizard to send someone the links to the shares.
Select Done.
You can also share a file using the Share icon on the Share ribbon bar. Select the file or multiple files and then click Share on the ribbon bar, as shown in Figure 3-28.

FIGURE 3-28 Sharing files from Windows Explorer
The Share option is also available within other apps, including Microsoft Edge. The set of targets, including contacts and other apps, will depend on which apps are installed on your device and offers a simplified method of sharing files quickly and with minimum effort.
Configure shared folders permissions
Permissions that are set on the share determine the level of access a user has to the files in the share. They can be set on FAT or later file systems. When you use NTFS, be careful not to restrict access at the share level, because doing so might affect the effective permissions. You can configure the permissions when you share a folder and set a level that the user or group will have when they connect to the folder through the share across the network.
Sharing permissions have three options:
Read Users and groups can view the files, but they cannot modify or delete them.
Change Users and groups can open, modify, delete, and create content, but they cannot modify file or folder permissions; the Change permission incorporates all Read permissions.
Full Users and groups can perform all actions, including modifying the permissions; the Full permission incorporates all Change permissions.
Unlike in earlier versions of Windows, there is no longer a visual icon or indicator in File Explorer to distinguish whether a folder is shared. All shared folders on your device appear in the Shared Folders node of the Computer Management console. You can also view the shared folders that exist on your device by using the Get-SmbShare Windows PowerShell cmdlet or by typing net view \localhost /all at the command prompt.
After a user has found the share in File Explorer, they can access the files directly. Another common way that users can connect to a shared folder over the network is by using the shares Universal Naming Convention (UNC) address. UNC addresses contain two backward slashes (\) followed by the name of the computer that is sharing the folder and the shared folder name; for example, the UNC name for the Marketing shared folder on the LON-DC1 computer in the Fabrikam.com domain would be:
\LON-CL1.Fabrikam.comMarketing
Troubleshoot Share permission issues
Share permissions can cause you many problems when you’re troubleshooting access to files and folders. You need to remember that Share permissions work together with file and folder permissions and that the most restrictive permission will apply. Another common cause of confusion is that Share permissions only affect shared resources over the network.
If your file system is configured with FAT or FAT32, there is no option to configure NTFS or ReFS permissions. If no Security tab is available in the resource’s Properties dialog box, you know that it cannot be formatted with NTFS and the file system is likely to be FAT/FAT32, as shown in Figure 3-29.
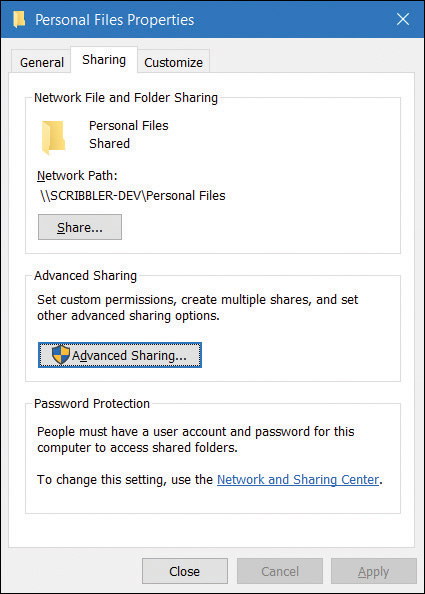
FIGURE 3-29 A FAT32-formatted volume’s Properties dialog box, with no Security tab
If you need to confirm the file system in use, you can view the properties of the drive by following these steps:
Open File Explorer and right-click the drive that is under review.
Select Properties.
On the General tab, review File System.
Select OK to close the dialog box.
Combine NTFS and Share permissions
Within a corporate environment, administrators share files over the network using Share permissions. If the volume is formatted with NTFS, there are likely to be NTFS permissions configured on the shared file as well. To fully understand the effects of these two sets of permissions, you will need to combine them.
When you’re combining Share and NTFS permissions, restricting access to resources across the network can be easy. By accepting the default share permissions, you provide standard users with read-only access even if NTFS permissions are less restrictive.
Unfortunately, there is no wizard to diagnose which restrictions are in effect, but you can use the Effective Permissions feature in NTFS to determine the permissions being applied to a specific user or group (Principal).
NTFS is all about rules, and they are applied thoroughly by the file system. Wrongly applied settings, often combined with default inheritance, can instantly spread an incorrectly configured setting across hundreds of files. Unlike most computer operations, there is no undo option.
When troubleshooting access, always look for the most restrictive permission that has been set and evaluate whether it is being applied. If necessary, you can view the effective permissions. If the most restrictive permission is not being applied when the resource is being accessed, you must identify the problem. Some other permission must be overlapping and affecting the resource; perhaps the user is a member of the Administrators group or another group that has Full Control permissions? You can also test what permissions are effective both at the local access level as well as when accessing the resource over the network share.
Often, the cause of many permission-based issues when troubleshooting file and folder access is that the Share permissions being applied on the share are too restrictive. It is preferable to use the more powerful NTFS permissions because these will always be effective, regardless of how they are accessed (over the network share or locally).
Reset Share and NTFS permissions
If you simply cannot decipher which NTFS settings are creating the problems, or if the problems are too complex or widespread, you can try to reset the file and folder permissions by using the ICACLS command-line utility.
This is especially useful if you get locked out of files and folders because of incorrect or deleted NTFS permissions.
To reset permissions using ICACLS, follow these steps:
Sign in to your computer using an administrator user account.
Open File Explorer and navigate to the folder that is giving you the problems.
On the File Explorer menu, select File and then select Open Windows PowerShell ss administrator.
Accept the UAC prompt, if prompted.
Run the following command: icacls * /RESET /T /C /Q.
The process of resetting files and folders to their default settings is very quick. After the original operating system defaults have been applied, you can configure the desired settings.
Configure, manage, and optimize local storage
Most devices installed with Windows 10 are supplied with a single physical disk. This disk is usually partitioned as described here and shown in Figure 3-30:
EFI System partition This small partition is used to start the computer and contains the Windows 10 startup files.
Operating system boot partition This NTFS partition contains the Windows folder and is usually the only file system volume.
Recovery partition This small partition is used when Windows 10 enters the Windows Recovery Environment (Windows RE).
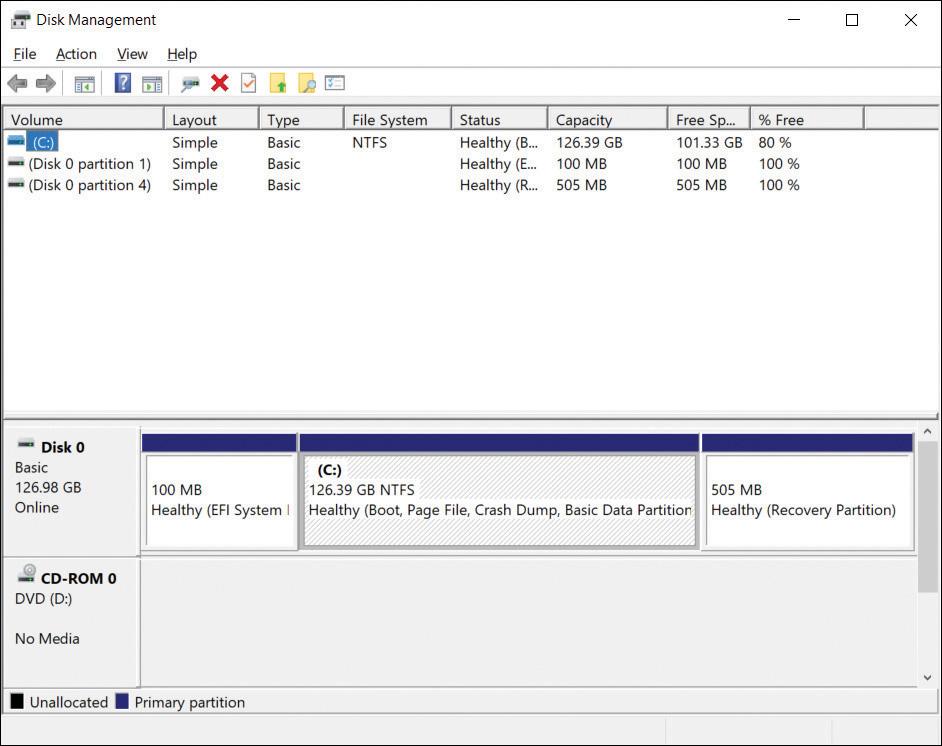
FIGURE 3-30 A single disk with default partitions
These days, the hard drive will probably be a solid-state drive (SSD). For tablets, the smaller mSATA form factor drive type might be used. These provide very high disk read/write performance and are often fixed directly to the motherboard.
You can use various tools and methods to manage Windows 10 disks and create volumes or partitions on them, including:
Disk Management
Windows PowerShell
DiskPart
Disk Management
This is the traditional GUI tool used for performing most configuration and management tasks relating to disks and volumes. The GUI uses the familiar Microsoft Management Console (MMC) that most administrative tools use. You can connect to the disks on a local or remote computer and perform tasks on both basic and dynamic disks and virtual hard disks.
Examples of the types of disk management tasks that you can perform using the GUI include the following:
Partition creation, including creating a basic, spanned, or striped partition.
Disk conversion between basic disks to dynamic disks. (To convert a dynamic disk to a basic disk, you must first delete all present volumes.)
Extending and shrinking partitions.
Viewing information relating to disk and volumes, such as volume name, layout, type, file system, status, capacity, free space, and percentage of disk free for each volume.
To open Disk Management, follow these steps:
Right-click Start and select Disk Management or enter diskmgmt.msc in the search box and then select diskmgmt.
Wait for Disk Management MMC to open and load the disk configuration information, as shown in Figure 3-31.
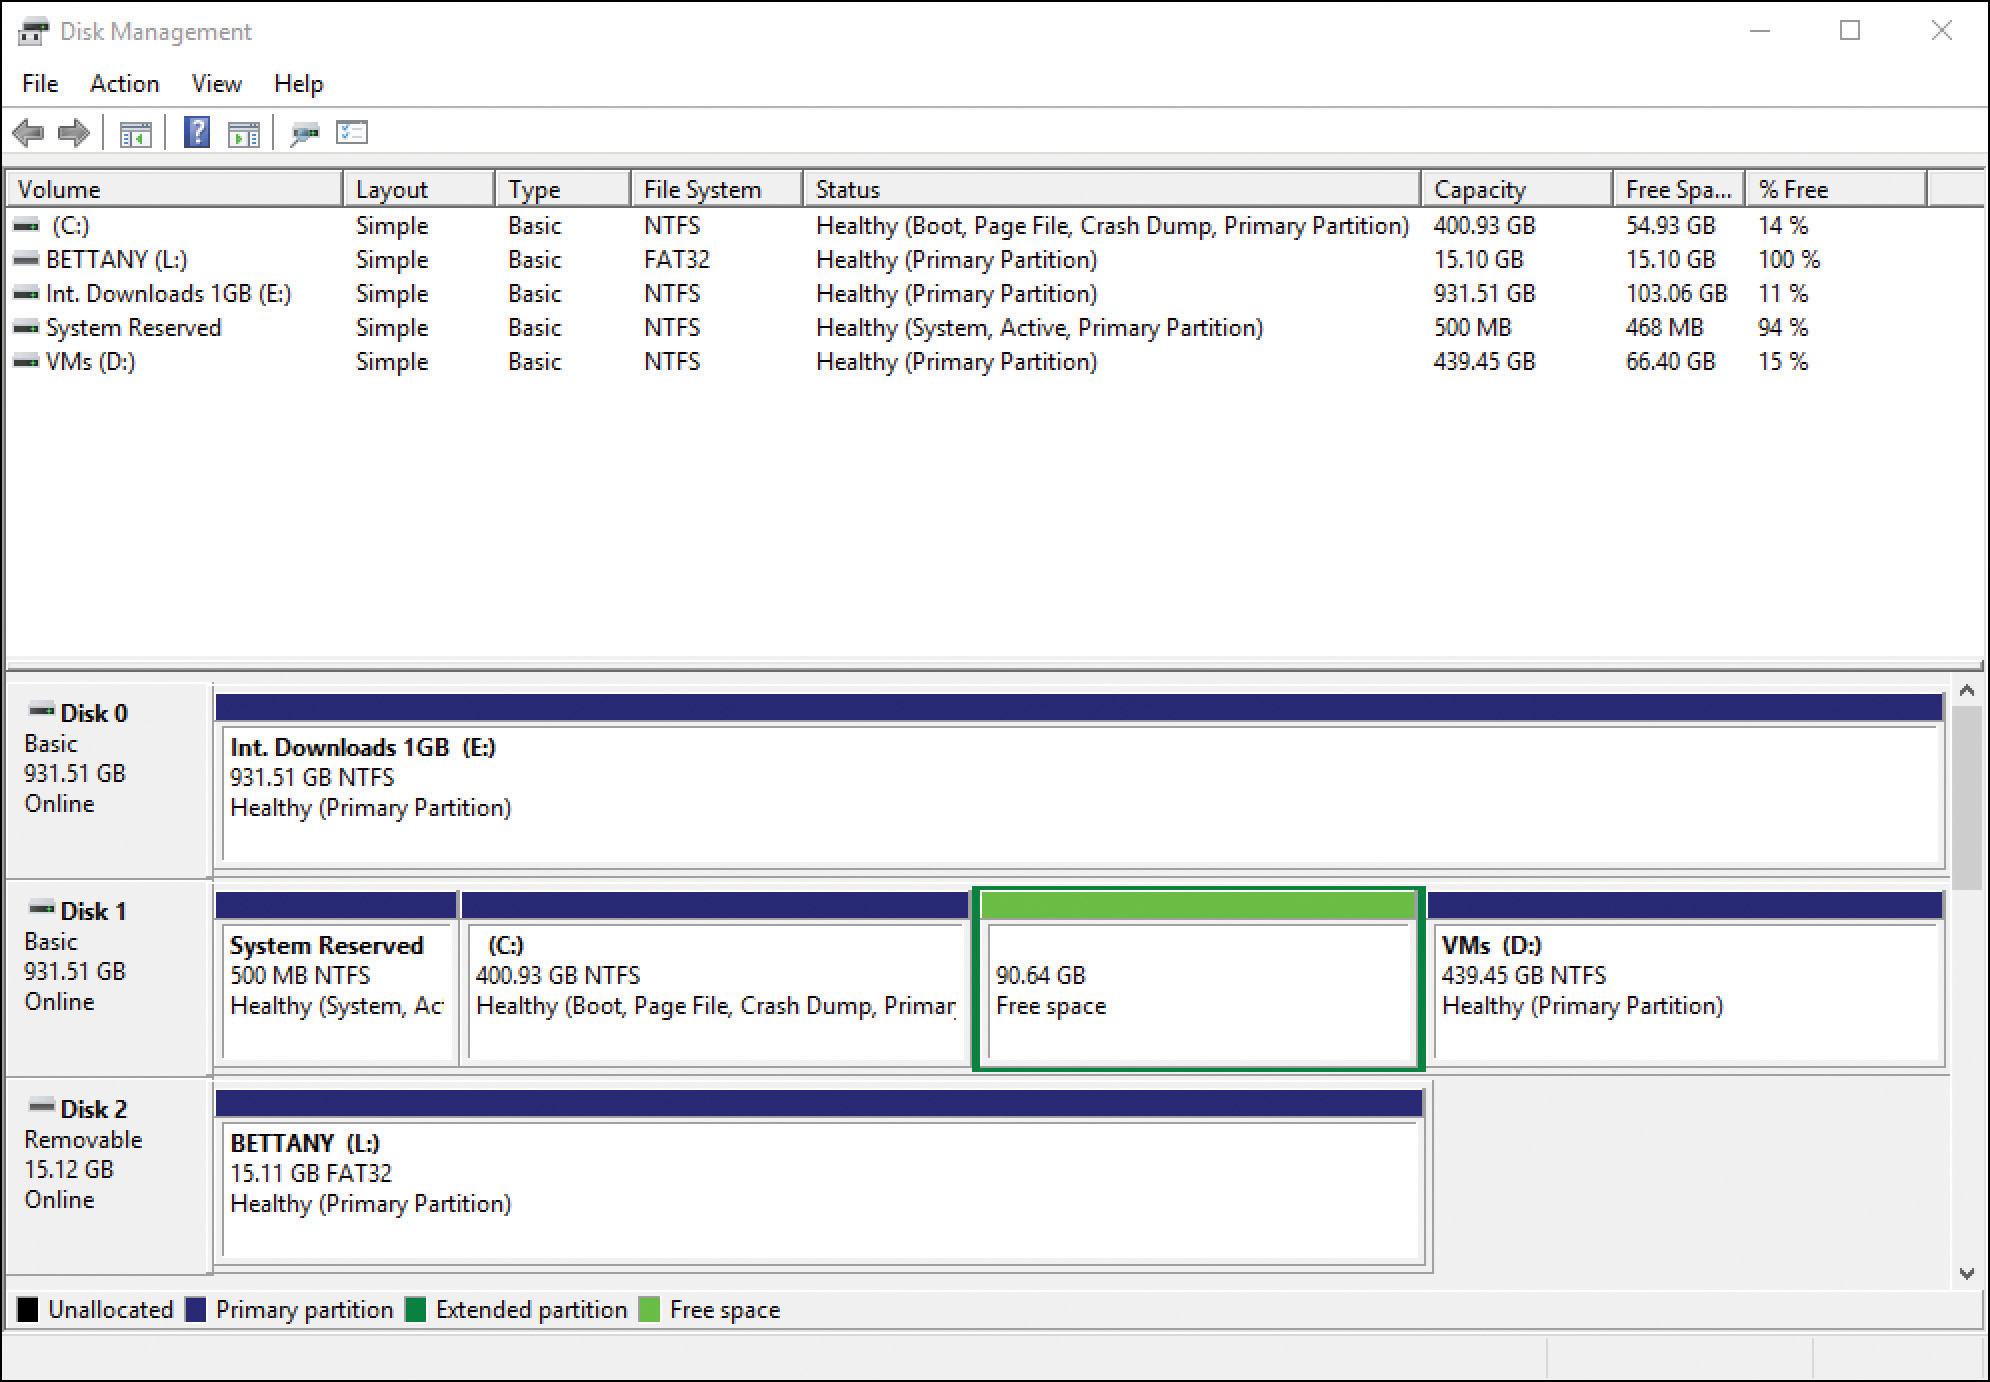
FIGURE 3-31 Disk Management console
You can use the Disk Management console to convert a basic disk to a dynamic disk by right-clicking the disk you want to convert and then selecting Convert To Dynamic Disk.
Windows PowerShell
Windows PowerShell offers many disk-related tasks from the command line; it can be used locally or remotely and can be scripted. Windows PowerShell now natively enables you to manage disks, volumes, and partitions and perform a range of tasks that cannot be performed using DiskPart or Disk Management.
Table 3-18 details some of the most common Windows PowerShell cmdlets that you should become familiar with.
TABLE 3-18 Common disk-related Windows PowerShell cmdlets
Command |
Description |
Additional Parameters |
|---|---|---|
Get-Disk |
Return one or more disks visible to the operating system. |
-FriendlyName -Number |
Clear-Disk |
Cleans a disk by removing all partition information and placing it in an un-initialized state. Erases all data on the disk. |
-Number -RemoveData -FriendlyName |
Initialize-Disk |
Initializes a RAW disk for first time use, enabling the disk to be formatted and used to store data. |
-FriendlyName -PartitionStyle -VirtualDisk |
Set-Disk |
Updates the physical disk on the system with attributes. |
-PartitionStyle -IsOffline -IsReadonly |
Get-Volume |
Gets the specified volume object or all volume objects if no filter is provided. |
-DriveLetter -DiskImage -FileSystemLabel -Partition |
Format-Volume |
Formats one or more existing volumes or a new volume on an existing partition. Acceptable file formats include NTFS, ReFS, exFat, FAT32, and FAT. |
-DriveLetter -FileSystem -FileSystemLabel |
Get-Partition |
Returns a list of all partition objects visible on all disks or, optionally, a filtered list using specified parameters. |
-Disk -DriveLetter -PartitionNumber -Volume |
Need More Review? Windows Storage Management–Specific PowerShell Cmdlets
You can review all storage cmdlets for Windows PowerShell and syntax explanations and examples at https://docs.microsoft.com/en-us/powershell/module/storage/?view=win10-ps.
To shrink a partition in Windows PowerShell, run the following command:
Resize-Partition -DiskNumber 0 -PartitionNumber 2 -Size (50GB)
To create simple volumes in Windows PowerShell, run the following commands:
Get-Disk -Number 0 New-Partition -UseMaximumSize -DiskNumber 0 |

Format-Volume -Confirm:$false -FileSystem NTFS -NewFileSystemLabel Simple2 Get-
Partition -DiskNumber 0
Make a note of the partition number you just created to use in the next step:
Set-Partition -DiskNumber 0 -PartitionNumber <partition number> -NewDriveLetter G
Windows PowerShell is the preferred command-line method for disk operations. The Windows PowerShell storage cmdlets do not recognize dynamic disks, so we recommend that you use Storage Spaces rather than dynamic disks.
DiskPart
DiskPart is a built-in command-line tool that offers you all the functionality of Disk Management plus some advanced features that can also be scripted into BAT files to automate disk-related tasks. One limitation of DiskPart is that it only runs locally.
Note Abbreviating Commands
When you use DiskPart, some of the commands can be abbreviated, such as using SEL instead of SELECT, PART instead of PARTITION, and VOL instead of VOLUME.
To open DiskPart, follow these steps:
Open an elevated command prompt.
Enter DiskPart.
DiskPart launches in the command line.
For a list of all DiskPart commands, enter help or commands, or enter ?.
When you have finished using DiskPart, you can leave the interface by entering Exit and pressing Enter.
The following list shows several DiskPart commands whose functions you should understand:
Active Marks the selected partition as the active partition
Add Enables you to add a mirror to a simple volume
Assign Enables you to assign a drive letter to a selected volume
Convert Converts between basic and dynamic disks
Create Enables you to create a volume, partition, or virtual disk
Extend Extends the size of a volume
Shrink Reduces the size of a volume
Format Used to format the volume or partition (for example,
FORMAT FS=NTFS LABEL="New Volume" QUICK COMPRESS)
If you want to create a USB bootable drive manually that contains the Windows installation files, you can use DiskPart commands to create, partition, and mark the USB drive as active.
Work with VHDs
A VHD can be thought of as a container object that holds files, folders, and volumes. The container, or VHD, is a single file with the .vhd or .vhdx file extension. You can think of a VHD file being similar in concept to a ZIP file. Analogous container types could include ISO, RAR, and WIM; they are all objects that contain files and folders inside them.
Because a VHD is just a file, it is portable and can be saved and transported on a USB drive or copied over a network. Be aware, however, that VHDs can grow very large, and the original open file format of VHD, which had a maximum size of 2,048 GB, was soon changed to the VHDX format, which allowed up to a 64 TB file size. A VHD can contain data, but you can also install and boot to an operating system using the VHD.
Wherever possible because of the disk-intensive nature of VHD, consider using an SSD to host the VHDs. This is especially applicable if you use a single drive on your Windows 10–based computer and use virtual machines and VHDs as the disk I/O; performance is likely to degrade quickly because of the increased disk read/write times and disk activity.
You can continue to use either the VHD or VHDX specification for your hard drives, but you should know the main differences between the two formats. VHD offers users ease of use and backward compatibility, whereas the VHDX format offers improvements in both scale and functionality. You can compare the two choices in Table 3-19.
TABLE 3-19 Virtual hard disk format
Type |
Features |
|---|---|
VHD |
Original format. Up to 2,048 GB (about 2 TB) in size. Compatible with virtualization technologies, including Virtual PC and Virtual Server. Useful when you are working with older operating systems and require backward compatibility. Can convert VHDX files to VHD by using Windows PowerShell. |
VHDX |
Introduced with Windows 8 and Windows Server 2012. Up to 64 TB in file size. Not compatible with operating systems older than Windows Server 2012 or Windows 8. Uses a 4 KB logical sector size to improve performance compared with VHD files. Offers protection against data corruption related to power failures by continuously keeping track of file updates in the metadata. Larger block sizes for dynamic and differencing disks. Can convert VHD files to VHDX by using Windows PowerShell or in the Hyper-V Manager. VHDX file format supports the shared virtual hard disk feature first available with Windows Server 2012 R2 and subsequent releases of Windows Server. Newer generation-2 virtual machines that are hypervisor-aware require VHDX file format. Shared VHDX allows guest clustering within Windows Server 2012 R2 and subsequent releases of Windows Server. VHDX format is not supported in Microsoft Azure. |
VHD Set (VHDS) |
Introduced with Windows 10 and Windows Server 2016. Same technical features as the VHDX format. Used as a shared virtual hard disk. Allows online resize. Supports host-based backup. Not supported in operating systems earlier than Windows 10. |
There are multiple ways to create a virtual hard disk:
Client Hyper-V Manager
Disk Management
Windows PowerShell
You can also use the DiskPart command-line tool, but this is becoming deprecated in favor of Windows PowerShell, which offers more extensive functionality and support.
Create VHDs with Hyper-V Manager
You can add the client Hyper-V feature to Windows 10 if the computer is running the Windows 10 Pro or Enterprise edition and has hardware that supports virtualization.
To create a virtual hard disk within Hyper-V Manager, complete the following steps:
Launch Hyper-V Manager.
In the Action pane, select New and then select Hard Disk.
Select the format for the disk as VHD, VHDX, or VHD Set, and then select Next.
Select the Disk Type (Fixed, Dynamically expanding, or Differencing) and select Next.
Provide the virtual disk with a name and storage location and select Next.
Configure the disk; the default settings are normally used and will create a new blank VHD with 127 GB. Select Next and then select Finish.
Use Disk Management to create VHDs
The Disk Management MMC includes a wizard that enables you to create a VHD that you can then mount and use. Not all of the VHD options are available in the Disk Management console, such as the ability to create VHD Sets or differencing disks; you should use Windows PowerShell or Hyper-V Manager if these tasks are required.
To create a simple VHD file, follow these steps:
Right-click the Start button and select Disk Management.
Select Action on the menu bar and then select Create VHD.
Select the location where you want to store your VHD.
Configure the VHD format and VHD type and select OK.
The new disk will appear in the lower pane of the screen and display the following characteristics:
Unknown Status
Not Initialized
Disk icon is cyan blue with down-pointing red arrow
To use the disk, initialize it by right-clicking the down-pointing red arrow on the disk icon and selecting Initialize Disk.
In the Initialize Disk dialog box, ensure that the disk you want to initialize is selected and choose MBR (Default) or GPT partition style and select OK.
The disk is marked with the status of Basic, and you can now create a partition, allocate a drive letter, and format the drive with a file system just like a normal disk.
Apart from the icon color in Disk Management, there is no other visual indicator in File Explorer or Disk Management to indicate that the disk is virtual. After you have finished using the VHD, you can detach the disk by right-clicking the disk icon in the lower pane of Disk Management and selecting Detach VHD. After you have detached the VHD, the VHD file is no longer locked to Windows 10 and becomes a portable hard drive.
Create VHDs by using Windows PowerShell
Disk Management offers the ability to create basic VHDs in a GUI environment, but if you need to create more complicated VHDs, such as differencing disks, or if you need to create 20 VHDs for a team of developers to work with, it would be easier and quicker to build Windows PowerShell scripts to do so. This section focuses on virtual hard disks.
You can manage every aspect of virtual disks with Windows PowerShell in both production and lab environments. Windows PowerShell enables you to configure, provision, and subsequently maintain all of your virtual estate rapidly. Windows PowerShell can be used to build a full virtual environment, including virtual disks, virtual machines, and virtual networks and switches.
More than 50 cmdlets are available in Windows PowerShell in Windows 10 that enable you to manage virtual and physical disks. This number will expand as new functionality is added. Table 3-20 outlines some of the common Windows PowerShell cmdlets that let you manage disks natively. After a VHD disk has been created, it is managed in the same way as a physical disk.
TABLE 3-20 Common native Windows PowerShell VHD and disk cmdlets
Command |
Description |
Additional Parameters |
|---|---|---|
New-VHD |
Creates one or more new virtual hard disks. |
-SizeBytes sets the size, such as 10 GB. Set the VHD type by using the following parameters: -Fixed -Differencing -Dynamic |
Get-Disk |
Provides information on all disks. |
-FriendlyName provides information about disks that have the specified friendly name. -Number provides information about a specific disk. |
Convert-VHD |
Converts the format, version type, and block size of a virtual hard disk file. |
Specify the name of the new VHD as .vhdx or .vhd, and the cmdlet will use this format. -VHDType <VHDType> allows the specification of the VHD type such as -Differencing or -Fixed. |
Clear-Disk |
Cleans a disk by removing all partition information. |
-ZeroOutEntireDisk writes zeroes to all sectors of a disk, effectively wiping it clear. |
Initialize-Disk |
Prepares a disk for use by the operating system. Default is to create a GPT partition. |
-PartitionStyle<PartitionStyle> specifies the type of partition, either |
Optimize-VHD |
Optimizes the allocation of space in a non-fixed VHD/X. Used with the compact operation to optimize the files. Reclaims unused space and rearranges blocks, normally reducing the size of a virtual hard disk file. |
-Mode Full (Default for VHD) Scans for zero blocks and reclaims unused blocks. -Mode Retrim Retrims the drive without scanning for zero blocks or reclaiming unused blocks. -Mode Quick (Default for VHDX) Reclaims unused blocks but does not scan for zero blocks. |
Set-Disk |
Updates a disk with the specified attributes. |
-PartitionStyle<PartitionStyle> specifies the type of partition, either MBR or GPT. You can use this cmdlet to convert a disk to another type of partition style. |
Get-Volume |
Returns information on all volumes. |
-DriveLetter<Char> gets information about the volume with the specified drive letter. -FileSystemLabel<String> returns information on NTFS file systems or Resilient File System (ReFS) volumes. |
Two new cmdlets relate to the new VHD Set files, which can be used with Windows Server and Windows 10. These cmdlets are:
Get-VHDSet Obtains information about a VHD Set file such as a list of all checkpoints that the set contains.
Optimize-VHDSet Optimizes the allocation of space that VHD Set files use when used with the compact operation to optimize the files. Reclaims unused space and rearranges blocks, normally reducing the size of a VHD file.
To create a VHD, you use the New-VHD cmdlet. You must specify the path to the VHD, the name for the newly created VHD, the VHD type, the size of the disk, and the format type, as shown here:
New-VHD -Path D:VHDMyDynamicDisk.vhdx -SizeBytes 100GB -Dynamic
The New-VHD cmdlet executes and creates the VHD. As with Disk Management, the newly created VHD will not be mounted, initiated, or formatted without further action.
Windows PowerShell enables you to string instructions together and then execute them as a single action. The following example creates a new, dynamically expanding, 127 GB virtual hard disk with the .vhdx extension, mounts it, initializes it, and then formats the drive, using NTFS so that it is ready to use:
Select Start, enter powershell, right-click Windows PowerShell, and then select Run as administrator. Select Yes in the UAC dialog box.
Run the following PowerShell command:
New-VHD -Path "D:VHDsTest.vhdx" -Dynamic -SizeBytes 127GB | Mount-VHD -Passthru
|Initialize-Disk -Passthru |New-Partition -AssignDriveLetter -UseMaximumSize
|Format-Volume -FileSystem NTFS -Confirm:$false -Force
NoteNew-VHD cmdlet
The New-VHD cmdlet is only available when the Hyper-V feature is enabled.
Use Storage Spaces and storage pools
Storage Spaces is a technology that is useful for desktop or server devices that have multiple hard disks that can be combined to provide storage redundancy by pooling separate disks and allowing Storage Spaces to manage their administration effectively.
Storage Spaces uses NTFS and the ReFS file format to configure volumes, which provides greater file resilience through ReFS self-healing capabilities. The redundancy aspects are derived by distributing data across several disk drives and using virtual disk arrays in a RAID configuration or as mirror sets. The operating system maintains the logical disks and presents the virtualized disk as a logical unit number (LUN), which the system can then access. You might have seen the LUN terminology before; it is a term used with Storage Area Network protocols such as Fibre Channel or iSCSI.
The requirements for creating a virtual disk with Storage Spaces are described in Table 3-21.
TABLE 3-21 Creating virtual disks with Storage Spaces
Requirement |
Description |
|---|---|
Physical disk |
Any size physical disks, such as Serial ATA (SATA), Serially Attached SCSI (SAS), or USB connected disks, can be used. You need a minimum of one physical disk to create a storage pool and more if you require mirrored disks. Disks must not be initialized or formatted. |
Storage pool |
A collection of one or more physical disks that you use to create virtual disks. All unformatted physical disks can be added to a storage pool. |
Storage space |
A logical disk created from one or more physical disks. It allows thin provisioning or just-in-time (JIT) disk allocations and can offer resiliency to physical disk failures through built-in functionality such as mirroring. |
Disk drive |
The drive letter allocated to the logical virtual disk and accessed through File Explorer. |
A storage space is created from a storage pool. As you add additional disks, you can create redundant storage spaces. Four types of storage layouts are available to you with Storage Spaces, as described in Table 3-22.
TABLE 3-22 Storage Space storage layouts
Storage Option |
Description |
Redundancy |
|---|---|---|
Simple |
A simple space has data written across all disks in a logically sequential way that offers increased performance. With multiple disks, automatic data striping enables read/write operations to multiple segments of data concurrently. |
Simple spaces provide no failover capabilities. If a disk that is storing the data fails, the data will be lost. |
Two-way or three-way mirrors |
Mirrored spaces maintain multiple copies of the data by way of data duplication to ensure that all data is redundant. Two-way mirrors maintain two data copies, and three data copies are maintained for three-way mirrors. Data is also striped across the multiple physical drives, which offers the speed enhancements (greater data throughput and lower access latency) of striped disks without the data-loss risk of a simple space. |
Data is mirrored so that if a single disk is lost, the data is available on another of the mirrored disks in the space. A resilient, two-way mirror requires a minimum of two physical disks and can tolerate a single drive failure. This requires a minimum of at least five physical disks for three-way mirroring and can tolerate two drive failures. The ReFS file format automatically maintains data integrity and can only be selected when using mirrored drives. |
Parity |
Parity is similar to RAID 5, which stores data, along with parity information across multiple physical drives. The parity writes are rotated across the available disks, which ensures an even distribution and drive optimization. A minimum of three physical drives is required for parity spaces. |
Parity spaces have increased resiliency through disk read/write journaling so that if a drive is lost or corrupted, the missing data can be retrieved from the journal. The journal is stored across the remaining multiple disks. |
A further feature that is available with Storage Spaces is how you provision the virtual disk spaces for use. Storage Spaces offers you two schemes:
Thin provisioning Enables you to allocate an intended storage that has greater capacity than is physically present at the time of creation. If you over-specify the amount of capacity compared to the data you currently have, the storage space engine disregards the extra storage capacity until datasets grow to require the storage. At this point, the extra storage is allocated. At any point, you increase the maximum size of an existing storage space and add drives as they are required at a later date. Thin provisioning is more economical and efficient because it allows organizations to deploy physical storage only when needed, thereby saving on operating costs, such as datacenter rack space costs associated with storing unused drives in situ.
Fixed provisioning Similar to traditional fixed storage allocation methods, by which you specify that the spaces will not increase beyond the initial storage capacity allocated at the same time as storage space creation. With fixed provisioning, you specify the hard limit for the size of the storage pool.
Configure Storage Spaces
When you have connected your physical drives to your computer, you can configure Storage Spaces by using the following steps:
Select Start, enter Storage Spaces, and then select Manage Storage Spaces.
Select Create a new pool and storage space.
If prompted, accept the UAC prompt.
Select the drives you want to add, as shown in Figure 3-32.

FIGURE 3-32 Selecting the drives to create a storage pool
All drives that are offline are automatically selected. Storage Spaces automatically identifies available drives to create the storage pool.
Select Create pool.
When the create pool operation completes, on the Enter a name, resiliency type, and size for the storage space page, shown in Figure 3-33, provide a name for the storage space and select the drive letter you want to use.

FIGURE 3-33 Creating the storage space
Select either the NTFS or ReFS file system. (Only if you choose a mirrored resiliency type can you format the storage space by using either the NTFS or the ReFS file system.)
Select the type of resiliency you require. This will depend on how many drives you have added to the storage space. But options include Two-Way Mirror, Three-Way Mirror, and Parity.
Set the Size (maximum) of the storage space. The size can be larger than the current capacity of the storage pool.
Select Create storage space to create your storage pool in the storage space.
After the storage pool has been created, the Manage Storage Spaces console manages and maintains it within Control Panel, where you can add, rename, or delete drives. If a physical disk is removed permanently from the pool, it must be reformatted before it can be used in another PC. Just like with mirrored or RAID disk sets, if you need to move the pooled disks to another computer, always move them as a unit so that their integrity is maintained.
As part of your exam preparation, create a storage space, provision a storage pool, and simulate a drive failure. In Figure 3-34, one of the physical drives used to create the storage space has been disconnected from the computer. Even with only one drive, the E drive continues to be available within File Explorer, and applications and users will be unaware of the failure until they review any notification in the Action Center.
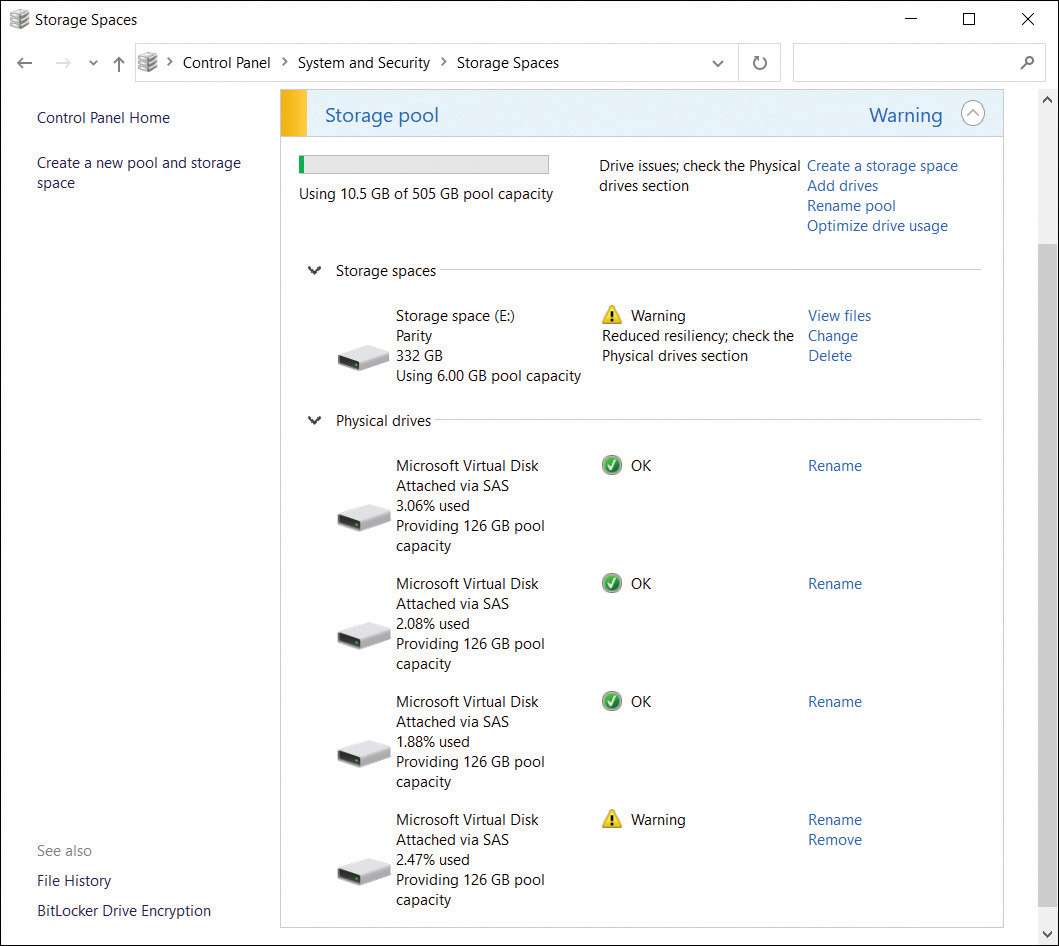
FIGURE 3-34 Reduced storage pool resiliency
If the removed physical drive is replaced, the storage pool checks the integrity of the pool and makes the necessary repairs. When it’s repaired and full operational resiliency is restored, the icon changes from a warning symbol to the check mark indicating that everything is OK, as was originally shown before the disruption.
Storage Spaces can use ReFS for mirrored resilient spaces, offering built-in automatic file repair. This helps prevent data loss and can be carried out while the disks are online and do not require a system reboot to check and repair errors. ReFS and Storage Spaces therefore provide enhanced resiliency in the event of storage device failure.
Exam Tip
Be aware of the self-healing capabilities ReFS offers, which are used for mirrored storage spaces. Remember that ReFS cannot be used for simple or parity resiliency types.
Manage Storage Spaces by using Windows PowerShell
You can script the creation, repair, and administration of Storage Spaces by using Windows PowerShell. There are many more storage management–specific cmdlets that relate to storage operations. Some of the Storage Spaces–specific cmdlets that can be used are described in Table 3-23.
TABLE 3-23 Storage cmdlets in Windows PowerShell
Storage Cmdlets |
Description |
|---|---|
|
Creates a new storage pool, using a group of physical disks |
|
Adds a physical disk to a storage pool for the creation of one or more VirtualDisk objects |
|
Gets a specific storage pool or a set of storage pool objects that are available |
|
Modifies the properties of the specified storage pool |
|
Sets the attributes on a specific physical disk |
|
Returns a list of VirtualDisk objects that are available |
|
Creates a new virtual disk in the specified storage pool |
|
Deletes an existing virtual disk and reclaims the space for use by other virtual disks in the same storage pool |
|
Rebalances a storage space configured as simple or mirrored, optimizing files based on disk space, disk size, and file size |
|
Upgrades the storage pool metadata to enable new features and functionality on pre–Windows 10 storage pools |
|
Removes a physical disk from a specified storage pool |
|
Deletes a storage pool and associated virtual disk objects |
To list all the cmdlets that are available, use the Get-Command -Module Storage cmdlet.
Need More Review? Storage Cmdlets in Windows Powershell
You can review the documentation relating to Storage Spaces Windows PowerShell cmdlets on MSDN at docs.microsoft.com/en-us/powershell/module/storage/?view=win10-ps.
Work with removable storage
Removable devices such as USB flash drives and Secure Digital High-Capacity (SDHC) memory cards are common and can offer portability benefits but also pose a potential threat to data security and loss. In this section, you learn how to work with removable devices.
Format removable devices
You can format removable devices in the same way as you can configure hard drives. All drives without a file format, or that have one that Windows 10 doesn’t understand, are considered RAW. To use the drive, first format the drive. If you insert an unformatted drive in your USB port, Windows prompts you to format the drive.
Depending on the size of your drive, you can format the drive using the FAT, FAT32 (default), NTFS, or exFat file format, using the format wizard. Be mindful when formatting a USB drive because, when you perform a quick format, the drive is not checked for errors. Although this is quicker, the system won’t mark bad sectors on the drive, and this can lead to data integrity problems later on.
For drives larger than 32 GB, exFat is a good general-purpose format; it handles files larger than 4 GB and optimizes the drive space well. For smaller drives, FAT32 is best because it is compatible with virtually all operating systems and is fast.
You should format using NTFS if you are seeking advanced functionality such as file permissions on individual files and folders.
Secure removable devices
Data stored on USB flash drives is inherently insecure and should be protected. This can be achieved by using NTFS permissions, encrypted using EFS, or by using BitLocker encryption. The most appropriate of these methods in an enterprise scenario is likely to be using BitLocker To Go because users understand it easily, and you can manage and configure the feature by using Group Policy.
BitLocker To Go is not designed to replace EFS or NTFS permissions; it adds an additional layer of security and protection on removable drives, including SDHC cards, USB flash drives, and external hard disk drives. BitLocker To Go is available in the Pro, Enterprise, and Education editions of Windows 10 only.
When encrypting removable media with BitLocker To Go, you have two options:
Encrypt used disk space only Encrypts only the part of the drive that currently has data stored on it. This is quicker and appropriate in most cases.
Encrypt entire drive Encrypts the full volume, including areas that contain no data, which takes longer to complete.
Note Bitlocker to go Requirements
To encrypt a removable drive by using BitLocker To Go, the drive must be formatted with NTFS, FAT, FAT32, or exFat file system and have at least 64 MB of available space. Because removable drives are portable and typically not tied to one device, BitLocker To Go does not require use of a Trusted Platform Module (TPM) chip. The full volume encryption key and the volume master key are stored on the encrypted drive.
To enable BitLocker Drive Encryption on a removable drive, perform the following steps:
Insert a USB drive into your computer.
Open File Explorer and right-click the USB drive in the left pane.
Select Turn on BitLocker from the context menu.
The Starting BitLocker Wizard appears and initializes the drive.
On the Choose how you want to unlock this drive page, choose Use a password to unlock the drive.
In the Enter your password and Reenter your password boxes, enter a password and select Next.
On the How do you want to back up your recovery key? page, select Save to a file.
In the Save BitLocker recovery key as dialog box, select This PCDocuments.
In the Save BitLocker recovery key as dialog box, select Save and then select Next.
On the Choose how much of your drive to encrypt page, select Encrypt used disk space only (faster and best for new PCs and drives) and then select Next.
On the Choose which encryption mode to use page, select Compatible mode (best for drives that can be moved from this device) and select Next.
In the Are you ready to encrypt this drive? page, select Start encrypting.
When the encryption has completed, BitLocker is fully enabled on the removable drive. If you eject the USB drive and then insert the drive back into your PC or another computer, Windows 10 prompts you to enter the password to unlock the drive.
Configure OneDrive and OneDrive for Business
OneDrive is a cloud-based service designed for storing files and synchronizing settings aimed at the consumer market. Microsoft gives each user 5 GB of free cloud storage for personal use. To access the service, the user must use a Microsoft account, and the service can be accessed natively from a computer or smartphone.
Consumers can upgrade their personal OneDrive account to a Microsoft 365 Family or Microsoft 365 Personal subscription (which offers additional software benefits and 1 terabyte of OneDrive storage space).
A business-oriented service called OneDrive For Business is based on Microsoft SharePoint technologies; it stores data in a specialized library in the cloud. OneDrive For Business plans are available that allow business usage and can be purchased as a standalone plan or as part of a Microsoft 365 Business or Enterprise subscription. You can add multiple OneDrive for Business accounts to your device, but only one personal account can be added.
OneDrive desktop app
OneDrive is integrated with Windows 10, using the OneDrive app, and when you sign in to Windows with a Microsoft account, a OneDrive folder is created in File Explorer at C:UsersUsernameOneDrive.
To protect against data loss, you should use OneDrive as your preferred location for all your data. When you add, modify, or delete files stored in the OneDrive favorite, your changes are replicated to OneDrive as long as you are online.
If you are using an operating system other than Windows 10, you might still be able to use the OneDrive desktop app; it is available to download from www.microsoft.com/microsoft-365/onedrive/download or the Microsoft Store, and is supported on the following operating systems:
Windows 7 or newer
Windows Server 2008 R2 or newer
macOS Sierra 10.12 or newer
iPhone, iPad, or iPod touch with iOS 9.0
Android
Windows Phone 7.5 or later
Xbox
The OneDrive app, located in the taskbar notification area, lets you modify synchronization settings. You can choose to synchronize all or selected files and folders from your cloud storage account to your device.
The OneDrive desktop app and sync client is preinstalled on Windows 10 devices and allows you to access your files stored in your online OneDrive if you use a Microsoft account to sign in to the app.
Once the app is configured, you can open File Explorer and locate a OneDrive icon. This icon represents a folder that is where the files you want to be kept in sync will be stored on your PC locally. By default nothing is stored—you must select files and folders and then they will be available.
If you add a new folder in the OneDrive folder within File Explorer, it will be available immediately in the cloud version of OneDrive and will be synchronized.
To configure OneDrive to synchronize folders from your OneDrive to your device, use these steps:
Right-click the OneDrive icon in the notification tray and select Settings.
On the Account tab, select Choose Folders.
On the Sync your OneDrive files to this PC screen select the check boxes for the folders and files that you want to sync.
Select OK.
On the Account tab, select OK.
The files will begin downloading immediately and the OneDrive app will monitor changes to local files as well as your cloud-based files, and it will maintain the synchronization.
On the notification area, the OneDrive for Business desktop app is colored blue whereas the consumer version is white. When displayed in File Explorer, both icons are blue, and the name of the account is listed after the business version to help differentiate.
OneDrive Files On Demand
OneDrive Files On Demand is a new feature available within OneDrive. This feature allows all your files and folders stored in OneDrive to be viewable within File Explorer on your PC without them actually being downloaded to your hard drive. You will be able to change each file and folder status to configure whether the resource should be stored locally.
You can turn on the Files On Demand feature by using these steps:
Sign in to OneDrive using your Microsoft account.
Right-click the white or blue OneDrive cloud icon in the notification area.
Select Settings.
On the Settings tab, select the Save space and download files as you use them box in the Files On-Demand section.
Once that setting is enabled, placeholders for all of your OneDrive content will be displayed in File Explorer. If you want to hide any folders from appearing in the OneDrive location in File Explorer, such as for privacy reasons, you can hide them by using these steps:
Sign in to OneDrive using your Microsoft account.
Right-click the white or blue OneDrive cloud icon in the notification area.
Select Settings.
On the Account tab, select Choose Folders in the Choose Folders area.
Clear the check box next to the folder you want to hide on this device.
After the OneDrive desktop app has retrieved a list of all files and folders from your OneDrive cloud account, you can browse to your OneDrive folder and see new cloud icons next to each item indicating the status of the file or folder availability as follows:
Online-only files Online-only files are placeholders only and don’t use space on your computer. If you open the file and your device is connected to the internet, it is downloaded and opened.
Locally available files After you have downloaded and opened any of your OneDrive files, they become locally available. You can open a locally available file at any time, even without internet access. To remove the local copy of the file, you can right-click the file and select Free Up Space.
Always available files If you choose the “Always keep on this device” option, files have the green circle with the white check mark. These files will be downloaded to your device and will be always available even when your device is not connected to the internet.
OneDrive web portal
Although integration is tight between the Windows 10 OneDrive app and the online version of OneDrive, the online version currently has slightly more functionality, although it can be slower to manipulate your files, depending on available bandwidth.
In the portal, users can:
Manage all their files stored on OneDrive.
Access previous versions of files.
Access the OneDrive Recycle Bin.
Buy more storage (Microsoft 365 subscription-based).
Configure advanced sharing options for files and folders.
Create Microsoft Excel surveys.
Users of mobile phones can also allow the automatic upload of all photos to their private OneDrive photos folder. With photos consuming some of your free 5 GB cloud storage each time you take a picture, you may be surprised at how quickly the quota is used up, but adding additional storage is relatively inexpensive. If you subscribe to Microsoft 365, OneDrive comes with 1 TB of storage and the ability to install Office applications locally on your PC, Mac, or iPad.
In OneDrive, you can access Microsoft Office Online, which enables you to create Word, Excel, Microsoft PowerPoint, and Microsoft OneNote files. After you create an Office online file, you can share the documents online, collaborate with other users, and edit documents at the same time. In addition, you can create text documents and Excel surveys. The surveys are simple; others can fill them out just by opening the link to the survey. You then see everyone’s response compiled in the online spreadsheet.
Privacy is a significant concern for many users, especially when discussing personal data. Although OneDrive is aimed at consumers and is therefore not suitable (or licensed) for use with enterprise data, Microsoft has upgraded the level of security and encryption to protect data held on the OneDrive service. Data is now protected with Perfect Forward Secrecy (PFS) encryption when you access OneDrive through the web portal, onedrive.live.com, mobile OneDrive application, and OneDrive sync clients.
Chapter summary
Each device on a network requires a unique IPv4 and, optionally, IPv6 configuration.
Windows 10–based network devices use name resolution to change names in IP addresses for network communications.
Windows 10 supports four commonly used VPN protocols. These are Point-to-Point Tunneling Protocol (PPTP), Layer 2 Tunneling Protocol (L2TP), Secure Socket Tunneling Protocol (SSTP), and Internet Key Exchange, Version 2 (IKEv2).
Windows 10 uses common authentication protocols, including EAP-MS-CHAPv2, PAP, CHAP and MS-CHAP v2.
VPN Reconnect is a feature supported when using IKEv2, which enables VPN connections to be automatically reestablished if they are broken. VPN Reconnect uses the IKEv2 tunneling protocol with the MOBIKE extension.
Always On, App-Triggered VPN, and LockDown VPN profiles are new VPN features in Windows 10 that enable administrators to implement enterprise-grade VPN requirements.
Wi-Fi Direct enables Windows 10 devices to interact with other hardware, such as printers, TVs, PCs, and gaming devices.
Windows 10 provides a number of tools that you can use to help troubleshoot networking issues.
Windows 10 supports NTFS as the default file system.
The Quick Access area appears at the uppermost left area of the File Explorer navigation pane. It shows the frequently used files and folders.
Effective Permissions is useful to determine the permissions a particular user would have through NTFS permissions.
Windows 10 NTFS uses 6 Basic Permissions and 13 Advanced Permissions for securing files and folders.
When you’re applying permissions to groups, remember that an explicit Allow setting will override an implicit Deny permission.
Use the ICACLS command-line tool to configure and view permissions on files and folders on a local computer and reset them to defaults.
Inheritance of permissions can be useful when applying permissions to a large environment because the permissions will be automatically propagated based on the default inheritance setting.
You can use the Effective Access feature to ensure that your NTFS permissions are as expected.
If you have administrative privileges, you can take ownership of an object, such as a file, and allocate it to another user or group.
You can reset the permissions of all the folders, files, and subfolders using the command
icacls <file name> /reset.Share permissions can be Read, Change, or Full.
Storage Spaces lets you utilize unused storage disk drives, including SATA, SAS, and USB drives, and combine the drive capacity to create a virtual disk for storing data. It’s used on Windows 10 clients and servers, and enables users to benefit from an “easy to expand storage” facility and optional data redundancy with fault tolerance without the typical high cost of ownership that a traditional SAN facility would incur.
Storage Spaces can be forcibly optimized using the
Optimize-StoragePoolPowerShell cmdlet, which is useful after disks have been added or removed.OneDrive is a free, cloud-based, consumer-oriented file storage service that is built into Windows 10 and used by many other operating systems through the OneDrive app.
OneDrive On Demand Files shows placeholders for all files not hidden. In addition, files can be configured to always be stored locally.
OneDrive Fetch Files On Your PC enables you to access locally stored files from the OneDrive web portal.
Thought experiment
In these thought experiments, demonstrate your skills and knowledge of the topics covered in this chapter. You can find the answers to these thought experiments in the next section.
Scenario 1
You have been hired to deploy Windows 10 at a new office for Adatum Corporation. The office was a greenfield site with no computer infrastructure, and it only has the network cabling and wireless infrastructure (which was installed by a contractor). You must help plan and implement networking services at the new location and verify that all equipment is working on the network.
As a consultant for Adatum, answer the following questions about networking:
1. You connected a number of devices to the wireless APs in the new building. They seem to be connected, but you want to verify that they can communicate with each other. Is it true that the Test-Connection Windows PowerShell cmdlet is the equivalent of the Ping command-line tool?
2. You want to be able to view the current network configuration of the installed laptops in the new building. Which of the following commands enable you to do this?
PingTracertNSlookupIPconfigGet-NetIPAddressNetsh
3. You are troubleshooting name resolution to the LON-DC1 domain controller. You suspect a problem might reside with the configured DNS server that was just installed at the site. If you create an entry for LON-DC1 in the local Hosts file of a test computer running Windows 10, which is used first, the DNS server or the local resolver cache?
4. You have been asked to set up a VPN solution for some users who want to work from home. Which VPN tunneling protocols can you use with Windows 10?
5. You notice that one of your computers has an IPv4 address that starts 169.254. What could this mean?
Scenario 2
You have recently implemented a new network-shared storage facility for your organization. This storage is formatted using NTFS and has been shared to groups containing users within Active Directory. Users of the design department will use the local storage to store CAD drawings in two folders: Current Projects and New Projects. The files within the New Projects folder are confidential. You notice that users who are not part of the design department are able to access the CAD files.
You must ensure that the network-shared storage facility is accessed by the design department personnel only.
Answer the following questions for your manager:
1. How will you ensure that only design department personnel can access the storage?
2. What share-level permissions should you grant on the storage?
3. You need to confirm to your manager that members of the organization who are not in the design department do not have access to the files contained in the storage. How will you reassure your manager?
4. You need to provide an audit trail of the access to the New Projects folder. How will you proceed?
Scenario 3
You want to reuse some hard drives that you have and create a Storage Space with them. You have four disks; each disk is 500 GB in capacity, but two of them have 200 GB of data that you want to keep. You want to configure them to offer fault tolerance so that if any one disk fails, you do not lose any data. You do not need to use all of the available disks as part of the Storage Spaces solution. Answer the following questions about how you should set up Storage Spaces:
1. Which types of resiliency could you choose: simple, mirrored, three-way mirror, or parity?
2. How many of the four disks would you use?
3. How will you ensure that the data on the two drives will not be lost?
Scenario 4
You are helping a small consulting business configure its file and folder strategy. Eleven employees work from a single office, which also acts as a technology center, home to a showcase demonstration area and meeting rooms. The company is still in the startup growth phase, and financial resources are restricted. It currently does not use a domain environment, but its location has excellent internet access and uses the cloud extensively for email, Dropbox, and OneDrive. All devices use Windows 10 Pro with Microsoft accounts, and no dedicated IT support is available.
You need to ensure that the company can share files and folders in a cost-effective way.
Answer the following questions on behalf of the company:
1. The staff members have personal experience using OneDrive. Could they use OneDrive for file storage and sharing in the small company?
2. Employees need to have access to their data resources when not connected to the internet. How would OneDrive help them?
3. In the demonstration area of the business, a Windows tablet is used as a media playback device. It is configured to play a slideshow of all media files within a specified directory on the local drive. How would you ensure that this device has the latest media content available at all times?
4. The owner has concerns about using OneDrive for Business for storing business resources and the long-term viability of using OneDrive for Business. Should the owner be concerned?
Thought experiment answers
This section provides the solutions for the tasks included in the thought experiment.
Scenario 1
1. Yes, the Test-Connection Windows PowerShell cmdlet is the equivalent of the Ping command-line tool.
2. The IPconfig, Get-NetIPAddress, and Netsh commands enable you to view the network configuration of computers running Windows 10.
3. The DNS resolver cache is checked before a DNS server is petitioned.
4. You can use the following VPN tunneling protocols: Point-to-Point Tunneling Protocol (PPTP), Layer Two Tunneling Protocol with IPsec (L2TP/IPsec), Secure Socket Tunneling Protocol (SSTP), or Internet Key Exchange version 2 (IKEv2).
5. It means that the device is configured to obtain an IPv4 address automatically and has been unable to obtain an IPv4 configuration from a DHCP server. This might be because the DHCP server is offline or because an insufficient number of addresses are available on the server.
Scenario 2
1. Create a design department security group, add all the design department personnel to the group, and give the design department group NTFS access to the storage.
2. You should give full-access, share-level permissions for the design department group.
3. You should use the Effective Access feature to verify the NTFS permissions in place. In the Advanced Security settings for the shared folders, evaluate the effective access permissions for a user or group that is not a member of the design department group.
4. Enable Auditing for success and failure in Group Policy, and then enable auditing on the New Projects folder to track both successful access to the folder and failed attempts.
Scenario 3
1. You could create a storage pool and choose to use either a two-way mirror or a parity storage pool with the four drives.
2. Answers may vary, but you can add additional drives to increase the size of a storage pool; therefore, you can utilize all four drives.
3. You should label the disks carefully to ensure that you do not accidentally use the incorrect disk because all drives that are added to the storage pool will be formatted, and the data will be deleted. You should use the two blank disks to create a new storage pool and provision a new storage disk, which is a two-way mirror with the two blank disk drives, and then back up the 200 GB data onto this new storage pool. You can add the remaining drives to the storage pool after the data transfer has completed.
Scenario 4
1. Each employee could continue to use OneDrive for personal use. For business use, the company should purchase either a standalone OneDrive for Business plan or an Office 365 subscription that includes OneDrive for Business. They can then create folders to contain their work files, which could then be shared among the employees as required. Alternatively, the owner/manager could create folders in the company OneDrive for Business and then share the folders (with edit permissions) with the staff to create, store, and synchronize resources.
2. The employees could configure the OneDrive app settings to synchronize their local devices with the files and folders they use. They could then work on these files; the files would then synchronize automatically when the users are connected to the internet.
3. Answers may vary. You could use OneDrive. Create a shared folder stored on OneDrive for Business to contain the media. Employees can then add new content to this media folder in OneDrive for Business. Configure the media playback device to synchronize with this folder and maintain the device connection to the internet.
4. Answers may vary. OneDrive is aimed at the consumer audience, whereas OneDrive for Business is an enterprise solution. The data stored in both OneDrive and OneDrive for Business is encrypted and therefore secure from unauthorized access. Employees should be granted access to only the shared resources they require. The default amount of space per OneDrive for Business is 1 TB, but the amount can be unlimited depending on the OneDrive for Business plan that the company purchases.