13. Self Joins and Views
The inner and outer joins of the previous two chapters dealt with various ways of combining data from multiple tables. The assumption has always been that the data exists in physical tables in a database. We’ll now turn to two techniques that will let us view data in a more virtual way. The first technique, the self join, allows the analyst to join a table to itself, referring to the same table twice, as if it were two separate tables. As such, the self join creates a virtual view of a table, allowing it to be used more than once. Second, we’ll learn about database views, which is a useful concept that enables us to create new virtual tables at will.
Self Joins
The self-join lets you join a table to itself. The most common use of the self join is in dealing with self-referencing tables. These are tables that include a column that refers to another column in the same table. A common example of this type of relationship is a table that contains information about employees.
In this next example, each row in a Personnel table has a column that points to another row in the same table, representing the employee’s manager. In a way, this is similar to the concept of a foreign key. The main difference is that, whereas foreign keys point to a column in another table, we now have a situation where a column points to another column within the same table.
Let’s look at the data in this Personnel table:

This table has one row per employee. The ManagerID column states which manager the employee reports to. The ID number in that column corresponds to a value in the EmployeeID column. For example, Li Wang has a ManagerID of 1. This indicates that Li’s manager is Susan Carter, who has an EmployeeID of 1.
We can see that the three people who report to Susan Carter are Li Wang, Charles Pike, and Scott Ferguson. Notice that Susan Carter has no value in the ManagerID column. This indicates that she is the head of the company and thus has no manager.
Now, let’s say that we want to list all employees and show the name of the manager to whom each employee reports. To accomplish this, we’ll create a self-join of the Personnel table to itself. A table alias must always be used with self joins so that we have a way of distinguishing each instance of the table. We’ll give the first instance of the Personnel table a table alias of Employees, and we’ll give the second instance a table alias of Managers. Here’s the statement:
SELECT
Employees.EmployeeName AS ‘Employee Name’,
Managers.EmployeeName AS ‘Manager Name’
FROM Personnel AS Employees
INNER JOIN Personnel AS Managers
ON Employees.ManagerID = Managers.EmployeeID
ORDER BY Employees.EmployeeName
The resulting data is:
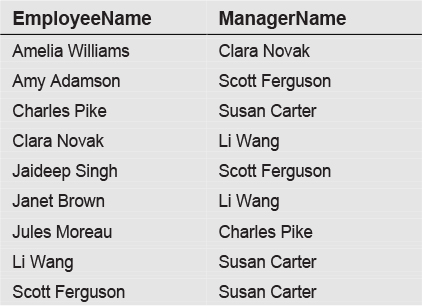
The key part of this SELECT is the ON clause in the join. To get the self join to work correctly, we must use the ON to establish a relationship between the ManagerID column of the Employees view of the Personnel table, and the EmployeeID column of the Managers view of the table. In other words, the indicated manager is also an employee.
Notice that Susan Carter isn’t shown in the previous data as an employee. This is because we used an inner join in the statement. Because Susan Carter has no manager, there is no match to the Managers view of the table. If we want Susan Carter to be included, we merely need to change the inner join to an outer join. The new statement is:
SELECT
Employees.EmployeeName AS ‘Employee Name’,
Managers.EmployeeName AS ‘Manager Name’
FROM Personnel AS Employees
LEFT JOIN Personnel AS Managers
ON Employees.ManagerID = Managers.EmployeeID
ORDER BY Employees.EmployeeName
The data retrieved is then:

We now see Susan Carter listed as an employee with NULL as the ManagerName, indicating that she has no manager.
Creating Views
The self join allows you to create multiple views of the same table. We’ll now extend this concept to allow us to create new views of any table or combination of tables.
Views are merely SELECT statements that have been saved in a database. Once saved, the view can be referred to as if it were a table in the database. Whereas database tables contain physical data, views do not contain data but allow you to proceed as if a view were a real table with data.
Views can be thought of as virtual tables. Additionally, views are permanent, not temporary. Once created, a view continues to be referenced until the view itself is deleted.
You might ask why views are necessary. We’ll get into the benefits of views later in the chapter, but in short, views provide added flexibility as to how data can be accessed. Whether a database has been around for a few days or for years, the data in that database is stored in tables in a very specific manner. As time progresses, requirements for accessing that data change, but it isn’t a trivial matter to reorganize the tables to meet new requirements. The great advantage of views is that they allow the analyst to create new virtual views of the data already in a database. Views allow you to create the equivalent of new tables without having to physically rearrange data. As such, views add a dynamic element to a database design by keeping it fresh and up to date.
How is a view stored in a database? All relational databases consist of a number of different object types. The most important object type is the table. However, most database management software allows users to save any number of other object types. The most common of these are views and stored procedures. There are often many other object types in a database, such as functions and triggers.
SQL provides the CREATE VIEW keyword to enable users to create new views. The general syntax is as follows:
CREATE VIEW ViewName AS
SelectStatement
After the view is created, the ViewName is used to reference the data that would be returned from the SelectStatement in the view. Here’s an example. In the previous chapter, we looked at this SELECT statement:
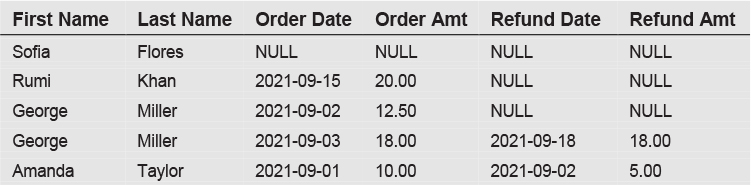
SELECT
Customers.FirstName AS ‘First Name’,
Customers.LastName AS ‘Last Name’,
Orders.OrderDate AS ‘Order Date’,
Orders.OrderAmount AS ‘Order Amt’,
Refunds.RefundDate AS ‘Refund Date’,
Refunds.RefundAmount AS ‘Refund Amt’
FROM Customers
LEFT JOIN Orders
ON Customers.CustomerID = Orders.CustomerID
LEFT JOIN Refunds
ON Orders.OrderID = Refunds.OrderID
ORDER BY Customers.LastName, Customers.FirstName, Orders.OrderDate
This statement returned this data:
To set up this SELECT statement as a view, we simply place the entire SELECT in a CREATE VIEW statement, as follows:
CREATE VIEW CustomersOrdersRefunds AS
SELECT
Customers.FirstName AS ‘First Name’,
Customers.LastName AS ‘Last Name’,
Orders.OrderDate AS ‘Order Date’,
Orders.OrderAmount AS ‘Order Amt’,
Refunds.RefundDate AS ‘Refund Date’,
Refunds.RefundAmount AS ‘Refund Amt’
FROM Customers
LEFT JOIN Orders
ON Customers.CustomerID = Orders.CustomerID
LEFT JOIN Refunds
ON Orders.OrderID = Refunds.OrderID
The only item missing in the above CREATE VIEW is the ORDER BY clause of the original SELECT statement. Because views aren’t stored as physical data, there is never a reason to include an ORDER BY clause for a view.
Referencing Views
When we execute the above CREATE VIEW statement, it creates a view called CustomersOrdersRefunds. Creating the view does not return any data. It merely defines the view for later use. To use the view to bring back data as before, you would execute this SELECT statement:
SELECT *
FROM CustomersOrdersRefunds
This retrieves:

Notice that this data is displayed in a different row order than what was originally retrieved. This is because the view does not contain an ORDER BY clause. As a result, the data is returned in the order in which it is physically stored in the database. This is easily corrected by adding an ORDER BY clause to the SELECT, as follows:
SELECT *
FROM CustomersOrdersRefunds
ORDER BY [Last Name], [First Name], [Order Date]
This now returns the data in the expected order. Remember that columns in views must be referenced by the column aliases specified when the view was created. We can no longer reference the original column names. In this example, the CustomersOrdersRefunds view applied a column alias of “Last Name” to the LastName column in the Customers table. We therefore need to reference the column alias in the ORDER BY clause. As mentioned in Chapter 2, we can include brackets around each of these column names in the ORDER BY clause to allow for correct interpretation of the embedded spaces.
Once a view is created, it can be referenced and utilized just like any other table. For example, we might want to see only a few selected columns from the view and select only one specific customer. To do that, we can issue a SELECT statement such as:
SELECT
[First Name],
[Last Name],
[Order Date]
FROM CustomersOrdersRefunds
WHERE [Last Name] = ‘Miller’
The output is:

As before, we need to place square brackets around each of the column names because they contain embedded spaces.
Benefits of Views
The previous example illustrates one of the important benefits of using views. Once a view is created, that view can be referenced just as if it were a table. Even if the view references multiple tables joined together, it now appears logically as just one table.
Let’s summarize the benefits of using views:
![]() Views can reduce complexity. First, views can simplify SELECT statements that are particularly complex. For example, if you have a SELECT statement that joins six tables together, it might be useful to create views with two or three tables each. You can then reference those views in a SELECT statement that is less complex than the original.
Views can reduce complexity. First, views can simplify SELECT statements that are particularly complex. For example, if you have a SELECT statement that joins six tables together, it might be useful to create views with two or three tables each. You can then reference those views in a SELECT statement that is less complex than the original.
![]() Views can increase reusability. In a situation where three tables are always joined together, you can create a view with those three tables. Then, instead of always having to join those three tables every time you query data, you can simply reference a predefined view.
Views can increase reusability. In a situation where three tables are always joined together, you can create a view with those three tables. Then, instead of always having to join those three tables every time you query data, you can simply reference a predefined view.
![]() Views can properly format data. If columns are incorrectly formatted in the database, you can use the CAST or other functions to format that column exactly as desired. For example, you might have a date column stored as an integer datatype in the database, in a YYYYMMDD format. It might be advantageous to view this data as a date/time column so it can be presented and manipulated as a true date. To accomplish this, you can create a view on the table that transforms the column to the proper format. All subsequent references to that table can then reference the new view rather than the table.
Views can properly format data. If columns are incorrectly formatted in the database, you can use the CAST or other functions to format that column exactly as desired. For example, you might have a date column stored as an integer datatype in the database, in a YYYYMMDD format. It might be advantageous to view this data as a date/time column so it can be presented and manipulated as a true date. To accomplish this, you can create a view on the table that transforms the column to the proper format. All subsequent references to that table can then reference the new view rather than the table.
![]() Views can create calculated columns. Suppose two columns in a table include Quantity and PricePerItem. End users are usually interested in the total price, which is calculated by multiplying the two columns together. You can create a view of the original table with a new calculated column with this calculation. Users can then reference the view and always have the calculation available.
Views can create calculated columns. Suppose two columns in a table include Quantity and PricePerItem. End users are usually interested in the total price, which is calculated by multiplying the two columns together. You can create a view of the original table with a new calculated column with this calculation. Users can then reference the view and always have the calculation available.
![]() Views can be used to rename column names. If a database contains cryptic column names, you can create views with column aliases to translate those names into something more meaningful.
Views can be used to rename column names. If a database contains cryptic column names, you can create views with column aliases to translate those names into something more meaningful.
![]() Views can create a subset of data. Let’s say a database contains a table with all of your customers. Most of your users need only to see customers who have placed an order during the prior year. You can easily create a view of this table that includes this useful subset of data.
Views can create a subset of data. Let’s say a database contains a table with all of your customers. Most of your users need only to see customers who have placed an order during the prior year. You can easily create a view of this table that includes this useful subset of data.
![]() Views can be used to enforce security restrictions. Often you want certain users to be able to access only certain columns in a given table. To accomplish this, you can create a view of the table for those users. The security features of the database can then be used to grant access to the new view for those users, while restricting them from accessing the underlying table.
Views can be used to enforce security restrictions. Often you want certain users to be able to access only certain columns in a given table. To accomplish this, you can create a view of the table for those users. The security features of the database can then be used to grant access to the new view for those users, while restricting them from accessing the underlying table.
Modifying and Deleting Views
After a view is created, it can be easily modified using the ALTER VIEW statement. Here’s the general syntax:
ALTER VIEW ViewName AS
SelectStatement
When altering a view, you must specify the entire SELECT statement contained in the view. The original SELECT in the view gets replaced by the new SELECT. Let’s say we originally created a view with this statement:
CREATE VIEW CustomersView AS
SELECT
FirstName AS ‘First Name’,
LastName as ‘Last Name’
FROM Customers
To add a new column to this view for a CustomerID, we would issue a statement such as:
ALTER VIEW CustomersView AS
SELECT
FirstName AS ‘First Name’,
LastName AS ‘Last Name’,
CustomerID AS ‘Cust ID’
FROM Customers
Once again, creating or altering a view does not return any data. It merely creates or modifies the definition of the view.
The DROP VIEW statement is used to delete a previously created view. The syntax is:
DROP VIEW ViewName
To delete the CustomersView created earlier, we can issue this statement:
DROP VIEW CustomersView
Looking Ahead
Self joins and views are two different ways of viewing data in a virtual manner. The self join allows the analyst to join a table to itself. Self joins are useful with self-referential data, where one column in a table can be joined to another column in the same table.
Database views are much more flexible. Essentially, any SELECT statement can be saved as a view, which can then be referenced as if it were a physical table. Unlike tables, views do not contain any data. They merely define a new virtual view of data in existing tables. As such, views serve a wide variety of functions, from reducing complexity to reformatting data. Once created, views can be modified or deleted with the ALTER VIEW and DELETE VIEW statements.
In our next chapter, “Subqueries,” we’ll return to a topic more directly related to our previous discussion of how to join tables together. Subqueries provide a method of relating tables to each other without making explicit use of an inner or outer join. Because of the wide variety of ways that subqueries can be structured and used, this is probably the most difficult subject in this book. However, an understanding of subqueries can be tremendously rewarding. There’s actually quite a bit of flexibility in how subqueries can be used. As such, this lends itself to a certain amount of creativity in your query designs.