Chapter 3. The Workflow
Workflow, at its simplest, is the movement of documents, artifacts, and/or tasks through a work process. More specifically, workflow is the operational aspect of a work procedure:
• How tasks are structured
• Who performs them
• What their relative order is
• How they are synchronized
• How information flows to support the tasks
• How tasks are being tracked
Because the dimension of time is considered in workflow, workflow considers “throughput” as a distinct measure. Workflow problems can be modeled and analyzed using graph-based formalisms such as Petri nets and UML activity diagrams.
In Wikipedia a workflow management system is defined as “a computer system that manages and defines a series of tasks within an organization to produce a final outcome or outcomes. Workflow Management Systems allow you to define different workflows for different types of jobs or processes.”
The ClearQuest and Jazz artifact is the work item; you can imagine the work item as a document that is physically moved from one person to another. In the change management practice the purpose of the work item is to change other artifacts such as source code, manuals, models, and even requirements. The workflow is defined by a state machine (the state transition matrix) which contains all the states through which the work item may transition. In ClearQuest the state transition is performed by an action of type Change_State.
3.1. Software Development Processes
Workflow is a key concept in several software development processes such as the Rational Unified Process (RUP), the Telelogic Harmony, the Open Unified Process (OpenUP), and others.
We shall only briefly discuss workflow in RUP and OpenUP, and then focus on a method that we think is best for change management practices.
3.1.1. The Rational Unified Process (RUP) Method
Workflow is a key concept in RUP; it is explained as follows.
A mere enumeration of all roles, activities, and artifacts does not constitute a process; we need a way to describe meaningful sequences of activities that produce some valuable result, and to show interactions between roles. A workflow is a sequence of activities that produces a result of observable value.
In UML terms, a workflow can be expressed as a sequence diagram, a communication diagram, or an activity diagram. Figure 3.1 presents an activity diagram from the change management discipline of the RUP practice.
Figure 3.1. Change request activity diagram in Rational Unified Process
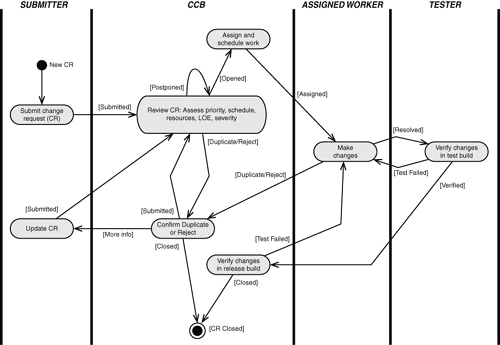
The area between the bars represents the responsibilities of a specific role, in other words, the actions that should be performed by the person having that role. In this diagram the actions are represented by ovals and the states by arrows.
3.1.2. OpenUP Method
OpenUP is a Lean Unified Process that applies iterative and incremental approaches within a structured lifecycle. OpenUP embraces a pragmatic Agile philosophy that focuses on the collaborative nature of software development. It is a tools-agnostic, low-ceremony process that can be extended to address a broad variety of project types.
For more information on OpenUP change management practices and workflows visit the Eclipse site and the Wiki site:
“OpenUP,” http://epf.eclipse.org/wikis/openup/, November 30, 2010 (accessed February 24, 2011).
“OpenUP—Home,” http://process.osellus.com/sites/wiki/OpenUP/Wiki%20Pages/Home.aspx, January 7, 2008 (accessed February 24, 2011).
Now that we understand what a workflow is, and what the basic elements are, let’s see how we can represent the process we need and how to realize it in ClearQuest and Rational Team Concert.
3.2. Process Representation
There are many techniques for representing a process; each one has advantages that manifest in emphasizing one or more aspects of the flow. For example, the state diagram emphasizes the states; the activity diagram emphasizes the activities and the flow logic. We shall later discuss a few of these methods.
Figure 3.2 represents a simple flow.
Figure 3.2. State transition diagram
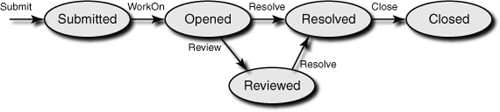
In Figure 3.2 the ovals represent the states; the arrows represent actions that transition the work item from one state to another. Some of the workflow rules are defined in this diagram; other rules are defined textually, and we shall discuss them later. In the diagram note the following:
• Entering state Submitted can be done by the action Submit only (only one arrow enters that state).
• The state Closed is a dead end; you cannot transition to any other state from that state (no arrow exits from that state).
• There are only two alternative paths in this diagram.
In ClearQuest we define the flow in a state transition diagram in a very simple way in a textual matrix and not in a graphical tool, and therefore it is less informative.
We suggest that during the design phase you draw a diagram that will enable all involved stakeholders to quickly understand the workflow, in order to discuss and agree upon it. The diagram is part of the design model and the system documentation and will later be useful during user training.
A graphical representation such as the one in Figure 3.2 usually does not include all the rules; they are elaborated in an accompanying document.
Here are some basic recommended rules for the workflow definition:
• Every state should be given a unique name. The name is in passive tense, such as Submitted, Resolved, or Closed. The name of the state is written inside the oval, as shown in the diagram.
• Every action should be given a unique name. The names are in active tense, such as Submit, Resolve, or Close. The name of the action is written above the arrow, as shown in the diagram. If the arrow is not horizontal, write the action name on the side of the arrow that would be the top if the arrow were horizontal.
• Permission to perform an action is usually not granted to everyone but is limited to one or more roles. In some cases role definition is not enough, as the organization may define complex logic to allow access to actions.
• The role(s) that are allowed to perform an action are written below the arrow (or on the side of the arrow that would be the bottom if the arrow were horizontal).
We shall discuss roles in the next chapter; for now, to complete the picture assume that a role can be represented by the user’s group or by a name.
• We suggest enclosing the role name in square brackets, such as [Tester], [Developer], or [Leader]. There are two reasons for the brackets: to make the graphical syntax clear, and because with a complex flow the actions will be drawn vertically, and people may confuse the action name and the role.
• If nothing is written under the arrow, all users are allowed to perform the action.
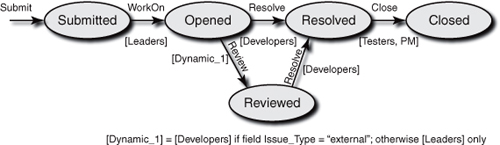
• As previously mentioned, there are situations where the access control (permission to perform an action) logic is complex and just adding the roles is not enough. In these cases enter under the arrow [Dynamic_1], [Dynamic_2], etc.
• [Dynamic_1] is defined textually; for example, Action Integrate is always allowed to role [Tester] and is allowed to role [Developer] if the value of the field TestType is UnitTest. It is clear that such logic requires translation to an appropriate algorithm. In ClearQuest it is done by scripting the Access_Control hook (of the action or base action).
Figure 3.3 demonstrates a workflow diagram that uses these recommendations.
Figure 3.3. Modified state transition diagram
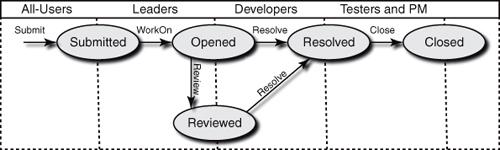
Another method of drawing a flow that emphasizes the roles is shown in Figure 3.4. Two vertical dotted lines mark the role name, the states are located on the lines, but the actions are between the lines and cannot cross them. In this diagram it is very clear which actions are performed by each role. The disadvantage is that the sequence of actions from Submitted to Closed (the happy path) does not always flow from left to right as in the previous diagram; this can be seen in the activity diagram of Figure 3.1. Also, in some cases the roles are not predefined; we marked such a role [Dynamic] in Figure 3.3. See an example in the next chapter.
Figure 3.4. State diagram—roles presentation
In many cases the change process involves several organizational units and several tools. This makes the process presentation more complex and harder to understand. Figure 3.5 is an example of such a process diagram. The process was designed with IBM WebSphere Business Modeler (WBM).
Figure 3.5. Complex change management process diagram
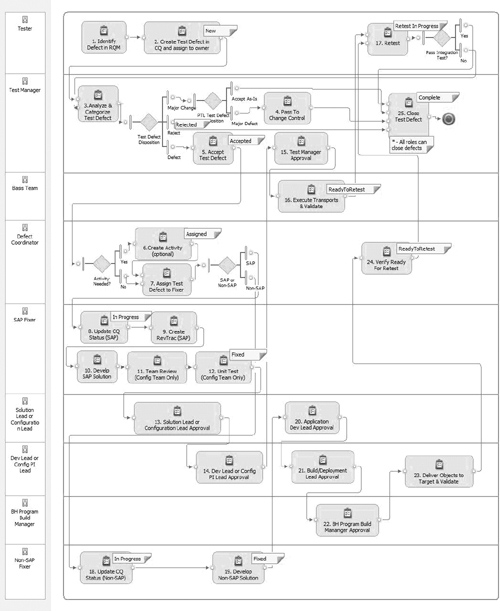
Notice how easy it is to see the activities of each role, to identify the decision points and which role makes the decision. The states in ClearQuest are flagged on the relevant activities. The process involves two additional tools that are integrated into ClearQuest: Rational Quality Manager and RevTrac.
3.2.1. Creating the State Transition Matrix
After you have agreed with the stakeholders on the workflow of each work item, you have to convert the graphical diagram to a state transition matrix. This is done in a similar way in ClearQuest and in Rational Team Concert:
1. Create a state in the States section for each state (oval) in the diagram.
2. Create an action in the Actions section for each action (arrow) in the diagram.
3. For each action define the source(s) state(s) and the target state.
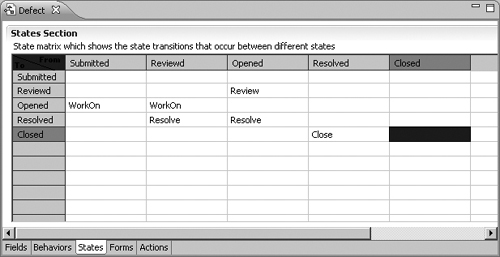
Figure 3.6 is a realization in ClearQuest of a state transition diagram of the workflow described in Figures 3.2 and 3.3.
Figure 3.6. Definition of the state transition diagram in ClearQuest Designer
To verify that the state transition matrix is identical to the graphical chart, do the following:
1. For each state count the number of arrows pointing to that state in the graphic model. Now count the number of actions in the raw (to state) of that state in the state transition matrix. The numbers should be identical.
2. For each state count the number of arrows pointing away from that state in the graphic model. Now count the number of actions in the column (from state) of that state in the state transition matrix. The numbers should be identical.
We have described some techniques for how to graphically model a workflow. We now proceed with a detailed description of the states that are basic elements of the workflow.
3.3. The States
The states in a workflow can be classified by type and divided into lifecycle stages. We shall discuss here the stages in the workflow and the state types.
3.3.1. Basic Stages in Workflow
When designing the workflow model, you should consider defining states of the following stages of the work item lifecycle:
• Submission
The submitter, or the person who requires the change, fills out the submission form. The submitter is obliged to fill in, at a minimum, all the mandatory fields, and to provide the required information for the roles performing the next actions, especially to the solution provider. It is important to identify and store the submitter contact information, by the login name for an internal user and by full name and company name for an external user. Submitter details are required for two reasons: to be able to contact the person for clarification of the request and for notification of the resolution status. The submit date is also an important piece of information to store. In cases where the submitter is not the reporter (for example, a customer requested the change indirectly by phone or e-mail), we need in addition to store the reporter name, his or her company name, and the report date. We shall discuss in detail in Chapter 4, “The Data,” the recommended fields to include at this stage. Also note that ClearQuest allows the definition of a special form for this stage called the Submit Form. Submission is performed by an action of type Submit. Every record type must have an action of this type and therefore it is created by default.
• Analysis
The information is analyzed by a subject matter expert. The analyst checks that the defect is actually a defect and can be reproduced. What is the cost of the fix/change in time and labor? Which component should be changed, and what other components are affected? Are there any external effects? What is the cost of not making the change? The analyzer should try to quantify as much as possible all of these questions as well as others that may be more relevant to the environment in which the organization operates. Organizations that use classification methods, such as the Beizer defect classification, will classify the defect in this stage.
• Decision
The data provided by the analyst will be considered by the decision maker, usually the Software Change Control Board (SCCB, also called CCB). The board will have to decide whether to make a change and when, that is, in what product version the change will be included (a target date may also be supplied). The board should also decide who the solution provider is, or at least select the person who will select the solution provider. The board can decide to postpone the decision without selecting the target version (in this case the change will be discussed again in a later stage, usually when deciding on the content of the next release). The board may also decide to reject the change, usually because of high risk or high cost versus small value to the project. Another common reject reason is “Work as designed”—the submitter assumed the application would work in one way but it was designed to work in a different way. Other reject reasons are “Out of scope,” “Test error,” and “Not reproducible.”
• Resolution
After the decision is made to make the change and the solution provider has been assigned, the resolution stage starts. Software engineers will make the necessary changes in the code; technical writers will change the documentation; and so on. The solution providers will work with version control tools like ClearCase, and therefore the integration between the change management tool and the version control tool is manifested mainly at this stage. We shall discuss this matter in Chapter 6, “Integrations.” In many cases the work item is split into several tasks, either because the change requires expertise in several domains, or to accelerate the project by parallel development.
• Testing
After the resolution is completed and a new version is built (this version usually includes several changes from several solution providers), the test team will verify that the changes and fixes operate as required. It is well known that the preferred way is to perform full regression tests. If the testers find out that the change is not satisfactory, they will transition the work item back to the Analysis state.
• Closure
After test results are analyzed, and if tests pass with no errors, the tester or the test manager will approve that the change was done, has been tested, and is ready to be released. In some workflows the submitter is the one who closes the change and approves that the result meets the requirements.
These are the very basic stages; each stage will be represented by one or more states. In some special cases two stages may be joined into a single state.
The stages may vary depending upon the nature of the work item. Some examples: A defect with low cost and no affected components may go directly to the resolution state with no need for the CCB to take action. A new feature with high cost may require more analysis and more approval stages. In some organizations every defect goes through code review and every feature through both design review and code review. Some organizations require that unit testing be an additional stage, and others include it in the resolution state.
Here are some additional stages that the organization can include in the workflow:
• Reopening
After the closure, a decision may be made to reopen the change for one of the following reasons: a mistake was made in the closure decision; changes were made in the environment or in the requirements. Reopening does not necessarily require a state of its own; the change can be returned to one of the initial states as required (Submitted, Opened, or another). As this operation is not common, we suggest enforcing an explanation for the reopening. In our opinion it is not correct to reopen a closed change. If such a need arises, you can just open a new change and reference the closed change. This is correct from the process point of view and from the organizational metrics point of view.
• Deferring or postponing
The CCB sometimes decides that a change is important but has a lower priority and therefore will not be implemented in the current release. There are various reasons to postpone a change, but they are usually high cost, high risk, or long implementation time versus lower priority due to no significant commercial gain. It is recommended when putting a change in the Deferred state to specify the delay time or the release in which the change is to be implemented. In this way it will be easier to identify the changes to be reconsidered when the CCB meets to discuss the content of a new release.
• Deleting or rejecting
The CCB decides that the requested change has no importance to the organization and it will not be implemented now or in the future. Other examples are incorrect reports, such as defects that have been found to function correctly. The rejection reason should be documented by rejection type (“Not a bug,” “Work as designed,” “High risk,” etc.) and by free description.
Deleted is a state; it does not mean that the work item is physically deleted from the database.
• Duplicating
This is a special state type that indicates that the change (or similar change request) was already recorded in the system. When a change request is in state Duplicated, it means that there is another record that describes the same issue, and that record is referenced from the duplicated record. It also means that a record in this state should not be worked on, as the work is done on the original (and referenced) record. A record having the state Duplicated is actually of type Completed. The reference between the changes allows us to perform operations such as notification to the submitter that a fix for the change exists when the parent record (the referenced one) was fixed.
Duplicates can be used by the organization to understand the impact of an issue based on the number of submissions. If you get a lot, then this issue affects a lot of people. Typically, the issue is duplicated and the submitter is added to a subscription or notification list.
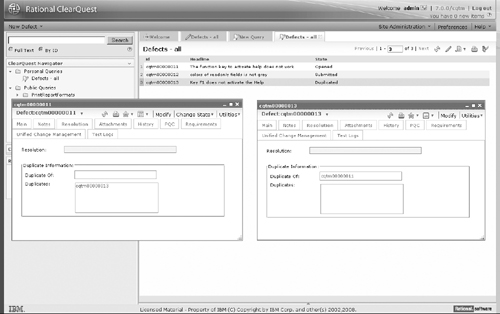
In Figure 3.7 you can see two records. Record 013 is a duplicate of record 011; they are links and can be accessed by just double-clicking. The state of record 013 is Duplicated and the state of record 011 is Opened.
Figure 3.7. Records duplication example in ClearQuest
3.3.2. State Types
The state names are proprietary and in many cases not in English. Some ClearQuest packages require you to define the type of each state. The definition is done using ClearQuest Designer by selecting the properties of each state.
Currently the following ClearQuest packages make use of state types:
• Unified Change Management (UCM) by the supporting package AMStateTypes
This package is used for the integration of ClearQuest with ClearCase/UCM.
• Resolution
This package adds support for tracking how a work item was resolved.
Knowing the state type enables you to automate several operations, for example, change field requiredness when entering a state of a specific type.
3.3.2.1. UCM State Types
When working with ClearCase Unified Change Management (UCM) methodology integrated into ClearQuest, there are some rules that the methodology enforces on your workflow. UCM defines four types of states: Waiting, Ready, Active, and Complete.
We shall briefly explain the types as they are well explained in both ClearCase and ClearQuest administration manuals. The state types are defined from the developer, or the solution provider, point of view.
• [W] Waiting
The change was submitted and registered in the database, but no solution provider was selected. This is the early stage in the process. Either no decision was made by the CCB, or a decision was made but the team leader has not assigned the solution provider to resolve the change. Examples of states of type Waiting are Submitted, Analyzed, and Postponed.
• [R] Ready
The change was assigned to a solution provider but the work has not started. Assignment means that the field Owner contains the login name of the developer.
• [A] Active
The solution provider is working on the change. It means that files have been checked out, modified, and associated with this change.
• [C] Complete
The developer finished the work. It means that the change was committed to the integration stream.
Each and every state in the flow must be mapped to one of these types.
Figure 3.8 shows the state transition matrix and the state Properties view. You can see in the State Types view that the state Opened is of type Active for the package AMStateTypes, 1.0; as mentioned before, this package is the supporting package for the Unified Change Management package.
3.3.2.2. Resolution State Types
The Resolution package requires you to define the type of each state. Two types are allowed:
• Resolved means that the solution provider has finished working on the work item. It does not necessarily mean that the work item is closed.
• Not_Resolved means that the solution provider has not finished working on the work item, or has not started the work.
Figure 3.9 shows the state transition matrix and the state Properties view. You can see in the State Types view that the state Opened is of type Not_Resolved for the package Resolution, 1.1.
Figure 3.8. State type definition for the UCM package
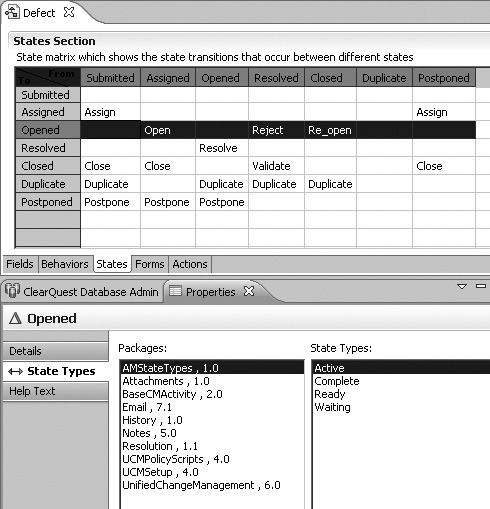
Figure 3.9. State type definition for the package Resolution
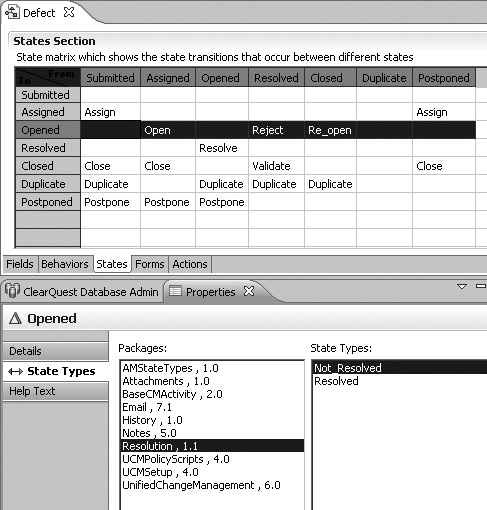
Note that the state Opened has two types, Not_Resolved for the package Resolution and Active for the package AMStateTypes. This is perfectly correct and does not create any conflict as the types are related to different packages.
3.4. Dynamic Workflow
In ClearQuest the state transition matrix defines the core workflow of a work item, or in ClearQuest terms a stateful record type. Transition is done by actions performed by user selection. It means that the workflow is static. In many cases it is necessary to have a dynamic state machine, so the flow will vary depending on different conditions.
We shall demonstrate a technique that will enable a user (having the appropriate role) to change the default workflow for each and every record.
3.4.1. Background
In ClearQuest you can create work items of several types which are called record types. Usually they are Issue, Defect, Enhancement, Feature, Activity, Test Case, Build, and many others. A company may want to have only one record type to deal with change requests (there are many good reasons), but the static state transition matrix limits the implementation. Let’s look at some simple examples:
• For new features and enhancements you would probably want the CCB to decide whether to implement them or not; for a bug you do not need the board to make this decision, and the flow can be shorter and faster.
• In small projects testers are familiar with the development teams; they know the developer who owns the defective component that they have just tested. So there is no need to go through some states to assign the bug to the developer; the tester can select the assignee during the Submit action.
• For features that pose a high risk to the project the project manager may want to have extra actions such as DesignReview and CodeReview. For simple features these actions may be omitted.
Each extra action is, in the best case, a waste of time for the user performing the action.
A more severe consequence is when the change delivery is delayed for a long time, or even forgotten. In the worst case someone makes a mistake and moves the issue to the wrong state, causing unnecessary delays to several users and inefficient work of the team.
In the following paragraphs we shall explain the programming technique to implement dynamic workflow, to be followed by three examples, each one with a higher complexity level.
3.4.2. The Technique
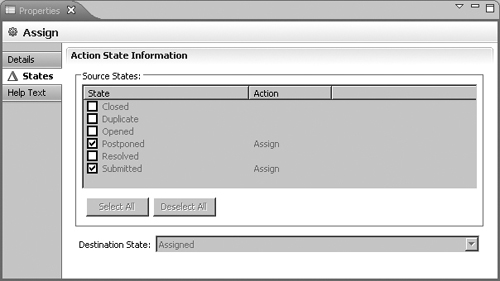
In ClearQuest performing an action of type Change_State always moves the record to a specific single state. In Figure 3.10 you can see the action Assign in the Properties view; there are two source states (multiple choice) but there is a single destination state (choice list).
Figure 3.10. State transition in Action Properties dialog
We will use a hook to move the record to another state defined in the state transition matrix.
To change the record state with the ClearQuest API one must use the session method EditEntity(); a correct BASIC example is
session.EditEntity EntityObj , "Assign"
Beginners sometimes try to change the state using
SetFieldValue("State", "NewState")
This call is forbidden and will not work. Another common mistake is trying to call another action in a validation or commit hook; this will result in a failure. Calling EditEntity() from a notification hook will not change its state. When the notification hook is fired, the record is already committed to the database and no changes to the record are possible in this context. So it seems as if there is no way to move the record to another state other than the current action destination state.
However, the fact that the notification hook is executed after the commit and the fact that it is possible to reload the record (as if it were open in a new session) enable us to perform the required action on that record.
The method of dynamic (or adaptive) workflow is based on this idea.
Warning
Using LoadEntity() is better than using a new session as it does not require a new login and does not expose the user password in the code.
3.4.3. Automatically Move to Another State
You are probably familiar with all the predefined schemas in ClearQuest. In all of them the initial state is Submitted and no owner is assigned. The default action in this state is Assign, which moves the record to the Assigned state and requires you to fill in the fields Owner and Priority.
As explained in section 3.4.1, “Background,” in many cases the submitter can fill in the fields Owner and Priority, after which we would like to move the record to the state Assigned automatically.
The way to do it is by performing the action Assign in the notification hook after the record is committed to the database. This can be done in two ways:
• New session
In the notification hook, create a new session, log in by providing a username and password, edit the entity, and perform the required action.
• Reloading the record
This method is preferred over the new session method, as it is faster, shorter, and does not reveal the password in the code.
Listing 3.1 is an example of a notification hook code, placed in the action Submit, that automates the state change.
Listing 3.1. Auto-change State
Sub Defect_Notification(actionname, actiontype)
' Purpose: Change defect state to "Assign" if owner & priority were
' set on submit
' Created by SB on 11 Dec 2003
' Date modified: 23 Sep 2007
Dim session, EntityObj
' check if both owner and priority have values
if ( "" <> GetFieldValue("Owner").GetValue AND _
"" <> GetFieldValue("Priority").GetValue ) then
ThisID = GetDisplayName
' Get, Edit and Validate the record
Set session = GetSession()
Set EntityObj = session.LoadEntity ("defect", ThisID)
session.EditEntity EntityObj , "Assign"
status = EntityObj.Validate
if (status <> "") then
session.outputdebugstring "SB>>>: Fail validating " & _
"in action assign: " & status & vbCrLf
EntityObj.Revert
else
session.outputdebugstring "SB>>>: Success validating " & _
"in action assign: " & status & vbCrLf
EntityObj.Commit
end if ' pass validation
end if ' auto assign
End Sub
3.4.4. One Record Type Having Several State Machines for Each Issue Type
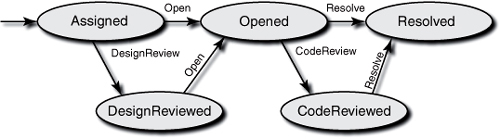
Now let’s take a step forward and see a more complicated scenario. The ClearQuest schema has one record type called Issue, which deals with defects, enhancements, and features. We want to include more states when the type of the issue is Enhancement or Feature. For the sake of the example, let’s assume that it must go through the additional states DesignReviewed and CodeReviewed. The states and actions are represented in the workflow diagram in Figure 3.11.
Figure 3.11. Partial state diagram
How do we change the workflow to force the transitions to the above-mentioned states?
Let’s consider the portion of the state machine described in Figure 3.11. From the state Opened it is possible to move to the Resolved state using the action Resolve, or to the Code-Reviewed state with the action CodeReview. Some organizations may leave the decision to the developers, trusting their judgment or their familiarity with the company methodology. But in several situations the transition decision can be automated; the automation gives the organization better control of the process.
As mentioned earlier, if the issue is a defect, code review is not necessary, but for a new feature code review is obligatory. Other rules can be used, such as complexity value, number of lines of code changed, or function points.
When the developer has finished coding and testing, the issue needs to move to the next state. To do this, a special action we called Next is used.
The Next action has been added to the Issue record type; its type is Modify.
The notification hook of this action will determine the required final state using the required action of type Change-State which will be activated on the reloaded entity.
Listing 3.2 is a code example to perform the required state change. Notice the Case "Opened" section for the selection of the next action as previously explained.
Listing 3.2. Dynamic Change State
Sub Issue_Notification(actionname, actiontype)
' - Purpose: Change issue state to the required state
' - Created by SB on 01 Dec 2003
' - Date modified:
Dim session, EntityObj
' - check the current state
Cur_state = GetFieldValue("State").GetValue
Issue_Type = GetFieldValue("Issue_Type").GetValue
ThisID = GetDisplayName
' - Get session and reload the entity
Set session = GetSession()
Set EntityObj = session.LoadEntity ("defect", ThisID)
' - find the required action
Select Case Cur_state
Case "Submitted"
NextAction = "Analyze"
Case "Analyzed"
NextAction = "Assign"
Case "Assigned"
If ( Issue_Type = "Defect" ) then
NextAction = "Open"
Else
NextAction = "DesignReview"
End if
Case "DesignReviewed"
NextAction = "Open"
Case "Opened"
If ( Issue_Type = "Defect" ) then
NextAction = "Resolve"
Else
NextAction = "CodeReview"
End if
Case "CodeReviewed"
NextAction = "Resolve"
Case "Resolved"
NextAction = "Verify"
Case "Tested"
NextAction = "Close"
Case "Closed"
End Select
' - Edit the record using the selected action
session.EditEntity EntityObj , NextAction
status = EntityObj.Validate
if (status <> "") then
session.outputdebugstring "SB>>>: Fail validating action " & _
NextAction & ", the error is: " & status & vbCrLf
EntityObj.Revert
else
session.outputdebugstring "SB>>>: Success validating action" & _
NextAction & ", the error is: " & status & vbCrLf
EntityObj.Commit
end if
End Sub
3.4.5. A State Machine for Each Issue
Now let’s look at a more complicated scenario. The flow rules will be set manually by the CCB (or other authority). Consider a new feature arriving to the CCB. The CCB may reject, postpone, or accept the feature. If it is accepted, the CCB may require that the feature pass through some additional states, based on the risk it poses to the project (there may be other reasons to set different workflows, for example, the stage of the project).
The solution we propose is as follows:
In the schema we include fields to define whether a state is mandatory. For example, if the field Req_CodeReview has the value Yes, the state CodeReviewed is mandatory.
A person with a hub role (or other authority) will fill in these additional fields. The screen shot in Figure 3.12 is an example of how to select the required states in a tab form called Navigation Flow.
Figure 3.12. Setting the workflow navigation path

As in the previous example, we define an action of type Modify (let’s call it Next_Action or just Next). The notification hook of this action will reload the entity and will perform the required action that will change the state according to the rules previously set on the form.
The code for this hook is provided in Listing 3.3.
Sub Issue_Notification(actionname, actiontype)
' - Purpose: Change issue state to the required state
' - Created by: SB on 12 Dec 2003
' - Date modified: 22 Sep 2007
Dim session, EntityObj
' - check the current state and the type of the issue
Cur_state = GetFieldValue("State").GetValue
Issue_Type = GetFieldValue("Issue_Type").GetValue
ThisID = GetDisplayName
' - Get session and reload the entity
Set session = GetSession()
Set EntityObj = session.LoadEntity ("defect", ThisID)
' - find the required action
Select Case Cur_state
Case "Submitted"
If (GetFieldValue("Req_CCB").GetValue = "Yes" ) then
NextAction = "toCCB"
Else
NextAction = "Analyze"
End if
Case "Analyzed"
NextAction = "Assign"
Case "Assigned"
If (GetFieldValue("Req_DesignReview").GetValue = "Yes" ) then
NextAction = "DesignReview"
Else
NextAction = "Open"
End if
Case "DesignReviewed"
NextAction = "Open"
Case "Opened"
If (GetFieldValue("Req_CodeReview").GetValue = "Yes" ) then
NextAction = "CodeReview"
Else
NextAction = "Resolve"
End if
Case "CodeReviewed"
NextAction = "Resolve"
Case "Resolved"
NextAction = "Verify"
Case "Tested"
NextAction = "Close"
Case "Closed"
End Select
' - Edit the record using the action previously selected
session.EditEntity EntityObj , NextAction
status = EntityObj.Validate
if (status <> "") then
session.outputdebugstring ">>>: Fail in validating action " & _
NextAction & ", the error is: " & status & vbCrLf
EntityObj.Revert
Else
session.outputdebugstring ">>>: Success in validating action " _
& NextAction & vbCrLf
EntityObj.Commit
end if
End Sub
But something is missing in this method; the fields’ requiredness defined in the behaviors table will not have any visual effect. The action the user selected is of type Modify, and it is not clear during the record editing what the final state is. Field behavior is defined by the final state of the action the user selected. Therefore it is necessary to set the requiredness of the fields before the record is edited, meaning in the initialization hook of the action Next.
Listing 3.4 is an example of how to do this.
Listing 3.4. Dynamic Workflow with Requiredness
Sub Issue_Initialization(actionname, actiontype)
' - Purpose: Change fields Requiredness based on final state
' - Created by: SB on 18 Dec 2003
' - Date modified: 23 Sep 2007
Dim newses , EntityObj
' check the current state
Cur_state = GetFieldValue("State").GetValue
IType = GetFieldValue("Issue_Type").GetValue
ThisID = GetDisplayName
ReqCCB = GetFieldValue("Req_CCB").GetValue
' find the required action
Select Case Cur_state
Case "Submitted"
If (ReqCCB = "Yes" OR IType = "Feature" ) then
Else
SetFieldRequirednessForCurrentAction "Owner", AD_MANDATORY
SetFieldRequirednessForCurrentAction "Priority", AD_MANDATORY
End if
Case "CCB"
SetFieldRequirednessForCurrentAction "Owner", AD_MANDATORY
SetFieldRequirednessForCurrentAction "Priority", AD_MANDATORY
Case "Opened"
SetFieldRequirednessForCurrentAction "Resolution", AD_MANDATORY
Case "CodeReviewed"
SetFieldRequirednessForCurrentAction "Resolution", AD_MANDATORY
End Select
End Sub
In this example the field requiredness values are hard-coded in the hook; this is easier to code but not the best from a maintenance point of view. We shall discuss this issue in section 8.8.9, “Using Hard-Coded Data,” in Chapter 8, “Development.”
3.5. ClearQuest ALM Schema Workflow
The ClearQuest ALM schema takes a different approach to workflow. The workflow is built from several work item types, and the flow advances by creating new work items. The work item types that build the flow are
• ALMRequest
• ALMTask
• ALMActivity
The diagram in Figure 3.13 shows these work item types within the basic steps of the ALM workflow.
Figure 3.13. The ClearQuest ALM workflow and work items in the ALM process
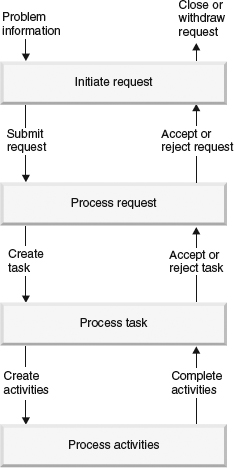
An example will clarify the process.
An ALM work process begins with a request:
1. A user submits an ALMRequest. The change request could describe an enhancement request, a release requirement, or a defect. The submitter must select the ALMType, the ALMProject, the ALMCategory, as well as additional fields that define the request.
2. A triage team or change control manager reviews the ALMRequest and accepts or rejects it. If they accept it, they create an ALMTask, which is a high-level description of the work to be done to implement the ALMRequest. The request record includes a link to the ALMTask record, and the ALMTask is autolinked to the ALMProject. More than one ALMTask can be linked to the ALMRequest according to the defined ALM configuration.
3. A lead developer or other team lead reviews each ALMTask and then activates it. Activating the ALMTask creates ALMActivities to complete the ALMTask. The team lead assigns these ALMActivities to team members. Examples of ALMActivities are development activities, test activities, and documentation (doc) activities. The ALMTask record includes links to the ALMActivities records, and the ALMActivities records have links to the ALMTask.
4. Developer, test, and doc leads assign their activities to team members who update the activity records to reflect the status of their work. When they finish their work, they deliver their changes and mark their activities as Complete.
5. A release engineer integrates and builds the delivered changes and creates baselines.
6. A tester tests changes in the baselines. The test lead marks a test task as Complete after the test activities are worked on and completed.
7. The user who submitted the ALMRequest reviews the ALMTask and its ALMActivities and, if satisfied, marks the ALMRequest as Complete.
Each of the stateful ALM record types (Request, Task, and Activity) has a standard state transition workflow that completes the ALM workflow.
This new package version includes some enhancements with regard to process automation, for example, complete successors when specific resolution code values are selected, open successors when all predecessors have reached a specific state, and many others for request, task, and activity. See the release notes for full details.
3.6. Jazz Workflow
In the Jazz-based products the definition of the workflow is performed in a very similar way to ClearQuest as described in this chapter, but there is a difference. The Jazz workflow is not an integral part of the work item process as in ClearQuest. Figure 3.14 shows the workflow definition in Jazz. The workflow name is Authoring Workflow. The Jazz workflow includes the following sections:
• States
A state is defined by a name. Additional optional properties of state are Description, Group, and Show Resolution. The Group value classifies the state in three groups: Open, Closed, and In_Process. (This is similar to state types in ClearQuest.) The Show Resolution check box defines whether the resolution options will be shown in this state.
Figure 3.14. Workflow definition in a Jazz work item
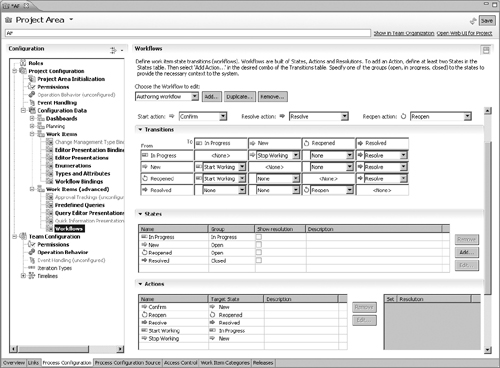
• Actions
The actions are defined in the state transition matrix, and the Actions section is a read-only section. An action is defined by name and target state. Optional properties are description and icon. Note that actions are of type Change State only and there are no other types.
• Transitions
This is the state transition matrix that defines which transitions are allowed and what actions will perform the transition.
• Resolutions
A resolution is defined by name and brief description for the manner in which a work item can be resolved. The list of optional resolutions will be displayed when the state “Show resolution” check box is marked.
Icons can be assigned to actions and states to ease the operation and improve the user experience.
In addition, special action types can be defined; these are Start action, Resolve action, and Reopen action.
The defined workflow should be bound to one or more work item types. This is done in the Workflow Binding section of the work item. Figure 3.15 shows an example of workflow binding: the Authoring Workflow is bound to the Task-Quality work item type category.
Figure 3.15. Binding workflow to type category in a Jazz work item

3.7. Subflow
Subflow is a deviation in the main workflow of a work item. The subflow may occur because of unplanned activity or a predicted yet rare situation that is not included in the main flow. This simplifies the main flow and eases the users’ training and the deployment phase.
Subflow can be dealt with in many cases with child work items. For example, if during the process of change the owner identifies a need to deal with another element or an additional unpredictable task is required, he or she can create a child work item for that.
If the users can create child work items that are of a different type from the parent, it increases the flexibility of dealing with subflows. The ClearQuest ALM schema is built to deal with subflow as the workflow is based on a hierarchy of work items.
There are additional techniques to deal with subflow depending on the nature of the subflow. In the next paragraphs we explain in detail some options to deal with a subflow called More Information or Question and Answer and with build approval flow.
3.7.1. More Information
There are cases when the work item owner needs more information to continue the work. For example, the solution provider may need advice from a coworker who has more experience, or more information is required from the work item submitter, or the owner wants to ask a question and document both the question and the answer. This is a deviation from the main flow and needs to be tracked. There are several solutions to the “more info” tracking requirement.
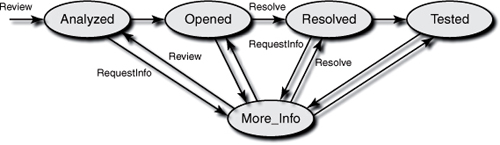
3.7.1.1. New State
You can create a new state called More_Info. An action of type Change_State will transition from all states to this state. To return the information you need a special action to transition from the More_Info state to the original state transitioned from. Because a unique action is required to transition to a state, the designer needs to create a new action or use another action that is used in the flow. Look at the portion of the workflow in Figure 3.16. The action RequestInfo is used by the information requestor in all states. The information provider will have to use a different action to transition back to the previous state. This is a potential situation for errors, as we cannot expect the person to investigate the previous state. We need a better solution.
Figure 3.16. Sample sub-workflow for the More Information flow
A better solution is to have a single action of type Modify that will transition to the correct state in the background. In this solution, when the information requestor selects the action RequestInfo, an action initialization hook stores the name of the current state and the name of the requestor. When the information provider selects the action ProvideInfo, a notification hook reads the requestor name and the required state and performs the transition. The hook examples in sections 3.4.4, “One Record Type Having Several State Machines for Each Issue Type,” and 3.4.5, “A State Machine for Each Issue,” are good examples of how to change the state after a Modify action.
You can use the Log_Entry field to document the information request and the information provided, or you can create additional fields for them.
3.7.1.2. Reassign
Another solution that does not involve a new state is to reassign the work item to the person whose information is required. The requestor will perform an action called RequestInfo of type Modify and will have to fill in at least two fields: Owner and Question. When providing the information, the new owner will have to perform the action ProvideInfo, also of type Modify, and fill in the field Owner (with the name of the previous owner who requested the information) and the field Answer.
You can use the Log_Entry field to document the information request and the information provided, or you can create additional fields for them.
This solution does not involve complex workflow changes, and in that regard it is better than the new state solution, but it has some disadvantages. Reassigning is not correct from a governance point of view. The new assignee is not really the owner of the work item, which may mislead managers who make status queries. The information provider is required to reassign the work item to the previous owner, and this is a potential source of errors. We recommend that this operation be automated.
This solution can be improved by adding a substate field or a check box that indicates that the work item is delayed because of the More Information subprocess.
3.7.1.3. Dedicated Actions
In this solution the designer creates two new actions of type Modify: Question and Answer. New fields are also required:
• One field is needed to identify the person to whom the question is addressed.
• The second field is a flag that indicates that a question was asked but was not answered yet. We often call this flag the substatus of the subflow.
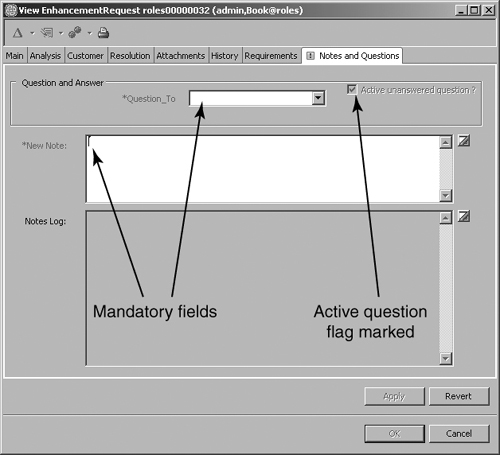
Figure 3.17 shows an enhancement request record after the action Question. Note the mandatory fields the information requestor needs to fill in. Also note that the “Active unanswered question” check box is marked.
The Question action initialization hook is simple and is demonstrated in Listing 3.5. The Question_To (field of type Reference to users) is cleared and made mandatory, the field flag ActiveQuestion is turned on, and the Note_Entry is made mandatory.
Figure 3.17. More Information subflow: the user interface after the user has selected the action Question
Listing 3.5. Question Initialization Hook
sub EnhancementRequest_Initialization {
my($actionname, $actiontype) = @_;
# $actionname as string scalar
# $actiontype as long scalar
# action is Question
# record type name is EnhancementRequest
# Start User Code
$entity->SetFieldValue("ActiveQuestion" , "Y" );
$entity->SetFieldValue( "Question_To" , "" );
$entity->SetFieldRequirednessForCurrentAction("Note_Entry",
$CQPerlExt::CQ_MANDATORY);
$entity->SetFieldRequirednessForCurrentAction( "Question_To",
$CQPerlExt::CQ_MANDATORY);
# End User Code
}
Note that this solution uses the standard fields Note_Entry and Notes_Log to ask the questions and provide the answers. The ClearQuest screen shot in Figure 3.18 demonstrates the user interface after the action Answer.
Figure 3.18. More Information subflow: the user interface after the user has selected the action Answer
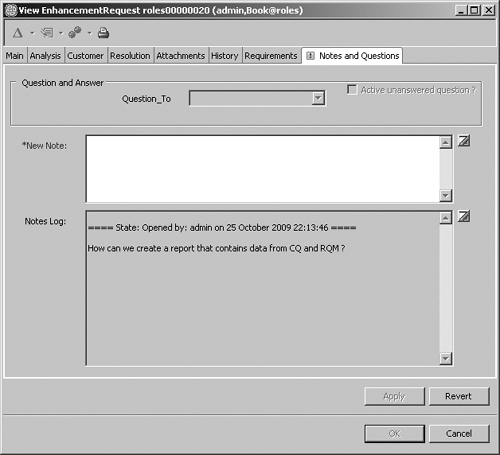
The Answer action initialization hook is simple and is demonstrated in Listing 3.6. The Question_To is cleared and turned to be read-only, the field flag ActiveQuestion is turned off, and the Note_Entry is made mandatory so the answer will be provided.
Listing 3.6. Answer Initialization Hook
sub EnhancementRequest_Initialization {
my($actionname, $actiontype) = @_;
# $actionname as string scalar
# $actiontype as long scalar
# action is Answer
# record type name is EnhancementRequest
# Start User Code
$entity->SetFieldValue("ActiveQuestion" , "N" );
$entity->SetFieldValue( "Question_To" , "" );
$entity->SetFieldRequirednessForCurrentAction("Note_Entry",
$CQPerlExt::CQ_MANDATORY);
# End User Code
}
As we have mentioned, this solution uses the standard Notes package; notes and comments appear in the Notes_Log fields with questions and answers. This is not wrong, but it requires more effort from users to find information. One simple solution is to use different fields for notes and for questions and answers. Another solution is to improve the log formatting so it will be easier to differentiate questions from notes. The package format for each entry header is
==== State: Opened by: admin on 26 October 2009 09:08:29 ====
The hook to the format of this header is a global subroutine that is called from the Note_Entry Value_Changed hook as follows:
SetLog($fieldname, "Notes_Log");
The SetLog subroutine can be modified as shown in Listing 3.7.
Listing 3.7. SetLog Subroutine
sub SetLog {
# noteEntryField As String
# notesLogField As String
my ($noteEntryField, $notesLogField) = @_;
my $session, $myName, $banner, $thisNote, $thisNoteInfo;
my $oldNotes, $newNotes, $crLf, $month, $now;
my $QA_head = "";
$oldNotes = $entity->GetFieldOriginalValue($notesLogField)->
GetValue();
$thisNoteInfo = $entity->GetFieldValue($noteEntryField);
# hash of months and their corresponding strings in English
%month_string = (
"1" => "January",
"2" => "February",
"3" => "March",
"4" => "April",
"5" => "May",
"6" => "June",
"7" => "July",
"8" => "August",
"9" => "September",
"10" => "October",
"11" => "November",
"12" => "December",
);
if ($thisNoteInfo->GetValueStatus() eq $CQPerlExt::CQ_HAS_VALUE) {
$thisNote = $thisNoteInfo->GetValue();
$session = $entity->GetSession();
$crLf = "x0dx0a";
my ($sec, $min, $hour, $mday, $mon, $year, $wday, $yday, $time)
= localtime();
$now = sprintf("%2.2d %s %4d %2.2d:%2.2d:%2.2d", $mday,
$month_string{$mon + 1} ,$year + 1900, $hour, $min, $sec);
$myName = $session->GetUserLoginName();
# Get action and alter banner for Question and Answer
my $CurrentAction = $entity->GetActionName();
$session->OutputDebugString(">>>Action is: $CurrentAction
");
if ($CurrentAction eq "Question" ) {
$QA_head = "?? " . $CurrentAction . " to " .
$entity->GetFieldStringValue("Question_To") . " ?? ";
}
if ($CurrentAction eq "Answer") {
$QA_head = "!! " . $CurrentAction . " !! ";
}
$banner = $crLf . $QA_head . "==== State: " .
$entity->GetFieldValue("State")->GetValue() .
" by: " . $myName . " on " . $now . " ====" . $crLf;
$newNotes = $banner . $crLf . $thisNote . $crLf . $oldNotes;
}
else {
$newNotes = $oldNotes;
}
$entity->SetFieldValue($notesLogField, $newNotes);
}
The SetLog() global subroutine is read-only by default, as it is owned by the Notes package. To modify the subroutine you will have to use the following command line (note that the code appears here on two lines but is actually a single line of code):
Packageutil enableediting –dbset mydbset admin adminPWD
–enable CQdesignerLogin
Modifying package hooks is not recommended; instead of modifying the subroutine SetLog(), you can create a new global subroutine, SetQALog(), that is called from the Note_Entry Value_Changed hook, as shown in Listing 3.8.
Listing 3.8. Note_Entry Value_Changed
sub note_entry_ValueChanged {
my($fieldname) = @_;
# $fieldname as string scalar
# record type name is EnhancementRequest
# field name is Note_Entry
# Start User Code
my $CurrentAction = $entity->GetActionName();
if ($CurrentAction eq "Question" || $CurrentAction eq "Answer" ) {
SetQALog($fieldname, "Notes_Log");
}
else {
SetLog($fieldname, "Notes_Log");
}
# End User Code
}
Figure 3.19 shows the Notes_Log field after this change is applied to the schema. Notice the different banner for Question, Answer, and other notes. You can take this approach further and customize the note banner for various actions or subflows in your workflow.
Figure 3.19. More Information subflow: the Notes Log with a distinct banner for each action

3.7.2. Build Approval
Another subflow example is when a project requires build approval from several roles: Development Manager, Deployment Leader, and Build Manager. Instead of adding three states to the flow that are not required by all projects and are not required in all work item types, we can do the following:
1. Add an action of type Modify: Build Approve.
2. Add a field of type String: Build Approval Status.
3. Add a hook to auto-assign the next role that needs to approve.
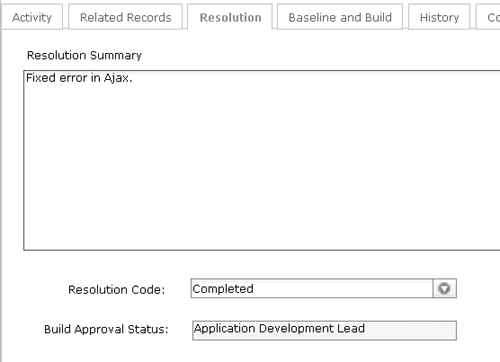
Figure 3.20 shows the new field in the Resolution tab. The field is a read-only field which is updated only by the action hook demonstrated later.
The next code examples are Perl global hooks that will be called from the Complete action validation hook to assign the first approver, and from the Build Approve validation hook to assign the next approver.
In section 8.1.3, “Employing Reusable Assets,” of Chapter 8, “Development,” you can find a discussion of when it is advisable to use global hooks.
Figure 3.20. Sample subflow for build approval process
The action hook code in Listing 3.9 calls the global script AssignApprover() to assign the approver.
Listing 3.9. Calling Global Script
sub ALMActivity_Validation {
my($actionname, $actiontype) = @_;
my $result;
# $actionname as string scalar
# $actiontype as long scalar
# $result as string scalar
# action is BuildApprove
# record type name is ALMActivity
# Start User Code
& AssignApprover();
# End User Code
return $result;
}
The global hook in Listing 3.10 is a code example to auto-assign an approver. Note that the approver is read from the ALMRole record.
Listing 3.10. Global Script to Assign Approver
sub AssignApprover()
{
# Purpose: Assign next approver
# The approver is the primary in the ALMRole record
# I/O : None
my $sapStatus = $entity->GetFieldValue("APP_Approval")->GetValue();
my $project = $entity->GetFieldValue("Project")->GetValue();
my $rolekey;
if( $sapStatus eq "Developer fixed") {
$rolekey = $project . " " . "Development Lead";
$entity->SetFieldValue("APP_Approval", "Development Lead" );
}
if($sapStatus eq "Development Lead") {
$rolekey = $project . " " . "Deployment Lead";
$entity->SetFieldValue("APP_Approval", "Deployment Lead" );
}
if($sapStatus eq "Deployment Lead") {
$rolekey = $project . " " . "Build Manager";
$entity->SetFieldValue("APP_Approval", "Build Manager" );
}
$session->OutputDebugString(">>>>>APPassign:: key: $rolekey
");
my $EntityObj = $session->GetEntity("ALMRole", $rolekey );
my $primary = $EntityObj->GetFieldValue("Primary")->GetValue();
$entity->SetFieldValue("Owner", $primary );
}
# End of Global Script Process
3.8. Summary
In this chapter we explained different methods for designing a workflow. We recommended using a simplified state chart to design a workflow for ClearQuest and for Jazz work items.
In section 3.3, “The States,” we explained the workflow stages and the states in each stage and suggested the various usage scenarios.
In section 3.4, “Dynamic Workflow,” we disproved the myth that says that the ClearQuest state machine is static. We explained how to make the state machine dynamic using some scripting. The flexibility of ClearQuest enables us to go beyond the basic functionality and allows organizations to create a (dynamic) workflow the way they need. We demonstrated how the flow can be automated in some cases; in other cases a general user action that we have called Next (the implicit meaning is that the user has finished the activity) will cause the work item to move to the required state, thus enforcing the workflow rules.
As a more complex example, we showed how to adapt a different workflow for each and every record, using user selection rules for states and flow path, set in the record itself.
The ideas presented can be developed and enhanced to meet other needs of various organizations or projects. This is the beauty of ClearQuest; most of the customization can be done using the GUI, and the complex requirements can be developed using scripting.
We explained the different approach that the ClearQuest ALM schema uses to define and manage workflow. The ALM schema defines three types of work items: ALMRequest, ALMTask, and ALMActivity. The work flows from a higher level to a lower level and is approved at the higher level.
In section 3.6, “Jazz Workflow,” we explained the Jazz workflow elements, how to define a workflow, and how to bind a workflow to a work item type.
In the last section of the chapter we explained what a subflow is, provided several examples of subflows, and demonstrated some solutions to common subflows.