
The Basic Principles of Camerawork
There are a number of basic visual conventions used by the majority of cameramen operating broadcast cameras. Many of these standard camera techniques were developed in the early part of the twentieth century when the first film makers had to experiment and invent the grammar of editing, shot-size and the variety of camera movements that are now standard. The guiding concept was the need to persuade the audience that they were watching continuous action in ‘real’ time. This required the mechanics of film-making to be hidden from the audience; that is to be invisible. Invisible technique places the emphasis on the content of the shot rather than production technique in order to achieve a seamless flow of images directing the viewer’s attention to the narrative. It aims for unobtrusive shot change without any visual distraction or discontinuity of image.
A Coherent Technique
The point of this brief history of visual storytelling is rather than simply committing to memory a list of do’s and don’ts about TV camerawork, it is better for you to understand why these visual conventions exist. There is a coherent technique behind most TV camerawork. The way a shot is framed up, the way a zoom is carried out, the amount of headroom given to a certain size of shot is not simply a matter of personal taste, although that often affects shot composition; it is also a product of ninety odd years of telling a story in pictures. The development of invisible technique created the majority of these visual conventions. Knowing why a camerawork convention exists is preferable to simply committing to memory a string of instructions. You can then apply the principles of invisible technique whenever you meet up with a new production requirement.
Basic Skills
This section of the manual identifies the following skills needed by a cameraman working on a multi-camera production in addition to a knowledge of production methods (see page 20, Programme production):
![]() Technology: an understanding of camera technology, lens characteristics and studio/OB arrangements.
Technology: an understanding of camera technology, lens characteristics and studio/OB arrangements.
![]() Basic skills: anticipation, preparation and concentration.
Basic skills: anticipation, preparation and concentration.
![]() Operational skills: basic camera and pedestal operational skills.
Operational skills: basic camera and pedestal operational skills.
![]() Picture making skills: positioning the camera and lens.
Picture making skills: positioning the camera and lens.
![]() Intercutting: matching shots and edit point…
Intercutting: matching shots and edit point…
![]() Composition: an understanding of shot composition.
Composition: an understanding of shot composition.
![]() Recording and transmission: rehearsal and transmission procedure.
Recording and transmission: rehearsal and transmission procedure.
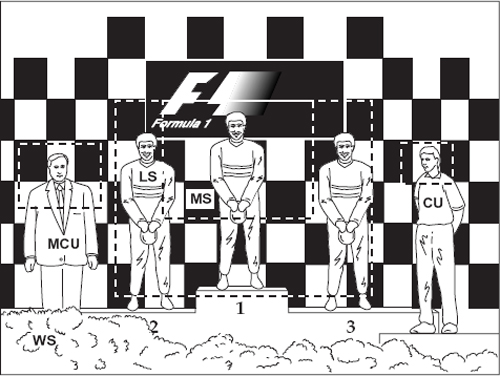
Because so much of television programming involves people talking, a number of standard shot sizes have evolved centred on the human body. In general, these shot sizes avoid cutting people at natural joints of the body such as neck, elbows, knees. Normal interview shots include:
![]() CU (close up) Bottom of frame cuts where the knot of tie would be.
CU (close up) Bottom of frame cuts where the knot of tie would be.
![]() MCU (medium close up) Bottom of the frame cuts where the top of a breast pocket of a jacket would be.
MCU (medium close up) Bottom of the frame cuts where the top of a breast pocket of a jacket would be.
![]() MS (medium shot) Bottom of frame cuts at the waist.
MS (medium shot) Bottom of frame cuts at the waist.
Other standard shot descriptions are:
![]() BCU (big close up) The whole face fills the screen. Top of frame cuts the forehead. Bottom of the frame cuts the edge of chin avoiding any part of the mouth going out of frame (rarely used in interviews).
BCU (big close up) The whole face fills the screen. Top of frame cuts the forehead. Bottom of the frame cuts the edge of chin avoiding any part of the mouth going out of frame (rarely used in interviews).
![]() LS (long shot) The long shot includes the whole figure.
LS (long shot) The long shot includes the whole figure.
![]() WS (wide shot) A wide shot includes the figure in a landscape or setting.
WS (wide shot) A wide shot includes the figure in a landscape or setting.
![]() O/S 2s (over-the-shoulder 2 shot) Looking over the shoulder of a foreground figure framing part of the head and shoulders to another participant.
O/S 2s (over-the-shoulder 2 shot) Looking over the shoulder of a foreground figure framing part of the head and shoulders to another participant.
![]() 2 shot, 3 shots, etc., identifies the number of people in frame composed in different configurations.
2 shot, 3 shots, etc., identifies the number of people in frame composed in different configurations.
Note: Precise framing conventions for these standard shot descriptions vary with directors and cameramen. One person’s MCU is another’s MS. Check that your understanding of the position of the bottom frame line on any of these shots shares the same size convention for each description as the director with whom you are working.
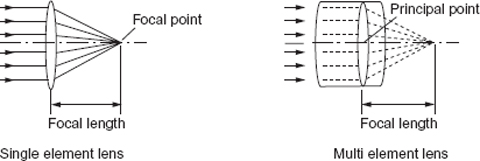
Focal Length
When parallel rays of light pass through a convex lens, they will converge to one point on the optical axis. This point is called the focal point of the lens. The focal length of the lens is indicated by the distance from the centre of the lens or the principal point of a compound lens (e.g. a zoom lens) to the focal point. The longer the focal length of a lens, the smaller its angle of view will be; and the shorter the focal length of a lens, the wider its angle of view.
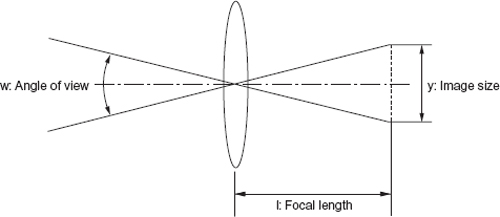
Angle of View
The approximate horizontal angle of view of a fixed focal length lens can be calculated by using its focal length and the size of the pick-up sensors of the camera.
Although there are prime lenses (fixed focal length) available, the majority of broadcast video cameras are fitted with a zoom lens which can alter its focal length and therefore the angle of view over a certain range. This is achieved by moving one part of the lens system (the variator) to change the size of the image and by automatically gearing another part of the lens system (the compensator) to simultaneously move and maintain focus. This alters the image size and therefore the effective focal length of the lens.
Zoom Ratio
A zoom lens can vary its focal length. The ratio of the longest focal length a zoom lens can achieve (the telephoto end), with the shortest focal length obtainable (its wide-angle end), is its zoom ratio. Lenses with ratios in excess of 50:1 can be obtained but the exact choice of ratio and the focal length at the wide end of the zoom will depend very much on what you want to do with the lens. Large zoom ratios are heavy, often require a great deal of power to operate the servo controls and have a reduced f-number (see below).
Extender
A zoom lens can be fitted with an internal extender lens system which allows the zoom to be used on a different set of focal lengths. For example, a 2x extender on a 14 x 8.5 mm zoom would transform the range from 8.5–119 mm to 17–238 mm, but it may also lose more than a stop at maximum aperture.
F-Number
The f-number of a lens is a method of indicating how much light can pass through the lens. It is inversely proportional to the focal length of the lens and directly proportional to the diameter of the effective aperture of the lens. For a given focal length, the larger the aperture of the lens, the smaller its f-number and the brighter the image it produces.
Horizontal Angle of View
For a camera fitted with 2/3” CCDs the formula would be:
![]()
F-Number Range
F-numbers are arranged in a scale where each increment is multiplied by ![]() 2 (1.414). Each time the f-number is increased by one stop, the exposure is decreased by half:
2 (1.414). Each time the f-number is increased by one stop, the exposure is decreased by half:
1.4 2 2.8 4 5.6 8 11 16 22
The effective aperture of a zoom is not its actual diameter, but the diameter of the image of the diaphragm seen from in front of the lens. This is called the entrance pupil of the lens. When the lens is zoomed (i.e. the focal length is altered) the diameter of the lens which is proportional to focal length alters and also its entrance pupil. The f-number is small at the wide angle end of the zoom and larger at the narrowest angle. This may cause f-number drop or ramping at the telephoto end on an OB when the entrance pupil diameter equals the diameter of the focusing lens group and cannot become any larger.
Focusing is the act of adjusting the lens elements to achieve a sharp image at the focal plane. Objects either side of this focus zone may still look reasonably sharp depending on their distance from the lens, the lens aperture, and the lens angle. The area covering the objects that are in acceptable focus is called the depth of field. The depth of field can be considerable if the widest angle of the zoom is selected and, whilst working with a small aperture, a subject is selected for focus at some distance from the lens. When zooming into this subject, the depth of field or zone of acceptable sharpness will decrease.
Follow Focus
Television is often a ‘talking head’ medium and the eyes need to be in sharp focus. Sharpest focus can be checked ‘off-shot’ by rocking the focus zone behind and then in front of the eyes. Detecting ‘on-shot’ which plane of the picture is in focus is more difficult. You, as the cameraman, must be the first to detect loss of focus, but this can only be achieved if the viewfinder definition is better than the definition of the viewer’s display and the plane of sharpest focus can be seen without rocking focus.
As camera or subject moves there will be a loss of focus which needs to be corrected. The art of focusing is to know which way to focus and not to overshoot. Practise following focus as someone walks towards the lens (UK convention – turn the capstan clockwise). Turn capstan anti-clockwise as the subject moves away from camera. Practise throwing focus from one subject to another.
Zoom Lens and Focus
A zoom lens is designed to keep the same focal plane throughout the whole of its range (provided the back focus has been correctly adjusted). To zoom into a subject, the lens must first be fully zoomed in on the subject and focused. Then zoom out to the wider angle. The zoom will now stay in focus for the whole range of its travel. If possible, always pre-focus before zooming in. Even if a zoom has not been rehearsed, always pre-focus whenever possible on the tightest shot of the subject. This is the best way of checking focus and it also prepares for a zoom-in if required. When zooming into a subject on which the focus has not been predetermined (blind zooming), it is best to be focused slightly back behind the subject so that you know where your zone of focus is. As focusing becomes more critical at the end of the zoom range, focus can be pulled forward. This helps to correct focus the right way.
Within a composition, visual attention is directed to the subject in sharpest focus. Attention can be transferred to another part of the frame by throwing focus onto that subject. Use the principle of invisible technique and match the speed of the focus pull to the motivating action.
The transition between 4:3 aspect ratio television and the conversion to 16:9 has produced an interim generation of dual format cameras. Different techniques are employed to use the same CCD for both formats.
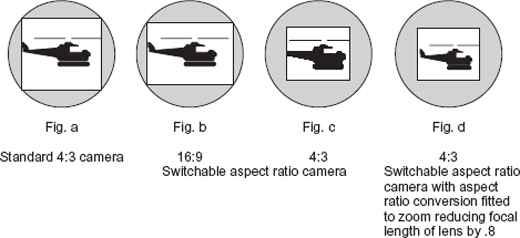
The horizontal angle of view is related to the focal length of the lens and the width of the CCD image. In a dual format camera, if the CCD is optimized for 16:9 format, the angle of view will be smaller working in the 4:3 format compared to working in 16:9 using the same focal length of the lens. At the shortest focal length the loss is about 20%. When switched to 4:3 working, there will be a 9 mm diameter image (c) compared to the 11mm diagonal image when working in 16:9 or the 11 mm diameter image of the conventional 4:3 format camera (a). This change in horizontal lens angle when switching formats can be remedied by employing an optical unit in the zoom (similar to an extender but producing negative magnification) which shortens the focal length when working in the 4:3 mode (d). This 0.8 reduction of focal length produces the same range of angles of view as a conventional 4:3 camera using the equivalent zoom lens. It is not essential when working in 16:9/4:3 dual aspect ratio camera to fit a lens with a 0.8 convertor, only an awareness that the lens angle will be narrower than its equivalent use with a standard 4:3 camera.
Depth of Field
Changing the f-number alters the depth of field – the portion of the field of view which appears sharply in focus. This zone extends in front and behind the subject on which the lens is focused and will increase as the f-number increases. The greater the distance of the subject from the camera, the greater the depth of field. The depth of field is greater behind the subject than in front and is dependent on the focal length of the lens. F-number and therefore depth of field can be adjusted by altering light level or by the use of neutral density filters.
Minimum Object Distance
The distance from the front of the lens to the nearest subject that can be kept in focus is called the minimum object distance (MOD). Many zooms are fitted with a macro mechanism which allows objects closer than the lens MOD to be held in focus. The macro shifts several lens groups inside the lens to allow close focus, but this prevents the lens being used as a constant focus zoom. Close focusing (inside the MOD) can sometimes be achieved by using the flange-back adjustment.
The professional broadcast video camera consists of a zoom lens (sometimes servo controlled from behind the camera), attached to a camera body containing three or four light sensors (CCD or charge coupled device), electronic circuits to process the signal, an electronic viewfinder, and various production facilities such as talkback, filter controls, mixed viewfinder, switches, etc.
The three vital facilities that keep the camera operator in touch with programme production when working in a multi-camera mode are viewfinder, talkback and cue lights. Without a good quality viewfinder he/she is unable to frame-up and focus the shot. Without talkback and cue lights, he/she is unaware when the shot will be taken.
Operational controls which have a significant influence on the operation of the camera and transform it from an electronic device into a programme production tool are:
![]() servo controls of the zoom lens which allow a smooth take-off, precise control of speed of zoom and positive focus
servo controls of the zoom lens which allow a smooth take-off, precise control of speed of zoom and positive focus
![]() a pan/tilt head to enable the fluid control of camera movement. The pan/tilt head should be adjustable to achieve precise balance in order to cater for a wide range of camera/lens combinations and additional attachments such as prompters. It should also have the facility to accommodate the varying centres of gravity (C of G) of different lens/camera/viewfinder combinations
a pan/tilt head to enable the fluid control of camera movement. The pan/tilt head should be adjustable to achieve precise balance in order to cater for a wide range of camera/lens combinations and additional attachments such as prompters. It should also have the facility to accommodate the varying centres of gravity (C of G) of different lens/camera/viewfinder combinations
![]() a camera mounting which allows the camera operator to position the camera and lens quickly, smoothly and with precision for the desired shot and for the camera to remain at that setting until it is repositioned.
a camera mounting which allows the camera operator to position the camera and lens quickly, smoothly and with precision for the desired shot and for the camera to remain at that setting until it is repositioned.
In addition to the operational controls there is obviously a requirement that cameras produce a high quality electronic picture. This will depend on the design characteristics of the camera’s performance such as its sensitivity, resolution, contrast range, colour matrix, etc.
The technical quality of the image produced by the camera has an important influence on how the viewer responds to the production. However, the priorities for a cameraman are often centred on the handling ability of the camera, lens and mounting, plus the need to work with a reasonable depth-of-field in an ad lib situation, coupled with the necessity of seeing the focus zone in the viewfinder. In addition, good communications are essential, whether in a crowded studio or operating in a remote location. If the operators cannot hear or talk to the control room, then their contribution is severely impaired.
Facilities Found on a Multi-Camera Production Camera

- An electronic viewfinder which is usually monochrome although some cameras have the choice of colour or mono. Focusing of a broadcast video camera is through the viewfinder. The definition of the electronic picture therefore must allow the cameraman to be the first person in the production chain to see loss of optical focus.
- Viewfinder controls – brightness, contrast, peaking (to accentuate edge definition as an aid to focusing); may also have controls for viewfinder image size.
- Mixed viewfinder controls to enable the viewfinder picture to be switched to other video combinations.
- Cue lights in the viewfinder, on the front of camera and on the front of lens are lit when the camera output is selected at the vision mixing panel. Cue lights outside the viewfinder (on the camera body and lens) can be switched out of circuit if required.
- Zoom lens – available in a range of zoom ratios.
- Lens hood – to help control flare and degradation and as partial protection against rain.
- Zoom thumb control on adjustable pan bar.
- Zoom focus capstan wheel on pan bar.
- Range extender for zoom lens.
- Shot box – to pre-set a range of zoom angles of views.
- Headset and headset jack points for talkback from and to the control room staff.
- Talkback volume – controlling production and engineering talkback and programme sound level to the headset.
- Filter wheel – fitted with a range of colour correction filters, neutral density and effects filters.
- Crib card holder and sometimes crib card illumination.
There are a wide range of camera mountings available to cover the diverse requirements of multi-camera programme making in the studio and on location. No one camera mounting will necessarily embrace all styles of camerawork and all weights of equipment. Which mounting to use will depend on:
![]() Is the mounting to be transported to its operating position (i.e. at a location rather than operated daily in a studio)? Equipment that may have to be carried up stairs or rigged in difficult locations will need to be lighter and easily rigged and de-rigged compared to equipment used permanently in a studio.
Is the mounting to be transported to its operating position (i.e. at a location rather than operated daily in a studio)? Equipment that may have to be carried up stairs or rigged in difficult locations will need to be lighter and easily rigged and de-rigged compared to equipment used permanently in a studio.
![]() Is the mounting to be used to reposition the camera ‘on-shot’ or is simply to have the ability to reposition ‘off-shot’? A tripod on wheels (if the ground surface is suitable) can be repositioned to a new camera position but is unsuitable for development shots. A pedestal mounting with steerable wheels and smooth adjustment of height will allow a development on shot if operated on a level floor.
Is the mounting to be used to reposition the camera ‘on-shot’ or is simply to have the ability to reposition ‘off-shot’? A tripod on wheels (if the ground surface is suitable) can be repositioned to a new camera position but is unsuitable for development shots. A pedestal mounting with steerable wheels and smooth adjustment of height will allow a development on shot if operated on a level floor.
![]() What all-up weight will the mounting need to support (e.g. camera, lens and possibly a camera operator)?
What all-up weight will the mounting need to support (e.g. camera, lens and possibly a camera operator)?
The simplest way of moving a lightweight camera is to carry it on the shoulder (on or off-shot) although this will not give such a smooth movement as using a harness around the torso to steady the camera. There are a range of lightweight tripods, portable pedestals and jib-arms that can be used with a lightweight camera. There is also the facility to rig a lightweight camera on the end of a boom arm and to remotely control its movement on a servo-driven pan/tilt head and to remotely control the lens. At the other end of the scale there are cranes capable of elevating a full facility camera and camera operator to a lens height of over twenty feet.
Pan/Tilt Heads
A good pan and tilt head will have adjustment for the centre of gravity (C of G) of the combination of camera/recorder, lens and viewfinder in use. If the C of G is not adjusted, the camera will either be difficult to move from the horizontal or it will tilt forwards or backwards. Adjustment of the C of G balance should not be confused with mid-point balance, which involves positioning the camera and lens to find the point of balance on the head.
The setting of the friction or drag control of the head depends on the shot and personal preference. Using a very narrow lens for an extreme close shot (e.g. a bird nesting), may require much more friction than that needed to pan the camera smoothly when following rapid impromptu movement (e.g. skating). Some cameramen prefer a heavy drag or ‘feel’ on the head so that there is weight to push against while others remove all friction allowing the head to be panned at the slightest touch.
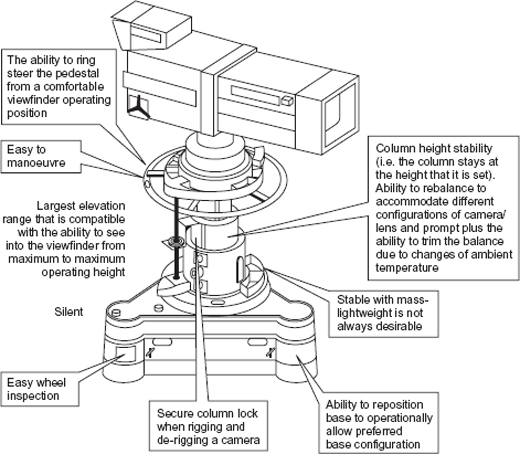
Live or ‘recorded as live’ television production requires a camera mounting that can be quickly and silently repositioned ‘off’ shot and have the flexibility to be smoothly positioned ‘on’ shot to accomplish pre-rehearsed camera movements. It must also be capable of instant small adjustments in track or crab mode to compensate for masking by artistes or wrong positioning. A usable shot must always be provided in a continuous programme even though the position of the artistes is not as rehearsed. In a studio these requirements are best served by a pedestal camera mounting controlled by the cameraman who can instantly compensate without misunderstanding or delay between tracker and cameraman.
The cameraman, whilst operating the camera, can also move the camera forwards, backwards or sideways by means of the ring steering wheel which alters the direction of the double wheel positioned at each corner of the base and he can alter the camera height. This must be accomplished silently, smoothly and with minimum effort. Continuous adjustment of the pedestal requires a smooth floor and complete mastery in the use of a pedestal. Smoothly positioning the camera ‘on’ and ‘off’ shot requires learning skills in the use of the mounting.
The six basic principles of multi-camera camerawork are:
- preparation
- anticipation
- concentration
- invisible technique
- silent operation
- teamwork.
Preparation
Look at the script to find out how the show is broken down into sections, recording periods, etc. Try to get an overall picture of the working day. Check that your camera cable is ‘eighted’ with no obstruction and carry out a pre-rehearsal on your camera and mounting (see page 71, Pre-rehearsal check list).
Preparation and Anticipation
The rehearsal period is the time to discover what the contribution from each craft group will be. Each member of the camera crew has to establish what their role in the production is via a two-way exchange of information with the director and by talking to the other cameramen. In many rehearsals, all the information may be supplied on preplanned camera cards and a floor plan marked with camera positions. The feasibility of the planning is then tested by a rehearsal of every shot.
With other programme formats, the barest information on a running order is supplied and the camera operator has to seek details of the camera coverage that may affect him. Experience enables the right questions to be asked as this is the only opportunity to discover what is required before a camera operator is faced with a ‘live’ performance. Each member of the crew has to work in the real time of the programme and all decisions are governed by the time-scale of the event. Whilst the planning may have taken months or weeks, and the rehearsal days or hours, transmission is governed by the time-scale of the event covered. Shot decisions have to be made in seconds with no time-out to consider the best way of tackling a particular situation. Preparation and anticipation are essential in order to create the time for fast camerawork.
Concentration
Do not let your attention drift towards the content of the show unless it is linked with cues for camera movement you are involved with. A basic rule in any simple activity such as repositioning a monitor is applicable all the way through multi-camera production practice – if possible, never do something on recording or transmission that was not done on rehearsal. There are many exceptions to this injunction but until you have sufficient production experience, stick to the rule.

The Pan
The simplest camera movement is the pan. It is often used to give visual variety amongst a number of static shots but usually the main use of a pan, apart from keeping a moving subject in frame, is to show relationships.
Essential operational points when panning:
![]() motivate the pan by action, to show relationships or to reveal new information
motivate the pan by action, to show relationships or to reveal new information
![]() ensure that the end frame has significance
ensure that the end frame has significance
![]() match speed of movement to mood and content
match speed of movement to mood and content
![]() synchronize all reframing with the action
synchronize all reframing with the action
![]() use dominant lines or movement to bridge first and end frame
use dominant lines or movement to bridge first and end frame
![]() use the appropriate lens angle
use the appropriate lens angle
![]() accelerate and decelerate the pan in the correct ratio
accelerate and decelerate the pan in the correct ratio
![]() correct friction (and cams)
correct friction (and cams)
![]() anticipation n correct body posture
anticipation n correct body posture
![]() correct choice of lens angle
correct choice of lens angle
Condition of the Pan/Tilt Head
Controlled smooth camera movement cannot be achieved unless the correct friction has been selected for the programme format. The amount of friction constraining vertical and horizontal movement is often a personal choice. Each cameraman needs to balance out the need for easy flexible movement against the operational difficulties of holding the camera steady when tracking, crabbing and panning the camera without friction.
A compromise amount of friction is therefore selected which suits the programme requirements and weather conditions. Using a long lens continuously at its narrow end in a high wind may require more friction than the same operation in a flat calm.
Eye, Hand and Body Co-Ordination
Invisible camera technique requires camera movement to be unobtrusive and matched to content. Panning and tilting the camera is a basic skill that requires considerable practice until there is complete coordination between the eye and hand. A requirement of good camerawork is the ability to move the camera smoothly and to be able to accelerate/decelerate movement.
Control of Pedestal
At each corner of the base of the pedestal are a pair of wheels. Their direction is controlled by the large steering ring positioned under the trim weight storage tray. The direction of the alignment of the wheels is communicated to the hand by a raised red indicator attached to the steering ring so that without looking away from the viewfinder, information is always available as to the direction the pedestal will move when pushed. The alignment of the base of the pedestal can be adjusted to avoid constantly working with a corner of the base directly behind the camera.
Variable Lens Angle
A zoom lens has a continuously variable lens angle and is therefore useful in multi-camera TV production for adjusting the image size without moving the camera position. When operating from behind the camera, the adjustment is controlled on most television cameras via the thumb on a two-way rocker switch which alters the direction and speed of the zoom. A good servo zoom should allow a smooth imperceptible take-up of the movement of the zoom which can then be accelerated by the thumb control to match the requirements of the shot. There is usually provision to alter the response of the thumb control so that a very slow zoom rate can be selected or a very fast zoom speed for the same movement of the thumb control.
Zoom and Composition
The zoom lens allows the desired framing of a shot to be quickly achieved. Shot size can be quickly altered out of vision to provide a range shots. Each shot can have the required size and framing to match other cameras (see page 68, Intercutting). Extended zoom ranges (30:1–40:1–70:1) allow a wide range of shots to be obtained from a fixed position (e.g. on an OB scaffold tower/hoist), and provides for visual movement across terrain where tracking would not be possible.
Readjustment On Shot
The zoom is often used to adjust the shot to improve the composition when the content of the shot changes. Trimming the shot ‘in vision’ may be unavoidable in the coverage of spontaneous or unknown content, but it quickly becomes an irritant if repeatedly used. Fidgeting with the framing by altering the zoom angle ‘on-shot’ should be avoided.
A common mistake with users of domestic camcorders is to centre the subject of interest in the frame and then to zoom towards them keeping the subject the same distance from all four sides of the frame. The visual effect is as if the frame implodes in on them from all sides. A more pleasing visual movement is to keep two sides of the frame at the same distance from the subject for the whole of the movement.

Preselect one or two adjacent sides of the frame to the main subject of the zoom and whilst maintaining their position at a set distance from the main subject of the zoom allow the other two sides of the frame to change their relative position to the subject. Keep the same relationship of the two adjacent frame edges to the selected subject during the whole of the zoom movement.
The point that is chosen to be held stationary in the frame is called the pivot point. Using a pivot point allows the subject image to grow progressively larger (or smaller) within the frame whilst avoiding the impression of the frame contracting in towards them.
Marking Up a Pedestal Position
The marks made with a floor crayon are quickly erased by pedestal and cable movement across them. They will need re-marking as there is a great deal of activity across the floor between rehearsal and transmission/recording. ‘Lo-tack’ tape (designed to be easily removed on de-rig) is more permanent but there is a risk, if there are too many marks on the studio floor, of bumping over the tape when moving on shot and causing a jump in the framing.
Repositioning the Camera at Speed
When repositioning the camera at speed across the studio floor, turn the camera in the direction of travel as it is easier to push a camera than to run backwards. Make certain that you walk around the pedestal in a direction that provides sufficient slack cable between camera and cable clamp on the pedestal base rather than winding the cable loop around the column. Pushing the camera onto a new set also allows you to start composing the shot before you come to rest and speeds up the move.
There is the paradox of creating camera movement to provide visual excitement or visual change whilst attempting to make the movement ‘invisible’. Invisible in the sense that the aim of the technique is to avoid the audience’s attention switching from the programme content to the camerawork. This is achieved when camera movement matches the movement of the action and good composition is maintained throughout the move. The intention is to emphasize subject – picture content, rather than technique.
From Bad to Better
A good rule of thumb for any camera movement which involves at some point a bad body posture for operating or a bad sightline to the viewfinder, is to start from the worst operating condition, and, during the camera development, unwind to a good operating position. This allows framing and focus at the end of the shot to be adjusted when working in the best operating position.
Camera Cable
More pedestal movements ‘on’ shot have suffered from cables being fouled, snagged or stood on than possibly for any other reason. If there is no-one on the crew cable clearing, make certain that there is a sufficient length of unimpeded cable available for the intended movement.
Viewfinder
If there is a change of height of the camera or, during a crabbing movement, it is necessary to position the body away from the centre of the viewfinder, provision must be made to alter the viewfinder hood in order to see the whole of the viewfinder image.
Two Types of Camera Movement
There are broadly two types of camera movement: Functional, the camera is moved to keep the subject in frame, and decorative, the camera is moved to provide variety and interest or to explain an idea.
When to Re-Frame
A common dilemma is when to re-frame a subject who is swaying in and out of reasonable framing. The shot may be too tight for someone who can only talk when they move or they may make big hand movements to emphasize a point. The solution is loosen off the shot. It is seldom a good idea to constantly pan to keep someone in frame as inevitably you will be ‘wrong-footed’ and compensate for an anticipated movement that does not happen. If the shot cannot be contained without continuous re-framing then the incessant moving background will eventually become a distraction from the main subject of the shot.
![]() Try to disguise camera movement by synchronizing with subject movement. Start and stop the movement at the same time as the subject.
Try to disguise camera movement by synchronizing with subject movement. Start and stop the movement at the same time as the subject.
![]() When zooming, hold one side of the frame static as a ‘pivot point’ rather than zooming in to the centre of the frame.
When zooming, hold one side of the frame static as a ‘pivot point’ rather than zooming in to the centre of the frame.
![]() Try to find a reason to motivate the zoom and to disguise the zoom. Use a combination of pan and zoom.
Try to find a reason to motivate the zoom and to disguise the zoom. Use a combination of pan and zoom.
![]() Panning and zooming are done to show relationships. If the beginning of the shot and the end of the shot are interesting but the middle section is not, it is better to cut between the start of the shot and the end frame rather than to pan or to zoom. Begin and end on a point of interest when panning. If the end of the shot is uninteresting why pan to it? Have a reason for drawing attention to the final image of a pan.
Panning and zooming are done to show relationships. If the beginning of the shot and the end of the shot are interesting but the middle section is not, it is better to cut between the start of the shot and the end frame rather than to pan or to zoom. Begin and end on a point of interest when panning. If the end of the shot is uninteresting why pan to it? Have a reason for drawing attention to the final image of a pan.
![]() Pace the pan so that the viewer can see what the camera is panning over. Hold the frame at the beginning and end of the pan.
Pace the pan so that the viewer can see what the camera is panning over. Hold the frame at the beginning and end of the pan.
![]() Use dominant lines or contours to pan across or along. Find some subject movement to motivate the pan.
Use dominant lines or contours to pan across or along. Find some subject movement to motivate the pan.
![]() When panning movement, leave space in the frame in the direction the subject is moving.
When panning movement, leave space in the frame in the direction the subject is moving.
Perspective of Mass
The composition of a shot is affected by the distance of the camera from the subject and the lens angle that is used. This will make a difference to the size relationships within the frame. The size relationship of objects in a field of view is known as the perspective of mass. Put simply, the closer an object is to us the larger it will appear and vice versa. The image of an object doubles in size whenever its distance is halved. This is a simple fact of geometric optics and it applies to a camera as it does to the eye. Adjusting the camera distance and the lens angle can provide the size relationships required for a composition.

Working with the camera close to the subject (b) produces an increase in the size ratio between foreground and background figures. The foreground object appears unnaturally large and the background appears unnaturally small. It is a perspective of mass relationship we are not usually aware of. A wide-angle lens allows more of the foreground subject to be in frame and it is this combination that produces distortion when used too close to the face (a ‘Pinnochio’ nose).
A part of our perception of depth depends on judging size relationships. The smaller we perceive a known object, the further we judge it to be from us. The size relationships produced by a very narrow-angle lens at a distance from the subject (c), produces the illusion of squeezing the space between equal size figures. The camera distance from the subject produces the size relationships whilst the long focal length lens provides the magnification of the foreground and background. The space between the subjects in frame appears to be condensed.
Central to the craft of camerawork are the skills required to create arresting and informative images. There is usually a reason why a shot is recorded on tape or film. The purpose may be simply to record an event or the image may play an important part in expressing a complex idea. Whatever the reasons that initiate the shot, the camera operator should have a clear understanding of the purpose behind the shot. After establishing why the shot is required, and usually this will be deduced purely from experience of the shot structure of the programme format, the cameraman will position the camera, adjust the lens angle, framing and focus. All four activities (including knowledge of programme formats) rely on an understanding of the visual design elements available to compose a shot within the standard television framing conventions. Effective picture making is the ability to manipulate the lens position and the lens angle within a particular programme context. The seven primary decisions which effects the image to be made when setting up a shot are:
- camera angle (the position of the camera relative to the subject)
- lens angle
- camera distance from the subject
- camera/lens height
- frame
- subject in focus
- depth of field.
Camera Position/Lens Angle
The composition of a shot is affected by the distance of the camera from the subject and the lens angle that is used. This will make a difference to the size relationships within the frame – the perspective of mass.
The Subjective Influence of Camera Height
Lens height will also control the way the audience identifies with the subject. Moving the horizon down below a person makes them more dominant because the viewer is forced to adopt a lower eyeline viewpoint. We are in the size relationship of children looking up to adults. A low lens height may also de-emphasize floor or ground level detail because we are looking along at ground level and reducing or eliminating indications of ground space between objects. This concentrates the viewer’s interest on the vertical subjects. A high position lens height has the reverse effect. The many planes of the scene are emphasized like a scale model. Usually it is better to divide the frame into unequal parts by positioning the horizon line above or below the mid-point of the frame. Many cameramen intuitively use the rule of thirds (see page 67), to position the horizon. A composition can evoke space by panning up and placing the line low in frame. Placing a high horizon in the frame can balance a darker foreground land mass or subject with the more attention grabbing detail of a high key sky.
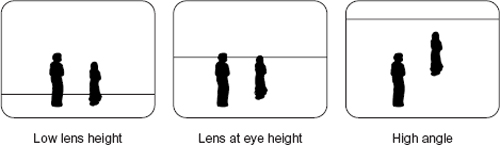
Lens height and tilt will control the perspective of line. Shooting low with a level camera will produce one type of line perspective; shooting from a high vantage point tilted down will produce another set of line relationships in the frame. On a flat surface, the horizon line cuts similar size figures at the same point. The height of that point is the height of the lens.
Form and Content

The structural skeleton of the shot is only partially formed by content. For example, every cameraman knows that a shot of an object can be made more interesting if the camera is moved from a square-on, symmetrical viewpoint to an angle of view favouring more than one side or surface and/or the height of the lens is varied. Repositioning the camera is altering the structural skeleton, for while the content of the shot remains and is recognizable as a ‘building’, converging lines of rooftop, windows, doors, etc., have been altered and restructured to provide a more pleasing ‘front surface’ design.
Composition is commonly defined as arranging all the visual elements in the frame in a way that makes the image a satisfactory and complete whole. Integration of the image is obtained by the positioning of line, mass, colour and light in the most pleasing arrangement.
Many television cameramen know, through many years of experience, exactly how to position the lens in space or choose a different lens angle in order to improve the appearance of the shot. They are either working to inherited craft values of what is ‘good’ composition or they are repositioning and juggling with the camera until they intuitively feel that they have solved that particular visual problem. Frequently there is no time to analyse a situation and the only thing to fall back on is experience. Compositional experience is the result of many years of solving visual problems. Good visual communication is not a gift from heaven but is learnt from finding out in practice what does and does not work.
Controlling Size Relationships
As well as the standard methods of shot size and positioning the frame, composition can also be controlled by manipulating the perspective of mass. To increase the size of a background figure to a foreground figure it is common practice to reposition the camera back and zoom in to return to the original framing. The size relationships have now altered. It is not the narrower angle that produced this effect but the increased distance from the camera.
Moving the camera towards or away from the subject alters the size relationships between foreground and background objects. The perspective of mass changes in a similar way to our own perceptual experience when we move towards or away from an object. Tracking the camera therefore not only conforms to our normal visual expectations but sets up interesting rearrangements of all the visual elements in the camera’s field of view.
Tracking into a scene extends the involvement of the viewer in that they are being allowed visually to move into the two-dimensional screen space. If depth is to be indicated it must be self-evident and contained in the composition of the image. A tracking shot provides a change in viewpoint and allows the viewer greater opportunity to experience the depth of the space pictured compared to either a zoom or a static shot. The important point to remember is that subject size relationship is a product of camera distance. How the subject fills the frame is a product of lens angle. This, of course, is the crucial distinction between tracking and zooming. Tracking the camera towards or away from the subject alters size relationships – the perspective of mass. Zooming the lens preserves the existing relative size relationships and magnifies or diminishes a portion of the shot.

The rule of thirds proposes that an attractive balance can be achieved by placing the main subject on one of the intersections of two equally spaced lines horizontally in the frame and two lines equally spaced in the vertical.
Composition Summary
Composition is the principal way of making clear the priorities of a shot. It emphasizes the main subject and eliminates or subdues competing elements of visual interest. There must be a reason for framing up any shot; good composition enables that reason to be transmitted to the viewer. Good visual communication is achieved by good composition. Here is a partial checklist of the do’s and don’ts of composition:
![]() The camera converts three dimensions into two dimensions. Try to compensate for the loss of the third dimension by looking for ways to represent depth in the composition.
The camera converts three dimensions into two dimensions. Try to compensate for the loss of the third dimension by looking for ways to represent depth in the composition.
![]() Avoid dividing the frame into separated areas by strong vertical and horizontal elements unless this is a specific required effect.
Avoid dividing the frame into separated areas by strong vertical and horizontal elements unless this is a specific required effect.
![]() Check the overall image, particularly background details (e.g. no chimneys/posts growing out of foreground subjects’ heads).
Check the overall image, particularly background details (e.g. no chimneys/posts growing out of foreground subjects’ heads).
![]() Keep important action away from the edge of the frame but avoid repeating square-on, symmetrical eye-level, centre-of-frame shots.
Keep important action away from the edge of the frame but avoid repeating square-on, symmetrical eye-level, centre-of-frame shots.
![]() Offset the dominant interest and balance this with a less important element.
Offset the dominant interest and balance this with a less important element.
![]() Fill the frame if possible with interest and avoid large plain areas that are there simply because of the aspect ratio of the screen. If necessary, mask off part of the frame with a feature in the shot to give a more interesting composition.
Fill the frame if possible with interest and avoid large plain areas that are there simply because of the aspect ratio of the screen. If necessary, mask off part of the frame with a feature in the shot to give a more interesting composition.
![]() Emphasize the most important element in the frame by its position using control of background, lens-angle, height, focus, shot size, movement, etc. Make certain that the eye is attracted to the part of the frame that is significant and avoid conflict with other elements in the frame.
Emphasize the most important element in the frame by its position using control of background, lens-angle, height, focus, shot size, movement, etc. Make certain that the eye is attracted to the part of the frame that is significant and avoid conflict with other elements in the frame.
![]() Selective focus can control the composition. Pulling focus from one plane to another directs attention without reframing.
Selective focus can control the composition. Pulling focus from one plane to another directs attention without reframing.
![]() Attempt some visual mystery or surprise but the stronger the visual impact the more sparingly it should be used. Repeated zooming results in loss of impact and interest.
Attempt some visual mystery or surprise but the stronger the visual impact the more sparingly it should be used. Repeated zooming results in loss of impact and interest.
![]() With profile shots, where people are looking out of frame, give additional space in the direction of their gaze for ‘looking room’. Similarly when someone is walking across frame, give more space in front of them than behind.
With profile shots, where people are looking out of frame, give additional space in the direction of their gaze for ‘looking room’. Similarly when someone is walking across frame, give more space in front of them than behind.
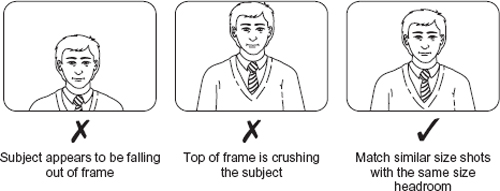
![]() Give consistent headroom for the same sized shots decreasing the amount with CUs and BCUs. Always cut the top of the head rather than the chin in extreme close up.
Give consistent headroom for the same sized shots decreasing the amount with CUs and BCUs. Always cut the top of the head rather than the chin in extreme close up.
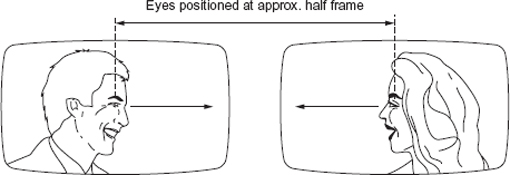
![]() The eyes are the centre of attention in shots of faces. A good rule-of-thumb is to place them one third from the top of frame.
The eyes are the centre of attention in shots of faces. A good rule-of-thumb is to place them one third from the top of frame.
What Makes a Shot Change Invisible?
Continuous camera coverage of an event using a number of cameras relies on a stream of invisible shot changes. Invisible in the sense that the transition between each shot does not distract the audience. Although individual camera operators frame up their own shots, the pictures they produce must fit the context of the programme and match what other cameramen are providing. No shot can be composed in isolation – its effect on the viewer will be related to the preceding and succeeding shot.
Interviews
Multi-camera coverage of an interview is about the most widespread format on television after the straight-to-camera shot of a presenter. The staging of an interview usually involves placing the chairs for good camera angles, lighting, sound and for the ease and comfort of the guests and the anchor person. The space between people should be a comfortable talking distance.
Editing conventions sometimes rely on everyone involved in the production having a knowledge of well known shot patterns (see shot sizes, page 49), such as singles, two-shots, o/s two-shots, etc., in the customary camera coverage of an interview. This speeds up programme production when matching shots of people in a discussion and allows fast and flexible team working because everyone is aware of the conventions.
Matching to Other Cameras
In addition to setting up the optimum position for singles, two-shots, etc., camera operators need to match their shots with the other cameras. The medium close-ups (MCUs), etc., should be the same size with the same amount of headroom, looking room, the same height, and if possible, roughly the same lens angle (therefore the same distance from their respective subjects), especially when intercutting on over-the-shoulder two-shots. This avoids a mismatch of the perspective of mass. The best method of matching shots is to use the mixed viewfinder facility or to check with a monitor displaying studio out.
Eyeline
Eyeline is an imaginary line between an observer and the subject of their observation. In a discussion, the participants are usually reacting to each other and will switch their eyeline to whoever is speaking. The audience, in a sense, is a silent participant and they will have a greater involvement in the discussion if they feel that the speaker is including them in the conversation. This is achieved if cameras take up positions in and around the set to achieve good eyeline shots of all the participants. That is, both eyes of each speaker, when talking, can be seen on camera rather than profile or semi-profile shots.
There may be a number of variations in shots available depending on the number of participants and the method of staging the discussion/interview. All of these shot variations need to be one side of an imaginary line drawn between the participants.
To intercut between people to create the appearance of a normal conversation between them, every shot of a sequence should stay the same side of an imaginary line drawn between the speakers unless a shot is taken exactly on this imaginary line or a camera move crosses the line and allows a reorientation (and a repositioning of all cameras) on the opposite side of the old ‘line’.
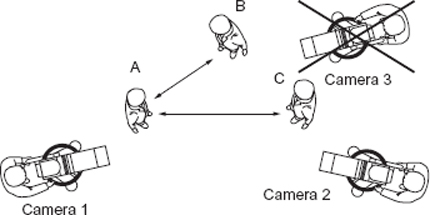
Cameras 1 and 2 can be intercut on subjects A, B, and C, but camera 3 (apart from being in camera 1’s shot) cannot be intercut with 1 or 2 except if 1 is on subject B and 3 is on subject A.
Cross Shooting
A standard cross shooting arrangement is for the participants to be seated facing each other and for cameras to take up positions close to the shoulders of the participants.

MCU position with good eyeline can be quickly zoomed out and reframed to provide a tight over-the-shoulder 2 shot without repositioning the pedestal.
The usual method of finding the optimum camera position is to position the camera to provide a well composed over-the-shoulder two-shot then zoom in to check that a clean single can be obtained of the participant facing camera. A tight over-the-shoulder two-shot always risks masking or a poorly composed shot if the foreground figure should lean left or right. to instantly compensate, if this should occur, set the pedestal steering wheel in a position to allow crabbing left or right for rapid repositioning on or off shot (see page 75, headroom and looking room diagrams).
If you are inexperienced in operating a camera, try to keep the following points in mind during rehearsal:
![]() Use the rehearsal period to establish what your specific contribution will be. Ask questions if you are unsure.
Use the rehearsal period to establish what your specific contribution will be. Ask questions if you are unsure.
![]() Make notes on your camera card or running order and mark up camera position if a precisely framed shot is required (e.g. a chroma key shot with an inset graphic).
Make notes on your camera card or running order and mark up camera position if a precisely framed shot is required (e.g. a chroma key shot with an inset graphic).
![]() Make yourself aware of the role of other cameras and their repositions.
Make yourself aware of the role of other cameras and their repositions.
![]() Plan for the unexpected and have contingency plans for any eventuality.
Plan for the unexpected and have contingency plans for any eventuality.
![]() Do not over commit yourself with numerous camera repositions if you are unsure of the time available to implement them.
Do not over commit yourself with numerous camera repositions if you are unsure of the time available to implement them.
![]() Check the cable routeing of the camera and any potential object on which it could get snagged (e.g. rostrum corners, stage weights, boom wheels).
Check the cable routeing of the camera and any potential object on which it could get snagged (e.g. rostrum corners, stage weights, boom wheels).
![]() Remember that you must provide exactly the same compositions on transmission/recording as was agreed in rehearsal unless the programme is an ‘as-directed’ format.
Remember that you must provide exactly the same compositions on transmission/recording as was agreed in rehearsal unless the programme is an ‘as-directed’ format.
When to Offer Shots
One of the hardest techniques for camera operators to master in multi-camera camerawork on a fast moving show is when to offer shots or when to wait for direction. A camera operator, for example, will often spot during a discussion a participant not on camera bursting to get their word in and may be tempted to offer up a shot of them. Many directors appreciate this contribution and providing there is the trust and experience developed in a long working relationship between camera crew, vision mixer and director, a variety of reaction shots can be offered and taken whilst still keeping up with the flow of the discussion. Alternatively, many directors dislike being left without a cover shot and prefer to decide on all camera movement. In these circumstances the camera operator must stick on the last directed shot until directed to do otherwise.
What Shots are Required?
Variation in camera angle and shot size are needed in most ‘as-directed’ situations to give variety and pace to the presentation. The director will ask for a string of requirements and coordinate each camera, but by listening to talkback and with the occasional use of the mixed viewfinder facility to see what shot has been selected, a camera operator will often be able to find an appropriate shot that matches the needs of the programme at that point. The judgement and the ability to assess what shot is relevant is part of the skill needed to be developed by a camera operator.
The following basic preparations should be followed when new to operating a camera:
![]() Check over camera, mount, release pan/tilt locks and unlock pan/tilt head.
Check over camera, mount, release pan/tilt locks and unlock pan/tilt head.
![]() Check that the cable is ‘eighted’ and free to follow any camera movement.
Check that the cable is ‘eighted’ and free to follow any camera movement.
![]() Look through the camera cards if supplied and check opening position on floor plan if available.
Look through the camera cards if supplied and check opening position on floor plan if available.
![]() Check that you can clearly hear production and engineering talkback on your headset and that all cue lights are functioning.
Check that you can clearly hear production and engineering talkback on your headset and that all cue lights are functioning.
![]() Set up the viewfinder (see page 99).
Set up the viewfinder (see page 99).
![]() Get the feel of the camera movement and adjust friction.
Get the feel of the camera movement and adjust friction.
![]() Adjust pan bar and position of the zoom demand unit according to personal preference. Position of pan bar may need to be altered to accommodate very high or low shots during rehearsal.
Adjust pan bar and position of the zoom demand unit according to personal preference. Position of pan bar may need to be altered to accommodate very high or low shots during rehearsal.
![]() Check focus and the varying zone of focus depending on zoom angle and check that the zoom holds focus over its whole range (i.e. check back-focus, see page 97).
Check focus and the varying zone of focus depending on zoom angle and check that the zoom holds focus over its whole range (i.e. check back-focus, see page 97).
![]() Reduce the headset cable loop to the minimum operational requirements and tie off to the camera. A long loop can easily get snagged.
Reduce the headset cable loop to the minimum operational requirements and tie off to the camera. A long loop can easily get snagged.
Camera Position and Key Light
Key lights are positioned to produce the desired modelling on the presenter and are typically set to between 10 and 40 degrees either side of the eyeline position to the planned lens position (A). If the camera is crabbed beyond this point (B) and the presenter turns to face the lens then the modelling on the face becomes either non-existent (camera under key light) or ‘over modelled’ which results in an ugly nose shadow that spreads across the face.

If the camera continues to crab away from the key light (C) then possibly the back light will start to illuminate the face with a key light acting as back light and there is no fill.
Talkback Discipline
With nearly all communication channelled through the control room, it is obviously important to choose the right time to talk to the director or control room. Do not interrupt an existing discussion or a briefing that will be addressed to the whole crew. Wait for a pause – and close to transmission or recording this never seems to occur – before opening your microphone and calling the control room. Keep the conversation brief and if questions from the director can be answered with a simple yes or no, nod the camera in the vertical direction for ‘yes’ and pan the camera in the horizontal direction for ‘no’.
‘As-Directed’ Procedures
‘As-directed’ procedures require fast reflexes and an awareness of the development in programme content. Sometimes a programme will have sections which have a rehearsed shot structure interspersed with ‘as-directed’ sequences. For a camera operator, the danger point is the junction between the two. It is easy to be caught in the ‘as-directed’ mode of operation and therefore out of position for the scripted, numbered shot sequence.
Problems During The Show
No live or ‘record as live’ programme will be without its problems or unexpected emergencies. Artistes missing their marks or prevented from getting to a prearranged position will need instant adjustment from the camera operator. Compensation will be needed for unexpected masking by people or structures. If a shot is missed, forget about it and make certain the next shot is there. Too often, a number of operational errors snowball because people spend time agonizing over their mistakes. If something is preventing you getting to a shot and you are unable to speak to the director, show on camera what the problem is. Help communicate other people’s problems by showing on camera their circumstances (e.g. a stage manager who has lost talkback, equipment failure, etc.). If there is a production mistake on transmission, never spend time deciding on the cause. Get on with the next item and leave the post mortems until after the programme has finished. Remember to follow up operational incidents (equipment malfunction, the wrong equipment, communication failures, operational procedures, etc.) that affected your work and check that they will not occur next time.
Coping with Change
If there is a major change during the programme, anticipate how it will affect your shots and be prepared to adjust to a new and unrehearsed situation. Never underestimate the importance of anticipation in making time for yourself. Do not allow the excitement and confusion of a situation to get in the way of thinking clearly in order to act decisively.
The ability to remember the precise framing of a shot comes with practice and experience. There are no visual memory rules or procedures to be learnt as visual memory appears to operate at the instinctive level. At the speed at which some shots are required, the reflex selection of lens angle and framing are completed in an instant. In general, however, it is always a good idea to make notes on the camera card as a reminder of a shot.
Marking Up
Most camera operators prefer to scribble a few words against a complex shot description as additional information noted at rehearsal. These abbreviated reminders (which may be incomprehensible to any one else) replace the typed shot description. The aim of any alteration to the card by the camera operator is to make instantly legible any essential camera movement and to link it to the action that cues it. During rehearsal, the camera operator will be marking up his card and marking the camera position, if necessary.
For example, a camera card may have the scribble ‘2 lean fwd stands’ which translated by the camera operator means ‘when she leans forward for the second time she will stand and I will need to crane up and focus fwd’. A well laid out camera card will always have plenty of space for this type of rehearsal note. It is also important that the changeover between two cards occurs during a sequence of slow shot change to avoid hastily scrabbling to get the top card flipped over while looking for the next shot.
Working to Cue Lights
All television cameras designed for multi-camera working are fitted with red lamps on the camera and in the viewfinder called cue lights or tally lamps. The tempo of intercutting between cameras requires the camera operator to develop the ability to work at two speeds. Off-shot, there is often the need to find the required shot almost instantaneously. Once settled on the framing, and the camera is cut to, there may be the need to develop the shot (zoom in or out, pan, track, etc.) at a tempo controlled by the subject matter. Frequently this will be a slow, unobtrusive movement. When the cue light goes off, the camera operator is again released to find the next shot in the fastest possible time.
A Mixed Viewfinder
The camera operator can usually switch his/her viewfinder feed from the camera output to a mixed feed of camera output and a designated source (e.g. another camera).
VTR Clearance
After a recording there will be a pause whilst VTR establish if they have a recording without fault or whilst the director decides if any section of the programme requires a retake. When the final clearance has been given the de-rig can begin.
Often the most unpredictable factor in an outside broadcast is the weather. The positions of the cameras are usually controlled by the nature of the event but they are often sited to avoid looking into the sun. Extreme weather changes may be experienced during the period of rig, rehearse and transmit and therefore adequate precautions must be made to protect equipment against adverse weather, and to protect personnel against adverse weather.
Personal Weather Protection
Large scale events (e.g. golf) involve cameras being scattered a long way from the scanner. They also involve long transmissions. A camera operator setting out for the day therefore needs to equip himself with a choice of clothing to match any changing weather conditions. The standard advice in weather protection for equipment or people is to prepare for the worst. Those who work regularly out of doors must make themselves aware of the risks involved and how to protect themselves against sunburn, skin cancer, etc.
New to Talkback
A camera operator new to wearing a headset and working with talkback might be overwhelmed by the amount of information received. With experience it is possible to ignore all but the information that affects camerawork. This is not simply camera direction. Any information that may affect future shots or shots that will be needed should be remembered by the camera operator and used when required.
Programme Sound
It is often important to listen to programme sound. During a discussion, sports commentary, etc., the camera shots offered will be directly related to the information supplied by programme sound. Many camera operators prefer to work with one of the headset earpieces on one ear and the other earpiece off the ear. Programme sound can then be heard directly and the uncovered ear is available in case of solti-voce messages from other people such as floor mangers, etc., during transmission.
Silence
Reducing the amount of noise on recording/transmission can be achieved by:
![]() reducing cable noise – correctly wrapping other cables (e.g. lights, prompt, etc.) around the camera cable reduces the surface area of the cable dragging on the floor if no cable clearer is present and a well maintained pedestal or other mounting to eliminate loose or rattly fixtures.
reducing cable noise – correctly wrapping other cables (e.g. lights, prompt, etc.) around the camera cable reduces the surface area of the cable dragging on the floor if no cable clearer is present and a well maintained pedestal or other mounting to eliminate loose or rattly fixtures.
![]() wearing soft soled shoes.
wearing soft soled shoes.
There is a trade off-between a fast move to achieve a specific shot against the amount of noise the move produces. If the noise is prohibitive then other ways must be found to achieve the shot.
Looking Room
One of the compositional conventions of camerawork with profile shots, where people are looking out of frame, is to give additional space in the direction of their gaze for ‘looking room’. Similarly when someone is walking across frame, to give more space in front of them than behind.
Remote Control
There are a number of camera remote control systems which attempt to mimic how a camera is manually operated. At the remote operating position the facilities include:
![]() the control of camera functions through a joystick, and/or rotating switch which allows control of pan, tilt, zoom and focus discreetly on shot
the control of camera functions through a joystick, and/or rotating switch which allows control of pan, tilt, zoom and focus discreetly on shot
![]() the ability to remotely control the above functions on a number of cameras and to precisely set the time of a specific camera movement (e.g. zooming)
the ability to remotely control the above functions on a number of cameras and to precisely set the time of a specific camera movement (e.g. zooming)
![]() the facility to set-up a number of shots on each camera, to label and store each set-up and the capability of rapidly recalling a specific shot. Sometimes this memorized data is recorded on a computer floppy disk which can be removed from the memory system for future programmes
the facility to set-up a number of shots on each camera, to label and store each set-up and the capability of rapidly recalling a specific shot. Sometimes this memorized data is recorded on a computer floppy disk which can be removed from the memory system for future programmes
![]() the stored parameters of each shot memorized may be recalled by button, mouse or using a touch screen visual presentation.
the stored parameters of each shot memorized may be recalled by button, mouse or using a touch screen visual presentation.
Setting up a Shot
A shot can be framed up by means of a joystick, and by adjusting the camera height by way of the elevation unit. Once framed up, the shot can be stored and the speed of any zoom in/out can be adjusted and preset so that when the shot is recalled, the rehearsed position of panning head and lens angle/focus is quickly obtained. There is always the need to preview a stored camera position because whereas the camera parameters may be precise, presenters are human and their body position or chair position may have shifted. Trimming the shot to adjust headroom and composition may be necessary on preview or on shot.
Storing a Shot
A number of shots can be programmed and quickly accessed either through a keypad recalling alphanumeric code for each shot, or by a touch screen displaying a mosaic of freeze frames of shots available. Whatever the system in use, there is always the essential requirement of maintaining an up-to-date index describing each shot stored so that it can be accurately recalled.
Recalling a Shot
The accuracy of the robotic system’s repeatability (i.e. returning to the same shot), is measured either in arcsec or degrees (60 arcsecs = 0.01 degrees). Most systems are accurate enough to accommodate shots of presenters who are unlikely to be absolutely immobile as they are usually paid to be animated and vivacious. A more important consideration is the speed of repositioning between shots. The robotic speed is unlikely to match a manual operator because of the servo motor’s design requirement to avoid overshoot and oscillation at maximum speed, and the need to provide imperceptible movement ‘on-shot’ at the slowest speed.
Basic requirements for any robotic system of camera control are:
![]() silent operation
silent operation
![]() remote control of pan, tilt, zoom, and focus
remote control of pan, tilt, zoom, and focus
![]() rapid repositioning, fast acceleration, swift motor responses
rapid repositioning, fast acceleration, swift motor responses
![]() tight damping without oscillation or overshoot
tight damping without oscillation or overshoot
![]() imperceptible control of movement on-shot
imperceptible control of movement on-shot
![]() movement on-shot using pivot points
movement on-shot using pivot points
![]() storage of a number of preset positions of pan/tilt settings, zoom and focus setting with a designated code or description
storage of a number of preset positions of pan/tilt settings, zoom and focus setting with a designated code or description
![]() preview facilities of each camera’s output – these can be displayed on the same screen
preview facilities of each camera’s output – these can be displayed on the same screen
![]() cue/tally light indicating which camera is currently selected at the vision mixing panel
cue/tally light indicating which camera is currently selected at the vision mixing panel
X-Y Servo Pedestals
With x-y function fitted, the pedestal can be remotely repositioned or remotely moved on-shot. Over time, if a pedestal is moved around a studio, there may be a tendency for the base to move out of its original alignment and to twist, causing errors when recalling a stored pedestal position. One method of correcting this is to lay black and white squares on the studio floor, and then store their position in the remote control memory. When this position is recalled, the pedestal moves to the squares and uses their alignment to reorientate the base of the pedestal.
Touch Screen Display
Touching any picture on the screen will select the shot.