capture and enhance
Sam Everton
essential skills
~ Capture high-quality digital images for image editing.
~ Gain control over the color, tonality and sharpness of a digital image.
~ Duplicate, optimize and save image files for print and for web.
Introduction
Every digital image that has been captured can be enhanced further so that it may be viewed in its optimum state for the intended output device. Whether images are destined to be viewed in print or via a monitor screen, the image usually needs to be resized, cropped, retouched, color-corrected, sharpened and saved in an appropriate file format. The original capture will usually possess pixel dimensions that do not exactly match the requirements of the output device. In order for this to be corrected the user must address the issues of ‘Image Size’, ‘Resampling’ and ‘Cropping’.
To end up with high quality output you must start with the optimum levels of information that the capture device is capable of providing. The factors that greatly enhance final quality are:
• A ‘subject brightness range’ that does not exceed the exposure latitude of the capture device (the contrast is not too high for the image sensor).
• Using a low ISO setting to capture the original image.
• The availability of 16 bits per channel scanning or the camera Raw file format.
Optimizing image quality
This chapter focuses its attentions on the standard adjustments made to all images when optimum quality is required without using any advanced techniques. Standard image adjustments usually include the process of optimizing the color, tonality and sharpness of the image. With the exception of dust or blemish removal, these adjustments are applied globally (to all the pixels). Most of the adjustments in this chapter are ‘objective’ rather than ‘subjective’ adjustments and are tackled as a logical progression of tasks. Automated features are available for some of these tasks but these do not ensure optimum quality is achieved for all images. The chapter uses a ‘hands-on’ project to guide you through the steps required to achieve optimum quality.
Save, save and save
Good working habits will prevent the frustration and the heartache that are often associated with the inevitable ‘crash’ (all computers crash or ‘freeze’ periodically). As you work on an image file you should get into the habit of saving the work in progress and not wait until the image editing is complete. It is recommended that you use the ‘Save As’ command and continually rename the file as an updated version. Unless computer storage space is an issue the Photoshop (PSD) file format should be used for work in progress. Before the computer is shut down, the files should be saved to a removable storage device or burnt to a CD/DVD. In short, save often, save different versions and save backups.
Stepping back
Digital image editing allows the user to make mistakes. There are several ways of undoing a mistake before resorting to the ‘Revert’ command from the File menu or opening a previously saved version. Photoshop allows the user to jump to the previous state via the Edit > Undo command (Command/Ctrl + Z) while ‘Histories’ allows access to any previous state in the History palette without going through a linear sequence of undos. Alternatively the user can ‘Step Backward’ by using the keyboard shortcut Ctrl + Alt + Z (PC) or Command + Option + Z (Mac).
Advantages and disadvantages of 16-bit editing
When the highest quality images are required there are major advantages to be gained by starting off the editing process in ‘16 Bits/Channel’ mode. In 16 bits per channel there are trillions, instead of millions, of possible values for each pixel. Spikes or comb lines, that are quick to occur while editing in 8 bits per channel, rarely occur when editing in 16 bits per channel mode. The disadvantages of editing in 16 bits per channel are:
• Not all digital cameras are capable of saving in the RAW format.
• The size of file is doubled when compared to an 8 bits per channel image of the same output size and resolution.
• Some editing features (including many filters) do not work in 16 bits per channel mode.
• Only a small selection of file formats support the use of 16 bits per channel.
Comb lines that appear in the histogram will usually disappear if editing in 16 bits per channel
Choosing your bit depth
It is still preferable to make major changes in tonality or color in 16-bit mode before converting the file to 8-bit mode. Images can be converted from 8-bit (Image > Mode > 16 Bits/Channel) or captured in 16-bit (the preferred choice). Most of the better scanners that are now available (flatbed and film) now support 16 bits per channel image capture. Many scanners refer to 16 bits per channel scanning as 48-bit RGB scanning. Some scanners offer 14 bits per channel scanning but deliver a 48-bit image to Photoshop. Remember, you need twice as many megabytes as the equivalent 8-bit image, e.g. if you typically capture 13.2 megabytes for an 8 × 10 @ 240ppi you will require 26.4 megabytes when scanning in 16 bits per channel.
Note > Photoshop also supports 32 Bits/Channel editing which is primarily used for editing images with a high dynamic range (see Montage Projects – High Dynamic Range).
Foundations project 1
Follow the seven steps over the following pages in order to learn how to create one image optimized for print and one image optimized for web viewing from the same image file.
Image capture – Step 1
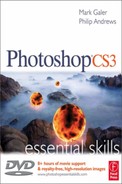
Capture a vertical portrait image using soft lighting (low-contrast diffused sunlight or window lighting would be ideal). The image selected should have detail in both the highlights and shadows and should have a range of colors and tones. An image with high contrast and missing detail in the highlights or shadows is not suitable for testing the effectiveness of the capture or output device.
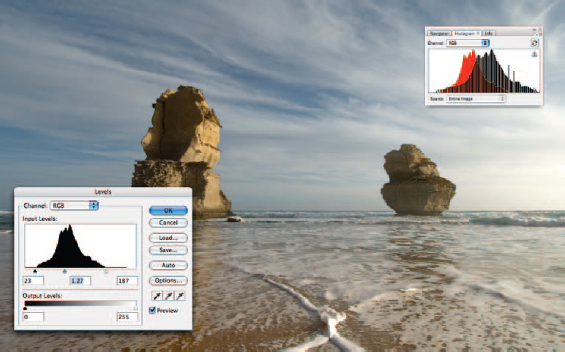
Digital capture via a digital camera
Images can be transferred directly to the computer from a digital camera or from a card reader if the card has been removed from the camera. Images are usually saved on the camera’s storage media as JPEG or RAW files. If using the JPEG file format to capture images you should choose the high or maximum quality setting whenever possible. If using the JPEG file format, it is important to select low levels of image sharpening, saturation and contrast in the camera’s settings to ensure optimum quality and editing flexibility in the image-editing software. If the camera has the option to choose Adobe RGB instead of sRGB as the color space this should also be selected if one of the final images is destined for print.
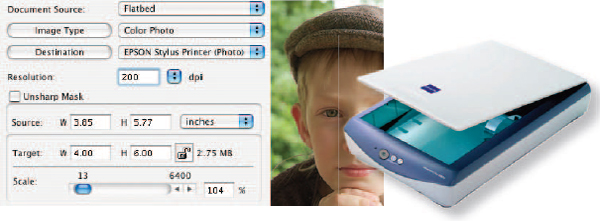
Digital capture via a scanning device
Ensure the medium to be scanned is free from dust and grease marks. A smooth paper surface (rather than a textured surface) offers the best medium for flatbed scanning. The scanning device can usually be accessed directly from the Adobe software via the ‘Import’ command. Ensure that you scan the image at an appropriate resolution for your image-editing needs (see ‘Digital Basics > Calculating file size and scanning resolution’).
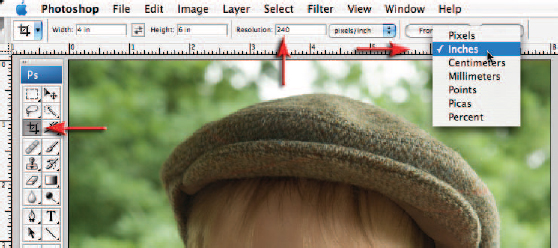
Cropping an image – Step 2
After opening the captured image in Photoshop, click on the Crop Tool icon in the Tools palette. In the Options bar type ‘4in’ in the Width field and ‘6in’ in the Height field. Type in ‘240’ in the Resolution field and set the resolution units to ‘pixels/inch’. When sizing an image for the intended output it is important to select the width and height in pixels for screen or web viewing and in centimeters or inches for printing. Typing in ‘px’, ‘in’ or ‘cm’ after each measurement will tell Photoshop to crop using these units. If no measurement is entered in the field then Adobe will choose the default unit measurement entered in the Preferences (Preferences > Units & Rulers). The preference can be quickly changed by Control-double-clicking on either ruler (select View > Rulers if they are not currently selected).
Note > The Image Size dialog box can also change the size of an image but it cannot crop an image to the a different ‘format’ or shape, e.g. you cannot change an oblong image to a square image unless you crop or remove a portion of the image using the Crop Tool.
Additional information
The action of entering measurements and resolution at the time of cropping ensures that the image is sized and cropped or ‘shaped’ as one action. Entering the size at the time of cropping ensures the format of the final image will match the printing paper, photo frame or screen where the image will finally be output. To quickly delete all of the existing units that may already be entered in the fields from a previous crop, select the ‘Clear’ option. To quickly enter the current actual measurements of a selected image, click on the ‘Front Image’ button. This option is useful when you are matching the size of one or more new images to an existing one that has already been prepared.
Note > If both a width and a height measurement are entered into the fields the proportions of the final crop will be locked and may prevent you from selecting parts of the image if the capture and output formats are different, e.g. if you have entered the same measurement in both the width and height fields the final crop proportions are constrained to a square.
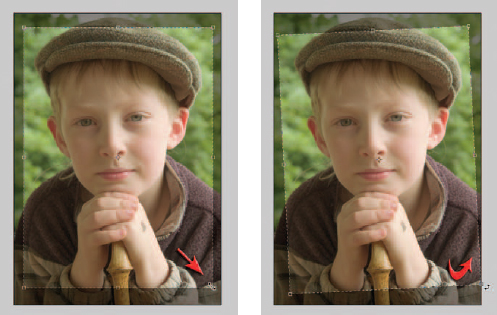
Perfecting the crop
Click and drag to place the cropping marquee on the image; you can resize the marquee with the corner handles. The marquee can be click-dragged to reposition or use the keyboard arrow keys to fine-tune the positioning. If the image is crooked you can rotate the cropping marquee by moving the mouse cursor to a position just outside a corner handle of the cropping marquee. A curved arrow should appear, allowing you to drag the image straight.
Before completing the crop, you should check the entire image edge to see if there are any remaining border pixels that are not part of the image. Click on the ‘Change Screen Mode’ icon at the bottom of the Tools palette to change the screen mode to ‘Maximized Screen Mode’ or ‘Full Screen Mode’. Alternatively you could drag the corner of the image window to extend the size of the window. You may need to select View > Fit on Screen to see all edges or if you must zoom in to see details, you can quickly move the window view by using the Hand Tool (press the Spacebar). Press the ‘Return/Enter’ key on the keyboard to complete the cropping action. Alternatively press the ‘Esc’ key on the keyboard to cancel the crop.
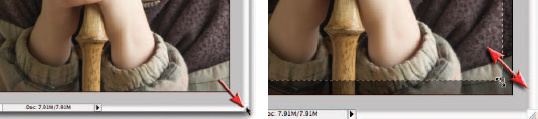
The marquee tool is programmed to snap to the edges of the document as if they were magnetized. This can make it difficult to remove a narrow border of unwanted pixels. To overcome this problem you will need to go to the ‘View’ menu and switch off the ‘Snap To > Document Bounds’ option.
Note > See ‘Retouching – Project 1’ for more information on cropping images.
Tonal adjustments – Step 3
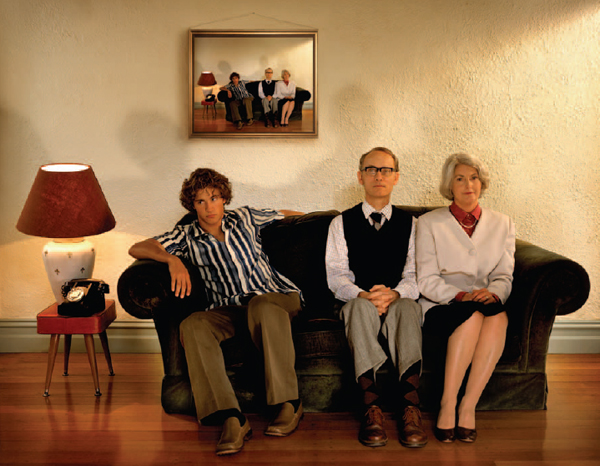
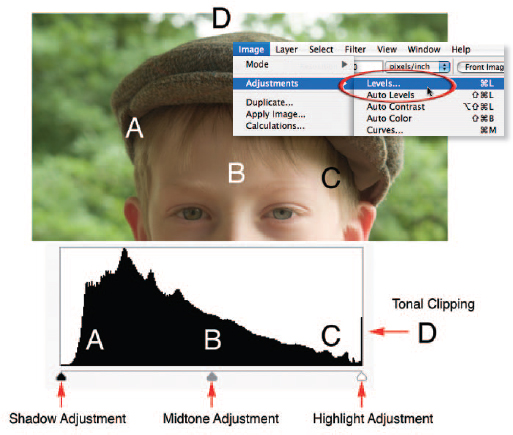
The starting point to adjust the tonal qualities of EVERY image is the ‘Levels’ dialog box (go to ‘Image > Adjustments > Levels’). Do not use the ‘Brightness/Contrast’ adjustment feature in older versions of Photoshop. The horizontal axis of the histogram in the Levels dialog box displays the brightness values from left (darkest) to right (lightest). The vertical axis of the histogram shows how much of the image is found at any particular brightness level. If the subject contrast or ‘brightness range’ exceeds the latitude of the capture device or the exposure is either too high or too low, then tonality will be ‘clipped’ (shadow or highlight detail will be lost and no amount of adjustment will recover it).
Histograms
During the capture stage it is often possible to check how the capture device is handling or interpreting the tonality and color of the subject. This useful information can often be displayed as a ‘histogram’ on the LCD screen of high quality digital cameras or in the scanning software during the scanning process. The histogram displayed shows the brightness range of the subject in relation to the latitude or ‘dynamic range’ of your capture device’s image sensor. Most digital camera sensors have a dynamic range similar to color transparency film (around five stops) when capturing in JPEG or TIFF. This may be expanded beyond seven stops when the RAW data is processed manually.
Note > You should attempt to modify the brightness, contrast and color balance at the capture stage to obtain the best possible histogram before editing begins in the software.
Optimizing tonality
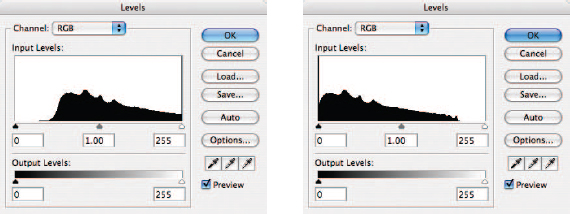
In a good histogram, one where a broad tonal range with full detail in the shadows and highlights is present, the information will extend all the way from the left to the right side of the histogram. The histogram on the left (below) indicates missing information in the highlights (right side of histogram). The histogram on the right indicates a small amount of ‘clipping’ or loss of information in the shadows (left side of histogram).
Histograms indicating image is either too light or too dark
Brightness
If the digital file is too light a tall peak will be seen to rise on the right side (level 255) of the histogram. If the digital file is too dark a tall peak will be seen to rise on the left side (level 0) of the histogram.
Solution: Decrease or increase the exposure/brightness in the capture device.

Histograms indicating image either has too much contrast or not enough
Contrast
If the contrast is too low the histogram will not extend to meet the sliders at either end. If the contrast is too high a tall peak will be evident at both extremes of the histogram.
Solution: Increase or decrease the contrast of the light source used to light the subject or the contrast setting of the capture device. Using diffused lighting rather than direct sunlight or using fill-flash and/or reflectors will ensure that you start with an image with full detail.
Optimizing a histogram after capture
The final histogram should show that pixels have been allocated to most, if not all, of the 256 levels. If the histogram indicates large gaps between the ends of the histogram and the sliders (indicating either a low-contrast scan or low-contrast subject photographed in flat lighting) the subject or original image should usually be recaptured a second time.
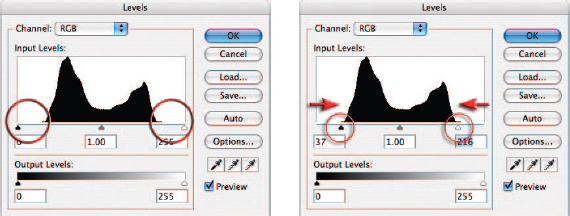
Small gaps at either end of the histogram can, however, be corrected by dragging the sliders to the start of the tonal information. Holding down the Alt/Option key when dragging these sliders will indicate what, if any, information is being clipped. Note how the sliders have been moved beyond the short thin horizontal line at either end of the histogram. These low levels of pixel data are often not representative of the broader areas of shadows and highlights within the image and can usually be clipped (moved to 0 or 255).
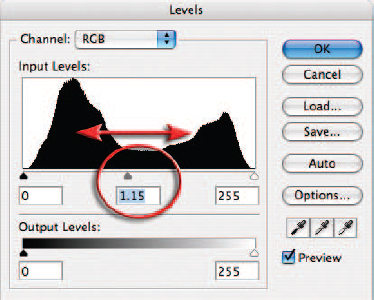
Moving the ‘Gamma’ slider can modify the brightness of the midtones. After correcting the tonal range using the sliders, click ‘OK’ in the top right-hand corner of the Levels dialog box.
Note > Use the Levels for all initial brightness and contrast adjustments. The Brightness/Contrast adjustment feature in Photoshop CS and CS2 should be avoided as this will upset the work performed using Levels and can result in a loss of information.
Shadows and highlights
When the tonality has been optimized using the Levels dialog box the shadow and highlight values may require further work. One of the limitations of the Levels adjustment feature is that it cannot focus its attention on only the shadows or the highlights, e.g. when the slider is moved to the left both the highlights and the shadows are made brighter.

Targeted adjustments can be achieved using the Curves adjustment feature (Image > Adjustments > Curves). Curves allows the user to target tones within the image and move them independently of other tones within the image, e.g. the user can decide to make only the darker tones lighter while preserving the value of both the midtones and the highlights. It is also possible with a powerful editing feature such as Curves to move the shadows in one direction and the highlights in another. In this way the contrast of the image could be increased without losing valuable detail in either the shadows or the highlights. See ‘Advanced Retouching – Projects 1 and 2’ for more information on Curves.
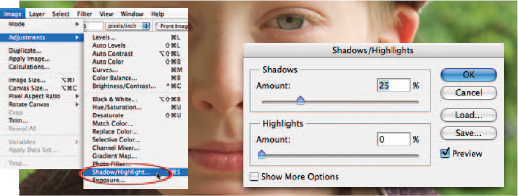
The Shadow/Highlight adjustment feature (Image > Adjustments > Shadow/Highlight) offers an alternative. This targets and adjusts tonality in a non-destructive way and in many ways offers superior control than the Curves adjustment feature (midtone contrast) in a user-friendly interface. The disadvantage is that the adjustment is not available as an adjustment layer. See ‘Advanced Retouching’ for more information.
Note > See ‘Retouching Projects – Project 3’ for more information on shadow and highlight control.
Target values – using the eyedroppers
Note > The following procedure is recommended for quick corrections only. The procedure is useful for a semi-automated approach to target the important shadow and highlight tones.
To ensure highlights do not ‘blow out’ and the shadows do not print too dark it is possible to target, or set specific tonal values, for the highlight and shadow tones within the image using the eyedroppers (found in the Levels and Curves dialog boxes). The tones that should be targeted are the lightest and darkest areas in the image with detail. The default settings of these eyedroppers are set to 0 (black) and 255 (white). These settings are only useful for targeting the white paper or black film edge. After establishing the darkest and lightest tones that will print using a step wedge (see ‘Digital Printing’) these target levels can be assigned to the eyedroppers.
Setting a target value
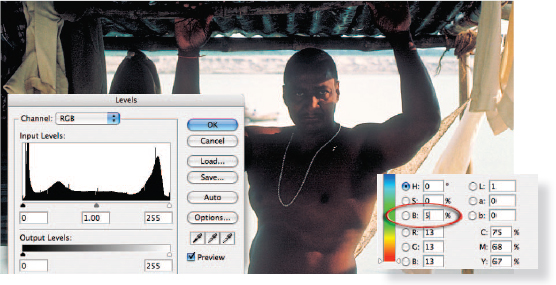
1. Double-click the black or white eyedropper tool in the Levels dialog box to display the Color Picker (now called the ‘Select target shadow color’ or ‘Select target highlight color’ dialog box).
2. Enter a value in the ‘Brightness’ field (part of the Hue, Saturation and Brightness or ‘HSB’ controls) and select OK. A value between 4 and 8 would be considered ‘normal’ for shadow target tones while values between 92 and 99 could be considered for target highlight tones.
3. Carefully view the image to locate the brightest highlight or shadow with detail. Be careful to select representative tones, e.g. for the target highlight do not select a specular highlight such as a light source or a reflection of the light source which should register a value of 255.
4. Using the black and white eyedropper tools, with the altered values, click on the appropriate image detail to assign their target values.
Note > When setting the target values of a color image it is important to select neutral highlight or shadow tones, otherwise a color cast may be introduced into the image. If a color cast is introduced using this technique the color can be corrected by using the center eyedropper ‘Sample in image to set gray point’ and then clicking on a neutral tone within the image.
Color adjustments – Step 4
Neutral tones in the image should appear desaturated on the monitor. If a color cast is present try to remove it at the time of capture or scanning if at all possible.
Solution: Control color casts by using either the white balance on the camera (digital), shoot using the RAW file format or by using an 80A or 80B color conversion filter when using tungsten light with daylight film. Use the available color controls on the scanning device to correct the color cast and/or saturation.

Color correction using Levels
If you select a Red, Green or Blue channel (from the channel’s pull-down menu) prior to moving the Gamma slider (middle slider) you can remove a color cast present in the image. For those unfamiliar with color correction, the adjustment feature ‘Variations’ in Photoshop or ‘Color Variations’ in Photoshop Elements gives a quick and easy solution to the problem.
Setting a gray point
Click on the ‘Sample in image to set gray point’ eyedropper in the Levels dialog box and then click on any neutral tone present in the image to remove a color cast. Introducing a near white card or gray card into the first image of a shoot can aid in subsequent color corrections for all images shot using the same light source.
Note > See ‘Retouching Projects – Project 2’ for more information.
Variations (not available when editing 16-bit files)
The ‘Variations’ command allows the adjustment of color balance, contrast and saturation to the whole image or just those pixels that are part of a selection. For individuals that find correcting color by using the more professional color correction adjustment features intimidating, Variations offers a comparatively user-friendly interface. By simply clicking on the alternative thumbnail that looks better the changes are applied automatically. The adjustments can be concentrated on the highlights, midtones or shadows by checking the appropriate box. The degree of change can be controlled by the Fine/Coarse slider.
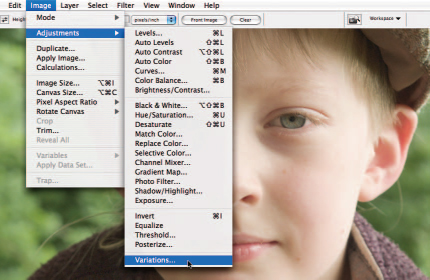
Variations can be accessed from the Adjustments submenu in the Image menu. Start by selecting the ‘Midtones’ radio button and then adjust the Fine/Coarse slider until you can see a thumbnail that looks about right, and then click on the one you like. Then click ‘OK’.
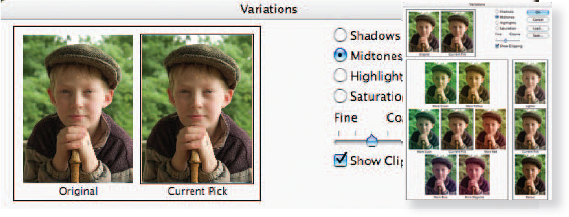
Note > Clicking on a thumbnail more than once will result in repeated, and increasing, intensity of the chosen correction. Editing with the highlights, shadows or saturation button checked can lead to a loss of information in one or more of the channels. If the ‘Show Clipping’ is checked, a neon warning shows areas in the image that have been adjusted to 255 or 0. Clipping does not, however, occur when the adjustment is restricted to the midtones only.
Cleaning an image – Step 5
The primary tools for removing blemishes, dust and scratches are the ‘Clone Stamp Tool’, the ‘Healing Brush Tool’ and the ‘Spot Healing Brush Tool’. The Clone Stamp is able to paint with pixels selected or ‘sampled’ from another part of the image. The Healing Brush is a sophisticated version of the Clone Stamp Tool that not only paints with the sampled pixels but then ‘sucks in’ the color and tonal characteristics of the pixels surrounding the damage. The Spot Healing Brush Tool requires no prior sampling and is usually the first port of call for most repairs. The following procedures should be taken when working with the Spot Healing Brush Tool or Healing Brush Tool.
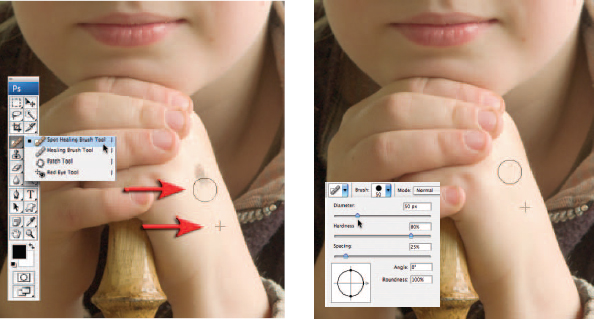
1. Select the Spot Healing Brush Tool from the Tools palette.
2. Zoom in to take a close look at the damage that needs to be repaired.
3. Choose an appropriate size, soft-edged brush from the brushes palette that just covers the width of the blemish, dust or scratch to be repaired.
4. Move the mouse cursor to the area of damage.
5. Click and drag the tool over the area that requires repair.
6. Increase the hardness of the brush if the repair area becomes contaminated with adjacent tones, colors or detail that does not match the repair area.
7. For areas proving difficult for the Spot Healing Brush to repair switch to the Healing Brush Tool or the Clone Stamp Tool. Select a sampling point by pressing the Alt/Option key and then clicking on an undamaged area of the image (similar in tone and color to the damaged area). Click and drag the tool over the area to paint with the sampled pixels to conceal the damaged area (a cross-hair marks the sampling point and will move as you paint).
Note > If a large area is to be repaired with the Clone Stamp Tool it is advisable to take samples from a number of different points with a reduced opacity brush to prevent the repairs becoming obvious.
Sharpening an image – Step 6
Sharpening the image is the last step of the editing process. Many images benefit from some sharpening even if they were captured with sharp focus. The ‘Unsharp Mask’ and the ‘Smart Sharpen’ filters from the ‘Sharpen’ group of filters are the most sophisticated and controllable of the sharpening filters. They are used to sharpen the edges by increasing the contrast where different tones meet.
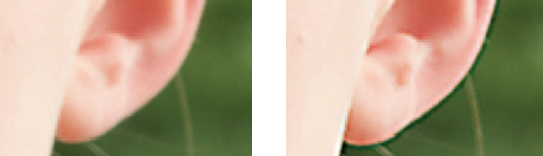
The pixels along the edge on the lighter side are made lighter and the pixels along the edge on the darker side are made darker. Before you use the Unsharp Mask go to ‘View > Actual Pixels’ to adjust the screen view to 100%. To access the Unsharp Mask (the slightly simpler of the two sophisticated sharpening filters) go to ‘Filter > Sharpen > Unsharp Mask’. Start with an average setting of 100% for ‘Amount’, a 1- to 1.5-pixel ‘Radius’ and a ‘Threshold’ of 3. The effects of the Unsharp Mask filter are more noticeable on-screen than in print. For final evaluation always check the final print and adjust if necessary by returning to a previously saved version or by going back one step in the History palette. The three sliders control:
Amount – This controls how much darker or lighter the pixels are adjusted. Eighty to 180% is normal.
Radius – Controls the width of the adjustment occurring at the edges. There is usually no need to exceed 1 pixel if the image is to be printed no larger than A4/US letter. A rule of thumb is to divide the image resolution by 200 to determine the radius amount, e.g. 200ppi ÷ 200 = 1.00.
Threshold – Controls where the effect takes place. A zero threshold affects all pixels whereas a high threshold affects only edges with a high tonal difference. The threshold is usually kept very low (0 to 2) for images from digital cameras and medium or large format film. The threshold is usually set at 3 for images from 35mm. Threshold is increased to avoid accentuating noise, especially in skin tones.

Note > See ‘Retouching Projects – Project 5’ for more information on sharpening images.
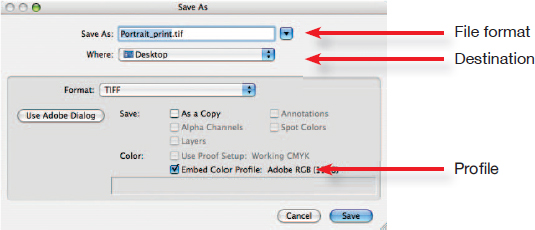
Saving a modified file – Step 7
Go to the ‘File’ menu and select ‘Save As’. Name the file, select ‘TIFF’ or ‘Photoshop’ as the file format and select the destination ‘Where’ the file is being saved. Check the ‘Embed Color Profile’ box and click ‘Save’. Keep the file name short using only the standard characters from the alphabet. Use a dash or underscore to separate words rather than leaving a space and always add or ‘append’ your file name after a full stop with the appropriate three- or four-letter file extension (.psd or .tif). This will ensure your files can be read by all and can be safely uploaded to web servers if required. Always keep a backup of your work on a remote storage device if possible.
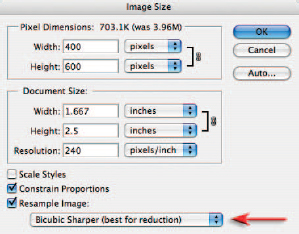
Resize for screen viewing
Duplicate your file by going to ‘Image > Duplicate Image’. Rename the file and select OK. Go to ‘Image > Image Size’. Check the ‘Constrain Proportions’ and ‘Resample Image’ boxes. Type in 600 pixels in the ‘Height’ box (anything larger may not fully display in a browser window of a monitor set to 1024 × 768 pixels without the viewer having to use the scroll or navigation bars). Use the Bicubic Sharper option when reducing the file size for optimum quality.
Using the Crop Tool (typing in the dimensions in pixels, e.g. 600px and 400px) will also resize the image quickly and effectively. This technique does not, however, make use of Bicubic Sharper and images may require sharpening a second time using the Smart Sharpen or Unsharp Mask filter.
Note > Internet browsers do not respect the resolution and document size assigned to the image by image-editing software – image size is dictated by the resolution of the individual viewer’s monitor. Two images that have the same pixel dimensions but different resolutions will appear the same size when displayed in a web browser. A typical screen resolution is often stated as being 72ppi but actual monitor resolutions vary enormously.
JPEG format options
After resizing the duplicate image you should set the image size on screen to 100% or ‘Actual Pixels’ from the View menu (this is the size of the image as it will appear in a web browser on a monitor of the same resolution). Go to ‘File’ menu and select ‘Save As’. Select JPEG from the Format menu. Label the file with a short name with no gaps or punctuation marks (use an underscore if you have to separate two words) and finally ensure the file carries the extension .jpg (e.g. portrait_one.jpg). Click ‘OK’ and select a compression/quality setting from the ‘JPEG Options’ dialog box. With the Preview box checked you can check to see if there is excessive or minimal loss of quality at different compression/quality settings in the main image window.
Note > Double-clicking the Zoom Tool in the Tools palette will set the image to actual pixels or 100% magnification.
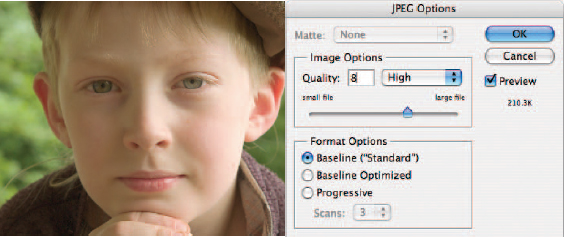
Choose a compression setting that will balance quality with file size (download time). High compression (low quality) leads to image artifacts, lowering the overall quality of the image. There is usually no need to zoom in to see the image artifacts as most browsers and screen presentation software do not allow this option.
Image Options: The quality difference on screen at 100% between the High and Maximum quality settings may not be easily discernible. The savings in file size can, however, be enormous, thereby enabling much faster uploading and downloading via the Internet.
Format Options: Selecting the ‘Progressive’ option from the Format Options enables the image to be displayed in increasing degrees of sharpness as it is downloading to a web page, rather than waiting to be fully downloaded before being displayed by the web browser.
Size: The open file size is not changed by saving the file in the JPEG file format as this is dictated by the total number of pixels in the file. The closed file size is of interest when using the JPEG Options dialog box as it is this size that dictates the speed at which the file can be uploaded and downloaded via the Internet. The quality and size of the file is a balancing act if speed is an issue due to slow modem speeds.
Save for Web & Devices
The Save for Web & Devices command from the File menu offers the user an alternative, all-in-one, option for resizing, optimizing and previewing the image prior to saving the file in the JPEG format. Access the Save for Web & Devices feature from the File menu. Click on the 2-up tab to see a before and after version of your image. Click on the second image and, from the ‘Preview Menu’, choose either the Mac or Windows options. This will enable you to anticipate how your image may be viewed in software that cannot read the ICC profile that Photoshop normally embeds as part of the color management process, e.g. most web browsers.
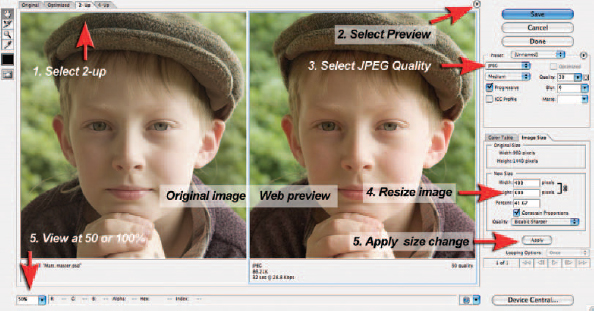
To adjust the color or tone prior to saving as a JPEG exit the Save for Web feature and go to View > Proof Setup and then choose either Macintosh RGB or Windows RGB depending on the intended monitor that the image will be viewed on. With the Proof Setup switched on, adjustments may be required to both image brightness and saturation in order to return the appearance of the image to ‘normal’. Brightness should be controlled via the ‘Gamma’ slider in the ‘Levels’ adjustment feature and color saturation via the ‘Hue/Saturation’ adjustment feature.
Capture and enhance overview
1. Capture an image with sufficient pixels for the intended output device.
2. Resize and crop the image to the intended output size.
3. Optimize the histogram using the Levels dialog box.
4. Adjust the tonality and color.
5. Clean the image using the Spot Healing Brush Tool.
6. Apply the Unsharp Mask or Smart Sharpen filter.
7. Save the adjusted image as a Photoshop file (PSD).
8. Duplicate the file and resize for uploading to the web if required.
9. Save the file as a JPEG with a suitable compression/quality setting.

Mark Galer
6 inches x 9 inches @ 240ppi – 3:2 format image cropped from an original 4:3 format digital sensor

Paul Allister