adobe camera raw
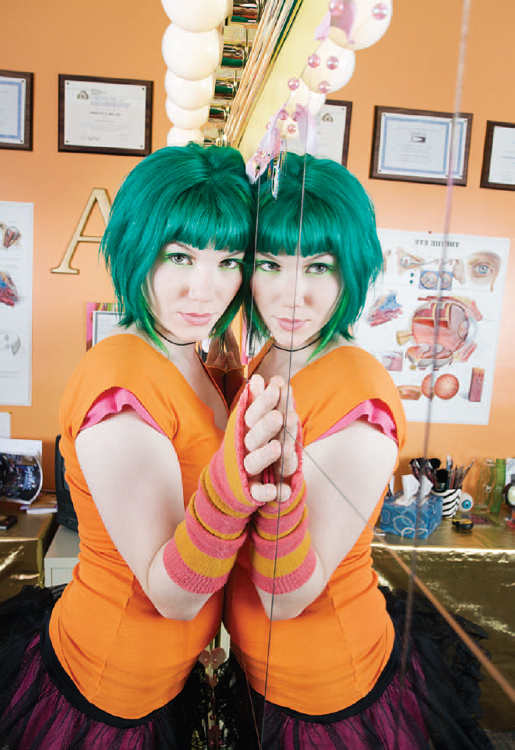
Vanessa Montgomery by Victoria Verdon Roe
essential skills
~ Capture High-quality digital images as camera Raw files.
~ Process a camera Raw file to optimize color, tonality and sharpness.
~ Use camera Raw settings to batch process images for print and web viewing.
~ Convery Raw files to digital negatives for archival storage.
Introduction
One of the big topics of conversation since the release of Photoshop CS has been the subject of ‘Raw’ files and ‘digital negatives’. This chapter guides you through the advantages of choosing the Raw format and the steps you need to take to process a Raw file from your camera in order to optimize it for final editing in Photoshop CS3.
All digital cameras capture in Raw but only Digital SLRs and the medium- to high-end ‘Prosumer’ cameras offer the user the option of saving the images in this Raw format. Selecting the Raw format in the camera instead of JPEG or TIFF stops the camera from processing the color data collected from the sensor. Digital cameras typically process the data collected by the sensor by applying the white balance, sharpening and contrast settings set by the user in the camera’s menus. The camera then compresses the bit depth of the color data from 12 to 8 bits per channel before saving the file as a JPEG or TIFF file. Selecting the Raw format prevents this image processing taking place. The Raw data is what the sensor ‘saw’ before the camera processes the image, and many photographers have started to refer to this file as the ‘digital negative’. The term ‘digital negative’ is also used by Adobe for their archival format (.dng) for Raw files.
The sceptical among us would now start to juggle with the concept of paying for a ‘state-of-the-art’ camera to collect and process the data from the image sensor, only to stop the high-tech image processor from completing its ‘raison d’être’. If you have to process the data some time to create a digital image why not do it in the camera? The idea of delaying certain decisions until they can be handled in the image-editing software is appealing to many photographers, but the real reason for choosing to shoot in camera Raw is QUALITY.
Processing Raw data
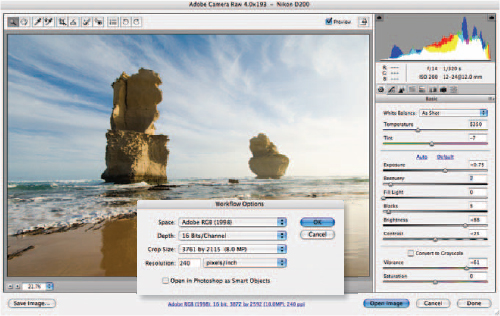
The unprocessed Raw data can be converted into a usable image file format by Adobe Camera Raw (ACR). Variables such as bit depth, white balance, exposure, brightness, contrast, saturation, sharpness, noise reduction and even the crop can all be assigned as part of the conversion process. Performing these image-editing tasks on the full high-bit Raw data (rather than making these changes after the file has been processed by the camera) enables the user to achieve a higher quality end-result. Double-clicking a Raw file, or selecting ‘Open in Camera Raw’ in Bridge, opens the Adobe Camera Raw (ACR) dialog box, where the user can prepare and optimize the file for final processing in the main Photoshop editing interface. If the user selects 16 Bits/Channel in the Workflow Options, the 12 bits per channel data from the image sensor is rounded up – each channel is now capable of supporting 32,769 levels instead of the 256 levels we are used to working with in the 8 bits per channel option. Choosing the 16 Bits/Channel option enables even more manipulation in the main Photoshop editing space without the risk of degrading the image quality. When the file is opened into the image-editing workspace of your Photoshop software, the Raw file closes. Any changes you make to the appearance of the image in the ACR dialog box will be applied to the image that is opened in Photoshop’s main editing space but won’t alter the original image data of the Raw file. The adjustments you make in the ACR dialog box are instead saved as either a sidecar file (.xmp) or in the computer’s Camera Raw database.
Processing projects – images on supporting DVD
Although the ACR dialog box appears a little daunting at first sight, it is reasonably intuitive and easy to master, and then Raw image processing is a quick and relatively painless procedure. The dialog box has been cleverly organized by Adobe so the user starts with the top slider and works their way down to the bottom control slider. If the image you are processing is one of a group of images shot in the same location, and with the same lighting, the settings used can be applied to the rest of the images as an automated procedure.
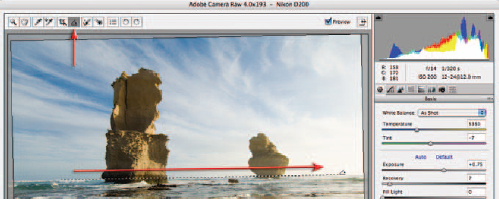
Straighten, crop and size – Step 1
Select the Straighten Tool on the top left-hand side of the ACR dialog box. Click on one end of an imaginary horizontal or vertical line within the image and drag to the other end of the line and then let go of the mouse clicker to automatically straighten the image. Cropping in ACR does not delete pixels but merely hides them and these pixels can be recovered if necessary.
Crop the image to the correct aspect ratio or shape using the Crop Tool. Select one of the existing aspect ratios or create your own using the ‘Custom’ command found in the Crop menu. The aspect ratio of the bounding box will change when a new format is selected. Click and drag on any corner handle to alter the composition or framing of the image. Use the keyboard shortcut Command/Ctrl + Z to undo any action that you are not happy with.
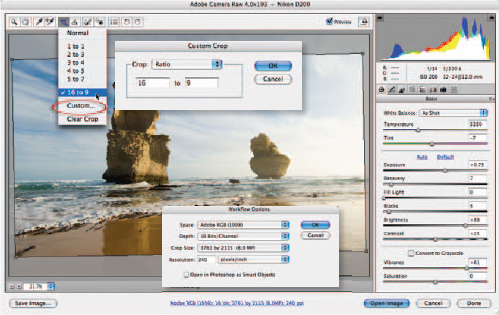
The Crop Size (pixel dimensions) and Resolution can also be set in ACR. If your target output is specified in inches or cms you will need to perform some calculations to ascertain the optimum crop size (divide the dimensions of the document needed by the optimum image resolution required by the output device). As crop sizes are only approximate in ACR you should choose a size that is slightly larger than the actual dimensions required.
Color space – Step 2
There are four choices of color space in the ACR dialog box and it is important to select the most appropriate one for your workflow before you start to assign color values to the image in ACR (using the controls on the right side of the dialog box). ColorMatch RGB is rarely used these days (it was a space commonly used before color management came of age back at the end of the last decade) so the choice is now limited to just three. The main difference between the three major spaces is the size of the color gamut (the range of colors that each space supports). There is not much point in working with a color space larger than necessary as the colors outside of the monitor space will not be visible and they cannot be reproduced by an output device with a limited gamut range. The three color spaces are as follows:
sRGB – This is the smallest (with a range of colors similar to a typical monitor) of the three common color spaces and should be selected if your images are destined for screen viewing or are destined to be printed by a print service provider using the sRGB color space.
Adobe RGB (1998) – This space is larger than the sRGB space and is the most common color space used in the commercial industry, where the final image is to appear in print. It is a good compromise between the gamut of a color monitor and the gamut of an average CMYK printing press. It is also a space that is suitable for some Print Service Providers and standard quality inkjet prints, e.g. a budget inkjet printer using matte or semi-gloss paper.
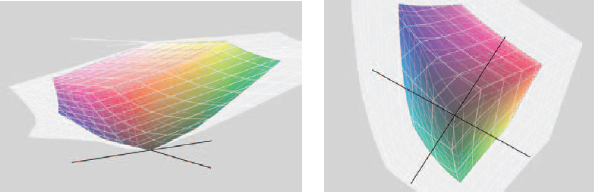
The wide gamut ProPhoto space (white) compared to the Adobe RGB 1998 space (color)
ProPhoto RGB – This is the largest color space and can be selected if you have access to a print output device with a broad color gamut (larger than most CMYK devices are capable of offering). When working in ProPhoto the user must stay in 16 Bits/Channel for the entire editing process. Converting to smaller color spaces in Photoshop’s main editing space usually results in loss of data in the channels regardless of the rendering intent selected in the conversion process. This loss of data may not be immediately obvious if you do not check the histogram after the conversion process. The data loss is most apparent in bright saturated colors where texture and fine detail may be missing as the color information in the individual channels has become clipped in the conversion process.
Choosing a bit depth – Step 3
Select the ‘Depth’ in the Workflow Options (click on the blue text at the base of the ACR dialog box). If the user selects the 16 Bits/Channel option, the 12 bits per channel data from the image sensor is rounded up – each channel is now capable of supporting 32,769 levels. In order to produce the best quality digital image, it is essential to preserve as much information about the tonality and color of the subject as possible. If the digital image has been corrected sufficiently in ACR for the requirements of the output device, the file can be opened in Photoshop’s main editing space in 8 bits channel mode. However, if the digital image has further corrections applied in the 8 bits per channel mode, the final quality will be compromised. Sixteen-bit editing is invaluable if maximum quality is required from an original image file that requires further or localized editing of tonality and color in Photoshop after leaving the camera Raw dialog box. If you have assigned the ProPhoto RGB color space in ACR you must use the 16 Bits/Channel color space in Photoshop to avoid color banding or posterization.
The problem with 8-bit editing
As an image file is edited extensively in 8 Bits/Channel mode (24-bit RGB) the histogram starts to ‘break up’, or become weaker. ‘Spikes’ or ‘comb lines’ may become evident in the resulting histogram after the file has been flattened.
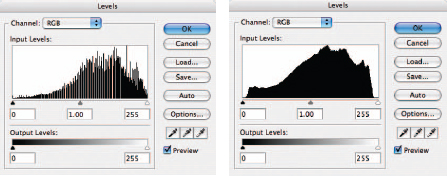
Final histograms after editing the same image in 8 and 16 bits per channel modes
This is due to the fact that there are only 256 levels or tones per channel to describe the full color range of the image. This is usually sufficient if the color space is not huge (as is the case with ProPhoto RGB) and the amount of editing required is limited. If many gaps start to appear in the histogram as a result of extensive adjustment of pixel values this can result in ‘banding’. The smooth change between dark and light, or one color and another, may no longer be possible with the data supplied from a weak histogram. The result is a transition between color or tone that is visible as a series of steps in the final image (see Shadow management).
A ‘Smart’ solution
By opening a Raw file as a smart object (Open Object – hold down the Shift key if this option is not visible) the user can open a Raw file in 8 Bits/Channel but keep the integrity of the histogram by returning to the ACR dialog box to make any large changes to hue, saturation or brightness (luminosity) values.
White balance – Step 4
The first step in optimizing the color and tonal values for the color space we have chosen to work in is to set the white balance by choosing one of the presets from the drop-down menu. If a white balance was performed in the camera, the ‘As Shot’ option can be selected. If none of the presets adjust the color to your satisfaction you can manually adjust the ‘Temperature’ and ‘Tint’ sliders to remove any color cast present in the image. The ‘Temperature’ slider controls the blue/yellow color balance while the ‘Tint’ slider controls the green/magenta balance. Moving both the sliders in the same direction controls the red/cyan balance.

Alternatively you can simply click on the ‘White Balance’ eyedropper in the small tools palette (top left-hand corner of the dialog box) and then click on any neutral tone you can find in the image.
Note > Although it is a ‘White Balance’ you actually need to click on a tone that is not too bright. Clicking on a light or mid gray is preferable.
A photographer looking to save time may introduce a ‘gray card’ in the first frame of a shoot to simplify the task. If precise white balance is extremely critical the photographer can shoot a GretagMacbeth ColorChecker Chart that uses a range of color and gray patches. The user can then target the Red, Green and Blue patches and fine-tune the white balance using the Calibrate controls in ACR. Precise measurements for the colors can be found on the website www.brucelindbloom.com
A GretagMacbeth ColorChecker Chart
Tonal adjustments – Step 5
Directly beneath the White Balance sliders are the tonal controls. Careful adjustment of these sliders will allow you to get the best out of the dynamic range of your imaging sensor, thereby creating a tonally rich image with full detail. Set the brightest points within the image using the ‘Exposure’ slider and darkest points using the ‘Blacks’ slider. Both of these sliders behave like the input sliders in the ‘Levels’ dialog box and will set the white and black points within the image. The ‘Brightness’ and ‘Contrast’ sliders can be used to fine-tune the midtone values. The new ‘Recovery’ slider is designed to rescue highlight tones that may otherwise clip and also the new ‘Fill Light’ slider will lighten the very dark shadow tones that may not print with any texture or detail (think of recovery and fill light as non-destructive variants of the shadow/highlight adjustment feature). Tall peaks appearing at either end of the histogram indicate you will lose shadow, highlight or color detail when you export the file to the main Photoshop editing software. If the image becomes too dark because you are dragging the Exposure slider to the left in order to protect highlight detail, instead use the Recovery slider to darken the highlight detail without darkening the midtone values. Check the Shadows and Highlights buttons at the top of the ACR dialog box for a quick indication of clipping in the histogram.
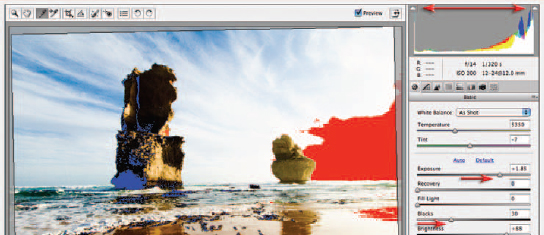
Raising the Exposure and Blacks sliders has clipped the highlights (red) and blacks (blue)
Advanced clipping information
Hold down the ‘Alt/Option’ key when adjusting either the ‘Exposure’ or ‘Blacks’ slider for an indication in the image window of the channel, or channels, where clipping is occurring. Excessive color saturation for the color space selected, as well as overly dark shadows and overly bright highlights, will also influence the amount of clipping that occurs. Clipping in a single channel (indicated by the red, green or blue warning colors) will not always lead to a loss of detail in the final image. However, when the secondary colors appear (cyan, magenta and yellow), you will need to take note, as loss of information in two channels starts to get a little more serious. Loss of information in all three channels (indicated by black when adjusting the shadows and white when adjusting the exposure) should be avoided.
Note > Large adjustments to the ‘Brightness’, ‘Contrast’ or ‘Saturation’ sliders may necessitate further ‘tweaking’ of the Exposure, Recovery, Fill Light or Blacks sliders.
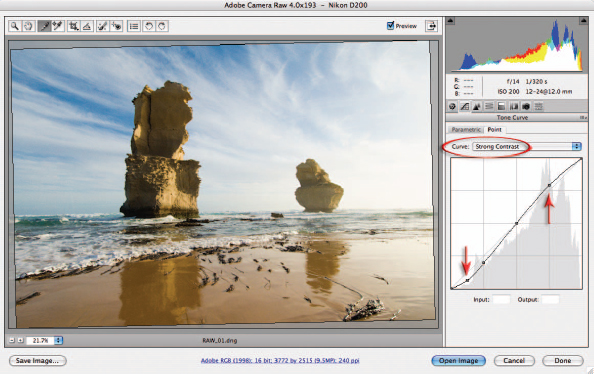
Adjusting tonality in Raw using the Tone Curve
It is possible to fine-tune the tonality in camera Raw using the ‘Tone Curve’ editor. The user can choose to edit the tone curve using four sliders underneath the curve in the ‘Parametric’ tab or in a similar way to the Curves adjustment feature in the main editing space of Photoshop by using the tone curve in the Point tab. In the ‘Point’ tab the user is able to choose one of the presets from the Tone Curve menu or choose ‘Linear’ from this menu and then place their own adjustment points on the curve. To place an adjustment point on the curve simply click on the line and then drag the adjustment point to a new position.
Selecting adjustment points from the image
In the Point tab, it is possible to create an adjustment point by sampling a tone from the preview image. To select an adjustment point in this manner move the mouse cursor into the preview window. Hold down the Ctrl key (PC) or Command key (Mac) to access the sample tool. Note the small ring that appears on the tone curve in the relative position to the tone being sampled. Click the mouse while sampling a highlight tone, a midtone and a shadow tone to add adjustment points. Click on an adjustment point on the tone curve to make it the active adjustment point. Either drag the adjustment point to make the selected tonal range darker or lighter or enter a new value in the output field just below the tone curve. You can use the keyboard arrow keys to fine-tune adjustment point placement. See ‘Advanced Retouching’ for more information on adjustment curves.
Note > The keyboard shortcut for cycling through the adjustment points (to make a different adjustment point active) is to hold down the Ctrl key and then press the Tab key (PC and Mac). Remove adjustment points by selecting an adjustment point and then pressing the Backspace key (PC) or Delete key (Mac).
Saturation and vibrance – Step 6
Increasing saturation in ACR can lead to clipping in the color channels. Clipping saturated colors can lead to a loss of fine detail and texture. Saturation clipping is especially noticeable when you have selected the smaller sRGB color space and have captured an image with highly saturated colors. As a landscape image is not the best image to illustrate saturation and vibrance we will use a more colorful image to illustrate these issues. The Vibrance slider that has been introduced with CS3 applies a non-linear increase in saturation (targeting pixels of lower saturation). It is also designed to protect skin tones in order to prevent faces from getting too red. It should create less clipping problems when compared to the Saturation control.
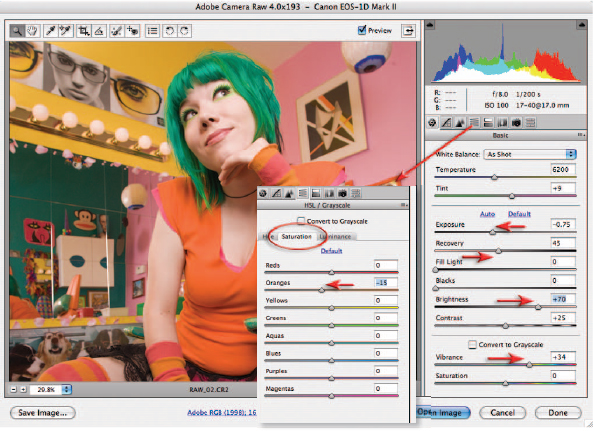
High levels of saturation clipping present in this file were corrected with the help of the Saturation controls in the HSL tab – saturation could then be increased reasonably non-destructively using the Vibrance slider Image of Melissa Zappa by Victoria Verdon Roe
In images where some colors readily clip due to their natural vibrance (especially when using a smaller gamut such as sRGB), lowering the global saturation in order to protect the clipping of a single color can result in a lifeless image. In these instances the user can turn to the HSL tab to edit the saturation of colors independently.
Note > Choosing a larger color space such as ProPhoto RGB, where the colors rarely clip, is only a short-term solution. The color gamut must eventually be reduced to fit the gamut of the output device. ACR is currently the best place in CS3 to massage these colors into the destination space.
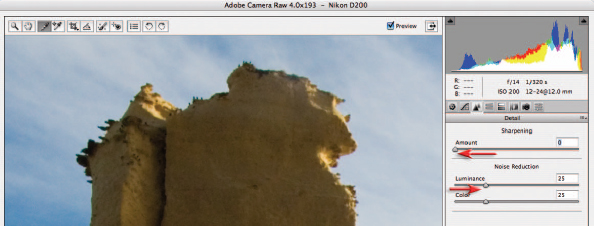
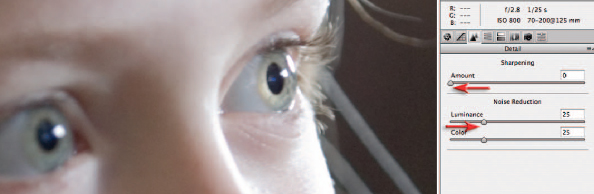
Noise reduction and sharpening – Step 7
Set the image to 200% and click on the Detail tab to access the sharpness and noise reduction controls. The Luminance and Color sliders (designed to tackle the camera noise that occurs when the image sensors’ ISO is high) should only be raised from 0 if you notice image artifacts such as noise appearing in the image window.
Note > Zoom image to 200% to determine levels of noise present in the image.
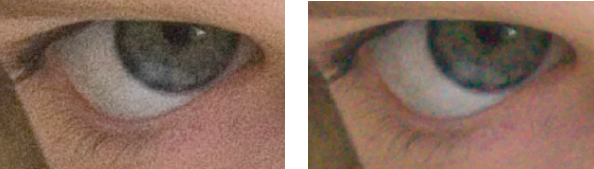
In the image above the sensor was set to 400 ISO on a budget DSLR. Both luminance noise (left) and color noise (right) are evident when the image is set to 200%. When using more expensive DSLR cameras that are set to 100 ISO, it may be possible to leave the Luminance and Color noise sliders set to 0.
It is recommended that you only perform a gentle amount of sharpening in the Raw dialog box (less than 25). By default, sharpening only affects the image preview as viewed in Bridge and not the image opened in the Photoshop editing space. Sharpening can be changed to affect all images by changing the default Camera Raw preferences.
Warning > The Luminance and Color sliders can remove subtle detail and color information that may go unnoticed if the photographer is not careful to pay attention to the effects of these sliders. Zoom in to take a closer look, and unless you can see either the little white speckles or the color artifacts set these sliders to 0.
Digital exposure
Most digital imaging sensors capture images using 12 bits of memory dedicated to each of the three RGB color channels, resulting in 4096 tones between black and white. Most of the imaging sensors in digital cameras record a subject brightness range of approximately five to eight stops (five to eight f-stops between the brightest highlights with detail and the deepest shadow tones with detail).

Distribution of levels
One would think that with all of this extra data the problem of banding or image posterization due to insufficient levels of data (a common problem with 8-bit image editing) would be consigned to history. Although this is the case with midtones and highlights, shadows can still be subject to this problem. The reason for this is that the distribution of levels assigned to recording the range of tones in the image is far from equitable. The brightest tones of the image (the highlights) use the lion’s share of the 4096 levels available while the shadows are comparatively starved of information.

An example of posterization or banding
Shadow management
CCD and CMOS chips are, however, linear devices. This linear process means that when the amount of light is halved, the electrical stimulation to each photoreceptor on the sensor is also halved. Each f-stop reduction in light intensity halves the amount of light that falls onto the receptors compared to the previous f-stop. Fewer levels are allocated by this linear process to recording the darker tones. Shadows are ‘level starved’ in comparison to the highlights that have a wealth of information dedicated to the brighter end of the tonal spectrum. So rather than an equal amount of tonal values distributed evenly across the dynamic range, we actually have the effect as shown above. The deepest shadows rendered within the scene often have fewer than 128 allocated levels, and when these tones are manipulated in post-production Photoshop editing there is still the possibility of banding or posterization.
Adjusting exposure in ACR
For those digital photographers interested in the dark side, an old SLR loaded with a fine-grain black and white film is a hard act to follow. The liquid smooth transitions and black velvet-like quality of dark low-key prints of yesteryear is something that digital capture is hard pressed to match. The sad reality of digital capture is that underexposure in low light produces an abundance of noise and banding (steps rather than smooth transitions of tone). The answer, however, is surprisingly simple for those who have access to a DSLR and have selected the Raw format from the Quality menu settings in their camera. Simply be generous with your exposure to the point of clipping or overexposing your highlights and only attempt to lower the exposure of the shadows in Adobe Camera Raw.
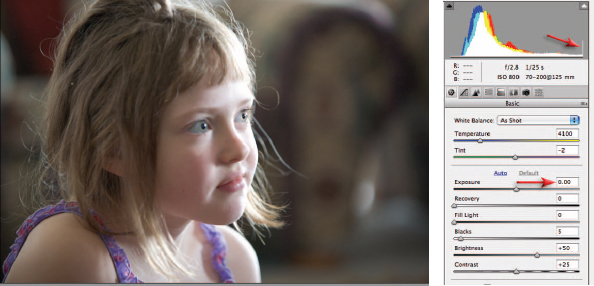
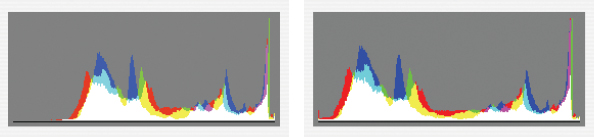
1. The first step is the most difficult to master for those who are used to using Auto or Program camera exposure modes. Although the final outcome may require deep shadow tones, the aim in digital low-key camera exposure is to first get the shadow tones away from the left-hand wall of the histogram by increasing and NOT decreasing the exposure. It is vitally important, however, not to increase the exposure so far that you lose or clip highlight detail. The original exposure of the image used in this project reveals that the shadow tones (visible as the highest peaks in the histogram) have had a generous exposure in-camera so that noise and banding have been avoided (the tones have moved well to the right in the histogram). The highlights, however, look as though they have become clipped or overexposed. The feedback from the histogram on the camera’s LCD would have confirmed the clipping at the time of exposure (the tall peak on the extreme right-hand side of the histogram) and if you had your camera set to warn you of overexposure, the highlights would have been merrily flashing at you to ridicule you of your sad attempts to expose this image. The typical DSLR camera is, however, a pessimist when it comes to clipped highlights and ignorant of what is possible in Adobe Camera Raw. Adobe Camera Raw can recover at least one stop of extra highlight information when the Exposure slider is dragged to the left (so long as the photographer has used a DSLR camera that has a broader dynamic range than your typical fixed lens compact digicam).

Adobe Camera Raw rescues the highlights – sometimes automatically
‘Exposing right’
When the Auto checkbox in the Exposure slider is checked, Adobe Camera Raw often attempts to rescue overexposed highlights automatically. With a little knowledge and some attention to the camera’s histogram during the capture stage, you can master the art of pushing your highlights to the edge. So if your model is not in a hurry (mine is watching a half-hour TV show) you can take an initial exposure on Auto and then check your camera for overexposure. Increase the exposure using the exposure compensation dial on the camera until you see the flashing highlights. When the flashing highlights start to appear you can still add around one extra stop to the exposure before the highlights can no longer be recovered in Adobe Camera Raw. The popular term for this peculiar behavior is called ‘exposing right’.
PERFORMANCE TIP
If the highlights are merrily flashing and the shadows are still banked up against the left-hand wall of the histogram, the solution is to increase the amount of fill light, i.e. reduce the difference in brightness between the main light source and the fill light. If you are using flash as the source of your fill light, it would be important to drop the power of the flash by at least two stops and choose the ‘Slow-Sync’ setting (a camera flash setting that balances both the ambient light exposure and flash exposure) so that the flash light does not overpower the main light source positioned behind your subject. The harsh light from the on-camera flash can also be diffused using a diffusion device.
2. Before we massage the tones to create our low-key image we must first check that our tones are smooth and free from color and luminance noise. Zoom in to 100% magnification for an accurate preview and look for any problems in the smooth dark-toned areas. Setting both the Luminance Smoothing and Color Noise Reduction sliders to 25 (found in the Detail tab) removes the noise in this image. I would also recommend that the Sharpness slider be set to 0 at this point. Rather than committing to global sharpening using the Adobe Camera Raw dialog box, selective sharpening in the main Photoshop editing space may help to keep the tones as smooth as possible.
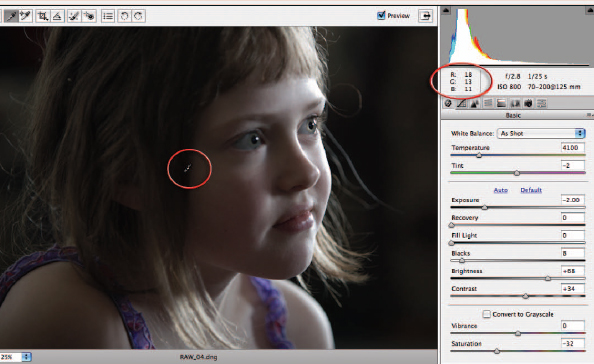
3. Create the low-key look by moving the Exposure and/or the Brightness sliders to the left in the Basic tab. You can continue to drop these sliders until the highlights start to move away from the right-hand wall of the histogram. Select the ‘White Balance Tool’ and move your mouse cursor over the deeper shadows – this will give you an idea of the RGB values you are likely to get when this image is opened into the editing space. Once you approach an average of 15 to 20 in all three channels the low-key look should have been achieved.
Expose right and adjust left
‘Expose right’ and multiple exposures
This inequitable distribution of levels has given rise to the idea of ‘exposing right’. This work practice encourages the user seeking maximum quality to increase the camera exposure of the shadows (without clipping the highlights) so that more levels are afforded to the shadow tones. This approach to making the shadows ‘information rich’ involves increasing the amount of fill light (actual light rather than the ACR’s fill light) or lighting with less contrast in a studio environment. If the camera Raw file is then opened in the camera Raw dialog box the shadow values can then be reassigned their darker values to expand the contrast before opening it as a 16 Bits/Channel file. When the resulting shadow tones are edited and printed, the risk of visible banding in the shadow tones is greatly reduced.
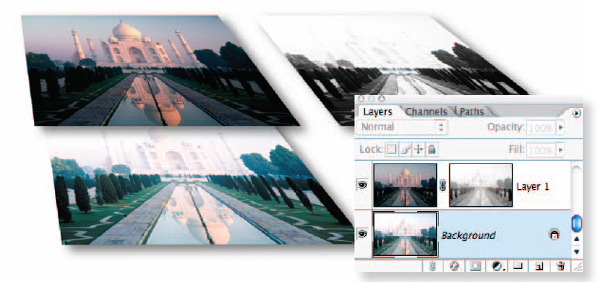
Separate exposures can be combined during the image-editing process
This approach is not possible when working with a subject with a fixed subject brightness range, e.g. a landscape, but in these instances there is often the option of bracketing the exposure and merging the highlights of one digital file with the shadows of a second. Choose ‘Merge to HDR’ (high dynamic range) from the File > Automate menu or use the manual approach outlined in ‘Advanced Retouching’. The example above shows the use of a layer mask to hide the darker shadows in order to access the bit-rich shadows of the underlying layer and regain the full tonal range of the scene.
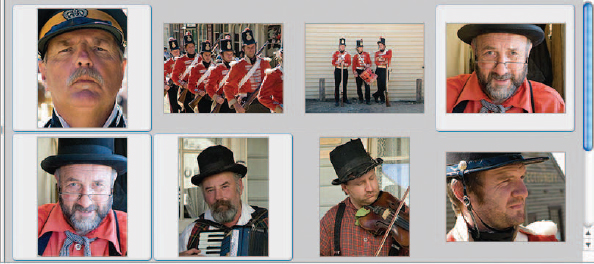
Images by kind permission of Sovereign Hill Outdoor Museum, Ballarat, Victoria
Processing multiple Raw flies
It is possible to open more than one image into the camera Raw dialog box. Opening the files in Bridge (Ctrl + R or Command + R) instead of Photoshop (Ctrl + O or Command + O) will allow you to process a batch of files in Bridge while working on another image in Photoshop.
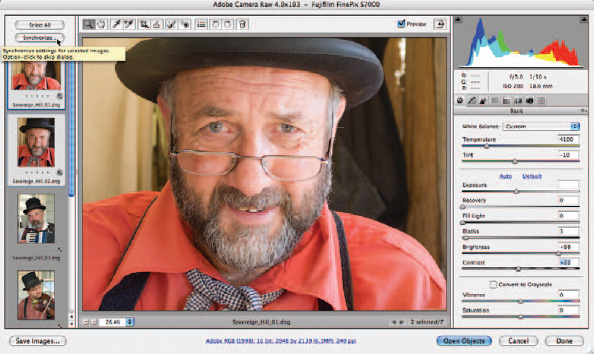
When images share the same lighting it is possible to synchronize the Raw settings. Images taken with a camera using the Auto White Balance setting will often display minor color variations which would benefit from being standardized in camera Raw.
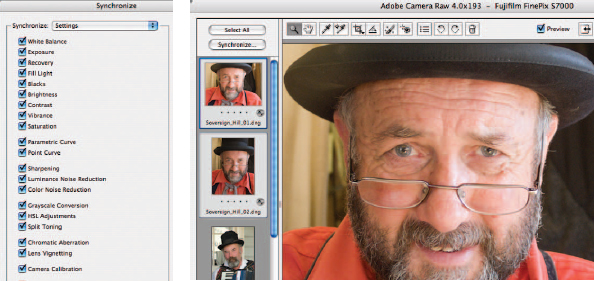
Start the synchronize procedure by optimizing one image and then select the rest of the images that share the same lighting. Clicking on the Synchronize button allows you to choose the precise Raw settings you would like to synchronize. The ability to synchronize selected settings allows you to standardize some components, such as color and tonality, while leaving other settings, such as crop and sharpness, specific to an individual image.
Note > Cropping an image in Camera Raw does not delete the pixels but merely hides them from view in the Bridge previews. The crop can be removed or altered at any time.
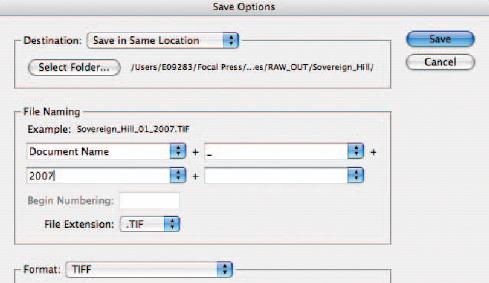
Select Done in the camera Raw dialog box to apply the changes or select ‘Save’ to process the files (convert them to PSD, TIFF or JPEG files with the settings applied). Saving multiple files can take a while but you can work in Photoshop on another image whilst this process is taking place (so long as the Raw files were opened in Bridge rather than in Photoshop).
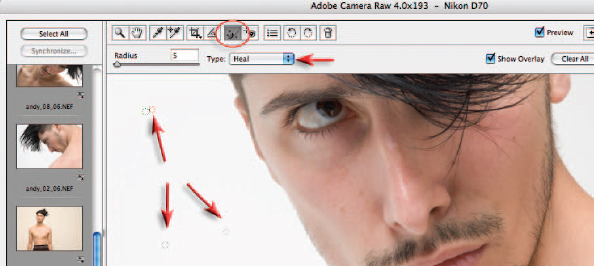
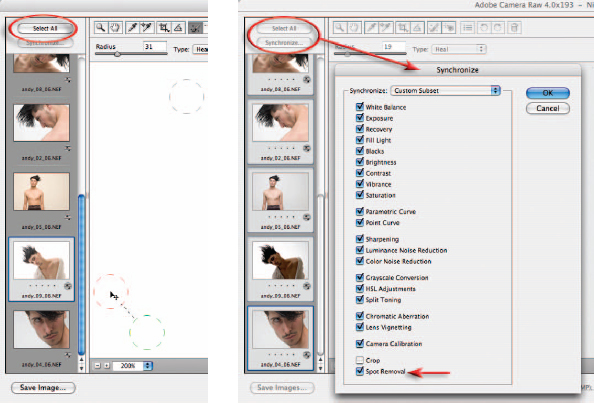
Dust on the sensor – batch removal
A significant problem arises for many digital cameras when dust is allowed to accumulate on the sensor. This becomes most noticeable in smooth areas of light tone such as sky or white studio backdrops as dark spots. Use the Retouch tool and click on a spot in the image. Photoshop will automatically choose an area of the image to heal this spot. The Radius can be changed by raising the Radius slider or dragging the red circle bigger. The source for the heal area (the green circle) can be dragged to an alternate location if required. Fortunately the dust is in the same place in each and every image and so after spotting one image you can choose ‘Select All’ and ‘Synchronize’ to remove the dust from all images you have open in the ACR dialog box. Be sure to check the Spot Removal option in the Synchronize dialog box before selecting OK.
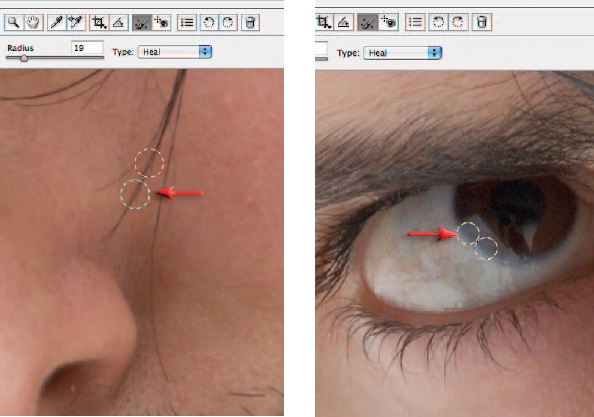
In areas of continuous tone the heal area that is selected automatically by Photoshop is usually OK. In areas of fine detail the healing area may need to be relocated to ensure lines do not appear disjointed.
Archiving Raw files as digital negatives
Working with camera Raw files is going to create some extra strain on the storage capacity found on a typical computer’s hard drive. What to do with all of the extra gigabytes of Raw data is a subject that people are divided about. You can burn them to CD or DVD disks – but are the disks truly archival? You can back them up to a remote FireWire drive – but what if the hard drive fails? Some believe that digital tape offers the best track record for longevity and security. Why archive at all you may ask? Who can really tell what the image-editing software of the future will be capable of – who can say what information is locked up in the Raw data that future editions of the Raw editors will be able to access. Adobe has now created a universal Raw file format called DNG (Digital Negative) in an attempt to ensure that all camera Raw files (whichever camera they originate from) will be accessible in the future. The Digital Negative format also includes lossless compression to reduce the size of the Raw files. The Adobe DNG converter is available from the Adobe website or from the supporting DVD. The converter will ensure that your files are archived in a format that will be understood in the future. Expect to see future models of many digital cameras using this DNG format as standard. One thing is for sure – Raw files are a valuable source of the rich visual data that many of us value and so the format will be around for many years to come.

Low-key image created in Camera RAW by reducing exposure – image by Mark Galer
Melissa Zappa by Victoria Verdon Roe
Highly saturated colors carefully massaged into the Adobe RGB (1998) profile in Adobe Camera Raw