

CHAPTER 4
Drums Setup

There is no great trick to making a set of drums sound like a well-tuned, punchy, solid drum set. First, start with a well-tuned, punchy, solid drum set. Properly tuned, well-played drums coupled with good songwriting and solid engineering will always record the best.
But let's get real. Some drummers aren't interested in changing heads or tuning. They just want to bash away. If this works for the music and the artist, then bask in the bash.
Placing the Drums
• Arrive early. If you are new to the room, or new to the drummer, set up a bit earlier than normal, perhaps even the night before the session. This should give you and the drummer extra time to work out the absolute best sounds. But don't tire him out before the session starts.
• Determine the best placement for the drums. For a rock record, you might place the drums in the middle of the room to minimize coloration from close reflections. For ambience microphones, maybe place the drums next to a door that opens up into a larger area such as a loading bay. This isn't necessarily done for a huge ambient rock drum sound, but for using a bit of the room sound for placement and focus of the drums.
For a blues session, you might not place the drums right in the middle, but more to one side to leave space for other players. For a country session, maybe place the drums in a less live situation, such as an isolation booth. Ask the staff where other engineers normally place the drums.
Work with the drummer to find the best location. You don't want to place the drums in the isolation booth then find out he wants to be on the floor with the rest of the band. Change your setup for him – don't expect him to change his setup for you.
• Get felt in the corner. Take advantage of the room's acoustics. Some studios have reversible panels on the walls where one side is reflective wood and the other side is absorbent padding. Use these acoustic panels to change the characteristics of different parts of the room. If these measures are not enough to eliminate errant frequencies or reflections, hang blankets and place baffles. Wait until all the microphones are set up before carefully placing the baffles.
• Rise and shine. If a whole band is playing together, maybe place the drum kit on a drum riser to eliminate low-end rumble from neighboring amplifiers and to keep rumble from the drums out of the amplifier microphones. The drummer might play a little better when he is at eye level with the rest of the players and the engineer. It makes him feel as if he's on stage.
• Use a carpet under the drums. Lay out a carpet before setting up the drum kit to keep reflections from bouncing off the floor back into the microphones. A carpet helps eliminate some of the squeaks and rattles that may occur when the kit sits on the bare floor. A carpet also helps keep the kit stationary.
But how does it sound without the carpet underneath the kit? Maybe a drum sound with reflections from the floor will work for your situation. Just don't scratch the floor.
• His rug is taped on. If you know the drummer is in again next week, tape the markings on the carpet under the kit. Use duct tape to mark exactly where each drum and stand goes. Different drummers using the same carpet may need different colors to distinguish whose kit goes where.
• Most drummers will set up the kit themselves. Once the drums are placed properly according to the drummer, set all microphone stands squarely on the floor at the correct spots. Use the strongest stands available. The placement of the drums takes precedence over the placement of the microphone stands. Work the setup around the drums.
• Use a sand bag to hold a stand in place. Set all stands stably enough that if someone bumps into them the placement remains unchanged.
• Stop the kick from moving forward. Some drummers really hit the drums, causing the kick to edge forward, shifting the whole kit. Secure the kick in place using a cinder block, sandbag, or equivalent. Some situations call for nailing a short plank in front of the kick drum to keep it in place, but this is an extreme measure.
• Fix faulty felts. Replace worn felt pads and plastic sleeves that hold the cymbal in place. A worn cymbal sleeve may rattle against its metal stand.
• Bring it from home to me. Encourage the drummer, as with the rest of the musicians, to bring all of their percussion instruments to the sessions. Different songs may require different sounds, especially snare drums and cymbals. No one wants to hear, ’I have a tambourine, but I left it at home,’ or, worse, ‘Oops, I just broke my last drumstick.’
• Don't compromise the drum sound. Take the time to fix problems before they reach the console.
Changing Drum Heads
• More than one way to skin a kit. As with guitar strings, drum heads (also called skins) wear out with use. New drum heads record much better than dead drum heads.
• Do not change the drum heads without approval. It's not your sound, it's the drummer's. Some drummers prefer the sound of a dead snare or certain tom-tom tunings. Don't monkey with any musical gear unless you own it or you have approval. Musicians tend to get choked when they walk into the room and find their instrument disassembled across the floor with you trying to somehow ‘improve’ the sound.
If you do change the heads on the drums, either replace them with similar heads or find out what the drummer wants.
• Go stand on your head. If you must change a drum head:
(1) Use a proper drum key to remove the lugnuts.
(2) Remove the old head from the snare.
(3) Clean out any waste and wipe the rim clean with a rag.
(4) Check for warpage on the rim by laying the drum upside down on a flat surface, turning out the lights, and shining a flashlight inside the drum to check for any gaps. If gaps exist, the drum can't be properly tuned. It needs to be looked at by a competent professional drum dude.
(5) Seat the new head and connect each lugnut by hand.
(6) Tighten the lugnuts like you would when changing a tire – not one after the other, but one then its opposite across the drum; for example, one o'clock, then seven o'clock, as shown in Figure 4.1. Twist each lugnut once, then twist the opposite one once with a single twist. Turn each lugnut gradually so the head tightens to the shell evenly. As the head tightens, lessen the amount of each turn. Expect cracks and crackle sounds. That is the head stretching. Press down on the drum as you tighten the lugnuts to really stretch the head across the rim. Sometimes drummers kneel or even stand on the snare drum head to stretch it.
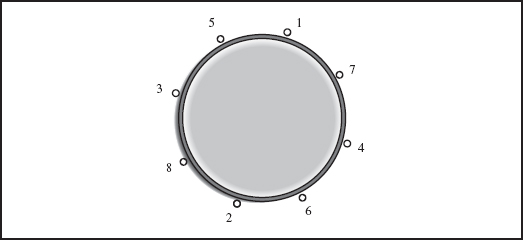
FIGURE 4.1
Tuning a drum
• Front line assembly. Removing the bottom head of the tom-toms or the front head of a kick drum results in uneven resonance in the drum shell. Better to install an old head and trim most of it out, leaving an inch or two around the perimeter. This leaves the front hardware intact, yet allows full access to inside the drum for a microphone, if that's your setup.
Tuning the Drums
• You can't beat our drums. If you took two wooden sticks and pounded on a guitar for hours on end, do you think it might need to be tuned now and again? It's understandable that pounding on a set of drums over and over, take after take, tends to render the ever-loving life out of them. Keeping drums in tune with new heads keeps them musical and therefore easier to record.
Tuning works well when the drum heads are left to stretch for at least a day. Of course, this might not be an option when you are scheduled to record the drums right now.
• Turn the snares off before tuning the snare drum. Tap around the outer edge of the drum head and listen for differences in pitch. Tighten or loosen as necessary. This takes a trained ear.
A tighter head gives more attack and crack, and a looser head gives a deeper, flappier sound with less crack. Some drummers leave the snares loose because they like the loose, rattle-like sound.
• Tune that thing up. Proper tuning enhances the drums’ overtones and brings out fundamental resonance. Tuning a drum slightly lower produces a larger sound because more air is moved. Set it too low and the tone suffers. Tuning a drum higher raises its natural lower frequencies.
Tom-toms tuned too high may create additional rattle on the snares under the snare drum.
• Tune that thing down. Down tune a small snare drum for a massive snare sound. Some of those great big drum sounds you heard in music as a kid were not made by the huge kits you may have imagined. Tune the drums to fit the song.
• Tuning two-headed tom-toms. With two-headed tom-toms, sometimes the drummer prefers the top skin tuned higher than the bottom. He'll tune the top skin slightly high and the bottom skin slightly low to give the drums a more sustained and pleasing sound. Sometimes for a dryer sound he'll prefer the bottom skin tuned higher than the top. For a nice, full sound he might prefer the top head tuned the same as the bottom.
Bottom heads help to control the tuning and decay of the drum, and give more body to the tom-tom sound. Two-headed tom-toms can be harder to record than single-headed tom-toms, as the tuning can take longer.
Tune each drum, starting with the top head then adjusting the bottom head. Keep going down until all tom-toms are tuned. Some drummers tune their drums by knocking on the shell or tapping the head of the drum then listening to the resonant frequency and tuning the heads to that.
• Intervals. A common interval between tom-toms is fourths and, as some drummers say, a fifth between the lowest tom and the kick. Determining the interval tends to be the drummer's domain, not the engineer's. If he wants thirds, thirds it is. Ideally, each drum would be tuned to help underscore the musical chords of the song.
Smaller drums, cymbals, and percussion instruments such as tambourines and castanets are classed as indefinite pitch, or not of a fixed pitch, so they aren't normally tuned.
• Alter the pitch a bit. Keep an even tension on all lugnuts so unwanted overtones are minimized. Maybe create a more complex tom-tom sound by loosening one lugnut to slightly lower its pitch.
• Carr talk. Well-tuned drums sound great, so take the time needed. When I worked with KISS, the late, great Eric Carr had a drum tuner in the control room. Eric would pound the drums for a couple of takes then the drum tuner would tweak the tuning before the next take. The drums were always right.
• Drummers always know best. There is no right or wrong way to set up an instrument. Different people prefer different setups and the drummer knows best about his own drums. A good drummer will be able to hear the proper pitch and tune the drums to minimize sympathetic ringing.
Preparation
• Dampin’ donuts. To dampen a drum, place a donut (an old drum head with the middle cut out) on top of the drum head. The drum will have less sustain than a drum with no damping. For real damping, roll up a wad or two of duct tape then duct tape these wads to the drum head. This renders it dead. Don't put anything over the area where the drumstick hits the head.
Commercial sticky gum is now available that tears off. Tear off a blob and smear it across the drum for damping. Some drum heads are manufactured with a damping system, such as a thicker outer rim, installed.
Before damping, consider the song and the rest of the instruments. A full, fast song may not need drum damping. A drum sound with all the overtones might not sound as big and ringy when the rest of the instruments are playing.
• King of the ring. Work with the player to eliminate all the drum kit's squeaks and rattles – not to be confused with the natural ring of the drums. Harmonics are part of the sound of the drum kit. Many drummers like this ringing overtone, which is more a function of tuning. Some engineers, not understanding that this can be a desirable trait, work on eliminating it.
• Listen, shove it. To deaden the kick drum sound, place a folded packing blanket or a sand bag inside the kick. Maybe fill the kick drum with torn up newspaper or light blankets and towels. Whatever works for the situation. But, before shoving in a blanket, listen to the kick drum. Maybe the sound you want is already there.
• Will that be cash or credit card? For a real click on the kick drum, glue a quarter right where the beater hits the head. If you are too cheap for that, tape a charge card (preferably the record producer's) to the kick drum head with duct tape. The beater creates a click when it hits the quarter, or the card, and not the drum head.
• Wooden versus felt. A felt beater on the kick results in a softer, woofier sound. A wooden beater can give a clickier, defined kick sound. Many hard rock players use a wooden beater, while a lot of jazz players use felt beaters. These choices commonly fall into the drummer's jurisdiction.
• We don't have much tape, so let's wrap it up. Wrap masking tape or duct tape around the felt beater to give it more attack. Naturally, the tape wears out after a few takes.
• Spring break. If a new pedal spring is squeaking, oiling it may not be necessary – just try exercising it. Pull the spring further ahead than it is supposed to go, but be careful not to break or even damage the spring by overstretching it. There's nothing like a good stretch before getting started.
Miking the Drums
Miking the kick drum
• Head space. Different microphone placements will result in vastly different kick drum sounds. The best way to find the perfect spot is to listen in the control room while your assistant moves the microphone around. As the drummer plays the kick drum, you listen for the best spot. When you hear it, tell the assistant to stop. That is the best starting point. A combination of these may work best but, if one microphone is on the beater side aiming out, press the phase button. Figure 4.2 shows a microphone:
(a) At close range. Aimed within a few inches from where the beater meets the skin, creating more click and attack than boom.
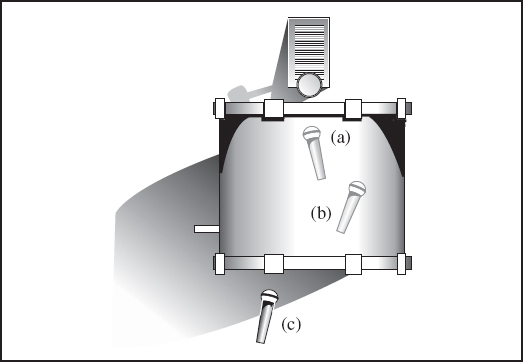
FIGURE 4.2
Microphones inside the kick drum
(b) Pulled back and off-axis. A microphone aimed towards where the shell meets the head results in a rounder sound, with definition, less attack, and more boom. This is a common starting point.
(c) Distant. Pull the microphone to just outside the open head for a full, deep drum sound, but watch for increased leakage and decreased clarity.
• Dynamics. Due to the high pressure of drums in modern music, dynamic microphones are commonly used in close-miking situations. Dynamics tend to be more robust and can handle the solid pressure levels. A large diaphragm dynamic microphone works well to accurately capture as much low end as possible. That kick can push a lot of power.
Many of today's condenser microphones are quite rugged and certainly up to the task of recording the toughest of drums and drummers.
• The style of music dictates placement. For a heavier rock sound, you might put the microphone a few inches from the inner head, then baffle off the kick drum. For a more jazzy sound, you might leave the front bass drum head on, then place the microphone a short distance from the front head in a more open environment.
• Written right. The songwriting has everything to do with the sound. A properly written and arranged song will allow the drummer to feel the groove better and maybe play with a certain feel that won't be accomplished with a poorly written song.
• Embarrassing leakage. Lessen leakage on the kick drum track by aiming the microphone inside the kick drum away from the low tom-tom.
• Use a real bass drum. If you aren't getting that round, low, kick drum sound that you desire, bring in a larger bass drum, even as large as a parade-style bass drum, and set it close to the front of the kick drum. Set a microphone in front of the big drum. As the drummer plays, this low drum will ring sympathetically. Add this round, warm, low end in to the sound as desired. Use this technique to give a smaller drum kit a more natural low end.
• Build a kick drum tunnel. Once the microphone setup is complete, build a tunnel around the kick drum. This isolates the rest of the room from the kick drum microphone and keeps the kick drum somewhat isolated from the rest of the room. Some engineers use a chair in front of the kick with a blanket over it. Some use two microphone stands to hold the blanket, as shown in Figure 4.3. This setup works well with one close microphone and a second one outside the shell aimed in at the pedal. Follow this routine:
(1) Use a proper stand and place the microphone in the kick drum as you normally would to suit the music.
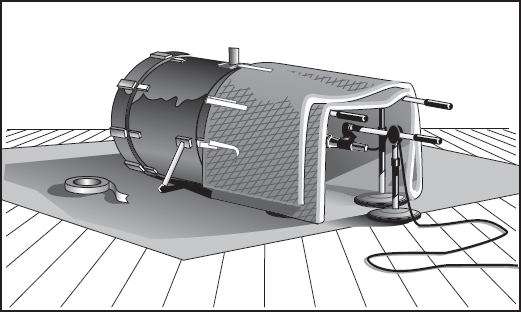
FIGURE 4.3
Kick drum tunnel
(2) Place two short microphone stands (or similar apparatus) in front of the kick drum, then lay a packing blanket over the stands, creating a tunnel.
(3) Duct tape the blanket to the hardware on the kick drum, not the shell. Ask the drummer before duct taping blankets to his beloved drums. For more isolation, cover the open end with another blanket, making sure you don't move the microphone.
• A last resort. In a big session where microphone stands are at a premium, consider laying the microphone directly on the pillow inside the kick drum, aimed at the beater. Crude but effective.
• A kick drum sound is only as good as the surrounding drum set. Leave all the drums in the monitor mix when setting up the kick microphone. This lets you monitor frequency overlap between the tom-toms and the kick drum.
• Let's dance on. Don't underestimate the importance of a good kick drum sound. It carries the downbeat of the music. This is what people dance to.
Miking the snare drum
• Start with a dynamic microphone. A loud snare drum's high transients mean that a dynamic microphone may work best. Start by aiming the microphone across the drum head toward the center of the drum where the stick meets the head. Keep the microphone about an inch above the rim. Maybe aim the microphone off-center to eliminate some of the click and to coax more of the tonality from the drum. Listen and move the microphone to suit your needs.
Some recording engineers aim the snare microphone off-axis to the high hat to minimize leakage.
Some sessions may start with a click track, followed by recording a basic guitar or keyboard melody, adding the rest of the instruments, then recording the drums last, having the drummer play in a style that matches the rest of the pre-recorded tracks.
• Use more than one microphone. Place a second microphone underneath the snare drum to capture the snares hitting the bottom skin. Since the bottom microphone ’sees’ the heads move out when the top microphone ‘sees’ the heads move in, the microphone signals are in opposite polarity. Switch the polarity on the bottom microphone channel.
• Head to head. Tape a small, hefty condenser microphone alongside the dynamic microphone on the top of the snare drum. Position the capsules as close together as possible. This condenser microphone should accentuate the higher frequencies of the snare, while the dynamic microphone should pick up the punch of the drum. Rather than equalizing the dynamic microphone to get more highs out of it, raise the level of the condenser microphone to add a nice crack to the snare sound.
If the situation calls for it, maybe use two different microphones on the top of the snare, plus one on the bottom. Of course, this takes three channels on the console, more time, and may not even be necessary. Rarely will three microphones sound three times as good.
• Eliminate room rattles. Keep all unused snare drums covered, as the snares tend to rattle from the room sounds.
• Wanted. Dead or alive. When I worked on Bon Jovi's ‘Slippery When Wet,’ Tico Torres would remove pockmarks from his snare drum skin by slowly moving a lit portable lighter above them. The heat caused the pockmarks to recede, reviving an otherwise dead drum head for one more pass.
Miking the tom-toms
• Dynamic microphones work well on close-miked tom-toms where the player hits hard. Condenser microphones sound good on less aggressive styles, as they capture the player's rich subtleties and dynamics. Some close-miked condensers may overload. If possible, use the largest capsule microphones on the lowest tom-toms.
• Single-headed tom-tom. If the tom-tom has a single head, place the microphone inside the drum. Aim it away from the cymbals to reduce leakage. Yet again, check the phase between other drum microphones.
• Bottom microphones. If the tom-tom has two heads, adding a second microphone underneath can add dimension and depth if done correctly. Again, the bottom microphone channel would be switched out-of-phase at the console. Although this adds to the number of inputs and microphones and the amount of time, it can create a solid tom-tom sound.
• Halve your inputs. Normally, both the top and bottom tom-tom microphone channels are bussed to a single track, then recorded. If certain frequencies need to be added or pulled on the top microphone, the chances are that those same changes will be needed on the bottom, so why not combine them then process the two microphones as one?
Plug the top microphone into the assigned input at the microphone input panel, and plug the bottom microphone into the same input at another input panel. For example, if the top microphone is plugged into input 12, the bottom microphone would be connected to input 12 at a second wall panel in the room. The cable on the bottom microphone would be an ‘opposite polarity’ cable. This can load down the two microphones, possibly causing low-frequency loss. It is better to use microphones that don't require phantom power.
Save cables and inputs by making a set of ‘two-to-one’ XLR cables where two three-foot long cables each have a female XLR connector at one end. Reverse the polarity at one of the female ends. This means that the connections to pins two and three will be switched. At the other end, combine these two cables and connect them to a single male XLR jack.
Mark the reverse polarity connector with red nail polish to show which female connector is reversed. At least, that's what you can say you're doing when they catch you in the makeup department buying red nail polish.
• What's your angle? Play with the angle and placement of the microphone to hear the best placement with the least leakage.
• Lost in space. Pull the microphones back some to capture resonance from the tom-toms that may be lost with close miking. The further away they are, the more the rest of the drums affect the sound, picking up more of the bulk of the drum rather than the initial hit.
• Try this. Place one microphone between two rack tom-toms and set the polar pattern in a figure-8 position. Of course, check with the drummer that no microphone or stand is in his way.
• Isolate your low tom. To get a larger-sounding floor tom-tom sound, place foam pads under the feet of the drum. The tom-tom won't lose as much low resonance through the floor.
• Great balls of cotton. To lower the ringing in the toms, toss a handful of cotton balls inside them. The ringing will decrease depending on how many balls are tossed in. Even properly tuned toms can ring out.
• Reduce the low tom-tom rattle. Hang the drummer's stick bag off of the side of the floor tom to reduce rattle.
Miking the cymbals/overhead
• Don't take the overhead microphones lightly. The drum sound lies in the overhead microphones. Get a great sound in the overheads, then accentuate this good sound with well-defined kick and snare – the key elements of a good drum sound.
• Condense to the music. Condenser microphones work well as overheads because they preserve the natural crispness of the sound. Placing them a few feet above the drums will result in smooth response, and a warm and nicely meshing blend of all the drums.
As the microphones are pulled back, they will reveal more of the room sound. A properly designed room will enhance your drum sound. A poorly designed room will make the best of drum kits sound average. Use the song, the proximity to other instruments, and the ability of the player to determine the best placement for the overheads.
• Center the microphones over the snare. For a centered, focused sound, place two main overhead microphones the same distance from the snare drum. Commonly, two microphones in a stereo pattern are ample for overheads.
• Height of the mike. Set both overhead microphones to the same height. From the console, use your eye to match the height of both microphones with a horizontal plane in the studio, such as where the wall and ceiling meet.
• Do you want to close mike the cymbals? Dynamic microphones work well when close miking cymbals, due to the combination of high transients and the proximity effect. Because close miking cymbals has the potential for maximum overload, pad the microphones, use a peak limiter, and set record levels low. Close miking the cymbals will pick up more low end, but pulling the microphones back and up results in more overall drums being recorded. Other than for close miking, dynamic microphones are not recommended for cymbals or overheads.
If the player is a real basher, pull the cymbal microphones back so less of the splash will come through. Or add a strip of duct tape across the cymbals for damping. Always check with the player before making any modifications to his instrument.
• Your hat got blown off. Depending on your needs, either a condenser or dynamic can work on a high hat. But sometimes either a high hat microphone is not necessary or there just aren't enough microphones. Place the snare microphone in a position to pick up more of the high hat, or aim an overhead microphone more towards it.
• Start with a cardioid pattern. Drum microphones with a cardioid pattern will pick up more focused areas than microphones with an omnidirectional pattern. Big stereo tom-tom fills might lose their stereo effect under omnidirectional microphones.
• Pick up your hat. To minimize leakage, aim the high hat microphone away from the snare drum. Take the time to find the sweet spot where you pick up lots of high hat with minimal leakage from the other drums and cymbals.
• No rush. Aim the high hat microphone so it is away from any rush of air that occurs when the high hat opens and closes. A narrower polar pattern may be needed to ease the breeze. Alternatively, aim the microphone towards, but not directly at, the center of the bell. This will result in a heavier sound.
• Use a windscreen on the high hat microphone. A strategically placed windscreen can minimize any breezes coming from the rush of air into the high hat microphone.
• Clean cymbals sound better. If cymbals are dead sounding, clean them with a standard copper or metal cleaner. This returns some of the original sheen – aurally and visually.
• Thin cymbals. Thicker cymbals are louder than thin ones, so, if cymbals are washing over all of your drum tracks, try thinner cymbals.
• Trashy hat sound. Some songs may need the trashiest of high hat sounds. For serious trash, ask the drummer to bring in an old cracked high hat. Don't destroy a perfectly good cymbal to do this in case the sound doesn't work with the song. A trashy high hat microphone sound may need a microphone pad.
Miking the room ambiance
• Condenser microphones usually work best for ambiance. Dynamic microphones tend to have a midrange bump, so they might not be the best choice. To get a large, ambient drum sound, place a pair of matching microphones in corners of the room, spaced evenly from the drums. Place each a couple of feet from each corner, aimed into the corners to record more reflection and less direct sound. For more freedom while mixing, record stereo ambiance microphones on their own tracks.
• Set boundaries. Set two boundary microphones on the floor or on the walls at opposite sides of the studio. These can work well as ambiance microphones as long as other instruments do not leak into them. I have heard of engineers forcing drummers to tape these microphones to the front of their shirts.
• Go beyond your accepted recording space. Place a microphone in an adjacent room, or an elevator shaft, or a loading bay, for a natural reverb. Use different microphone spacings and combinations to properly place instruments within the rest of the tracks.
• Added thud. Put a microphone in another room just to catch that low-end thump that permeates everywhere. Not really the ambiance, but the low-end rumble. You know that dull thud you hear when your neighbor plays his stereo too loud? Add that to the mix for more bottom.
• Headphones for mike. Place a set of headphones on a microphone stand across the room. Or hang a set of headphones around the drummer's neck to record the drums from his perspective. Because headphones are transducers, like microphones, they can be plugged into microphone inputs and the stereo signal will be transmitted. Use the proper adapters and turn off the phantom power.
• Place the microphones low and in front of the kit. When aimed upward, these microphones can record an ambient drum sound with ample bottom and minimal cymbal splash.
One-microphone setups
Sometimes there is no choice but to use one microphone to record the drums. The fewer the microphones used, the deader the room should be. Figure 4.4 shows three methods of recording drums with one microphone. Try:
(a) From above. A microphone placed above the drums has lots of cymbals and snare, but little kick.
(b) In front. Placing the microphone in front results in lots of kick drum with minimal snare.
(c) In the middle of the room. A distant microphone in the room aimed at the drums is certainly not a tight sound, but more of an ambient sound. Maybe have someone walk around the room with the microphone while the player plays, and listen for the best spot.
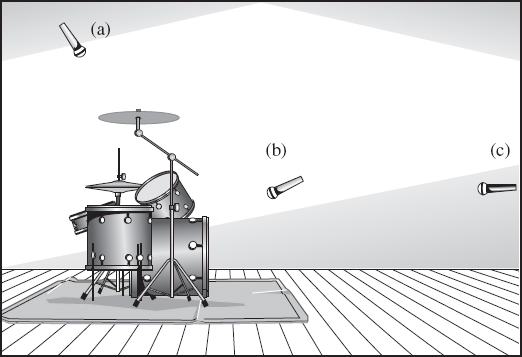
FIGURE 4.4
One-microphone setups
Two-microphone setups
Two microphones open up more options for a good drum sound. Whenever you combine two or more microphones, check for phase problems. Figure 4.5 shows three methods of recording drums using two microphones.
(a) X/Y overhead. Microphones placed in an X/Y pattern over the drummer record the tom-toms, snare, and cymbals in a nice stereo spread. This setup loses some kick drum.
(b) In front and wide apart. Placed a couple of feet in front of and above the drums, this setup captures the full kit with no real direct sounds. Good but ambient, especially in a live room.
(c) One for the kick and one for the overhead. Determine how close you want the second microphone to the snare drum. Maybe close miking the snare works best, or maybe more of an overhead microphone to record the rest of the drums works best.
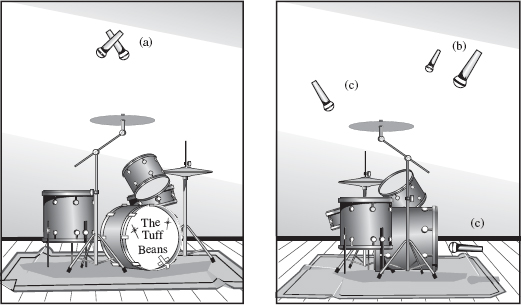
FIGURE 4.5
Two-microphone setups
Three-microphone setups
Great for jazz, as the overheads pick up exactly what the player is trying to translate – often lost when the drums are individually miked. Figure 4.6 shows three methods of recording drums with three microphones.
(a) Kick, and a stereo pair over the kit. This is a standard and very effective three-microphone setup. Many great recordings have been made with this setup. Choose a stereo microphone setup and listen to what works best in your situation. This setup works well for projects on a limited budget. Fewer microphones mean less time, fewer tracks, and fewer distractions. Just take the time needed to place the microphones right.
(b) Kick, snare, and overhead. This setup will help you hear what happens to drum sounds when you raise and lower certain frequencies. This is not a stereo setup as there is only one overhead microphone.
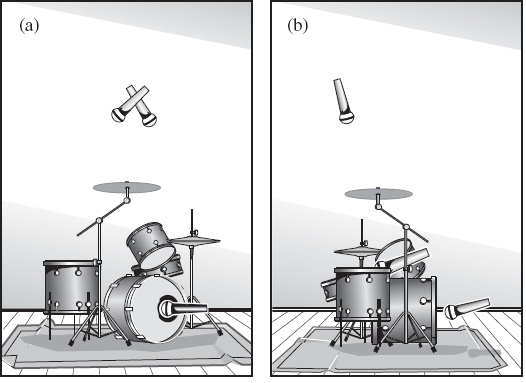
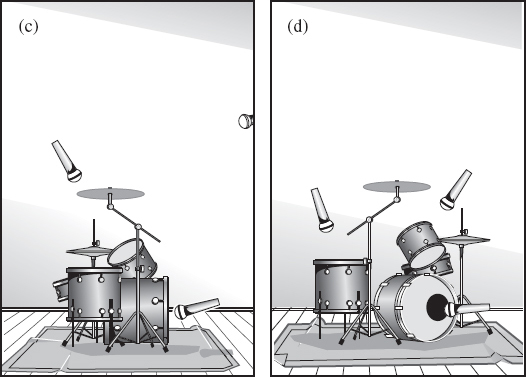
FIGURE 4.6
Three-microphone setups
(c) Kick, overhead, and distant. Exactly where the third microphone is placed is up to the engineer. As the number of microphones increases, so do your options. Set them up and listen.
(d) Low tom, semi close snare, semi close kick. This is a tighter sound with less cymbals and more separation between the tom and snare microphones.
• Use four microphones on the drums. Commonly, this would be the same as the three-microphone setup in Figure 4.6 (b) with the addition of another overhead microphone to record the drums in stereo.
• My aim is true. Position the overhead microphones so that they aren't aimed directly at a tom-tom or a cymbal. This will avoid one drum or cymbal sounding too loud in one of the overhead microphones. Or just aim one of the overheads to pick up more of the high hat.
• Use five or more microphones on the drums. Close-miking the drums is more common today than placing three or four microphones around the kit. To get a great, full-sounding kit, place one or more microphones in the kick drum, one or more on the snare, maybe one on the high hat, one or more on each tom-tom, and two well-placed overheads. Use the overheads to get spacing and depth between the toms and cymbals. Placed correctly, they will pick up the toms, cymbals, and high hat, plus the snare, evenly. More microphones mean more time.
Using two microphones on the kick drum is mentioned above. The close one will have a clickier, more present sound. The distant one will sound rounder, with more lows and middle. These two might be used in tandem, getting the click from the close one and the full bottom from the distant one. Confirm that the two are in phase with each other.
• Don't be fooled. Great drum sounds can be achieved with few microphones. Just because you don't have a microphone on each drum and cymbal does not mean the drums will sound second-rate. The fewer microphones you have, the longer it takes to place them exactly right, but a few strategically placed microphones can make a good song sound fantastic.
• ‘Sorry, I was in the studio – how much do I owe?’ The best time to go into the studio to check the drum microphones is when the pizza guy arrives.
The Click Track
• Click track going to the drummer. A click track is normally sent through the drummer's headphones to help him maintain proper tempo throughout the song. With today's wide array of sounds available, ask the drummer exactly what he prefers for the click sound. Some may want a snare, some may want a cowbell. Maybe he wants the click to be in quarter notes or half notes. Work this out with the drummer beforehand to make him as comfortable as possible.
• Don't force players to use a click track. Some players never use a click when rehearsing or playing live, so they might not do their best in the studio if they are forced to use one. Some players prefer a song's natural ebb and flow to emerge. Perhaps they want to speed up a bit in the chorus or slow down a bit during a quiet part. A click is not always a necessity.
• Use a different sound for the off-beat. Sometimes the snare and bass drum mask the click and the drummer can't distinguish exactly where it is. Sending an off-beat click allows him to hear exactly what the beat is.
• Some drummers like the click track loud. Start by turning the click down to a non-lethal level, then raise the level as the drummer asks.
• Phasing out. If the click track is leaking into some of your tracks, pan the click to the same place in the mix as the track that contains the click leakage, then switch the polarity on the click track channel. Slowly raise the gain of the click track into the mix until it cancels the offending click. Click track leakage should be avoided in the first place.
Electronic/Computer Drums
Whether a stand-alone drum machine or DAW-based drums, virtually all studios have some sort of electronically sampled drums. Some engineers use them as a timing reference, some use them to trigger real drum sounds, some combine live drums with drum loops. Some producers rely totally on drum machines, while others cringe at the very sight of one. Whatever works for your situation is the best way.
• Record live high hat or percussion. If recording real drums is not possible, at least record a live high hat with programmed drums. Live percussion will help a lifeless electronic drum track, because no drummer is exact or perfect and these slight deviations in timing are what give music its groove.
• Use individual returns. Recording every drum to an individual track is great if you have a plethora of tracks. If you are recording all tracks to stereo, return the separate outputs from the drum machine into individual tracks on the console and buss them over to the two stereo tracks. This allows you to process each drum sound individually so you can equalize them to work with the rest of the instruments. This also allows you to separate the sends to any effects unit so all instruments aren't going to the same reverb.
Return, for example, three different snare drum sounds to the console, then buss the three channels to a single track. Record the snare drum track while changing levels and combinations of the three tracks throughout the song, just to keep all hits slightly different.
Electronic drum sounds commonly bring a lot of low frequencies to the table. Individual returns allow you to equalize individual tracks to make room for other instruments.
• Punch the drummer. To give a drum machine more life, ride the different tracks as you record them, maybe push the kick a bit in the chorus, or punch the high hat into a verse, much like a real drummer would do. Just don't overdo it.
• Use different drum fills. No two drum fills or tom rolls should be the same unless they are an actual written part. For example, the tom-tom roll into the second chorus of a song should be different from and stronger than the tom-tom roll into the first chorus.
• Route the electronic drums through a set of speakers in the studio.
Set up two microphones in the studio and aim the microphones into the corners of the room, not toward the speakers. You want ambiance, not direct signal. Add this live stereo track in with the originals.
• Distort of something big. Run the electronic drums through a set of loud, distorted speakers in the studio, with close microphones aimed toward the speaker cone. Bring this live sound in just under the electronic drums.
• Free samples. There is a plethora of sounds and samples on the Internet. Search out the ones that will be appropriate for your sessions.
• Get real. Some engineers place live drums in the room, then send the drum machine signal through the speakers just to record the actual drum overtones and rattles. But, if you have real drums, why are you using a drum machine?
• Get inside the drums. Many machines process their own drum effects. Access the internal workings and lower the level of the effects processing. Recording dry drums on separate tracks leaves all mix options available.
• Shy away from hard panning when recording the drum machine tracks in stereo. Think of an actual drum kit, where the cymbal and hat tracks all leak into each other. Drums, especially cymbals, panned hard left and hard right sound unnatural.
• Don't record the drums. Low on tracks? Only record the control track that drives the drum machine. This allows you to try different sounds and patterns before committing. Because the drum machine slaves to the control track code every time, even in the middle of a song, there is never any question regarding sync.
• Bored to run. Running a repeating drum pattern is boring. Program some changes, such as off-beats, tom-tom fills, appropriate crash or ride cymbals, and all the things that a real drummer would do. Work on parts and beats that will fit within the song.
• Tom fills in on the drums. Drummers have two hands, two feet, and one mouth – usually big. Program a drum track as if the drums are being played by a real drummer. For example, don't program a snare drum hit during a tom-tom fill.
• Alter MIDI. MIDI (musical instrument digital interface) is available to control all aspects of the digital drum machine, including velocity and dynamics, program change, etc. MIDI is beyond the scope of this book. There is ample literature available elsewhere.