

CHAPTER 5
Electric Guitars Setup
The best guitar sound always starts at the source. The guitar (including bass guitar) must be in good condition, properly aligned and intonated, and with all knobs, switches, and cables checked and in working order. Most importantly, it must be in tune. The rest is up to the player. The finest instrument can sound wretched in the wrong hands. You want the listener to get a lump in their throat, not their stomach.
• Re-cord your guitar. New, properly stretched strings will always get the richest results.
• For more meat, use thicker strings. Lighter strings are not as meaty as thicker strings. Thick strings result in a heavier sound, but can be more difficult to play.
• Bright and oily. Add a few drops of oil to a tissue and oil the strings to keep string noise at a minimum.
Amplifier Placement
• Talk to the player. Before doing any setup of amplifiers or instruments, ask what will make him comfortable when he plays, then set up that way. He may prefer to be isolated with the amplifiers, in the studio, or even with you in the control room. The best placement for the player is where the player wants to be.
Check how loud it is going to be. Some players may play quiet enough to just leave the amplifiers in the room with the drums. If so, then maybe aim the guitar amplifier away from the drums.
• Use the best amplifier. If applicable, set up all available amplifiers and try all combinations. Use an amplifier the power rating of which is higher than the speaker. Better the speakers distort before the amplifiers.
• Bigger is not always better. Don't discount a smaller amplifier for the appropriate sound. Sometimes the biggest baddest amplifier isn't what a song needs. Some of those big guitar sounds you always heard on your favorite songs aren't the massive setups you imagine. When I did KISS's ‘Animalize,’ Paul Stanley told me that on some previous recordings he originally had huge amplifiers set up but ended up using a little practice amplifier for a lot of the sounds.
• Place the amplifier as far from the control room as possible. During basics, the amplifier is often isolated from the rest of the instruments. Unless the control room is isolated from the studio, low frequencies will go through walls, floors, and everywhere.
If you can hear or feel the guitar amplifier through the floor or walls, you won't get a true indication of how it really sounds. If you hear additional lows, you might pull the bass frequencies at the console. When you listen back the sound will be bass-shy. Better to record a pass and then listen back to get a true analysis of the sounds before continuing.
• Space for the bass. Place the bass amplifier in the biggest room possible. Because bass frequencies are physically longer, they need space to build. A large dead room works great for the bass as the room echo and ambiance are minimized and the size allows the low frequencies to build.
• Try different places. Place the amplifier at different places in the room, such as a foot away from a wall, and aiming toward a wall. Maybe lean the amplifier over so it rests on a wall and place a microphone under it. Maybe set up baffles around the amplifier to control the lower frequencies or to change the room response. As with the drums, throw a carpet under the amplifier to absorb some reflections.
• The place for the bass. Keep a bass amplifier out of corners and away from walls, as walls increase bass reflections into the microphone.
• Aim the amplifier into a reverberant space. Placing a guitar amplifier in a reverberant room, such as a bathroom or kitchen, is great for tight natural reverb, but a better result might come from placing the amplifier outside the space and aiming it in toward the live space. As with the vocals, when the amplifier is placed in the room and you have a close dynamic microphone and a far microphone, lots of these live reflections are picked up by both microphones. When the amplifier is placed outside of the room and aimed in, the ambiance will sound great but the close microphone will not have all the ambiance. The ambiance track will have more depth than if the amplifier was right in the room.
• Rising high. Figure 5.1 (a) shows that when the microphone is placed too close to the floor, errant reflections are introduced. Figure 5.1 (b) shows an amplifier raised off the floor to keep reflections from bouncing back into the microphones. Amplifiers generate a lot of vibrations, so, unless the setup is very stable, there is a chance of it slowly vibrating off the riser. I've noted that sessions go smoother when amplifiers don't come crashing to the floor.
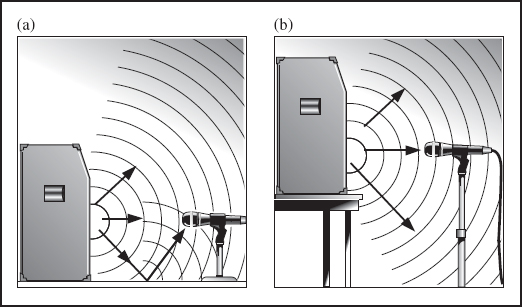
FIGURE 5.1
Amplifier on riser
• Turn-ups and leaks. Isolate amplifiers during basics, not only to keep the loud amplifier out of the rest of the microphones, but also to prevent leakage into the microphone placed in front of the amplifier. Fixing a guitar track that has leakage on it can be tricky as the repairs won't have the rest of the players in the background.
• Leave the amplifiers in the bottom part of the road case. This raises the amplifier off the floor, isolating it. Lock the wheels on the road case or you may have a roving amplifier.
• Place two amplifiers together. When splitting a guitar signal into separate amplifiers/speaker cabinets, either totally isolate each speaker cabinet or place the cabinets beside each other. Placing the cabinets next to each other minimizes delay in leakage. For example, two cabinets in a room are placed next to each other and both are close-miked. Signal, or leakage, from cabinet A naturally spills into cabinet B's microphone. Placing cabinet A across the room means the leakage takes longer to reach cabinet B's microphone. These lengthy delays will muddy the signal.
• Barring grille. Grille cloths can buzz and metal grilles can rattle. Record amplifiers with nothing between the microphones and the speaker cone.
• Baffle the amplifiers. Due to leakage, an amplifier may need to be totally baffled, but not so much that the amplifier overheats. In addition, don't isolate it so much that the musician can't get at it. Let him get his sound, then baffle off the amplifier. Occasionally, it's the record producer that's totally baffled.
• The direct route. If tracks are available, record a clean direct sound using a direct box or the direct output from the back of the amplifier. This gives you a bit of freedom come mix time if the amplified sound isn't working with the song. Route the direct track into an amplifier in the studio, or a ‘virtual’ amplifier such as a Sansamp or POD to ‘re-amp’ the track for a more appropriate sound.
• You can't fix it in the mix. Take the time to get the right guitar sound before recording it.
Connections In and Out
• Plug in the guitars before turning on the amplifiers. If amplified, the plug-in transient can blow the amplifier fuses.
• Keep it short. Again, keep all ¼” cables as short as possible. Standard unbalanced cables connected to the high-impedance input of an amplifier should be no longer than 16 feet, as they lose high-frequency signal with increased length.
• Connect back-to-back direct boxes. To increase a ¼” cable length with minimal signal loss, set up two passive direct boxes with an XLR microphone cable between them. Connect a ‘female to female’ adapter to one end of the XLR cable. Figure 5.2 shows a short ¼” unbalanced high-impedance cable going from the guitar into the first direct box, where the signal switches to a balanced low-impedance signal and runs through an XLR cable to a direct box on the other end. Then the signal is swapped back to high-impedance and another short ¼” unbalanced cable goes from the direct box into the input of the amplifier.
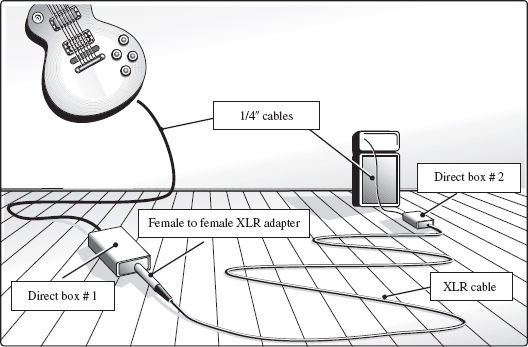
FIGURE 5.2
Back-to-back direct boxes
Loud Amplifiers
• Turn it down. Many guitarists turn their amplifiers all the way up then play with the knobs to get the best sounds. Maybe turn the amplifiers down to get a full, clean sound, then turn the amplifiers up, adding a natural distortion to your full, clean sound.
• Turn it up. Some say a good, ripping guitar tone can only come from a loud amplifier. Tubes being pushed naturally compress the signal and add a warm presence to a sound. Different tubes can vastly change an amplifier sound. Learning about different tube amplifiers and what they do can aid the engineer in deciding on what works best for what situation. Spend the time getting the right sound at the amplifier, not in the control room.
• Do not touch. Ask the player before changing the settings on a musical instrument or amplifier. Note the settings to return to the original sound.
• Low and behold. Some bass players add lots of lows when they are playing live, and we love that, but excess low end may not be necessary in the studio. A better sound might come from recording a full, round bass, not just the low frequencies. Come mix time, the engineer can fine-tune exactly which low frequencies will work best.
• Distortion-free bass. Unlike a guitar amplifier, where some distortion may be wanted, a clean and solid bass guitar sound cuts through and sounds best. This means that the bass amplifier might not need to be unbelievably loud to get the job done.
Of course, overload and distortion to the nth degree is fun too.
• Use the fuses recommended by the manufacturer of the gear. Anything less, and you may continually blow fuses. Anything more, and you may blow the amplifier or, worse, cause a fire. If the amplifier is in an isolated booth, this might not be noticed immediately.
• Ask the player if the output level on the instrument is all the way up. The cleanest signal is the loudest signal available from the output of the instrument. But some players use the volume control as part of their sound.
• Virtually a virtuoso. ‘Virtual amplifiers’ are plug-ins or stand-alone units that have completely changeable parameters and settings to simulate every major guitar amplifier on the market.
• Record the clean output from a direct box to a separate track. At mix time, if you need more ‘body’ from the guitar sound, run this direct track through a virtual amplifier and experiment until you have the perfect sound.
Preparation
• Listen to all the direct boxes available to you. Direct boxes are like microphones – they differ widely in frequency response. One that works great on a bass may sound sluggish on a guitar. Some amplifiers today have built-in direct-output jacks, eliminating the need for an external direct box. As with most gear, the cheap ones sound cheap, especially in the low frequencies.
• Try some of the many effects pedals on the market today. They can give an average guitar sound proper placement. They have modern sounds and are great to rent for a few weeks while recording. Many of today's all-in-one effects boxes also work as direct boxes, as well as a harmonizer, delay, tuner, etc. The signal comes out of the output much like the money comes out of your wallet.
• Just plug it in. Sometimes you can just plug the electric guitar directly into the pre-amp of the console, turn it up all the way to distort the inputs, and there's your sound. A high-impedance cable plugged directly into a low-impedance input will overload the pickups of the guitar, changing (some say degrading) the tone. Word is that the famous Beatles ‘Revolution’ guitar sound was overloaded console pre-amps.
• Using lots of pedals means various changes in gain. Go through each pedal and set the levels with as much gain as possible and as little noise as possible without overload. One wrong setting in the signal chain can overload an input or, worse, create an annoying buzz or hum.
• Use new batteries. Sometimes the pedal is quieter with new batteries rather than standard AC power. Write the date on a piece of tape and stick it on the battery. When you are changing batteries, you know how old each one is.
• Run your signal into a portable boom box that has line inputs. The built-in el-cheapo compressors can really distort a sound. Maybe overload the inputs, or change some equalization settings, then record the output with a cheap microphone for a dirtier sound. We used this effect on Foreigner's ‘I Want to Know What Love Is.’
• Creatively limited. Of course, use compression and limiting to lower peaks and raise overall levels, but also sometimes use it as a creative device to shape a sound.
Miking the Amplifiers
• Use a microphone that can handle it. The sound pressure associated with close miking, coupled with the inherent low frequencies of a shredding guitar sound, can damage the sensitive microphone capsule in a condenser or ribbon microphone. A dynamic microphone is sturdy enough to take a lot of level without folding and has a presence peak that can bring out some of the grit on a guitar sound. A condenser, if it can handle the pressure, can result in a warmer sound. Newer condenser microphones can handle a lot of pressure, but a dynamic is still the sturdier choice.
• Avoid overload at the microphone. If necessary, move the microphone, insert pads into the signal, or lower the source level. Overloaded signal is unusable and unrepairable unless that overloaded sound is the goal. Digital overload is always unpleasant. Ideally, with the right microphone, record the signal with no microphone distortion and no additional gain. The sound recorded will be cleaner with less hiss and noise.
• Match the microphone to the speaker. Cabinets commonly have one to four speakers inside them. The different speakers can have different responses, so, if the speaker has a lot of bottom, use a microphone with the opposite characteristic – one that is bass-shy. Maybe ask the player if any of the speakers have been replaced, or if he knows if any of them sound better than others within the cabinet.
• Pad early. Pad as close to the source as possible to minimize overload before the signal reaches the console. Some microphones house removable pads that you install between the capsule and the pre-amp. Better to pad at the microphone than at the console.
• The best sound is the sound that works. There is, of course, a wide range of methods used to set up amplifiers for recording. Suggestions include:
(a) One microphone close. Figure 5.3 (a) shows a common starting point. Place a dynamic microphone a few inches from the cone. A close microphone has a boomier low end due to proximity effect. Pulling the microphone back can ease this. Turning the microphone away from the speaker results in a duller sound. If just a bit more ambiance is needed, try changing the polar pattern to omnidirectional. A good spot tends to be right where the cone and the dome meet.
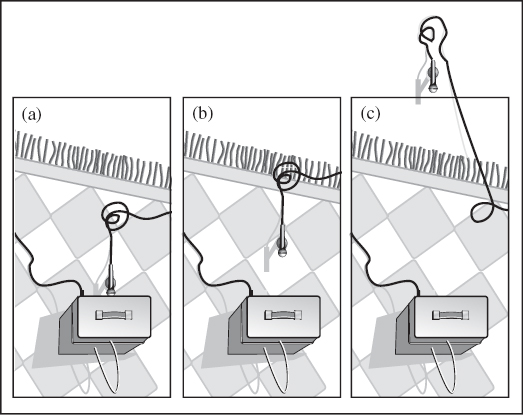
FIGURE 5.3
Close, semi-close, and distant
(b) One microphone semi-close. A clean guitar sounds great with the microphone placed one to two feet away and aimed at the cabinet. The proximity effect is defeated and a certain warmth comes across when the microphones are not so close to the speaker. To capture more room sound than original signal, position the microphone off-axis from the amplifier.

FIGURE 5.4
Two-microphone setups
(c) One microphone distant. Use a condenser or ribbon microphone, due to the full, dynamic sound. The room itself can be as much of the sound as the instrument, but don't let the milieu of the room overshadow the direct amplifier sound. An ambient sound can easily turn cloudy and disappear in a busy mix.
(d) Two microphones – close and close. Figure 5.4 (d) shows one microphone aimed straight at the edge of the middle cone and another microphone angled away at the outer cone. One picks up more of the crunch, while the other picks up more of the warmth. Sometimes the choice is one or the other, not both. When combining two close microphones, don't expect it to sound twice as good.
(e) Two microphones in stereo pattern. Use this setup either for recording an amplifier in stereo or to combine the two microphones to a single track. Note that some amplifier makers purposely switch speaker polarity to get a more varied sound.
(f) Two microphones – front and back. A second microphone aimed at the back of a speaker cone might add needed tone without introducing equalization. Of course, the amplifier must have an open back. This setup has the back microphone aimed somewhat toward the front microphone, so switch the polarity on the back microphone or risk losing signal due to phase cancellation.
• It's a setup. Additional setups might include:
A direct box. Sometimes there is no choice but to use just a direct box. Direct boxes are great, but there is a certain magic in the air between an amplifier and a microphone. A direct box can enhance flaws that an amplifier in a room may gloss over. String noise, squeaks, and clicks come through more on a clean direct track than through the amplifier. But these so-called flaws (that are normally only heard in solo mode) can be what gives a track more life.
One microphone and a direct box. A close microphone with a direct box is a common method for recording an electric instrument and the standard method to record bass guitar. Record the signal from the direct box and the microphone on separate tracks for more control over the best combination of good tone and tight low end. Check for phase issues between the microphone and the direct signal.
Two microphones – close and far. The close microphone adds definition, clarity, and focus, and the far microphone contributes midrange, warmth, depth, and placement. A common setup is one in which the closer microphone is a dynamic and the distant microphone is a condenser.
Two microphones – stereo room. Depending on the characteristics of the room, a proper stereo setup can result in a wide ambient sound. Great for placing a sound at a specific point in the mix, but easily lost in the haze as more instruments are introduced.
Three microphones. Though excessive, some engineers get a great sound with one close microphone, one semi-close, then a third one further off in the room. Done correctly, they capture the full crunch from the close microphone, the warmth and midrange from the middle one, and the ambiance and full low frequencies from the room microphone.
Some engineers like to record the actual pick hitting the strings on an electric guitar, so they set up an additional close microphone aimed at the guitar itself, where the pick hits the strings. This can open a new can of worms if the player moves around a lot while playing.
Three microphones and a direct box – holy cow. Going for three or more inputs opens a plethora of options, and these large setups tend to take a lot of studio time. Sometimes too many options can be a bad thing.
• Consider the polar pattern when setting up to record an amplifier. A cardioid pattern, rather than an omnidirectional pattern, on a microphone placed in front of a guitar amplifier might localize the sound and keep the rest of the instruments from leaking into the track.
• It's time to move the capsule if you dare. Once the microphones are roughly placed in front of the amplifiers and the player has set the settings on the amplifier, move the microphone around to find the best spot for the music being recorded. To do this:
(1) Ask the player to turn the amplifier way down.
(2) Turn the microphone up in the headphones.
(3) Have the player play so that you can hear more signal in the headphones than from the output of the amplifier.
(4) Hold the microphone in front of the amplifier and move it around until you locate the best spot. Don't worry – you'll hear it.
(5) Place the stand and connect it to the microphone without moving the placement of the microphone – easy to say, maybe not so easy to do.
(6) Ask the player to return his amplifier settings to the original levels.
• You need some help. If you have someone helping you, even better.
(1) Ask the assistant to wear earplugs and a set of unplugged headphones. Those high volumes can be damaging to the ears.
(2) Have the player play while the assistant moves the microphone around. Tell him to stop moving the microphone when the player stops playing.
(3) Listen to the microphone in the control room. As the assistant moves the microphone around in front of the amplifier, listen for where it sounds best.
(4) When the assistant locates the optimum spot, you indicate to the player to stop playing.
(5) That's the assistant's cue to stop moving the microphone. He then sets the microphone in that position and tightens the microphone stand, leaving the microphone in the same spot.
• The final countdown. If you know you are going to send a guitar to an effect, note that some effects sound edgy in the upper midrange and highs. A guitar recorded with a little warmer sound may counteract that harshness.
• The wrong microphone. If the amplifier needs drastic processing, chances are you've got the wrong microphone. Or, an excuse I have heard, ‘It's the right microphone, it's just on the wrong amplifier’