

CHAPTER 6
Acoustic Instruments Setup

Stringed instruments get their sound from plucking, bowing, or striking a stretched string or set of strings. The strings themselves don't generate much power; the power comes from the resonances of the body of the instrument. The size of the instrument, along with the length, thickness, and tension of the strings, determines the string's pitch and the guitar's harmonic structure.
Naturally, a properly tuned, rich-sounding acoustic guitar will sound better than the old cracked beach guitar. The intonation, neck, and frets must be up to professional standards with no buzzes, fret noise, or other distractions.
Acoustic Preparation
• That same G string is getting pretty dull. Replace old guitar strings to add crispness and clarity to any acoustic guitar sound.
• Tension in the studio. Preserve the tension of a stringed instrument by changing strings one at a time. Removing all the strings at once totally eases the tension on the neck – not the guitar's natural state. To allow for proper stretching, change strings well in advance of the session.
• Start with a good player. It is difficult to record a player who isn't ready to be recorded. Better a great player with not-so-good-sounding equipment than the other way around.
• Get intimate with the guitar player. In some situations, do as you would on a vocal recording. Dim the lights and set up a table and music stand to create a more intimate atmosphere. Make the effort to pamper the player a bit.
Placing the player
• Lessen lesson. For an overdub, place the player in the middle of the room, aimed toward the control room. In bigger studios, place a couple of baffles around the back and sides of the player and perhaps throw a rug on the floor to lessen the room ambiance in the close microphone.
• How live do you want the sound? Using an overly dry absorbent space may suck up some of the luster of a guitar, especially if the guitar is not close-miked. A natural-sounding space with a small degree of inherent liveness, such as a hardwood floor, works well to record a full-sounding track.
For more variation come mix time, some engineers prefer to record in totally dead spaces, eliminating the natural reverb of a room.
• Hz rentals. If the instrument is not up to par, consider renting a quality instrument. A rental is a couple of days. A recording is forever.
• It reflects badly on you. There are few circumstances in which recording in a small, really live room produces the best tracks. Recording an acoustic guitar, or any instrument, in highly reflective places such as the bathroom will always generate lots of short, tight reflections. Maybe wait. If needed, this slapback effect can always be added later.
• Yo-yo strings. When recording strings such as violins, placement in the room is critical. Microphones are often placed a few feet away from the instrument to pick up all the harmonics and warmth. It's best to know the room and understand where frequency bumps are. For example, don't place the cellos in a part of the room that has accentuated low frequencies, as certain low frequencies will be unnaturally boosted.
Placing the microphones
• Start with a condenser. Condenser microphones work well on all stringed instruments due to the wide frequency range and smooth pickup characteristics. Many dynamic microphones won't have the appropriate high-end capabilities, plus they may introduce certain unwanted frequency boosts.
Sometimes a dynamic microphone is perfect for the situation. Or maybe use a ribbon microphone – whatever the situation calls for.
• Take the tube. If one is available, try a tube microphone. A tube microphone has a certain warmth and records acoustic instruments very well. But many of today's small personal studios simply cannot afford good tube microphones.
• Try a large diaphragm microphone to bring out the inherent low end in any deeper instrument, such as a cello or a stand-up bass.
• The pattern depends on the environment. An omnidirectional pattern picks up the complete soundfield, hopefully making the stringed instrument sound a bit more live. Plus, there is no proximity effect.
The cardioid pattern mostly captures what is placed directly in front of it, and might work better in a poorly designed space.
• Get down and listen. Once the player is set up and ready, determine the best placement for the microphone. Because every acoustic instrument and player are different, get down on your knees and put your finger in one ear (yours, not the player's) and listen. As he plays, move around to locate the spot with the richest sound. Place the microphone there.
• Who wants punch? Look down the so-called barrel, or front pickup area (if applicable), of the microphone and aim it to where the guitar pick (if used) meets the strings.
• Use your ear as a guide. If the sound is too loud for your ear, consider a pad. Recording, for example, a light acoustic guitar, you probably won't need a pad. Recording a trumpet, you might.
• Don't aim a close microphone directly in front of the sound hole, but off-axis a bit. As the player plays, the sound hole resonates at a low frequency. This will create a ‘woof’ in an improperly placed microphone. Aim the cardioid microphone capsule more toward the neck and less toward the sound hole so any ‘woof’ is naturally minimized by the microphone's polar pattern. If you must aim the microphone into the sound hole, place a windscreen in front of the sound hole to minimize air flow onto the capsule.
• Check your microphone levels. Place the microphone so it picks up all the strings at the same level. Placed incorrectly, the recording might have just the high strings with not enough impact. If the guitar is there to simply add sparkle, you may want less impact. Maybe lower the microphone or pull it away to capture more of the higher strings and harmonics. Since the idea is to get the best sounds without a lot of processing, record the instrument appropriately for how it will be placed in the final mix. Again, the adjustment of microphone choice, placement, and microphone settings is recommended before reaching for the equalization.
• Aim the microphone away from the player's mouth. Any unwanted breathing noises may spoil an otherwise quiet passage.
• Move it. While you listen in the control room, have someone slowly move the microphone around in front of the sound hole to get the best placement.
• What works for this may not work for that. Final placement depends on the style of music. A jazz acoustic guitar would not be miked the way a pop acoustic guitar would be. A country picking guitar would use a different placement than a love song. Slow songs would be miked differently from fast songs. All situations are unique. Figure 6.1 shows:
(a) Close miking. Place the microphone one foot or closer for a ‘harder’ sound, with an emphasis on the upper midrange. Proximity effect and sound hole resonance might be a concern. In addition, the player must stay still for the sound not to change. Moving the microphone further away from the sound hole should give the player a bit of freedom to move without compromising the guitar sound.
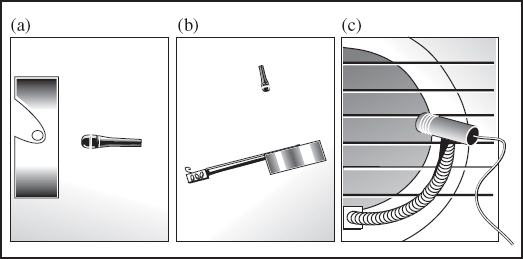
FIGURE 6.1
One-microphone setups for acoustic instruments
(b) Not-so-close miking. Move the microphone further away from the guitar in an acoustically suitable room for a rounder, warmer sound. The microphone will pick up all the parts of the guitar that are missed with close miking. A single microphone placed from 12 to 18 inches away and aimed toward the instrument is a reliable starting point. But a guitar with too much room sound gets lost in a busy mix.
(c) Pick-up microphone. A smaller microphone attached to the guitar ensures a uniform sound whenever the player moves around, as the microphone stays the same distance from the instrument at all times. This setup works well in a live room because the microphone picks up the acoustic guitar and little else.
• Use two microphones on the acoustic. Common placements for two-microphone setups on an acoustic guitar include, as shown in Figure 6.2:
(a) Close/far. Figure 6.2 (a) shows a second, distant microphone added to increase ambiance and placement. Due to the sound's natural delay in reaching the second microphone, check the phasing between the microphones.
(b) Stereo. When using two or more microphones on an acoustic guitar, the temptation is always to make a real stereo sound. When two microphones are placed to capture a stereo spread, a hole in the middle becomes more apparent as the distance between the microphones grows.
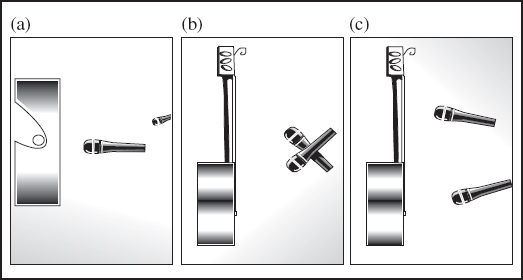
Two-microphone setups for acoustic instruments
(c) Neck/sound hole. Set up and connect an additional microphone to record the string noise, then combine it with the other microphone. One microphone captures the higher frequencies and the other microphone gets the lower frequencies. Adjust for proper highs and lows with the level faders rather than with equalization. Either use matching microphones for a uniform sound, or two different styles to capture different tonal nuances of different areas of the guitar.
• Pick up the microphone. If there is a pickup in the acoustic guitar, run the signal through an amplifier and then place a microphone in front of the amplifier. Combine the microphone on the instrument and the microphone on the amplifier at the console, changing it to more of an electric sound than an acoustic one.
• Recording a guitar and vocal. When the player wants to sing along but you don't want the leakage, try a pickup on the acoustic guitar and a tight polar patterned microphone for the vocals. A close microphone on the guitar works, but there will leakage issues on the vocal microphone, and vice versa. However, usually the vocal sound is more important than the guitar sound.
Some engineers place a microphone stand or Plexiglas plate somewhere between the player's mouth and hands to minimize leakage, but this adds reflections and results in the player being uncomfortable – the last thing you want. However, unless one of the two tracks is being redone later, what is wrong with leakage between them? Your only issue may be the phase between the two microphones.
• Room size versus close miking. In a large room, use two microphones on a five-piece string section. In a smaller room, maybe individually mike them. Placing the microphones closer to each instrument results in less of the room influence and more of the direct signal.
• Combine the direct and the miked signals. Use a microphone to capture all the rich lows, and the direct signal to capture the nice highs. Acoustic pickups are great for live situations but, in the studio, if you have a choice, a well-placed microphone will sound better. Perhaps record the pickup on a separate track, then pan them left and right for a stereo effect. You decide.
• What, this old thing? Violins, cellos, violas, etc. can be expensive instruments and the players are normally very good and very expensive to hire. Come in early to make sure you are totally set up and ready to record when they walk in the door. Better string players are used on jingle sessions, where they are on a strict time schedule for the day.
• Don't close mike violins. Violins really only sound full and rich if there is some ‘air’ between the instrument and the microphone. A single player might not warrant a stereo microphone setup. To record two or more violins, place cardioid microphones in an X/Y position quite a few feet above the violin players for a rich, ambient stereo sound. As the string section grows, cellos and violas get miked from the front, not above.
• Use the riser wiser. In the early days of pre-amplification, stand-up bass players would use a riser, or raised platform, when they performed. Because the instrument was resting on the riser, the riser itself would resonate, enhancing the overall low frequencies and making the bass appear bigger and louder.
• String a guitar differently. String an acoustic guitar with the higher octave strings from a 12-string and have the guitarist play along with an original acoustic track. Even better, have two guitarists play the same part together while miking both. This may give more depth to the track. Playing a 12-string gives the 6-string track a chorus-like effect.
• Cover the sound hole for a deader, dryer sound. Of course, this stops the air pressure from getting into or out of the sound hole. The minimal air pressure generated inside the guitar has nowhere to go, so no air pressure means no microphone capsule movement. Compressed air itself makes no sound at all, except when my grandfather is involved.
Piano
• Good news: there's no wrong way to do it. The piano is such a versatile instrument, there is really no right or wrong way to record it. Different microphone placements will, of course, result in different sounds. Using a certain setup for one song may work great; using the same setup for another song may not work at all. The wide range of piano styles makes it impossible to say one method of recording is wrong and another method is not.
• Tuning the studio piano. Recording engineers don't normally tune the piano. Leave that to a professional.
• Place the piano before the piano tuner arrives. Moving the piano after it has been tuned may throw it out of tune.
• Aim the open lid toward the open studio, not toward a nearby wall. You don't want reflections bouncing back from the wall into the piano microphones. Move an upright piano well away from the wall.
• Check, please. Check all the pedals for squeaks or noises and, with the player, eliminate them by oiling the pedals. Check with the proper people before dousing the pedals with oil. Maybe a pillow stuffed under the pedals will work, but the player might object.
• Back to that leakage thing. Sometimes the piano must be recorded in the main room, with the rest of the instruments. Eliminate leakage by using baffles and packing blankets. If possible, isolate the piano in its own room. Easy to say, but few studios have a dedicated piano booth.
• Reflect on the day's work. If the player uses no print music, remove the built-in music stand on the piano but leave the lid. The reflections from the lid are part of a piano sound.
Placing the microphones
• Open lid, insert head. Once the piano is correctly placed, put your head in the piano and listen to the player playing the music to be recorded. Consider the part to be played, the player's ability, the style, and the tempo and prominence of the piano part to be played before placing the microphones.
• What style of microphone? Microphones vary from large to small diaphragm, each having their own role. Large-diaphragm microphones might work well for more classical and jazz or slower tempo songs, while small-diaphragm microphones might work better on rock songs with faster tempos. Whatever style of microphone you choose, use the biggest, heaviest, strongest microphone stands available.
Tube microphones create the warmest sound and tend to have more of a pleasing harmonic distortion than solid-state microphones. Condenser microphones work well to capture the wide range of frequencies produced by the piano. Dynamic microphones may capture the piano's lower frequencies best. Boundary microphones will minimize leakage when taped to the underside of the lid with the lid closed or on the short stick, covered with a moving blanket.
• Close or distant microphones? Because the sound board – where most of the sound is generated – has a large surface area, really close miking may not capture the full spectrum of the instrument. Close miking the sound board will add a brightness that cuts through other instruments and features more ‘hammer hitting the string’ sound. Mid-placement microphones add tone, while distant microphones contribute more room sound. As the distance between the microphone and the sound board increases, the surrounding area has more influence. In a properly designed acoustic space, distant miking works very well to capture a full, rich piano sound.
Maybe close miking might work for a pop session and a more ambient sound may work for a jazz or blues session. Often, the style of music is the final determination for placing the microphones, except perhaps when the piano is baffled off and part of a full session.
• Use shockmounts on piano microphones. Heavy instruments with an abundance of low end can make the floor and the microphone stand rumble. Without shockmounts, the microphones pick up this low rumble.
• Use one microphone on the piano. Reasons for recording the piano in mono include there not being enough microphones, or inputs at the console. Perhaps the piano is just a support instrument among many and would get lost in stereo. Perhaps the mix plan has the piano panned over to one side, so a stereo recording isn't needed. Maybe there are just not enough tracks. As a starting point for setting up one microphone on a piano, Figure 6.3 shows some possible setups:
(a) A microphone angled in from the side and aimed sideways toward the high and low strings using a figure-8 pattern.
(b) A microphone placed across the middle of the sound board, perhaps with an omnidirectional pattern.
(c) A boundary microphone taped to the inside lid of the piano. Use caution with duct tape on the piano as it may ruin the finish. Maybe tape it to the floor or the wall. Maybe.
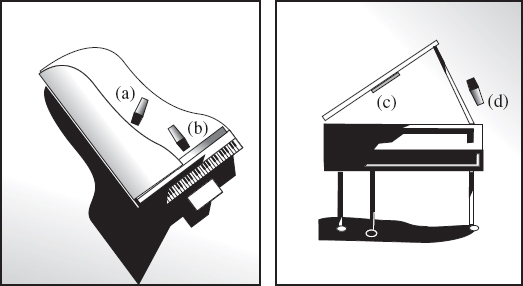
FIGURE 6.3
One-microphone setups for pianos
(d) A microphone placed a few feet away from the opening of the piano, just enough to capture the attack of the keys but not so much as to render the sound overly ambient.
• Use two microphones on the piano. Commonly, two microphones do a fine job of recording the grand piano, capturing the complete range of notes across the board. Figures 6.4 and 6.5 show how different setups might include:
(a) A stereo pattern. Try a well-placed stereo X/Y pattern about a foot above the sound board, using one microphone to capture the highs and the other to capture the lows. This setup results in a bright, in-your-face sound. In addition, watch the spacing so those all-important middle notes aren't lost in the hole between the microphones.
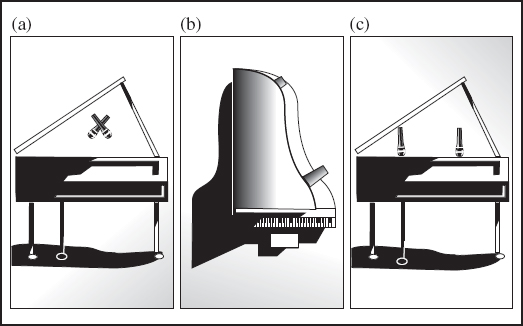
FIGURE 6.4
Two-microphone setups for pianos

Additional two-microphone setups for pianos
(b) High and low. Use one microphone aimed toward the higher strings and another aimed toward the bottom, or low end, of the piano. Some pianos, such as uprights or baby grands, may lack sufficient low end. A large diaphragm microphone on the lower strings just might capture more of the lower frequencies.
(c) Across the sound board. Aim two microphones straight down at a point about a foot above the sound board at ⅓ and ⅔ of the way across.
(d) Both microphones a few feet away. Set them raised high enough to aim into the piano, maybe or maybe not in a stereo pattern.
(e) One microphone close and one far. Not a stereo recording, but sometimes the piano might not need to be recorded in stereo. Record too many stereo tracks in a song and they might all melt into one blob of cloudiness.
(f) One microphone aimed at the strings and the other aimed up from underneath. Again, because the microphones are aimed at each other, switch the polarity on the bottom microphone.
• Raise the piano lid. When close miking, raise the lid, if applicable, as high as you can to minimize the reflections from the lid back into the microphones. Don't raise the lid too high if a boundary microphone is taped to the inside of the lid.
• Use three microphones on the piano. As two microphones hold a stereo pattern over the sound board, a third microphone might capture low end, especially on the grandest of grand pianos. Alternatively, use a third microphone as a room enhancement to any of the above stereo setups.
• Listen to the final sound in mono. If some frequencies disappear, you have phase issues between microphones.
• Talk to the hand. Record some piano and let the player hear it just for the sounds. This is good for all instruments of course, but the piano has such a wide variety of sounds and the player, especially a soloist, can be picky. The player is often happy to voice an opinion. Consider all suggestions or comments. A happy player plays better.
• Upright is not as grand. Recording an upright piano can be a challenge, as the strings are hard to access and the piano is usually up against a wall. Moving it away from the wall may ease reflections into the microphones, but it may change the amount of perceived bass.
The low end that makes a grand or baby grand piano sound so rich is the nice long, low piano strings. The string length is limited on an upright piano. If possible, remove the top of the piano. Figure 6.6 (a) shows an X/Y position and Figure 6.6 (b) shows two spaced microphones over the top of the piano. You could also lower a microphone into the piano but, due to proximity to the strings, some notes would be much louder.
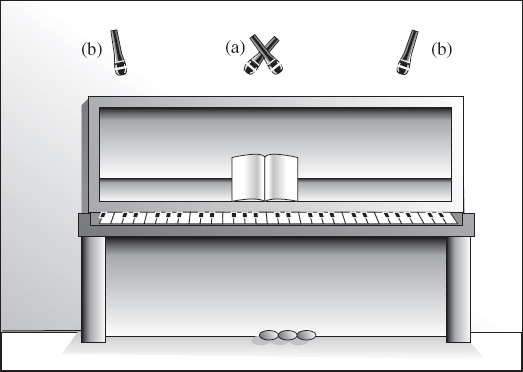
FIGURE 6.6
The upright piano
Keyboards
• Prepare. Ensure that all the prep work is done beforehand, with everything programmed and prepared. Hours can be wasted by inexperienced people learning how to operate equipment on the client's time.
Unless you or the programmer/player is totally familiar with the instrument, keep the manuals handy. Whoever is sequencing and programming the computers should know what they are doing.
• Confirm that all sequences are correct before committing. Ideally, you want to press play and have the sequence run through totally correctly. In addition, some situations require the sequencer to lock-up or sequence to a pre-recorded time code track.
• Place a limiter across the outputs of an unfamiliar keyboard, especially if you are experimenting with sounds. One blast of a piercing sound can ruin your speakers and it won't help your ears much either.
• Go direct. Modern keyboards have either an XLR or TRS phone-jack balanced output, so it can be plugged into the line inputs of the console. Older units may need a direct box and should be plugged into the microphone inputs to raise the signal to a usable input level.
Horns
• Use a live room to record the horns. Nothing sounds better than good horns in a live room – but not too live or else standing waves and unwanted ringy overtones may pop up. Toss rugs across the floor and set up baffles to minimize any errant frequencies.
• Place the horn section to get a nice live ambient feel. Omnidirectional microphones are great for distant miking things like horns and strings, as the natural reverb of the room comes through.
Conversely, placing the horn section too close to a wall or window may result in too much reflection being recorded. When the horn players are lined up and aimed at the control room, the sound may bounce off the window and back into the microphones.
• Set up the horn section the same as they would on stage. Place all the players in a row and set up a pair of microphones a few feet away. This setup will capture the warmth of the horns and eliminate some of the shrill sound associated with close miking. They will tell you how they prefer to be set up.
• Take a ribbon. Ribbon microphones are popular on brass sections because of their great high-end transient response and smooth, warm lows. Just don't place them too close to the horns. Ribbon microphones often can't handle the serious pressure generated. Dynamic microphones work well as they capture the sizzle generated, without overload.
• Let's try my pad. Horns tend to range in volume from loud to really loud with lots of transients, so microphone pads may be needed. Listen before pressing the record button, then listen back for distortion.
• Keep it a foot away. For a less clicky and warmer overall sound, keep the microphone at least a foot away from the bell of the saxophone. The air between the instrument and the microphone contains life. But, placed too close, that wind can really ‘pop’ the microphone.
• How many microphones are needed for recording horns? Different setups for a horn section may depend on the number of microphones you choose to use, as shown in Figure 6.7:
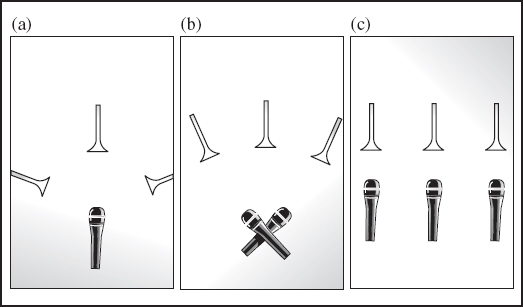
FIGURE 6.7
Horn placements
(a) Use one microphone. One microphone may have all players standing around it and playing.
(b) Use two microphones. Two microphones may be placed in a stereo pattern, or in tandem with all players in a row.
(c) Use three microphones. A three-microphone setup may allow each horn to have its own microphone. In this case, follow the three-to-one rule of microphone placement.
• Let's radiate those transients. Because horns radiate a lot of high transients from the bell, placing the microphones directly in front will result in a hard, shrill sound. Aiming the microphone at an off-axis angle, such as 45 degrees, or moving the microphone a few feet away from the bell should result in a warmer, pleasing sound, as well as minimize the key click sounds associated with some horns.
• Lowest of the low. For some wind or brass instruments, such as the clarinet, flute, or saxophone, sounds can come from the whole instrument, not just the bell. Place the microphone so it records the whole instrument.
• Use polar patterns to your advantage. Polar patterns will play a key role in choosing and placing a microphone.
• Set up a pop filter. Some wind or brass instruments may need a pop filter or windscreen to decrease air flow across the microphone capsule.
• Record horn sections together. Good horn sections, like groups of singers, need to hear each other, and lock in to how they want their sounds to blend with each others’ With individual tracks, this blend is left to the engineer at mixing. Record the players together so that they can blend with each other.
Listen to the blend of horns at different levels within the mix. Sometimes horns can sound full and big when loud, but, when turned down, only the trumpets are heard.
Proper microphone choice and placement should allow the whole sound to come through at a low level within the mix. With improper microphone choice and placement, only the shrill parts tend to come through the mix when the horns are set at a lower level.