

CHAPTER 9
Starting Points

Whether you are recording to analog or digital, the incoming signals will be routed, recorded, and monitored using the same process. The style of music, the artist, time restraints, and the tracks available will all determine how many tracks will be used for basics, overdubs, and vocals.
Track Layout
Determine which tracks get higher priority. For example, if the primary artist is a drummer, don't scrimp on the drum tracks. If the artist is primarily a pianist, record the piano in stereo rather than mono.
These choices are always a challenge because you must peer into the future to imagine the final outcome. Using the number of available tracks, you need to determine:
- How many instruments in total for the song will be recorded.
- Which instruments get routed to which tracks.
- Which tracks are recorded in stereo and which tracks are recorded in mono.
- How many tracks will each player get. Often drums get the most. For example, a large DAW setup may have 48 available inputs, where a lesser DAW setup may have 16 available inputs. With 48, you might use numerous tracks for the drums, giving each tom-tom (maybe both top and bottom) its own input channel, plus the snare drum, cymbals, and ambiance. However, with only 16 input channels available, you might want to use, for example, five tracks – kick, snare, hat, then a stereo mix of tom-toms and cymbals.
• Lay your tracks out consistently for every session. When the tracks are always laid out the same, you get used to where everything is. The console will become your instrument to play, like a piano. Rather than thinking, ’if I want that, I have to do this,’ your instincts will take over. In addition, you may be able to leave the setups the same from song to song, saving time.
• Layout on the console. On a digital console, banks of tracks are layered, commonly in blocks of eight. Assign stereo tracks evenly, for example not having the left side in one bank and the right side in another bank. In addition, you wouldn't want, for example, the effects for the drums returning in a block that holds the vocals. Historically, effects have returned on one section of the console. With digital consoles, effects for the drums should stay within the block, or blocks, that houses the drums. Maybe two blocks might hold drums and effects, with 12 tracks for drums and two stereo effects tracks, which equals 16 tracks – two banks.
• I wanna be effected. Effects for the vocals should stay in the same bank with the vocals.
• Track trick. Route the vocals to higher channels so they naturally return to the console more in the middle rather than all the way over to one side. Recording the vocal on ‘track one’ usually means leaning way over to address it. Better to be centered when you dial in those all-important vocal settings.
• Maximize your choices. If tracks are available, try recording different sounds of the same instrument. For example, record a bass track direct, a bass track with a microphone through an amplifier, and a bass track going through some effects. Use different processing on different tracks and come up with a suitable mix. Of course, check that all tracks are in phase with each other. Any or all can be erased or combined later.
• Hey, my stereo's gone. Don't record too many stereo tracks within a song. Final placement of stereo spread is determined during mixdown. When drums, bass, guitars, keyboards, horns, and vocals are recorded in stereo, the wide imaging of the individual instruments may get lost. I know, I know – sometimes you wish the musician would get lost.
• Don't buss single channels. If possible, route the signal directly to the multitrack recorder. A direct signal is higher quality because it has less processing. If the unprocessed signal doesn't sound right, maybe change the microphone or microphone placement.
• Scan across the console to confirm that all busses are correct. With all the signals routed every which way, one wrong button pressed could mean a great track ruined.
Documentation
• What is a tracksheet? Traditionally, the tracksheet is, of course, the page that documents the date, all locations of contents, where the tracks are, the names of the players, and additional comments. All must be clear. It also includes tape speed, equalization curve, reference level, alignment tones, and recorder manufacturer. Also noted are take numbers, dates, and possible small notes, such as microphones and outboard gear used. Cue lists and BPM (beats per minute) are also commonly documented.
• What is a recording map? In the old days of multitrack recording, sessions used tracksheets to stay organized. Tracksheets have almost become obsolete because, for one, tracks on the DAW are moveable. Yesterday's track 3 could be easily shifted to become today's track 15. Recording maps are used more as an overall reference rather than a day to day worksheet, as the tracksheet used to be.
Most engineers lay their tracks out similarly for every session within a project, which means the drums will probably stay in the same location for every song. For example, the kick drum may appear on track 3 on all songs, just for convenience and familiarity.
Figure 9.1 shows a recording map with emphasis on the DAW and its settings. Most of the track information would be written on either the recording map or the notes section of the appropriate track in the mix or edit window.
Also noted is information on parameters such as sample rate, bit depth, reference level, titles, and dates. Items not included here are the take numbers and the cue information, as these are visible in the edit window of the DAW.
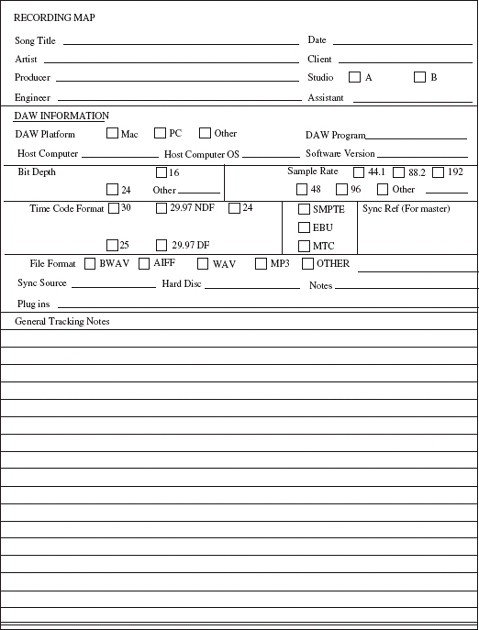
FIGURE 9.1
Recording map
• Clear and simple. All paperwork must be clear enough for any other person to easily sort through it. A bigger project might use any number of studios and recording engineers. Good, clean, complete, and easy-to-understand recording maps and notes are a staple of the recording environment and an important part of every session.
• Mark the choice pass. When naming a new track for the session, give it a proper label, not just ‘guitar 7.’ If a track is compiled, and simply called ‘comped master,’ some engineers like to label it with a ‘*’ A comp track is built using the best bits from all the takes. If the track has been edited for proper timing, add ‘**.’ If the track is properly in tune, add ‘***’ to the end of the file name. For example, the final lead vocal has been comped from lead vocal 1 though lead vocal 7 and is perfectly in time. It will be labeled with ‘**.’ If the tuning is acceptable, add a third ‘***’ When the project is finally ready to mix, all the choice tracks will have ‘***’ after their file names. Don't start the file name with a ‘*,’ as that can cause problems within the computer.
• Labeling, labeling, labeling. Some projects have hundreds if not thousands of files, including edited files, complete takes, partial takes, and unused takes. Place all these files in the master file list. Back up everything and remove any files that will not be used in the final mix. Without due diligence in labeling, you risk storing tons of files named ‘345476869’
• Use a notebook for each project. Store the relevant information there. Loose pages get torn, mixed up, and just plain lost. Personally, I am a fanatic at keeping paperwork. I have report cards from elementary school, love letters from Junior High, and that annoying restraining order thing.
• How about a date? Include the year when writing the date on anything. Years fly by, and, as anyone being audited by the IRS knows, something with the date ‘July 30’ is pretty much useless.
• My song is on the charts. If your project has more than a few songs, make a large chart with all the titles on one axis and all the instruments on the other. Finish a track then check it off on the chart. This makes it clear what has been done and what needs to be done. Anyone can look across the room and see exactly what is and isn't completed on the project.
• Write down favorite settings that you stumble upon while tracking or overdubbing. Experiment throughout the project. During the session, things are always happening. Often, something great might fly by, such as a great echo sound at one spot in a song. Noting a favorite setting gives you more options by mix time, as you will have lots of ideas collected. If possible, record that great echo effect onto an open track. If it moves you, then it should also move the listener.
• Department of redundancy department. Conflicting, redundant, or just plain wrong information is worse than no information at all.
• Stick to a schedule. If your project is under great time restraints, make up a schedule that everyone can agree on. Post this on the wall and stick to it.
• Use your head. Rather than blindly using the following settings, determine the characteristics of the musical instrument you are about to record. Every instrument sound has its own characteristic envelope.
• Use your ears. Better engineers know what each of their microphones sound like. They know how they want an instrument to sound, so, if needed, they equalize and compress using their preferred processing so they have a sound that is pretty much what they will want on the final mixes.
In addition, some engineers prefer to set all monitor faders at zero or unity gain, then set their levels using the record input levels, so, when the return faders are set at zero, everything returns at the proper level.
Drums
Ask yourself a few questions before setting the processors. If bussing a lot of microphones to a few tracks, will you place a compressor/equalizer across the buss, or across each incoming signal? How many tracks do you have to work with? More is not always better. Should the panning be set from the listener's perspective or the drummer's? How much processing should be used? Should you record any effects with the signal? Combining tracks can be tricky until you can see where things will lie within the final mix and set your levels accordingly.
• Use lower levels. Using a VU meter, set the recording machine input level of the drums low, occasionally in the yellow – never in the red. Check the drum levels on the peak meter reader as well. Drums can have a lot of wallop and the transients don't accurately display on VU meters. Drums are often the pillars of a song and must be sturdy enough to carry the load. Equalization and compression can bring out the natural crack and boom.
• Peak monitor. Really keep an eye on high-frequency/high-transient instruments, such as high hats, cymbals, and some percussion instruments. They can contain a lot of harmonics and high-level transients that can easily overload the record inputs.
• Use the proper drummer. Ask the drummer to play the song you are about to record. Getting sounds with the drummer playing a different song from the one you are about to record is close to useless.
• Pick a low snare. When getting drum sounds, set them at a reasonable level in the monitor mix. All drums sound great when turned up loud, but lower levels reflect a truer indication of how each drum sounds. If the drums sound full and clear at a lower level, imagine how great they'll sound when the volume is turned up.
Processing
The function that characterizes musical instruments falls into two categories: tonal and dynamic. Equalization deals with tonal aspects, which are the frequencies, and compression/limiting deals with the dynamic aspects, which are the levels.
Note that a good musical ear can hone in on certain frequencies that build up in certain musical areas. For example, if a song is in the key of A, there might be buildups in frequencies associated with A, specifically 110, 220, 440 Hz, and up.
Kick drum equalization
Set the kick drum frequencies in tandem with the settings on the bass guitar. These two instruments carry the low end of the song and each should be distinct. Add a frequency on one and pull the same frequency on the other. Proper Q settings can help define each drum by minimizing frequency overlap. Starting points for kick drum equalization might be:
- Pull below 40 Hz.
- Boost around 60–82 Hz to bring out the thud of the kick; maybe even lower in certain circumstances such as some dance mixes. This brings out the boom in the kick. Careful in this sub-area as things can become ‘blurry.’ Note that a tight kick skin won't have the low end of a looser skin.
- Boost at around 100 Hz for that solid body.
- Pull around 164 Hz to help bring clarity to the bass track. 164 Hz is a harmonic of the bass guitar's fundamental low E note, 41 Hz. This requires a thin Q setting.
- Add up to 200 Hz for body and fullness. Watch overlap.
- Pull from 200–300 Hz or maybe as high as 600 Hz, or even higher, to remove unwanted cloudiness and to open room for other instruments. Set the Q with the rest of the drums in the mix. These frequencies hold the bass and the guitar's primary frequency, and the lower end of the voice.
- Boost around 2.5–5 kHz for solid thwack. Today's kick drum-specific microphones may have an added equalization bump in this area.
- Boost at 5–8 kHz for crispness or a clicky sound. With faster tempo songs, the kick may need more click to be heard, while slower tempo songs leave room to allow solid lows to come through.
- Pull 8 kHz and up. These frequencies contribute little. Pulling them won't effect the sound much and may reduce hiss.
Snare drum equalization
As with all instruments, sweep the equalization and listen. Maybe mess with the Q settings to get a clearer picture of what frequencies need boosting or pulling.
- Roll off up to 100 Hz to reduce muddiness.
- Boost somewhere between 100–300 Hz for the body of the snare drum to come through.
- Boost somewhere between or around 500 Hz–1 kHz for that nice woody crack sound.
- Boost around 1 kHz for a ‘tink’ sound.
- Boost around 5 kHz for side stick and rimshots.
- Boost between 5–10 kHz for crispness.
Tom-toms equalization
- Roll off unwanted low end. Some tom-toms can get pretty low.
- Find and pull the rumble on each tom-tom. Turn up the level control on the equalizer, but not a lot. Too much low end can carry enough power to blow out a speaker. Sweep the low frequency as the player hits the drum and find any offending rumble, maybe somewhere within 300 Hz–1 kHz: the floor tom-tom might be lower. Find and pull the frequency using an appropriate Q setting – not enough to radically alter the sound, since there is a lot of harmonic tone within that frequency area. In addition, that frequency may have a higher harmonic sweet spot, so, when you pull the rumble, it naturally enhances that spot.
- Add between 100 and 300 Hz, depending on the drum, to bring out the thud.
- Pull around 8–900 Hz to lessen the ‘boxy’ effect. Boost in this area to add boom.
- Use a narrow Q setting and sweep between 3 and 5 kHz to find the ‘sweet spot’ frequency and raise it. You'll know it when you hear it.
- Pull a bit around 8 kHz and higher to diminish cymbal leakage.
Cymbals/overhead equalization
- Roll off up to 180 Hz to eliminate air conditioning rumble and low-level street noise.
- Boost a wee bit of 8–12 kHz to add shimmer.
- Sweep the high end to locate any frequencies that may need pulling or adding. The overheads preside over the whole drum kit and tend to gel the individual drums together. A rich, full-sounding kit should have lots of rich highs and few clashing lows.
High hat equalization
- Roll off everything below 180 Hz to remove rumble and leakage from other drums.
- Pull 500 Hz–1 kHz to remove ‘clang’
- Boost 3 kHz to add fullness or ring, but this is seldom needed.
- Find sheen at 8–12 kHz.
Room microphone equalization
- Use the appropriate microphone roll-off to minimize rumble.
- Pull somewhere within 120–500 Hz to open up room for high-priority instruments. The rich harmonics will still come through, with the power of the low frequencies coming from the individual drum tracks.
Drums compression
Only the very best drummers can hit the drum the same every time, so using compression is almost a necessity. Early transients tend to be very loud then quickly die down. This can present a problem, for example how to capture the meat of the sound while not overloading the input. Proper compression settings will control the drum transients, raise the overall level, and give the sound more punch.
Commonly, drums can be compressed more than other instruments because they are less musical and more percussive. Note that the character of the drum sounds changes as compression increases.
Before compressing the drums, listen to how they sound. For example, different styles of drumstick, or felt versus wooden beaters, need to be addressed. In addition, a tightly tuned drum skin needs different settings than a loose, flappy drum skin. Try these starting points:
Attack. 5–10 ms or maybe faster. A slower attack time allows initial peaks to sneak through before the compression kicks in. This may give a nice added crack to a snare sound, but watch for overload. A faster attack time may diminish the initial crack of the drum. Set the attack time on the kick drum a touch slower, as it may take a few milliseconds to build to its full potential.
Release. Start at 250 ms (a quarter of a second), then adjust to suit the song. A fast release time can bring up the level of the decay and raise the sound of the snares.
Ratio: 3:1 or 4: 1. Drums, due to their nature, have fast natural attack and release times, with plenty of peaks. A high ratio levels the dynamics while delivering the meat of the sound. Control the signal enough to record it, yet don't overcompress it so as to lose the initial transient crack. Of course, as the ratio gets higher, past 8 : 1 or 10 : 1, the compressor becomes a limiter.
Threshold. Low. A lower threshold preserves the full impact of the drums and can sustain its natural decay.
• Crossover points. Different frequencies may require different compression settings. Maybe move the compression crossover points of the multiband compressor to only process the applicable low frequencies just as you might set the compression points on a vocal track to address any prominent frequencies.
• Kick – the habit. If your drum setup has two kick drum microphones, maybe compress the far one and pull a bit of the high end. Add it in with the close microphone to get some teeth to the sound. Or try placing a microphone on the opposite side of the kick drum where the beater makes contact with the skin. Switch the polarity on this microphone.
• Split the snare. If the drummer is playing with both sticks on the snare drum, some of the hits may be louder than the rest. To raise the level of the lower ones, split the signal into two. Affect one of them in the way that you normally might, gating out all but the main or loudest hits.
Send the second signal to a limiter and compress the loudest part. Send a buss output from the first snare channel into the sidechain of the limiter. When the snare on the first track hits, that controls the compression of the limiter. Blend the two tracks until both the crispness of the loudest snares and the subtle inbetween parts are properly audible.
• Compressing the room. Run the room microphones through a compressor on high compression and fast release. When the player is playing, the ambient microphone level is lower, removing any unnecessary cloudiness. When the player stops, the ambient microphones open, making it sound as if the player is in a large, ambient room. As with many things in the studio, whether to compress room tracks is your personal preference. Do what you feel works with the song.
Drum gates
When placing microphones on the drums, complete separation is almost impossible. With proper microphone choice and placement, leakage from one drum microphone to an adjacent microphone can be minimized. Before you reach for the noise gate to eliminate leakage, confirm you have the appropriate microphone and have placed it properly. Note that messing with gates during recording can result in painting yourself into a corner. Sometimes it's better to wait and gate during the mix, especially when recording a drummer playing a dynamic song.
• Listen to the gates. If you are gating any of the drums while recording them, listen to the gated sound throughout the song to make sure the gates are being triggered correctly. Changing the input level of a drum track (sometimes even an equalization change) may alter the triggering of the gate. Check that all gates have triggered correctly before moving on.
• Gate the snare. It is not uncommon to add some degree of gating on the kick, snare, and tom-toms, but the cymbal microphones are not normally gated during recording. If the internal trigger on a drum gate isn't fast enough:
(1) Mount a small contact (pickup or lavalier) microphone to the rim. This tight microphone will open the noise gate faster.
(2) Listen to the contact microphone, sweep the equalization to find the drum's most prominent frequency, and accentuate it.
(3) Run the signal through a tight noise gate to make it sound like a click.
(4) Plug this into the sidechain input of the noise gate on the drum.
This really only works when the player makes solid drum hits. A drummer using brushes for drumsticks or lightly tapping the drums may not trigger the gates as planned.
• Gate the tom-toms. Eliminate leakage in the tom-tom tracks without using a separate microphone as a trigger. For each tom-tom, maybe:
(1) Split the signal coming from a tom-tom microphone into a second channel on the console. Insert a noise gate on the first tom-tom channel.
(2) On the second channel, determine the fundamental frequency of the tom-tom. Accentuate it by setting a thin Q, then pulling the other frequencies.
(3) Gate and equalize the signal so all that comes through is a solid click when the drummer hits the tom-tom. Leakage from any other instrument, even other tom-toms, should be dialed out.
(4) Run this output into the input of the sidechain of the noise gate that was inserted on the first tom-tom channel.
Any time the drummer hits the tom-tom, the trigger opens the noise gate, allowing the signal through. Due to the slow build of a tom-tom sound, maybe place a contact microphone on the rim of the drum and use it as the trigger.
• Talk to the drummer. Once you get the sounds to where you want them, record the drummer playing the song to be recorded, then have him come into the control room and listen. Once he is happy, you can move on.
• Electronic drum machines commonly have ‘hyped’ sounds. Electronic drums and percussion are already equalized and compressed, so some of the previous equalization and compression settings may be unnecessary.
Bass Guitar
Bass guitar equalization
Because recording bass guitar commonly falls in the realm of basics, it can be difficult to know what frequencies to add or pull until all the other tracks are recorded. Many engineers record the bass with no equalization. Then, during the overdubs stage, they play around with different settings to find what works best in preparation for the final mix.
• Get solid. The bass must be solid. Its job is to hold the low end together, so any level fluctuations by the player must be made uniform by using filters, equalization, compression and, most important of all, a good player playing a well-written song. As starting points:
- Dial out the very lows, maybe up to 40 Hz, using a high-pass filter so the compressor doesn't have to deal with unnecessary rumble.
- Add between 50 and 80 Hz for real lows on the bass. But don't mush this area with the kick drum. Add (or pull) a frequency on either the bass or the kick drum, but not both.
- Add around 82 Hz to add weight and to keep the bottom of the song solid. The punch dwells in these low frequencies.
- Use a narrow Q setting and pull between 160–350 Hz for clarity.
- Add somewhere between 600 Hz–1.5 kHz for the nuts to come through. Pull here and raise the overall level to open space for other instruments. Adding too much here can make the bass guitar sound vague.
- Add 2–2.5 kHz for presence, but watch overlap with other instruments.
- Add around 3 kHz to bring out click and fret noise.
- Pull from 4 kHz on up for a smoother, less attacky sound.
Bass guitar compression
Proper bass guitar compression settings can pull out more useable bottom and warmth. Often the bass guitar has fewer initial transients than an electric guitar, again depending on whether the player uses a pick or not, whether he uses a ‘thumb slap’ style, or whether he uses his fingers (of course, depending on the song, too). Different amplifiers require different approaches. Avalve (tube) amplifier has a natural musical compression, so additional compression may not be necessary. A close-miked setup will need different settings than a distant-miked setup. Dynamics play a major role in setting levels, because a more dynamic part will need different settings from a smooth part. In addition, signals that are more musical may require different compression settings for different frequencies. Unless the part or the player is totally wild, as starting points, try:
Attack. 20–60 ms. A slower attack time may help define the bass sound so that the initial note passes before the compression kicks in. Due to the low frequencies involved, it can take a bit longer to reach maximum power. Set a faster attack time, such as 0–20 ms, for a ‘clickier’ sound. For a smoother transition from non-compressed to compressed, try pressing the soft knee button.
Release. Medium to long. Use a longer release for substantial sustain.
Ratio. 4 : 1. It depends on how wild the player is–a good bass recording shouldn't need an overly high compression ratio. Adding too much compression may affect the higher harmonics of the bass guitar.
Threshold. Low. Maybe –25 to –15. Again, it depends on how smooth the player is. If he keeps his levels uniform, a higher ratio may work. A low threshold with a high ratio can result in a nice sustain. A ratio that's too high coupled with a threshold that's too low is noisy and can suck the dynamics from a track.
• All strings considered. Sometimes you must control certain frequencies and not others. Maybe the bass guitar has one note louder than the rest, but pulling the specific equalization could degrade the sound. Try this:
(1) Return the bass to another channel.
(2) Sweep the frequencies to find the offending note.
(3) Pull the rest of the frequencies, except for this note.
(4) Patch this equalized signal into the compressor's sidechain input. The sidechain dictates the compression, so only the input note is affected. This channel is for processing and not part of the audio signal.
• Sneaky peaks. An overly dynamic bass track may need a compressor plus a limiter to catch any peaks that sneak through.
• Know where you are going. Determine what you want before you start twiddling. Don't change things hoping to find some magical sound. Picture it in your mind and then dial it in.
• Does the player play with a pick during the song? Check beforehand if the player uses fingers or a pick. Sometimes he may use, for example, a fingering method during the verse and a pick during the chorus. This means the settings on the processors might need changing to compensate.
Electric Guitar
Electric guitar equalization
Of course, you don't really equalize the guitar, you equalize the microphones on the guitar amplifiers. With such a wide array of guitars, pickups, amplifiers, players, and styles, it is impossible to say there is a right or wrong guitar sound. The best guitar sound is the sound that makes the player happy. A happy player plays better.
Once the setup is complete and the microphones are correctly placed, have the guitar player play the part to be recorded and, as a starting point, try:
- Rolling off below 80 Hz. There is little musical information from a guitar lower than 82 Hz so adding will just add unnecessary low resonance. Leave this area for the designated low-end instruments: the kick drum and the bass guitar.
- Adding between 80–250 Hz for extra fatness. This area contains the fundamentals of the instrument. Maybe pull here if the guitars are not the primary musical instrument or if they overlap with the vocal.
- Adding between 250 Hz–1 kHz for content. This is an important guitar area because the second and third harmonics of the A and D strings live here. Adding the right frequencies in this area can place the guitar more in the foreground. Pulling here places it further away and makes room for vocals and other instruments.
- Sweeping the upper midrange, between 2–6 kHz, for the spot that has enough bite. Somewhere there is a spot where the sound isn't too brittle or too boomy and has just enough distinction.
- Adding 5–8 kHz for added richness, but this can also make any buzzes more apparent. Due to an amplifier's limited frequency range, musicality decreases with higher frequencies.
- Adding some highs, over 8 kHz. This can give an electric guitar some air but can easily turn the sound brittle.
Electric guitar compression
On a loud electric guitar amplifier, there are lots of low-frequency harmonics and overtones but not a lot of highs. Take proximity effect into consideration while setting compression levels. Too much low end can dominate, then dictate the compressor's reactions.
Medium to loud guitars may need less compression as the proximity effect on the microphones may not be as apparent. Try:
Attack. Semi-fast to fast, such as 10–50 ms. Semi-fast attack times can smooth out a lead guitar solo.
Release. Long. From half to one second. Longer release times heighten the sustain. Shorter times increase pumping, especially with high ratio and low threshold. Start by setting the release where it returns to zero just as the next beat of the song hits.
Threshold. Low. Start at –25 and slowly raise it so all the crunch is brought to the surface. Unfortunately, this also brings up the noise.
Ratio. At least 5:1; maybe as high as 10 : 1 for sustained guitars. Use the peak level control, if available, to keep the initial attacks at bay, especially if the attack setting is at all slow.
• Compensate at the amplifier before the control room. Once you get the sound you want, compare the settings on the amplifier with the equalization at the console. If the amplifier has, for example, certain frequencies pulled and you are adding them at the console, set the amplifier settings to compensate then remove the console equalization. Get the best sound from microphone placement and the tone controls on the amplifier. Always ask the player before touching or changing his amplifier setting.
• Use distortion as a creative tool. Use distortion to add edge to a sound. Tube distortion works best when the tubes are being driven, so turn up that tube amplifier. But everything distorts differently. Digital overload distortion will always sound terrible.
Acoustic Guitar
Acoustic guitar equalization
A properly miked, well-maintained, and well-tuned acoustic guitar with new strings should need little equalization. Perhaps only to remove bothersome rumble, to add some frequencies for sheen, or maybe to pull where the sound may mask other instruments.
When equalizing something with as many overtones as an acoustic guitar, pull the un-harmonic overtones and enhance the pleasing harmonics. Here, the musical recording engineer has the advantage. As a starting point, maybe:
- Roll off below around 82 Hz. The lowest note on the standard acoustic guitar is E, around 82 Hz.
- Sweep the low-midrange, from 80–300 Hz, to find the boomy sound, then pull it using a narrow Q setting.
- If there is room, add somewhere between 80–350 Hz for body.
- Add 300 Hz–1 kHz for early harmonics.
- Add somewhere between 700 Hz and 1.2 kHz for more ‘wood,’ or pull here to ease the secondary harmonics.
- Add 1.5–3 kHz for presence. Pull for hollowness.
- Add 3–5 kHz for presence and attack.
- Add 5–10 kHz for brightness.
- Add around 10–12 kHz for sparkle. Consider, though, that it doesn't take much to go from sparkle to brittle. Adding highs means adding noise.
Acoustic guitar compression
The characteristics of an acoustic guitar might include wide dynamic range, semi-fast rich initial transients, and substantial sustain. The acoustic guitar may not have as many peaks as a snare drum, unless the part is percussive, but it does have peaks. Closer-miked sounds may need more compression than microphones placed a couple of feet away. Try:
Attack. 10–20 ms. A very fast attack can control the initial transients of a sound.
Release. Medium. Start at 250 ms and raise or lower as the tempo of the song dictates.
Threshold. Medium to high. A high threshold allows all the natural sounds and dynamics of the guitar to remain intact. A lower threshold might bring out more lower body.
Ratio. Low to begin with; maybe 2 : 1 or 3 : 1. A higher compression ratio may be needed as a player may tend to move off-axis now and again. Play with the ratio until the quiet bits as well as the loud bits can be heard. A higher ratio can increase the sound's density so it fits in with the other compressed tracks.
• Choose to use two. If you choose to use two microphones on an acoustic instrument, the one with more lows – usually the closest microphone – may need more compression than the distant one.
• De-ess the guitar. Minimize fret squeaks and noise with a de-esser.
• Defeat the proximity effect. Pull some of the low frequencies that may be created by the proximity effect so the compressor won't react to the added lows.
• Sympathy for the level. When the acoustic instrument is not in use, put it away, or loud levels in the room will cause it to ring out sympathetically.
Vocals
Vocal equalization
•Eek. You EQ? Better engineers prefer microphone choice and placement before equalization to get their vocal sound. If you must equalize, have the singer sing the song and:
- Pull up to 80 Hz. This area can be rolled off for most vocals as it holds all microphone rumble and not a lot of clarity. Pulling these lows on the vocal will open space for other instruments that benefit from this frequency, such as the kick or the bass. Try a microphone roll-off instead of an equalizer.
- Add 80–300 Hz for thickness and body. This area contains the vocal fundamental tones of many singers, sometimes higher for a female voice, so it carries a lot of the weight of the vocal sound. Tread lightly in this area. Pulling these frequencies can result in a hollow, boxy sound. Adding here risks masking other important instruments. Commonly, though, the vocal has prominence over other instruments.
- Pull around 300–500 Hz, depending on the voice, to ease offending first harmonics. Adding too much in the 500 Hz–1 kHz range results in a honky, nasal-like sound.
- Add 800 Hz–2 kHz for intelligibility. This area adds warmth or quality of voice. Pulling some of these frequencies can eliminate harshness, but too much can result in a hard, colder sound.
- Pull around 1 kHz to allow space for other instruments. This works well on background vocals as they are commonly used as support rather than being the main focus.
- Add 2–6 kHz for clarity and presence. This is where the ‘s's and the ‘t's cut through. Too much in this range and a de-esser may be needed. Pulling here makes the vocal sound dull. Adding too much makes the vocal sound shrill.
- Add from 6–16 or 18 kHz for sibilance and air. Setting the right equalization in this area can place a vocal just perfect, but mind the hiss created by raising these high frequencies.
Vocal compression
The characteristics of vocals, depending on the singer and situation, can include fast attack and wide dynamic level changes.
Some vocals need limiting and compression, but some vocals don't. Some engineers love to compress all vocal tracks, while others choose to record vocals with as little processing as possible. Maybe choose selective processing, using compression only on the bits that need it. Do whatever works, as long as the louder parts don't overload and the quiet parts stay out front. The key to good vocal compression is subtlety. You don't want to hear the compressor working; you just want to hear every note and nuance.
Compression settings on the vocal depend a lot on the settings on the rest of the tracks. A rock track may have tighter overall compression settings than a love ballad. The vocal must stay buoyant among the rest of the tracks, so settings must be uniform with the rest of the instruments. Try:
Attack. Fast to medium-fast, depending on the tempo of the song. Too fast an attack time can mask the very beginning of the vocal line. A soft knee setting on the compressor works well on vocals as it smoothes the transition into compression.
Release. Set the release time at fast for a faster song and slow for a slower song.
Threshold. Start at the highest, then work backward. When you see the needle move – stop. You want the loud passages to compress and the regular full voice to move the needle minimally.
Ratio. Start with 3 : 1 or 4 : 1, depending on the singer and the part. Set a solid output then set the ratio for the best final settings.
• Set the settings according to his abilities. Good singers have control over their dynamics and know how to work a microphone. They might not need as much compression or limiting as a less experienced singer. Bryan Adams is the king of singing loud with no microphone overload, just by knowing when to move off-axis a bit.
• Set the settings according to the song. Determine the dynamics of the vocal part. If the vocal is consistent in level throughout a song, the settings will be different from if the vocal were more dynamic in certain sections. Very dynamic tracks might benefit from limiters over compressors, as a properly set limiter will not allow the signal to overload.
• Place a peak limiter in the chain with a compressor. A dynamic, close-miked vocal can have such seriously high peaks that one compressor alone may not be able to control them. You choose which one comes first, the limiter or the compressor.
• The background vocals have more compression than the lead vocal. Background vocals are often not as dynamic as the main vocal, so they can be more compressed to sit nicely in the background. For lead vocal clarity, buss the lead vocal into the sidechain of the background vocal compressor. This automatically lowers the background vocals whenever the lead vocal is singing.
• Limit when you record and compress when you mix. Limiting a prerecorded vocal is not like limiting a live vocal. Due to the limitations of analog recording equipment, a pre-recorded vocal can't be as dynamic as a live vocal. A digital recording can preserve the original dynamics.
• De-ess the vocal. A de-esser placed first in the chain controls any sibilance problems before reaching the compression and equalization. The de-esser can eat some of the needed sibilance if it is set too high. Try waiting until the mix to ease out the ‘s's, as long as the vocals are recorded properly.
• I auto-pitch it. Many engineers connect an auto-pitcher in the signal path in case the singer's pitch strays a bit. Record the vocal normally and record the ‘tuned’ vocal on another track. Then, if the tuning on the first track goes way out, bounce only the needed bits from the tuned vocal track.
• Gating the vocal is uncommon. Gating the vocal microphone may well be common in live settings, but studio situations are more intimate. All the vocal inflections must be heard. A quiet note is no less important than a louder note.
Horns
Horn equalization
Horns can be particularly brittle if recorded incorrectly. Again, microphone choice and placement play a huge role in getting the best sound. Poorly written horn parts will be infinitely harder to record. Maybe:
- Unless the song relies on horns for the bass parts, install a microphone roll-off to pull all the frequencies below the horn's lowest note.
- Add 200–500 Hz for the body to come through but, again, depending on the placement in the final mix, you may not want the horns masking the vocals.
- Consider presence at 2–4 kHz. Watch overlap in this area. This is a good area to pull when the horns aren't to be feature instruments.
- Try boosting from 5 kHz on up, which can bring out brilliance. Too much, though, and the sound turns shrill and brittle.
- Think about boosting 8 kHz, which brings out click from the keys.
Horn compression
Horns can be dynamic and loud, with high initial transients and little decay. Too much compression can remove some dynamics and thin out the sound. Compression may not be needed on all the horns, maybe just the lower horns such as the baritone sax. Higher horns tend to cut through naturally, so they may not need the compression. Starting points may be:
Attack. Fast. For many horn sections, usually as fast as possible.
Release. It depends on the song. If the horn parts are choppy, keep the release faster. A solo horn might have a medium release time. Horns being used as pads might have a slower release time.
Threshold. Low, perhaps –10 to –15 dB. A lower threshold can pull up all the nice growl.
Ratio. 3:1. This is a standard starting point. Raise it a bit to control the low end, especially if the player likes to move around a lot. Keep the ratio low, as horn players tend to ‘swell’ a lot as they play. Higher ratios level these emotional swells. Just don't overdo it.
• Flugel. Double Flugel. Doubled horn tracks sound great, except for low horns. The low-frequency area needs clarity, and that area belongs to the bass guitar and kick drum.
Piano
Piano equalization
A piano has a rich, full sound, initial high transients, and lots of natural decay. The sound depends on many variables, including placement, microphone choice and placement, player ability, song writing, and so much more that these starting points may be of little use.
If you must equalize the piano, use a wide Q setting with minimal level changes. Adding too much equalization on the piano results in a mix where the only piano frequencies you hear are the ones you added. As starting points:
- Roll off the very lows, below 50 Hz.
- Bring up the low end by boosting 50–150 Hz.
- If the sound is too boomy, pull in 2–400 Hz range.
- Add presence and attack by boosting between 4–8 kHz.
- Add air by adding 8 kHz and higher.
Piano compression
Start by setting the compressor as a limiter with a high threshold and work backwards from there. As the player plays the song to be recorded, set the levels to where the needle moves only during the louder bits. Starting points may be:
Attack. An up-tempo song may have a faster attack than a slower piece. Set the attack according to the tempo of the song.
Release. A medium release time is a good starting point. As with the attack settings, fine-tune it once the tempo of the song is determined.
Threshold. A lower threshold means more of the sound is compressed, but the piano has a full sound with a lot of fundamentals and overtones. Set it too low and overtones lose distinction. A higher threshold might be a good starting point.
Ratio. A high ratio ensures that the signal will not overload, even if the player decides to go all ‘Jerry Lee’ at the end of a smooth love song.
Something's Not Right
Sometimes you simply will not be happy with a sound. You've changed microphones, you've equalized, you compressed, you've put it in a taxi and sent it round the block – you've tried everything. Maybe:
- Remove all processing and listen to the core instruments, often bass and drums.
- Turn any amplifiers down or up. Listen at different levels.
- Disconnect any or all pedals in the signal line.
- Use a designated heavy-duty cable from the instrument to the amplifier.
- Have the player play the song you are working on.
- Tweak the controls until the sound doesn't stink. Don't spend an hour on it. Pull some of the midrange frequencies to clean up any muddiness.
- Change the equalization on the other instruments so it fits in better. Sometimes equalizing the other instruments that surround a track will give it more definition.
- Have your assistant move the microphone a bit to get a better sound off an amplifier or instrument.
- Change the amplifier or, even more drastically, the tubes inside the amplifier.
- Turn off all pedals or effects, then bring them in one at a time.
- Listen to the sound in the track with the vocals.
- Maybe it isn't the instrument; maybe it's the part. Not to step on any toes, but perhaps ask the writer to maybe re-evaluate the part.
- Wait. The tone will improve as the player gets warmed up.