

CHAPTER 10
Signal Routing

In the analog recording world, hotter levels to tape can result in distorted sounds. In the digital world, hotter means cleaner sounds because you are using more of the ‘volume bits.’ However, when the signal reaches 0 dBFS, sounds will instantly become 100% distorted.
Lowering the recording levels would avoid overload, but lower it too much and the signal leaves the high ‘hot’ area, or digital MSB (most significant bits), and edges into the lower resolution of LSB (least significant bits).
• Set the microphone input fader at zero. This is not off, but about three-quarters of the way up. Set the record input level with the microphone input trim control to take advantage of the console's optimum parameters.
• What is trim? The trim knob is an active gain control within the preamp. Because different instruments and microphones can have vastly different levels, the trim lets you raise and lower the incoming signal for the optimum level.
• Avoid overloading the system. Lower your input levels for high-transient tracks such as percussion instruments.
• Lovely read a meter aid. When recording musical instruments with high transients, rely on your ears and your experience, using the meters only as an aid. Remember, peak levels tend to be too fast for the VU meters, which might show inaccurate readings.
• Players will play harder as a song progresses. Perfect levels at the start of the song may creep into the overload zone by the end of the song. Set input levels a touch low before pressing the record button.
• What is headroom? Headroom is the distance, measured in decibels, between a device's optimum operating level and the distortion point. More headroom can mean more room for peaks.
• What is signal-to-noise ratio? This is the ratio, measured in decibels, between the noise floor and the optimum signal level. A higher number is desired here so more information can be recorded.
Levels To Record
• Keep it quiet. Like links in a chain, the console is a linked series of circuits. If one link is low, boosting somewhere else to compensate adds unnecessary noise and distortion. A little bit of noise here and there adds up to a whole lot of noise in the final result. On rock records there may be a bit of leeway, but on jazz, classical, or solo instrument recordings, unnecessary noise is unacceptable. You've heard the adage, ‘watch the pennies and the dollars will take care of themselves.’ Similarly, ’watch the little noises and the cleanliness will take care of itself’
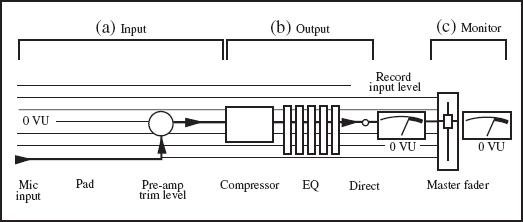
FIGURE 10.1
Good chain
• Get the best level as early as possible in the gain stage. The sound recorded will be cleaner, with less hiss and noise. A louder signal means less additional level is needed at the pre-amp stage. A low level will mean raising gain control, resulting in increased noise. Levels that are too hot will overload the inputs.
Take the necessary time to set the optimum operating level for the cleanest sound and the least noise and distortion.
• Good versus bad. Every device introduced to the signal degrades the signal's definition. Less processing means purer sound, with more focus and clarity. The best signal has the smallest amount of processing. You can dumb down a good signal but you can't smarten up a bad signal.
Figure 10.1 shows good gain staging. Minimize noise while maximizing gain at:
(a) The input stage. The right microphone enters the console at the proper level. From there, the pre-amp raises the input level. No pad or trim change is needed.
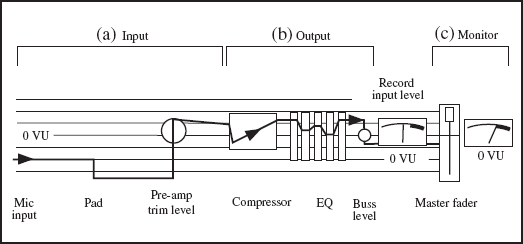
FIGURE 10.2
Not-so-good chain
(b) The output stage. Compression and equalization are not connected into the signal path, and a healthy level is going ‘direct’ to the input of the recording machine.
(c) The monitor stage. The clean signal level then returns to the master fader at 0 VU.
Figure 10.2 shows an unnecessary amount of noise introduced into the signal chain at:
(a) The input stage. The microphone level is too hot for the input, so the pad is introduced. This lowers the signal level into the pre-amp so the trim level must be raised.
(b) The output stage. The input level to the compressor is too hot, so the input is lowered. To compensate, the output level is then raised so the signal level overloads the next component – the equalizer. This overloaded signal level is then lowered at the buss, and this low-level signal is sent to a recording machine input.
(c) The monitor stage. A signal recorded with low level means the fader must be raised higher than normal for the signal to reach 0 VU.
The Monitor Mix
• Monitor the return from the recorder, not the channel input. Before setting levels and sounds, route the signal from the microphone through the console to the recording machine and back again to the monitor section at the console. By not monitoring the output of the recording machine, you don't really know what's there. An errant buzz or click might slip by unnoticed.
Monitoring the returns from the multitrack recorder allows you to stop and punch in whenever the situation calls for it. If you are monitoring the inputs when you record, you won't hear the recorded track to punch into.
• Get fast. Good engineers can get great monitor mixes in just a few moments because they know what they want. This isn't the time to do any kooky equalization or wild effects. Just quickly set up a solid monitor mix so the recording can proceed.
• Pan the players. In the monitor mix, place the players as they are in the studio, including the drums as you see them. For example, if a guitar player is toward the left side in the studio, pan the guitar to the left side in the control room. If the high hat is on the right, pan the high hat to the right.
If you choose to pan the drums from the drummer's perspective, where the high hat is on the opposite side, that's fine. Just pan the cymbal microphones the same. Don't, for example, pan the high hat from the drummer's point of view then the cymbal microphones from the listener's point of view.
• Use the mute buttons. To eliminate unwanted console noise, make a habit of muting unused channels. This does not apply to open channels within a workstation.
• Flange can mean you're hearing it in two places. If you hear the sounds ‘flanging’ while monitoring the output of the recording machine, you might be hearing the input as well as the output. Maybe the channel sending signal to the multitrack recorder is accidentally being sent to the monitor buss too.
• Don't send everything to everything. Pick and choose which effects, if any, works best with each track. Continually work out your layout and direction on the rough mixes, listening to which parts pan best with which parts, or what grooves work with what level changes. Maybe no effects at all works best for a song.
• Remember Fletcher–Munson. Another reminder to monitor at low volume levels, not only for your ears but for your sounds. Fletcher-Munson curves chart equal loudness points and state that different frequencies will appear louder or quieter at different levels. Figure 10.3 shows that what may sound great at volume 9 may sound bass-shy at volume 2. It's a little-known fact that Fletcher-Munson's wife also had curves.

FIGURE 10.3
Fletcher-Munson curves
The Cue Mix
• Ignore everything else but this. For the best performance, set a great headphone, or cue, mix. If a musician is really stoked with the sounds, the cue mix, and the studio vibe, the performance will improve. Take the time to get the absolute best mixes for everyone.
Go into the studio yourself and listen to each cue mix. Speak into the microphone; maybe sing along to hear the level. Have the band play, and listen. Can you hear everything? Is the vocal going to be loud enough? Is it too loud? Are the effects as you want them to be? Are the left and right sides at equal levels? Does it sound rich and full in the headphones?
• I see cue. Determine whether the cue mix should be set at pre-fader or post-fader. A pre-fader cue mix lets you change the fader levels in the control room without changing the headphone levels. A post-fader cue mix means headphone levels change as the fader levels change.
• Don't turn the cue all the way up. Set the overall cue mix level from half to three-quarters of the way up, so you still have plenty of room for more volume. It should be loud enough so they can hear it, yet not so loud it will blow their hearing out. Better to be hear ‘Hey buddy, turn the cue up’ than ‘Hey moron, the headphones are too loud.’
• Comfortable is best. Just as the players are set up in the studio as they normally play with each other, so should the cue mix be. For example, if the drummer is used to hearing the rhythm guitar to his left, set up the cue mix so that's how he hears it. It may be vexing to see a player on his left while hearing him on the right side of his cue mix.
• Avoid abrupt changes in the cue mix, such as level changes or effects return levels. If you change something on the console and it accidentally goes to the headphones, it throws the player's concentration.
• The cue mix is a priority, not something to be set and forgotten. Continually check that each cue mix is the best it can be for each player. If each player has own cue station, go and check each one for proper mix and pan levels.
• Set the proper level for the vocals in the singer's cue mix. If a singer's vocal track is not loud enough, he may either slowly move closer to the microphone as the session progresses or, worse, to make up for low levels, sing beyond his comfort range. This may result in a musically sharp vocal track. Just the opposite may happen if the vocal is too loud in the cue mix. He will not sing to his comfortable level and may sing slightly flat.
• Buzz off. Tell the player to leave the headphones off until you are ready to press the record button. No one needs to hear the clicks, pops, and feedback that can accidentally shoot through headphones as signals get routed. Only when you have checked the headphones yourself and are finally ready to press the record button should the player don the headphones and begin.
• Bad news: you both have mono. If you only have one stereo cue send but need two mixes, split the stereo send into two mono signals using the pan and volume at the console to get the best mono mixes. Of course, stereo mixes always sound best.
• Use a dedicated reverb for the vocal. At any time of day or night, whenever he wants to do a vocal, the effects in his headphones are set exactly how he likes it.
• Set up opposite polarity speakers. For vocal overdubs, if headphones are too uncomfortable for a singer to wear, Figure 10.4 shows the opposite polarity speaker setup.
(1) Place two speakers in front of the singer at ear level.
(2) Make a triangle by placing the microphone directly between the two. Use a tape measure to guarantee both speakers are equidistant from the microphone capsule.
(3) At the back of one of the speakers, switch the two wires so the polarity is opposite to the other.
(4) Send a mono signal to the speakers. Because their polarity is opposite, compression from one speaker (a) and rarefaction from the other speaker (b) will combine and cancel at the microphone.
(5) Play the song and listen to the microphone. Often the leakage heard is no worse than leakage from headphones.
(6) Although minimal, there is leakage. Don't play a track in the cue mix that you don't plan on using in the final mix. Leakage from a track that isn't there can come through loud and clear when you turn the vocal up during the final mix.
(7) Of course, this works only during overdubs, not when the whole band is playing along.

FIGURE 10.4
Opposite polarity speaker setup
• Clearly label the instruments on the cue stations. Larger studios today use individual eight-channel consoles at each cue station. Perhaps the drums return on two tracks, then bass, acoustic guitar, etc. return on the remaining channels. When the player wants a louder track in his headphones, he just has to turn it up. Everything should be crystal clear for the musicians so, if they need more acoustic guitar, they can just reach over and turn it up.
But few players are recording engineers, so a player may hear that something is wrong but not know exactly what. Go out into the room and set up everyone's cue station to their needs. For example, the drummer may need to hear more click track and less kick drum, or the bass player may need to hear no click track and more kick drum.
• Don't force anyone to wear headphones. Players not too experienced in the studio may not want to wear cumbersome headphones. Bands rehearse without headphones all the time, so all of a sudden forcing a player to wear headphones might make him uncomfortable. To get the best performance, the players must be at ease.
• Keep the drum levels low in the headphones during basics. Everyone in the room can feel the drums because they are usually playing right there next to them in the room.
• Give the drummer his own cue mix. The drummer may want louder levels and maybe no one else wants a loud click pounding away in their headphones. Other players in the room may not want any click in their headphones but want to play along with the drums.
• Keep it simple. During an overdub, mute some of the secondary instruments in the cue mix. With fewer guidelines, a player may come up with a few ideas that wouldn't come out if all the other instruments are there.
• Keep the effects on the vocal in the cue mix to a minimum. The singer needs to hear his own voice. Chorus messes with his tuning and delay messes with his timing.
• No fooling. If the player wants a change in the headphones, do not try to fool him by pretending to turn up a track change a setting. This embarrasses him and makes you look like an amateur.