
CHAPTER 30
BREAKING DOWN THE SCRIPT
Shooting rehearsals on video should have given you a firm sense of the camera coverage required, but final codification with your director of photography (DP) can only be decided in relation to your authorial intentions and the limitations of the medium itself. While simple poverty may preclude dollying or craning shots, freeze frames, special titling, and optical work, this is, after all, just slick packaging and its absence should never debilitate a worthwhile film.
The responsibility for the graphic aspects of filmmaking lie variously with the director, cinematographer, and art director. Steven Katz's Film Directing Shot by Shot (Boston: Michael Wiese Productions in association with Focal Press, 1991) does a fine job explaining the staging options for different kinds of scenes. From its more than 350 pages of storyboards and diagrams you learn how useful drawing skills are when you want to plan coverage on paper of a three-dimensional world. Many of the book's techniques depend on dollies, cranes, and take-apart sets that are common in professional filmmaking but beyond the purse of the low-budget group. Even if you can afford this equipment, to operate it adequately and make all the lighting changes that its use may demand will massively slow the production, especially if its operators are learning on the job. This is very wearing on the cast.
Keep in mind that decades of classic cinema were shot with absurdly limited equipment. You will do your best work using the simplest techniques that serve the film's artistic intentions. Resist your crew's desire to experiment with “better” equipment. The over-elaborate staging you accede to (only because you don't want to disappoint your DP) may fail and may kill a scene that would have worked perfectly well had it been kept simple. Fight for simplicity—simple is strong, less is more. For your level of expertise, stay focused on what you can do and what matters.
With your DP, decide, in the light of what camerawork revealed in rehearsal, what coverage is now desirable for each scene.
DIAGNOSTIC QUESTIONS
Use these questions to help you develop a shooting and editing strategy for a scene:
Geography:
- What must the scene show to establish the environment satisfactorily?
- Does this orientation come early, or is it delayed for dramatic reasons?
- What combination of distance and lens will you need to contain the widest angle, and is the location big enough to allow this?
- Will you have enough lighting to shoot the most comprehensive shot?
Movements by Characters:
- At which points do characters move from one point to another and why?
- How will you show it? (Drop back to a wide angle? Move the camera with a character? Show another character's eyeline changing as he or she hears the moving character's footsteps?)
- What axis does the character move along at each stage of his or her movements?
Point of View:
- At each significant moment, whose point of view (POV) are we sharing?
- Whose global POV predominates in the overall story?
- When and why does POV change?
- Does a particular change move toward the subjective or the objective, and why?
- What emotion, thought, or preoccupation might POV convey?
- How does the Storyteller feel about the events in this scene?
Eyelines:
- What are the significant eyelines in the scene? (These motivate what the audience wants to see and therefore motivate camera placement from shot to shot.)
- Where do eyelines change?
- Where should the camera look along an eyeline?
Camera Movement:
- When and why should the camera move?
- What feeling does its movement create?
- At what speed should the movement be? (Movements must be paced appropriately if they are to integrate with other aural or visual rhythms in a scene. Be careful of strobing when panning over repetitive patterns such as railings. See camerawork manual for further information.)
- At what significant moments must you show relationship? (You might frame a sleeping character supposed to be catching a plane with a clock in the background—more effective than laboriously intercutting the clock—or you might play a whole mother-daughter argument in tight, single shots to emphasize the adversarial, isolated feel of their relationship.)
Isolation:
- Who or what might legitimately be isolated from surroundings? (A misfit boy might frequently be shown alone, while the gang members who try to recruit him always appear as a pack. A phone silently refusing to ring for someone waiting on tenterhooks for a call might also be shown as a single shot. In each case this isolation complements a dominant perception, either of someone within the film or that of the Storyteller.)
Space:
- What is the significance of space between characters? (Space between people is charged and even political. The changing distance between two characters having a conversation is highly indicative of who is gaining control and who is retreating or hiding. Camera position and the choice of lens can alter the audience's perception of space. For instance, a crowded street is often shot with a telescopic lens to compress cars and people into a bobbing sea, while someone reaching imploringly through prison bars might be shot with a wide-angle lens so his or her hand comes across a void and becomes enormous in the foreground.)
PLANNING COVERAGE
Taking into consideration everything mentioned previously, you must now lock down how you want to cover each scene and provide yourself with graphics and reminders so you don't have to rely on your memory while directing. Once a shoot gets under way, sensory overload will turn your memory into a blank.
COVER IMPORTANT ASPECTS IN MORE THAN ONE WAY
Be prepared to cover vital story points or important emotional transitions more than one way so that later you have a choice and can exercise maximum control over the telling moment. For instance, in a family reunion scene where a glass from an old wedding set gets broken by the mother, your beat may be her moment of realization and grief. The incident can, however, be given additional poignancy by shooting reactions on the part of others present. Her son may show anger at her clumsiness, her daughter may be surprised, her husband may be amused because he thinks it is just a minor accident, and her daughter-in-law may be concerned that she cut herself. You would not use all these reactions, but having them allows you later to choose the right inflection as required by the scene's finished state and context.
Covering these reactions allows for a variable richness in defining the moment. It also follows our often-mentioned principle of abundance in which you generate more than strictly necessary to permit options, and therefore control, later. This is not about artistic compromise but survival; only foolish optimists take a 2-day water supply to cross a 2-day desert.
THE FLOOR PLAN AND THE STORYBOARD
Draw a floor plan. It will help you consolidate your intentions for blocking and indicate how to use the fewest and most effective camera angles. On it show the characters' movements and the camera angles necessary for the edited version you want. Figure 30-1 is the bracket scene in a script and Figure 30-2 is its floor plan. This diagram, growing out of the blocking developed during rehearsals and
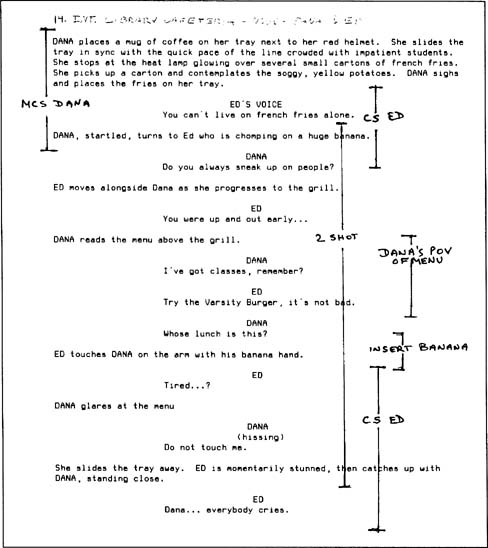
FIGURE 30-1
Script page bracketed with intended shots. Editing options are immediately visible.
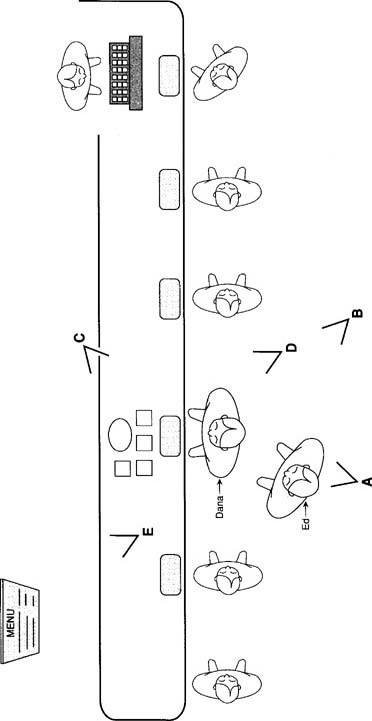
modified by location realities, helps further work out the editing in advance and enables the DP to plan lighting and camera movements.
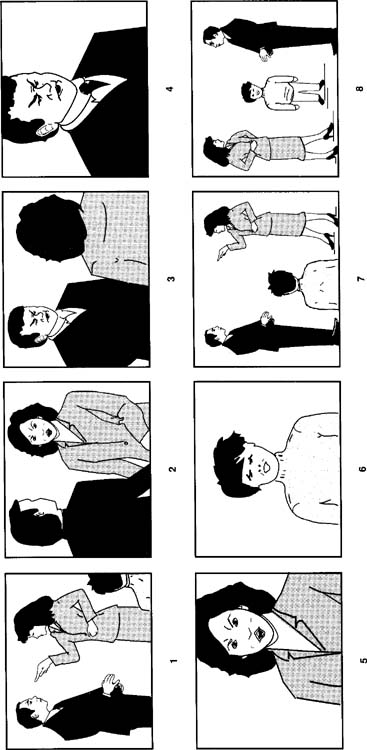
On a tightly planned production, the art director may make storyboard sketches for each angle, as in Figure 30-3A. These help ensure that the contents of each composition are as interesting and relevant as possible. The suggestions each expert contributes may be so good that the director revises the original conception. As always in a true collaboration, the whole can be greater than the sum of its parts.
Whatever the original intentions, the storyboard plan often goes out the window when you shoot. The particularities of a lens's field of view, problems with lighting, the needs of a character's movements, and even the size of the framing can all lead you to recompose the image and block actors quite differently.
SCRIPT BREAKDOWN
Better than a simple list is a graphic representation (as always) to show the intentions and the state of play. A development of the floor plan and bracketed script as described in Chapter 29 will provide you with a thorough and up-to-date version. It works like this:
1. Ground Plan
a. Make a floor plan of the intended scene showing walls, doors, windows, furniture, etc. and indicating the characters' movements and stopping points, as in Chapter 5, Figure 5-3.
b. As in Figure 5-3, mark the camera positions, but for clarity designate them A, B, C, etc.
Position A will be shot first because lighting for the widest or master shot determines all the others. Each tighter shot (positions B, C, etc.) will follow because closer shots usually need individual relighting to match the lighting logic of the master shot.
2. Shooting Script
a. Bracket each intended shot on the shooting script (see Figure 30-1) using a color to indicate its size. (Cool blue for wide shots, warm yellow for medium shots, and hot red for close ups). Remember to give good over laps between shots so the editor has a range of options for cutting from one to the next.
b. Designate each bracket Cam A, Cam B, Cam C, etc. to show where you intend to shoot it from.
c. Place a brief description of the angle by the head of the bracket to avoid ambiguity (Example: CS hand lighting fire).
Each bracket represents a camera angle with its brief identifying description, as in Figure 30-1. Now the script reveals at a glance how you intend to cover the action and what editing alternatives you have designed. For smooth and seamless editing, the best place to cut is always on a strong physical movement. To best understand this, pick a well-made feature film scene like yours and analyze the coverage and cutting points. Remember that you must ensure generous overlaps from shot to shot so your editor has a choice of action match cuts.
CAMERA PLACEMENT
Placing the camera can seem like an industrial decision based on lighting or other technical considerations. But technique must be made to mimic the way human awareness works at an event, or the event will have no soul.
USING LINES OF TENSION
The following are some reminders concerning the camera's relationship to a scene's axes or lines of tension. These are the invisible lines of strong feeling you would draw between the most important people and objects in a scene. Often they are also sightlines and have great dramatic potential (changes of eyeline, for instance), and often they dominate the composition. Lines of tension and sightlines justify particular camera angles and imply the emotional connections (and therefore POVs) associated with particular characters. This is not easy to describe, and you will understand best if you have done the close editing analysis suggested earlier in this book.
SUBJECTIVE AND OBJECTIVE
No matter whose POV your film favors, POV will move. Changes in lines of tension or changes in their intensity are your prime clues. Let's look at the way the consciousness of an onlooker moves around when observing the archetypal scene of two people in conversation.
The concept of there being a Concerned Observer is important. The observation itself is the normal, relatively objective movement of human perception, and we use it as a model for how the camera and editing moves our attention around within a scene. Quite simply, camerawork and editing together mimic the way any observer's ears, eyes, and psychological focus migrate within an environment, whether quiet or busy.
Angle and shot changes are motivated by stimuli from the scene, but they also represent a narrative agenda as the Storyteller pursues a line of inquiry. Perception is often shaped noticeably by the predispositions of the Storyteller, once that sensibility has been established. Observation can be by a character within the film or that of a Storyteller from outside, directing our attention. The mood of observation may start relatively detached, and then become involved with the predicaments and personal qualities of the characters, or it can happen in reverse order. Like you or me in any consuming life-situation, a film will “breathe” in and out between these extremes. The difference can be dramatized by returning to the familiar experience of watching a tennis game (see Chapter 4: The Actor and the Acted Upon).
The closer the camera is to a line of tension, the more subjectively involved the audience will feel. When complementary angles are used, the audience is switched rapidly between each protagonist's subjective experience, so the aggregate effect may be to enter the fray without necessarily identifying with one contestant or another. This depends on the balance of editing, as well as, less measurably, the power in each actor's characterization.
We can vary the Observer's relationship to the axes, and vary his or her closeness to what is observed. Close shots are not magnification alone but mimic the psychological exclusion of other concurrent events, which may reach us through sound only. Juxtaposing subjects in antithetical relationship can be accomplished either by editing them together or, less obviously, by blocking them together within a single shot.
SIGHTLINES AND LINES OF TENSION
Look at the floor plan for a mother and father argument as observed by the child (see Figure 30-3A). The various psychic connections or possible lines of tension are in fact duplicated by the dotted-in sightlines. The major axis is between the parents, but others exist between each parent and the silent child. Each sightline suggests a camera position. What each camera angle covers is shown in the storyboard sequence (Figure 30-3B). Some angles are close (as in 4, 5, and 6), some in medium two-shot (1, 2, and 3), and there are two master shots—further angles that take in everything (7 and 8). Positions 1, 2, and 3 are all to some degree omniscient because they are an outsider's view of the characters, that is, in pairs and related to each other. Position 7 is even more comprehensive, taking in all three. Positions 4, 5, and 6 are, however, close and subjectively involved, as if viewed by one of the other characters. Position 6 would be useful to show the child's eyeline shifts.
SHOW RELATEDNESS
How are the protagonists to be spatially related? Showing the couple arguing in the same frame but the boy separated in a close-up reinforces his separation from both of them. Relating boy and mother in one frame to father alone in another suggests a different configuration of alliances or antipathies. There could be other factors—using foreground and background, the sides of the frame, different camera heights, and different levels of lighting—any combination of which might predispose the audience toward interpreting the scene in a particular way or from a particular POV. It would be misleading to suggest hard and fast rules here because human judgment is made from a multiplicity of nuances. What matters is the sensibility and rationale by which each shot is composed, lit, and blocked.
THERE ARE NO RULES, ONLY AWARENESS
From the audience perspective, everything on the screen is interactive and interrelated, so there can be few formulae. Compositionally you are always showing the specifics of relationship among subject and object, one object and another, or one person and another and implying the relationship of one idea, principle, or judgment to another. To do this you may also use editing or story construction (parallel storytelling, for instance, where you might intercut a boxing match with a lover's feud). Whatever works does so through suggestion and implied comparison. It is more important to try out an idea and judge from what you see and feel, rather than rely very much on a theory.
AVOID CROSSING THE SCENE AXIS
Because the child in our argument example remains in a fixed position, camera coverage that replicates his vision of his parents must stay to one side of the A

to B axis line. If you cross this axis with your camera, as in position 8, your characters begin to look in the wrong screen direction, as you see in the storyboard sequence. In positions 1 through 7, the father always looks screen left to screen right, and the mother right to left. Even in the big close-ups (4 and 5) the character's eyelines maintain the same screen direction. However, in camera position 8 that consistency disappears because the camera has strayed across the scene axis line. Conventionally this is avoided. Try shooting an additional shot after crossing the line and intercutting it to see if you really want to break the conventions.
MOVEMENTS THAT LEAD TO REGROUPING MUST BE SHOWN
In scenes where characters move, they usually regroup to face in new screen directions. At the very least this means that early and late reaction shots cannot be interchanged, and the scene cannot easily be restructured in the cutting room if so desired. Movements that lead to regrouping must be shown onscreen. Regard them as reset transitions that establish new compositional phases of the scene. From a scene design POV, you don't want people milling around but want instead to choreograph movements (and therefore group configurations) strictly for their new importance. Movements should have dramatic significance, and you will want to show them anyway. Plan carefully so the scene will cut together effortlessly on the screen.
PLANNING WHERE TO EDIT
In marking up the script for the scene, you now know what shots you intend to use to cover each part, but you probably feel unsure about how to cut from one angle or one size of shot to another. Here are some guidelines, but remember to leave plenty of overlap between shots so the editor has a choice of cutting place.
EDITING IN MOVEMENT
Plan to use any pronounced movement in the scene as a convenient cutting point between angles. These are called action match cuts or simply match cuts. They are useful as transitions because they take place in movement at a time when the eye is least critical. At the point when the mind decides what is going to happen next, the eye becomes uncritical. The best match cuts are made thus:
Outgoing shot: Initiate just enough of the movement for the audience to recognize what's about to happen.
Incoming shot: Complete the bulk of the movement, but on most action add three frames of repeating action to overlap the outgoing shot.
The three or four frames of repeated action on the incoming shot are needed because the eye does not register the first three or four frames of any new image. Make a literal matched action, with no overlap, and the match stutters and fails to look smooth. Try it.
EDITING AS REFRESHMENT
Cutting between different angles can also renew and refresh the spectator's perspective, showing different POVs, and invoking different kinds of experiences. If the angles stay close to the axis, we remain subjectively involved and eventually become desensitized. So for variation, the Storyteller may take us out of the firing line to review the situation from a more detached perspective. In a political meeting this might suggest a stepping away from the intensely personal to take a historical or sociological perspective. This interrupts what has become standard to push us into interpreting from another intellectual or emotional angle. You will, of course, have to foresee this and shoot it.
CONTINGENCY PLANNING
Plan your coverage but ensure against surprises. Foresee weather changes, scheduling difficulties, and though you intend to show only one character onscreen during an intense exchange, shoot both. This allows you abundance—a fallback alternative if your plans are not fulfilled.
CRIB SHEETS
When first directing, work hard to brief yourself by making copious, organized reminder lists on note cards so you forget nothing in the hurly-burly of the set. As fatigue sets in, your memory and imagination will shut down, and those notes (Figure 30-4) will be a lifesaver. Defining the story points you want to make and nailing down what you intend for each sequence means you are directing from a plan instead of waiting to recognize success when it appears.
SCHEDULING THE SHOOT
A glance at the shooting script and the floor plan shows in what order to schedule the shooting. Wide or establishing shots are done first for lighting reasons and because they set the performance levels. Closer shots and over-shoulder shots follow, with reaction shots, inserts, and cutaways done last. If you make changes of approach during the shoot, it may have an impact on scheduling, so make a
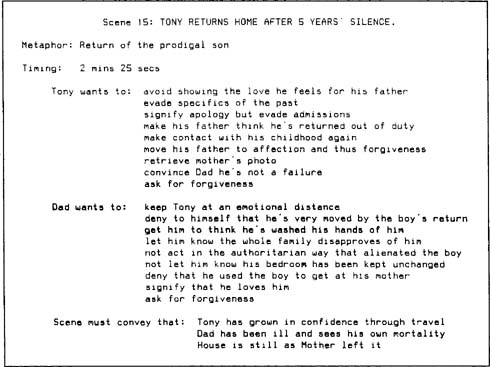
FIGURE 30-4
Example of director's crib notes.
practice of periodically going over the shooting script with the Script Supervisor, DP, and AD to make sure scheduling still reflects the most logical way of organizing the shooting.
KEEPING TRACK
You have the shooting script marked up, and once the shoot is under way, the script supervisor will amend a copy of the shooting script as each setup is completed, checking off what was shot by adding takes and circling those considered best. Bracket lines can be amended or added in purple or some other color so that at any point the director, script supervisor, or DP can see intended and amended coverage at a glance. This can be a lifesaver when shooting departs from the original intentions.
At all times the unit must know unequivocally what it has shot, what it still needs to shoot, and how it will cut together. Unlike lists, which obstinately remain abstract, good graphic representations require no cross-referencing or special knowledge.
During your first projects these records of first intentions and final execution will be valuable when you do post-mortem sessions afterward and compare your planning against the resulting shoot.