
6
Processing with Photoshop Elements
After downloading raw files, or importing raw files into a designated folder, the next step if you are using a ‘Convert and then Edit’ workflow is to process the files using a raw converter. In this phase of the workflow you examine each raw image in turn, or a group of similarly executed files, making note of any problems with shadows, highlights, exposure, white balance and more. This is the time to make lobal adjustments (adjustments to the whole of the image) to bring your images within their acceptable dynamic range and to fine-tune them to your personal taste. It is also the time to save files to DNG format and archive them in a safe storage location.
In this section I will walk you through the process of conversion with what is arguably the most widely used raw software in the world – Adobe Camera Raw (ACR). Coming in two slightly different flavors, one shipped with Photoshop Elements and the other with Photoshop and Bridge, ACR provides a logical approach to enhancing your raw files during the conversion process. This chapter concentrates on the steps involved for Photoshop Elements users, with Chapter 7 delving into the intricacies of the utility when used with Photoshop and Bridge.
The Photoshop Elements Organizer, seen here in the PhotoBrowser mode, is an excellent file browser and manager and is generally the pivot point of these image activities for Elements users.

The Organizer workspace (PhotoBrowser) – the starting point
The Photoshop Elements Organizer workspace or PhotoBrowser, as it is sometimes known, is a great file browser and picture manager. Once files are imported into the browser the feature will become a pivot point for all your photo management activities. The PhotoBrowser is an excellent starting point as it provides functions to open, import, tag, search for, catalog and retrieve raw files from a long list of supported cameras. Even though it is possible to open raw files directly into the Editor workspace of Photoshop Elements, to use the program to its fullest you should always import your photos into the Organizer (PhotoBrowser) workspace first. If you are using the Adobe Photo Downloader for transferring files from your card, or camera, then the utility automatically displays the imported photos in the Organizer space immediately after downloading.
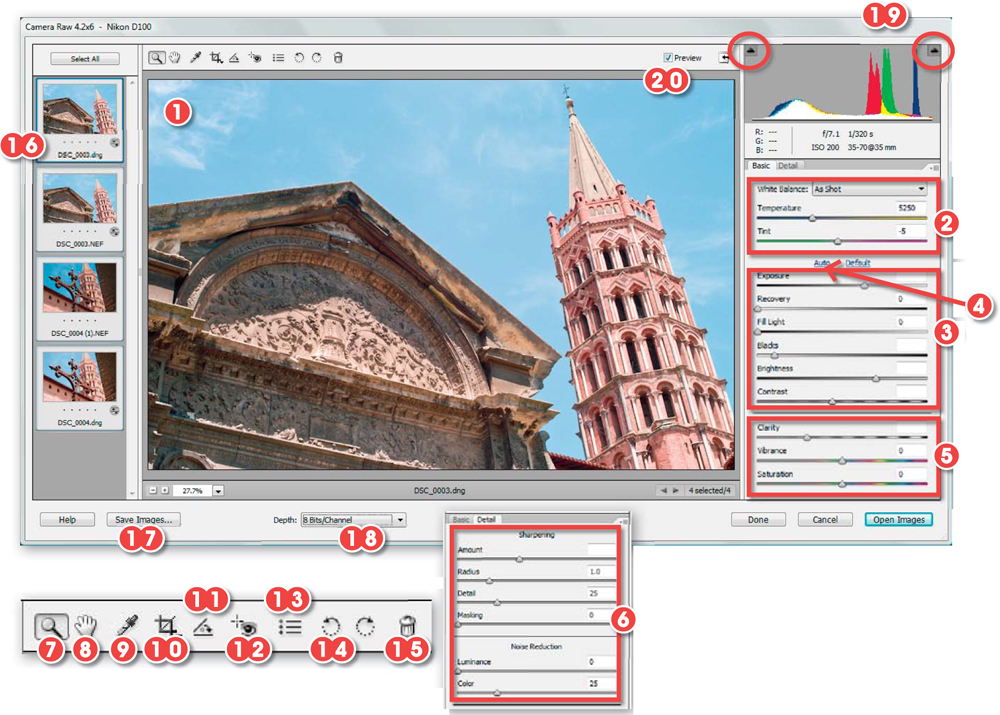
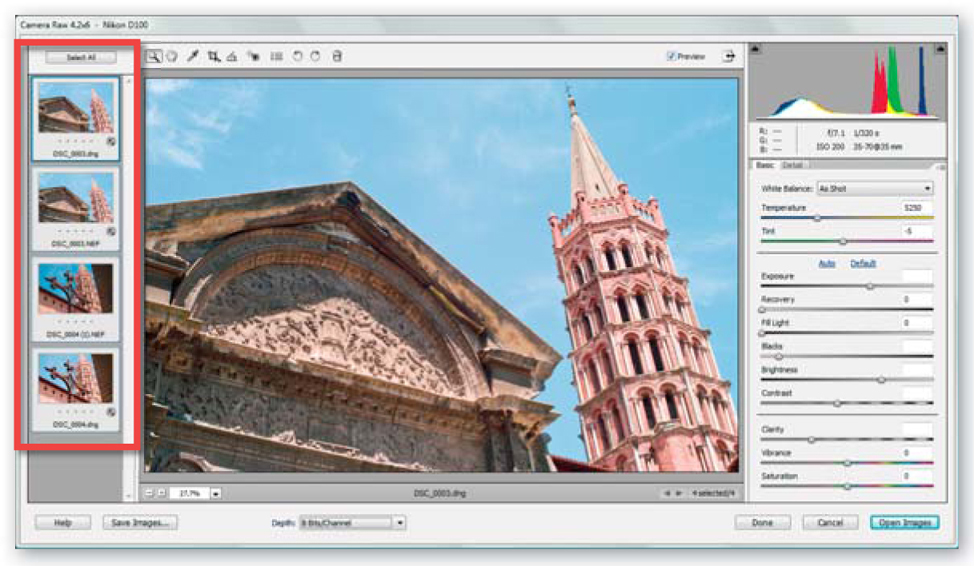
Features of the Elements 6.0 version of the Adobe Camera Raw dialog box.
1. Preview area.
2. White balance settings.
3. Tonal controls.
4. Auto option for tonal control settings.
5. Color controls.
6. Sharpness and noise options.
7. Zoom tool.
8. Hand tool.
9. White balance tool.
10. Crop tool.
11. Straighten tool.
12. Red eye removal tool.
13. ACR preferences.
14. Rotate buttons.
15. Mark for deletion button.
16. Queued raw files.
17. Save button.
18. Bit depth options.
19. Shadow and highlights clipping warnings.
20. Preview checkbox.
Anatomy of the Camera Raw dialog
Before commencing to process our first raw file, let’s take a close look at the Adobe Camera Raw feature as it appears in Photoshop Elements 6.0. The ACR dialog, the user interface between you and what goes on inside the Camera Raw plug-in, provides tools to adjust, process, convert and save raw files. After opening a raw photo from inside either the Organizer or Editor workspaces, this dialog will be displayed.
The ACR dialog can be broken into four separate areas:
1. Preview
2. Image adjustment controls
3. Raw file queue
4. Toolbar
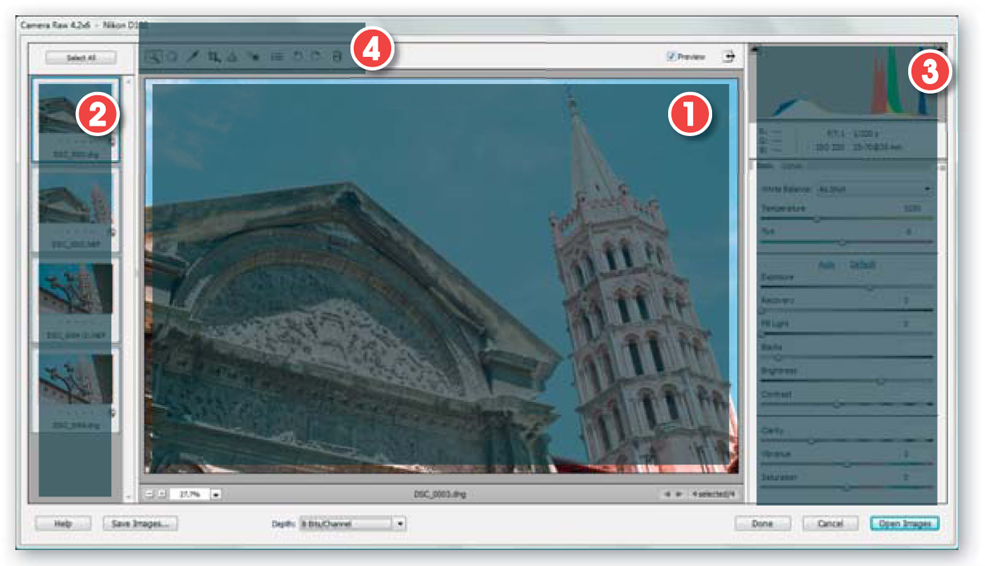
The feature’s window is broken into four distinct areas:
1. A preview of the file is displayed in the center of the dialog. Any editing or development changes made to the file will be reflected automatically in this preview.
2. A queuing area for raw files awaiting processing. This area of the dialog is only present when multiple raw files are selected for opening.
3. Controls or settings area. This part of the dialog contains all the processing and development controls for altering the look of the color, tone, sharpening and noise in the photo. The settings are grouped under two tabs – Basic and Detail. A histogram graph is also displayed here. The Photoshop version of ACR contains a larger range of controls listed under more tabbed headings.
4. The toolbar sits at the top of the dialog and houses options such as the Zoom, Hand, Crop and Straighten tools.
The Help and Save buttons are located at the bottom left of the window. In the center is the bit depth menu and on the right, are the Done, Cancel and Open Images buttons.
The precise grouping of tools and adjustment controls varies between Photoshop and Photoshop Elements versions of ACR and between different releases of the utility. To ensure that you have the best selection of tools to use on your raw files, make sure that your ACR plug-in is always up to date.
By way of introduction let’s look at each of these areas in turn.
The preview image in ACR’s dialog is capable of being magnified to a range of levels. The current magnification value is shown in the bottom left corner of the window.
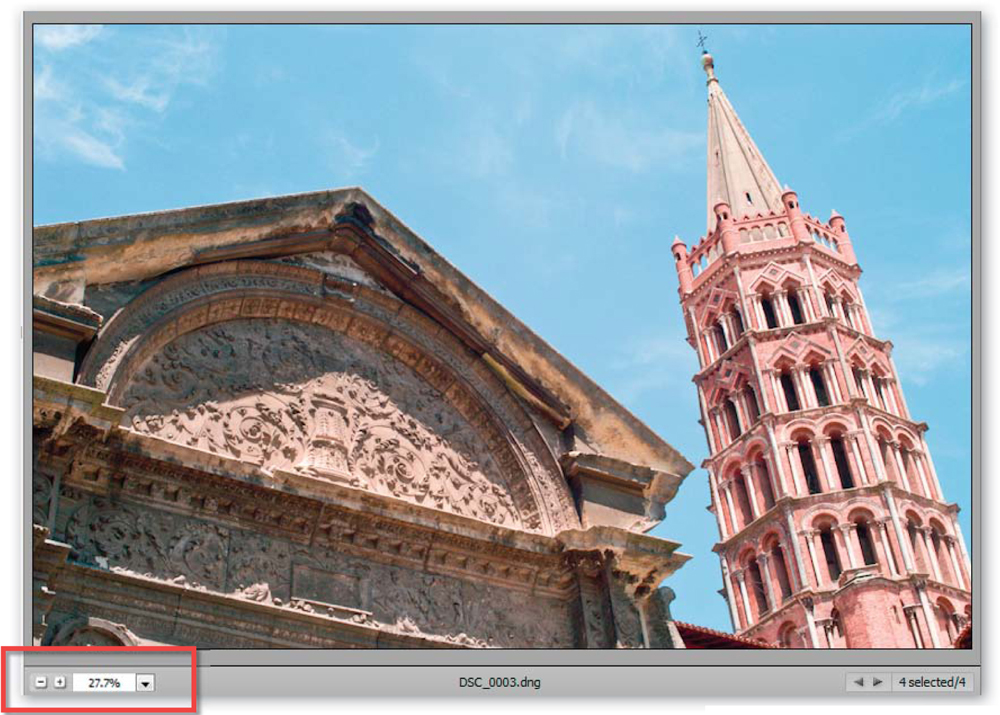
The preview space
The preview displays the changes you make to your image via the develop settings. Any adjustment of controls are reflected immediately in the preview image, providing a visual reference to the effect of the alterations. The preview can be enlarged or reduced in size to suit the screen area available. When making some changes, such as Sharpening or Noise Reduction, the preview should be magnified to at least 100%. At this zoom setting, you will be able to preview the results of the adjustments of these controls.
There are three ways for you to change the magnification level of the preview to 100%:
1. Double-click the Zoom tool,
2. Select the 100% entry from the zoom menu at the bottom left of the dialog, or
3. Use the Ctrl+ to magnify or Ctrl − to reduce the size of the preview to the zoom value in the window at the bottom left of the dialog.
The zoom menu at the bottom left of the dialog provides a variety of zoom levels for quick access.

Image adjustment controls
The right-hand side of the ACR dialog is reserved for the core adjustment features.
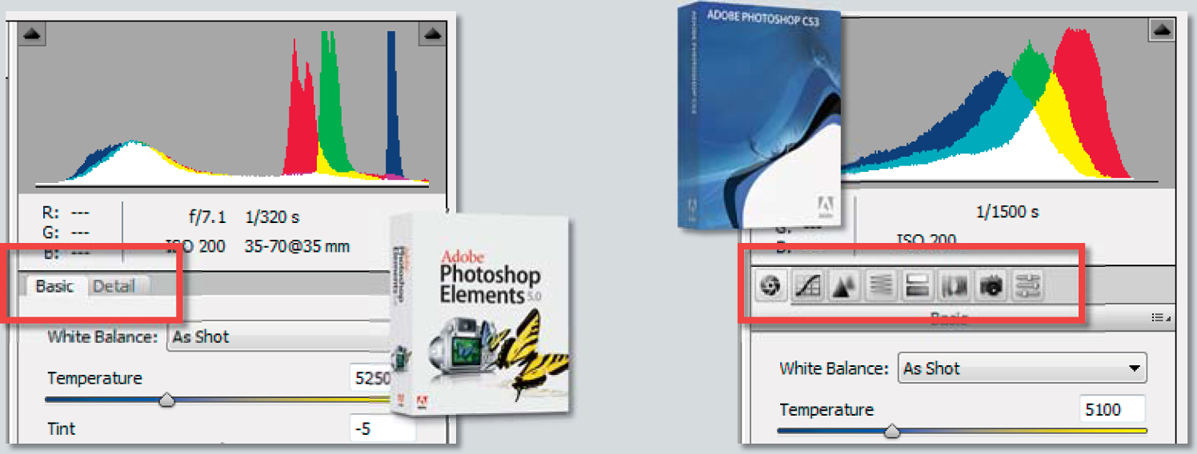
Histogram
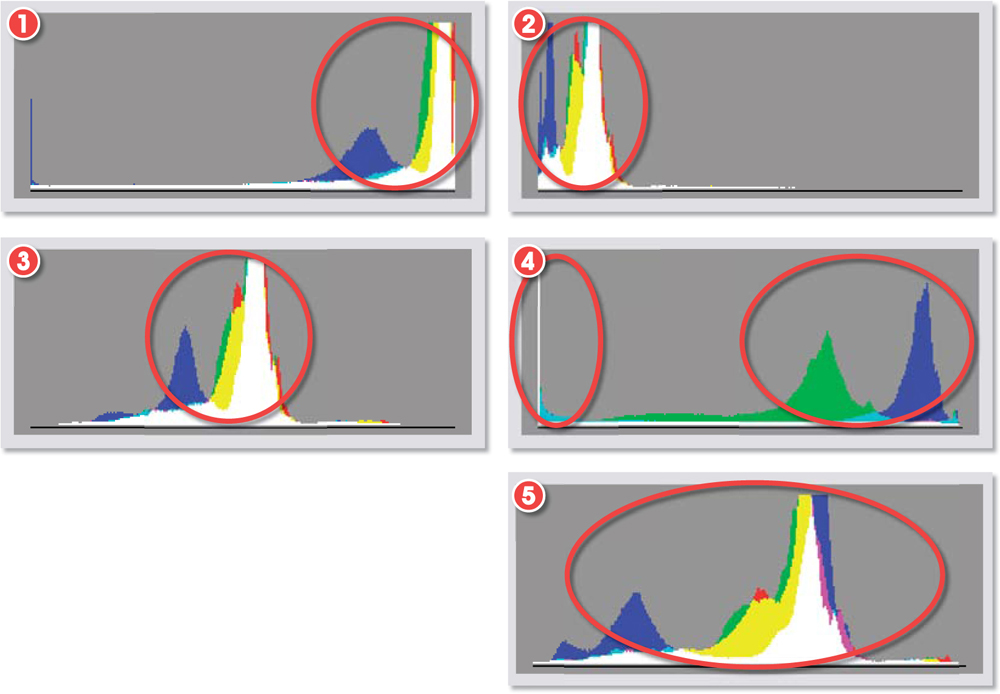
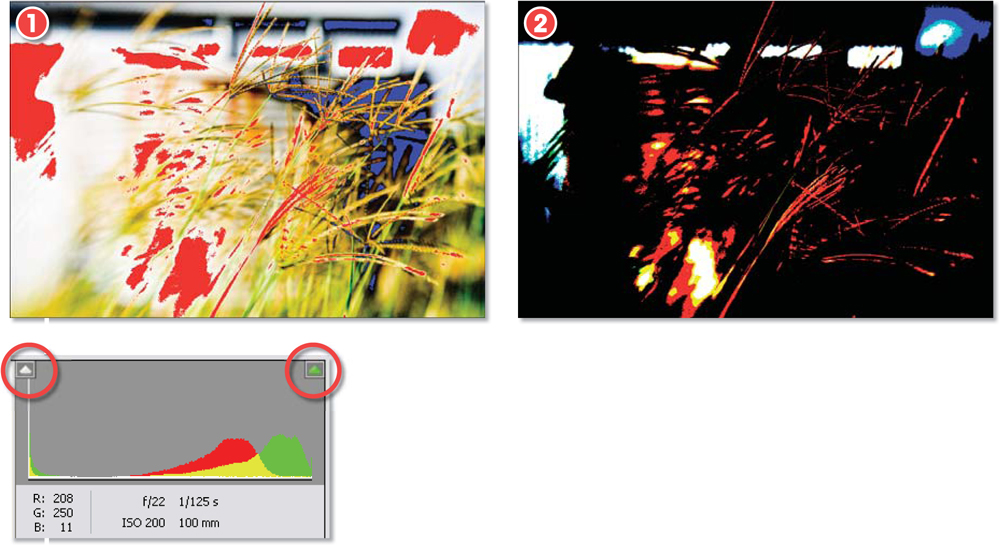
A full color histogram is located under the RGB values. The feature graphs the distribution of the pixels within your photo. The graph updates after changes are made to the color, contrast and brightness of the picture. By paying close attention to the shape of the graph you can pre-empt many image problems. The aim with most enhancement activities is to obtain a good spread of pixels from shadow through midtones to highlights without clipping (converting delicate details to pure black or white) either end of the tonal range.
The histogram in ACR shows the distribution of pixels across the image. Areas with the most pixels are the tallest areas of the graph. The shape of the histogram indicates the look of the picture.
1. An overexposed image has a histogram with the pixels bunched to the right end of the graph.
2. Conversely, underexposed photos have pixels pushed to the left.
3. Flat or low-contrast pictures typically have all their pixels grouped in the middle.
4. High-contrast photos or those that have ‘clipped’ highlights and shadow areas usually have many pixels at the extreme ends of the graph.
5. For the best results, with most images, you should always aim to spread the pixels between the maximum black and white points without clipping any of the image pixels.
This is not the case for all photos though. Take, for instance, the case of a black cat in a darkened room, the correct histogram for this photo will show a bunching of the pixels towards the left side of central, where as a shot of the sky slopes, also correctly exposed, will display most pixels to the right of the histogram graph.
The Basic tab
Below the histogram is a tab area containing two options – Basic and Detail. The Basic tab contains all the tone and color controls. On the other hand, the Sharpening and Noise Reduction features are grouped under the Detail tab. Here we will concentrate on the controls under the Basic tab.
Image Settings menu
The Settings drop-down menu is displayed by clicking the Settings button on the right side of the Tabs. The menu contains the Image Settings, Camera Raw Defaults, Previous Conversion, Custom, Clear Imported Settings, Save New Camera Raw Defaults, and Reset Camera Raw Defaults entries. Here are some more details on each entry:
The Settings menu contains options for saving or recalling image settings associated with specific cameras.
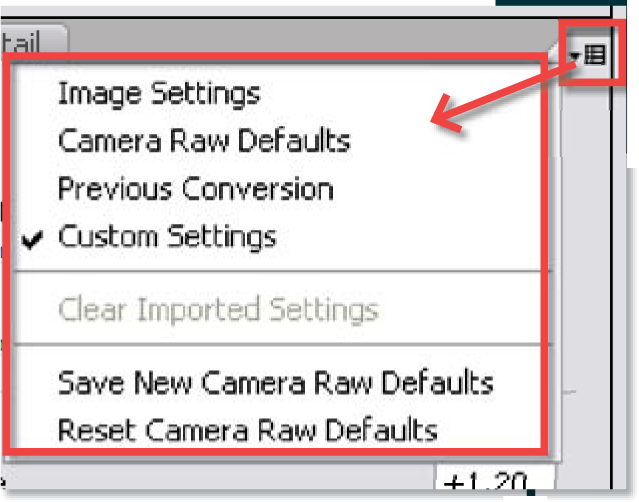
Image Settings: The Image Settings option restores the original settings of the current photo. Use this selection when you want to reverse changes that you have made and wish to restore the photo to its virgin state.
Camera Raw Defaults: This option applies a group of slider settings that are default values associated with a specific camera and photograph. When a photo is opened for the first time, the settings and white balance will be altered to Camera Raw Defaults (based on the camera model) and As Shot (based on the camera settings used for the photograph), respectively.
Previous Conversion: Another option in the Settings drop-down menu is Previous Conversion. This setting stores the ‘last used’ values for all controls and is an efficient way to apply the enhancements used with the previous image to one currently open in the dialog. Using this option will help speed up the conversions of a series of photos taken at the same time under the same lighting conditions. Simply make the adjustments for the first image and then use the Previous Conversion option to apply the same settings to each of the successive photos from the series in turn.
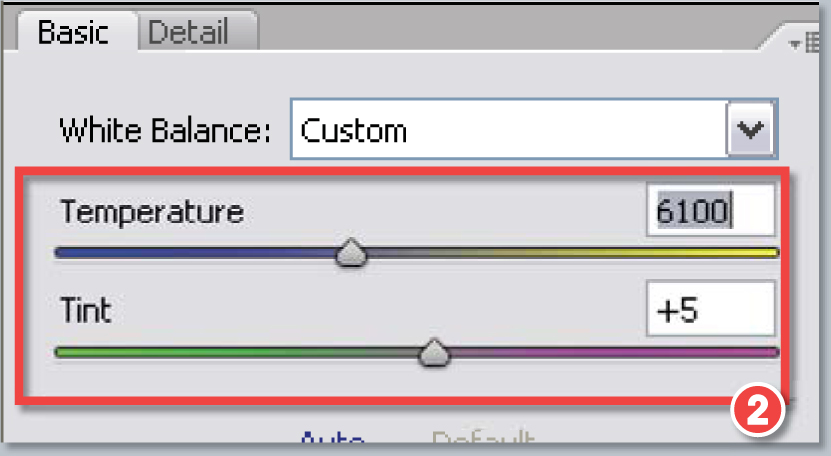
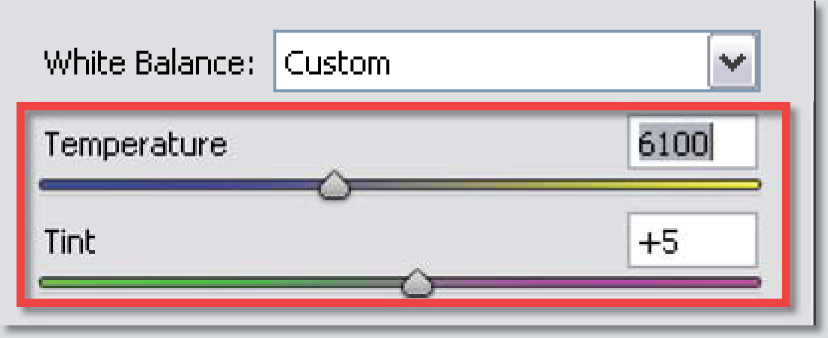
Custom: Moving any of the slider controls such as Temperature or Tint sliders under the White Balance menu automatically changes the settings entry to Custom. Once the settings have been customized for a particular photograph the values can be saved as a new Camera Raw Default entry using the save option in the pop-up menu accessed via the sideways arrow next to the Settings menu.
Pro’s tip: As ACR
recognizes the raw file created with different cameras the new Camera Raw Default will be applied to only those photos captured with the specific camera that the settings have been saved for.
White balance correction
White balance is used to correctly balance the color of the scene to the lighting conditions at the time the shot was taken. Leaving white balance set at As Shot means you elect to keep the white balance values that were used when taking the picture.
As you know, one of the advantages shooting raw is that this setting is not a fixed part of the picture file. Altering the specific white balance setting at the time of raw conversion is a ‘lossless’ action. This is not the case if you have used an incorrect setting and have shot in JPEG or TIFF. Use either of these two formats and the white balance setting will be fixed in the file and can only be changed with destructive adjustments using features like Color Variations or Remove Color Cast. In this regard raw shooters have much more flexibility.
Drop-down menu: For instance, if you selected a Daylight setting in-camera and think that Shade or another white balance preset may be closer to the actual lighting conditions you may select one of the options from the list of presets under the White Balance drop-down menu. Moving either the Temperature or Tint sliders switches the setting to Custom. These controls are used for matching the image color temperature with that of the scene.
When an original file is opened for the first time in the dialog, the settings and white balance values will be set to Camera Raw Defaults (based on camera model and make) and As Shot (determined by the camera settings at the time of capture), respectively.
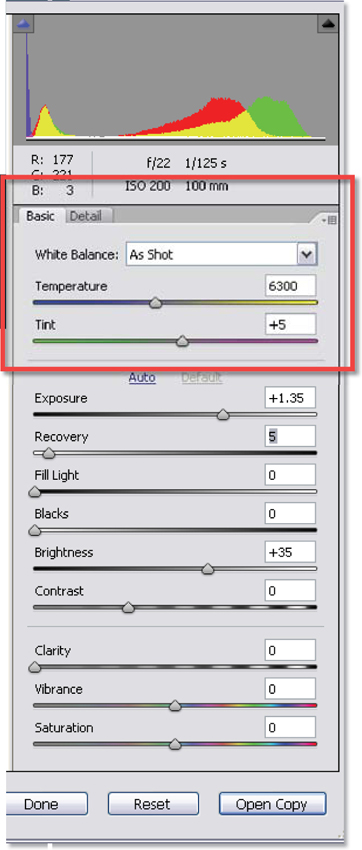
Temperature: The Temperature slider is a fine-tuning device that allows you to select a precise color temperature in units of degrees kelvin. When an image is too yellow, meaning it has a lower color temperature than you prefer, move the Temperature slider to the left to make the colors bluer and compensate for the lower color temperature. When an image is too blue, or higher in temperature than you prefer, move the slider to the right to make the image warmer, adding more yellow compensation. So, left is to make image colors cooler and right is to make image colors warmer.
Tint: The Tint slider fine-tunes the white balance to compensate for a green or magenta tint. Moving the Tint slider to the left adds green and to the right adds magenta. This control is often used to neutralize a color cast caused by lighting from fluorescent tube or strip sources.
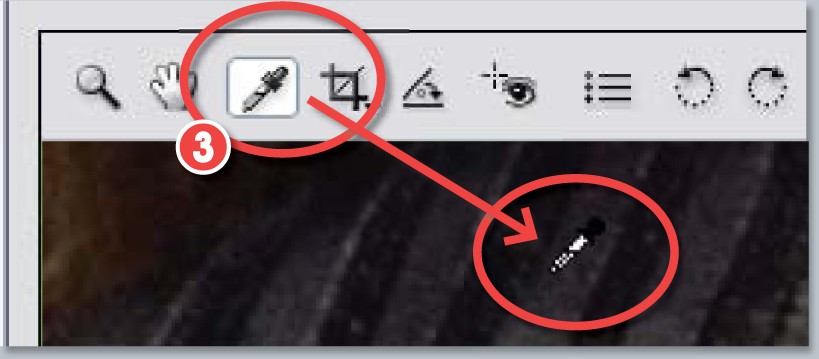
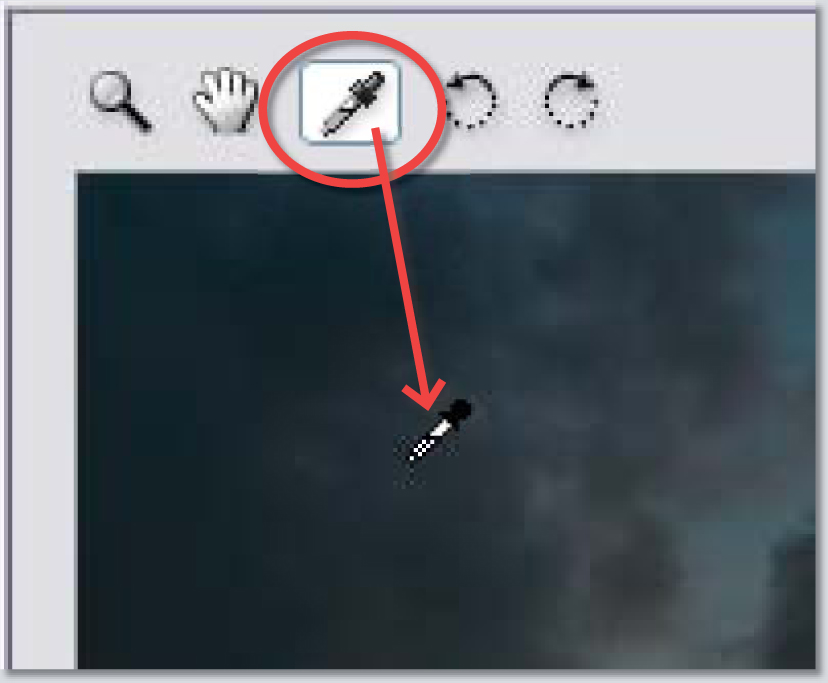
White Balance tool: The quickest and perhaps easiest way to adjust white balance is to select the White Balance tool and then click in an area that should be neutral gray or even amounts of red, green and blue. For best results, use a dark to midtone as the reference and be careful not to click on an area with pure white or specular highlights. These will produce unreliable results so keep away from the bright highlight areas of highly reflective or chrome surfaces. One suggestion for working with neutral gray is to:
WB tool workflow
1. Click on the White Balance tool.
2. Move the White Balance tool cursor over a midtone area which should be neutral gray but contains a color cast in the preview.
3. Click on the image location to neutralize the cast not just in the selected area but in the whole photo.
WB summary:
The white balance in your raw photo can be adjusted in one of three ways:
1. Selecting the light source-specific entry that best matches the lighting in the scene from the drop-down list.
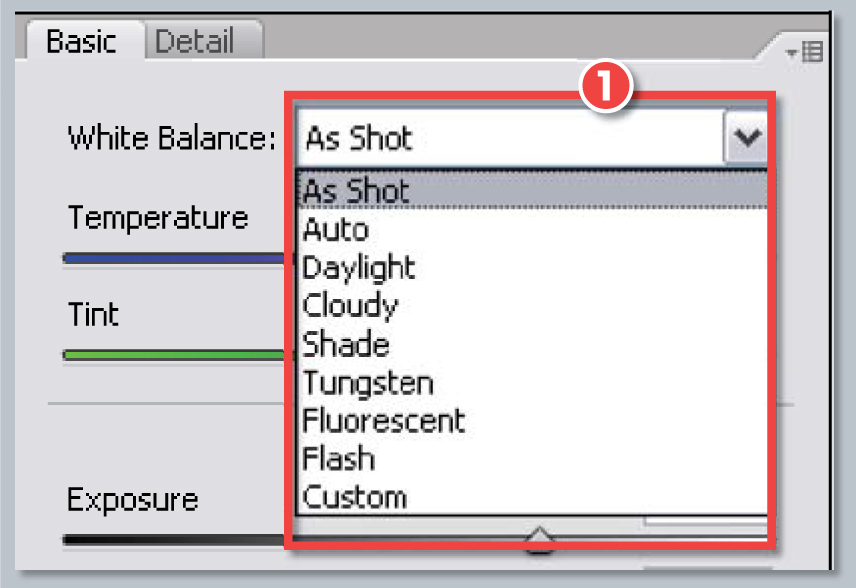
2. Manually adjusting the Temperature and Tint slider values until the preview appears neutral and free from color casts.
3. Selecting the White Balance tool and then clicking on a picture part that should be neutral.
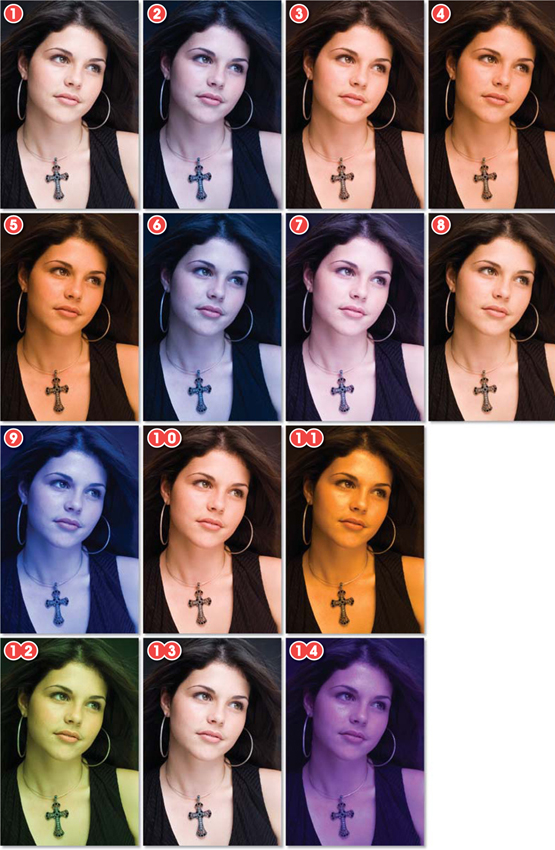
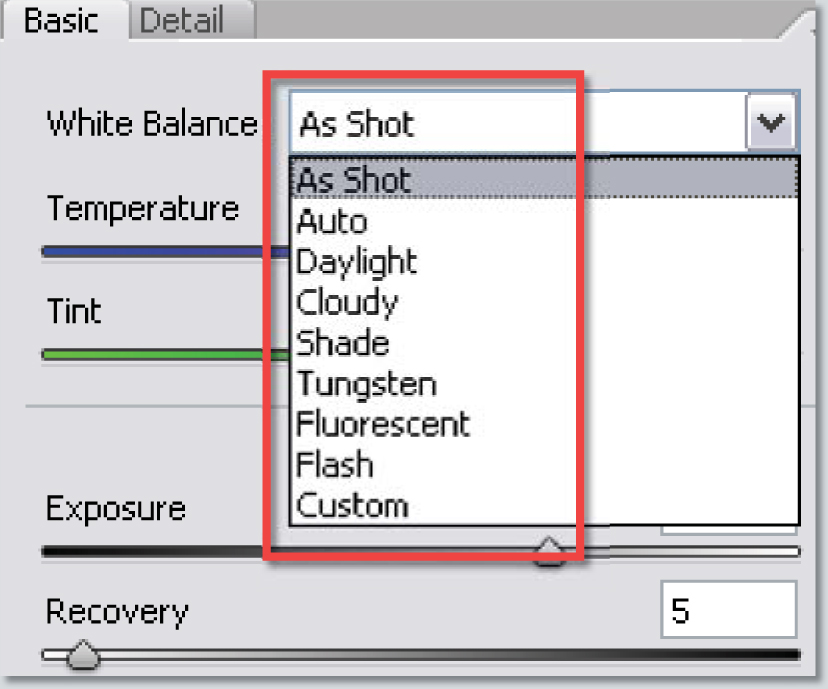
White balance options.
Presets:
• 1. As Shot
• 2. Auto
• 3. Daylight
• 4. Cloudy
• 5. Shade
• 6. Tungsten
• 7. Fluorescent
• 8. Flash
Temperature settings:
• 9. 2500
• 10. 5500
• 11. 20,000
Tint settings:
• 12. -100
• 13. 0
• 14. 100
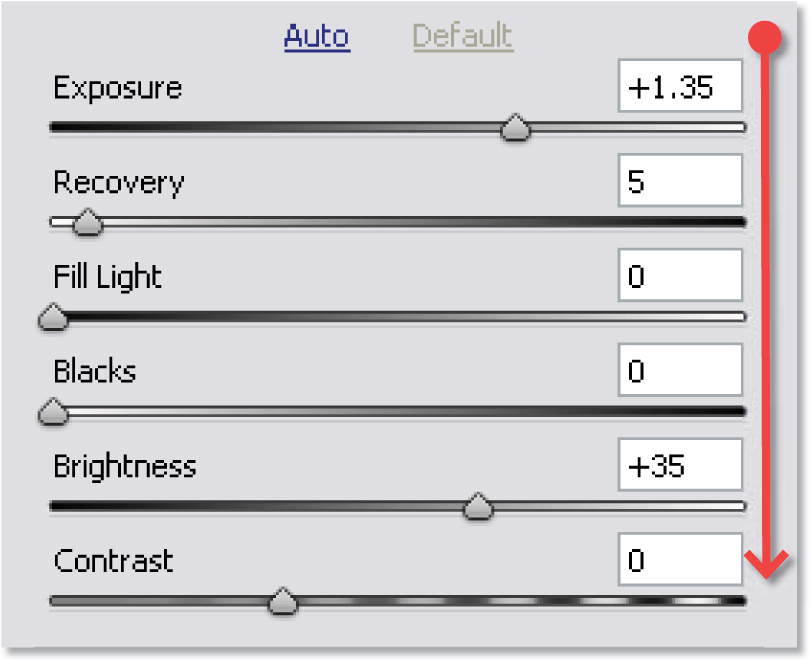
Adobe has positioned the slider controls that adjust the tones within the image in the order (top to bottom) that they should be applied within the ACR dialog. The Exposure and Blacks sliders should be used first to set the white and black points in the photo. Use the Alt/Option keys in conjunction with these sliders to preview the pixels being clipped and to accurately peg the white/black points. Or alternatively switch on the Shadows/Highlights Clipping Warnings which perform the same function whilst leaving the full color preview visible.
Next lighten or darken the photo using the Brightness slider. Unlike the Exposure control this slider doesn’t affect the white and black points of the image but rather adjusts the appearance of the photo by compressing or extending the altered tones. Recovery and Fill Light sliders are new for this release of Elements’ ACR. Use the Recovery control to rebuild highlight areas where one channel has been clipped. The Fill Light slider brightens mid to dark shadow areas.
Making tonal adjustments
Exposure, Recovery, Fill Light, Blacks, Brightness, Contrast, Clarity, Vibrance and Saturation sliders are available for making adjustments to raw files. Adobe has positioned these controls in the dialog so that when working from top to bottom you follow a specific enhancement workflow. For this reason you should follow these steps in order:
Tonal changes workflow
1. Set the white clipping points using the Exposure slider.
2. Set the black clipping points using the Shadows slider.
3. Use Recovery/Fill Light controls (if needed).
4. Adjust the overall brightness using the Brightness slider.
5. Adjust contrast using the Contrast slider.
6. Use the Clarity slider to adjust local contrast.
7. Boost specific desaturated colors with the Vibrance slider.
8. Adjust saturation, if needed, using the Saturation slider.
Exposure
The Exposure slider adjusts the brightness or darkness of an image using value increments equivalent to f-stops or EV (exposure values) on a camera. An image is underexposed when it is not light enough or too dark and it is overexposed when it is too light. Simply move the slider to the left to darken the image and to the right to lighten (brighten) the image.
What do the f-stop or EV equivalents indicate? An adjustment of -1.50 is just like narrowing the aperture by 1.5 (one and a half) f-stops. Moving the slider 1.33 places to the left will dramatically darken an image and to the right the same amount will result in a bright image. If you have to move more than two full stops in either direction this probably indicates your settings at capture were inaccurate. Making adjustments beyond two stops starts to deteriorate image quality as invariably shadow or highlight detail is lost (clipped) in the process.
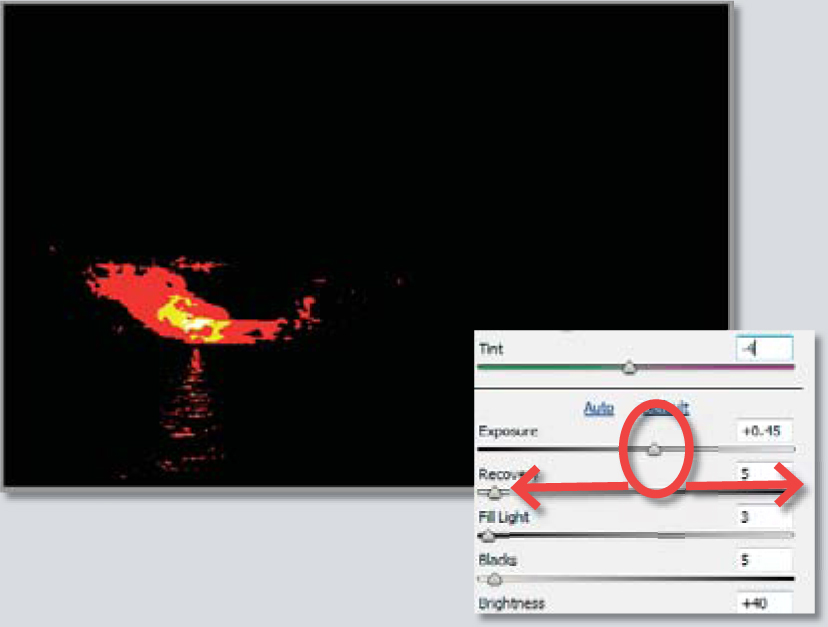
For those of you who are interested, the Exposure slider sets the white clipping points in the image. Clipping shows as values creeping up the left (shadow) and right (highlight) walls of your histogram (and red and blue areas in the image if shadow and highlight previews are turned on), and occurs when the pixel values shift to the highest highlight value or the lowest shadow value. Clipped areas are completely black or white and contain no detail. As you want to maintain as much detail in the shadows and highlights as possible your aim should always be to spread the picture tones but not to clip delicate highlight or shadow areas.
To ensure that you don’t accidently convert shadow or highlight detail to pure black or white pixels ACR contains two different types of ‘Clipping’ warnings.
1. When the Shadows and Highlights Clipping Warning features are selected at the top of the Histogram graph, areas of highlight clipping are displayed in the preview as red and shadows as blue.
2. Holding down the Alt/Option key whilst moving either the Exposure or Shadows sliders will convert the preview to black (for Exposure) or white (for Shadows). Any pixels being clipped will then be shown as a contrasting color against these backgrounds.
Blacks (Shadows)
Moving the Blacks or Shadows slider adjusts the position of the black point within the image. Just as was the case with the Exposure slider you should only make shadows adjustments when the clipping warning is active. This will ensure that you don’t unintentionally convert shadow detail to black pixels. Remember movements of the slider to the left decrease shadow clipping. Moving it to the right increases or produces clipping.
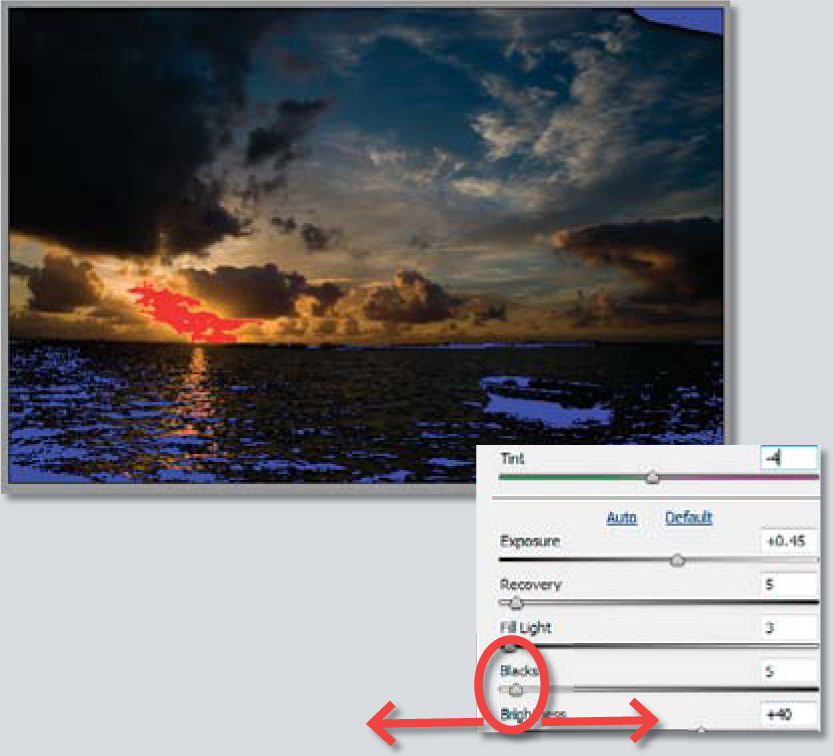
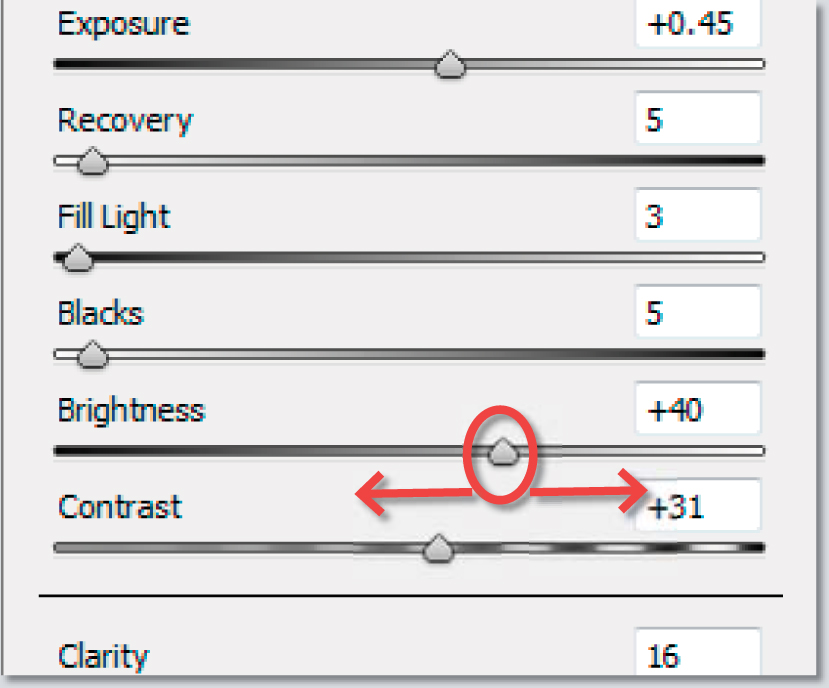
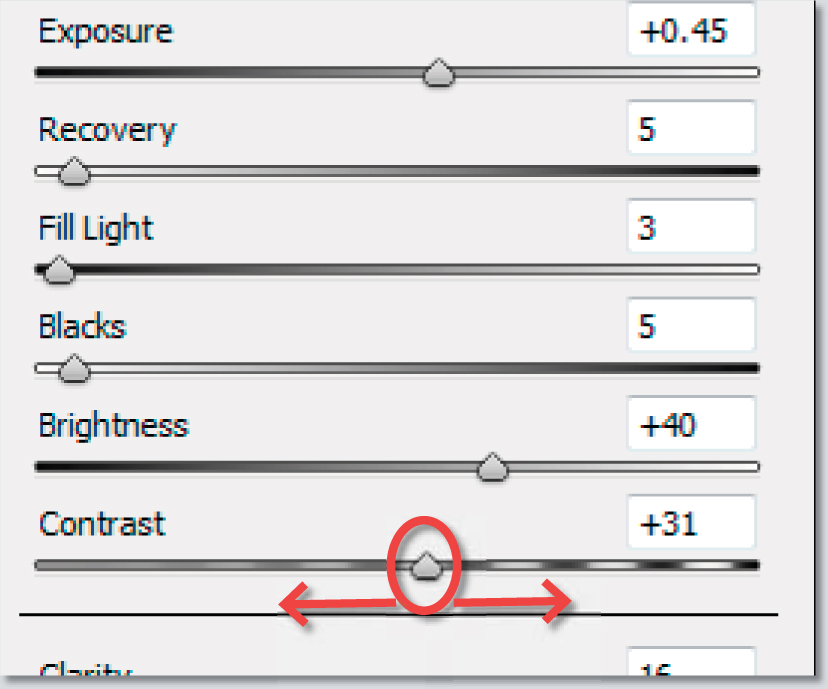
Brightness and Contrast
The Brightness slider is different to the Exposure slider although both affect the brightness of an image. Brightness compresses the highlights and expands the shadows when you move the slider to the right. When adjusting your photos your aim is to set the black and white points first and then adjust the brightness of the midtones to suit your image.
Contrast adjusts the spread of the midtones in the image. A move of the Contrast slider to the right spreads the pixels across the histogram, actually increasing the midtone contrast. Conversely movements to the left bunch the pixels in the middle of the graph. It is important to adjust the contrast of midtones after working on exposure, shadows and brightness.
The Recovery slider is used for correcting clipped highlights. With the clipping warning activated it is easy to see problem highlights (1). When moving the slider to the right, ACR will attempt to reconstruct clipped details from the information stored in the non-clipped channels (2).

Recovery
When a photograph is overexposed one of the consequences can be that the lighter tones in the image lose detail and are converted to pure white. This process is called clipping. Digital images are created with details from three color channels (red, green, blue). In situations of slight overexposure, when only one channel is clipped, it is possible to recreate the lost detail with the highlight information from the other two (non-clipped) channels. The Recovery slider attempts to recreate lost highlight details in such cases. Moving the slider to the right progressively increases the degree of highlight recovery.
The Fill Light slider manipulates the mid to dark tones in the photo. Moving the slider to the right pushes these tones towards the highlight end of the histogram, lightening them.
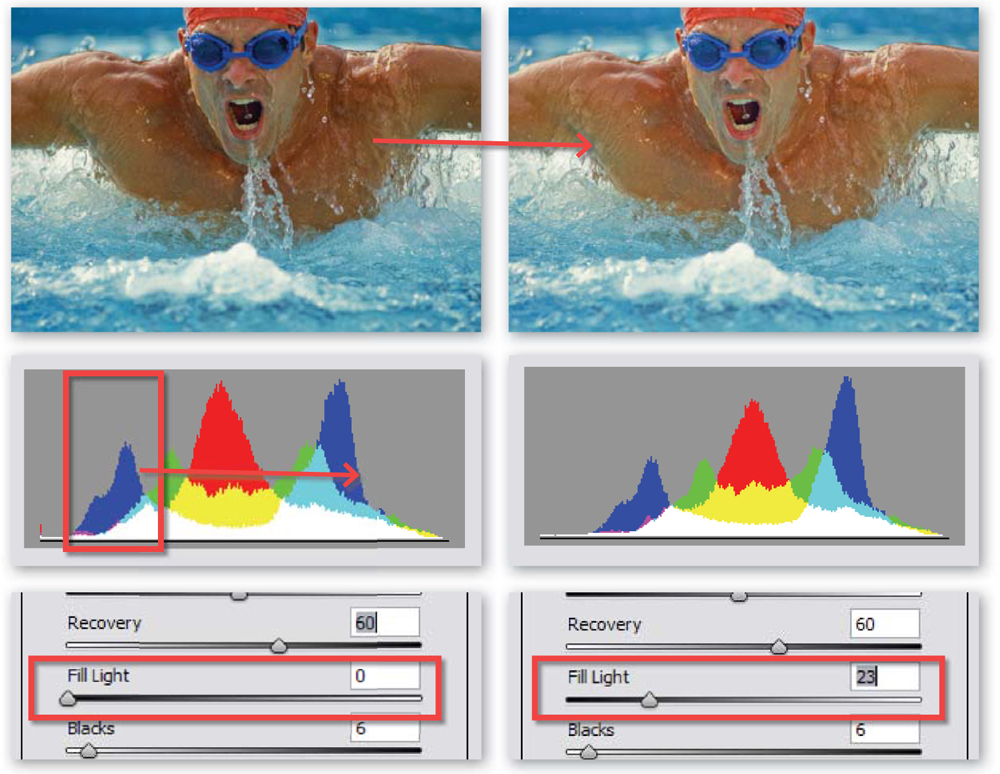
Fill Light
The Fill Light slider is used to lighten the darker tones in a picture without affecting the middle to highlight values. Use this control to brighten backlit subjects or boost shadow details. The beauty of this control is that the changes it makes do not generally impact on mid to highlight values.
The Clarity slider gradually increases the contrast of details in the photo.
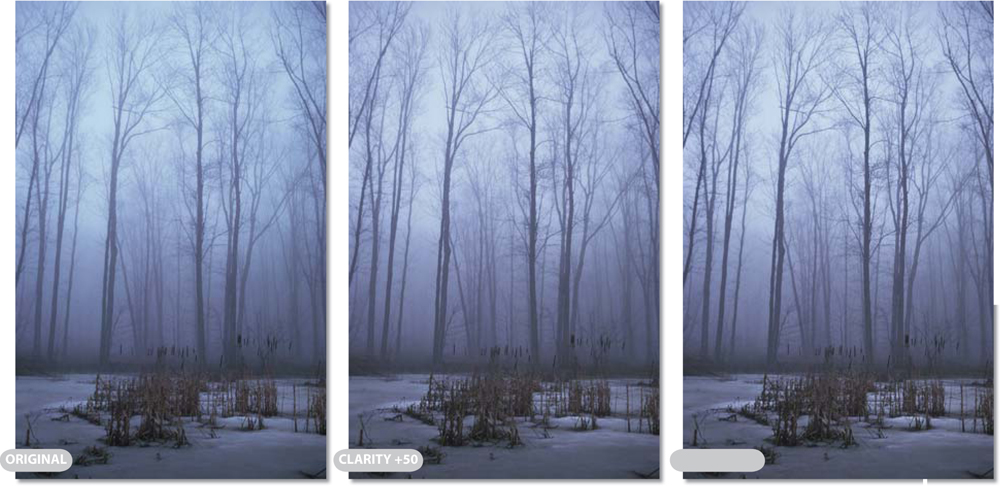
Clarity
Located along with Vibrance and Saturation controls at the bottom of the Basic panel, this new slider produces localized contrast changes to otherwise flat images.
Rather than adding contrast to the whole image by streteching the tones between black and white points, Clarity works on changing contrast on the detail in your photos. There are many sophisticated, multi-step, sharpening techniques that produce similar effects but thankfully Adobe has managed to squeeze much of their contrast-increasing abilities into a single control. Moving the slider to the right increases the effect.
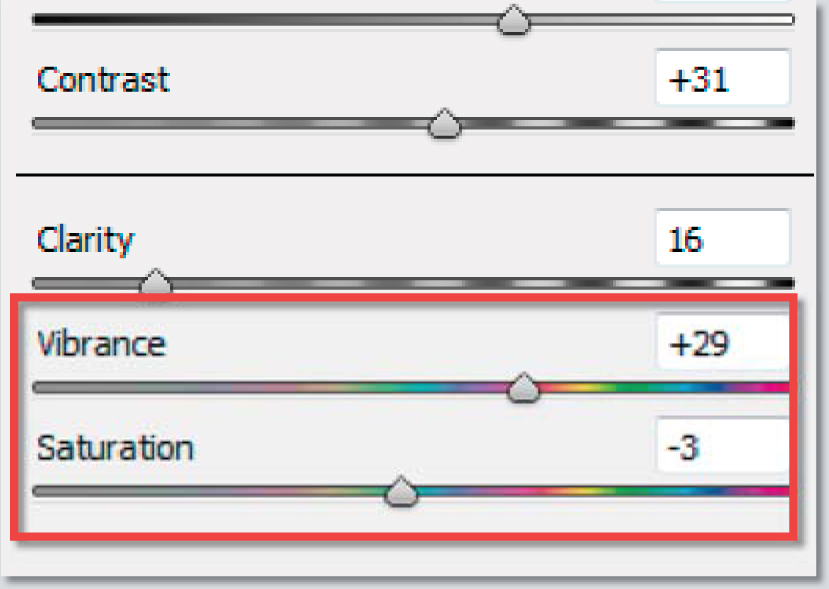
Vibrance
The Vibrance slider is a new addition to the Basic panel of Adobe Camera Raw. Like the Saturation control, Vibrance controls the strength of the color in the photo. Movements to the right boost the color and movements to the left make the vividness of the hue more subtle. But unlike the Saturation slider, Vibrance manages these changes selectively, targeting the least saturated colors and protecting (to some extent) skin tones.
This makes the new control the first tool to reach for when you want to boost the color in your photos. The results are easier to control and less likely to display posterization or color clipping from over-application than the traditional Saturation control.
The Saturation slider controls the strength or vibrancy of the color within your raw photos.
(1) Dragging the slider all the way to left (-100) will remove all color from the photo, creating a monochrome picture.
(2) A value of 0 is the default setting where the saturation is neither boosted nor reduced.
(3) Moving the slider all the way to the right to a setting of +100 produces twice the saturation of the normal or default setting.
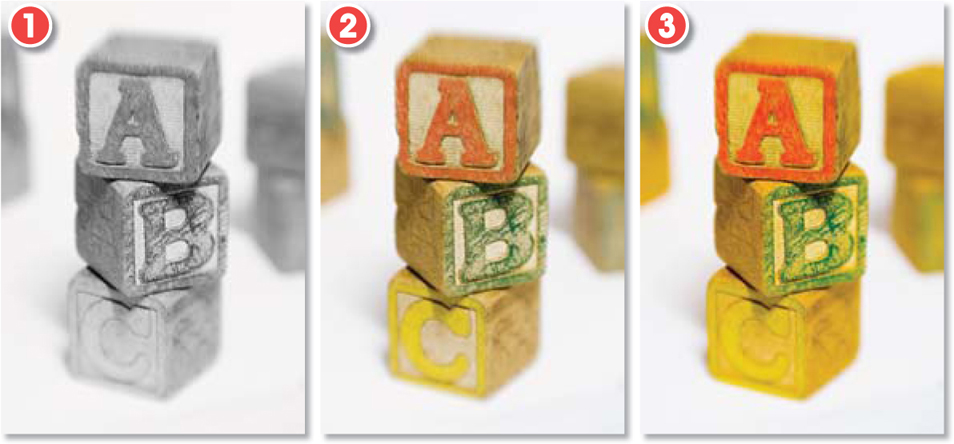
Saturation
If desired, the Saturation slider may be used to adjust the strength of the color within the photo. A setting of -100 is a completely desaturated monochrome image and a value of +100 doubles the saturation. Watch changes in the histogram when you move the Saturation slider in either direction.
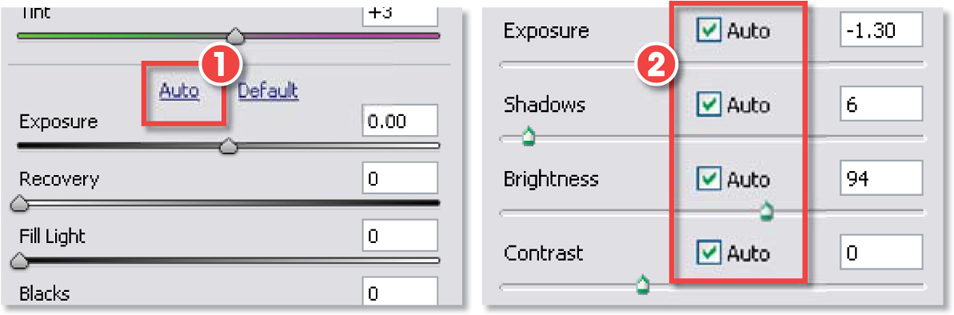
Auto tonal control
When first opening a picture ACR will adjust the tonal controls to an average setting for the picture type and camera make/model. When the Auto setting is selected, ACR examines the picture and adjusts the controls according to the images’ content. When these settings are in place, moving the associated slider will remove the selection but these values can be reinstated by selecting the checkbox again.
Pro’s tip: In some instances you may need to readjust Exposure and Blacks sliders after Brightness, Recovery, Fill Light and Contrast to fine-tune your enhancements.
(1) A single Auto button is provided with the version of ACR that ships with Photoshop Elements 6.0.
(2) There are individual Auto options for Exposure, Shadows, Brightness and Contrast controls inside earlier versions of the ACR dialog.
Sharpening, Luminance Smoothing and Color Noise Reduction
Sharpening (Amount, Radius, Detail, Masking), Luminance Smoothing and Color Noise Reduction are all controls that can be accessed under the Detail tab.
Sharpening
Sharpening is an enhancement technique that is easily overdone and this is true even when applying the changes at the time of raw conversion. The best approach is to remember that sharpening should be applied to photos as the very last step in the editing/enhancement process and that the settings used need to match the type of output the photo is destined for. In practice this means images that are not going to be edited after raw conversion should be sharpened within ACR, but those pictures that are going to be enhanced further should be sharpened later using the specialist filters in Photoshop Elements.
When a picture is first opened into the ACR the program sets the sharpening and noise values based on the camera type and model used to capture the image. For many photographers making further adjustments here is an exception rather than a rule as they prefer to address sharpening in the Editor after cropping, straightening, enhancing, resizing and going to print.
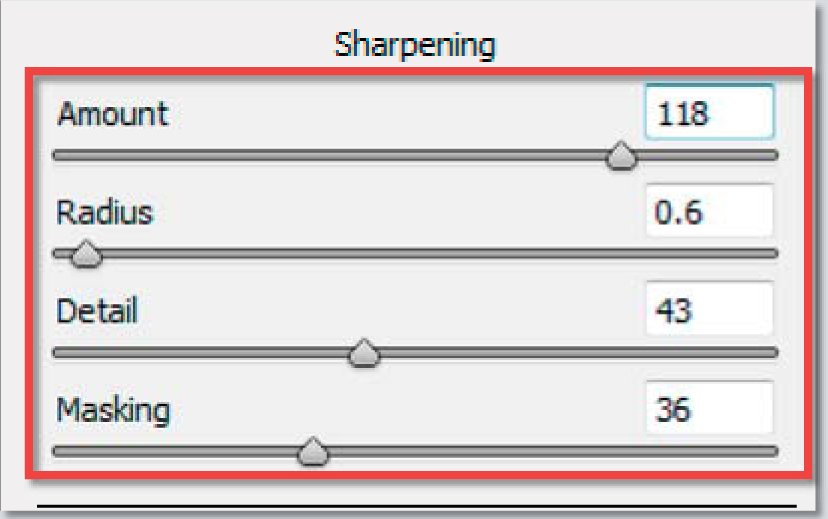
The Detail tab contains both Sharpening and Noise Reduction options.
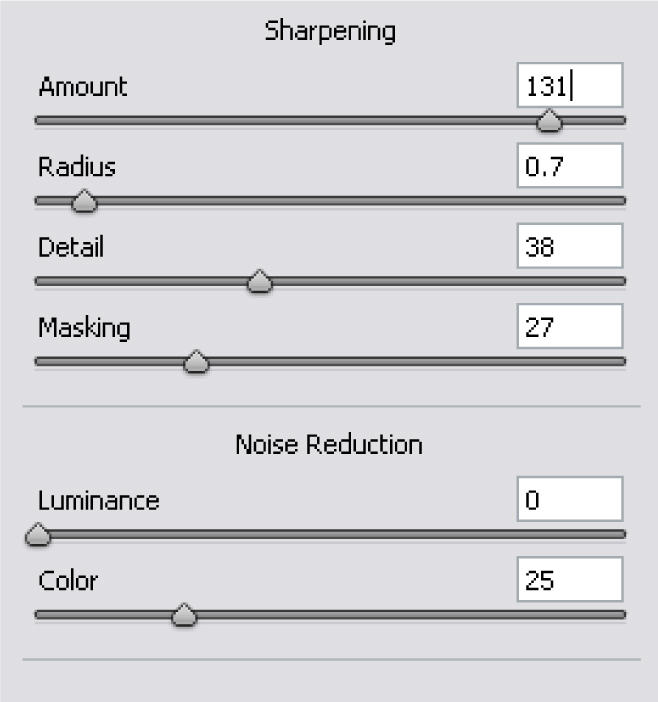
The inclusion of two new controls in the Detail section of the Camera Raw dialog contributes substantially to the user’s ability to fine-tune the sharpening in their images. Added to the existing Amount (strength of the effect) and Radius (number of pixels from an edge that will be changed in the sharpening process) sliders is the Detail and Masking controls. Both sliders are designed to control which parts of the image the sharpening effect is applied to. As with all sharpening techniques ensure that the preview is set to 100% before playing with the new controls. In fact, this magnification level is essential if you are to see the masking previews mentioned below.
Moving the Detail slider to the right increases the local contrast surrounding edge areas and therefore enhances the appearance of details. Moving the slider to the left decreases the effect and also reduces the appearance of halos.
The Masking control interactively applies an edge locating mask to the sharpening process. Sharpening through an edge mask is nothing new but encapsulating the process in a single slider control is. A setting of 0 applies no mask and therefore all detail in the photo is sharpened. Moving the slider to the right gradually isolates the edges within the photo until, at a setting of 100, sharpening is only being applied to the most contrasty or dominant edges in the picture. Holding down the Alt/Option key (at 100% magnification) as you move the slider previews the masked areas, allowing you to fine-tune exactly where the sharpening is being applied. Remember no sharpening is occurring in the black parts of the mask, in the areas masked by gray tones only partial sharpening is being applied and in white mask sections the full effect is revealed.
After magnifying the preview to 100% there are four different preview options available when holding down the Alt/Opt keys and sliding one of the Sharpening sliders.
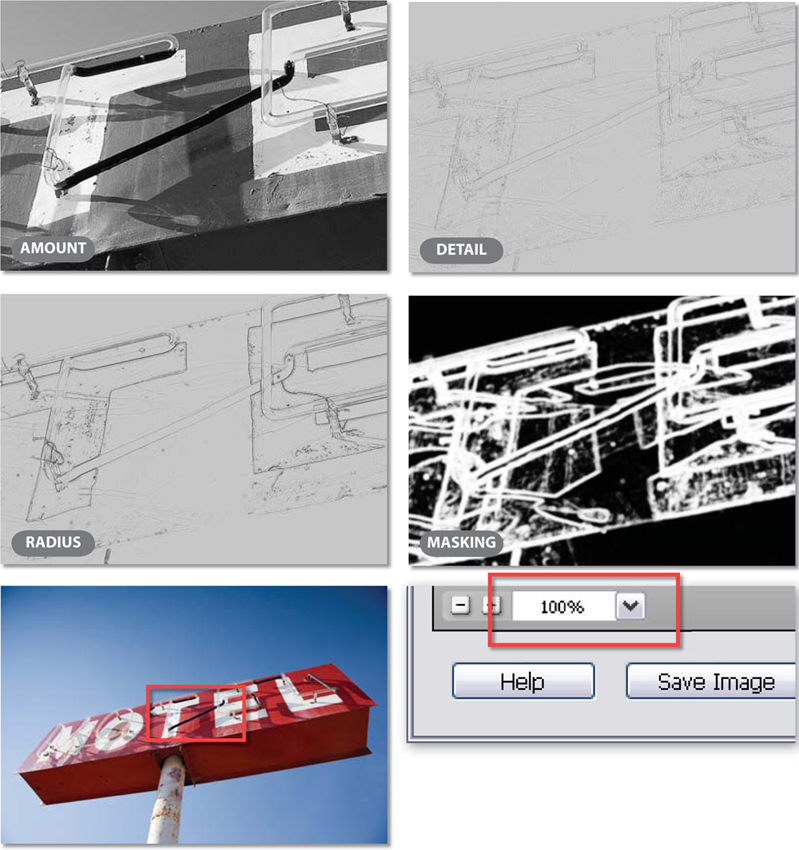
As well as including a mask display option, in the latest version of ACR you can also preview the settings for the other sharpening sliders.
Holding down the Alt/Option keys while moving the Amount slider displays a ’luminosity only’ version of the image so that you can gauge the sharpening effect without the distraction of color. This preview also reminds us that in the latest version of ACR sharpening is applied to detail only and not the color information in the photo. When the Alt/Opt keys are used with the Radius slider the preview highlights the ‘edges’ in the image that will be sharpened and the width of the sharpening effect.
Along with the masking options for Sharpening, the ACR design team also took the opportunity to tweak the noise reduction algorithms in the latest release of the product. Though the effects are not as dramatic as those possible via other methods (see Noise Reduction in Chapter 12), the changes are definitely an improvement.

Noise Reduction
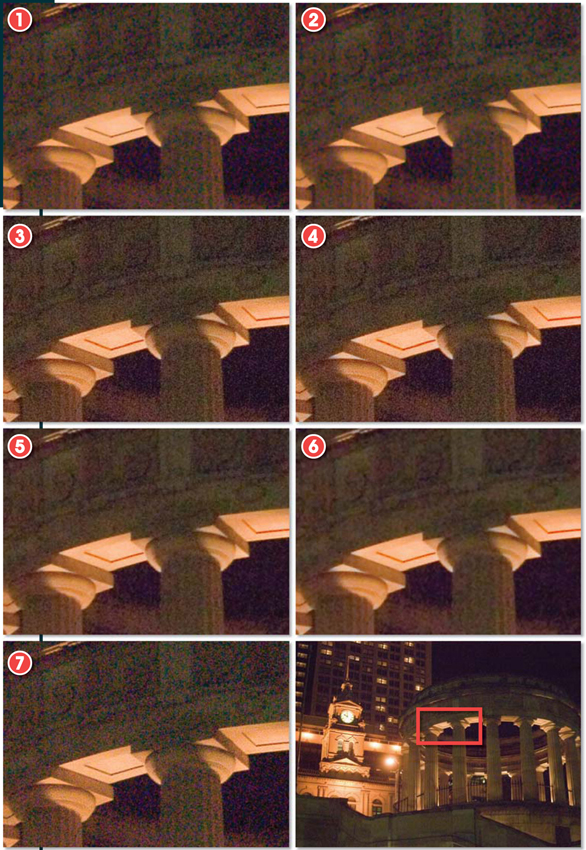
ACR contains two different noise reduction controls. The Luminance Smoothing slider and the Color Noise Reduction control. The Luminance Smoothing slider is designed to reduce the appearance of grayscale noise in a photo. This is particularly useful for improving the look of images that appear grainy. The second type of noise is the random colored pixels that typically appear in photos taken with a high ISO setting or a long shutter speed. This is generally referred to as chroma noise and is reduced using the Color Noise Reduction slider in ACR. The noise reduction effect of both features is increased as the sliders are moved to the right.
ACR contains two noise reduction controls – Luminance Smoothing for grayscale noise and Color Noise Reduction for minimizing errant color pixels. Like most noise reduction controls effective use is a balance between removing digital grain and creating flat featureless areas of color. This example demonstrates how the different settings alter the look of noisy photographs.
1. 50, 0 (Luminance Smoothing, Color Noise Reduction).
2. 100, 0.
3. 0, 50.
4. 0, 100.
5. 50, 50.
6. 100, 100.
7. 0, 0 (no noise reduction).
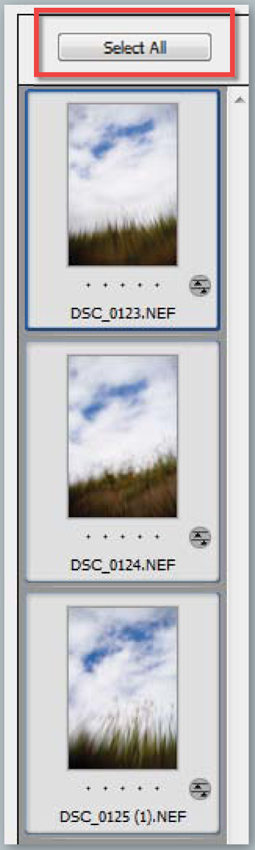
When selecting multiple raw files to open in Photoshop Elements the pictures are listed on the left side of the Adobe Camera Raw dialog.
Raw file queue
The third section of the Photoshop Elements version of the ACR dialog only appears when you select multiple raw files inside the Organizer workspace and then choose the Full Edit option from the right-click menu. The selected files are opened into the ACR dialog and listed on the left-hand side of the main workspace. This function, though available in the Photoshop version of ACR, is new for the edition that ships with Photoshop Elements 6.0.
In general, only one image can be selected from the grouping, and displayed in the preview area, at a time. All changes made to the image settings are applied to the selected photo only. Users can move from image to image making the necessary enhancements before clicking the Done key to apply the changes without transferring the files, or Open to display the converted pictures in the Full Edit workspace. But this is not the only way to work with the files.
The Select All button at the top of the queue area allows the user to apply settings used for a single image across a range of photos grouped here.
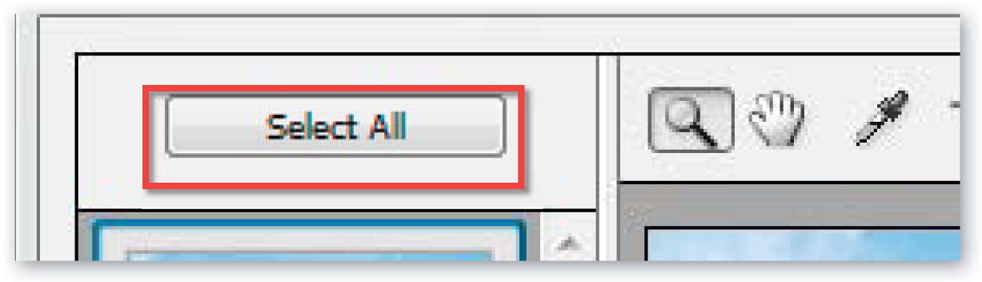
Synchronizing enhancements across multiple files
The Select All button at the top of the queued files can be employed for a more efficient workflow. With this feature enhancement changes made to a single photo can be applied across the whole range of images queued in the dialog.
Step by step: Applying changes across multiple raw files
1. For best results, start by multi-selecting files from the Organizer space that have similar characteristics or were shot under the same lighting conditions.
2. Next, open the pictures in ACR by selecting the Full Edit option from the right-click menu.
3. Now select a single photo from the queue that is indicative in tone and color of the whole group. With this photo displayed in the preview area, choose the Select All option from the top of the dialog.
4. Proceed to make enhancement changes to the previewed files as you would normally. Notice that these changes are also applied to the other photos in the queue.
5. The changes made to all the photos can then be fine-tuned to suit the characteristics of individual images (if needed) by selecting each picture in turn and adjusting the controls.
6. If no changes for individual files are necessary, then the selected photos can be saved, using the Save Images button, transferred to the Edit workspace with the Open Images option or the enhancement settings applied by clicking the Done button.
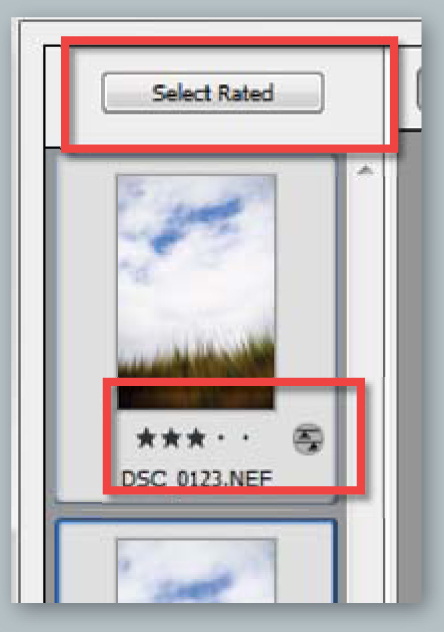
Step by step: Applying changes across rated raw files
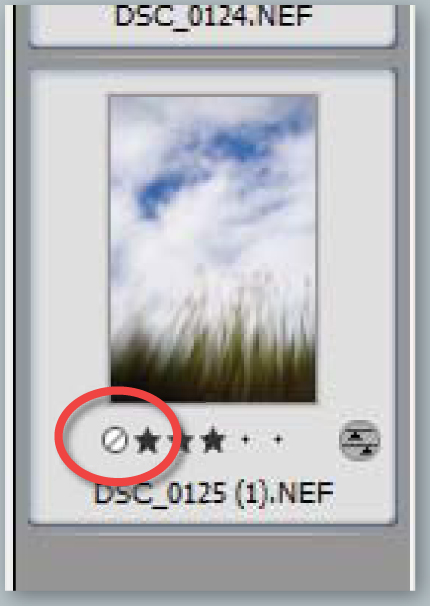
1. In addition to being able to apply image changes across all the queued files by choosing the Select All button, it is also possible to adjust just a subset of the files listed. Start by reviewing each of the queued files in turn by clicking onto the thumbnail on the left of the dialog.
2. During the review process rate those files that you want to adjust as a group. Do this by clicking the star rating section located under each thumbnail.
3. Once the review process is completed and all files to be enhanced as a group are rated, hold down the Alt key and choose the Select Rated button at the top of the queued list. Notice that this action selects only those files with a star rating attached.
4. Now you can set about applying the changes to those selected as before.
5. If you want to remove an image from the Rated grouping simply click on the no rating option under the thumbnail.
Photoshop Elements users have access to a range of tools via the toolbar at the top of the ACR dialog.
1. Zoom tool
2. Hand tool
3. White Balance tool
4. Crop tool
5. Straighten tool
6. Red Eye Removal
7. Preferences dialog
8. Rotate image 90ºCC
9. Rotate image 90ºC
10. Toggle Mark for Delete
11. Preview
12. Toggle Full Screen
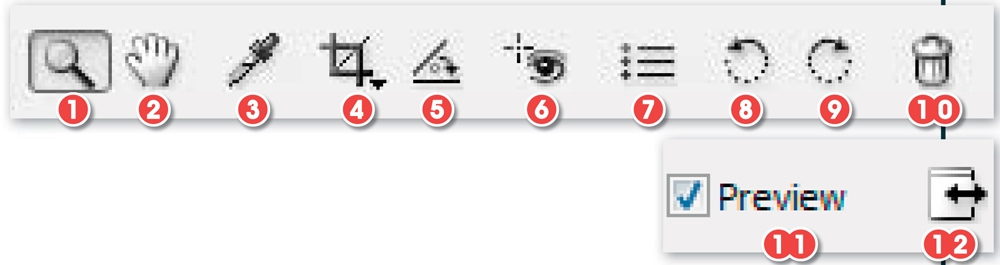
Toolbar
Like the image adjustment tabs on the right of the ACR dialog, the contents of the program’s toolbar are different depending on if you are working on files inside Photoshop Elements or Photoshop/Bridge. Elements users have the following tools at their disposal (left to right):
Zoom tool (Z) – The Zoom tool is useful for looking closely at the image for problems with focus and execution – slow shutter speed, lack of stabilization, incorrect aperture setting. At 25% an image may appear to be quite impressive, yet when examining it at 100% often a bit of movement and/or lack of focus appear.
Hand tool (H) – When the preview image is enlarged you can use the Hand tool to easily move around the screen.
White Balance tool (I) – The White Balance tool is very powerful. Clicking this tool on a picture portion that is meant to be neutral (even amounts of red, green and blue) removes any color casts and adjusts the hue of the entire image in one fell swoop.
Crop tool (C) – Use the Crop tool to remove unwanted areas around your photo or to reshape the format of the image to fit a specific paper type. The tool can be click-dragged around the area to keep or a specific cropping format can be selected from the drop-down menu accessed via the small downward-facing arrow in the bottom right of the tool button.
Straighten tool (A) – The Straighten tool can automatically rotate a picture taken with the horizon slightly crooked. Simply drag the tool along the line in the image that is meant to be level and ACR will automatically rotate and crop the photo to realign the horizon.
Red Eye Removal (E) – Use the Red Eye Removal tool to recolor the pupil area of photos taken with flash. Either click onto the red pupil or click-drag a marquee around the problem area. The Pupil Size and Darken sliders can be used to adjust the quality of the results.
Open Preference dialog (Ctrl + K) – Displays the Camera Raw Preferences dialog.
Rotate image 90° counter-clockwise (L) – Rotates the selected photo to the left.
Rotate image 90° clockwise (R) – Rotates the selected photo to the right.
Toggle Mark for Delete – Use this tool carefully to delete files that you don’t want to keep in the catalog.
Preview (P) – Switches the preview of current image adjustments settings on and off.
Toggle Full Screen (F) – Switches the display mode of the dialog from a floating window to full screen.
Output options
Now to the business end of the conversion task – outputting the file. At this stage in the process ACR provides several options that will govern how the file is handled from this point onwards. In previous versions of the dialog the lower right-hand corner houses all the output options, now they are spread along the bottom of the window. The options include Save Image, Cancel, Open Image, Done and Help, and a further three, Save Image (without the options dialog), Reset and Open Copy, when the Alt/Option button is pushed.
Help: Opens the Photoshop Elements help system with raw processing topics already displayed.
Once all controls for the raw conversion have been set ACR provides a range of options for the next step in the process. Save, Help, Cancel, Done and Open are available by default (1). Holding down the Alt/Option key switches the button set to Save (without a dialog), Help, Reset, Open Copy and Done (2).
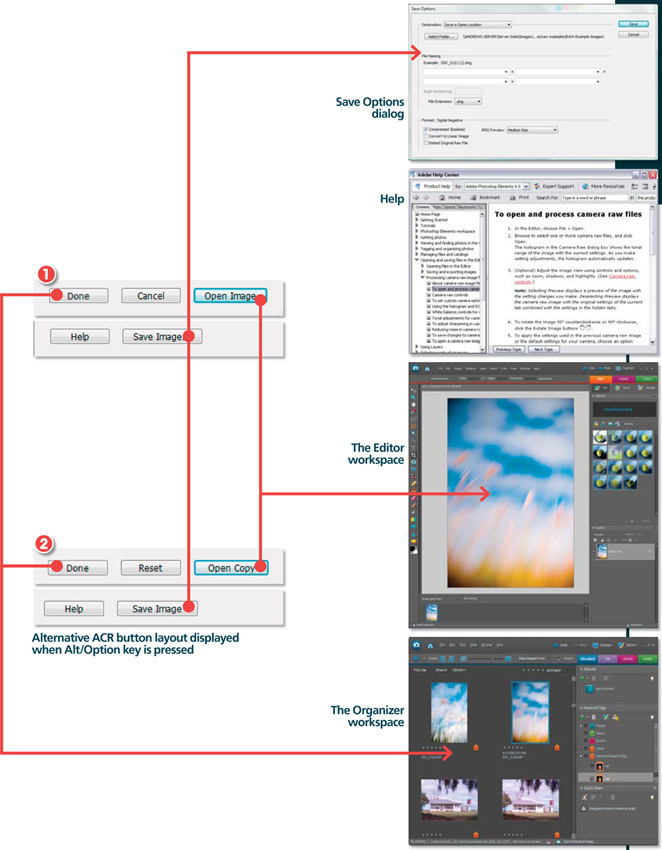
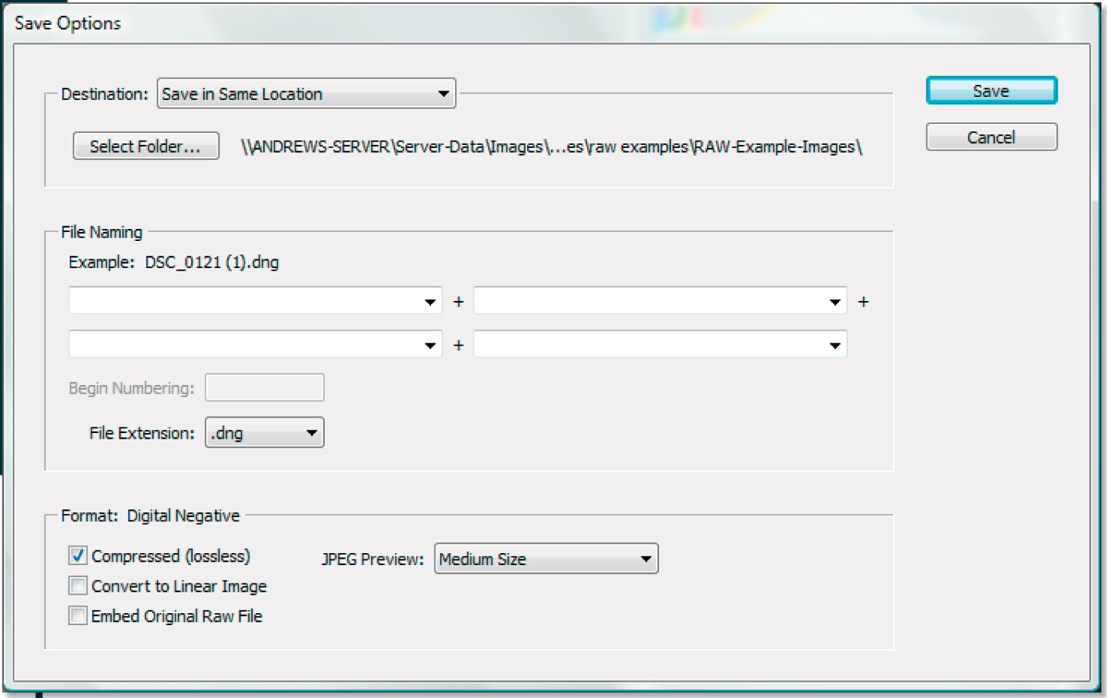
The Save Options dialog is displayed when the Save Image … button is pressed. To skip this dialog and still save the processed file in DNG format hold down the Alt/Option key whilst clicking the Save Image button.
Cancel: This option closes the ACR dialog not saving any of the settings to the file that was open.
Save Image: The normal Save Image button, which includes several dots (…) after the label, displays the Save Options dialog. Here you can save the raw file, with your settings applied, in Adobe’s own DNG format. The dialog includes options for inputting the location where the file will be saved, the ability to add in a new name as well as DNG file-specific settings such as compression, conversion to linear image and/or embed the original raw file in the new DNG document. It is a good idea to Select Save in Different Location in the Destination drop-down at the top to separate processed files from archive originals. Clearly the benefits of a compressed DNG file are going to help out in the storage issue arena and compression is a big advantage with DNG. Embedding the original raw file in the saved DNG file begs the questions of how much room you have in the designated storage device and whether you really want to have the original raw file here.
Save Image (without save options): Holding down the Alt/Option key when clicking the Save button skips the Save Options dialog and saves the file in DNG format using the default save settings.
Open Image: If you click on the Open button Elements applies the conversion options that you set in ACR and opens the file inside the Editor workspace. At this point, the file is no longer in a raw format so when it comes to saving the photo from the Editor workspace Elements automatically selects the Photoshop PSD format for saving.
Open Copy: The Open Copy option differs from Open Image in that it applies the development settings to a duplicate of the file which is then opened into the Elements Editor workspace.
Reset: The Reset option resets the ACR dialog’s settings back to their defaults. This feature is useful if you want to ensure that all settings and enhancement changes made in the current session have been removed. To access the Reset button click the Cancel button whilst holding down the Alt/Option key.
Done or Update: The Done button applies the current settings to the photo and the dialog is then closed. The thumbnail preview in the PhotoBrowser workspace will also be updated to reflect the changes. In previous versions of the dialog clicking the Open button in conjunction with the Alt/Option key (the Update button) will update the raw conversion settings for the open image in the same way.
Pro’s tip: If the thumbnail doesn’t update automatically, select the picture and then choose Edit > Update Thumbnail in the PhotoBrowser workspace.
Skip: In previous versions of Adobe Camera Raw holding down the Shift key whilst clicking the Open button will not apply the currently selected changes and just close the dialog. In this way it is similar to the Cancel button.
The knowledge: Differences between Adobe Camera Raw (ACR) in Photoshop/Bridge and Photoshop Elements
The Adobe Camera Raw utility is available in both Photoshop Elements and Photoshop (and Bridge) but the same functionality and controls are not common to the feature as it appears in each program. The Photoshop Elements version contains a reduced feature set but not one that overly restricts the user’s ability to make high quality conversions.
Processing with Photoshop Elements and Adobe Camera Raw
Now that we have a good understanding of the various controls in the Adobe Camera Raw dialog let’s walk through the complete process.
Opening
This seems like a simple step but just as there are many roads that lead to Rome so too are there a variety of ways to open a raw file in Adobe Camera Raw.
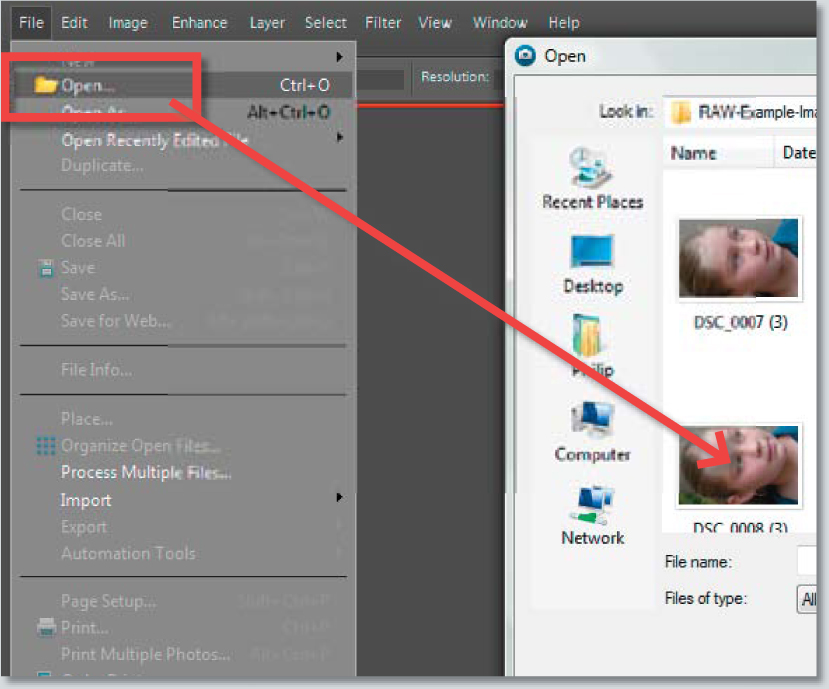
1. Opening the raw file in the Editor workspace
Once you have downloaded your raw files from camera to computer you can start the task of processing. Keep in mind that in its present state the raw file is not in the full color RGB format that we are used to, so the first part of all processing is to open the picture into Adobe Camera Raw. Selecting File > Open from inside Elements will automatically display the photo in this.
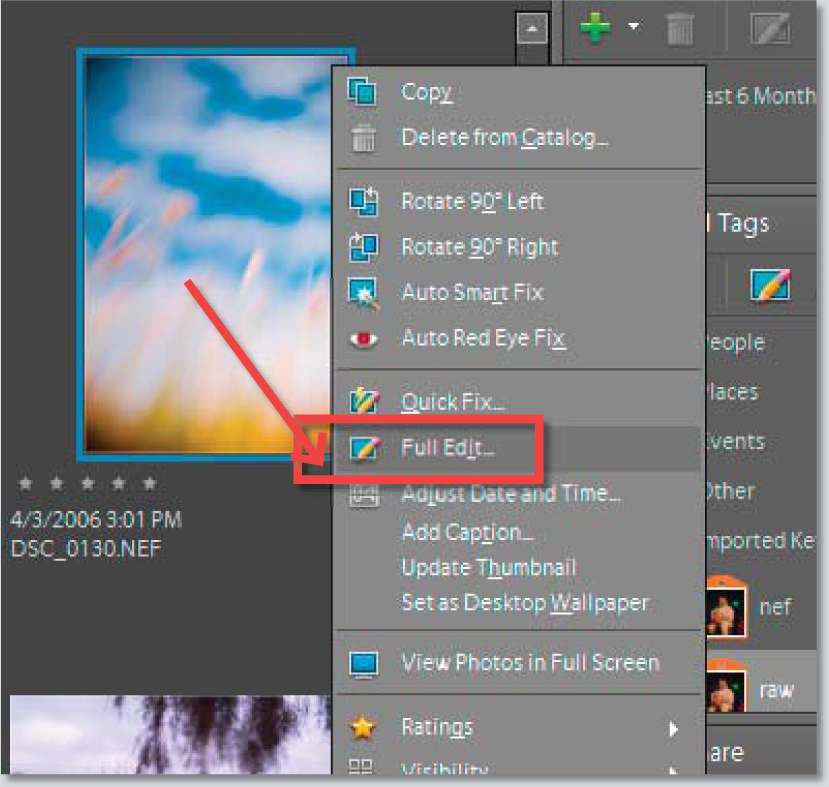
2. Starting with the PhotoBrowser
Starting in the PhotoBrowser or Organizer workspace simply right-click on the thumbnail of the raw file and select Full Edit or Go to Standard Edit from the pop-up menu to transfer the file to the Elements version of ACR in the Editor workspace.
Rotate
3. Rotate right (90 CW) or left (90 CCW)
Once the raw photo is open in ACR you can rotate the image using either of the two Rotate buttons at the top of the dialog. If you are the lucky owner of a recent camera model then chances are the picture will automatically rotate to its correct orientation. This is thanks to a small piece of metadata supplied by the camera and stored in the picture file that indicates which way is up.

Adjusting white balance
Unlike other capture formats (TIFF, JPEG) the white balance settings are not fixed in a raw file. ACR contains three different ways to balance the hues in your photo.
4. Preset changes
As we have seen you can opt to stay with the settings used at the time of shooting (As Shot’) or select from a range of light source-specific settings in the White Balance dropdown menu of ACR. For best results, try to match the setting used with the type of lighting that was present in the scene at the time of capture. Or choose the Auto option from the drop-down White Balance menu to get ACR to determine a setting based on the individual image currently displayed.
5. Manual adjustments
If none of the preset white balance options perfectly matches the lighting in your photo then you will need to fine-tune your results with the Temperature and Tint sliders (located just below the Presets drop-down menu). The Temperature slider settings equate to the color of light in degrees kelvin – so daylight will be 5500 and tungsten light 2800. It is a blue to yellow scale, so moving the slider to the left will make the image cooler (more blue) and to the right warmer (more yellow). In contrast the Tint slider is a green to magenta scale. Moving the slider left will add more green to the image and to the right more magenta.

6. The White Balance tool
Another quick way to balance the light in your picture is to choose the White Balance tool and then click on a part of the picture that is meant to be neutral gray or white. ACR will automatically set the Temperature and Tint sliders so that this picture part becomes a neutral gray and in the process the rest of the image will be balanced. For best results when selecting lighter tones with the tool ensure that the area contains detail and is not a blown or specular highlight.
Tonal control
The next group of image enhancements alters the tones within the photo. There are nine different slider controls each dealing with a specific group of image tones. Each of the controls can be controlled automatically based on individual image content by clicking the Auto option just below the white balance options. Use the following steps if you want a little more control.
7. Setting the white areas
To start, adjust the brightness with the Exposure slider. Moving the slider to the right lightens the photo and to the left darkens it. The settings for the slider are in f-stop increments, with a +1.00 setting being equivalent to increasing exposure by 1 f-stop. Use this slider to peg or set the white tones. Your aim is to lighten the highlights in the photo without clipping (converting the pixels to pure white) them. To do this, hold down Alt/Option whilst moving the slider. This action previews the photo with the pixels being clipped against a black background. Move the slider back and forth until no clipped pixels appear but the highlights are as white as possible.

8. Adjusting the shadows (blacks)
The Blacks or Shadows slider performs a similar function with the shadow areas of the image. Again the aim is to darken these tones but not to convert (or clip) delicate details to pure black. Just as with the Exposure slider, the Alt/Option key can be pressed whilst making Shadows adjustments to preview the pixels being clipped. Alternatively the Shadow and Highlights Clipping Warning features (top left and right corners of the histogram) can be used to provide instant clipping feedback on the preview image. Shadow pixels that are being clipped are displayed in blue and clipped highlight tones in red.
9. Brightness changes
The next control, moving from top to bottom of the ACR dialog, is the Brightness slider. At first the changes you make with this feature may appear to be very similar to those produced with the Exposure slider but there is an important difference. Yes, it is true that moving the slider to the right lightens the whole image, but rather than adjusting all pixels the same amount the feature makes major changes in the midtone areas and smaller jumps in the highlights. In so doing the Brightness slider is less likely to clip the highlights (or shadows) as the feature compresses the highlights as it lightens the photo. This is why it is important to set white and black points first with the Exposure and Shadows sliders before fine-tuning the image with the Brightness control.
10. Recovering highlights and shadow detail
If the highlights are still being clipped then use the Recovery slider to recreate detail in the problem area. Likewise if the shadow areas are too dark then drag the Fill Light slider to the right to lighten these tones in the photo. Be careful with over-application of either of these controls as it can make the image look low in contrast.
11. Increasing/decreasing contrast
The last tonal control in the dialog, and the last to be applied to the photo, is the Contrast slider. The feature concentrates on the midtones in the photo with movements of the slider to the right increasing the midtone contrast and to the left producing a lower contrast image. Like the Brightness slider, Contrast changes are best applied after setting the white and black points of the image with the Exposure and Blacks sliders.
12. Local contrast control
The Clarity slider is used to alter the local contrast or the contrast of details within the photo. It works well with photos that have been photographed with diffused light or on a cloudy day. Use Clarity and Contrast sliders together.
Color strength adjustments
As one of the primary roles of the Adobe Camera Raw utility is to interpolate the captured colors from their Bayer mosaic form to the more usable RGB format it is logical to include a couple of color strength controls in the process.
13. Vibrance adjustment
Unlike the Saturation slider, which increases the strength of all colors in the photo irrespective of their strength in the first place, Vibrance targets its changes to just those colors that are desaturated. Use this control to boost the strength of colors in the photo with less risk of posterized results.
14. Saturation control
The strength or vibrancy of the colors in the photo can be adjusted using the Saturation slider. Moving the slider to the right increases saturation, with a value of +100 being a doubling of the color strength found at a setting of 0. Saturation can be reduced by moving the slider to the left, with a value of -100 producing a monochrome image. Some photographers use this option as a quick way to convert their photos to black and white but most prefer to make this change in Photoshop proper, where more control can be gained over the conversion process with features such as the Channel Mixer.
Sharpness/smoothness and noise reduction
With the tones and colors now sorted let’s turn our attention to sharpening and noise reduction. Both these image enhancements can be handled in-camera using one of a variety of auto settings found in the camera setup menu, but for those image makers in pursuit of imaging perfection these changes are best left until processing the file back at the desktop.
15. To sharpen or not to sharpen
The latest version of ACR contains four separate sharpening controls. Use the Amount slider to determine the overall strength of the sharpening effect. The Radius is used to control the number of pixels from an edge that will be changed in the sharpening process. The Detail and Masking sliders are both designed to help target the sharpening at the parts of the image that most need it (edges) and restrict the sharpening effects from being applied to areas that don’t (skin tone and smooth graded areas). Moving the Detail slider to the right increases the local contrast surrounding edge areas and therefore enhances the appearance of details. Moving the slider to the left decreases the effect and also reduces the appearance of halos. The Masking control interactively applies an edge locating mask to the sharpening process. A setting of 0 applies no mask and therefore all detail in the photo is sharpened. Moving the slider to the right gradually isolates the edges within the photo until, at a setting of 100, sharpening is only being applied to the most contrasty or dominant edges in the picture.
16. Reducing noise
ACR contains two different Noise Reduction controls. The Luminance Smoothing slider is designed to reduce the appearance of grayscale noise in a photo. This is particularly useful for improving the look of images that appear grainy. The second type of noise is the random colored pixels that typically appear in photos taken with a high ISO setting or a long shutter speed. This is generally referred to as chroma noise and is reduced using the Color Noise Reduction slider in ACR. The noise reduction effect of both features is increased as the sliders are moved to the right.

Output options
Now to the business end of the conversion task – outputting the file. The Photoshop Elements version of ACR contains only the Color Depth output option.
17. Controlling color depth/space and image size/resolution
The section below the main preview window in ACR contains the output options settings. Here you can adjust the color depth (8 or 16 bits per channel) of the processed file. Earlier versions of Photoshop Elements were unable to handle 16 bits per channel images but the last two releases have contained the ability to read, open, save and make a few changes to these high color files.

Save, Open or Done
The last step in the process is to apply the enhancement changes to the photo. This can be done in a variety of ways.
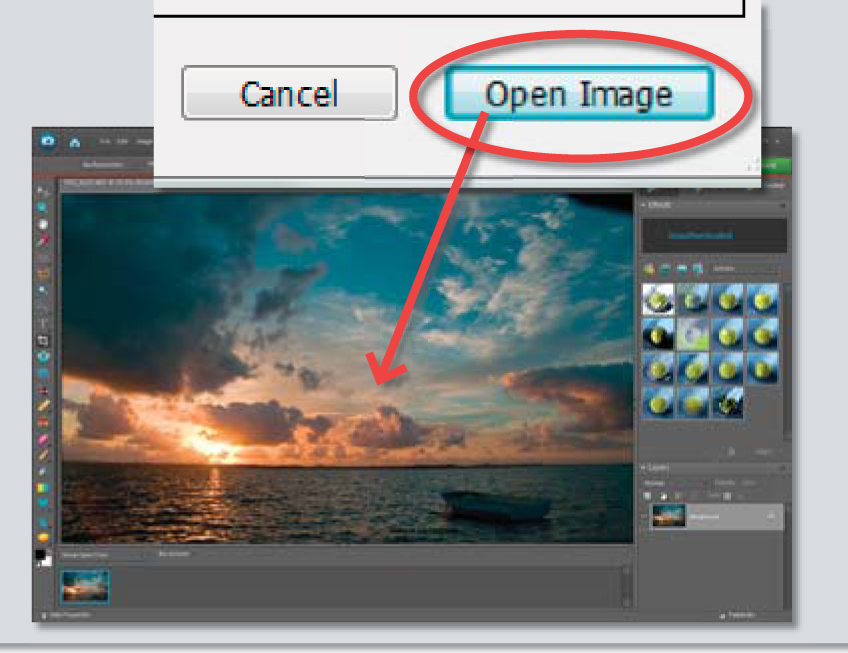
18. Opening the processed file in Photoshop Elements
The most basic option is to process the raw file according to the settings selected in the ACR dialog and then open the picture into the Editor workspace of Photoshop Elements. To do this simply select the Open Image button. Select this route if you intend to edit or enhance the image beyond the changes made during the conversion.
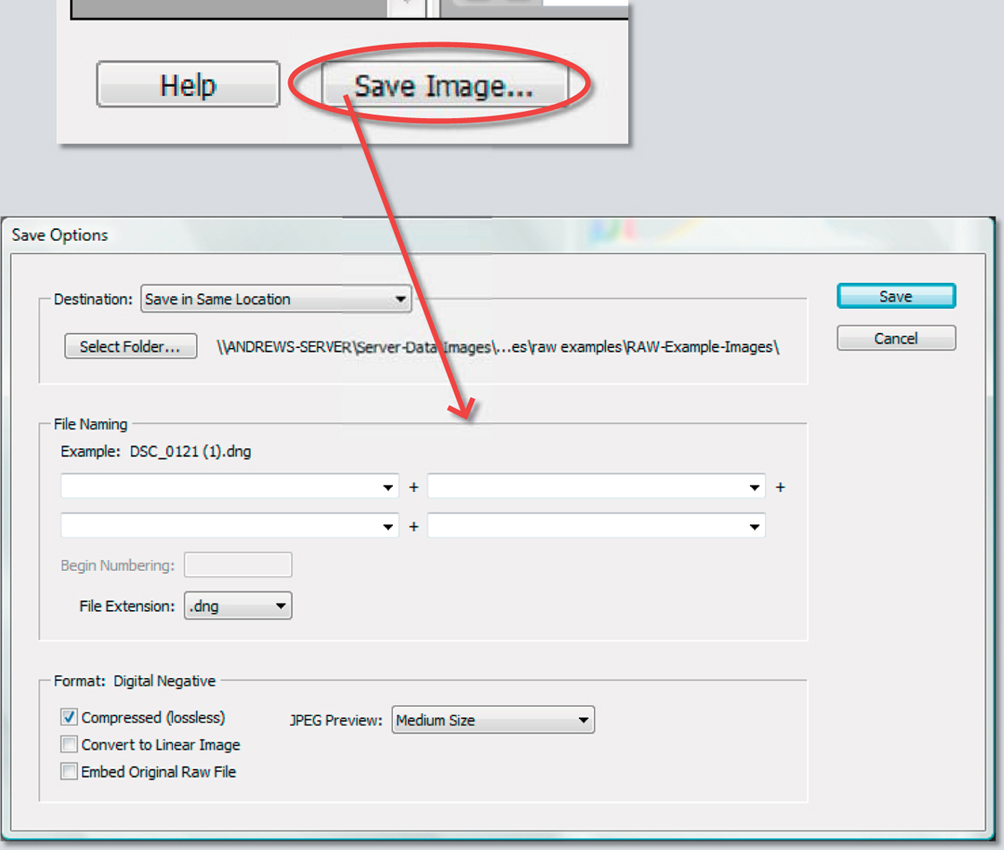
19. Saving the processed raw file
Users also have the ability to save converted raw files from inside the ACR dialog via the Save Image button. This action opens the Save Options dialog which contains settings for inputting the file name as well as file type-specific characteristics such as compression. Use the Save option over the Open command if you want to process photos quickly without bringing them into the editing space.
Pro’s tip: Holding down the Alt/Option key whilst clicking the Save button allows you to store the file (with the raw processing settings applied) without actually going through the Save Options dialog.
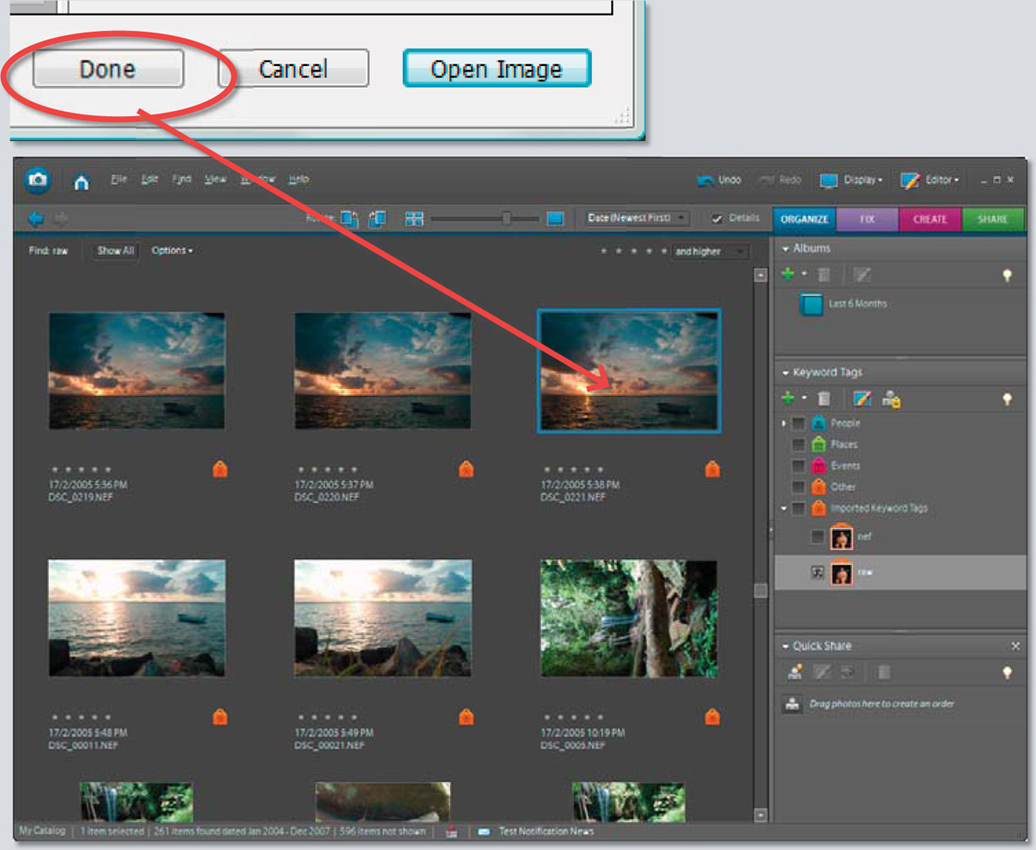
20. Applying the raw conversion settings
There is also an option for applying the current settings to the raw photo without opening the picture. By Clicking the Done button (or Alt-clicking the OK button – holding down Alt/Option key changes the button to the Update button in previous versions of the dialog), you can apply the changes to the original file and close the ACR dialog in one step.
The great thing about working this way is that the settings are applied to the file losslessly. No changes are made to the underlying pixels, only to the instructions that are used to process the raw file.
When next the file is opened, the applied settings will show up in the ACR dialog ready for fine-tuning, or even changing completely.