
7
ACR, Photoshop and Bridge

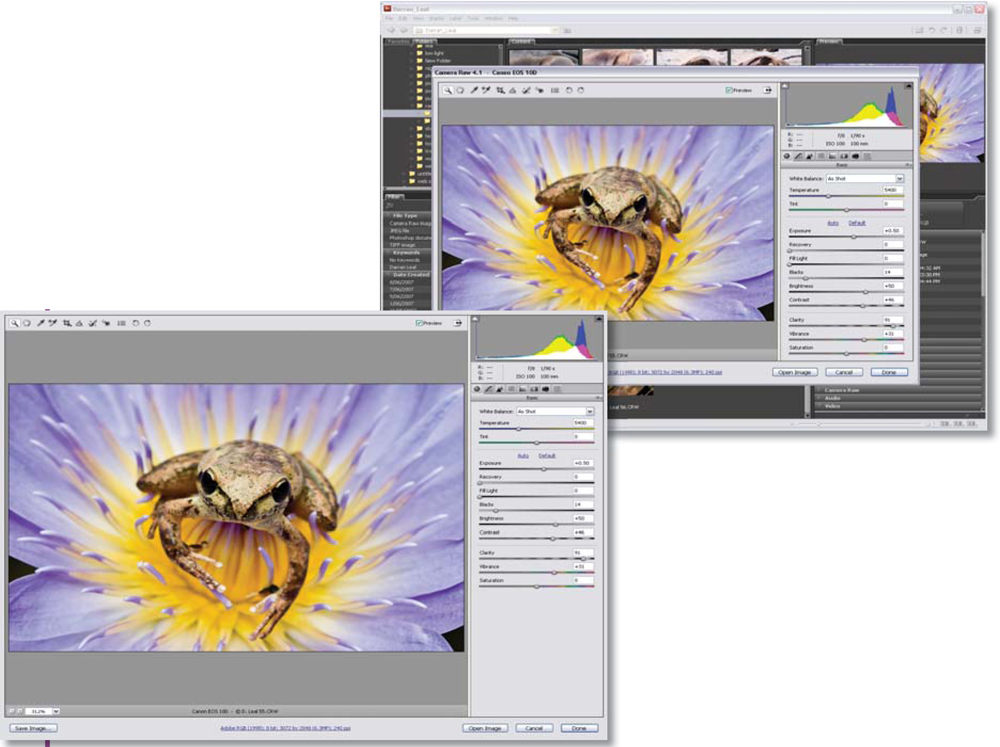
How do you process your raw photographs in Adobe Photoshop? You start by opening them. To do this you can always use the ubiquitous Open command but you also have the option to open files via Bridge (CS2 and CS3) or the File Browser (CS).
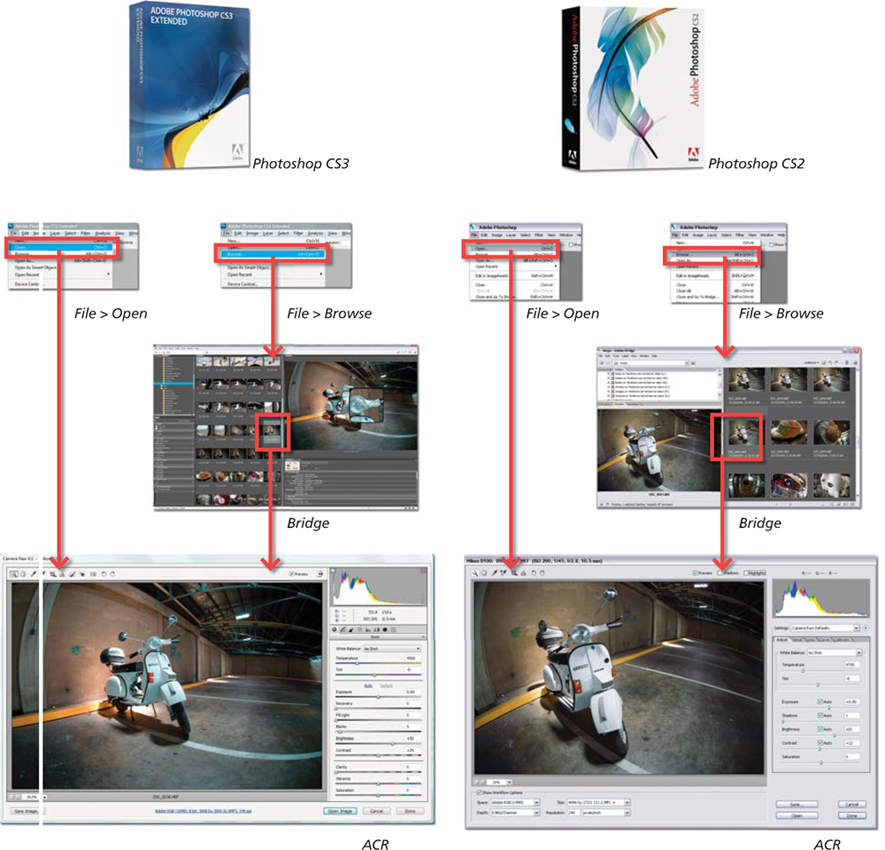
Over the last few versions of the program both Photoshop and Bridge have become more raw aware. Where Photoshop used to be the beginning of all raw editing it is now possible to process your raw files without even opening the photos into the package. Starting with Bridge raw images can be opened into Adobe Camera Raw, the photos enhanced using the many features found here and then the settings applied to the picture without ever moving the image into Photoshop proper. This Bridge to ACR and back to Bridge workflow is very efficient in time and also computing resources as the resource hungry Photoshop is not touched in the process. Irrespective of the route you take, the key component in the process is Adobe Camera Raw.
Photoshop-less Raw processing
Photoshop users can open their raw files into Adobe Camera Raw by selecting File > Open or selecting from either Bridge or the Photoshop File Browser in earlier versions of the program.
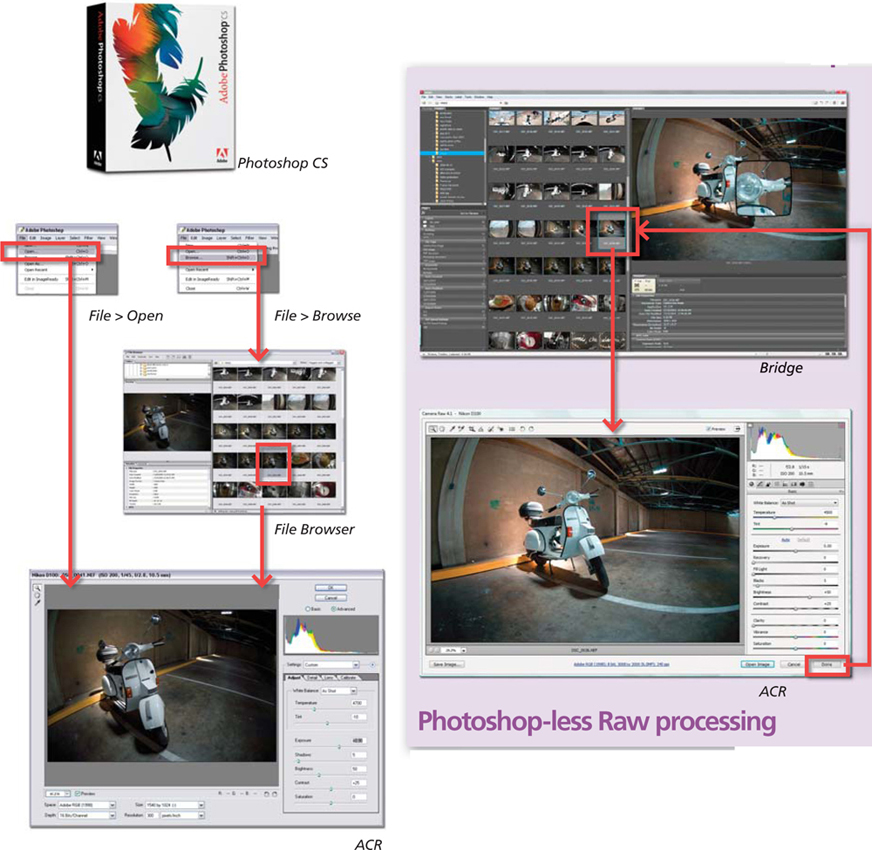
All roads lead to Adobe Camera Raw (ACR)
Selecting File > Open displays a file dialog where you can select and open your raw photo. File > Browse, on the other hand, opens either Bridge or the File Browser, depending on which version of Photoshop you are running. Both utilities provide a thumbnail view of the raw files you have on your hard drive. To open a photo, just double-click the picture’s thumbnail.
Both methods for opening a file will eventually lead to the photo being displayed in Adobe’s raw conversion utility – Adobe Camera Raw (ACR). Different versions of the ACR are shipped with Photoshop CS3, CS2 and Photoshop CS. Changes to the list of features present in the utility as well as the cameras supported by each edition of ACR are made from time to time, so to ensure that you have the very latest incarnation of ACR download the most recent version from www.adobe.com and install it by following the steps below:
The knowledge: Keeping ACR up to date manually
For all but the latest version of Photoshop you will need to update ACR using the following steps. Point your browser to www.adobe.com and then look for the Adobe Camera Raw update page. Next download the latest version of the utility and install using these steps:
1. If Photoshop is open exit the program.
2. Open the system drive (usually C:).
3. Locate the following directory: Program Files/Common Files/Adobe/Plug-Ins/CS2/File Formats.
4. Find the Adobe Camera Raw.8bi file in this folder.
5. Move the plug-in to another folder and note down its new location just in case you want to restore the original settings.
6. Drag the new version of the Adobe Camera Raw plug-in, the Adobe Camera Raw.8bi file (that you downloaded), to the same directory as in step 3.
7. Restart Photoshop.
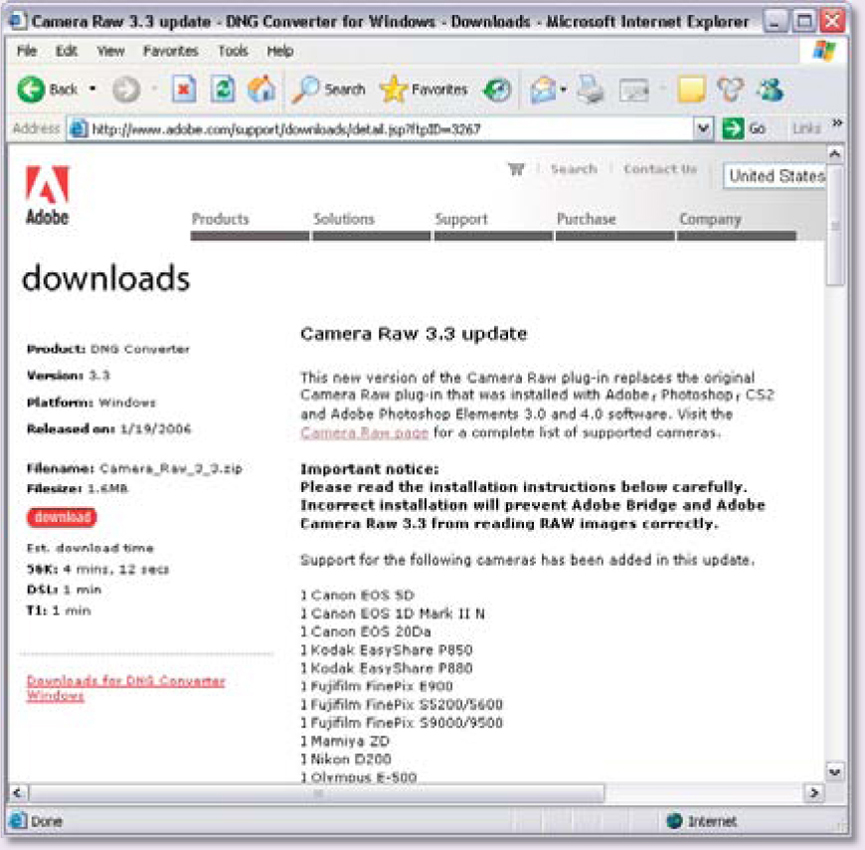
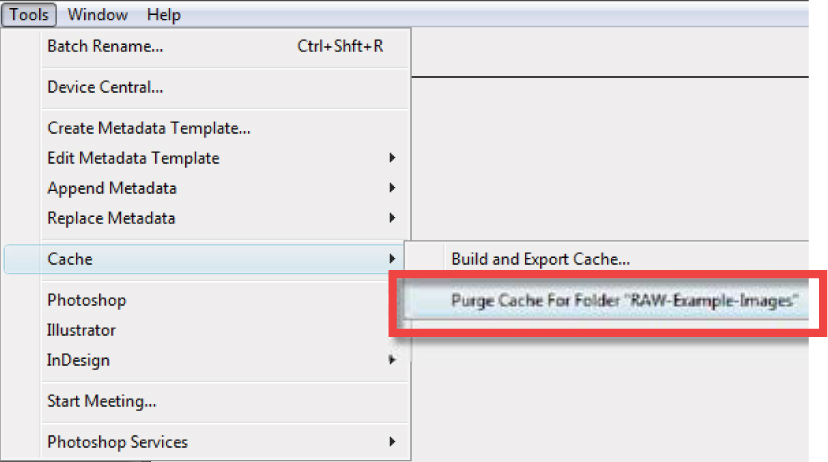
Note: If after installing the new version of ACR your raw files are not displayed as thumbnails, start Bridge and then select Tools > Cache > Purge Central Cache. Keep in mind that this action deletes the stored thumbnail data for all folders as well as any labels, ratings and rotation settings for files that don’t have XMP support.
The knowledge: Keeping ACR up to date automatically
Thankfully Photoshop CS3 has an automated update process that includes the Adobe Camera Raw plug-in. Use the following steps to update to the latest version of ACR:
1. Start Photoshop. Navigate to and select the Help > Updates option. This will force the program to go online and search for any new updates.
2. If an update is found, the Adobe Updater is displayed with a list of the updates. Choosing the Install button will download the files and install into the correct directory. During the installation process you may be asked to close Photoshop or Bridge.
3. After restarting Photoshop you will find that the new version of Adobe Camera Raw is available.

ACR contains a comprehensive toolbar situated at the top of the dialog. Tools that are stored here include:
1. Zoom tool
2. Hand tool
3. White Balance tool
4. Color Sample tool
5. Crop tool
6. Straighten tool
7. Retouch tool
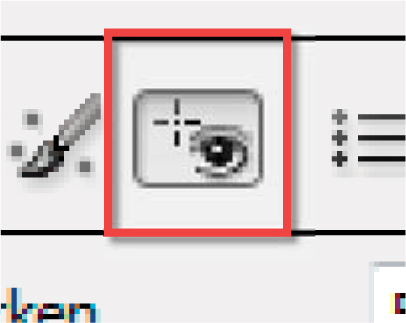
8. Red Eye Removal
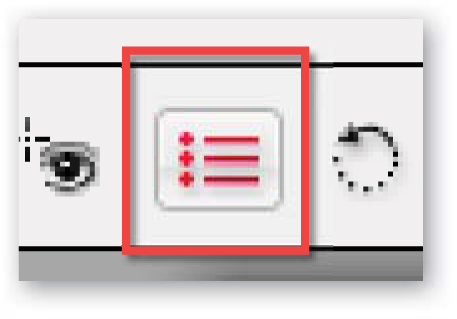
9. Open Preferences dialog
10. Rotate image 90° CCW or Rotate image 90° CW
11. Toggle Mark for Delete
12. Preview
13. Toggle Full Screen

Photoshop’s own version of Adobe Camera Raw
As we have already seen, Adobe Camera Raw is the raw conversion utility used by both Photoshop and Photoshop Elements. Both versions share the core processing power but it is the one included with Photoshop that contains the fullest range of image editing and enhancement options. Where Elements users have access to the Basic and Detail tabs, Photoshop aficionados have no less than eight different tabs crammed full of tonal, color and sharpness controls to play with. Add to this the inclusion of color sampling tool and retouching tools and options for opening raw files as smart objects inside Photoshop directly from ACR and you will see why running ACR from Bridge or Photoshop is the choice of most professionals.
It is no surprise that the tools and features inside Photoshop Lightroom have an uncanny resemblance to those in ACR. Based on the same conversion technology both the Lightroom and ACR development teams have been working hard to ensure comparability between the two programs. Adobe hopes that these efforts will mean that photographers have a broader choice of workflow, being able to mix and match between Lightroom, Photoshop, Bridge and Camera Raw when finding the best ‘fit’ for their preferred workflow.
The tabbed panes on the right of the dialog house the image, color and sharpness controls that form the basis of all raw enhancement adjustments.
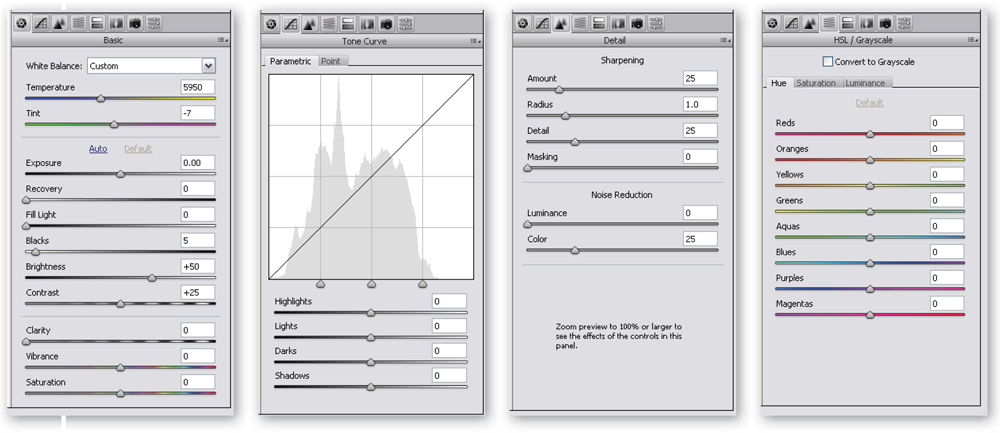
Basic: Contains white balance, tonal and color saturation controls.
Tone Curve: Both Parametric (slider based) and Point curves for non-linear tonal controls.
Detail: Houses Sharpening and Noise Reduction sliders.
HSL/Grayscale: Contains Convert to Grayscale and Hue, Saturation and Luminance controls.
The first thing that you will notice about the Photoshop version of Adobe Camera Raw is that there are more icons across the top left-hand side of the dialog box than Elements users can access. Next look to the tabbed controls on the right. In ACR4.1 there are eight different tabbed panes containing a broad range of tonal, color and sharpness controls.
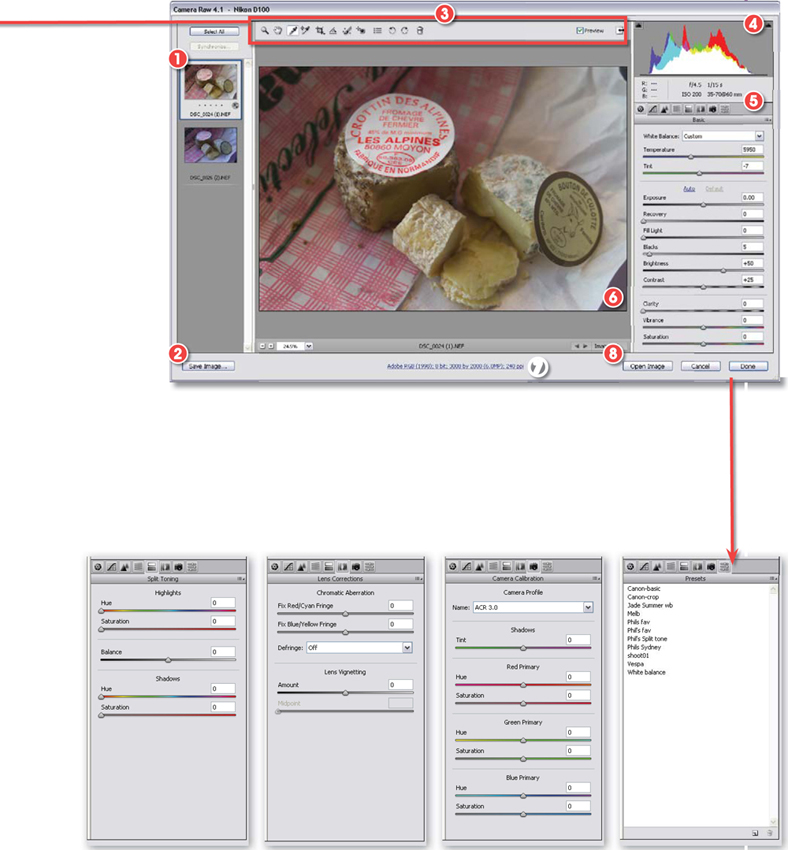
Multiple raw files can be selected and queued on the left of the dialog while they are being processed either individually or as groups via the Select All and Synchronize options.
Key ACR components:
1. Queue area
2. Save button
3. Toolbar
4. Histogram
5. Tabbed control panes
6. Preview
7. Output options
8. Output buttons
Split Toning: Combines tinting controls for Highlights and Shadows with a Balance control for the split point.
Lens Corrections: Contains controls for Chromatic Aberration, Defringing and Vignetting problems.
Camera Calibration: Includes slider controls for fine-tuning the default Camera Profi les in ACR.
Presets: Lists saved groups of settings for quick application.
The preview area
The preview area in the ACR dialog is the main way for photographers to asses the changes made to their images with the feature’s controls and tools. As such, the image in the preview space reflects all adjustments made to the file. To ensure the accuracy of some enhancements it will be necessary to get in a little closer to your files so the preview image can be enlarged or reduced in several different ways.
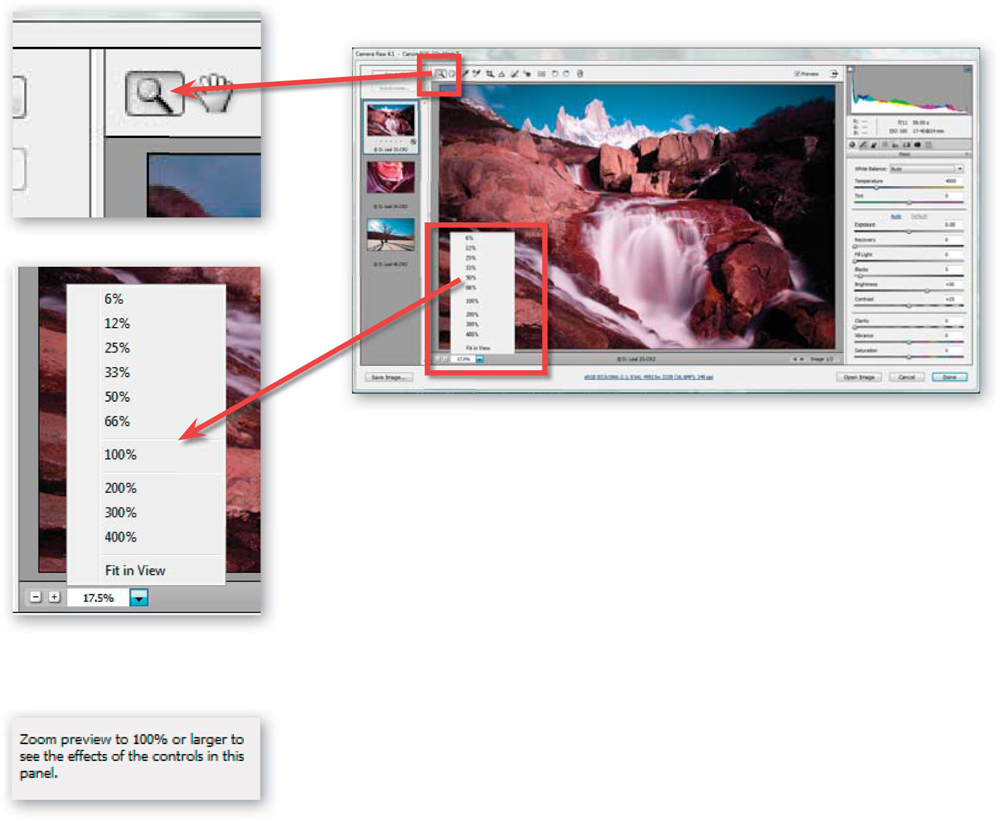
The Zoom tool can be used to draw a marquee around the area to be enlarged or double-clicked to zoom straight to 100% view. Alternatively preset zoom settings can be selected from the zoom menu at the bottom left of the dialog. The same shortcut keys that are employed in Lightroom, Photoshop and Elements can also be used here. Ctrl/Cmd + to enlarge or Ctrl/Cmd − to reduce the image size. The current zoom or magnification factor can be seen at the bottom right of the dialog.
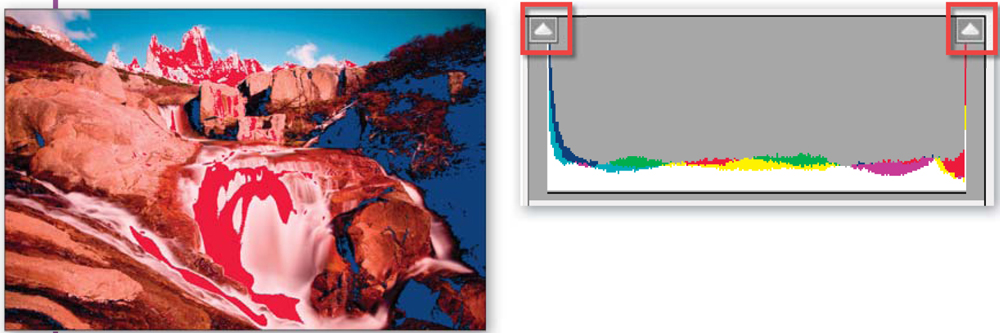
Previewing clipping
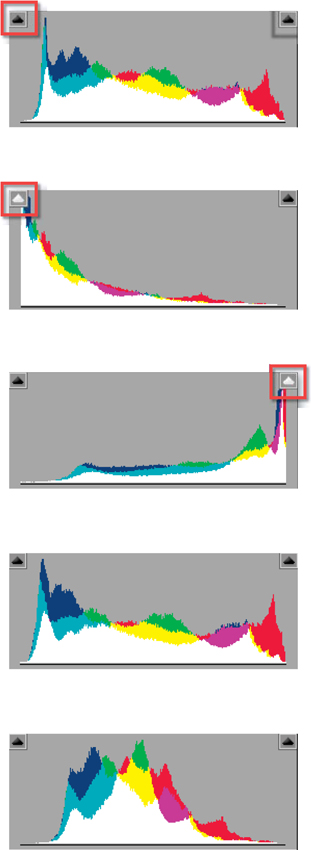
One of the critical areas of image adjustment is ensuring that any changes to tone or color don’t clip captured details in either the shadow or highlight areas of the photo. The preview image in conjunction with the histogram form a key partnership in providing this clipping feedback to the user when they are making changes to the photo. By activating the highlight and shadow clipping warnings in the histogram (click on the upwards-facing arrows in the top left, for shadows, or top right, for highlights of the histogram), areas being clipped are displayed in the preview image.
Clipped shadow details are displayed in blue and clipped highlights in red. As well as the warning in the preview image, the actual clip warning arrows in the histogram area reflect the color of the channels (red, green, blue) being clipped. If details for more than one channel are being clipped then the arrow turns white. If no details are being clipped then the arrow is black.
Histogram
The histogram provides another way to check the enhancements that you make to your raw photos. The feature graphs the spread of pixels across the tonal range from black (left of the histogram) to white (at the right end) of the photo. The height of the graph represents the number of pixels present in the image at any single tonal area in the photo. The histogram in ACR is presented in full color so that you can also see how individual color channels are distributed throughout the tonal range.
Though not as immediately accessible as the preview image as a mechanism for feedback, the histogram provides a crucial objective view of how your changes are affecting the image. Spend some time getting to know how the histogram represents different image types. Once you understand this, you will better be able to diagnose the problems in your pictures and, more importantly, the steps needed for correction.
Toolbar
The toolbar at the top of the ACR dialog houses the features used by photographers to interact directly with the photo. The list of tools available here has been steadily growing over the last few releases of the program, with the current version containing 14 entries on the toolbar.
Zoom tool
The Zoom tool, like its namesake in many other imaging programs, is designed to enlarge the preview image, enabling the user to carefully examine the appearance of key areas of the photo.
The preview area and zoom level can be selected by drawing a marquee with the Zoom tool on the preview image.
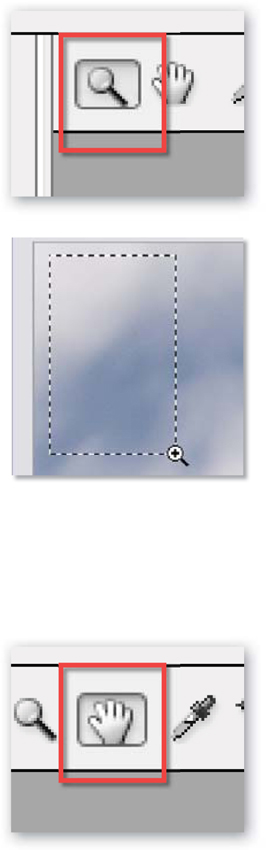
Double-clicking the Zoom tool automatically displays the photo at 100%. This is handy because this is the minimum zoom setting recommended for previewing the effects of the controls in the Detail tab. In fact, in the latest version of the ACR sharpening, noise reduction and defringing effects are only previewed at 100% or greater. You will be able to manipulate the slider controls at less magnified settings but it just won’t be possible to see the changes in the preview window. However, most photographers use the Zoom tool by click-dragging a marquee around the area to be enlarged. Once the mouse key is released the preview snaps to the selected area.
The current zoom level is indicated in the small window next to the zoom presets drop-down menu at the bottom left of the dialog.
Hand tool
The Hand tool is employed when the preview is magnified in such a way that the image extends beyond the boundaries of the preview window. Click and drag the preview to move the picture within the window. This is a handy technique to use when retouching dust spots or viewing sharpening effects across the photo.
For those readers who use shortcuts to speed up their workflow it is worth noting that holding down the space bar with the Zoom tool selected will switch the Hand tool, allowing faster navigating.
White Balance tool
The White Balance tool, along with the White Balance options in the control panel (presets, temperature and tint sliders), provide the user with a variety of ways to adjust the overall color of the photo. These features are used to correct color casts caused by capturing images under differently colored light sources. The White Balance tool is used to click on an image part that is meant to be a neutral tone (light gray) in the photo. ACR calculates the color cast of the picture part or how different the red, green, blue values are from a neutral target and then adjusts the color of the whole image to account for the difference.

Depending on the subject matter you are photographing it may be difficult to locate a neutral picture part to use as a reference for this tool. For this reason many photographers now carry a small gray card, or set of color swatches, which they insert into a scene containing mixed lighting. Next a reference picture, with the swatches included, is captured before continuing to photograph normally. Back at the desktop the reference image is balanced by clicking on the light gray swatch with the White Balance tool. The White Balance settings for this image are then saved and used for the rest of the images in the series.
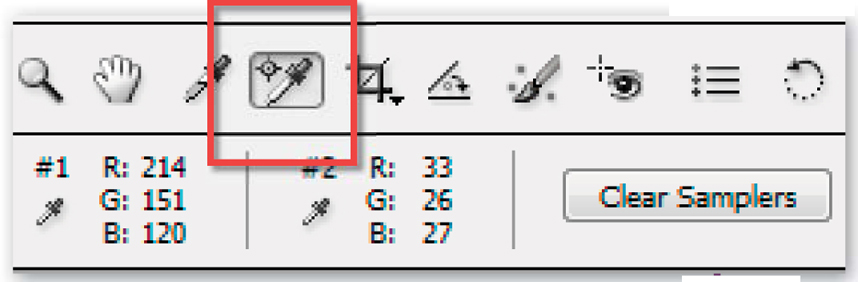
Color Sample tool
The Color Sample tool is used for measuring the red, green, blue values (RGB) of different picture parts. After selecting the tool from the ACR toolbar the user clicks onto the image area to be measured. A small target icon is added to the picture indicating the area being measured. Next, a special Sampler Bar is displayed beneath the toolbar and the values for the sampled area are listed here. Multiple samplers can be added to an image. Each sample is numbered on the image and its RGB values listed in the Sampler Bar. The samples remain active until the Clear Samples button is selected. This allows the user to make tone and color settings changes and review the resultant changes to RGB values. Using this process it is possible to customize the way that images captured under difficult lighting circumstances are processed through the ACR dialog. For more details on this technique go to Chapter 9.
Crop tool
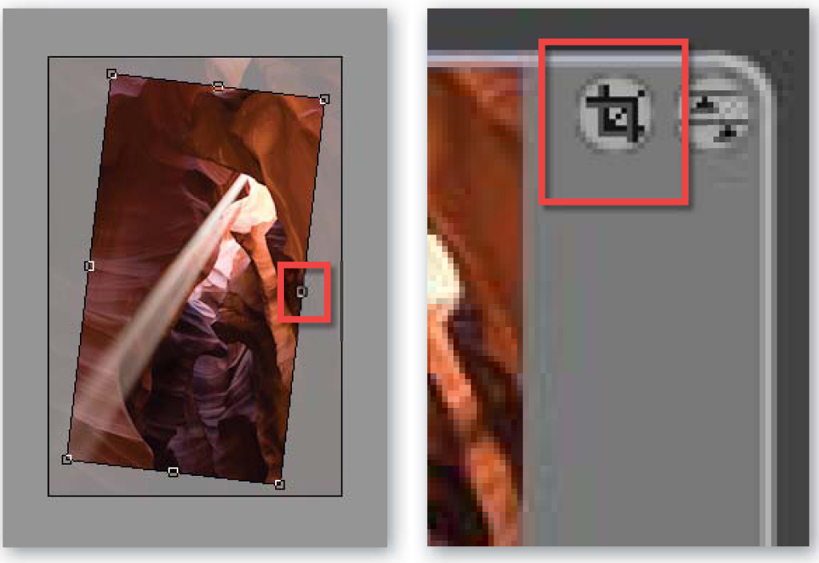
The Crop tool is a comparatively recent inclusion in the ACR dialog. With this feature it is possible to non-destructively crop your raw files. The tool works in two different modes – via a drawn marquee or with presets selected from the drop-down menu.
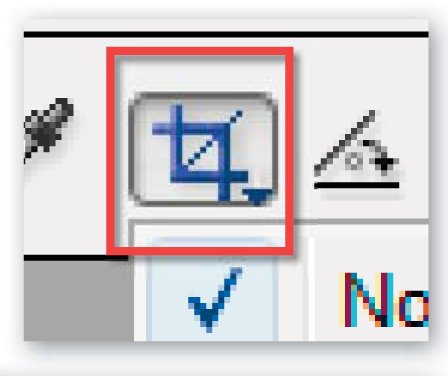
After selecting the tool click and drag the marquee around the area of the image to be retained. The shape and size of the marquee can be adjusted by dragging either corner of edge handles. It is also possible to rotate the marquee by moving the cursor outside of the marquee edge and click-drag to pivot. Upon clicking the Done button ACR applies the crop to your image and updates the thumbnail in the Bridge content space. If the rotated crop has been applied then the image is pivoted as well. Don’t be concerned though, as cropped picture parts are only removed from view and not deleted permanently. A crop icon is added to the Bridge thumbnail to indicate that the picture is not being viewed full frame.
Alternatively, you can apply a preset crop from the list available when you click the downwards arrow at the bottom right of the Crop button. You can select from a list of preset options or create your own with the Custom entry. Selecting a preset will automatically apply a crop to the image in the format selected. You can adjust the size and shape of the crop as you would normally, but if you want to resize and still retain the aspect ratio (shape) of the crop use the Shift key while dragging the corner handle.

Custom crops are applied in the same fashion except, when selecting the Custom Crop entry from the menu, you will need to enter the ratio and units that will be used for the crop, before it is applied to the photo.
To remove an existing crop, open the file in to ACR and click on the Crop tool. Next you can either hit the Esc key or select the Clear Crop option from the drop-down menu available from the Crop tool button.

Straighten tool
The Straighten tool provides an efficient way to realign cooked horizons back to horizontal. Simply click on the tool and click-drag a line along the edge that is mean to be horizontal. Let go of the mouse button and ACR will automatically rotate and crop the image to straighten the horizon.
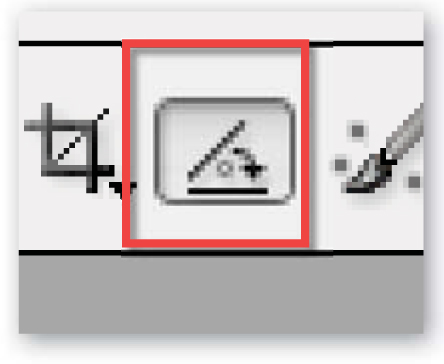
The feature works just as well on picture parts that are meant to be vertical. Simply click-drag the Straighten tool along the image edge that needs to be vertical, let go and ACR will automatically rotate and crop.
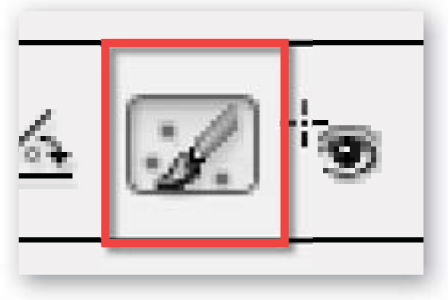
Retouch tool
Adobe included the Retouch tool in Camera Raw 4.0. Alongside the Red Eye Removal tool, the inclusion of these two new features completes the feature set for ACR, and turns the program from a processing step on the way to Photoshop into an enhancement end in itself. Now wedding, portrait, journalist, documentary, architecture and candid photographers alike can complete the majority of their enhancement tasks without ever having to leave the program.
1. Retouch tool
2. Tool tip radius size
3. Heal/Clone menu
4. Display retouching overlay or source – target circles
5. Remove all retouching edits from image
6. Retouching source – target circles
The process for using the Retouch tool borrows from both the Clone Stamp and Spot Healing brush tools that feature in Photoshop and Photoshop Elements.
The feature contains two sections: a circle that indicates the target of the retouching, which is generally placed over the mark to remove, and a circle to select the source area that will be used as a reference for the color, tone and texture that will be painted over the mark. Sound familiar? It should – this is how the Clone Stamp tool works. The difference is that with ACR’s Retouch tool, the target area is selected first by click-dragging the cursor to the size of the mark. ACR then automatically searches for a suitable source point in the nearby pixels.
For ease of recognition the target circle is colored red and the source circle is a green hue. Both circles are linked with a straight line to indicate which source belongs to which target.
For the majority of the time ACR does a pretty good job of selecting a source point, but there will be occasions when you may want to choose your own. This is a simple matter of click-dragging the source circle to a new location. The same technique can be used for moving the target circle. To change the target size use the Radius slider in the tool’s options bar at the top of the dialog. Holding down the Alt/Option key while clicking on the target circle deletes or cuts the retouching entry.
Heal or Clone: The tool works in two modes – Heal and Clone. The Heal mode uses the technology found in the Spot Healing Brush to help match texture and tone of the source area to the target surrounds. The Clone option gives more weighting to the specific qualities of the source area when over-painting the mark.
Step by step
1. Start the process by ensuring that the preview window is enlarged to at least 100%. Select the magnification level from the pop-up menu on the bottom left of the dialog. Viewing the image zoomed in helps guarantee accuracy when specifying both target and source areas and presents a more precise preview of the results. Switch to the Hand tool using the H keyboard shortcut, to click-drag the preview area around the photo. You can switch back to the Retouch tool by pressing the letter B key.
2. Now drag the preview until you locate an area to be retouched. Select the Retouch tool from the ACR toolbar at the top of the dialog. By default the tool draws from the center, so move the pointer over the middle of the mark and click-drag the circle until it encompasses the blemish. This action sets the red target circle or the area to be retouched.
3. Unlike the situation with the Clone Stamp or Healing Brush tools there is no need to select the sample area separately. Adobe Camera Raw automatically searches the surrounds of the target area for a likely source and draws a corresponding circle attached with a single straight line. The source circle is colored green to distinguish it from the red target circle. If the source circle has been positioned incorrectly or is providing less than acceptable results in the target area then simply click-drag the circle to a new location.

4. Once the target and source have been positioned, the retouching entry can be modified in a couple of different ways. The size of the target circle can be adjusted by clicking onto the circle and then changing the radius setting in the tool’s options bar. The mode used for retouching can be switched between Heal (the technology used by the Spot Healing Brush) and Clone (which simulates the way that the Clone Stamp tool functions) using the drop-down menu in the bar.
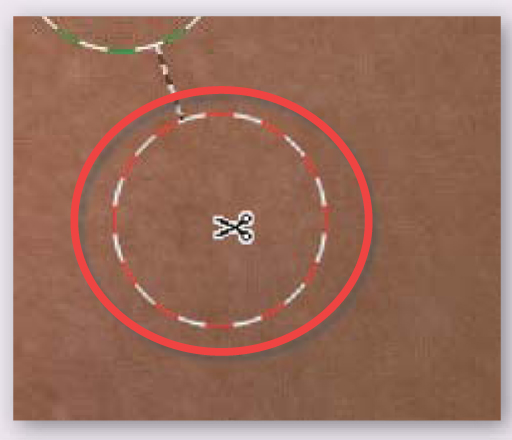
5. Individual retouching entries can be removed or deleted altogether by cutting the entry. With the Retouch tool selected, hold down the Alt/Opt key while positioning the cursor over either the source or target circles of the retouching entry. The cursor will switch shapes to a pair of scissors (see aside). Clicking the mouse button will then delete the entry.
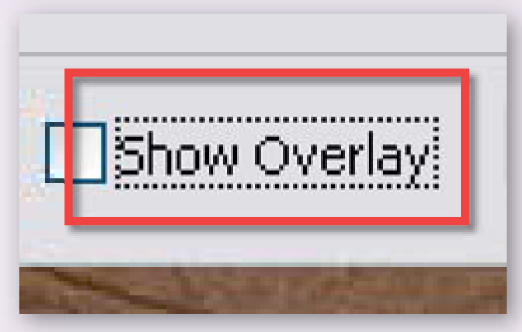
6. Once you have positioned and adjusted all retouching entries for a given image you can preview the results, without the target and source circles, by de-selecting the Show Overlay setting in the tool’s options bar. To re-display the circles, reselect the option.
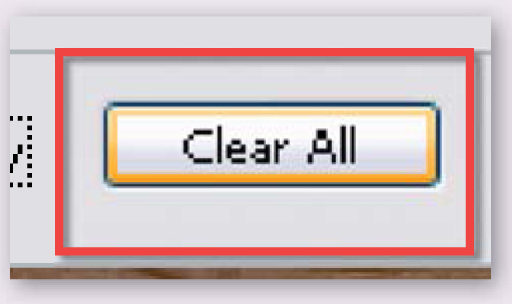
7. As all retouching entries created in Adobe Camera Raw are non-destructive they can be removed at any time, even if the file has been saved and reopened (as a DNG file). To remove all retouching entries for the current image, select the Clear All button in the Retouch tool options bar.
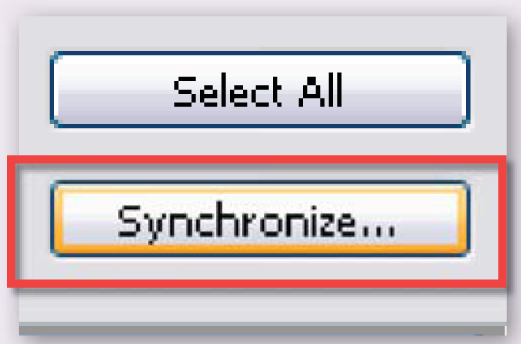
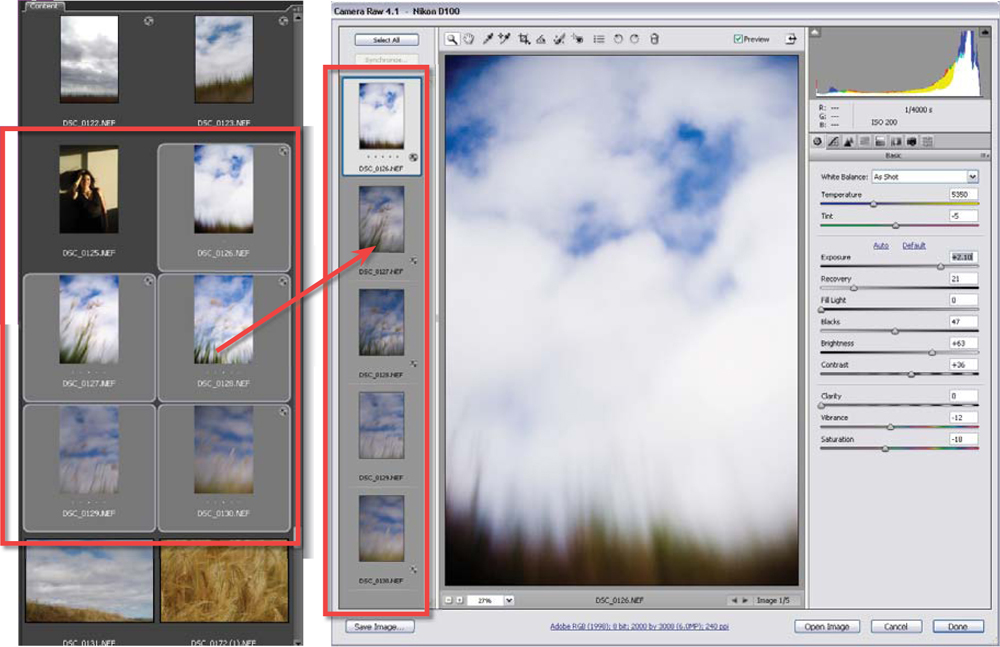
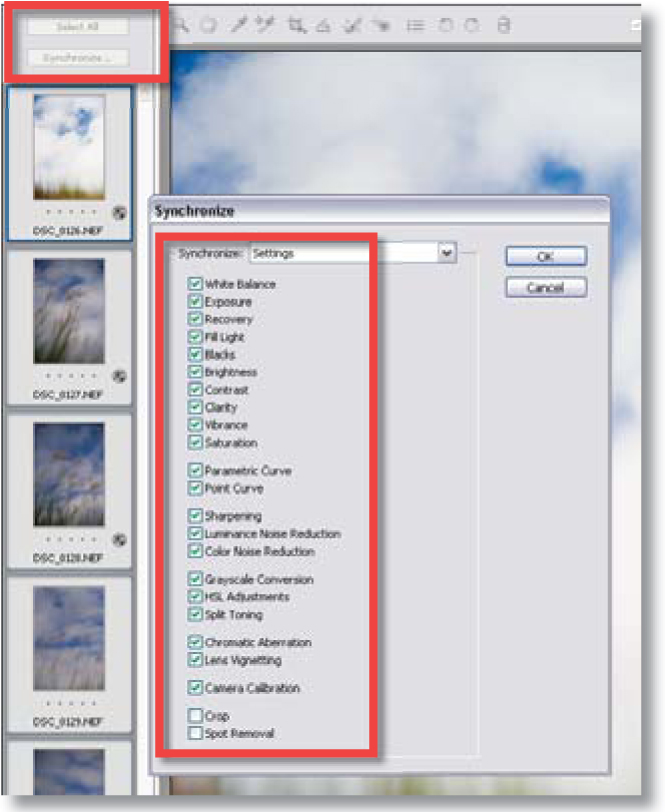
8. Synchronization of settings across a group of raw files being processed in ACR was a feature introduced in Photoshop CS2. After multi-selecting several images in Bridge and opening them in Adobe ACR, the pictures are listed vertically as thumbnails along the left-hand side of the dialog. Selecting more than one of these files (by holding down Shift or Ctrl/Cmd and clicking a second thumbnail) makes the Synchronize button at the top of the dialog active. Pressing the button will display the Synchronize window (left), allowing you to select which enhancement settings to copy from the current image to the others selected in the thumbnail list.
From ACR 4.0 the Synchronize list also includes a Spot Removal option, allowing users to copy Retouch tool entries from one picture to another. Though not all that useful in the example demonstrated here, this synchronize option is a godsend for photographers struggling with removing sensor dust from the same position in every image. ACR is so clever that it even accounts for changes in camera orientation when it is applying synchronized spot retouching.

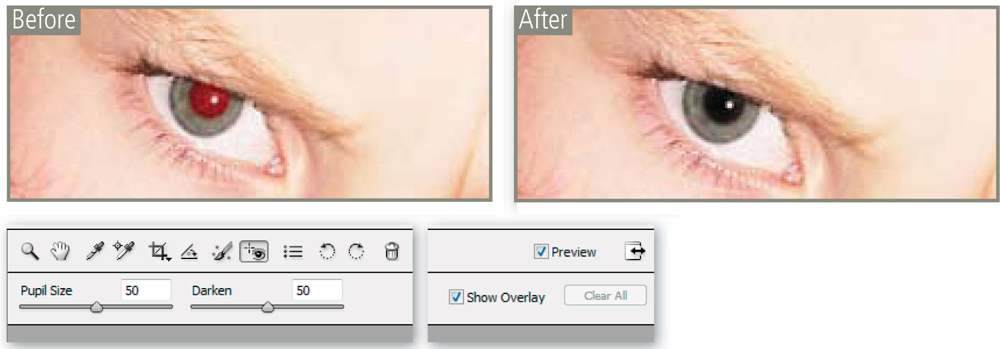
Red Eye Removal
From version 4.0 of Adobe Camera Raw the utility included a Red Eye Removal tool. The feature works in a similar way to the Red Eye tool in Photoshop proper. After selecting the tool, click-drag a marquee around the red eye to replace the color with a more realistic dark gray. The Pupil Size and Darken sliders can be used to fine-tune the results if the initial correction is not successful.
It is important to note that the changes made with the Red Eye Removal and the Retouch tools in ACR are non-destructive and can be removed at any time by selecting the Clear All button in the options bar.
Open Preferences Dialog
The Open Preferences Dialog button located on the ACR toolbar displays the same settings dialog as when you select Edit > Camera Raw Preferences inside Bridge. The options listed here control the way that ACR behaves. Entries include:
Save image settings in – Here you can choose between saving the conversion or Develop settings you use with your raw files to XMP-based sidecar files or a centralized database. If your images are only ever enhanced on a single machine with the same software then the central system is a good choice. If your image library is accessed by multiple machines using different workflows and associated software then XMP files will be a better choice.
Apply sharpening to – Select whether to apply sharpening to all images or just the previews.
Apply auto tone adjustments – Set the Develop settings to apply the auto option by default when first bringing the photo into ACR. The auto option in the latest version of ACR determines settings based on the characteristics of individual photos.
Apply auto grayscale mix when converting to grayscale – This option instructs ACR to examine the content of the photo being converted to grayscale and automatically determine the manner in which colors are mapped to gray. Again this is on an image-by-image basis.
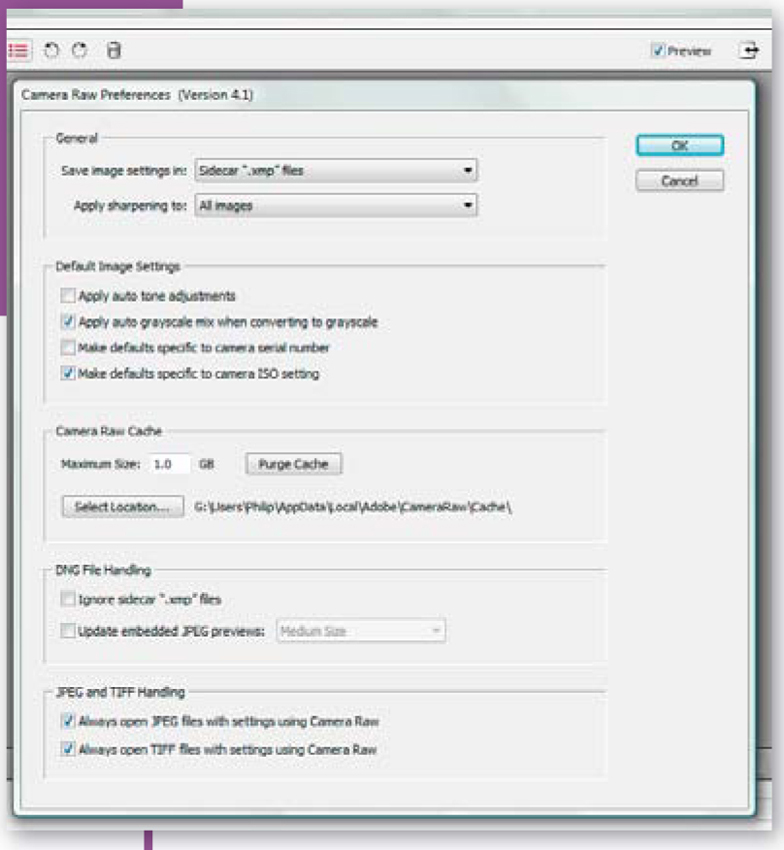
Make defaults specific to camera serial number – Saves any fine-tuning of the way that ACR handles files for specific cameras rather than more generically for models. This setting is handy for specialized circumstances where images from multiple cameras of the same model type are processed via ACR.
Maximum size of Camera Raw cache – Determines the maximum size of the preview cache used by ACR.
Purge cache – Deletes the current system-wide camera raw cache.
Cache location – Sets the location of the camera raw cache.
Ignore sidecar files for DNG – When opening existing DNG files this setting instructs ACR to ignore any settings contained in associated sidecar or XMP files.
Update embedded JPEG previews for raw files – Automatically updates the JPEG previews attached with DNG files when opening. You can also select the size of these previews from the drop-down menu listed here.
Always open JPEG files with settings using Camera Raw – Displays JPEG files with any associated ACR settings previously saved.
Always open TIFF files with settings using Camera Raw – Displays TIFF files with any associated ACR settings previously saved.
Note: For the first time in ACR 4.0 both JPEG and TIFF files can be opened and enhanced in the program. When hitting the Done button the ACR Develop settings are applied to the files just as they are for raw. If the two last settings are not selected then the ACR settings are ignored when the files are opened directly into Photoshop.
Rotate image 90° CCW or rotate image 90° CW
The rotate buttons provide a quick way to reorientate images that have been shot vertically but appear as horizontals. This is less of a problem nowadays as most raw-enabled cameras also have the ability to recognize and record the orientation used for picture taking. This information is stored in the metadata of the photo and used at the time of import to correctly orientate the image.
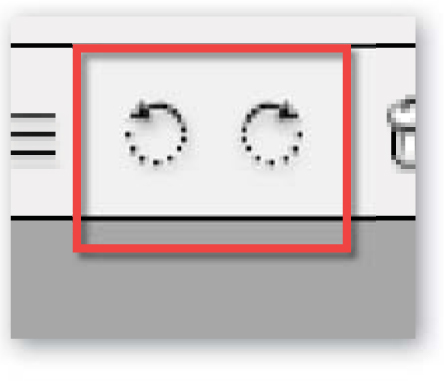
Both buttons rotate the image in full 90º steps, one working clockwise, the other counter-clockwise. For rotating photos in steps other than 90º, draw a marquee first with the Crop tool and then rotate the marquee by dragging the cursor outside the boundaries of the marquee.
Toggle Mark for Delete
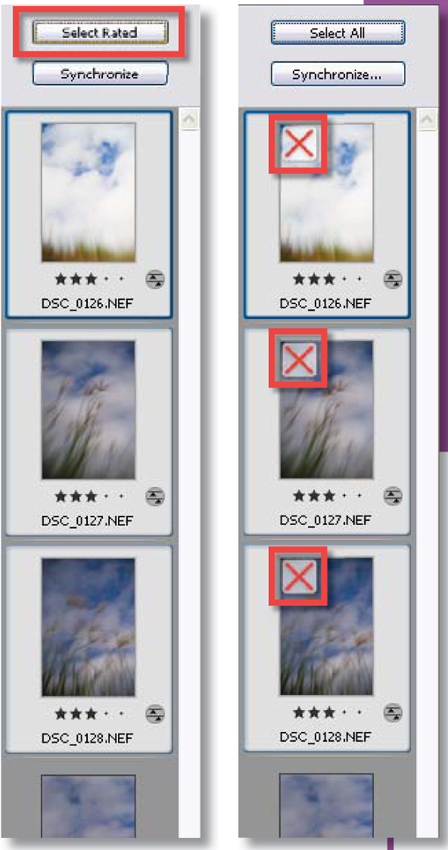
There are a range of simple editing options available to the user when several images are listed in the queue area of the ACR dialog. These include the Select All, Select Rated, Synchronize and Mark for Delete features.

The Toggle Mark for Delete button adds, or removes, a deletion red cross from the top right-hand corner of the image thumbnail. When marked for deletion images are automatically moved to the Trash when the ACR dialog is closed. Because this is akin to hitting the Delete key it is important to be very careful when using this feature.
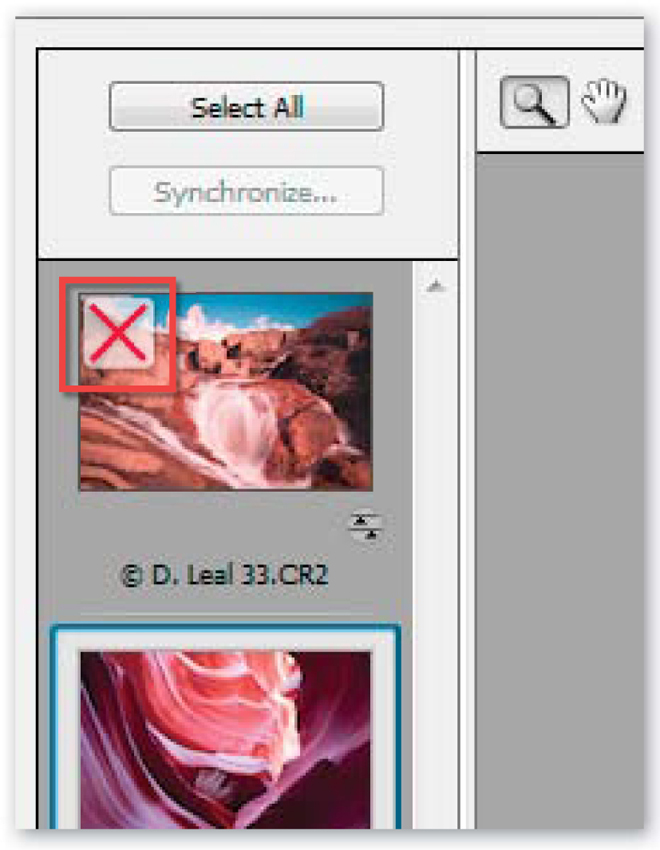
To add a deletion red cross to any image, select the picture from the queue group and click the Toggle Mark for Delete button. To remove the cross, click the Toggle button a second time with the same image selected.
The Toggle Mark for Delete button only appears on the ACR toolbar when multiple images are queued on the left of the dialog.
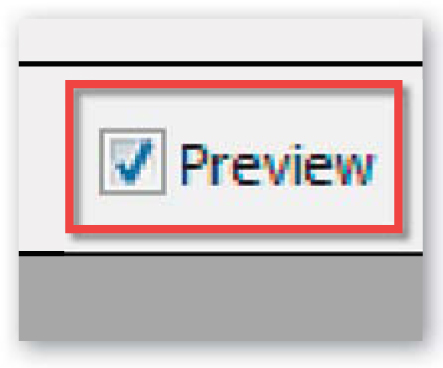
Preview
The Preview checkbox located on the right-hand end of the ACR toolbar controls if the settings currently selected are applied and displayed in the preview image. Unchecking the Preview option means that any changes made to the slider controls will not be seen in the preview image. This setting should always be checked by default.
Toggle Full Screen
New from the 4.0 version of Adobe Camera Raw is the ability for the dialog to be enlarged to full screen mode. Until this edition the utility was only available for display in a floating window version.
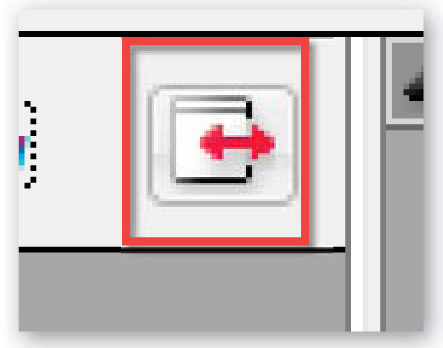
Clicking the Toggle Full Screen button will enlarge the ACR dialog to full screen. The larger dialog means that the preview area is much bigger, leading to less need for zooming to check details in the photo. Click the button again to reduce it back to its original size.
Tabbed control panes
The right-hand side of the ACR dialog contains the histogram at the top of the screen and then a series of tabbed panes underneath. It is the controls grouped in these panes that allow users to enhance their raw files. From version 4.0 the number of panes has been increased from five to eight. Let’s look at each in turn.
Basic (formally Adjust)
The controls in this pane can be broken down into three main sections – white balance, tonal and color controls. The controls are sequenced so that users work their way from the top of the pane to the bottom to enhance their photos.
The Basic tab contains the main controls that you use for enhancing the tones and colors in your raw photos.
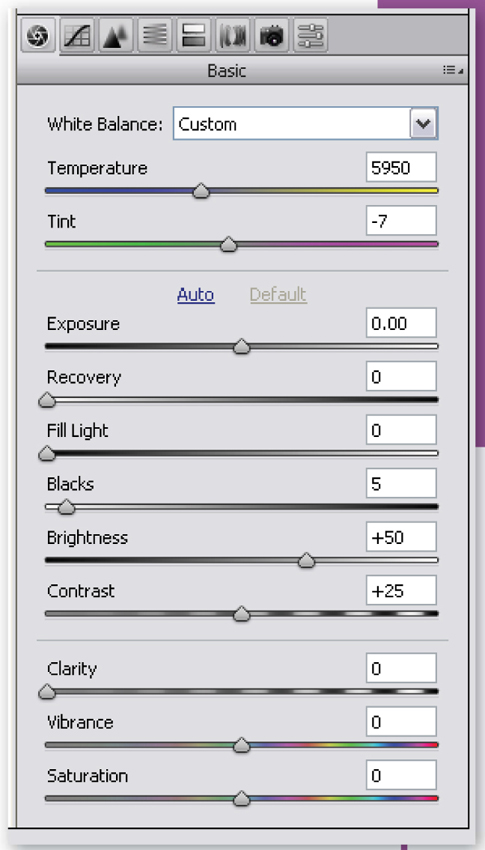
White Balance controls – The White Balance menu provides a range of preset options that duplicate those found in your camera. As the raw file doesn’t have a fixed white balance you can select a different option here than the one set on your camera. If you need a little more control then the Temperature and Tint sliders allow for white balance fine-tuning. The Temperature slider values are measured in kelvin, a measure of the color of light. So if you know the color temperature of the light source then match this slider to the light source value. In the absence of this information move the Temperature slider to the left to account for yellow casts, or a warm light source, or to the right for blue casts, or a cool light source. The Tint slider works with magenta and green casts and is typically used for neutralizing casts associated with fluorescent light sources.
The Temperature slider is used to adjust the balance between yellow and blue in the photo and is linked to an incremental scale called degrees kelvin which is a photographic measure of color temperature. The Tint slider balances the magenta/green light in the image and is typically used to eliminate color casts caused by fluorescent strip lighting.

Tone controls – Below the white balance controls are six sliders that are used for adjusting the tones of the photo.
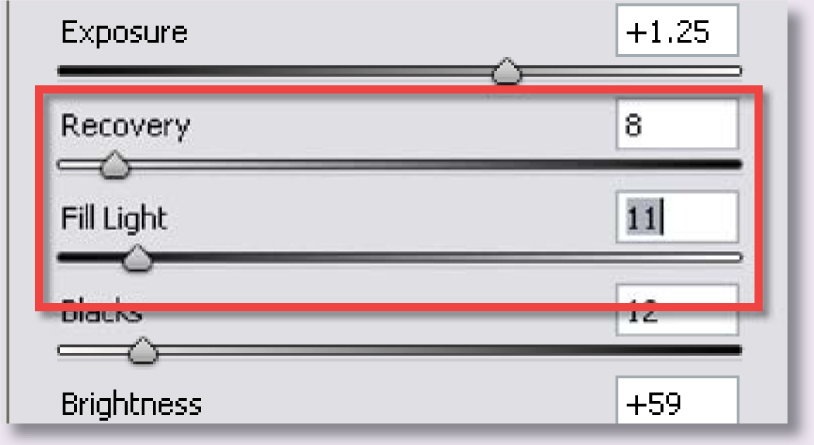
Exposure is used to alter the brightness of all the tones. Make sure that highlight clipping warning is activated before using this control. Moving the slider to the right pushes tonal detail towards the right end of the histogram. For best results move the slider to the right until you see the first pixels being clipped and back the control off a little so no tones are clipped. This sets your highlights.
Tonal controls and auto function.
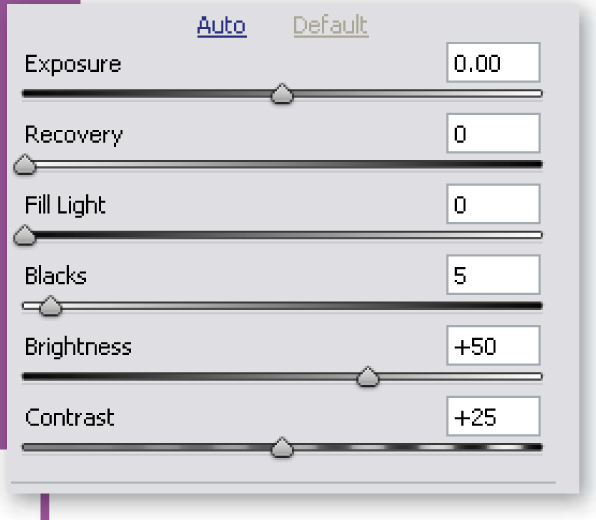
The Recovery and Fill Light controls are new for the latest version of ACR. The Recovery slider attempts to rebuild any highlight detail that has been clipped in-camera. It does this by using detail in any non-clipped channels. As long as detail remains in two of the three channels then the slider can reconstruct the highlights. The Fill Light slider concentrates the changes it makes to the darkest tones in the picture. The control can lighten detail normally hidden in the shadow area. Both of these controls should be used carefully as over-application can make a picture look dull and lacking in contrast. Too much Fill Light application can also produce the appearance of halos.
Pro’s tip: For quick indications of clipping hold down the Alt/Opt key while moving the Exposure or Blacks sliders.
The Blacks slider adjusts the point at which image detail is converted to pure black. Make sure that the clipping warning is activated before using this slider. Like the Exposure slider the best way to use this control is to move it to the right until you start to see clipping and then pull the slider to the left slightly until no clipping is present. This action sets the black point of the photo.
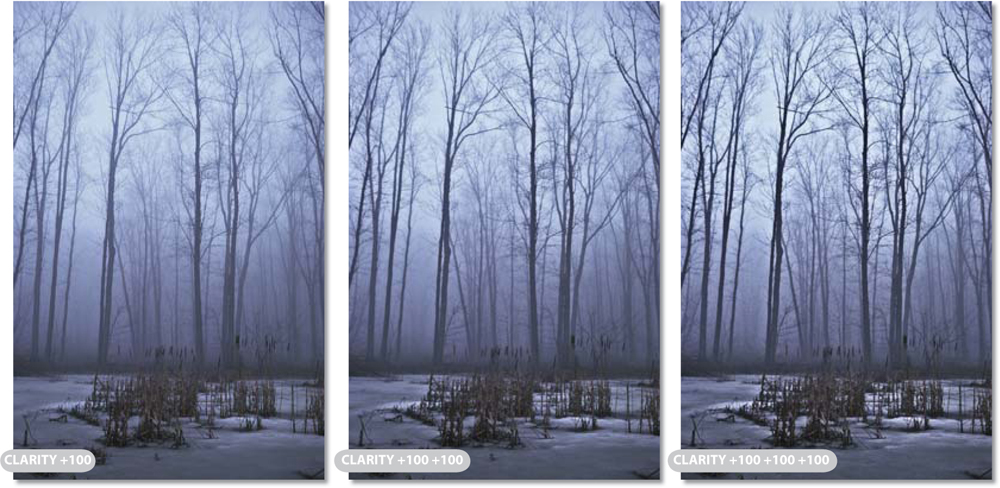
The 0–100 Clarity scale will provide enough range for most local contrast changes. For those occasions when substantial alterations are necessary, you can always apply the effect, save the image as a TIFF file (this applies the development settings), re-open the photo in Adobe Camera Raw and then apply the effect again. Be careful though, as this method removes the possibility of retracing your steps and undoing the effect if the changes prove too strong.
The Brightness control makes the midtone values of the image brighter (slider movements to the right) or darker (movements to the left) without unduly affecting the black or white points of the photo.
The Contrast slider controls the contrast or spread of tones in the image. Increasing the contrast, moving the slider to the right, will spread the image tones towards the extremes of the histogram. Decreasing contrast bunches the pixels around the middle of the graph, making the image appear flat.
It is a good idea to keep the clipping warning features active when making all the tonal changes listed here. Even though the Exposure and Blacks sliders are primarily responsible for ‘pegging’ or establishing the white and black points of the photo, it is possible that some readjustment to these points may be necessary after alterations made with the other tonal sliders.
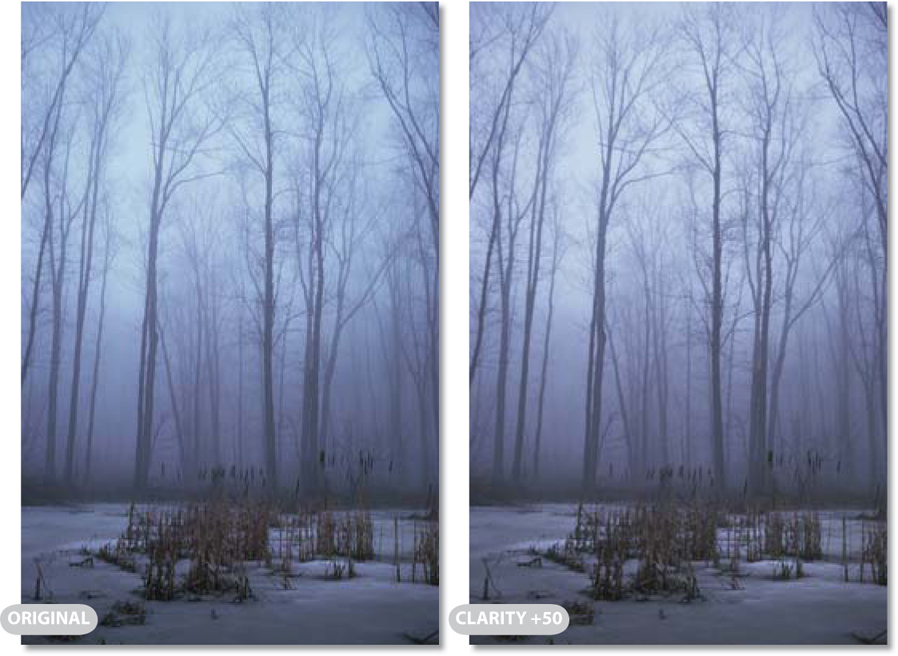
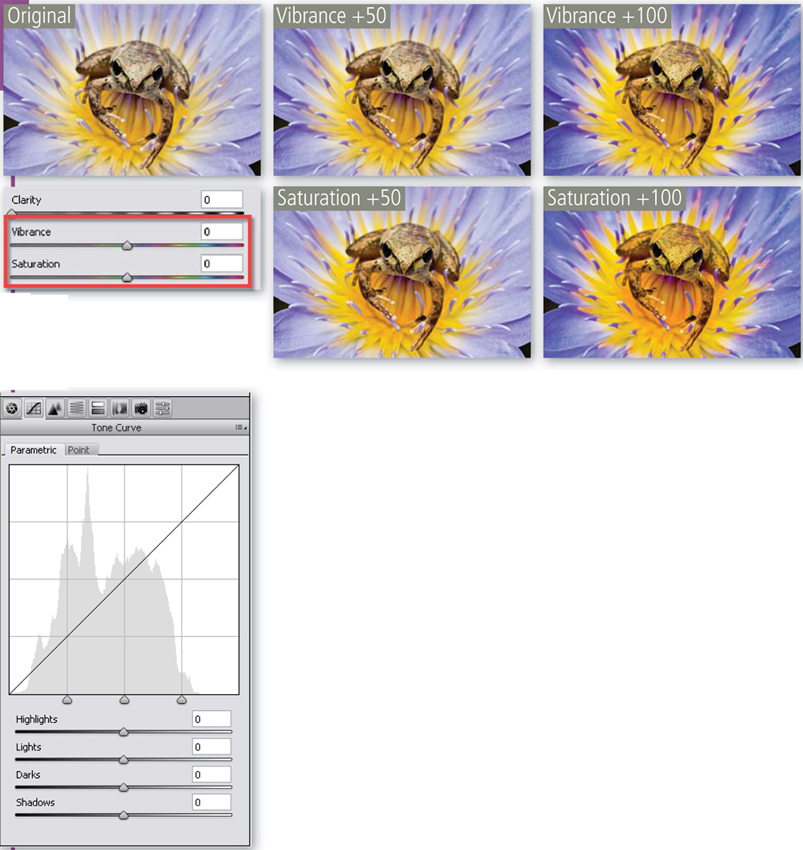
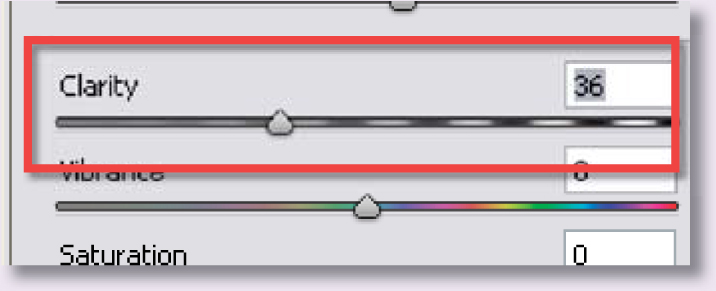
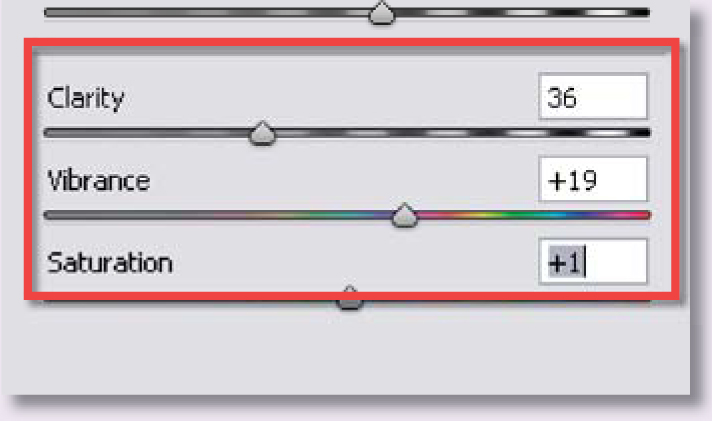
Color controls – The last section of the Basic pane contains three controls – Clarity, Vibrance and Saturation. Clarity and Vibrance are new additions to the group. The Clarity control adds local contrast to images shot under flat lighting conditions or when the subject comprises of very similar tones.
The Vibrance slider, like the Saturation control, increases the vividness of the colors in photos but applies the changes selectively to only those hues that are destaurated in the first place. This means that the slider targets the more pastel tones and doesn’t boost those colors that are already rich vibrant. In addition, the Vibrance slider tends to safeguard skin tone when it is applied.
In contrast the Saturation slider increases the saturation, or vividness, of all the colors in a photo irrespective of their original value. These factors make the Vibrance slider perfect when working with portraits or photos where selective adjustment is needed. The Saturation slider, on the other hand, is very useful for bumping the color of the whole photo up a few notches.
Tone Curve (formally Curve)
The Tone Curve feature provides the user with the ability to manipulate tones in a non-linear fashion. Experienced film aficionados often find working with a curves-based control easier to understand than a series of sliders that operate on specific tonal ranges. Well, in the latest version of the ACR curves control users are spoilt for choice. The feature now contains two distinct modes – Parametric and Point.
The Parametic option breaks the curve into four tonal areas – highlights, shadows, lights and darks – and then provides slider controls to alter each range of tones independently. Unlike the standard curve mode (or Point mode as it is called here) the user doesn’t change the spread of tones in the picture by directly pushing or pulling the curve; instead the sliders are used to change the curve shape.
You can also refine the adjustments by altering the position and range of the tonal quadrants via the three sliders directly under the curve graph. This allows the user to spread or reduce the range of tones for each of the four tonal groupings.
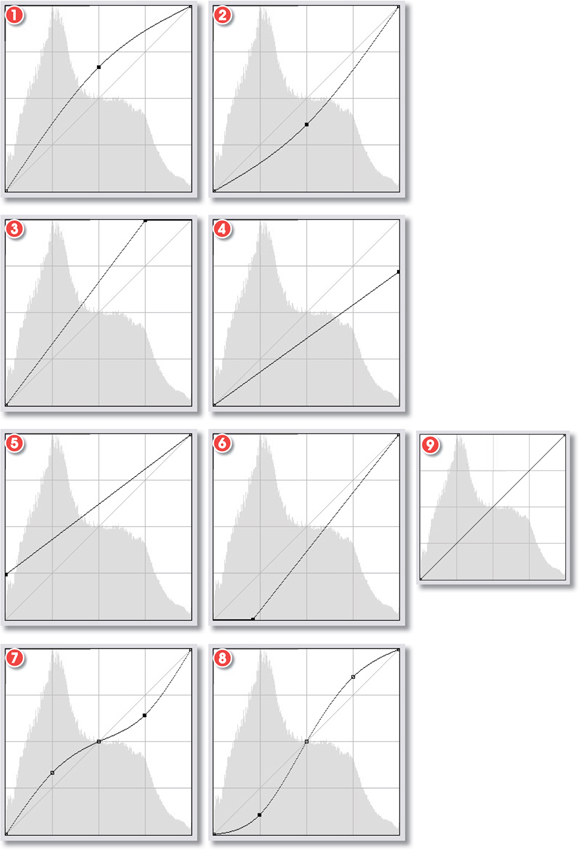
The shape of the curve determines how the tones are distributed within the photo. To produce the following standard enhancements replicate the curve shapes you see here by click-dragging points on the curve.
1. Lighten midtones.
2. Darken midtones.
3. Lighten highlights.
4. Darken highlights.
5. Lighten shadows.
6. Darken shadows.
7. Decrease contrast.
8. Increase contrast.
9. Default or Linear curve.
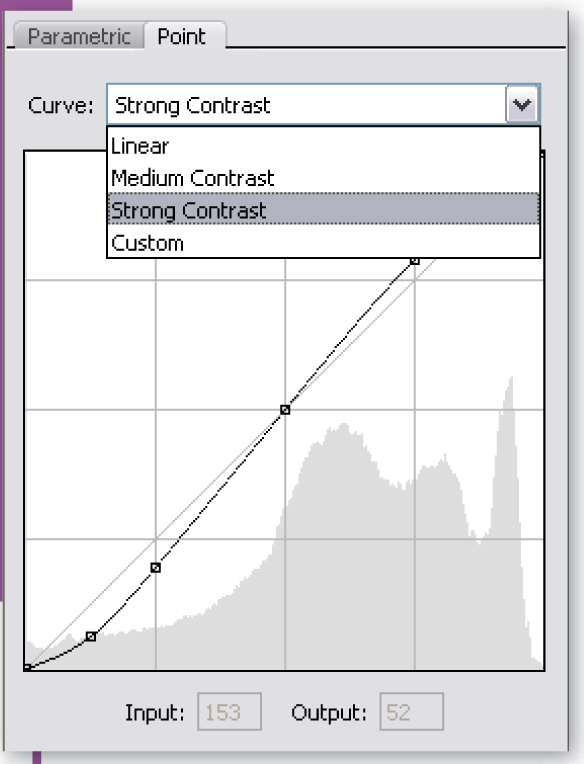
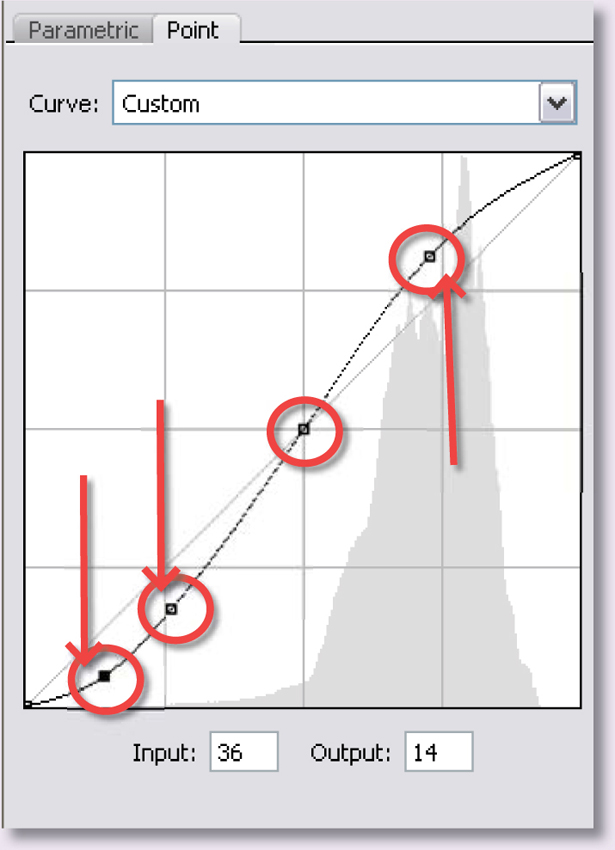
The Point mode in the Tone Curve works in a much more traditional manner, allowing you to push and pull the shape of the curve around via a series of control points. The points are added to the curve by clicking onto the curve line. The number and position of the points will affect how the curve bends and deforms when it is repositioned. Most photographers use the control points to establish key tonal areas around which the changes will pivot. As well as providing free form manipulation of the curve, the Point dialog also contains a drop-down menu containing popular curve manipulation options.
To help with making informed decisions about tonal changes via the curves control, Adobe has shadowed a luminosity (detail) histogram in the background of the dialog.
Detail
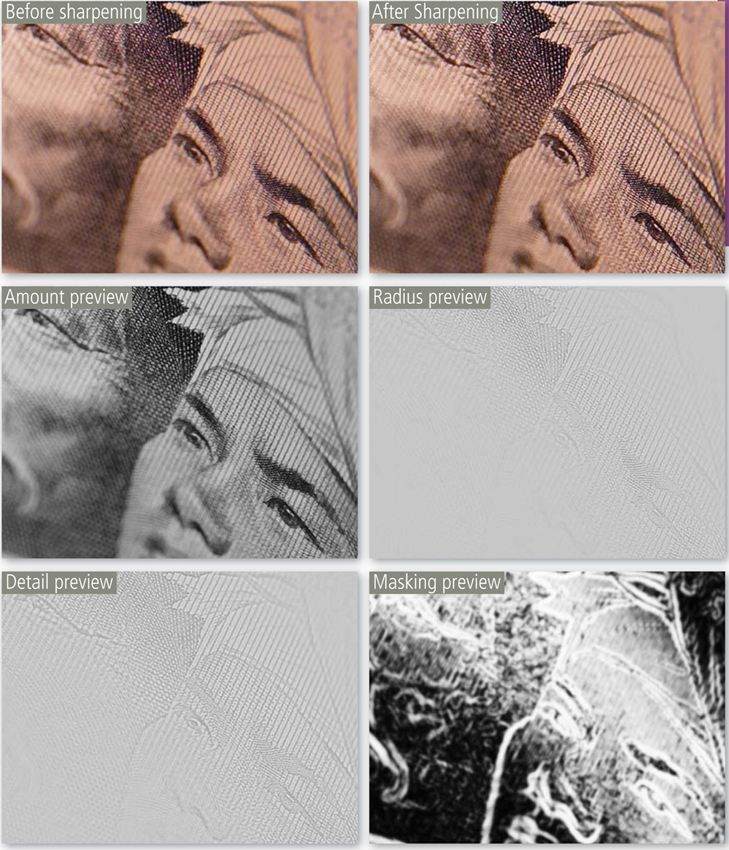
In the latest version of ACR the sharpening controls have been increased to four from a single slider a couple of versions ago. Where originally users were only able to control the Amount of sharpening, now it is possible to manipulate where the effect is applied. Sharpening effects are controlled via the following sliders – Amount, Radius, Detail and Masking.
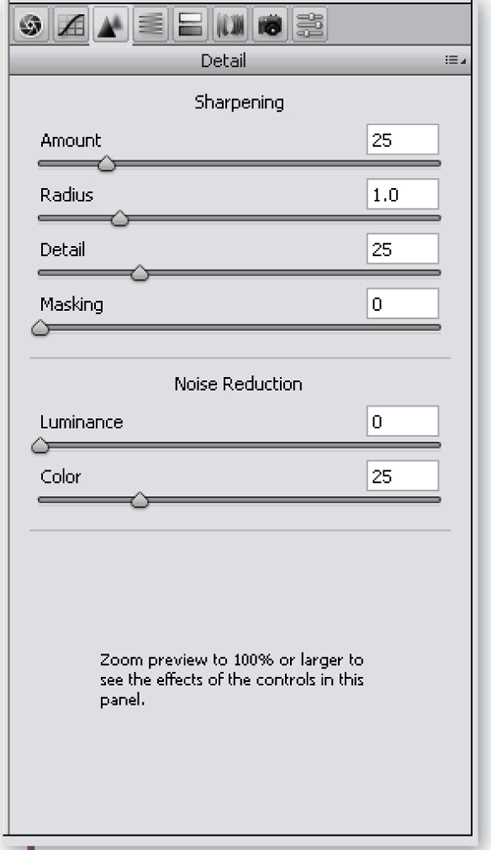
The Amount slider controls the strength of the sharpening effect. Move the slider to the right for stronger sharpening, to the left for more subtle effects. The Radius slider determines the number of pixels from an edge that will be changed in the sharpening process. The Detail slider is used to increase the local contrast around edge parts of the picture. Doing so makes the picture’s details appear sharper. The Masking control channels the sharpening effect through an edge locating mask.
Both the Detail and Masking sliders are used to target the sharpening more precisely in the image. Increasing the Detail value will raise the local contrast around smaller picture parts. Reducing the value will decrease the appearance of halos around these areas. Moving the Masking slider to the right gradually isolates the edges until the sharpening is only being applied through the most contrasty sections of the photograph.
With the preview at 100% magnification, holding down the Alt/Opt key will display different previews for each of the Sharpening sliders. The preview for the Amount slider shows the sharpening applied to the luminosity of the image. Both Radius and Detail sliders preview the value of the slider and the Masking option displays the mask being used for restricting where the sharpening is being applied. Remember the black areas of the mask restrict the sharpening and the light areas allow the sharpening to be applied.
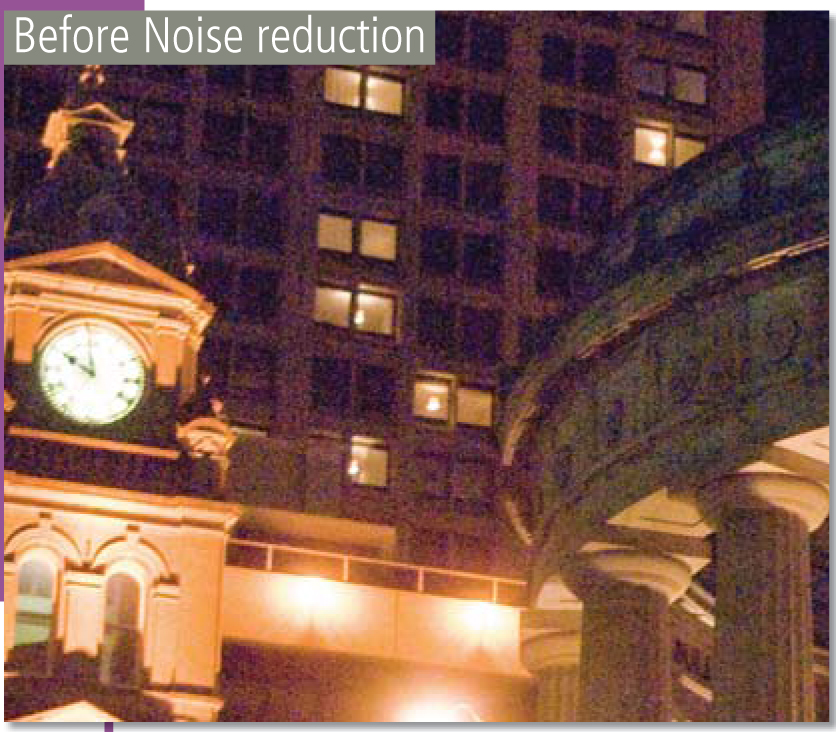
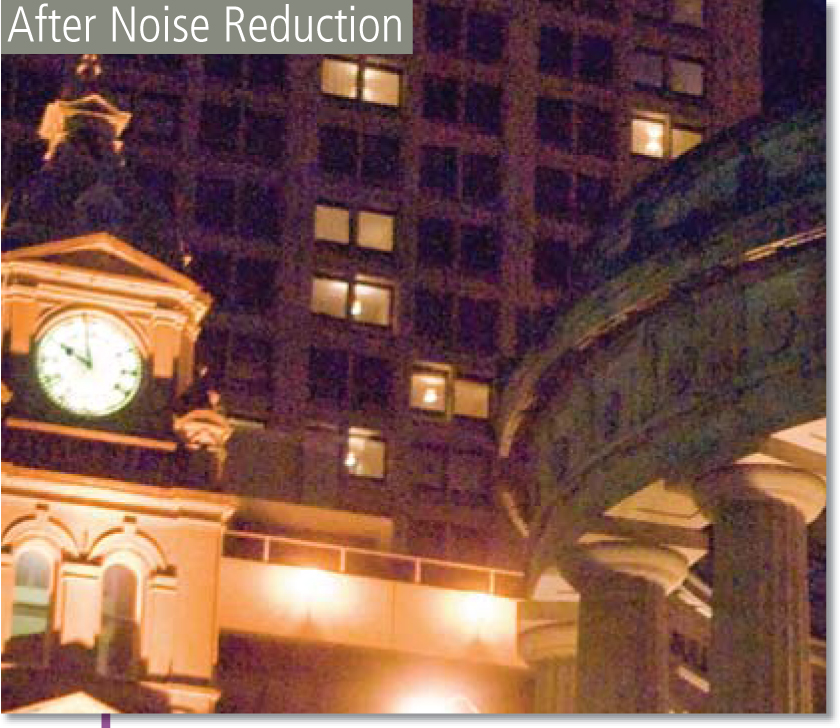
The next section in the Detail pane contains two controls for dealing with the noise in a raw image. Titled Luminance and Color, each slider deals with a different type of noise issue.
The Luminance slider concentrates on the grayscale, or ‘grain-like’, noise in the image. The control attempts to remove this spotiness from the photo while still maintaining edge detail in the photo. In contrast, the Color slider works on removing the random red, green and blue pixels that appear in photos taken with a long exposure or high ISO setting. Don’t expect these controls to turn an unusable 3200 ISO photo into an image that looks like it has been captured with the 200 ISO setting, but they are capable of noticeable noise reduction in problematic images.
In the latest revision of ACR, the design team took the opportunity to tweak the noise reduction algorithms. Though the effects are not as dramatic as those possible via other methods (see the noise reduction section in Chapter 12), the changes are definitely an improvement.
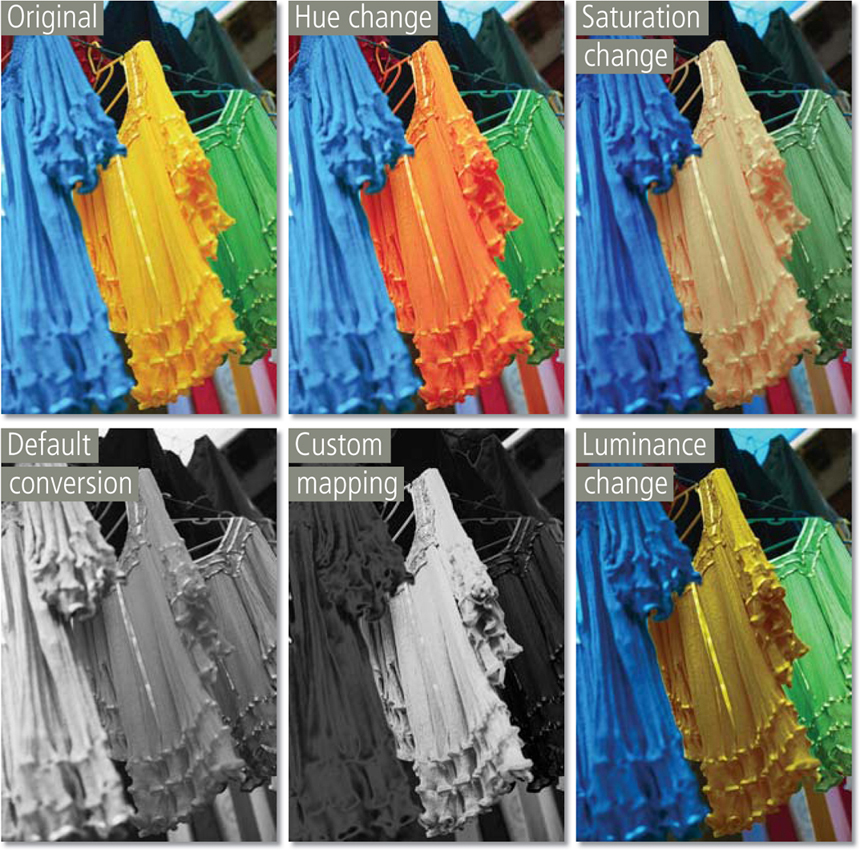
HSL/Grayscale
Drawing inspiration from the type of features that we have seen in Photoshop Lightroom, the sliders here provide control of the Hue, Saturation and Luminance of each color group (red, orange, yellow, green, aqua, blue, purple and magenta) independently.
This is a great improvement over what was available previously, when color changes were limited to red, green and blue channel-based divisions and saturation control.
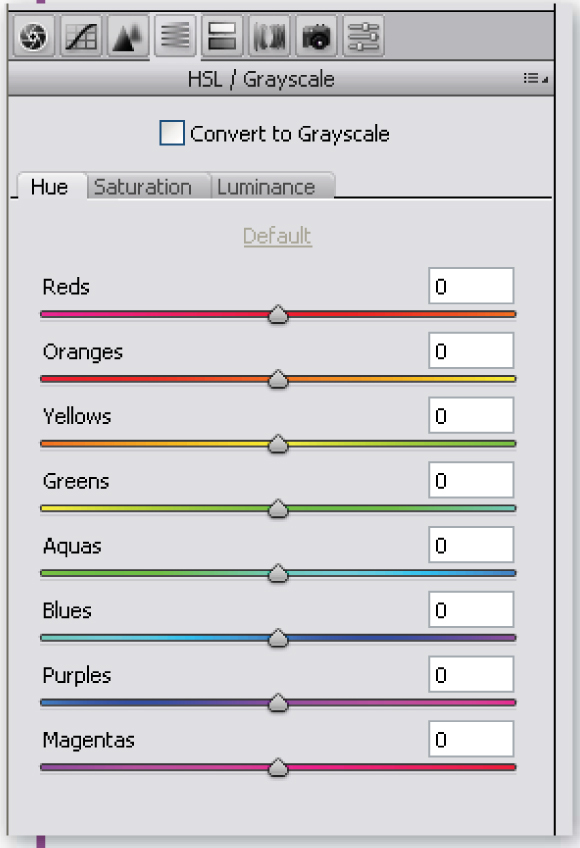
Hue – The Hue tab in the HSL control provides the ability to tweak the flavor of a specific color range. Unlike the drastic changes brought about by the Hue control in Photoshop’s Hue/Saturation feature, the sliders here manipulate the color of a selected color within a given range. The Reds slider, for instance, moves from a magenta red through to a pure red to an orange red. Moving this slider would enable the fine-tuning of just the reds in a photo between these limits.
Saturation – The Saturation control provides the ability to customize the saturation of not the whole image as is provided with the Saturation slider in the Basic pane, but a specific range of colors.
Luminance – The third tab in the HSL control deals strictly with the luminance of specific colors. With the sliders grouped here it is possible to change the brightness of a color grouping, which can translate into altering the color contrast in a photo by selectively increasing and decreasing the brightness of opposite hues.
Grayscale – By clicking the Convert to Grayscale option the feature changes to provide a method for creating custom mapping of the same color groupings to gray. Using this control it is possible to restore contrast to a grayscale conversion when the colors in the photo have translated to similar tones of gray, producing a low-contrast monochrome.
Split Toning
Monochrome printers can now rejoice as the addition of this feature means that you can tone highlights and shadows independently with the included Hue and Saturation sliders. Hue controls the color of the tint and Saturation its strength. Holding down the Alt/Opt key while moving either of the Hue sliders, will preview the tint at 100% saturation, allowing for easier selection of the correct color. To understand how the Hue slider works imagine the control moving progressively through the colors of the rainbow from red, through yellow, green and blue to purple and magenta.
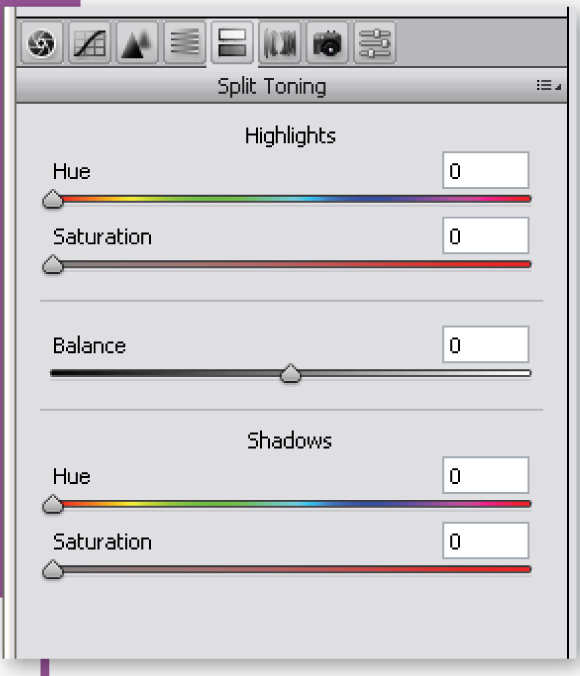
Also included is the Balance slider, which provides the ability to change the point at which the color changes. Movements to the right push the split point towards the highlights, whereas dragging the slider to the left means that more mid to shadow areas will be colored the selected highlight hue.
To use split toning with a monochrome image you must make the conversion to grayscale first. Do this by selecting the Convert to Grayscale option in the HSL/Grayscale pane first. Then move back to the Split Toning pane and adjust Highlight and Shadow Hue and Saturation and then the Balance point to suit.
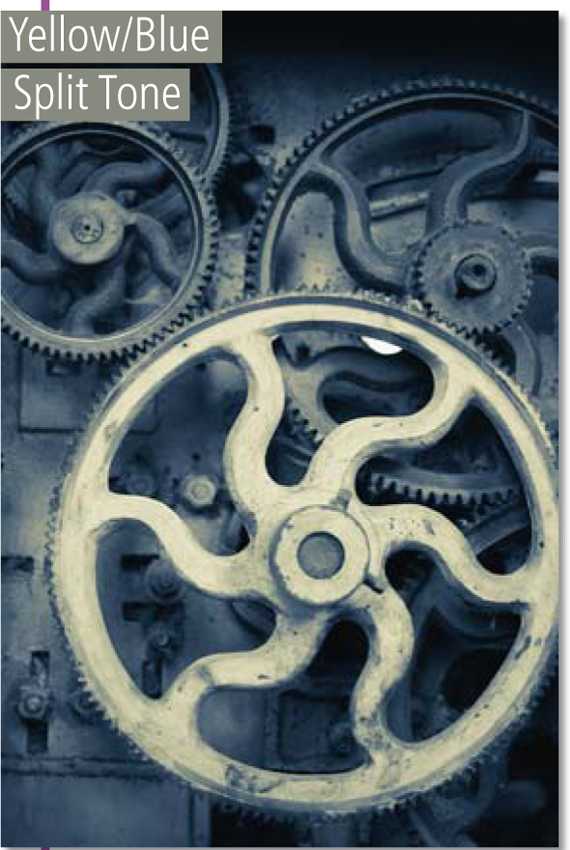
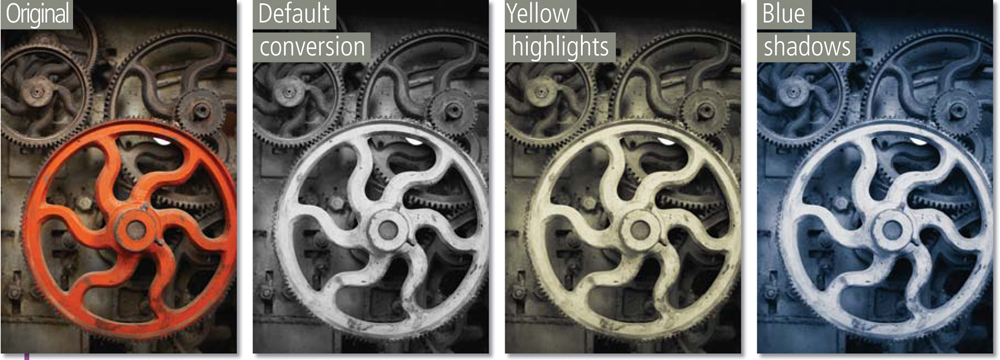
Pro’s tip: Don’t restrict your split toning activities solely to the realms of monochromes. The feature can also be applied to color images as well, providing some rather unusual but striking results.
Lens Corrections (formally Lens)
The Lens Correction pane contains options for correcting three different types of imaging problems associated with lens design – Chromatic Aberration, Fringing and Vignetting.
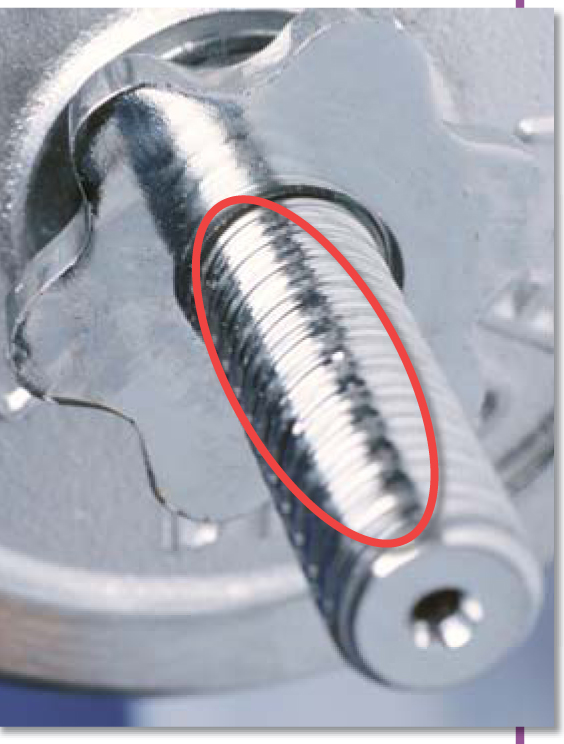
Two sliders are available to help with Chromatic Aberration, or the situation where edges recorded towards the outer parts of the frame contain slight misalignment of colors. Caused by a lens not focusing all the visible wavelengths together on a sensor, the sliders are designed to realign the problem areas and, in so doing, remove the colored edges.
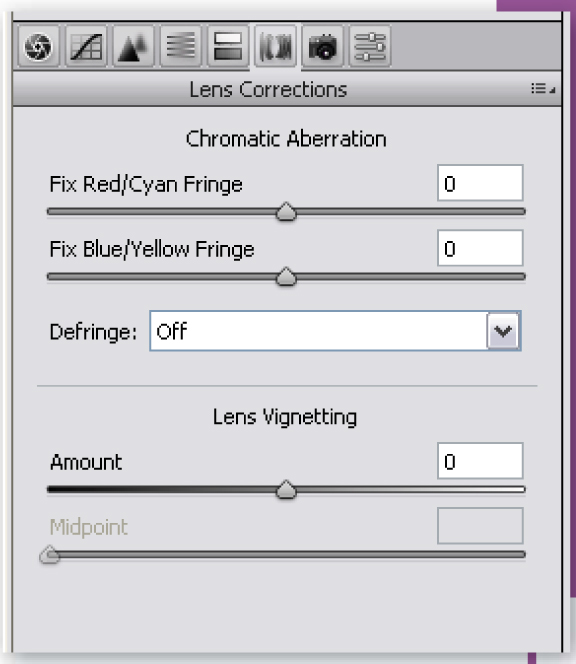
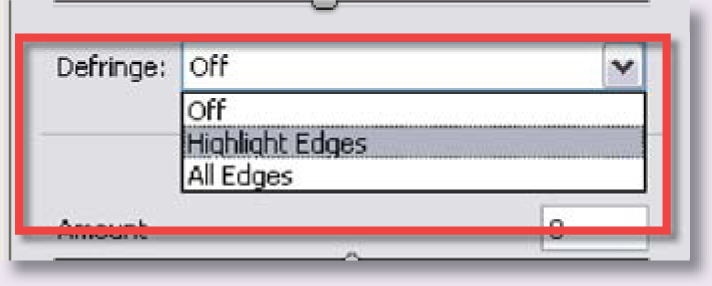
The new Defringe option helps remove the purple color that can surround very bright highlights.
Included for the first time from ACR 4.1 is the ability to control, to some extent, the sensor ‘flooding’ caused by overexposure in picture areas such as specular highlights. Located in the Lens Corrections panel, the new Defringe drop-down menu contains three options – Off, Highlight Edges, and All Edges. Selecting the Highlight Edges option decreases the purple-colored areas that often surround brightly lit metallic surfaces or sparkly water reflections. These errant colors are not caused by lens aberrations but rather result from a small selection of sensor sites being overexposed. Switching to the All Edges setting applies the effect to all the fringe areas in the image.
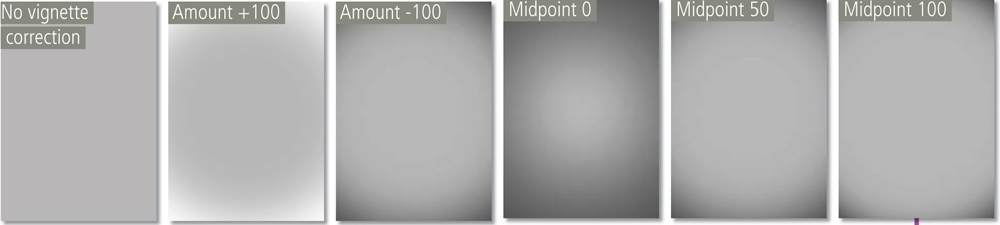
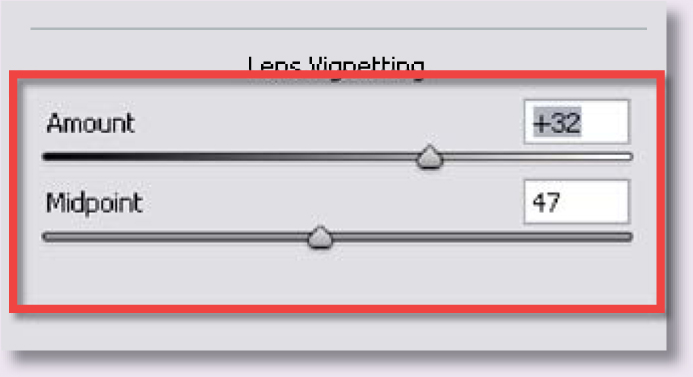
Vignetting is the slight darkening or lightening of the corners of a photo due to the inability of the lens to provide even illumination across the whole surface of the sensor. Most prevalent in ultra-wide-angle lenses when coupled with cameras with full frame sensors, two sliders are included in the Lens Correction pane to deal with this problem. When the Amount slider is moved to the right it lightens the corners. Dragging the control to the left has the opposite effect. The Midpoint control alters the amount of the frame affected by the vignetting correction. Higher settings concentrate the corrections to the corners of the frame.
The features located under the Lens tab are designed to aid in the correction of typical lens faults. The first two sliders are used to correct chromatic aberration (1) or the strange color edges that can fringe the sides of contrasting picture elements. Also included in this dialog is the ability to correct vignetting (2) or the darkening of the corners of a photo. The Amount slider controls the strength of the correction effect and the Midpoint alters how much of the image is included in the enhancement.
Intentional vignetting can can also be added as a creative effect to help focus the viewer’s eye on the central portion of the image. To preview the results of all these controls make sure that the image is being displayed at 100% or greater.
Camera Calibration (formally Calibrate)
The Camera Calibration pane provides four sets of sliders that can be used to fine-tune the camera profiles that ship with ACR. These profiles are specific to individual manufacturers and camera models and will suit most users’ needs straight out of the box. That said, there may be occasions when difficult lighting, or the wayward characteristics of a specific camera, could benefit from some fine-tuning of how the raw data is interpreted by ACR.
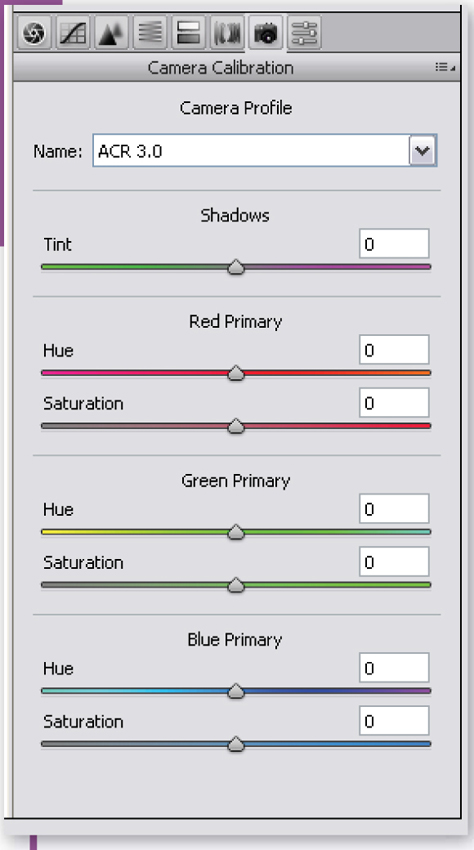
Keep in mind that this is not a task that you would undertake for all images; instead, it is a calibration activity that you perform when encountering a difficult shooting scenario or acquire a new camera body. To get the best from the controls listed here you should make adjustments based on a reference photograph containing a color target such as the Mini ColorChecker available from X-Rite(Gretagmacbeth). Also you will need to make sure that the key adjustments in the Basic tab are set first before starting the Camera Calibration process.
For more details on how to perform the calibration process go to Chapter 9. In the meanwhile, here are some details on the functions of each of the sliders:
Shadow Tint – This control adjusts the red–green balance tint of the shadow areas. Whereas the White Balance controls in the Basic pane target the color of the highlight areas, this slider works with the shadows.
Red, Green, Blue Primary Hue – The Hue sliders tweak the key colors in the photo within a broad range and are similar in function to the Hue sliders in the HSL/Grayscale pane.
Red, Green, Blue Primary Saturation – These controls concentrate on manipulating the strength of the specific colors in relation to each other.
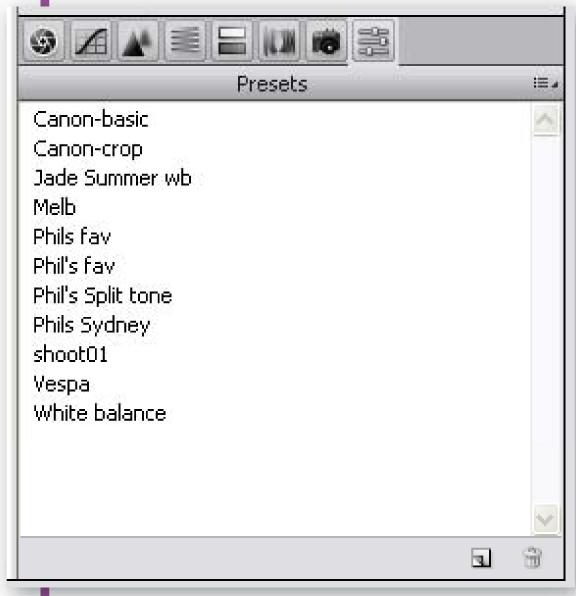
Presets
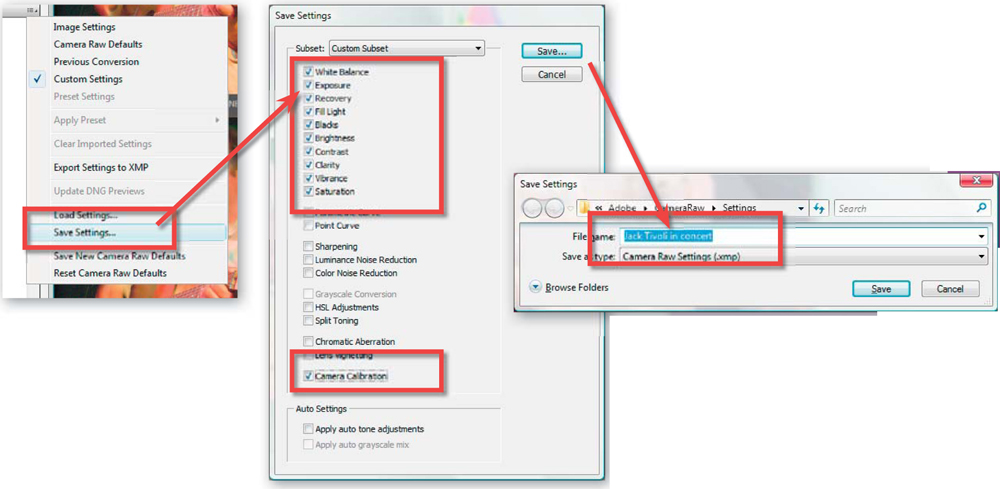
The Presets pane provides a single common area to store the settings, and groups of settings, that you save. Once saved and listed in the pane it is then a simple matter to apply the settings to other images by opening the photo and selecting the option from the list.
Saving settings is also an easy task. Start by adjusting the slider controls in the various panes until you achieve the result that you want. Next click on the Presets menu button in the top right of the pane. Select the Save Settings option from the pop-up menu. In the settings dialog that appears, choose the settings that you want to save in the preset and click Save. Add in a name for the presets in the window that appears and click Save again. The newly created preset now appears in the Presets pane ready for application.
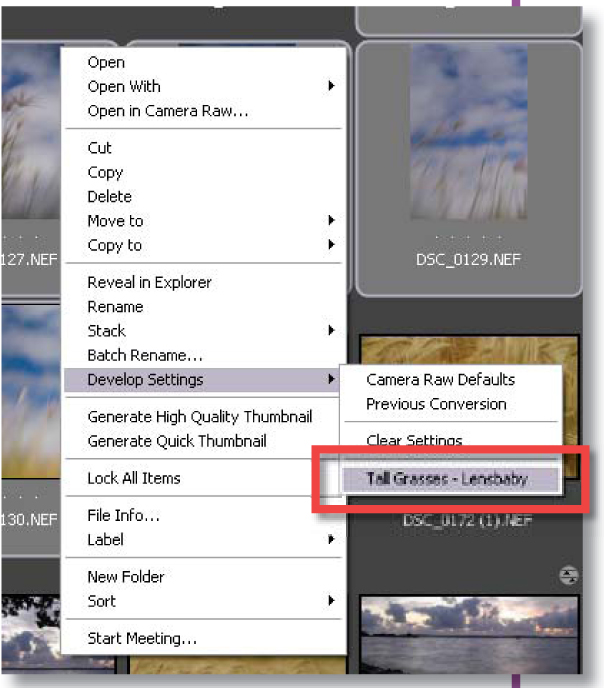
Pro’s tip: The settings preset can also be selected from the Develop menu in the right-click menu available in Bridge’s content area. This allows you to apply the saved settings to raw files on the fly without having to open the photo into ACR.
ACR output options
Apart from the Open Image button ACR provides several other options that will govern how the file is handled from this point onwards. To this end, the lower part of the dialog contains four buttons: Save Image, Open Image, Cancel and Done, and a further four, Save Image (without the options dialog), Reset and Open Copy when the Alt/Option button is pushed, and Open Object when the Shift key is pushed.
Cancel: This option closes the ACR dialog, not saving any of the settings to the file that was open.
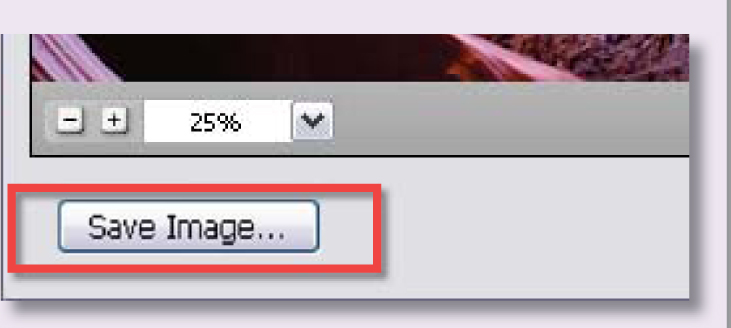
Save Image: The normal Save Image button, which includes several dots (…) after the label, displays the Save Options dialog. Here you can save the raw file, with your settings applied, in Adobe’s own DNG format as well as TIFF, JPEG and PSD formats. The dialog includes options for inputting the location where the file will be saved, the ability to add in a new name as well as format-specific settings such as compression, conversion to linear image and/or embed the original raw file for the DNG option.
Once you have adjusted all the controls in the Adobe Camera Raw dialog the last step is to choose how to handle the results of the conversion. To this end the utility contains four default buttons, Save Image (with options) Cancel, Open Image and Done, plus an extra four when the Alt/Option or Shift keys are pressed.
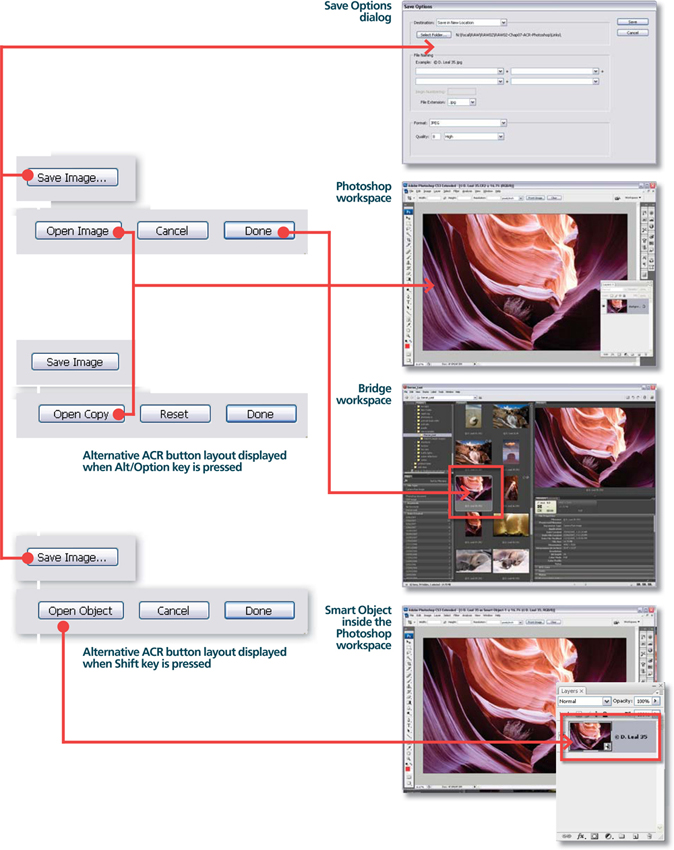
It is a good idea to Select Save in Different Location in the Destination drop-down at the top to separate processed files from archived originals. Clearly the benefits of a compressed DNG file are going to help out in the storage issue arena and compression is a big advantage with DNG. Embedding the original raw file in the saved DNG file begs the questions of how much room you have in the designated storage device and whether you really want to have the original raw file here.
Save (without save options): Holding down the Alt/Option key when clicking the Save button skips the Save Options dialog and saves the file in DNG format using the default save settings, which are the same as those last set.
Open Image: If you click on the Open Image button ACR applies the conversion options and opens the file inside the Photoshop workspace. At this point, the file is no longer in a raw format so when it comes to saving the photo from the Editor workspace Photoshop automatically selects the Photoshop PSD format for saving.
Reset: The Reset option resets the ACR dialog’s settings back to their defaults. This feature is useful if you want to ensure that all settings and enhancement changes made in the current session have been removed. To access the Reset button click the Cancel button whilst holding down the Alt/Option key.
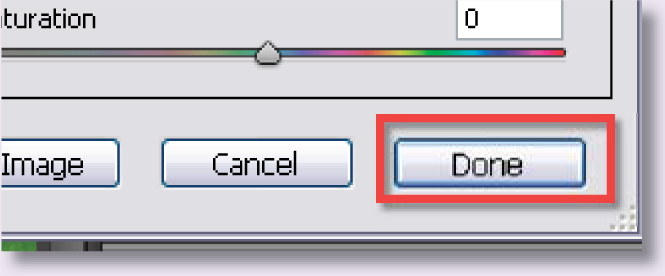
Done: Clicking the Done button will update the raw conversion settings for the open image. Essentially this means that the current settings are applied to the photo and the dialog is then closed. The thumbnail preview in the Bridge workspace will also be updated to reflect the changes.
Open Copy: Holding down the Alt key whilst clicking the Open button will apply the currently selected changes and then open a copy of the file inside the Photoshop workspace.
Open Object: The most exciting new addition to the list of ACR output options is the Open Objects entry, which is displayed when the Shift key is held down. Choosing Open Object will create a new document in Photoshop and embed the raw file in the document as a Smart Object. This route for transferring your files to Photoshop is the only one that continues to work with the picture in a lossless manner and is the core of all non-destructive editing techniques discussed in , 11 and 12.
Queueing files for processing
As well as being able to process files one at a time, Adobe Camera Raw is capable of queueing multiple raw files and work on this either in sequence or in sets of pictures. When several raw photos are selected inside Bridge and then opened into ACR (File > Open in Camera Raw) the pictures are listed on the left side of the dialog. The same scenario occurs when selecting multiple pictures in the File > Open dialog from inside Photoshop.

Once loaded into ACR the files can be worked on individually by selecting each thumbnail in turn, making the necessary changes and then moving to the next picture in the list. But there is a more efficient way to process multiple files. Firstly, select a group of images either taken under the same conditions with similar subject matter, or that you are wanting to process in a similar way (e.g. convert to grayscale and then sepia tone). Next open these into ACR using the keyboard shortcut Ctrl/Cmd + R. Now pick one of the photos that best represents the characteristics of the group and proceed to make the corrections to color, tone and sharpness that you would normally. When complete, pick the Select All button at the top of the Queue section of the dialog to pick all queued photos, or multi-select a subset of photos and then push the Synchronize button. The Synchronize dialog will be displayed listing all the ACR controls that can be copied from the initial photo to the rest of the group. Select, or deselect, the controls as desired, and then click OK. Automatically the settings are synchronized across all the selected photos.
This provides a good starting point for the enhancement process; all that now remains is to flick through each individual image and double check that the settings are working for that specific photo. If need be, then the settings can be fine-tuned to better suit any image.
Once the settings have been applied, the images can be saved, opened, copied or opened as objects just like any other files. When more than one picture is selected from the queue grouping, the output button titles change to plural to account for the fact that multiple photos will be saved, opened, copied, etc.
Another way to select a subset of images from those listed is to rate the pictures you want to apply common settings to and then select these photos with the Select Rated button (hold down the Alt/Opt key). With the Alt/Opt key still depressed, clicking the Synchronize button will synchronize using the last settings without displaying the Synchronize dialog.
Step by step: Processing with Photoshop, Bridge and Adobe Camera Raw
With the basics now out of the way let’s concentrate on the steps that you would take when processing a raw file in Photoshop, Bridge and Adobe Camera Raw.
Opening
With the inclusion of Bridge from Photoshop CS2 there are now more ways to open your raw files.
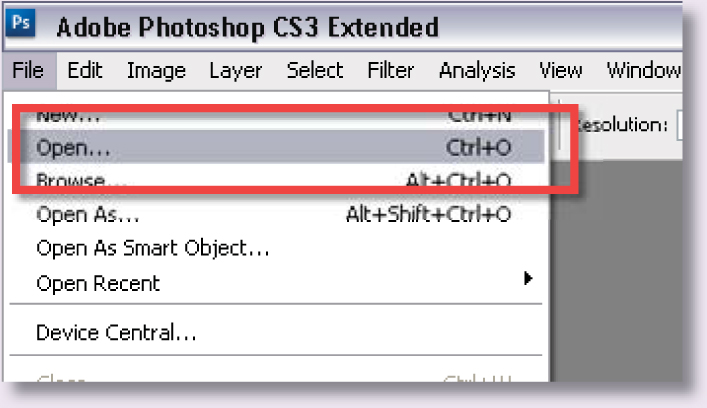
1. Opening the raw file in Photoshop
After downloading from the camera you can start processing the raw files. To do this you must start by opening the picture into the conversion utility. The simplest option is to select File > Open from inside Photoshop. This will import the photo into the Adobe Camera Raw (ACR) utility.
2. Using Bridge to open ACR in Photoshop
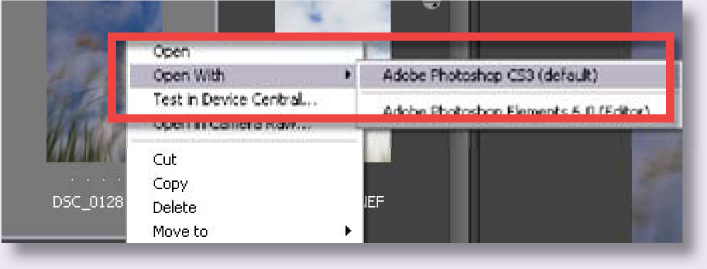
Bridge users can achieve the same result by right-clicking the file’s thumbnail and then choosing Open With > Photoshop.
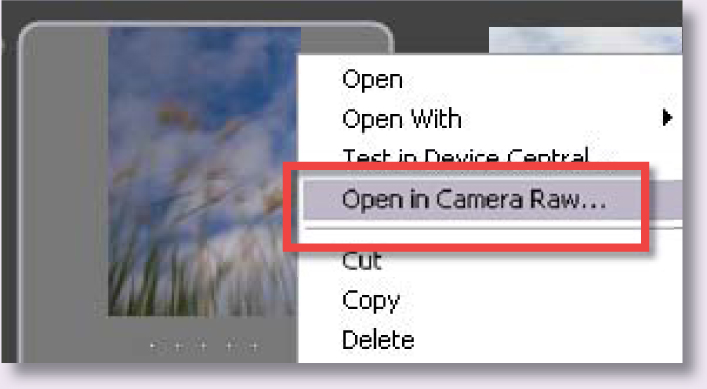
3. Opening into ACR in Bridge
Alternatively the photo can be imported directly into ACR without having to open Photoshop first by right-clicking and then selecting Open in Camera Raw. Working in Bridge allows for faster raw processing as the conversions take place without the need to share computer resources with Photoshop at the same time.
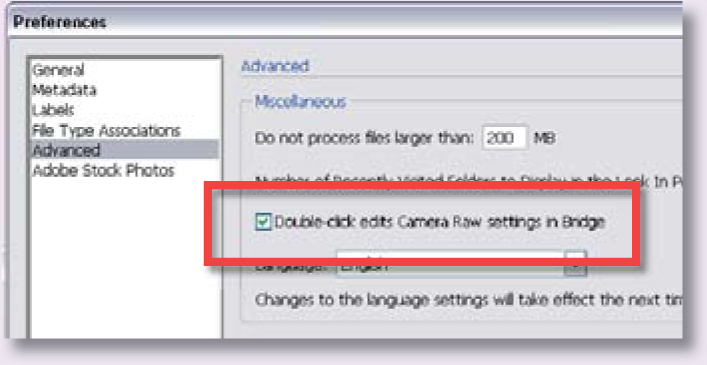
Pro’s tip: The preferences for Bridge can be adjusted so that double-clicking a thumbnail of a raw picture will automatically open the file in Camera Raw in the Bridge workspace. If this option is not selected then double-clicking will open the file in ACR in the Photoshop workspace.
Rotate and Straighten/Crop
4. Rotate right (90 CW) or left (90 CCW)
Once the raw photo is open in ACR you can rotate the image using either of the two Rotate buttons next to the preview window. If you are the lucky owner of a recent camera model then chances are the picture will automatically rotate to its correct orientation. This is thanks to a small piece of metadata supplied by the camera and stored in the picture file that indicates which way is up.
5. Straightening horizons or verticals
Photoshop and Bridge users can fine-tune the rotation of their pictures with the new Straighten tool. After selecting the tool click and drag a straight line along an edge in the photo that is meant to be horizontal or vertical. Upon releasing the mouse button ACR automatically creates a crop marquee around the photo. You will notice that the marquee is rotated so that the edges are parallel to the line that was drawn with the Straighten tool. When you exit ACR by saving or opening (into Photoshop) the picture, the rotated crop is applied.
6. Cropping to suit
Also new to the latest release of ACR which can be found in Photoshop or Bridge is the Crop tool. The feature works just like the regular Crop tool in Photoshop proper, just select and then click and drag to draw a marquee around the picture parts that you want to retain. The side and corner handles on the marquee can be used to adjust the size and shape of the selected area. The crop is applied upon exiting the ACR dialog. Predefined crop formats are available from the menu accessed by clicking and holding the Crop tool button. Also included is a Custom option where you can design your own crops to suit specific print or other outcome requirements.
Adjusting white balance
Unlike other capture formats (TIFF, JPEG) the white balance settings are not fixed in a raw file. ACR contains three different ways to balance the hues in your photo.
7. Preset changes
You can opt to stay with the settings used at the time of shooting (‘As Shot’) or select from a range of light source-specific settings in the White Balance dropdown menu of ACR. For best results, try to match the setting used with the type of lighting that was present in the scene at the time of capture. Or choose the Auto option to get ACR to determine a setting based on the individual image currently displayed.

8. Manual adjustments
If none of the preset White Balance options perfectly matches the lighting in your photo then you will need to fine-tune your results with the Temperature and Tint sliders (located just below the Presets dropdown menu). The Temperature slider settings equate to the color of light in degrees kelvin – so daylight will be 5500 and tungsten light 2800. It is a blue to yellow scale, so moving the slider to the left will make the image cooler (more blue) and to the right warmer (more yellow). In contrast the Tint slider is a green to magenta scale. Moving the slider left will add more green to the image and to the right more magenta.
9. The White Balance tool
Another quick way to balance the light in your picture is to choose the White Balance tool and then click onto a part of the picture that is meant to be neutral gray or white. ACR will automatically set the Temperature and Tint sliders so that this picture part becomes a neutral gray and in the process the rest of the image will be balanced. For best results when selecting lighter tones with the tool ensure that the area contains detail and is not a blown or specular highlight.
Tonal control
Then next group of image enhancements alters the tones within the photo. There are five different slider controls each dealing with a specific group of image tones. Each of the controls has an Auto option that when checked will let ACR decide on the best tonal setting to use. Use the following steps if you want a little more control.
10. Setting the white areas
To start, adjust the brightness with the Exposure slider. Moving the slider to the right lightens the photo and to the left darkens it. The settings for the slider are in f-stop increments, with a +1.00 setting being equivalent to increasing exposure by 1 f-stop. Use this slider to peg or set the white tones. Your aim is to lighten the highlights in the photo without clipping (converting the pixels to pure white) them. To do this, hold down Alt/Option whilst moving the slider. This action previews the photo with the pixels being clipped against a black background. Move the slider back and forth until no clipped pixels appear but the highlights are as white as possible.
11. Adjusting the blacks (shadows)
The Blacks slider (previously Shadows) performs a similar function with the shadow areas of the image. Again the aim is to darken these tones but not to convert (or clip) delicate details to pure black. Just as with the Exposure slider, the Alt/Option key can be pressed whilst making Blacks adjustments to preview the pixels being clipped. Alternatively the Shadow and Highlights Clipping Warning features can be used to provide instant clipping feedback on the preview image. Shadow pixels that are being clipped are displayed in blue and clipped highlight tones in red.
12. Brightness changes
The next control, moving from top to bottom of the ACR dialog, is the Brightness slider. At first the changes you make with this feature may appear to be very similar to those produced with the Exposure slider but there is an important difference. Yes it is true that moving the slider to the right lightens the whole image, but rather than adjusting all pixels the same amount the feature makes major changes in the midtone areas and smaller jumps in the highlights. In so doing the Brightness slider is less likely to clip the highlights (or shadows) as the feature compresses the highlights as it lightens the photo. This is why it is important to set white and black points first with the Exposure and Shadows sliders before fine-tuning the image with the Brightness control.
13. Increasing/decreasing contrast
The last tonal control in the dialog, and the last to be applied to the photo, is the Contrast slider. The feature concentrates on the midtones in the photo, with movements of the slider to the right increasing the midtone contrast and to the left producing a lower contrast image. Like the Brightness slider, Contrast changes are best applied after setting the white and black points of the image with the Exposure and Contrast sliders.

14. Tweaking problem areas
The Fill Light and Recovery sliders are new for the latest version of ACR. Use Fill Light to boost the brightness of just the middle to dark tones in the photo. Employ the Recovery control to rebuild the lost image data that occurs when overexposure has caused one of the color channels to be clipped.
Color strength adjustments
As one of the primary roles of the Adobe Camera Raw utility is to interpolate the captured colors from their Bayer mosaic form to the more usable RGB format it is logical to include a color strength adjustment as one of the controls in the process.
15. Increasing clarity
The Clarity slider can be used to increase the local contrast of images taken in hazy or overcast weather or with diffused lighting. When applying watch that fine details are not overly darkened by the control.
16. Vibrance and Saturation controls
The strength of the colors in the photo can be adjusted using the Vibrance and Saturation sliders. Vibrance boosts image colors that are desaturated whilst protecting skin tone values, whereas the Saturation control increase the vividness of all hues. Moving the Saturation slider to the right increases saturation, with a value of +100 being a doubling of the color strength found at a setting of 0. Saturation can be reduced by moving the slider to the left, with a value of -100 producing a monochrome image.
Lens corrections
The Lens tab contains tools for correcting three of the most common lens faults – color fringing and vignetting.
17. Reducing the appearance of color fringing
Chromatic aberration is essentially a lens flaw where color edges appear around the perimeter of picture parts. This occurs because the lens fails to focus all colors at the same point in the picture. The two sliders in this part of the dialog are designed to correct this problem. To obtain the best results zoom into the raw preview and locate an area that contains fringing. The sliders are split into two groups, Red/Cyan and Blue/Yellow. Move one at a time back and forth until you find a point where the fringing is least apparent.
Pro’s tip: Holding the Alt/Option key down whilst adjusting either slider hides the other fringing colors.

18. Reducing blooming-based fringing
In cases of extreme overexposure generally caused by pin or specular highlights, these clipped areas of the image can be tinted with a tinge of magenta. Use the options here to remove the problem.
19. Counteracting vignetting
Vignetting or the darkening of the corners of a photo is another lens aberration that can be corrected with the help of the controls grouped under the Lens tab. To start adjust the zoom of the preview so that you can see the whole image. Move the Amount slider to the right to lighten the corners and to the left to darken them. The Midpoint slider controls the amount of the picture changed by the feature. Moving the slider to the left includes more of the picture, movements to the right restrict the changes to just the immediate area around the corners.
Curve controls
Need even more control over the tones in your photo? Then it is time to tweak those pesky shadow and highlight pixels with the Curves feature. For straight changes to highlight and shadow points and the brightness of the midtones look to the controls found under the Adjust tab, but for sophisticated compression and expansion of specific ranges of tones then Curves is the feature to use. Many photographers apply a little Curves adjustment as the final enhancement step in the raw conversion process. The alteration may be to better suit the picture tones to the way that a temperamental printer prints or as a way of providing a signature ‘look’ to their photographic work; either way, Curves offers great flexibility for tonal enhancement.
20. More tonal adjustments
In this example I have tweaked the curve to add a little more contrast to the whole image. I start by pegging the midpoint (adding a control point to the middle of the curve). This will act as a pivot for the other Curves alterations and will ensure that the middle tones in the image stay put. Next I click on the highlight area (upper right) and push this part of the curve upwards slightly. This lightens these tones. Now to the shadows. Here I click on the shadows and push down slightly and then add a second point lower on the curve and do the same thing. Two points in this region give me better control over how the shadow detail is represented. The overall effect is that of a simple contrast-increasing curve.
Fine-tune color with calibration
In most photographs the occasional cast appearing in the shadow area of a picture that is different to the highlight is not a major problem. For these majority of images the Temperature/Tint controls under the Adjust tab will suffice but for those occasions where absolute control is needed then most professionals click onto the Calibrate tab.
21. Controlling shadow color
The Camera Profile is the version number of ACR when the camera was profiled. So the Canon 20D will only show ACR 2.4. Some have been reprofiled so they may show two versions of the profile. In this case start by choosing the Camera Profile you want to modify. If you are not using an embedded profile and haven’t enhanced the image before in a previous version of ACR, then choose ACR 3.0.
Next move the Shadow Tint slider to try to obtain a neutral shadow tone. In most cases moving the slider to the left adds green to the shadows and to the right adds magenta but this is largely dependent on the way that your camera sensor functions.
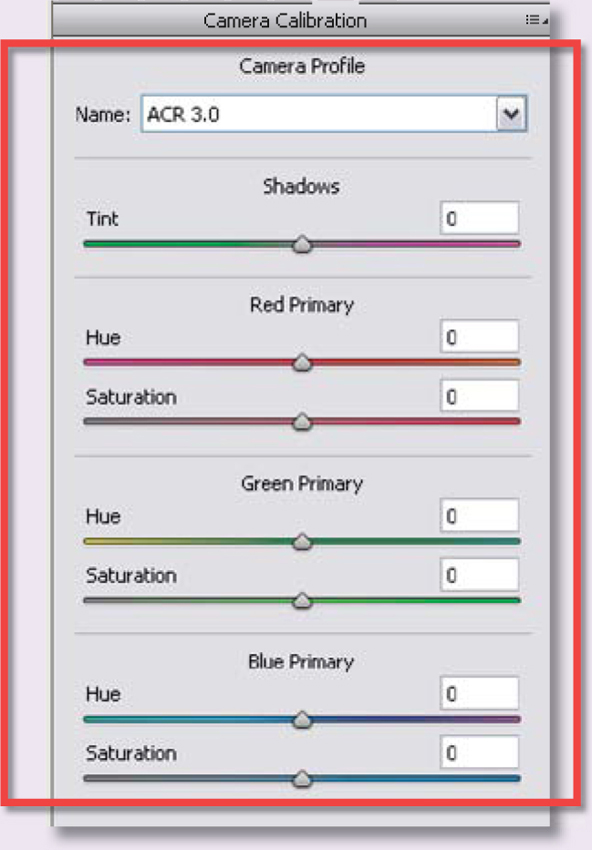
Refine the color of the shadow areas further by adjusting the Hue and Saturation of the individual color channels (red, green and blue).
Sharpness/smoothness and noise reduction
With the tones and colors now sorted let’s turn our attention to sharpening and noise reduction. Both these image enhancements can be handled in-camera when not shooting raw, using one of a variety of auto settings found in the setup menu, but for raw shooters control over sharpness and noise reduction occurs back at the desktop.
22. To sharpen or not to sharpen
Sharpening is an enhancement technique that is easily overdone and this is true even when applying the changes at the time of raw conversion. The best approach is to remember that sharpening is applied at two points in the process – capture and output. The settings here are used for capture sharpening and the output side of things is handled as the last step of the editing process. In practice this means that all images should be sharpening to some extent in ACR first and then specific sharpening determined by output size and media applied later in the process. The sharpening abilities of ACR have been boosted in the latest revision so now there are four sliders to fine-tune the sharpening application.
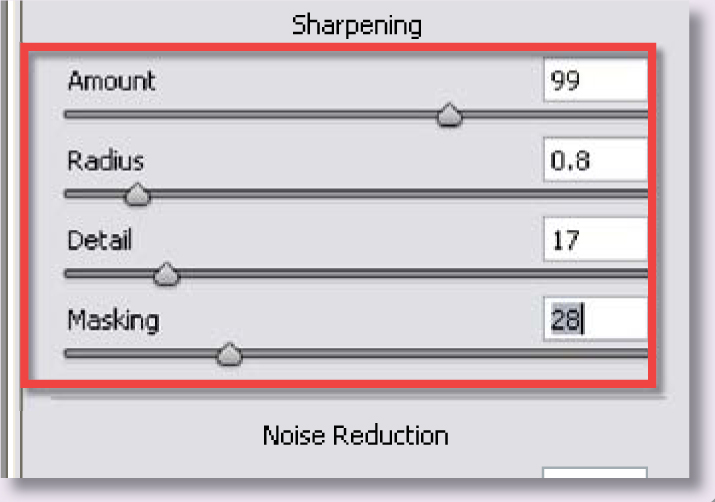
The Amount slider determines the strength of the effect. The Radius slider is used to adjust the range of pixels used in the sharpness calculation. Detail and Masking both control where the sharpening effect is applied. Increasing the Detail value raises the local contrast around small picture parts. Moving the Masking slider to the right gradually restricts the sharpening to just the most contrasty edges of the picture.
Always make sure that the preview is zoomed to a value of 100% before manipulating these controls so that you can preview the effects. Holding down the Alt/Opt key provides a preview of the settings for each slider as the effect is applied.
23. Reducing noise
ACR contains two different Noise Reduction controls. The Luminance slider is designed to reduce the appearance of grayscale noise in a photo. This is particularly useful for improving the look of images that appear grainy. The second type of noise is the random colored pixels that typically appear in photos taken with a high ISO setting or a long shutter speed. This is generally referred to as chroma noise and is reduced using the Color slider in ACR. The noise reduction effect of both features is increased as the sliders are moved to the right.
Pro’s tip: When using these tools keep in mind that overuse can lead to flat, textureless photos so ensure that you zoom into the image (at least 100%) and check the results of your settings in important areas of detail. The golden rule is apply the least amount of Luminance and Color noise reduction to get the job done.
Output options
Now to the business end of the conversion task – outputting the file. At this point in the process ACR provides options that will govern the type of file generated in the conversion.
24. Controlling color depth/space and image size/resolution
The section below the main preview window in ACR contains the output options settings. Here you can adjust the color depth (8 or 16 bits per channel), the color space (ICC profile), the image size (maintain capture dimensions for the picture or size up or down) and the image resolution (pixels per inch or pixels per centimeter).
Save, Open or Done
The last step in the process is to apply the changes. This can be done in a variety of ways in both Photoshop and Photoshop Elements.
25. Opening into Photoshop
The most basic option is to process the raw file according to the settings selected and then open the picture into the editing workspace of Photoshop. To do this click the Open Image button at the bottom right of the dialog. Select this route if you intend to edit or enhance the image beyond the changes made during the conversion.
26. Saving the processed raw file
Photoshop users have the ability to save converted raw files from inside the ACR dialog via the Save button. This action opens the Save Options dialog which contains settings for inputting file names, choosing file types and extensions as well as file type-specific characteristics such as compression. Opt for this approach for fast processing of multiple files without the need to open them in Photoshop. Unfortunately the same functionality is not available for Photoshop Elements users. Instead they will need to open (click the OK button) the converted file in the Editor workspace and then select File > Save As to perform the same function.

27. Applying the raw conversion settings
Both versions of ACR allow the user to apply the current settings to the raw photo without opening the picture. Just click the Done button. The great thing about working this way is that the settings are applied to the file losslessly. No changes are made to the underlying pixels only to the instructions that are used to process the raw file. When next the file is opened, the applied settings will show up in the ACR dialog ready for fine-tuning, or even changing completely.
28. Creating a Smart Object
If you are wanting to continue working with your unconverted raw file inside Photoshop then you will need to embed the file in a Smart Object layer within a Photoshop document. Unlike the previous version of ACR where this process had to be accomplished manually it is now possible to embed the file using a single button inside ACR. Holding down the Shift key, press the Open Object button. This action automatically creates a new Photoshop document and embeds the raw file in a smart object layer.
