
11
Editing Raw Files in Photoshop
Until recently, raw files were viewed as a capture-only format with the first step in any workflow being the conversion of the picture to another file type so that editing, enhancing and output tasks could be performed. I say recently because with the release of products such as Lightroom from Adobe, it is no longer necessary to change file formats to your pictures further through the production workflow.
Even Photoshop and Bridge are now sufficiently raw aware to allow the user to edit, enhance, print and even produce contact sheets, PDF presentations, picture packages and web galleries all from raw originals. Yes, sometimes the files are converted as part of the production process for these outcomes, but I can live with this intermediary step if it means that my precious pictures stay in the raw format for more of the production workflow. With a little trickery associated with Photoshop’s Smart Object technology it is now even possible to edit individual pictures inside a standard Photoshop document without having to convert the file first.
So with this in mind let’s look at some editing, enhancing and output options that are available for the raw shooter who wants to use Photoshop, but also wants to maintain his, or her, picture’s raw status for longer.
All roads lead to Photoshop
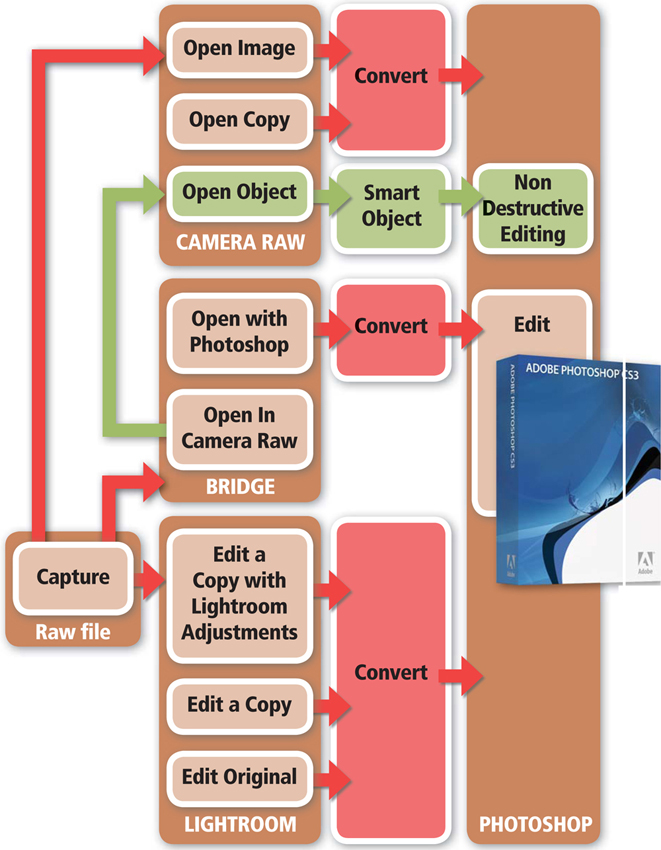
It has long been possible to import and edit converted raw files into Photoshop. In fact, this is the basis of the traditional raw workflow where the captured photo is first converted to a standard picture format, such as PSD, TIFF or JPEG, before being opened in Photoshop. This is still the route you will have to take for most pathways that lead to Photoshop (see pathway diagram opposite), but the inclusion of Smart Object technology in Photoshop CS2 and CS3 provides an editing alternative that retains the original raw file (see green pathway in the illustration opposite).
This option provides a non-destructive raw workflow with editing possibilities that go way beyond the global options (changes applied to the whole picture) available with Adobe Camera Raw and Photoshop Lightroom. Non-destructive enhancement might not always be your goal or, with some complex techniques, might not even be possible, so to start with in the next few pages we will look at all the different ways to open your raw images in Photoshop.
There are many ways to get your raw files into Photoshop. Most require the picture to be converted from its raw state to a format more suitable for editing (TIFF, PSD, JPEG), but there is a Smart Object-based workflow that maintains the original raw file throughout.
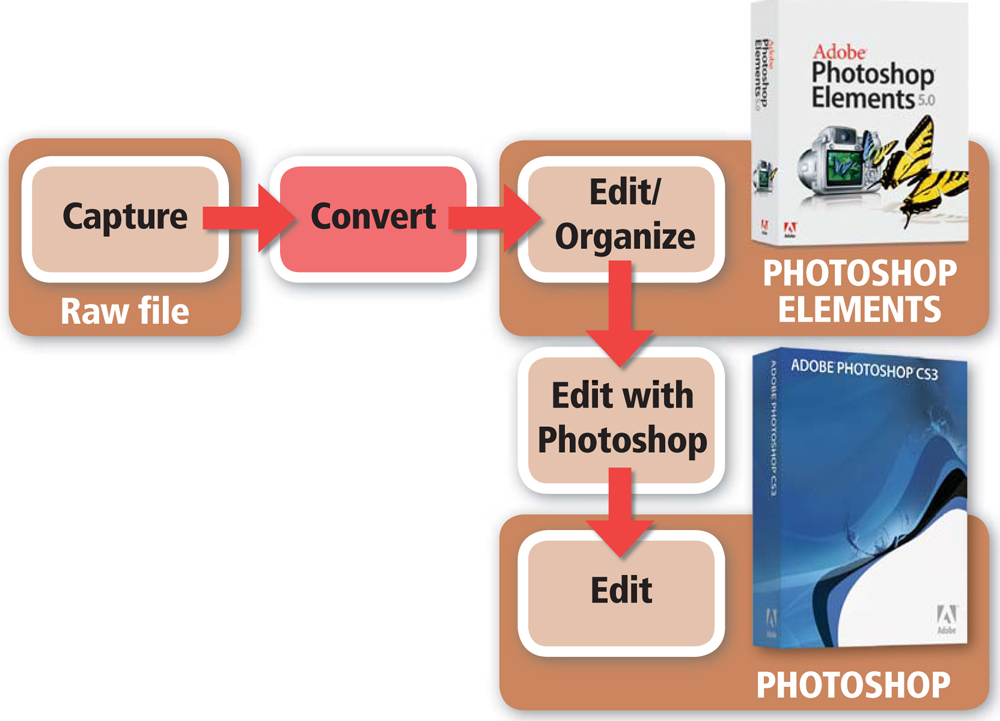
What about Photoshop Elements? What editing options are available with this package? Elements users can apply global conversion settings to raw files via ACR without having to open them fully into the Full Edit workspace. To make changes to specific areas of the photo, or to access more sophisticated editing features, the raw file will need to be converted and then opened into the Edit workspace. Alternatively, Elements users can also transfer their photos to Photoshop from the Organizer workspace with the Edit > Edit with Photoshop option.
From Lightroom
From the menu
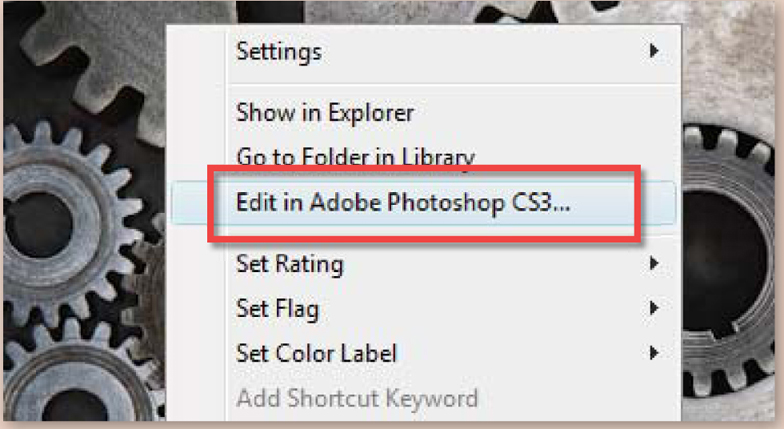
To pass a photo from your Lightroom Library to Photoshop select the image in the Library or Develop module and then choose Photo > Edit in Adobe Photoshop. The shortcut key for this action is Ctrl/Cmd + E.
Right-click access
Alternatively you can right-click on a photo in the Library module (in Grid, Loupe, Compare, or Survey View) and select the Edit in Adobe Photoshop option from the pop-up menu. This option is also available in the Develop module.

Edit Photo dialog
Once the Edit in Adobe Photoshop option is selected, Lightroom displays the Edit Photo with Adobe Photoshop dialog. Here you can select from the following three options:
Edit a Copy with Lightroom Adjustments – Lightroom duplicates the raw file, applies the current set of development or conversion settings and then opens the new file into Photoshop. The file format, color space and bit depth of the copy are determined by the settings in the Copy File Options section of the dialog. This is the only option available for raw or DNG files. The duplicated file is titled with the original filename plus ‘-Edit’.
Edit a Copy – Lightroom opens a copy of the file in Photoshop. No Develop settings are applied to the copy. This option is only available with non-raw files (i.e. PSD, TIFF or JPEG). The format, color space and bit depth of the copy are controlled by the settings in the Copy File Options section of the dialog. The filename of the copy is automatically set to the original name plus ‘-Edit’.
Edit Original – Again this option is only available with non-raw files. Lightroom opens the original file into Photoshop. All saved changes are applied to the original file.
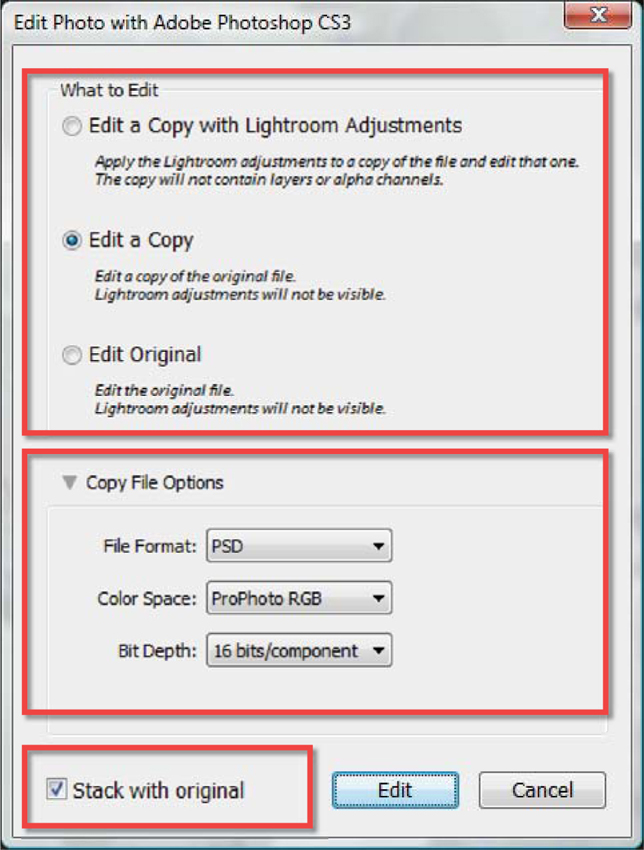
Stacking edited versions
Selecting the ‘Stack with original’ option when making a copy saves the duplicate alongside the original in the Lightroom library and automatically creates a stack from the two files.
From Bridge
Right-click access
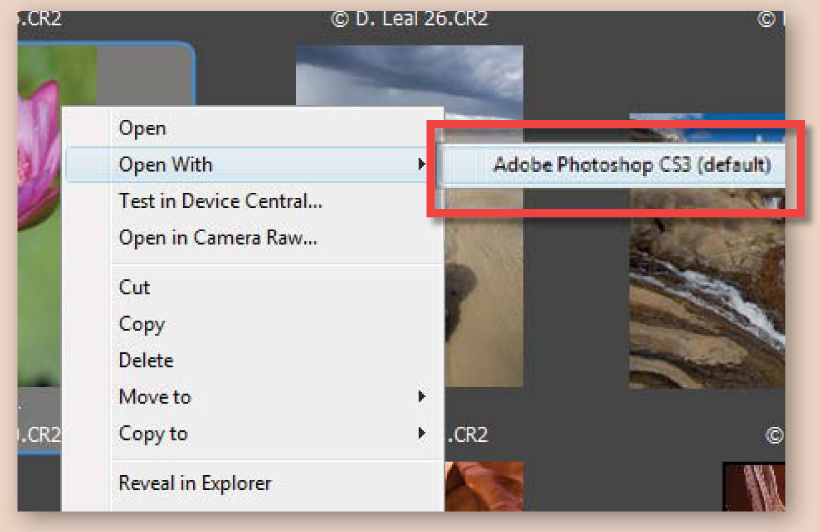
To pass a photo from Bridge to Photoshop right-click on the image in the Content panel and then select Open With > Adobe Photoshop. If Photoshop is the default application for the file type you are opening then you can select the Open option from the pop-up menu for the same result. These options will not open the file directly into Photoshop, but rather they will open the file in Adobe Camera Raw first, and from here you can open the image in Photoshop.
Double-click
Double-clicking on an image in the Content panel in Bridge will open the photo in the default program associated with the image’s file type. If Photoshop is the default program for raw files then holding the Shift key down while double-clicking will bypass the ACR dialog, convert the raw image and open the picture into Photoshop. The conversion is based on the Camera Raw Defaults.
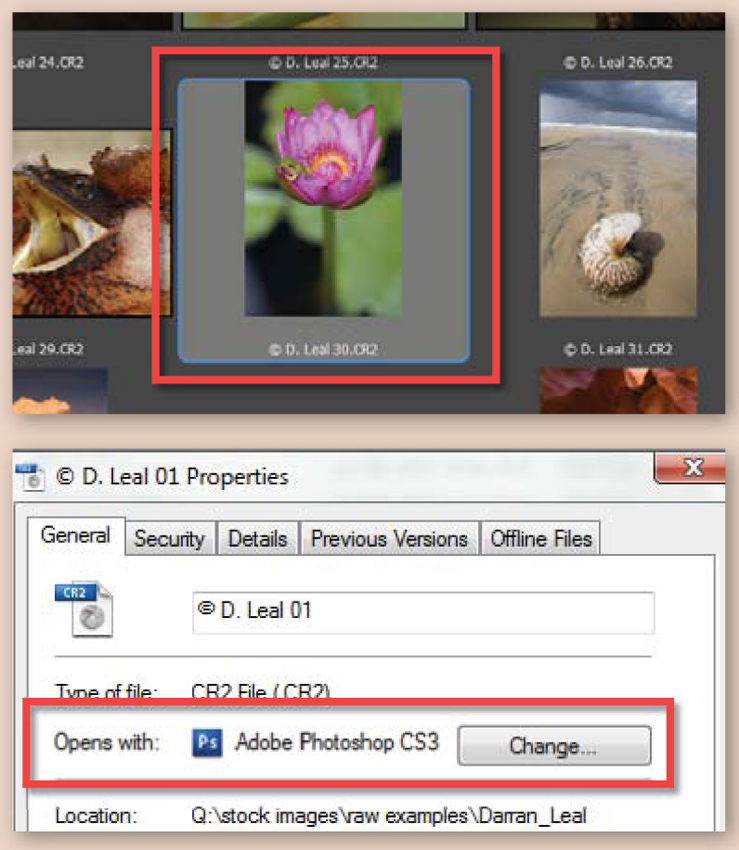
Pro’s tip: To change the program that opens a specific file type, Windows users should right-click the file and choose the Properties menu entry. Alter the ‘Opens with’ program by clicking on the Change button.
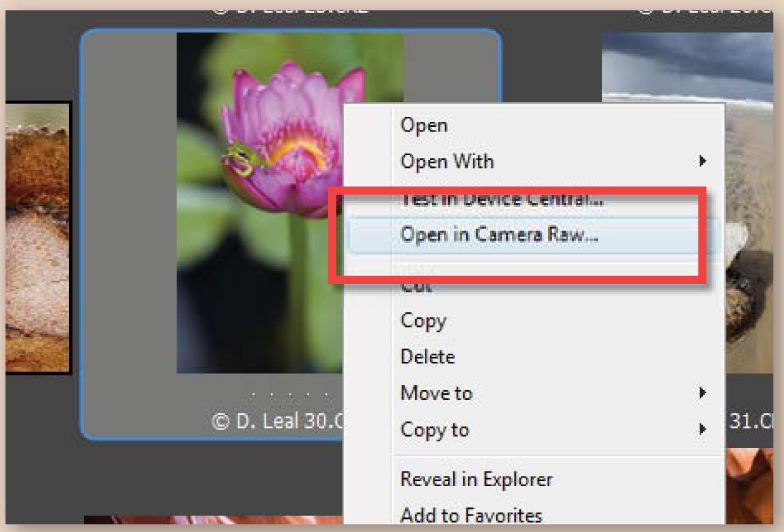
Photoshop via ACR
By far the most popular way to move your raw photos into Photoshop is via the Open in Camera Raw option (located on the popup menu when you right-click a raw file in the Content panel). This opens the image into the Adobe Camera Raw dialog. From here you have three methods for opening the photo into Photoshop. See opposite page for details.
From ACR
ACR to Photoshop
With the raw file open in Adobe Camera Raw there are three ways to transfer the image to Photoshop. They are:
Open Image – This option applies the current Develop settings to the raw file and also converts the photo to the PSD format. The resultant file is then opened into Photoshop. After changes are made in Photoshop the files will be saved with the same filename as the original raw file but the fie type will have changed to PSD.

Open Copy – Holding down the Alt/Opt key changes the Open Image option to Open Copy. With the Open Copy selection ACR applies the current Develop settings to a duplicate, converted, version of the file. This image is opened into Photoshop as a PSD file. The original raw file is left untouched. If multiple images are select in ACR then this option will open copies for each file.

Open Object – Holding the Shift key down will change the Open Image button to Open Object. This selection applies the current Develop settings, creates a new PSD document the size and format of the original file, and embeds the raw photo as a Smart Object. It is important to note that this approach DOES NOT convert the raw data to create a usable Photoshop document. This forms the basis of all the non-destructive techniques detailed here and in the next chapter.

Pro’s tip: The Done button simply applies the current Develop settings and then closes the ACR dialog without opening the file into Photoshop.

Creating raw Smart Objects from inside Photoshop CS3
As an alternative to using the Open Object route from Adobe Camera Raw, it is possible to open a raw file from inside Photoshop itself. The Open as Smart Object option is located under the File menu. After selecting the entry Photoshop presents you with a file browser so that you can locate the raw file. After selecting the photo click the OK button at the bottom of the dialog.
The raw file is then loaded into Adobe Camera Raw. Here you can make any changes or enhancements necessary before clicking the OK button to close the dialog and open the embedded file in a new Photoshop document.

Embedding raw files in Photoshop CS2
Smart Object technology was first released in Photoshop CS2 but the version of Adobe Camera Raw that came with that product didn’t contain the Open Object option. If you haven’t yet upgraded then don’t despair, the following technique provides a neat workaround for the problem. Smart Objects are a way of embedding the original file within a special layer in a Photoshop document.

Step by step
1. Creating a new document preset
Start by finding out the exact pixel dimensions of the raw file. Switch to Photoshop CS2 and create a new document using these dimensions in the New Document dialog. Save this document as a new preset. Label it something like ‘Nikon/Canon Raw Embed’. It will now be installed as a new entry on the preset document list.

2. Placing the raw file
Next, jump back to Bridge and click onto the thumbnail of the raw file. Now select File > Place > In Photoshop. Bridge opens Photoshop CS2 and then displays the raw file inside the Adobe Camera Raw dialog. Make any adjustments, but don’t fuss as you will be able to readjust the raw settings later on. Click the Open button and then Enter/Return to place the raw file into the Photoshop document.
Note: Make sure that the new document you create is the same orientation (portrait or landscape) as the raw file you are trying to embed.

3. Creating a Smart Object layer
Notice in the Layers palette that the raw picture has been placed as a special Smart Object layer rather than standard image layer. The raw file is now embedded into the Photoshop document. To make any changes to the raw settings, simply double-click onto the layer’s thumbnail. This action displays ACR, allowing you to tweak the raw settings until you are satisfied with the results. From this point onwards the file can be treated as a standard Photoshop document.

Making changes to an embedded raw file
OK, so you have successfully managed to embed your raw file and you now have a new Photoshop document complete with a Smart Object layer. The original conversion settings that were applied to the photo at time of embedding look fine but you want to fine-tune the color and contrast of the file. Or maybe there are a couple of marks on the photo that need removing. How can we make these changes in Photoshop without having to first convert the raw file to a standard format such as PSD or TIFF?
Well, the following collection of techniques will provide you with an inkling of the type of workflow that is now possible without having to convert your raw file first.
But you can’t edit a Smart Object. Not true!
Using this approach, simple retouching tasks are also not out of the question and they don’t require that the Smart Object be rasterized first. Jobs like removing a pimple from the face of an otherwise glamorous model are possible by creating a new layer above the Smart Object layer and then selecting the Spot Healing Brush (set to Use All Layers). Proceed to make the retouching corrections on the new layer. This is a great way to maintain the original raw file and provide the retouching options that are sometimes needed. This is especially helpful if you are not using Lightroom or the latest version of Adobe Camera Raw, which both contain options for spot removal.
The technique also demonstrates how skillful use of Photoshop technologies such as Sample All Layers, Adjustment Layers and Layer Blend Modes can provide innovative workflows that maintain the raw file throughout.
To remove marks and blemishes from an embedded raw file, start by creating a new layer above the Smart Object layer.

After selecting the Spot Healing Brush make sure that the new layer is selected and that the Sample All Layers option is ticked before clicking on the blemish.

Pro’s tip: Keep in mind that any changes made directly to the color, contrast and brightness of the raw file Smart Object will not be reflected in the retouching image layer. If you want to make such changes to both layers, create a new adjustment layer above both the retouching and Smart Object layers and use this for your enhancements.
After retouching the Smart Object any changes (color, contrast, brightness) that you make to the embedded raw file will not match the details in the retouching layer. So rather than making these changes directly to the raw file, add an adjustment layer (1) above both the Smart Object and retouching layers and alter the image via this control.

Tonal and color changes via the raw file
For color and tonal enhancements that don’t involve an existing retouching layer use the editing abilities of the Smart Object to make these changes directly to the raw file. Double-clicking the Smart Object layer opens the file inside the program of origin. For placed Illustrator files this means that the file is opened inside Illustrator ready for editing, for our embedded raw file the picture is opened inside Adobe Camera Raw. Cool!
All the settings for the values used for the current conversion are set in the dialog and it is a simple matter to adjust contrast, brightness, white balance, sharpness or any of the other variables available in the dialog. Clicking the Done button then saves the changes back to the Smart Object layer and in the process updates the view of the document in the Photoshop workspace. This way of working might seem a little convoluted but it provides a radical lossless method of manipulating your raw files as Photoshop documents.
Double-click the Smart Object layer or choose Layer > Smart Objects > Edit Contents to open ACR and edit the conversion settings of the raw file.

Employing a two Hue/Saturation adjustment layer technique to change a color photo to black and white maintains the status of the raw file and still provides control over the convert to gray process.

Convert to gray
Let’s take this lossless enhancement approach a little further and look at a new twist on an old convert to gray technique. First proposed by the Adobe evangelist Russel Brown, this method uses two Hue/Saturation adjustment layers to create an editable convert to gray technique that leaves the original pixels untouched. In our situation this means producing a grayscale picture from the raw file in its virgin state. This technique is suitable for CS2 and CS3 users alike.
Step by step
1. Embed a raw file in a new Photoshop document in the manner described above. Next make a new Hue/Saturation adjustment layer above the Smart Object layer. Don’t make any changes to the default settings for this layer, just create the layer and then close the dialog. Set the mode of the adjustment layer to Color. Label this layer ‘Filter’.

2. Now create a second Hue/Saturation adjustment layer above the Filter layer and alter the settings so Saturation is -100. Call this layer ‘Black and White Film’. The monochrome image now on screen is the standard result we would expect if we just desaturated the colored original.

3. Next double-click on the layer thumbnail in the Filter layer and move the Hue slider. This changes the way that the color values are translated to black and white. Similarly if you move the Saturation slider you can emphasize particular parts of the image. In effect you now control how the colors are mapped to gray.

4. For more precise control of the separation of tones you can restrict your changes to a single color group (red, blue, green, cyan, magenta) by selecting it from the dropdown menu before manipulating the Hue and Saturation controls.

New grayscale conversion options in CS3
Photographers have had such a long and glorious history of producing fantastic black and white images that in making the transition to digital we expected this tradition to continue unabated. But despite the ease with which digital allows us to convert a color photo to black and white, the ability to create richly toned monochromes is still a black art filled with mysterious magic for many image makers.
Thankfully the Black and White feature is also available as an adjustment layer for non-destructive conversions for embedded raw files. Simply insert the adjustment layer above the raw Smart Object layer.

It is for this reason that Adobe has produced a range of pathways, tools and techniques to convert color images to black and white over the past few years, starting with simple change to grayscale mode and desaturate techniques, and then moving on to the more sophisticated, and most say more difficult to use, Channel Mixer feature. Well, Photoshop CS3 includes a new feature that promises to bring quality grayscale conversions to the masses.
Called the Black and White feature (Image > Adjustments > Black and White), the new tool provides all the power of the Channel Mixer without the drawbacks. Overall density of the conversion is handled automatically and so there is no need to watch the channel settings numbers to ensure that they add up to 100, as was the case with Channel Mixer. Add to this the ability to tint the final result and you will quickly find yourself falling in love with monochromes again.
The feature’s dialog contains six slider controls for each of the color channels. Moving a slider to the right increases the dominance of the color in the conversion result. By changing several sliders at once you can very quickly alter the look and feel of the resultant monochrome. Towards the bottom of the screen there is a separate section that controls the tinting of the picture. To add a color to the grayscale click on the Tint checkbox and then use the Hue slider to adjust the color and the Saturation slider to adjust the strength or vibrancy of this color.
The Black and White feature in Photoshop CS3 provides a powerful new way to convert color pictures to grayscale photos. The way that different colors are mapped to gray can be adjusted with the channel sliders in the feature and a color added to the result using the Tint options.

Favorite conversion values can be saved using the options in the settings menu next to the Presets area of the dialog. Here you can Save current settings, Load previously stored settings or Delete any settings displayed in the Presets list.
But best of all, this new feature can be just as easily applied to raw files as it can to standard images. Simply add the Black and White adjustment layer above the raw Smart Object layer to create a totally customized, non-destructive, convert to gray option.
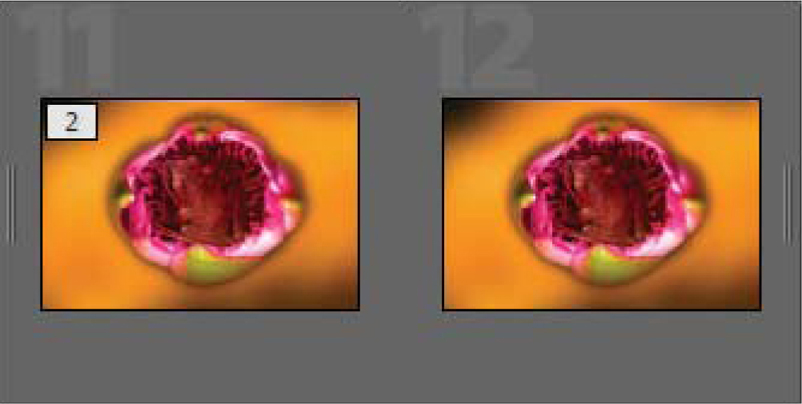
The Black and White feature provides sophisticated conversions for embedded raw files quickly and easily. Here are some examples (see right) of the different results that are possible:
1. Original color photo.
2. Conversion using the Auto button.
3. Conversion using 300, 189, 168, 63, 35, 63 settings.
4. Conversion using 23, 187, 268, 40, 300, 289 settings.
5. Conversion using the Auto button and 42, 20 Tint settings.
6. Conversion using the Auto button and 231, 19 Tint settings.

Step by step
1. Start by creating a new Photoshop document with a raw file embedded in a Smart Object layer. Do this by either selecting the Open Object option from Adobe Camera Raw or by selecting the File > Open as a Smart Object and choosing the raw file to include.

2. To start the conversion process open a color photo into the Photoshop workspace. Next, apply the grayscale conversion non-destructively by using the Black and White adjustment layer. Select the option from the pop-up menu displayed via the New Fill/Adjustment Layer button at the bottom of the Layers palette.

3. Ensure that the Preview option is selected in the Black and White dialog so that the changes you make are reflected in the photo. Click the Auto button for a general conversion or adjust how each color is mapped to gray using the sliders in the top portion of the dialog.

4. To color the monochrome select the Tint checkbox and then adjust the Hue and Saturation sliders until the desired color is achieved.

5. Alternatively, you can click on the color swatch to the right of the sliders to display a color palette where you can select the base color used in the tinting process.

Grayscale conversions whilst converting
Of course, the Photoshop Lightroom as well as the latest versions of Adobe Camera Raw grayscale conversion options are capable of customizing how individual colors map to gray. Have a look at Chapters 6, 7 and 8 for more details. The techniques detailed above are not necessarily meant to replace these features, but rather they are designed to show you what is possible when you start to think and work in a nondestructive fashion.
Add texture to your raw images non-destructively by using the new Smart Filters available in Photoshop CS3 or by applying the characteristics of a textured layer with layer Blend Modes.

Adding texture
But why stop there? Many monochrome workers also love the atmospheric texture that old grainy film stocks added to their images. Simulating grain is not a particularly difficult task with Photoshop. Most users will have played with the Filter > Noise > Add Noise filter and in doing so would have instantly added digital grain to their otherwise smooth photos. The Smart Filters technology in CS3 means that we can now filter the contents of Smart Object layers just as easily as we would other image layers.
Step by step: Smart Filters 101
Photoshop CS3 includes a new filtering option called Smart Filters. This technology allows you to apply a filter to an image non-destructively and more importantly for us it works with embedded raw files as well.
Based around the Smart Object technology first introduced into Photoshop in CS2, applying a Smart Filter is a two-step process. First the image layer needs to be converted to a Smart Object. This can be done via the new entry in the Filter menu, Convert for Smart Filters, or by selecting the image layer and then choosing Layer > Smart Objects > Convert to Smart Objects. In our case the embedded raw file is already a Smart Object layer so we are good to go. Next, pick the filter you want to apply and adjust the settings as you would normally before clicking OK.
Smart Filters are added as an extra entry beneath the Smart Object in the Layers palette. The entry contains both a mask as well as a separate section for the filter entry and its associated settings. Like Adjustment Layers, you can change the setting of a Smart Filter at any time by double-clicking the filter’s name in the Layers palette. The Blending mode of the filter is adjusted by double-clicking the settings icon at the right end of the filter entry.
The Smart Filter mask can be edited to alter where the filter effects are applied to the photo. In CS3, multiple Smart Filters can be added to a photo, but they all must use the one, common mask.
For raw shooters trying to maintain the integrity of their original raw file, Smart Filters provide a way to apply such things as sharpness, or in this case texture, non-destructively.
Applying a Smart Filter is a two-step process. To start the image layer needs to be converted to a Smart Object. Once this has occurred applying a filter to the layer will automatically create a Smart Filter entry in the Layers palette. The settings for any Smart Filter can be adjusted by double-clicking the filter’s name (1) in the Layers palette. The Blending Mode can be changed by double-clicking the settings icon (2) at the right end of the entry.

1. As with the other techniques detailed here, we start by creating a new Photoshop document with a raw file embedded in a Smart Object layer. Do this by either selecting the Open Object option from Adobe Camera Raw or by selecting the File > Open as a Smart Object and choosing the raw file to include.
2. Next, make sure that the Smart Object layer is selected and then choose the Filter > Noise > Add Noise filter. With the image set to 100% and the Preview option selected adjust the settings to suit the image. In this case Uniform distribution was selected and the Monochrome option was used as the effect is being applied to a grayscale image.

3. The strength of the filtering effect can be altered by changing the opacity of the filter. Do this by double-clicking on the settings icon on the right of the filter entry in the Layers palette. The Blend Mode used for the filter can also be changed here.

4. You can easily localize the effects of a Smart filter by painting directly onto the mask associated with the entry. With the mask thumbnail completely white the effect is seen at full strength. To reduce the dominance of the texture in an area the mask thumbnail is selected and the area painted with a black soft-edged brush of low opacity.

• Pro’s tip: Alternatively, the mask thumbnail could be changed to black or inverted using the Image > Adjust > Inverse option. Keep in mind that black sections of a mask do not apply the filter to the picture so inverting the thumbnail basically removes all filtering effects from the image. Next, a white soft-edged brush could be used to paint in the texture to the areas required.
Trying to filter a Smart Object layer directly in Photoshop CS2 will result in this warning dialog being displayed. Selecting OK will convert the raw file to a standard picture format and in the process lose the file’s ability to edit raw conversion settings at a later date. If you want to maintain a non-destructive workflow then you will need to find a way around this rasterization process. In the case of adding texture it is a simple matter of applying the texture to another layer and then altering the layer Blend Mode to mix the contents of both the texture layer and Smart Object layer.

Texture without Smart Filters
Unfortunately CS2 doesn’t contain Smart Filters. Applying texture non-destructively to an embedded raw file with this version of Photoshop is another matter. To achieve the same outcome we need to think a little more laterally. Rather than trying to filter the Smart Object layer itself, which would require the layer to be rasterized, losing the embedded file in the process, we will introduce the texture with the aid of layer blend modes.
Step by step
1. Start by adding a new blank layer to the top of the Layer stack. You can do this by clicking the Create a New Layer button at the bottom of the Layers palette or by selecting Layer > New Layer. Rename this layer ‘Texture’.

2. Next make sure that the layer is selected and then fill the layer (Edit > Fill) with the 50% Gray option available from the dropdown Use menu in the Contents section of the dialog. You will end up with a gray layer that sits above all other layers in the stack.

3. Now filter the layer with the Add Noise filter, making sure that the Monochrome option is selected so that no colored pixels are introduced into the grayscale image.

Note: For the sake of this example the texture settings used here are stronger than you will need to use.
4. Lastly select the texture layer and choose the Overlay entry from the list of Blend Modes available at the top of the Layers palette. Now the original grayscale image returns to view in the workspace but the texture of the upper layer is combined with the pixels from beneath.

Pro’s tip: To adjust the strength of the grain effect select the texture layer and alter the Opacity of the layer.
Darkening or lightening specific sections of the photo, generally called dodging and burning, can also be achieved without converting the embedded raw file by painting black or white onto a separate layer set to the Soft Light Blend Mode.

Non-destructive dodging and burning
Dodging and burning, or lightening and darkening specific parts of a photo for dramatic effect, has long been a part of photographic practice. Photoshop contains both Dodge and Burn tools but these features are often avoided by photographers as the changes they make are applied destructively to the original pixels. This, coupled with the fact that the tools don’t work with Smart Object layers, means that we need to find a workaround for localized darkening and lightening activities. The following technique uses a Dodge and Burn layer, set to the Soft Light Blend Mode, that sits above the image layer. Picture parts are darkened by painting on this layer with a black brush and lightened when painting with a white brush. The result is a technique that provides dodge and burn-like functionality but doesn’t change the original image.
Step by step
1. Start by adding a new blank layer above the Smart Object layer. You can do this by clicking the Create a New Layer button at the bottom of the Layers palette or by selecting Layer > New Layer. Rename this layer ‘Dodge and Burn’.

2. Next, change the Blend Mode of the layer to Soft Light. This will change the way that the layer interacts with the Smart Object layer beneath. Painting onto the layer with colors darker than mid gray will darken the image. Painting with lighter colors will lighten the photo.

3. To burn in specific areas of the image start by selecting black as the foreground color. Next, choose the Brush tool and adjust the edge to soft and reduce the Opacity to between 10% and 20%. Now, with the Dodge and Burn layer still selected, start to paint over the picture areas to darken. Because of the low opacity setting you will need to build up strokes in areas that need a stronger effect.
4. To lighten areas, or dodge, change the foreground color to white and paint over these parts of the photo.

Reintroducing some color
Taking the monochrome scenario one step further it is a simple task to add back some color in the form of a simple tint by adjusting the settings of the upper Hue/Saturation adjustment layer. Double-click on the Layer thumbnail (the left icon in the adjustment layer) to open the Hue/Saturation dialog. Now select the Colorize option and carefully adjust the Hue slider to choose the color to tone the photo. The Saturation slider in the same dialog can be used to control the strength of the toning effect.
To apply a sepia tone effect to the embedded raw file change the settings of the upper Hue/Saturation adjustment layer so that the Colorize option (1) is selected.

Split toning
For layer-based split toning effects, simply add two Color Balance adjustment layers above the Black and White adjustment layer. With one Color Balance layer target the Highlight range of tones, changing the tint of the image using the sliders. Use the second Color Balance adjustment layer to tint the shadow tones a different color.

Rather than rasterizing the embedded raw file apply pixel-based corrections to a merged copy of the nondestructive editing layers.

When you have no choice but to rasterize
Despite our best efforts there will be times when the particular Photoshop function that we need to use cannot be applied non-destructively to the embedded raw file. For example, features like filters just will not work on a Smart Object in CS2 unless the file is rasterized first. In these circumstances, there seems little option but to convert the Smart Object to a standard image layer (rasterize) before continuing the editing process. But even at this point it is worth looking for a technique that will still maintain the spirit of the non-destructive approach.
The way I work is to perform as much editing on the Smart Object as possible and when the need arises to rasterize I place all the non-destructed editing components (Smart Object layer, adjustment layers, retouching layers) into a Group (Layer Set) and create a single image layer that is the composite of all these editing effects. I can then apply the pixel-based editing techniques directly to the composite secure in the knowledge that if I need to go back to the original file later I can access the primary data via the Group. Here’s how it works:
Step by step
1. Start by creating a Smart Object layer from your raw file. Add in any adjustment and retouching layers and complete all the editing work that is possible using a Smart Object.

2. Multi-select all the layers (except the background layer) that are used for editing the Smart Object layer. Next place these layers into a new Group (Layer Set) by shift-clicking the Create a New Group button at the bottom of the Layers palette. Rename the Group ‘Raw File’.

3. Now make sure that the Group layer (‘Raw File’) is highlighted and then choose Select > All. You will notice a marquee is now around all the image. Next choose Edit > Copy Merged. This creates a copy of all the merged layers including the active layer and all other layers beneath. The copy is stored on the clipboard and can be pasted as a new image layer by selecting Edit > Paste.

4. With the composite layer created you can hide the contents of the Group by clicking on the eye icon on the left of the layer. Pixel-based enhancements can now be applied directly to the merged layer.
5. Where possible, from this point forward, continue using layers, adjustment layers and smart objects to keep the file as flexible as possible.

Photoshop functions for multiple images
Until now we have concentrated on tips and techniques for editing individual raw files inside Photoshop, but what about the more automated features in the program. You know, the ones that use a group of images for the presentation or printing. Is it possible to include raw files when using these features? Well the short answer is yes!
Options for screen output
Instant slideshows
Slideshow is one of the view modes available in the Bridge workspace. Selecting this option creates an automatic self-running slideshow containing the images in the current workspace or those multi-selected before choosing the feature. Raw files displayed in the Content panel can be selected for inclusion alongside standard image file formats. Pressing the H key displays a list of commands that can be used to navigate, edit and adjust the slideshow.
Bridge contains an automated slideshow feature that can be accessed directly from the View menu or by pressing Ctrl/Command + L.

This feature provides a great way to quickly edit and label a bunch of images that you have just photographed. Multi-select the photos within the Bridge workspace and then click Ctrl/Command + L to switch to Slideshow view. As each of the photos is being displayed you can rate the pictures by clicking the number keys 1–5 or label them by pressing 6–9. Some photographers use this approach with their clients interactively rating the pictures based on the client’s feedback to the slideshow.
By clicking H you can display the list of shortcut keys used to control the slideshow or add labels to pictures during the presentation.

The PDF Presentation dialog contains settings that control the timing and transitions in the slideshow.

Portable slideshows
If you need to send a series of photos to a friend or client, rather than showing them directly from your desktop, you can create a special portable slideshow which Adobe calls a PDF Presentation. The end result is a self-running slideshow saved in the PDF or Adobe Acrobat format that can be emailed or saved to a CD and then forwarded.
As before, start the process by multi-selecting the photos to be included in the presentation from the thumbnails inside the Bridge workspace. Next, select the PDF Presentation option from those listed in the Tools > Photoshop menu. Photoshop opens and the PDF Presentation dialog is then displayed. Here you have the option of adding to the files selected or removing any that are already on the list. Next, select the Presentation option at the bottom of the dialog and adjust the Advance and Transition settings before clicking the Save button.
Select a name and folder for the presentation before clicking Save for a second time. Choose the Screen Res setting from the PDF Presets dialog that is displayed, before pressing the Save PDF button. Photoshop now does its magic opening, converting, sizing and saving the pictures in the presentation format. The final result can be viewed in Adobe’s free Acrobat Reader.
The completed slideshow is produced in the form of a self-running PDF presentation which can be viewed with Adobe’s free Acrobat Reader.

Exporting to other file formats
Automated conversions using the Image Processor
Back when CS was first released Adobe evangelist Russell Brown developed the Image Processor to demonstrate the power of the scripting engine within Photoshop and at the same time provide a very handy image conversion utility. Now the Image Processor is a permanent part of both Bridge and Photoshop’s feature lineup.
The Image Processor script generates up to three different file format versions of the original raw file automatically.

The utility is designed to quickly convert a range of raw files into JPEG, PSD and TIFF versions. There is an option to manually adjust the raw conversion settings for the first file and then apply these settings to the rest of the images. The utility can also rename, run a pre-saved action, add copyright details and size at the same time as converting between formats, providing a fast and efficient workflow for processing images that have been captured in a single session.
The copies created by the Image Processor are conveniently stored in separate folders labelled with their file type.

After processing, the files are stored in three separate folders on your hard drive. To use the utility, select your raw files from inside Bridge and then choose Tools > Photoshop > Image Processor. Set the location where processed files are to be saved, the file type and any associated settings (size, compression, color profile), add in copyright details and then choose any actions to apply to the files.
Printing from raw files
Producing a contact sheet
The familiar Contact Sheet option that has been present in Photoshop for the last few versions can be used from Bridge to print ‘proof’ sheets of raw files. Thumbnails are multi-selected from the Bridge workspace before accessing the utility via the Tools > Photoshop menu.
The options contained within the Contact Sheet dialog allow the user to select the number of columns of image thumbnails per page and the content of the text labels that are added. The page size and orientation can also be chosen via the Page Setup. Pressing the OK button instructs Photoshop to open each image in turn, resize the picture and then position it in a new document ready for printing.
The Contact Sheet option in Bridge can generate proof sheet versions of multiple files from raw files.

Picture Package
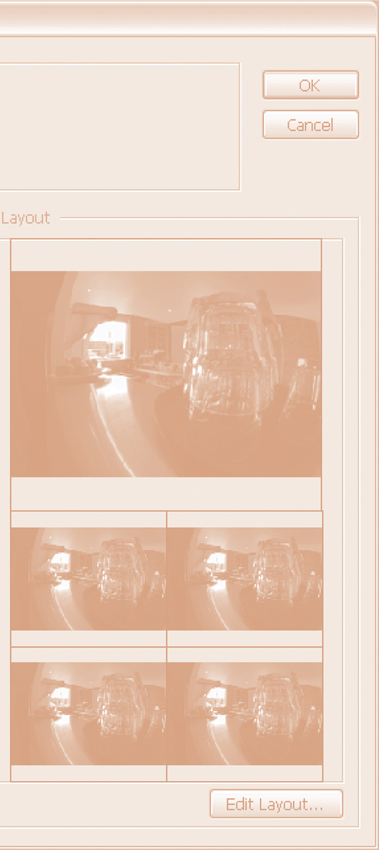
The multi-image printing idea is extended via the Picture Package utility which is also located under the Tools > Photoshop menu in Bridge. With this print utility you have the option of laying out several images of different sizes on a single page. Alternatively you can produce several copies of the same photo in a range of template designs. Use this utility to efficiently put together multi-print pages that are destined for cutting up and presenting separately.
The feature automatically lists the photos selected in Bridge in the Contact Sheet dialog. It is here that you can alter the sheet’s layout and design before producing the group of thumbnails as a new Photoshop document.

As well as producing contact sheets, raw files can be collated into other multi-print designs using the Picture Package feature also located in the Tools > Photoshop menu in Bridge.

Printing individual photos without conversion
Unfortunately Bridge doesn’t contain a straight print option that allows individual raw files to be printed directly from the Content panel. But don’t despair! Using the embedded raw file technique described earlier in this chapter, the raw photo becomes a Photoshop document, which in turn can be printed using the standard print options in the program.
Once you have completed the editing and enhancing of your embedded raw file it is possible to print the file just like any other Photoshop document.
