
1
Raw School 101
It’s a new day in photography. The earth-shattering change brought on by the availability of instant feedback on the digital camera’s LCD, or directly on computer monitor through tethered or wireless camera-to-computer capture, with histogram and capture information displayed, has changed the way we work and play in the realm of photography. Many, if not most, of us have ditched the chemicals and transformed our film darkrooms into digital darkrooms. We’re showing our clients or family and friends our work on various devices or as a quick print right after it’s produced, and we’re printing our own masterpieces or transmitting the image files directly to our imaging bureau. What is the next step in this ongoing digital development? Well, now many of us are embracing the advantages of ‘raw’ capture and building the new skills necessary to process and enhance our raw files in order to bring them closer to perfection or, at the very least, our liking.
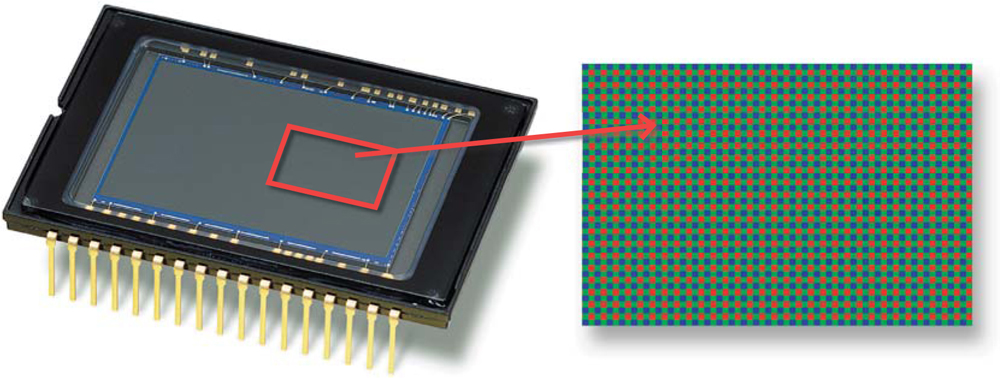
The standard camera sensor is made up of a grid of filtered sensor sites colored red, green and blue (RGB). The grid pattern used by most cameras contains twice as many green sensor sites as either red or blue, and in a special Bayer pattern. The RGB color design records both the color and brightness of the various parts of the scene.
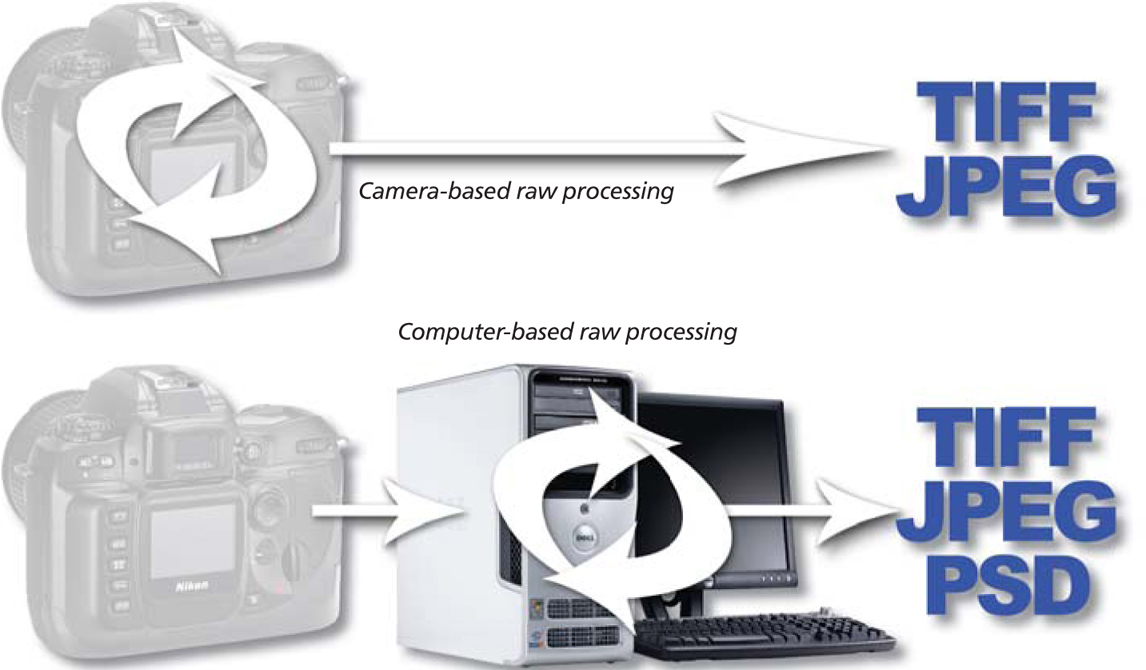
Unless you have been sleeping, or is that hibernating, under a rock for the last few months you will already know that ‘shooting raw’ is the latest hot topic for digital photographers the world over. More and more mid- to high-level SLR and compact cameras provide the option for switching from the traditional capture formats of JPEG and TIFF to raw. This capture format change gives photographers even more control over the digital photos they create by taking back a bunch of processing steps that until now have been handled by the camera, and placing them firmly in the hands of the shooter. By providing access to the image data early on in the processing workflow, photographers have more creativity options and better quality control with their pictures but, as with most things, along with this new found flexibility comes increased responsibility. Over the next few chapters we will take a close look at what it means to shoot, process and output raw files, and also examine the new wave of ‘complete raw workflow’ enhancement tools and techniques that are now entering the market. But before we get ahead of ourselves let’s start at the beginning with some details on the format itself.
What is raw?
To get a handle on what this file format is, and how it can help you make better pictures, we need to start by looking at the capture part of the digital photography process. All single-shot digital cameras (except those using the Foveon chip) contain a sensor that is made up of a grid, or matrix, of light-sensitive sites. Each site responds proportionately to the amount of light that hits its surface. By recording and analyzing each of these responses a tone is attributed to each sensor position in the grid. In this way a digital picture can be created from the range of scene brightnesses that are focused through the lens onto the sensor’s surface. Fantastic though this is, this process only results in a monochrome (black, white and gray) picture as the Charge Coupled Device (CCD) or Complementary Metal Oxide Semiconductor (CMOS) sensors by themselves cannot record the color of the light, only the amount of light hitting the sensor site.
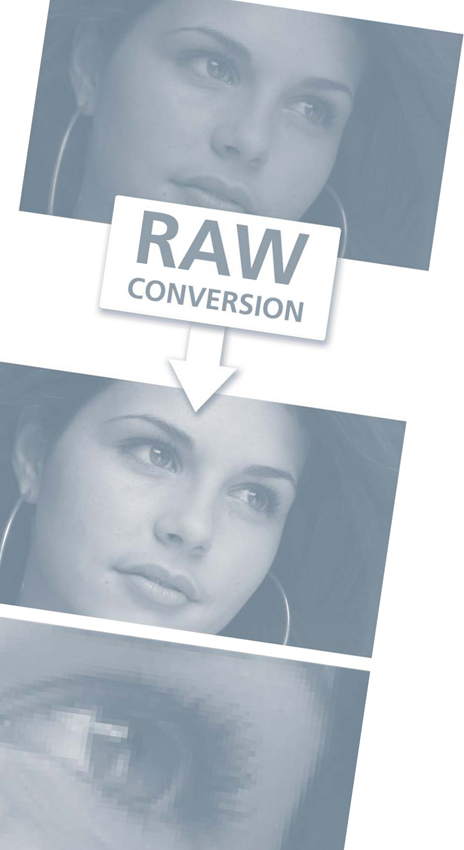
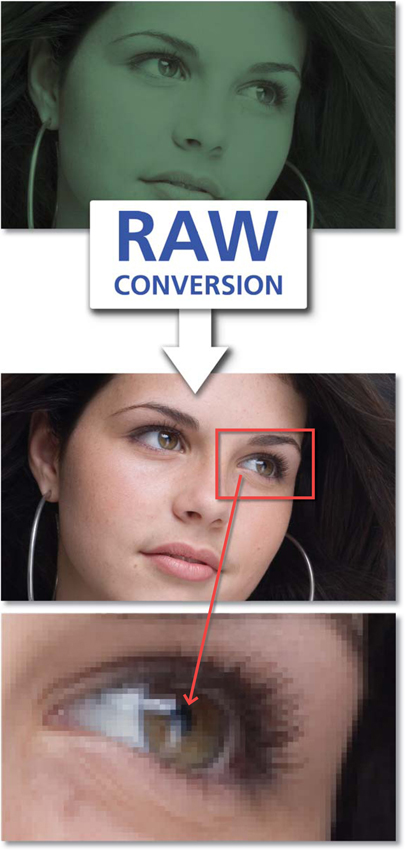
A raw file is the photo converted from its analog beginnings into a digital format but the photo is still separated into the Bayer pattern, where each sensor site represents one color only.

So how do our cameras create a color photo using mono sensors? Well, to produce a digital color photograph a small filter is added to each of the sensor sites. In most cameras these filters are a mixture of the three primary colors red, green and blue, and are laid out in a special design called a Bayer pattern. It contains 25% red filters, 25% blue and 50% green, with the high percentage of green present in order to simulate the human eye’s sensitivity to this part of the visible spectrum. Adding a color filter to each sensor site means that they respond to both the color and brightness of portions of the scene. Using this system the various elements of a color scene are recorded as a matrix or pattern of red, green and blue pixels of varying brightnesses. If you greatly magnify one of these images you will see the three-color matrix that was created at the time of capture.
The unprocessed sensor data saved at this point is referred to as a raw file. It contains information about the brightness and color of the scene, but in a form that can’t be readily edited or enhanced with standard photo software. Until the current influx of raw-enabled digital cameras and software, photographers were blissfully unaware of the existence of such files, as the images that they received from their cameras were already converted from the raw state to the much more familiar (and usable) JPEG or TIFF form. This conversion occurs as an integral part of the capture process, where the raw data coming from the sensor is used to create a full color image. Special algorithms are employed to change the Bayer-patterned data to a standard RGB form; in the process the extra details for non-red sites, for instance, are created using the information from the surrounding red, green and blue sites. This process is called interpolation, and though it seems like a lot of ‘smoke and mirrors’ it works extremely well on most cameras.
So you opt to save your images in JPEG or TIFF formats, the capture and interpolation process happens internally in the camera each time you pushed the shutter button. Selecting raw as your preferred capture format stops the camera from processing the color-separated (primary) sensor data from the sensor, and simply saves this data to your memory card. This means that the full description of what the camera ‘saw’ is saved in the image file and is available to you for use in the production of quality images.
Photographers switching from JPEG or TIFF capture to raw take on a conversion step in the photographic process that is not needed when working with the other formats.
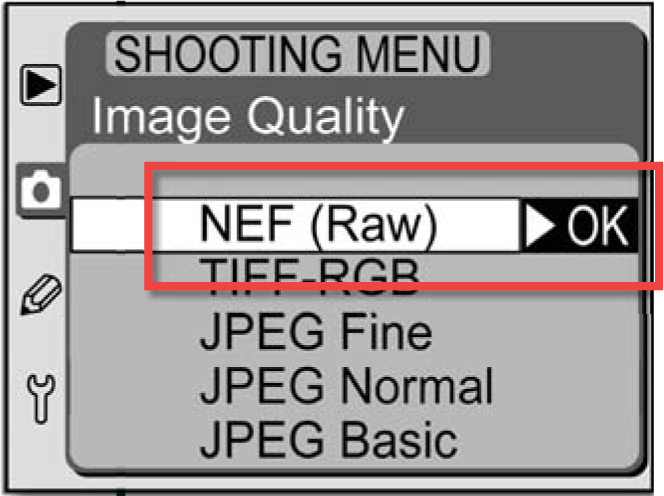
When selecting raw for image quality, the digital camera stores only the raw image and EXIF or metadata (camera type, lens and focal length used, aperture, shutter, and more). Any camera presets and parameter settings you make, such as contrast, saturation, sharpness and color tone (found in the Parameters menu on the Canon EOS 20D, for example), do not affect the data recorded for the image. They do, however, become the defaulted values during raw conversion, until you elect to change all or some of them. Only ISO speed, shutter speed and aperture setting are processed by the camera at the time of capture.
Generally speaking, before a raw file can be enhanced with a standard editing program, the picture has to be converted into a standard RGB picture format. This conversion process is usually handled by a dedicated conversion utility such as Adobe Camera Raw. This situation is changing somewhat as programs like Lightroom provide more and more enhancement options and editing software such as Photoshop becomes more ‘raw aware’.
Also the non-destructive enhancement tools in Adobe Camera Raw and Lightroom are so desirable that in the latest releases of these programs their editing abilities can also be used with JPEG and TIFF files.
Switching your camera to raw format capture removes the conversion step from being handled in-camera and allows more considered and creative conversions on the desktop.
An extra processing step
Sounds great, doesn’t it? All the quality of an information-rich image file to play with, but what is the catch? Well, for the most part raw files have to be processed before they can be used in a standard image editing application like Photoshop. It is true that brand new applications, like Adobe’s Lightroom, can enhance raw files without first converting them, but for the most part serious editing can only take place on a converted raw file. So to access the full power of these digital negatives you will need to employ a special raw converter. These programs come as either stand-alone pieces of software, or as a dedicated feature in your favorite editing package. Some can process files from capture devices of several manufacturers, others are restricted for use with single camera models only. They range from very expensive, fully featured, professional workhorses to free bundled utilities supplied with raw-enabled cameras. In this text we will concentrate on the raw processing abilities of Adobe Camera Raw, which ships with Photoshop and Photoshop Elements, and Photoshop Lightroom, the complete raw workflow product from Adobe.
Designed specifically to allow you to take the unprocessed raw data directly from your camera’s sensor and convert it into a usable image file, these editors also provide access to other image characteristics that would otherwise be locked into the file format. Variables such as color space, white balance mode, image sharpness and tonal compensation (contrast and brightness) can all be accessed, edited and enhanced as part of the conversion process.
Differences between raw and other formats
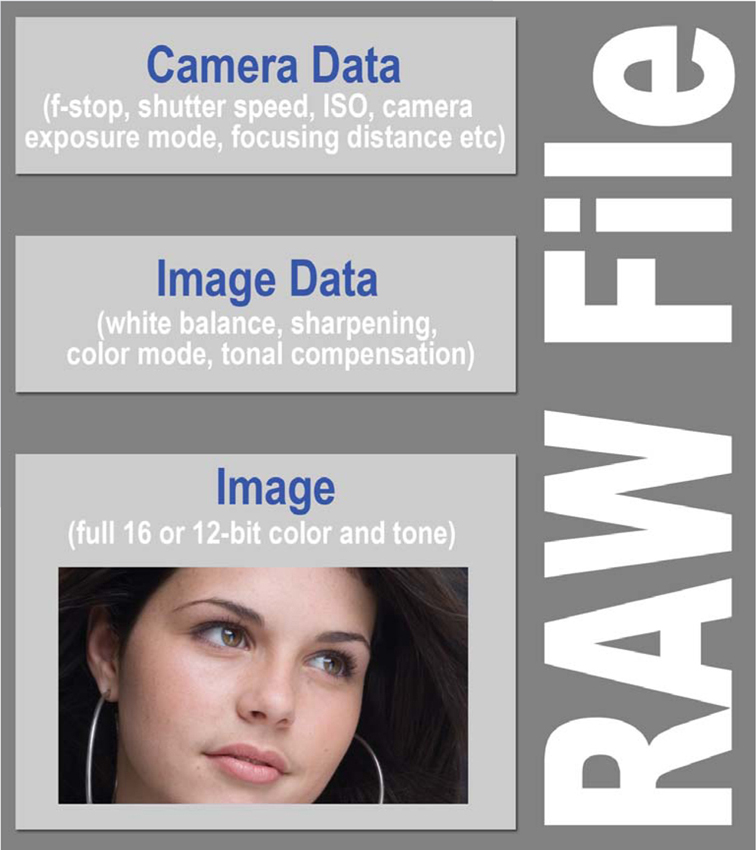
Raw files differ from other file types in that some of the options that are fixed during the processing of formats such as TIFF or JPEG can be adjusted and changed losslessly with a raw format. In this way you can think of raw files as having three distinct sections:
Camera Data, usually called the EXIF or metadata, including things such as camera model, shutter speed and aperture details, most of which cannot be changed.
Image Data which, though recorded by the camera, can be changed in a raw editor and the settings chosen here directly affect how the picture will be processed. Changeable options include color space, white balance, saturation, distribution of image tones (contrast) and application of sharpness.
The Image itself. This is the data drawn directly from the sensor sites in your camera in a non-interpolated form (Bayer pattern form). For most raw cameras, this image data is supplied with a 16-bit color depth, providing substantially more colors and tones to play with when editing and enhancing than found in a standard 8-bit JPEG or TIFF camera file.
Behold the new negative
So to put it simply, a raw file is a digital photo file format that contains the unprocessed image data from a digital camera’s sensor. Cameras with raw file support save the white balance, saturation, contrast, color, tone and sharpness settings for the file as tags (or place markers) but do not process them at the time of recording. The same settings for JPEG (and TIFF) files are processed in-camera and cannot be undone, if you will, in the digital darkroom. With raw capture you have full control over your raw file’s destiny. Capturing what you see in raw mode is the closest you can get to producing pure, unadulterated image data that will be ready for your creative control and interpretation.
Choosing raw over other capture file formats is not just a matter of preference it is also a choice to take full control of the processing of your digital photos.
A raw file is often called a digital negative for two or more reasons. First, raw files may be processed and converted multiple times without ever damaging the original image data. Second, the photographer is required to process and convert the digital negative in the digital darkroom post-capture, in a way similar to working with a negative in a traditional film darkroom. You always have the negative, whether digital or film, to reinterpret at a later date.
Why bother with raw? Why not just stick to JPEG?
OK, I know what you are thinking. Shooting in raw means more processing work for the photographer. So why bother? Why not just stick to JPEG? Well the answer is twofold – better image quality and more creative control.
Not too long ago when asked why I would ever choose raw over JPEG, I often said, ‘I shoot raw for the creative control I have over the images’. I’ve given this broad answer much thought and now think that it does not say quite enough about the power of raw. It’s not just about creative control. It’s also about quality control and assurance, if you will – not to sound too much like a Ford or General Motors executive or anything. When we tell our camera not to go ahead and process our files in-camera and make the decision to become the processing lab ourselves, we decide we want full creative control over working with our images to make them color correct, void of artifacts and defects (which are inherent in JPEG files) and great images overall, and we expect to assure our clients and/or ourselves what we have produced is of top quality. That’s creative control, quality control and quality assurance all rolled into one!
When we shoot raw instead of JPEG (or TIFF) we have as much control over image quality as we want and we can make creative changes to our raw file within the raw converter (or conversion process) well before we even get to the enhancement stage using imaging software. The camera sets markers for the selections we make at capture and we can move (adjust) the markers for exposure, white balance and more during conversion. This is not the case for JPEG files as they are processed in-camera and after download we take what we get (a fully processed file) and go from there. We have to try our best to recover detail or fix a problem in Photoshop or other imaging software, often using up precious time and creating more frustration than the image is worth to us. With raw capture, if your exposure and white balance are off just a little or, heaven forbid, even way off, you have the advantage of being able to correct and adjust your initial capture settings with a fair amount of success. With JPEG capture, if the exposure and white balance, for example, are a little askew you’re stuck, baby! Throw it away!!
When only the best will do!
Just as many photographers pride themselves in only shooting in manual mode, or boast about using the Levels or Curves features in Photoshop, rather than the Auto options, quality conscious shooters eagerly jump at the opportunity that raw capture affords by allowing them to get their hands on their photos early on in the processing chain. The conversion options provided by the camera at the time of capture, good though they may be, still provide an automatic-only approach to this important step. In contrast, armed with the top quality raw editing software that is now available and a raw-enabled camera, the desktop photographer can make careful and considered judgments about the many variables that impact on the picture conversion, providing customized picture-by-picture solutions never possible in the camera.
One advantage of working with raw files is the ability to use the full color depth that the image was captured in when processing and editing the file.
For instance, in the Workflow Options of Adobe Camera Raw the user has the opportunity to select 16 bits per channel depth for all converted and saved files.
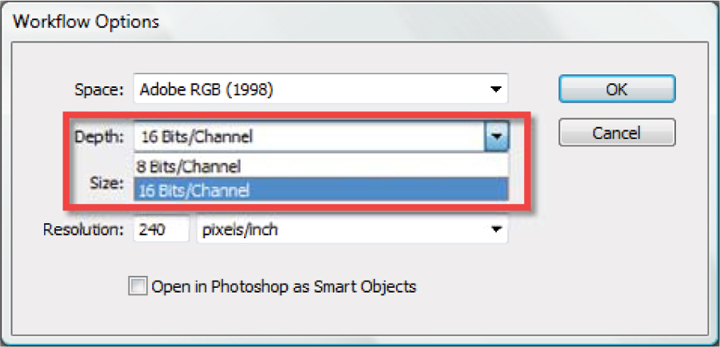
One of the real advantages of enhancing your photos during raw conversion is the changes are being applied to the full 12- or 14 -bit image rather than the limited color space of the 8-bit JPEG image. The changes are made to the file at the same time as the primary image data is being interpolated to form the full color picture. Editing after the file is processed (saved by the camera in 8-bit versions of the JPEG and TIFF format) means that you will be applying the changes to a picture with fewer tones and colors. And we all know the benefits, or should do, that such high bit editing provides.
Making the switch
The progression from JPEG to raw capture is probably much easier (and more addictive) than you ever imagined, providing you do your homework and learn the fundamentals. What may be difficult at first is finding your way around the raw converter menus and knowing what to do with a range of options. After all you are literally crawling through the attributes of a raw file and you’re in control of each attribute’s destiny. But once the terminology, control types and settings become familiar you will not want to relinquish your new found creativity and power over the quality of the images that you produce.
For the production photographer there are extra bonuses as most raw conversion programs also contain batch processing options. These allow the user to set up general parameters for a group of images and then instruct the program to process and save each file in turn automatically. This is a real time saver when you have to edit a bunch of pictures taken under the same shooting circumstances. In the same vein, some software also includes the ability to shoot and adjust pictures whilst your camera is attached to the computer. This feature, usually referred to as shooting ‘tethered’, works particularly well for studio photography and has the advantage of saving files directly to your computer, bypassing the camera’s memory card system.
Shooting tethered no longer requires you to connect you camera to the computer via cables; the big camera companies have wireless options for their mid- to high-range DSLR cameras.
Here the Nikon D2XS can be seen with the WT-2/2A wireless transmitter attached to the bottom of the camera. Good for up to 100 feet range approximately (30 meters), the transmitter can control the camera remotely (when used with Nikon Capture) and is also able to upload photographs directly to an FTP or file server over a wireless network.
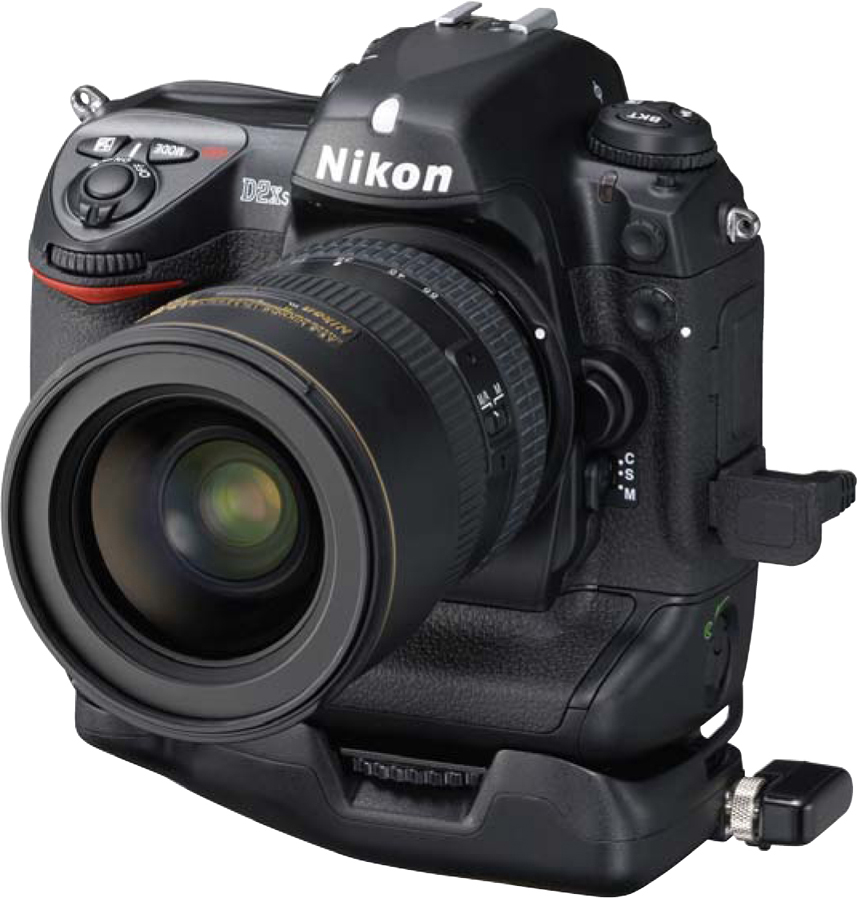
Being tethered doesn’t necessarily mean having wires connecting you camera and computer though. Both Canon and Nikon have wireless options for their leading DSLR cameras that provide the same connectivity as a cable but with loads more freedom.
Advantages of shooting raw
There are plenty of times when the features and benefits of raw capture make it the file format of choice. If we select an improper white balance at the time of capture or we have exposure or color saturation issues, for example, we can merely click on a drop-down menu tab in our raw converter and make adjustments. If creating the largest possible file size is paramount, raw is an excellent choice. If low light conditions prevail, we can use raw to make small adjustment requirements. These reasons are all fairly obvious to many of us who have heard about or tried raw capture with even a modicum of success. Professionals and amateurs alike: listen up! There are other big reasons.
Working your way through the various settings used to process a raw file is a great way to gain more understanding about the digital photography process.
• You get to use the full tonal and color range that was captured by the camera.
• You can remove many of the file processing decisions from the camera to the desktop, where more time and care can be taken in their execution (and more importantly, you are in control!). This includes:
• White balance changes
• Highlight, shadow and midtone adjustments
• Applying sharpness
• Manipulating saturation
• Color mode (sRGB, Adobe RGB etc.) switches.
• You create and save the most comprehensive digital picture file -‘digital negative’ – currently available.
• You can make image data changes, such as switching white balance settings, without image loss. This is not possible with non-raw formats as the white balance settings were applied when the image was processed in the camera.
• You can ‘upscale’ using primary image data (straight from the sensor) rather than preprocessed information, which arguably leads to better results.
• The original raw file is maintained. You can do a ton of work to your raw image prior to converting it without damaging the original negative, such as cropping (yes even cropping), color correction and more.
• A digital negative for archiving. With a raw original, you can always go back to an unprocessed file and revisit your approach to converting and processing it. Completely reinterpret the image if you like – warm it up, cool it down. Whatever. And you can do this over and over and over to perpetuity.
• Work with a wider dynamic range. Dynamic range in a digital camera is the range of black to white the image sensor can detect, from the highest measurable values of white to lowest black. (Don’t confuse this with gamut, the range of different colors the camera or other device, like a printer, can generate.) Our objective is to get the widest possible range of tones between black (shadows) and white (highlights) without clipping the shadows or blowing out the highlights. Our in-camera histogram will give us an approximation of this spread or range of tones within a particular image but we will really find out the truth when we open the file with a raw converter.
Parameters set in the camera at the time of capture, such as white balance, can be altered at the time of raw processing with no loss to the original file.

• Embrace high bit editing with 16-bit raw image files. A higher bit depth means more tones to play with, which eventually means smoother gradients and transitions in the final photograph. You have ever so much more data to work with in 16-bit mode.
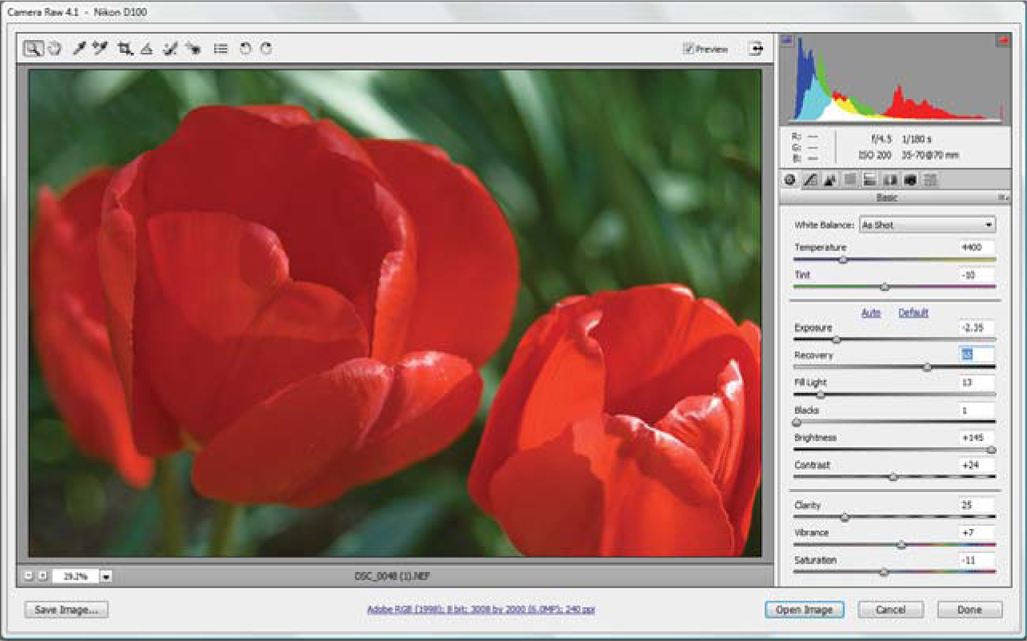
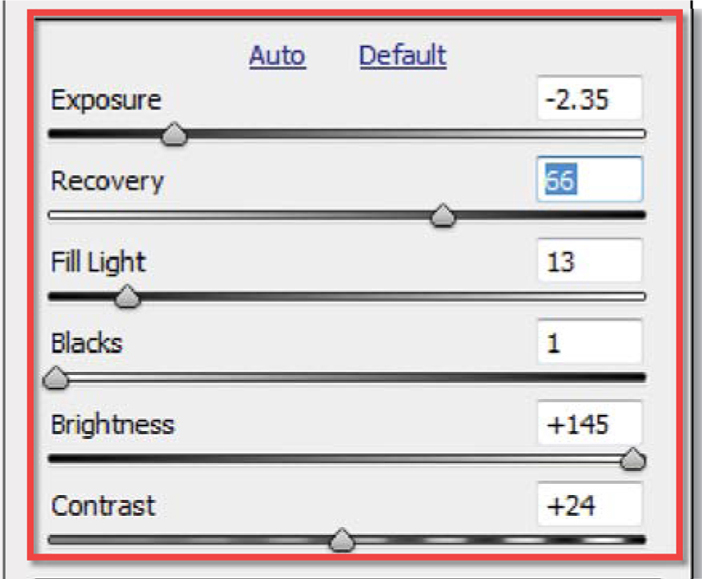
• Correct poor exposures (somewhat!). Think about this. Not only can you bracket your raw exposures, you can then adjust exposures up or down by one or more stops on your computer. Obviously you should try to nail your exposures in-camera and hope for just a minor tweak to exposure in the raw converter, but shooting raw does allow for a larger margin of correctable exposure error than other file types. Now I’m not saying that you can fix major problems; completely blown out highlights and shadows with lost data are not recoverable even in raw mode, but photos with minor errors are savable. In fact both Adobe Camera Raw and Lightroom have special controls for just this purpose. The Recovery slider in both programs reconstructs missing details in one channel with the data from the other two. Cool!
The high bit, high dynamic range nature of raw capture means that it is possible to fine-tune or correct minor exposure problems at the time of processing.
• Background batch processing: save time by batch processing raw images in the background, for example when using Adobe Bridge as an image adjuster and batch processing command center, or within other programs.
• Edit and correct lens-based problems such as vignetting and chromatic aberration.
Raw disadvantages
There’s not many, but it wouldn’t be fair to overlook the issues that some photographers rate as raw’s main disadvantages.
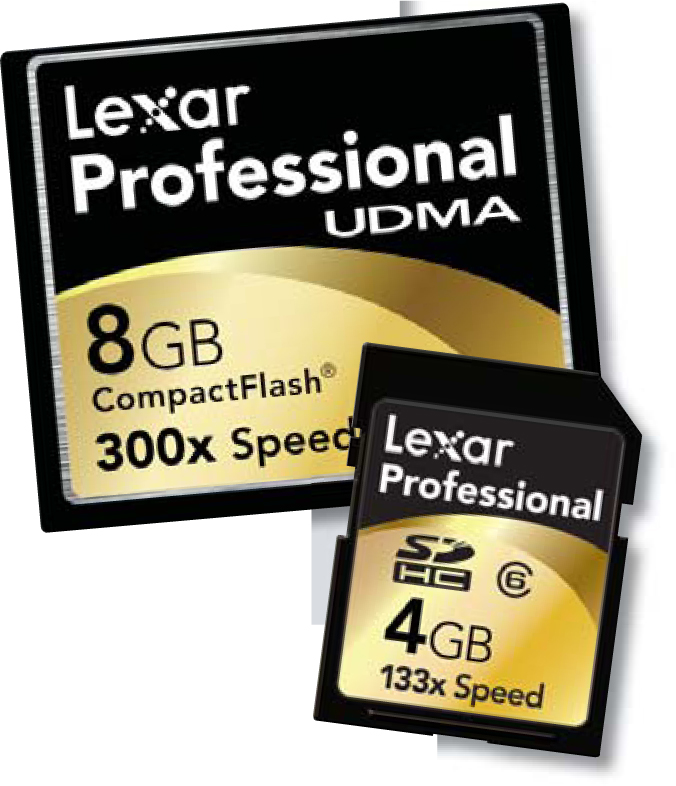
High-resolution cameras capturing raw files do require bigger, faster memory cards than when JPEG is selected as the capture format. Thankfully companies such as Lexar continue to release cards with higher capacities and faster read/write speeds.
• Bigger file sizes to store on your camera’s memory card. That means fewer photos per card.
• Having to process the images before being able to use them in your standard image editing program. Yep, that’s more time in front of the screen and less time shooting.
• Big file sizes plus on-the-fly processing can be a drain on meagre computing resources. Faster previews of raw conversion changes require up-to-date hardware which can be expensive.
• In some cases, needing specialist raw processing software to convert files, in addition to your favorite image editing package.
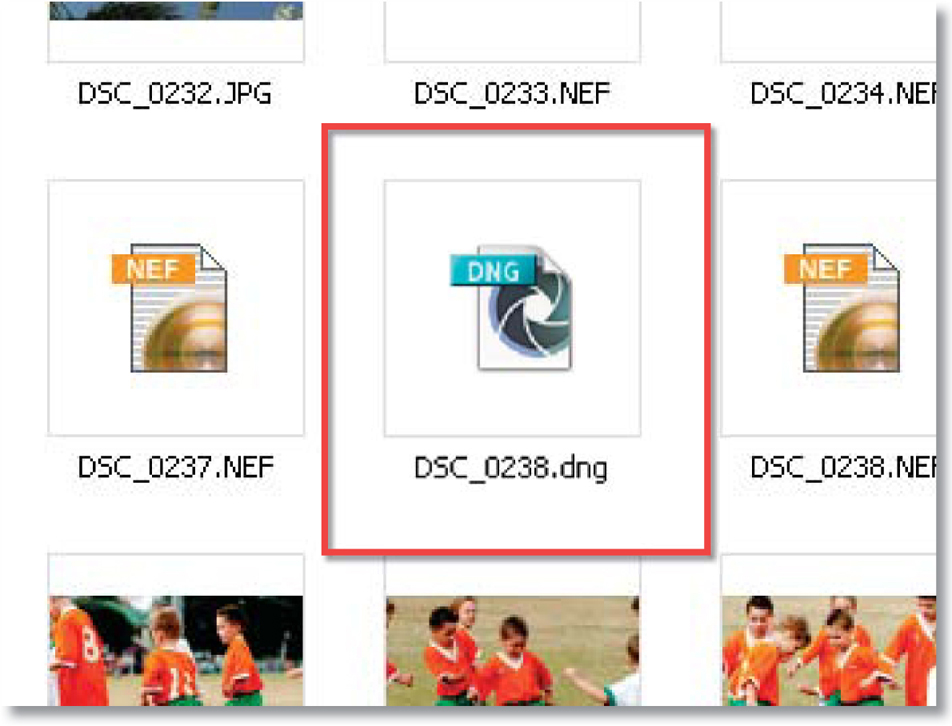
The DNG or Digital Negative file format is an open source format proposed by Adobe as a means of creating a common standard among digital cameras.
Proprietary and open raw file formats
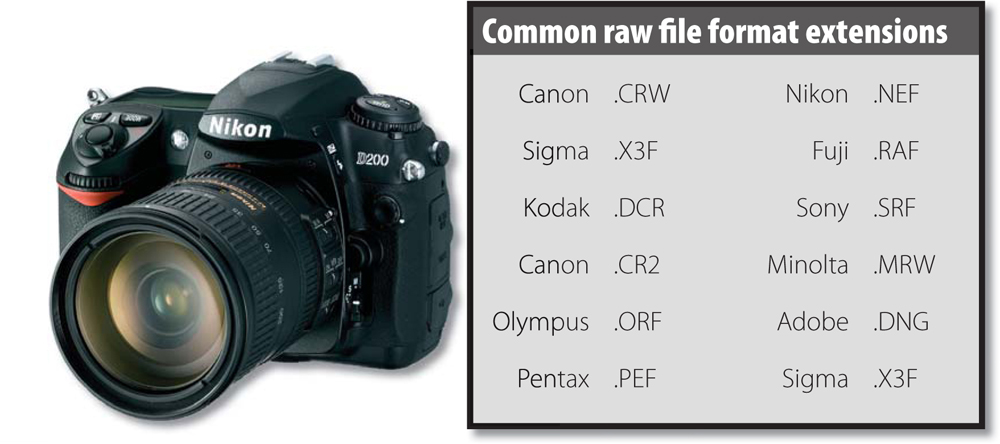
By now it should be plain to see that the raw format has many advantages for photographers, offering them greater control over the tone and color in their files, but unfortunately there is no one standard available for the specification of how these raw files are saved. Each camera manufacturer has their own flavor of raw file format. This can make the long-term management of such files a little tricky. What happens, for instance, if over time the specific format used by your camera falls out of favor and is no longer supported by the major editing packages? Will you be able to access your picture content in the future?
In February 2005 Adobe released a specification for a new non-proprietary file format for storing Camera Raw files. The Digital Negative format, or DNG, is being put forward by the company as a candidate for a common raw standard that both camera and software manufacturers can adopt. Most photographers believe that the new format is a step in the right direction, as it brings compatibility and stability to the area along with the assurance that your raw files will be able to be opened long after you camera has gone by the wayside.
The Digital Negative format comprises actual image data and the metadata that describes the image file. The major feature of DNG is its handling of metadata, the information that stays with a file about camera and lens used to capture the file, camera settings, and more. DNG is designed to work with a wide range of camera designs and features and will evolve with introductions of new cameras and technology within them. The Digital Negative specification helps ensure your images are accessible and readable in the future.
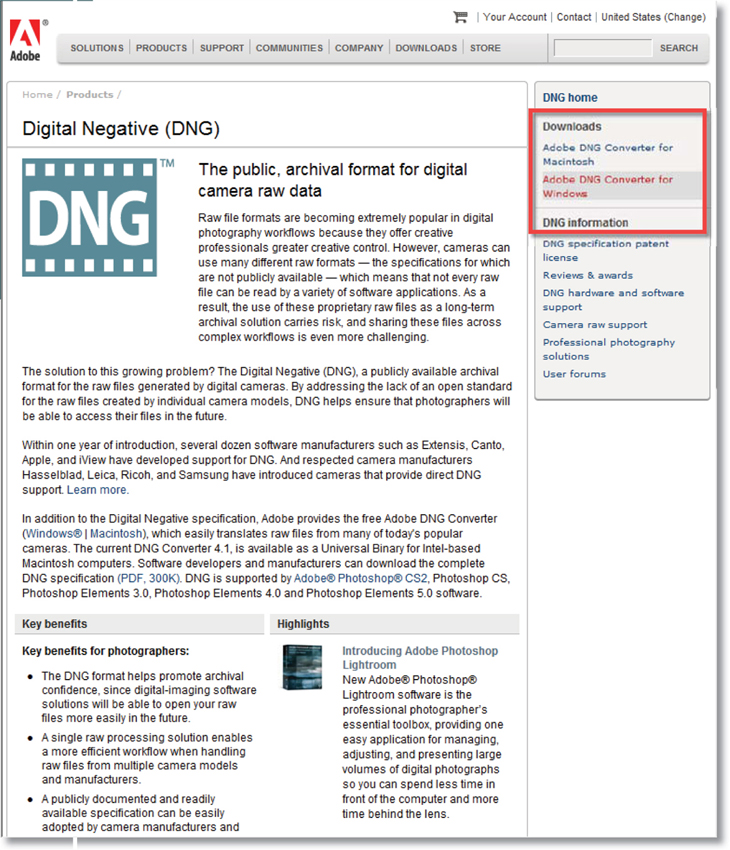
Adobe supplies a free DNG converter that lets you change your proprietary format raw files into the DNG format. Get your free DNG converter here: www.adobe.com/products/dng/. Though not strictly an open source format, Adobe freely publishes the specifications for the format and it can be used by hardware and software developers without charge.
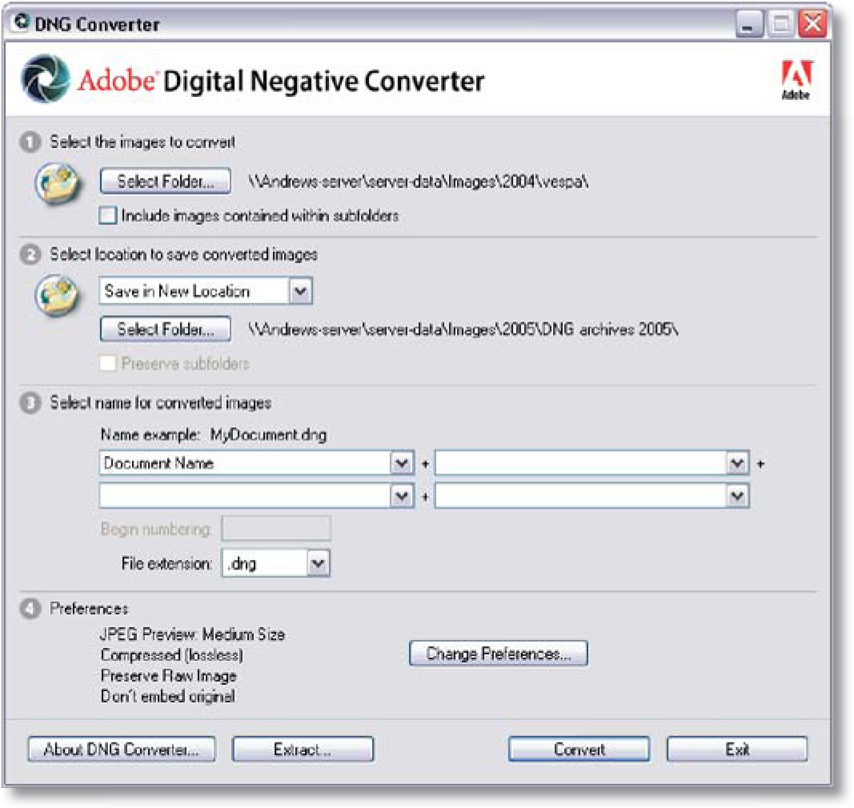
In addition to providing a common raw file format, the DNG specification also includes a lossless compression option which, when considering the size of some raw files, will help reduce the space taken up with the thousands of images that photographers accumulate. Also included is the ability to embed the original raw file (in its native format) inside the DNG file. This step does increase the size of the final file but it also provides peace of mind for those users who want to always maintain the original file. The original RAW Files can be extracted later using Adobe’s DNG Converter
The DNG or Digital Negative file format is an open source format proposed by Adobe as a means of creating a common standard among digital cameras. More information about the format plus the free DNG Converter software for both Macintosh and Windows machines is available from the www.adobe.com website.
The company hopes that the specification will be adopted by the major manufacturers and provide a degree of compatibility and stability to the raw format area. At the moment Hasselblad, Leica, Ricoh and Samsung have all produced cameras that capture in the DNG format, with more predicted to follow.
Adobe has included DNG output options in Photoshop CS2/CS3, Photoshop Elements 4.0/5.0 and Lightroom, and also provides a DNG converter that can change many proprietary Camera Raw formats directly to DNG. The converter is free and can be downloaded from www.adobe.com.