

PITCH CORRECTION OVERVIEW
Being able to correct a pitch in the studio has been a recent technological advancement. Pitch correction entails being able to identify the pitch, determine the correct pitch, and process the track with the pitch correction so that it does not sound artificial.
Since the beginning of digital audio workstations (DAWs), there have been techniques to adjust the pitch of tracks. This pitch adjustment would adjust the pitch of the entire audio region. This was not the best algorithm for adjusting the pitch of a lead vocal, as the result would have an artificial sound.
With the advance of processing and technology, pitch correction evolved into algorithms that were able to identify and correct the pitch with minimal artifacts. This pitch correction is able to conform identifiable pitches to a predetermined scale. This was the beginning of the modern era of perfectly intonated vocals.
In the past few years, having a vocal track on a pop record with slight fluctuations in pitch has become rare. Since correcting pitch in the studio has become easy to do, the standard has become to apply it almost all the time. This has led to a sterility in the sound of vocals on a pop recording. Much of the emotion carried by the vocalist is through the subtle variations in pitch.
For years, pitch correction has only worked across a monophonic track. This is because it is easier to identify the pitch from a monophonic sound source, as it has a periodic waveform. This periodic waveform is easier to recreate into a different pitch. More recent advancements have allowed for pitch adjustment beyond that of the monophonic instrument. This involves a much more complex process of identifying the fundamentals and harmonics of individual notes on a track.
There is constant debate over whether or not pitch correction has helped or hurt the quality of recordings. On one hand, some of the artistry and work that vocalists go through to hone their craft has been eliminated. They no longer need to record every single line as accurately as possible. However, more emphasis has been placed on getting the best feeling and inflection in the voice, which can lead to a better vocal performance for a song.
Many people associate the use of pitch correction with disposable pop music. Although there are many more factors in creating this pop music, pitch correction is used with every style of music. Even country and folk music, which has traditionally utilized vocalists with imperfections, such as Johnny Cash or Bob Dylan, has replaced their vocal stylings with a much more pop-oriented, perfect vocal sound.
The more that an engineer utilizes pitch correction in his or her work, the more he or she is able to hear the processing done on commercially released recordings. There is a noticeable sound to the pitch correction, but it is done so often that the general public has come to expect the perfectly pitched vocal.
As an engineer or producer, you should be well versed in being able to apply a subtle pitch correction to a vocal, as well as creating the “perfect” pop vocal. Different techniques with the various software plug-ins that are available allow for the different fluctuations to come through, while creating a more consistent vocal. It is all about using the right tool for the right job.
AUTO-TUNE
One of the most commonly used pitch-correction methods of the past ten years has been the use of the Auto-Tune plug-in, produced by Antares. There are two versions that are used in the studio. There is a stand-alone hardware version, as well as various plug-in incarnations of this technology. With the common usage of DAWs, the plug-in version has become the most common format utilized.
In order to get the most out of Auto-Tune, it is important to understand how pitch, as it relates to digital audio, functions. The pitch of a sound is determined by the period at which the waveform repeats itself. A monophonic, melodic instrument, such as the human voice, will create a periodic waveform (Figure 4.1).
The number of times that the periodic waveform repeats in a second determines the frequency of that pitch. Auto-Tune will analyze the pitch of the waveform in order to determine what pitch it is currently hearing, and then it will correct the pitch by stretching or compressing the periodic waveform and regenerating it to the desired correct pitch. For this reason, Auto-Tune will not work with any source material that contains polyphonic audio, such as a guitar chord or choir. When these waveforms are analyzed, there is no periodic waveform for Auto-Tune to detect what pitch it is hearing, and will therefore do nothing with the sound.

FIGURE 4.1
A periodic waveform with the arrows indicating a single period.
Auto-tune’s Automatic mode
There are two different modes of pitch correction with Auto-Tune: Automatic and Graphic. Automatic mode works well if you want to set the plug-in across the track with some general settings and let the plug-in work its magic.
When first opening the Auto-Tune plug-in, you will see that its default mode is set to “Automatic,” with the “Chromatic Scale.” The pitch-detection algorithms work best when selecting the Input Type that will match the source material. The choices are Soprano, Alto/Tenor, Low Male, and Instrument with the last choice of Bass being grayed out (Figure 4.2). This is because the Bass instance of the Auto-Tune plug-in is a specific algorithm designed to detect much lower pitches than are normally heard in the human voice and most monophonic instruments, such as a saxophone or cello.
When playing your track through the Auto-Tune plug-in, the piano keyboard (Figure 4.3) at the bottom of the screen will turn blue on the pitch that Auto-Tune is tracking from the source material. The bar above at the top will indicate the amount of pitch correcting that the Auto-Tune plug-in is performing. If the yellow indicator moves above the zero point, it means that the pitch is detected as being flat, and so Auto-Tune is raising the pitch by the amount of cents indicated.

FIGURE 4.2
The voice selection parameter of Auto-Tune to select the appropriate algorithm for the material.
RETUNE SPEED
There are two main settings of the Auto-Tune plug-in that will have the greatest impact on the sound of the track. The first setting is the Retune Speed. This setting will determine how quickly the pitch is corrected, once detected, in milliseconds. An extreme setting of 0-ms will result in the famous “Cher sound” from her song “Believe.” This extreme setting can also be heard in many other songs, such as “Only God Knows Why” by Kid Rock.
The more realistic settings begin at 20-ms for a solidly pitch-corrected sound and continue up above 100-ms for a more natural performance. Like many plug-in settings, Retune Speed can be automated in such a way that you can adjust the settings throughout the track to grab the pitch faster when necessary and to be more relaxed in its correction in other places.
If you are looking to minimize or remove a vibrato from a vocal performance, you can smooth out the pitch with a faster retune speed; however, there are other components to a vibrato such as formant and volume changes that will still make the sound of the vibrato present, even though the pitch fluctuations have been smoothed out.

FIGURE 4.3
The keyboard in the Auto-Tune plug-in, indicating the detected pitch.
SCALE AND KEY
The second-most important settings of Auto-Tune are the key and scale. This will determine which pitch Auto-Tune will correct the incoming pitch toward. If the vocal or instrument is fairly accurate, then the default setting of “Chromatic Scale” will probably work just fine. For instances where the “out-of-tune vocal” is actually closer to a different semitone, then Auto-Tune will correct the pitch to the nearest possible semitone, which could be a half-step above or below the desired pitch. In order to alleviate this, finding and setting the correct key and scale will eliminate the possibility of correcting the pitch to a note that is not even in the scale of the song.
The most common two scale settings for pop music are major and minor, but there is just about every scale imaginable in the scale settings. If you select “E minor” as the scale, you will see all of the tones that are not in the scale disappear as options (Figure 4.4). There are two options for creating a major or minor scale. The first option is to directly select the major or minor scale. The second, and most flexible, method is to select the correct key. Then select “Chromatic Scale” and press the “Set Minor” button that appears to the right of the notes (Figure 4.5). This will remove all of the unused tones from the scale, but you will then have the option of unremoving a note. This could be used if the singer intends a single pitch that is not in the specified scale, such as adding an A sharp if the singer has a passing tone or the chord being played happens to not be diatonic to the selected key.
FIGURE 4.4
The scale selection of Auto-Tune set to E minor.

FIGURE 4.5
The key has been set to E minor with a Chromatic Scale by pressing “Set Minor.”

Another method of removing a note from the scale is by clicking on the piano key at the bottom of the plug-in. This will remove that single note and only in the octave it was played. This feature is quick and easy to use, as you can watch the keyboard below as Auto-Tune is tracking the pitch, and any erroneous pitch tracking is visible. These erroneous pitches can be quickly removed by pressing those particular keys on the piano.
ADDITIONAL FUNCTIONS IN AUTOMATIC MODE
There are three other knobs that control other features in Automatic mode. The first is Scale Detune. This will allow the user to make small adjustments up or down to the global pitch reference of the Auto-Tune plug-in. If the instruments that the vocalist is singing to are all in tune with each other, but are slightly below A440 as a standard pitch reference, then you can lower the Scale Detune control to match the pitch reference being used. This will prevent Auto-Tune from correcting the pitch to an incorrect pitch reference, such as correcting the vocal track to be sharper in pitch than the others. The next knob is the Humanize function. This will make the retune speed more dynamic to fit the vocal part. For longer notes, the retune speed will be longer, and the shorter notes will have a faster retune speed. The last additional knob is Natural Vibrato. This will allow the user to increase or decrease the amount of vibrato that is already present in the vocal or instrument track.
The final section in Automatic mode is the Vibrato section, which is designed to create a vibrato to a vocal part that has none. It will simulate the formant and amplitude changes, as well as the delay in the start of the vibrato (Figure 4.6).
There are three choices for the shape of the vibrato: sine wave, saw, and square. The sine wave will sound the most natural, whereas the square wave will sound artificial as the pitch jumps up and down with little glissando between the modulations. The saw wave will sound artificial as well, because the vibrato moves up in pitch and then suddenly drops down.
The Onset Rate will determine the speed of the vibrato in hertz, or cycles per second. The Onset Delay will determine how long Auto-Tune will wait before engaging the added vibrato. The Onset Rate will then control how long from the end of the Onset Delay before the vibrato is at its maximum level. This will make the added vibrato seem more “human,” as there is usually some time at which a singer will take to initiate the vibrato once singing the note. The Variation knob will further humanize the vibrato by adding random variation to the Onset Rate and Amplitude Amount controls.
The Pitch Amount will control the amount of depth to the vibrato; that is how far the pitch will go up and down in relation to the original sung pitch. The Amplitude Amount will create differences in volume, which is something that occurs subtly in a vocalist’s natural vibrato. The Formant Amount controls the amount of resonance that is present in the original pitch.
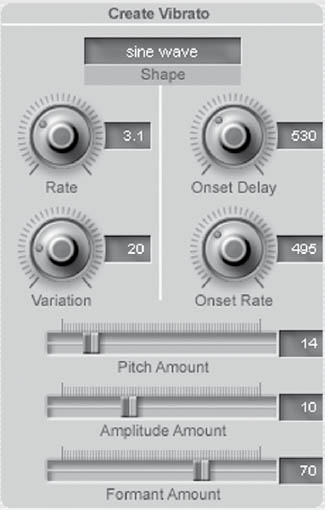
FIGURE 4.6
The vibrato settings of Auto-Tune.
Graphic mode
Graphic mode in Auto-Tune is best suited for making specific and precise manual adjustments to the pitch correction. Within this mode, you can do more dramatic pitch correction than found in Automatic mode. What is important to note is that within this mode, you will need to process the audio by recording the pitch-corrected version onto the same track or a different track.
SETTING UP THE TRACK TO BE PROCESSED IN GRAPHIC MODE
Depending on the software used, it is best to record the processed audio track to a different track. To accomplish this, start by setting the volume in the mixer of your DAW to zero, and remove or deactivate any plug-ins and volume automation on the source track, with the exception of Auto-Tune. Once this is done, create a send to an unused bus from the source track. Create a new track for the processed vocal below the original track with the input being the destination bus set from the track being processed.
For example, if you have a track with a vocal needing Auto-Tune, create, in Pro Tools, “send the output to Bus 1,” or any unused bus. “Create a New Track” and have the new track with its input from Bus 1. Mute this new track, so that when you are recording the processed audio, you do not hear both tracks playing at the same time. See Figure 4.7.

FIGURE 4.7
Setting up the track to record the processing of Auto-Tune.
THE TWO STEPS OF GRAPHIC MODE
There are two processes that you will need to do when setting up a track to be recorded with Graphic mode. The first is to Track Pitch, where you will select a portion of audio to be processed in your DAW. Then, the next step will be to Make Curve, which will lay a map down on the tracked audio to see what Auto-Tune will do to the audio. When first set up, the new curve laid down by Auto-Tune will correspond to the original tracked pitch, so there will be no change in pitch to the corrected audio track. From here you can manipulate the curve in a variety of ways to get Auto-Tune to correct the pitch as you would see fit (Figure 4.8).
When utilizing Graphic mode to make pitch corrections with Auto-Tune, it is best to work with single vocal phrases, rather than long passages of audio.
With the tracked audio in Graphic mode, you can move the entire curve around manually or redraw your own. With the Arrow tool, which is the default tool, once the pitch is tracked, you can drag the curve up or down to raise or lower the overall pitch. This is useful if you want to just raise a slightly flat vocal part overall.
The easiest tool to use would be the Line tool, which is the first tool on the left. From here you can draw segmented lines that will create a steady corrected pitch where you have drawn them in (Figure 4.9). The Line tool will create a sequence of lines, segmented every time you click the mouse. To end the segmenting of lines, just double-click the mouse.
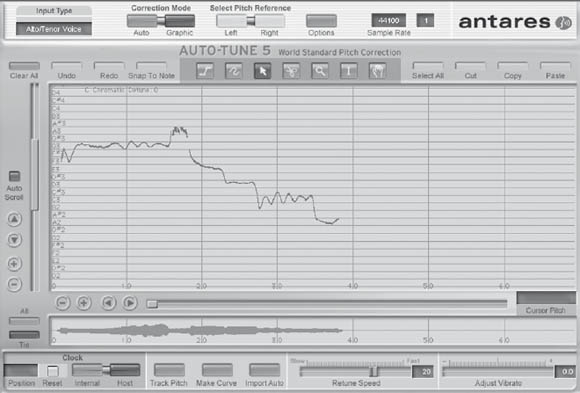
FIGURE 4.8
The pitch of a vocal tracked by Auto-Tune.
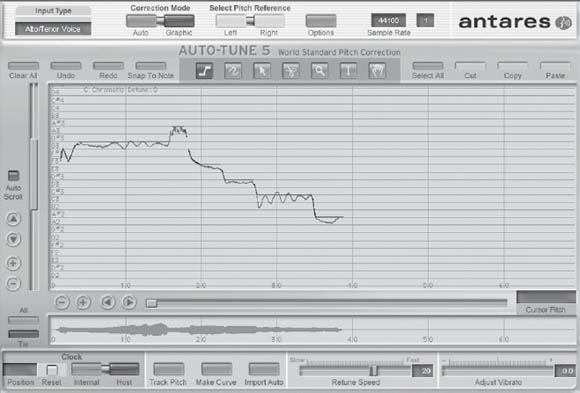
FIGURE 4.9
The corrected pitch has been drawn in with the Line tool.
The next tool is the Curve tool. With this tool, you can draw in any corrective curve that you wish.
The Scissors tool will allow you to make cuts in a continuous curve that Auto-Tune has drawn on the screen. This is useful if you want to raise and lower different sections of the curve with the Arrow tool.
Once your Graphic mode settings are the way that you want them, then it is time to record the processed audio onto a different track (Figure 4.10). Simply place the newly created track into “Record,” and record your selected segment. The audio region of the new track can then be placed onto the original track if you wish, or you can keep it in a different track, and then just mute the region of the original track.
Using Graphic mode in this way allows for a combination of both modes. You would be using Automatic mode for most of the track and then processing certain selections with Graphic mode, where more fine-tuning is necessary.

FIGURE 4.10
The pitch corrected with Graphic mode has been recorded onto a separate track.
Tracking the pitch of a bass track using Auto-tune
Since the Auto-Tune plug-in is designed to track and correct pitch, it is possible to use Auto-Tune to track the pitch, if you are looking to track the chord progression of a section or find the key of the song.
Since most bass tracks in pop-rock songs rely heavily on playing the root, you can place the Auto-Tune plug-in in Graphic mode merely to analyze the pitch of the notes being played. This is helpful if you are looking to write or sequence additional parts to a song.
Without even processing the audio, you can see in Figure 4.11 the root notes that were tracked by Auto-Tune are C, Ab, Eb, and Bb. This is a great starting point in transcribing the chords to a song or figuring out the key.

FIGURE 4.11
The bass notes tracked by Auto-Tune for transcription of the root notes.
MELODYNE
Melodyne is a powerful tool for pitch correction and more. It goes beyond pitch correction and allows you to adjust the volume, compress and expand note lengths, and create harmony vocals. Melodyne functions differently than any other real-time pitch-correction utility. Rather than correct the pitch in real time, Melodyne allows you to visually see a representation of the pitches and adjust them manually or automatically. This works well when you need to adjust just a few notes or the entire track. Melodyne is available in many commonly used plug-in formats, such as AU, RTAS, and VST.
Transferring the audio into Melodyne
In order for Melodyne to analyze the audio and process it, you will need to transfer the audio from a track on your DAW into a separate file on your hard drive. It is best to select the location on your hard drive that contains your session. This way, when backing up your session, any recorded files from Melodyne will be backed up with the rest of the session data.
Make sure any edits on the vocal track are completed before applying Melodyne. Because Melodyne will read transferred audio from a separate location outside of the DAW, it has no way of knowing if any edits have been done in the DAW once the track has been transferred. If edits need to be made on the track, you will need to retransfer the audio back into Melodyne for those sections.
An entire track can be recorded to Melodyne, but if it only needs to be applied to certain sections of the track, you can just transfer in those sections. When the track plays through the Melodyne plug-in, it will play back audio directly from the track until it reaches the point where the audio has been transferred into Melodyne, at which point it will switch to playing back the transferred audio automatically. After your DAW has played through the transferred audio, it will switch back to resuming the playback of the audio on the track in the DAW.
Begin selecting Melodyne to be the first plug-in for the audio track. If the plug-in is instanced after a compressor or equalizer, and the processing on those tracks will be transferred, any adjustments you make will not be reflective on what you hear coming out of the Melodyne plug-in, due to the reading of the transferred audio. After the plug-in has been inserted, go to Settings and Preferences (Figure 4.12) and select the new location in your session for the recorded files for the “Temporary Recording” folder (Figure 4.13).
FIGURE 4.12
The Preferences setting of Melodyne.

FIGURE 4.13
The selected recording folder for the transferred audio.

Once the record path has been selected, you can begin to transfer the audio into Melodyne. This is accomplished by clicking the “Transfer” button, which you will see glowing red, and then play through the entire track or individual phrase that you wish to use with Melodyne. Playing back the audio will now transfer the audio files into the previously selected folder for processing.
FIGURE 4.14
The “Transfer” button pressed to record the audio to the temporary folder while playing back the track.

Once the tracks have been transferred, Melodyne analyzes the audio for pitch, volume, and timing information and makes separations between the notes (Figure 4.15). Once these data have been gathered, you can begin to edit the pitch, timing, and volume of the individual notes.
Manually correcting pitch
To begin editing the pitch, you will need to select one of the pitch editing tools. There are three tools from which to select: Edit Pitch, Pitch Modulation, and Pitch Drift (Figure 4.16). Each of these tools has a specific pitch parameter that it adjusts, and we will delve into each of these tools.
Once the Edit Pitch tool has been selected, you can see Melodyne place gray blocks near the audio where Melodyne thinks that the corrected pitch should be moved to (Figure 4.17). Each pitch can be moved to the corrected location by double-clicking each note, which will then snap that note to the new location (Figure 4.18). If you make an error in any pitch correction, you can easily go and undo that move. Be sure that you undo the move from inside Melodyne’s editor as opposed to your DAW’s undo.
Because Melodyne averages the pitch of the notes when it makes its corrections, if there is some drift within the note itself, Melodyne may make the corrected pitch sharper or flatter during the sustained portion of the note (Figure 4.19). Trying to grab the pitch and manually adjust it will only snap the pitch to a neighboring note up or down. You can bypass Melodyne’s note snapping by holding down the “Option” key while dragging the note up or down (Figure 4.20).

FIGURE 4.15
The tracked audio transferred and analyzed in Melodyne.
If at any time you wish to revert to the previous uncorrected pitch, you can highlight the notes with the Selector tool, go to the Edit window, go under Edit Pitch, and select “Reset All Pitch-Related Changes to Original.” This can be done on individual notes or entire selected passages (Figure 4.21).

FIGURE 4.16
The three different tools for editing the pitch inside Melodyne.
Pitch drift and vibrato
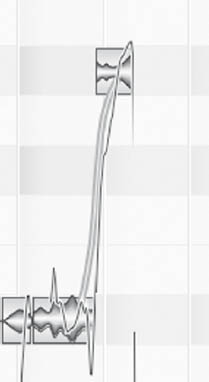
When Melodyne corrects the pitch, it maintains the vibrato as well as any drifting between the notes. Essentially, the center of the pitch has been adjusted, while the rest of the singer’s expression remains. The drifting between notes can be adjusted separately from the rest of the audio by selecting the Pitch Drift tool. Editing the pitch drift can increase or decrease the time it takes for the pitch to go from one note to the next. Since drifting between pitches is very natural for a singer to do (Figure 4.22), shortening the drift time can lead to unnatural-sounding results (Figure 4.23). The bigger the jump in pitch, the longer the drift should take for it to sound natural. For faster notes and shorter jumps in pitch, the drift can be shortened to whatever sounds best with the vocal.

FIGURE 4.17
The detected pitch is shown as rectangular boxes, where the pitch can be snapped to automatically.

FIGURE 4.18
The transferred audio has been snapped to the corrected pitches.
Melodyne will not initially adjust the vibrato (Figure 4.24). It will just keep the pitch centered. If the singer’s vibrato becomes too pronounced in specific sections, you can manipulate the vibrato with the Pitch Modulation tool. You can even extend or eliminate the vibrato completely. This is done by selecting the pitch and moving the Pitch Modulation tool either up, to extend the vibrato, or down, to minimize or eliminate it (Figure 4.25).

FIGURE 4.19
The corrected pitch, which is snapped to the detected pitch center, but is corrected sharp.
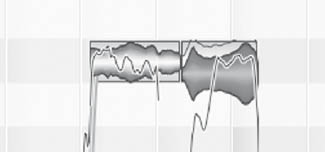
FIGURE 4.20
The corrected pitch has been manually adjusted so that it is no longer sharp.
FIGURE 4.21
Resetting the pitch parameters of all selected notes.
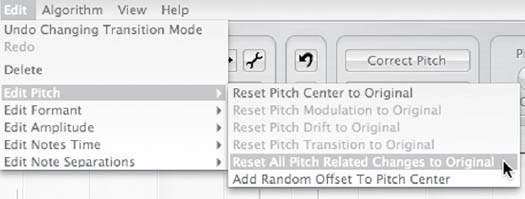
FIGURE 4.22
The natural, long drift associated with a larger jump in pitch.
Separating notes
Sometimes the singer may have long-held notes that change pitch. Melodyne may recognize these notes as being one single note, and so any adjustments made will affect all the sung pitches during the held note. You can use Melodyne’s Note Separation tool to create a break in the long-held note so that you can manually adjust each pitch (Figures 4.26 and 4.27). Just double-click in the middle of the note where you want to add a note break (Figure 4.28). These separated notes can be edited in the same way as the other notes.
Editing formants
Formants are resonant frequencies that are generated by chambers inside the human head. These formants vary depending on the vowel sung. Generic pitch shifting, which just shifts the entire pitch up or down, will also shift the formants up and down. This will create an artificial or chipmunk-type sound when shifted up. When Melodyne adjusts the pitch, it keeps the formants intact and unshifted. This makes for a more natural-sounding pitch adjustment. Melodyne gives you the option of adjusting the formants separately from the pitch. For most situations, the formant adjustment is performed automatically by Melodyne and will sound correct for the vocal part. These formants can be adjusted with the Edit Formant tool if any of the pitches sound as though they have this chipmunk artifact (Figure 4.29). For general formant editing, if the pitch is raised up, the formant will sound more accurate being lowered and vice versa for lowering the pitch and raising the formant.
FIGURE 4.23
The pitch drift has been corrected to 100 percent, making an unnatural-sounding instant jump.

By using the Edit Formant tool, you can raise or lower the formant just by dragging the mouse up or down. By adjusting these formants you can hear the resonances change, but the perceived pitch remains the same (Figure 4.30).
FIGURE 4.24
The natural vibrato visual in the corrected pitch.

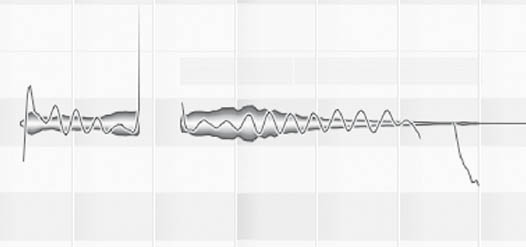
FIGURE 4.25
The natural vibrato has been reduced, but not eliminated with the Pitch Modulation tool.
Automatic pitch correction
In addition to being able to manually adjust pitch with Melodyne, you also have the ability to correct the pitch of entire passages all at once. This can be accomplished by selecting the data you wish to automatically correct the pitch on, and then pressing the “Correct Pitch” button (Figure 4.31). You can select individual passages by using the Selector tool and dragging over the notes in that particular passage. You can also select all the notes that have been transferred into Melodyne by moving your mouse to the Select menu and dropping down to “Select All.”
FIGURE 4.26
The Note Separation tool to break longer notes into individual notes.
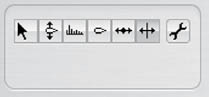
FIGURE 4.27
A long-held note, identified by Melodyne as being a long note, making both notes sound out of tune.

FIGURE 4.28
The held note has been broken into the individual notes, which can then be snapped to the appropriate pitch.


FIGURE 4.29
The formant that is visible when selecting the Edit Formant tool.
FIGURE 4.30
The formant has been lowered, while the corrected pitch remains the same.

FIGURE 4.31
The automatic Correct Pitch menu, which will adjust all the selected audio.

From the Correct Pitch menu, you can adjust the percentage that the original pitch will snap to the correct pitch. If the Correct Pitch Center is set to 100 percent, then Melodyne will adjust all the notes as if you had double-clicked on them individually in manual-correction mode. Adjusting the Correct Pitch Drift will adjust the drift between the notes. This setting will be more natural if left at 0 percent. Any incorrect automatic pitch adjustments can then be corrected manually, if necessary. As you adjust the sliders from the Correct Pitch window, you will see the adjustments made in real time as you move the slider up or down. Then click “OK” to exit the Correct Pitch menu with the adjustments made.
Even though you have automatically adjusted the pitch, it is best to go through and listen to each phrase to make sure that the automatic adjustments are accurate. Sometimes, as with any pitch-correction plug-in, if the singer is closer to the wrong note than the right note, it will move the pitch to the closest note. You may also find that you need to split notes on any long-held note that changes pitch.
Working with doubled vocals
If there are any tracks that are doubling the lead vocal, correct the pitch by using a separate instance of Melodyne in the same way that you would correct the lead vocal. Having the doubled-track pitch corrected in the same way as the lead vocal can almost make the tracks blend in too well together. The pitches may now be identical, with no slight fluctuations. If you are looking to create a thicker sound with the doubled vocal, you can fine-tune the pitch in Melodyne with the real-time correction knobs (Figure 4.32).

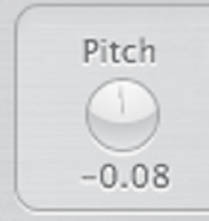
FIGURE 4.32
Melodyne’s global pitch adjustment knobs.
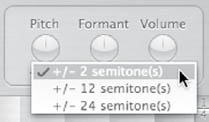
These correction knobs will apply their changes to the entire transferred audio. By right-clicking on the “Pitch” knob, you can adjust its range of resolution to being plus or minus two semitones (Figure 4.33). You can then detune the overall pitch by making fine adjustments with the Pitch knob. Detuning the track by a few cents will create a thicker sound than if two identically tuned vocal parts are playing simultaneously. See Figure 4.34
FIGURE 4.33
Adjusting the range of the global pitch knob to two semitones.
Working with scales
Just as with Auto-Tune, Melodyne gives you the ability to constrain the pitch correction to a particular scale. If all the notes on the track are diatonic to a specific scale, this can aid in the accuracy of the pitch correction as 5 out of the 13 notes of the chromatic scale are eliminated from the standard major or minor scale.
FIGURE 4.34
The global pitch has been detuned by eight cents, creating a slightly detuned vocal track.
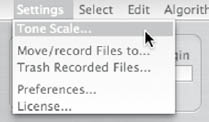
Melodyne is defaulted to snap the note to the nearest pitch and chromatic scale. If you know the key of the song, you can dial in the correct scale for the Melodyne plug-in. The scale can be adjusted by going to the Settings menu and selecting “Tone Scale.” This gives you the option of major and minor scales, as well as several other exotic scales that could be used (Figures 4.35 and 4.36). There is also a selection for choosing the appropriate key (Figure 4.37). Lastly, there is the option to adjust the pitch reference. This is based on “A” being 440 Hz. This can be adjusted up or down depending on the pitch reference of the instruments, but typically pop recordings will all use A 440 as the standard pitch reference.
FIGURE 4.35
The menu selection for adjusting the scale in Melodyne.
You will see that the scale in the Edit window of Melodyne has not adjusted according to any changes made under the settings. This adjustment is made in the lower left corner where you change the default “Note Snap” to “Scale Snap.” With Scale Snap enabled, all the notes still appear on the timeline; it is just that the selected notes will only snap to the nearest pitch in the selected scale. If there are certain notes that are not diatonic to the selected scale, you can manually adjust the pitch of these notes by holding down the “Option” key and dragging the note up or down to the appropriate pitch that may not fall in the designated major or minor scale. If you have selected an incorrect scale, Melodyne will show some of the targeted note boxes as being a semitone away from the actual correct pitch (Figure 4.38). You can click on the orange highlighted key on the left side of the Edit window to adjust the tonic of the scale. This can help you quickly make adjustments to find the correct scale if you have not been given the information.

FIGURE 4.36
The vast scale selection in Melodyne.
Creating harmony vocals
Since Melodyne can adjust pitches in a natural way, you can utilize it to create your own harmony parts to the lead vocal. Suppose there is a line that might sound great with a harmony. You can use Melodyne to raise the pitch of that part up a third, or however you wish to create your harmony part.
To begin creating a harmony part, select the line you want to be harmonized and copy that region onto a separate, new track. Open up an instance of Melodyne across that new harmony track and transfer the audio in as before. Constraining the scale will allow you to manipulate the pitches up or down in the key of the song. You may not find that you can create harmonies everywhere. You may notice that the pitch change may sound artificial in places, as there is a substantial amount of pitch change being applied, but in certain key places in the mix you can certainly get away with highlighting different words or phrases by creating these artificial harmonies.
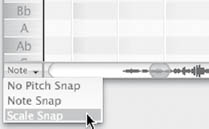
FIGURE 4.37
The selection to identify the grid where Melodyne will snap the notes.
Bouncing the corrected tracks
Because Melodyne does not process the audio on the track, but actually reads in a separate file that has been transferred, the corrected track needs to be recorded onto a separate track with all of the pitch corrections. This is especially important after you have mixed the song and are looking to archive it.
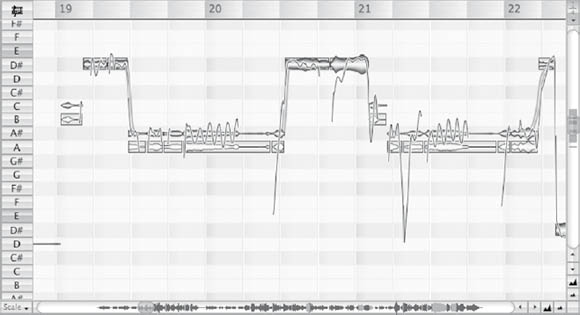
FIGURE 4.38
Melodyne identifying wrong pitches due to an incorrect scale setting.
In order to record the processed vocal track, make sure that any plug-ins, with the exception of Melodyne, are deactivated. Make sure that the audio output of the fader is set to zero; otherwise, there will be a gain difference in the bounced track. Send the lead vocal track through a single auxiliary bus instead of the stereo mix.
Create a new track and have the input set to be from the bus of the output of the corrected track. Once the corrected track has been recorded, you do not need to eliminate the track with Melodyne across it; you can merely mute it in case you need to apply further pitch correction in the future. See Figure 4.39.
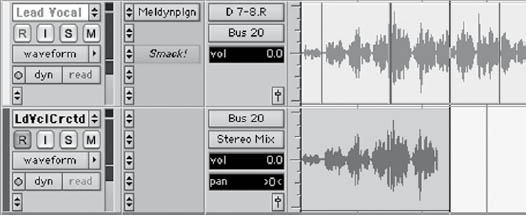
FIGURE 4.39
Recording the pitch-corrected audio onto a different track.
A FINAL WORD ABOUT PITCH CORRECTION
Pitch correction has become a standard necessity in today’s recording studios. Whether the vocalist needs it or not, the client will always assume that it is available. It becomes the engineer’s or producer’s job to determine how much of this pitch correction works for that specific client. A pop vocal will ultimately have more correction on it than a folk track. Sometimes a client may be hesitant to apply pitch correction to their vocals, but giving them a subtle demonstration as to what it can do for the track can help change their mind and make for a better overall product. Pitch correction should not be applied to the point where it is obvious that all of the life has been sucked out of the track.