
CHAPTER 4

Game Rules and Mechanics
But how can we speak of mere play, when we know that it is precisely play and play alone, which of all man’s states and conditions is the one which makes him whole and unfolds both sides of his nature at once?
Friedrick von Shiller
4.1 Introduction
Games for recreational use are as old as known civilization. The oldest complete board game set thought to be the precursor of backgammon, the Royal Game of Ur (played with seven markers and three tetrahedral dice), dates back to 3000 BC. Other such games include Wei-qi, otherwise known as Go, played in China as far back as 2000 BC, and the Egyptian Dogs and Jackals (1800 BC).
The underlying activity in games is play. Play can be found in all human cultures and most animal populations. At the most instinctual level, play provides teaching and learning opportunities. For example, young children will play to assist them in practicing life skills. This is also evident in the animal kingdom through observing the young of cats, dogs, and other mammals; for example, puppies play fight with each other and practice pouncing on inanimate objects in preparation for the grown-up world. The key element of play is the cause-and-effect nature that reinforces certain behaviors. To practice is to attempt to get better at some skill set. Without feedback on one’s actions, knowing how to improve is impossible.
When play becomes structured and goals, rules, and actions are applied they turn into games. In the playground, simple play involving chasing other children turns into a game of Tiggy or Brandy when one child becomes “it” and the objective is to tag another child in order to make him or her “it.”
These fundamental actions of human behavior found in the play and games of children are found at the very heart of computer games and make up the set of core game mechanics presented herein.
4.2 Game Mechanics
If play is the practice of core human “mechanical” behavior, then a game mechanic should define and constrain this behavior in a system with rules and rewards; for example, a child playing at stacking blocks will be learning how to position them correctly to build a stable tower. Once goals and/or restrictions are placed on the activity it becomes a game; for example, build a stack of blocks to 1 meter or build a stack of blocks to 1 meter in 30 seconds. In this example, there is the play action (stacking), a goal (1 meter in 30 seconds), feedback (if the blocks are placed incorrectly they will fall over), and rules (use only these blocks).
The theme throughout this book plays on the word mechanic to refer to the actions taking place in games from the internal workings of animation and programming to the interactions between the environment and the player. However, the term game mechanic, in game studies, is used to refer to designed game/player relationships that facilitate and define the game’s challenges. They are complex systems that include a set of possible player actions, motivations, goals, and feedback. Understanding that a game mechanic is much more than just an action and what other elements may be applied with that action opens up a plethora of almost infinite ideas for games by mixing and matching actions, goals, and rules. The cycle is illustrated in Figure 4.1. The player is presented with a challenge. To complete this challenge they have tools they can use to perform actions and rules that define the scope of these actions. The tools include peripheral computing objects such as keyboards and game controllers, as well as virtual in-game tools such as vehicles, weapons, and keys. The rules dictate how the player can act in the environment. In a board game, rules are written in an instruction booklet and monitored by players. In a computer game, the player is made aware of the rules and the game’s programming code ensures that the player follows them. The program also provides feedback to players based on their actions to assist them in learning how to better play the game and achieve the challenge. Part of the feedback mechanism is to also inform players when they succeed or fail.
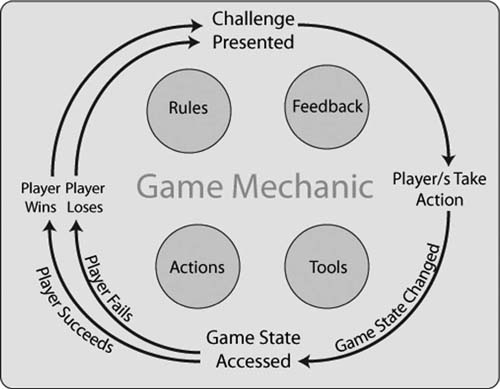
FIG 4.1 The game mechanic cycle.
One of the developers of the original Halo, the game that launched Microsoft’s Xbox, described the game as 5 minutes of fun over and over again. This first person shooter (FPS) game, in a visually rich 3D environment, employs numerous game mechanics that revolve around shooting and blowing things up. As a whole the game is represented by the ultimate game mechanic that challenges the player to uncover the secrets of a ring-shaped planet named Halo while battling a variety of aliens. This umbrella mechanic is broken down into a number of smaller mechanics that see players performing the same tasks over and over again in order to complete their objectives, with the key mechanics being kill or be killed, typically found in FPS games. As such you could say each of these tasks is a minigame in itself, although not as compelling to a player as automatons as they are put together and embedded within an engaging narrative. However, in order to understand how to design a game like Halo it is necessary to examine the most fundamental of game mechanics.
Consider the game of paper-rock-scissors in which two players simultaneously count to three and then present their hands gesturing for rock, paper, or scissors. If one person has paper and the other rock, paper wins because it can wrap rock. If one person has scissors and the other paper, scissors wins because scissors cut paper. If one person has rock and the other scissors, rock wins because rock blunts scissors. If both players show the same gesture the game is tied. One game of paper-rock-scissors completes one of the game mechanic cycles. The challenge is to show a hand gesture that is superior to your opponent on the count of three, the player action is to make a hand gesture, and the rules determine whose gesture wins.
This chapter introduces common generic game mechanic actions such as matching, sorting, searching, and hitting. Examples of how each of these is represented visually in a game and the programming that controls them are explained in depth. Common algorithms and data structures used for each mechanic will be worked through with the reader integrating where appropriate the key art assets.
4.3 Primary Mechanics
All primary game mechanics sit at the very heart of natural human behavior and ability. Humans have evolved to perform them instinctually. Abilities that have evolved over millions of years out of the need to survive now find themselves as repetitive actions in games. Why?
Humans are a pattern-seeking species. Our brains have evolved to deal with the plethora of sensations and information they deal with every day by symbolizing our knowledge internally. All decision-making activities therefore involve a prediction of risks and rewards as we can never have enough time to do to a rational atomic analysis of a situation. We are good at developing intuitive understandings of situations and internally develop our own understandings whether right or wrong, by which we then make future decisions. So reliable have our brains become on being able to process information in this way that we receive neurochemical rewards of dopamine when we make sense out of complete chaos. For this reason we believe that we can see patterns where there are none. How often have you heard something like “that cloud looks like an elephant”? The greater the randomness and the more we make sense of it and have that judgment justified, the greater the neurochemical reward.
As Raph Koster points out in his book A Theory of Fun for Game Design, the thing that make games fun is their ability to engage the human mind. They do this by presenting the brain with challenges that it is best designed to achieve. In short, this involves repetition and lots of pattern matching. The following sections outline many primary game action mechanics that all in some form require pattern matching and involve primitive human ability. One or more of these actions can be found in all games.
4.3.1 Searching
Searching is a basic human cognitive process that involves perception and scanning of an environment. Whether one is searching for car keys, looking through a telephone directory, or trying to find a friend in a crowd, the process requires the human brain to take snapshots of the environment and scan it quickly for items matching their internal symbolization.
In computer games, this ability is leveraged to make the player look for a specific piece of information, item, location, or character in an environment. The objective of the player’s search may be to find an item needed to proceed in the game, for example, a key to open a door, or to navigate a maze to get from one place to another.
Searching for the mineral resource titanium in an asteroid field in EVE Online is one primary mechanics employed in the game play. In order to begin making money to buy anything and progress in the game, mining minerals is the first action rookie players must learn. Part of the mining process is searching for minerals in mine fields and finding asteroids that have enough of the type you are looking for.
Looking for ammunition clips and medical packs has a long tradition in FPS games such as in Quake. This action will either see a player who is low on fire power or health searching the game level madly for any of these items or trying to remember where he saw the last one and returning to that location. Often with this action, if the player does not need ammunition or health, the item cannot be picked up or used and therefore remains in the same location until it is needed.
4.3.2 Matching
Matching is an activity that is part of the searching process. For the human brain, identifying one object as being similar to another is a simple thing. To be searching for something is to be able to identify when the mental image you have of the thing you are looking for is the same thing you are looking at; that is, they match. Many day-to-day activities involve matching, such as finding a pair of socks to putting the right PIN into an ATM.
In a game, matching is used to get players to put one or more things together because they are smaller pieces of a whole or are the same color or shape or have other similar characteristics. This common action may find players putting together parts of a machine to make it work as a whole or placing the same colored items next to each other on a grid.
Guitar Hero uses matching superbly. The entire game is focused around the player’s ability to match the guitar string on the screen with the button on the peripheral device. Not only must the player match the right note at the right time, but his rhythm of button pressing is also evaluated.
4.3.3 Sorting
Attempting to make order out of chaos is a common human behavior. People with very extreme cases of requiring everything to be in its place may suffer from compulsive obsessive disorder. However, in many cases when things are sorted, life is much easier. When things are in order and we can rely on them being in order, it lifts some of the cognitive load off doing other tasks. For example, if money is sorted correctly in a shop’s till, it makes the task of giving a customer change easier. Imagine trying to do grocery shopping in a place where none of the items was sorted on the shelves.
Games use this sorting desire to motivate players to arrange two or more items according to their characteristics, such as size, color, species, age, or name. Sorting can also be employed in activities where performing tasks in order is necessary to complete a challenge.
For example, in the 2D puzzle game Machinarium, players must make their way through levels by having their character, a little robot, make machines work in certain orders to accomplish particular tasks. In one level, the robot must wire a circuit panel one way to perform the first task and then rewire it in another to get the second one done. In The Sims, the player can sort the activities their Sim must do in order to satisfy their most immediate needs.
At a simpler level, games such as Bejewelled use matching with sorting to get the player to sort through randomly placed colored jewels to sort like ones into lines.
4.3.4 Chancing
Chance devices such as die and the drawing of straws for purposes of sorting, selecting, and division are common among many cultures, and the practice is referenced in classical Greek literature as early as the Trojan wars and beforehand in Egyptian artifacts.
Using chance in decision making is referred to as risk. Research has shown that the types of risks people take today stem back to situations encountered by our ancestors, including competition with other individuals, competition with other cultures, mating, resource allocation, and environment. For example, chasing a bear away from one’s food could pose certain risk, as would going to war with another tribe.
Chance in games is used to determine the probability to future outcomes. This is one of the oldest actions used in games involving the use of dice: rolling or coin tossing to determine an outcome based on chance. Without some element of probability in which players knew what the outcome of their actions would be before they did them, there would not be any need to take a risk. Research has shown the greater the risk, the higher the neurochemical reward.
The most obvious and earliest use of probability in adventure games came when the board game of Dungeons and Dragons was computerized. The board game involves the rolling of dice to determine the character’s ability levels, for example, how strong they are or how likely they are to shake off a magical spell. Probability also comes into play when characters face off against each other. If players knew for sure which character would win, there would be no enjoyment in a battle, nor reason for one. However, the game uses die rolls, which, in combination with their ability levels, are used to calculate success or failure. The computer game does the same thing. This mechanism has flowed through into almost all games to give an element of chance in situations and to make the outcome unknown.
4.3.5 Mixing
Mixing actions involves the combining of objects or actions to produce an outcome unachievable otherwise. In day-to-day life, people mix ingredients to make food, paint pigments to make new colors, and multitask actions to get jobs completed more quickly.
In computer games, actions can be combined to allow characters to perform tasks they couldn’t do with single actions, for example, jumping while running to leap across a crevasse in the game world or combining multiple keystrokes to perform special moves such as those available to characters in the fighting game Super Smash Brothers.
Combining game objects to produce other game objects is also an example of mixing. For example, in Doodle God, players begin with the four elements (fire, wind, earth, and water) that they must combine in different combinations to discover other objects such as coal, turtles, and plasma. In The Sims Medieval, the wizard character has the ability to mix herbs and minerals to make potions.
4.3.6 Timing
Human society is run by time. Even before the advent of mechanical timekeeping devices, the earth’s revolution around the sun meant humans were constantly on a time schedule.
The use of time in a computer game can be applied to as a game mechanic. It could involve completing a task within an allotted time, timing an action, or waiting for some event to occur. This mechanism is used to instigate urgency in situations such as racing, whether it be against the clock or an opponent or to generate anticipation when waiting for something to occur or forcing patience upon a player who has to wait for the game environment to change.
Time is a blatant obvious mechanism in racing games. It is used in Project Gotham, for example, to determine how long it takes a player to get around a track. This time is then converted into points. If the time is better than another set time, it may unlock another track or racing car.
In EVE Online, time is used to add respect to the long process of training one’s character with new skills. In the only massively multiplayer role-playing game, players may fly larger and faster ships only when they have trained for long enough. Training tends to take many hours and sometimes days in real time. As the player’s character can continue to train when the player is not logged in, it is also a clever mechanism to keep players attached to their character and to keep them logging back in to check on their progress and start new training regimes.
4.3.7 Progressing
Life is about progressing, whether it be growing from a baby to an adult, getting a university degree, or getting a job promotion. Humans, in general, experience stages in their lives that correlate with their age and achievements.
Games employ a progression scheme in which the player begins as a noob and progresses to the level of expert at the end. Along this journey, progression schemes are put in place that give players a feeling of achievement for their efforts. For example, in EVE Online, the longer you play the game, the higher the training level you can achieve. In StarCraft, the more you play, the more money you can make to spend on upgrading your equipment. In The Sims, one of the game goals is to progress the job of your Sim until it reaches its lifetime achievement.
Progression will occur naturally in any game as a player becomes more familiar and skilled at the game play. However, as can be seen from the preceding examples, it can also be built in as a reward system and a way to progress the player through game levels or narrative.
4.3.8 Capturing
To capture is to take something that belongs to someone else through force or your own efforts. Throughout history there is a long list of tribes capturing members of other tribes, armies capturing cities, and pirates taking ships.
Some games embed this mechanic as the primary objective of the game. For example, Civilization requires players to take over others cities and countries. The Dutch East India Company challenges players to take cities along the spice route in order to be able to build a more profitable trading company between European and east Asian cities.
Capturing can also be used in a game in not such a literal sense. For example, it could involve knocking out another game character in order to steal his weapon or stealing a car to make a quick getaway.
4.3.9 Conquering
In a similar vein to capturing is the action of conquering. Whereas capturing is more likened to stealing, conquering is about outdoing or annihilating the competition. Like capturing, human races have a long history of conquering. For example, the Spanish conquered and wiped out the Aztec Empire in the region now known as Mexico beginning in August 1519 and declaring final victory on August 13, 1521.
Outdoing an opponent is a classic game play goal. For example, in chess, the aim is to get your opponent into checkmate while taking pieces along the way or make them surrender. In the online StarCraft one-on-one games, this too is the objective. In Black & White, the player who takes the part of a god must gather more loyal worshippers than the other gods in order to drive the other gods away and rule over an island.
Again, this mechanic need not be so literal. The conquering of another opponent in a game environment might mean you own a bigger house, have more money, or have a better car. This is the clichéd need to “outdo the Joneses” and can be a direct goal in the game environment or could evolve as an interpersonal consequence of players comparing their individual game play success and status with each other.
4.3.10 Avoidance
One key to human survival is the avoidance of disliked and harmful things. This includes not eating poisonous substances, not sitting on a fire, and getting out of the way of large moving objects.
Numerous games require the player to avoid items and situations that are harmful to their character. Space Invaders requires players to move their ship so that it doesn’t get hit by alien fire, and FPS games require the player to avoid enemy fire. Jojo’s Fashion Show, a game in which the player must dress models according to particular themes, even requires the player to avoid wearing the wrong clothes.
Instead of telling players what they can do, avoidance is all about showing them what they can’t. The inability to avoid whatever it is they should be avoiding penalizes players through reduced points or health given the situation.
Avoidance places constraints on the actions of players such that they must keep in mind what they can’t do while trying to progress through the game environment.
4.3.11 Collecting
Collecting is another natural human behavior. At the extreme, someone who cannot control collecting items is classified as a compulsive hoarder. In a game environment, however, items are there to be collected for a purpose.
Some items can be collected and placed in an inventory to be used at a later time. When used, these might disappear or go back into the inventory. The collecting mechanic is often used with searching. In Disney’s Princesses game, children are required to walk through the virtual kingdom searching for and collecting magical items to help the princesses.
Other collection activities can happen almost by mistake. In the 2D platformer versions of Super Mario Brothers, collecting coins, stars, and other items happens just as the player moves the character through the levels, as the items are unavoidable. They are not challenging to pick up, and the number found collected is a record of progression through the level rather than achievement.
The original Doom and Wolfenstein 3D games introduced the concept of collecting points for finding secret rooms, killing all the guards and or monsters, and finding extra damage power-ups and the like. A count at the end of each level reveals how many have been found. A lack of finding them does not stop the player from progressing, but can give some incentive to replay that level to find all the added extras.
![]() For Research
For Research
This is by no means an exhaustive list of game action mechanics. If you are interested in learning more, visit the links:
4.4 Developing with Some Simple Game Mechanics
This section revisits a number of the primary game action mechanics with some practical implementations in Unity. Note that more than one mechanic is required in order to make a playable game prototype or to make an interactive application slightly game-like. For example, matching marbles of the same color is not a game. It’s just matching. But matching as many marbles as you can, of the same color in 2 minutes, instantly provides the player with a challenge, a goal, and a reward.
4.4.1 Matching and Sorting
Matching is a simple yet compelling game mechanic that sees the player scanning a number of items to find ones that are similar. This mechanic occurs in games such as Bejeweled, in which the player swaps adjacent gemstones arranged in a grid to make horizontal or vertical sets of three or more of the same colored gem. When a line is created, it disappears from the grid and the player gets some points. The matching mechanic is found across a wide range of popular games such as solitaire, where card suits are matched, monopoly, in which property colors are matched, memory, where images must be matched, to even kinect games, where body poses are matched.
Sorting is a game mechanic that is usually found with matching. It entails moving objects around to position them in a specific order or to match them. The game of memory does not including sorting, but solitaire does as the player sorts through the deck of cards to arrange them into suits.
For either mechanic there must be visual clues as to how the player should be sorting or matching game objects. For example, in Dr. Mario 64, the good doctor throws colored vitamins shaped like pills into a jar full of viruses. When four or more viruses and vitamins line up, they disappear. For this level of simplistic matching and sorting, iconic art is used throughout. For example, in Dr. Mario 64, the vitamin pills look like capsules and the viruses are small colored squares with sick and angry looking faces.
It is important to engage the player in these games with logical icons. If items need to be matched or sorted, they should look similar in appearance or have very clear shared characteristics that make them part of a particular group. If leaving a player to guess what matches with what or what goes where is not the objective of your game, don’t make it one.
![]() Unity Hands On
Unity Hands On
Matching and Sorting
In this hands-on session you are going to create a game that involves matching and sorting. Balls of different colors will fall down the screen. At the bottom of the screen will be four different-colored containers. The player will be required to use the mouse to sort the balls horizontally so that they eventually land in the container that matches their color. Halfway down the screen a bar will appear. The player will only be able to change the horizontal position of the balls while they are above the bar. Points are accrued for each correctly sorted ball.
Step 1. Download Chapter Four/Matching.zip from the Web site. Unzip and open the project in Unity. Open the scene called maingame. Play it and you will see a Score area and a quit button. The quit button will take you back to the main menu where you can press the play button to get back to the main game screen.
Step 2. Download Chapter Four/Beaker.blend from the Web site. Add it to the project.
Step 3. Add the beaker to the Scene. Position it at (0,0,10) where it will become visible in the Game.
Step 4. Add a GameObject > Create Other > Directional Light to the scene.
Step 5. Create a new Material to the Project. Set its shader to Transparent/ Diffuse. Set the main color to red and give it an alpha value of 100.
Step 6. Put the red material on the beaker.
Step 7. Add three other beakers to the Scene and give them the colors green, blue, and yellow.
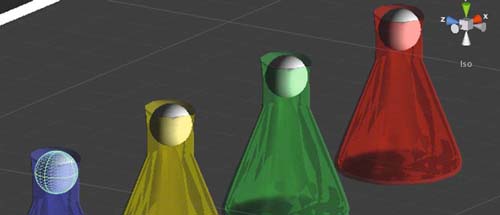
Step 8. Move each of the beakers so that they make a line across the bottom of the camera’s view as shown in Figure 4.2.
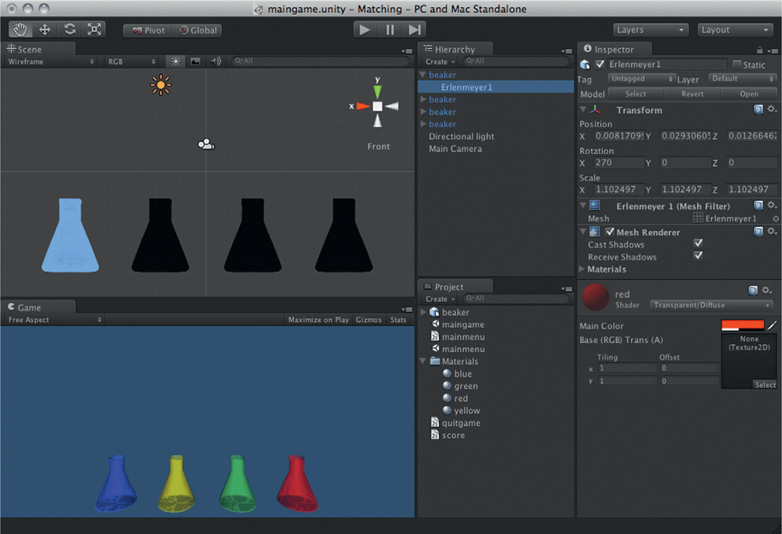
FIG 4.2 The initial setup for a matching and sorting game.
Step 9. Add a cube to the scene. Position it at (0,2,0) and give it a scale of (20,0.2,1) as shown in Figure 4.3. Tick the Is Trigger box of the Box Collider and set the z size to 10. The cube will appear as a white strip across the game with a large box collider. Ticking the Is Trigger box for the Box Collider will enable triggering an event when another object collides with it; however, it will not cause any physics events. This will allow objects to fall through it, but we can detect when this is happening programmatically.
Step 10. Create a sphere. Position it at (0,0,0) and scale it to (0.5,0.5,0.5). Attach a Rigidbody and set the drag to 10. In the Rigidbody settings for Constraints, tick the Z value of Freeze Position. This will keep the sphere always at its initial z value (in this case 0) even after a physics event.
Step 11. Turn the sphere into a prefab object called ball. Delete the original sphere object from the Hierarchy.
Step 12. Create a new JavaScript file called destroyWhenGone.js. Enter the code shown in Listing 4.1.
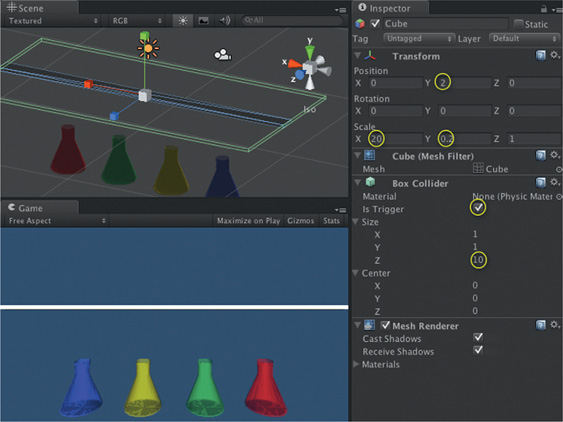
FIG 4.3 Adding a cube with a large box collider to the scene.

Step 13. Attach destroyWhenGone to the ball prefab. This code will destroy the object when it goes outside the area visible on the screen—the reason being that soon we will create code to spawn balls continually. When balls move outside the screen, they will be outside the game play area. In this case, they are no longer needed; instead of the physics system processing their location constantly and the game engine performing any other behaviors with them, it makes more sense to just get rid of them completely.
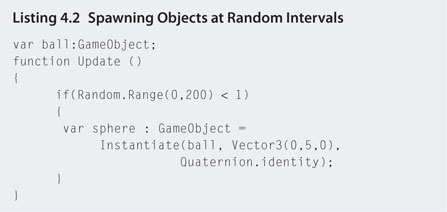
Step 14. Create a new JavaScript file called spawn.js. Enter the code shown in Listing 4.2.
Step 15. Attach this script to the camera. With the camera selected in the Hierarchy, locate the script in the Inspector and set the value for ball to the ball prefab created previously.
Step 16. Play. At random intervals a ball will be created and fall down the screen. When it goes out of view it is destroyed. A ball is created according to a generated random number between 0 and 200. If this number is less than 1, a ball is instantiated. To increase the interval between balls, increase the upper range. To have them appear more quickly, lower the upper range.
Step 17. To have the balls spawn at locations across the entire screen, modify the spawn.js code to that in Listing 4.3.
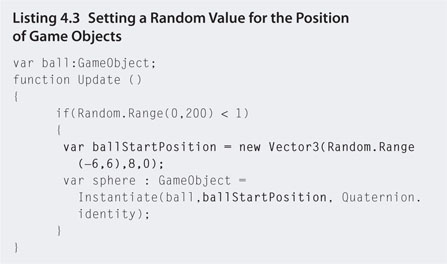
Step 18. Play. Because the starting x value for each ball is taken randomly from the range −6,6, balls will appear across the width of the screen, as this is the range of x values for the beakers. You may have placed your beakers at different distances depending on the screen resolution. In this case, increase or decrease the random range to suit. The starting y position is set to 8. If this is not beyond the top of your screen, you may want to increase it a little. The balls should spawn just beyond the player’s view.
Step 19. At this stage, balls will fall straight through the beakers. To add collisions, find the “Erlenmeyer1” meshes for each beaker object and attach a Component > Physics > Mesh Collider to each one. Ensure that the Mesh setting for this collider is set to “Erlenmeyer1” as shown in Figure 4.4.
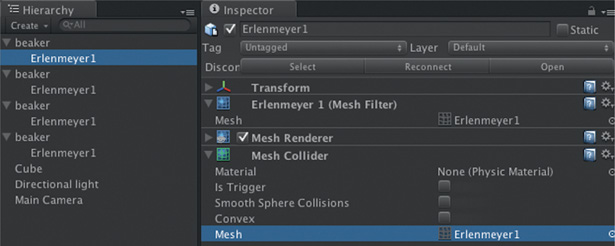
FIG 4.4 Attaching a Mesh Collider to the Mesh renderer of an object.
Step 20. Play. The balls will now collide with the beakers. If you want the balls to fall faster, lower their drag value in the ball prefab. However, as the game play starts to take shape you’ll be glad that they are falling more slowly.
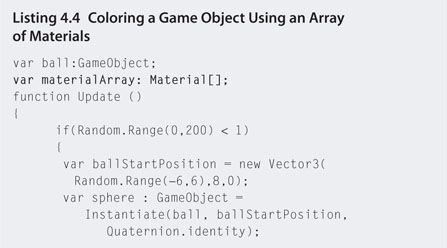
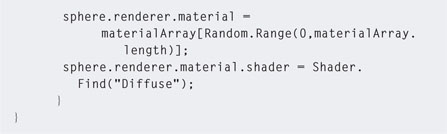
Step 21. Modify spawn.js to that shown in Listing 4.4. This will add an array of materials to the script so that each ball spawned can be assigned a random color. The shader for the material is changed to Diffuse, as we will be using the existing transparent-colored materials on the beakers, but we don’t want the balls to be transparent.
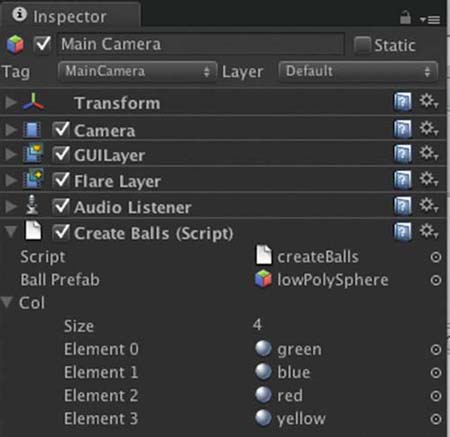
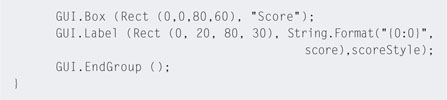
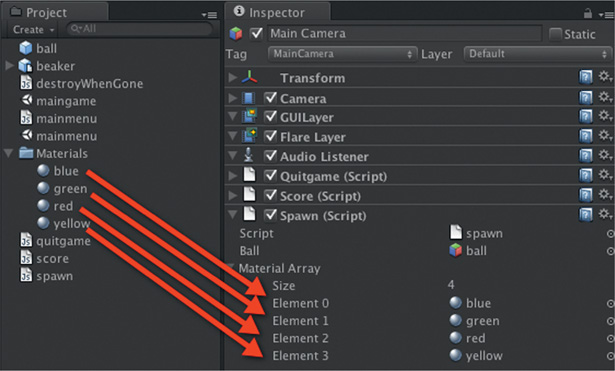
Step 22. With the main camera selected in the Hierarchy, locate the spawn script. Click on the small triangle next to Material Array to expose the array values. Set the Size to 4. For each of the elements that appear, drag and drop the blue, green, red, and yellow materials into the locations as shown in Figure 4.5.
FIG 4.5 Adding materials to an array in a script.
Step 23. Play. Each ball that falls will be assigned a random color. The colors are picked out of the array using the same Random.Range() function used for the spawn timing.
The next step involves moving balls with the mouse. The coding for this is not as simple as it might sound. Therefore, this hands-on session will be placed on hold to provide you with some essential background knowledge.
The Screen and the World
Most games, especially those on a computer with mouse control, require calculations that transform the mouse position on the screen in 2D to game environment coordinates in 3D. This is necessary when you need to program for the player clicking on and interacting with objects in the 3D world. They are not actually clicking on the game world; they are, in fact, clicking on an imaginary transparent flat plane through which the game is being viewed.
The screen coordinates are usually set most commonly with (0,0) in either the upper or lower left corner or right in the center. The mouse position is either counted in pixels or screen size proportions. For example, if the screen resolution was 640 pixels wide and 480 pixels high with (0,0) being in the lower left corner, the mouse coordinates when exactly in the center of the screen would be (320,240). When screen coordinates are proportional, values range from 0 to 1 in both the x and y directions no matter the resolution. For example, if (0,0) were in the top left corner, (1,1) would be in the lower right. The mouse position when the pointer is in the center of the screen would be (0.5,0.5).
If the different formats for the 2D screen space weren’t complicated enough, the 3D game world coordinates will be affected by rotation, perspective, or orthographic views and scaling. The nature of the problem is illustrated in Figure 4.6.
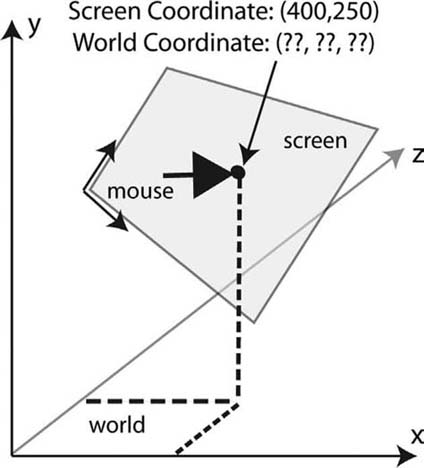
FIG 4.6 The difference between 2D screen coordinates and the 3D world.
Screen, Viewport, and World Vectors
Unity, as with all 3D graphics systems, has three coordinate systems: screen space, viewport, and world. The screen and the viewport are 2D systems, and the world is 3D. The screen coordinates by default range from (0,0) to (screen width in pixels, screen height in pixels). The viewport coordinates are proportional, going from (0,0) to (1,1), and the world coordinates are infinite. Having said that, the coordinates (−10,−50) in screen space and (−0.5,−1) in the viewport are legitimate. They just don’t appear in the visible range of the camera, just like 3D coordinates outside the camera frustum.
Unity has a number of useful functions for converting all these coordinate systems among each other. They can all be found in the script reference by searching for “Camera.” To try them out, create a new Unity Project with the script in Listing 4.5 . Attach the script to the camera, and the converted coordinates will be displayed in the console.
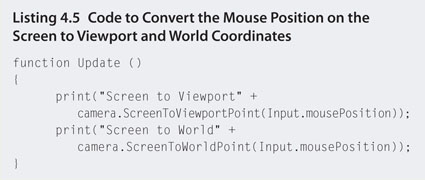
At first the coordinates may not change when you move the mouse over the screen. This will occur if the camera is in perspective mode and the near plane distance is very small—the reason being that the closer the near plane is to the camera, the more the frustum becomes a pyramid with the screen space representing the apex. Therefore, the screen is almost a single point in 3D space and essentially you are moving the mouse around on this point as far as the 3D coordinate system is concerned. Changing the camera to orthographic will give a square view volume and provide more screen space area with respect to the 3D world. You can also move the near plane farther away from the camera if you want the mouse position changes to register.
There are also functions called ViewportToScreenPoint(), ViewportToWorldPoint(), WorldToScreenPoint(), and WorldToViewportPoint().
Step 24. Select the ball prefab in the Project. At the very top of the Inspector click on Tag. Select Add Tag from the pop-up menu. The Inspector will change to a different view. Select the triangle next to Tags at the very top of the Inspector and type ball into Element 0. Reselect the ball prefab in the Project, click on Tag again, and find the newly added ball tag in the pop-up menu. Select it. This process is illustrated in Figure 4.7.
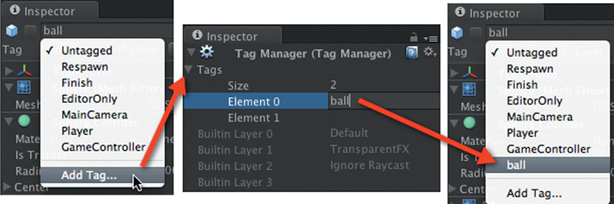
FIG 4.7 Adding a new tag.
![]() Unity Hands On
Unity Hands On
Matching and Sorting—Continued
Step 1. Create a new JavaScript file called clickndrag, add the code in Listing 4.6, and attach it to the ball prefab.
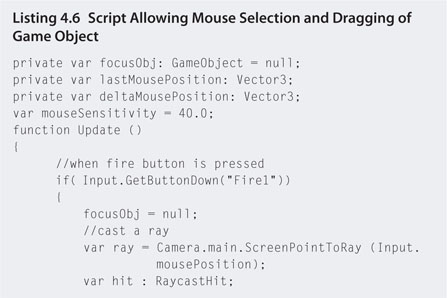
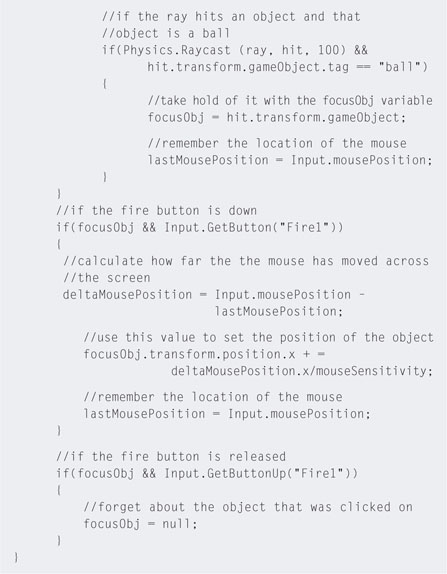
Step 2. Play. You will now be able to move the balls horizontally to line them up with the same colored beakers by clicking on them and dragging the mouse. To change the mouse sensitivity, modify the related variable at the top of the script. Note that it is exposed so that you can change it easily in the Inspector.
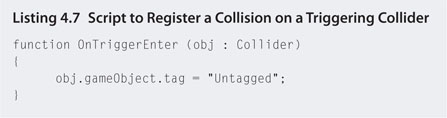
Step 3. The ability to move the ball once it has gone below the white line (fashioned from the cube added at the beginning) needs to be added next. The easiest way to do this is to change the ball’s tag as it passes through the trigger collider of the cube. To achieve this, create a new JavaScript file called stopBalls and add the code in Listing 4.7. Attach this script to the cube.
Step 4. Play. When the balls go through the cube collider it causes the OnTriggerEnter() function to run. When a collider is set to be a trigger only, it does not cause any collisions in the physics engine and therefore the OnCollisionEnter() and similar functions do not work. For each collision function there is an equivalent set of trigger functions. When the balls are below the white line they will no longer be moveable by the mouse.
Step 5. To complete this game we need to add a scoring mechanism. We will use a trigger collider at the entrance to each beaker to count the balls falling into them. Add four spheres to the Scene and resize and position them like corks in the top of each beaker as shown in Figure 4.8.
FIG 4.8 Plugging the top of a container with colliders.
Step 6. For each sphere, remove the Mesh Filter and Mesh components, as we only require the Sphere Colliders. For each ensure that the Is Trigger value is ticked.
Step 7. Create new JavaScript called countBalls and add the code shown in Listing 4.08.
Step 8. Attach countBalls.js to each of the spheres in the tops of the beakers.
Step 9. For each sphere, select it in the Hierarchy and set the value of Color Match by dragging the corresponding material from the Project onto the script component.
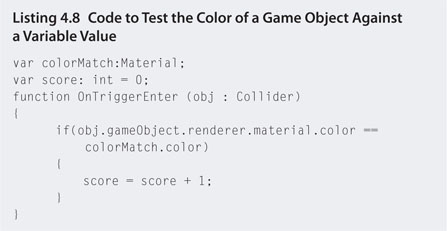
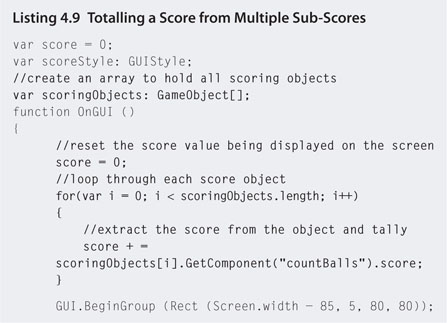
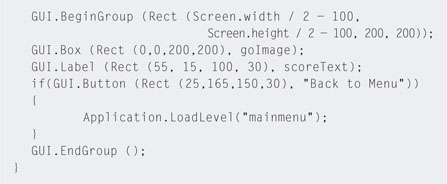
Step 10. Because the code is attached to each sphere, each sphere will keep a tally of the correctly colored balls. These four values need to be added together to determine the total score. Open the score.js script in the script editor and modify the existing code to that in Listing 4.9. The GetComponent() function gains access to the countBalls script, which is attached to the sphere objects and pulls out the score by referring to the variable by name.
Step 11. Save and select the main camera in the Hierarchy. Locate the score script component in the Inspector and, at the very bottom set under scoringObjects, set size to 4 and assign the values for the array of beaker spheres by dragging and dropping each one in place as shown in Figure 4.9.
FIG 4.9 Adding game objects to an array in another script.
Step 12. Save and play. Your game now keeps score.
Step 13. Save the scene (File Save Scene) and double-click on the mainmenu Scene in the Project.
Step 14. Open mainmenu.js in the script editor. This script is attached to the main camera and displays a small menu with a play button. Play to see this appear on the screen. Click on the play button and it will take you to the maingame Scene. To swap scenes, the function Application.LoadLevel() is used. The name you give to this function is the name you gave the scene when it was saved. You can’t reference another scene, however, if it is not included in the build. To include a scene, when the scene is open, select File Build Settings from the main menu. The window that opens has an area at the top where all included scenes are listed. Press the Add Scene button to put the scene into the list. The scene at the top of the list is the one that will open first when your game is run as an application. Drag and drop the scenes in the list to change the order. Press the Build button at the bottom of the window to create a stand-alone application. This includes an app for the Mac and an exe for Windows. These are the files that you can then distribute to others for playing.
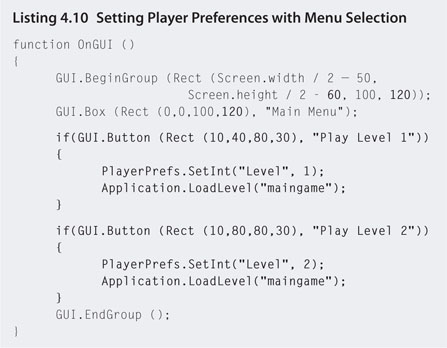
Step 15. Modify the code in mainmenu.js to that in Listing 4.10.
Step 16. The PlayerPrefs.SetInt() functions allow a system level setting of a variable. In this case it is called Level and it is set to 1 or 2 depending on the button pressed. This makes the variable available to be picked up by the maingame Scene when it opens. You can also use PlayerPrefs to store highest scores and other player details that can be used when the game is played the next time. To get the player’s level preference before the game starts, open spawn.js and modify the code as shown in Listing 4.11.
Step 17. Before playing, check that the white line cube you have used is called Cube in the Hierarchy. If it is not, change the name in the script by replacing the text “Cube” with the name you used. Play. The main menu buttons now set the level of difficulty that changes the height of the white line. The higher it is, the harder the game becomes.
Step 18. Finally, we want to add an end game scenario. To make it simple, we will have the game end after 20 balls have been caught. First, create a new scene with File > New Scene. After the scene opens select File > Save Scene and call it gameover. A scene icon with this name will appear in the Project.
Step 19. Download Chapter Four/gameover.png from the Web site and add it to the Project.
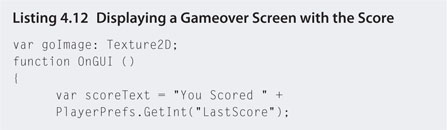
Step 20. Create a new JavaScript file called showScore.js and add the code in Listing 4.12.
Step 21. Attach showScore.js to the Main Camera. Select the camera in the Hierarchy and locate the script in the Inspector. Drag and drop the gameover texture from the Project onto the goImage variable in the script component.
Step 22. Play to check that it displays correctly.
Step 23. From the main menu, select File > Build Settings and click on Add Current to add the gameover scene to the game build.
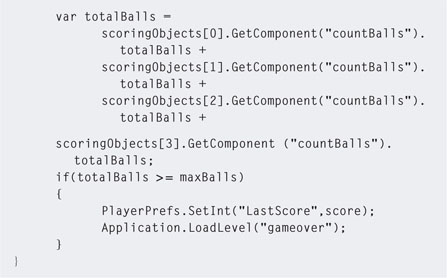
Step 24. Open score.js and change the code to check for a gameover situation and to save the score before switching to the gameover scene. This is given in Listing 4.13.
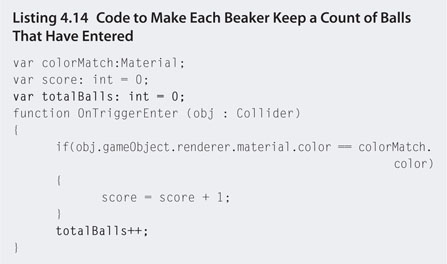
Step 25. The aforementioned code adds together the balls in each beaker. However, each beaker does not currently keep its own count. To fix this, open countBalls.js and update as shown in Listing 4.14.
Step 26. If you don’t want to wait until you’ve caught 20 balls to check your handiwork, change the value of 20 in score.js to a lower value.
Step 27. Open the mainmenu scene and test out your game.

4.4.2 Shooting, Hitting, Bouncing, and Stacking
The shooting, hitting, bouncing, and stacking mechanics used in computer games are synonymous with similar mechanics that make real-world games with a ball so popular. In order to play, players must understand the laws of physics and how they can achieve their goals by using the physical properties of the game environment to their best ability. For example, 10-pin bowling requires the player to toss a ball down an alleyway constructed of polished timber with gutters on each side in order to mow over as many pins as possible. Players must take into consideration the weight of the ball, the speed as with they throw, the angle at which they throw with respect to the length of the alley, and the mass of the pins. Players adapt succeeding attempts at knocking the pins over based on past performance. For example, if players find that they tend to always land the ball in the right gutter, they might decide to release it closer to the left or try to spin the ball in the opposite direction.
Many computer games implement these trial-and-error environmental impact practices. For example, the highly successful mobile game Angry Birds sees the player attempting to use a slingshot to hurl birds at stacked objects in order to knock them over. The Xbox Kinect game Kinectimals also presents the player with the same knock-over-the-stack minigames. Each time players take a shot at something they gather feedback from their attempt based on the number of items knocked over or the direction in which the ball (or bird) went and how fast they were flung. Players then use this knowledge to improve their next try.
Game engines that include physics systems such as Unity take much of the work out of creating these types of games as developers can rely heavily on the physics calculations doing most of the work for them. For example, the old PC game Gorillas that saw gorillas throwing bananas across the screen in an attempt to hit each other using a variety of trajectories had to have the mathematics programmed directly into its base code. Today, the task is simpler because the player can just throw an object and let the physics system take care of the rest—well almost.
![]() Unity Hands On
Unity Hands On
Shooting
In this hands-on session you will create a simple cannon to fire cannonballs at a stacked structure on the other side of a terrain.
Step 1. Download Chapter Four/Shooting.zip from the Web site. Unzip and open the project in Unity. Open the scene called scorchedEarth2011. In the game you will see a terrain and a cannon.
Step 2. Create a new JavaScript file called aim.js. Enter the code shown in Listing 4.15. This script provides rotation to a game object
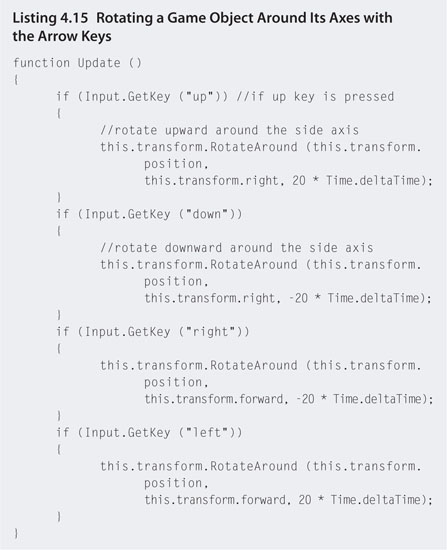
when the arrow keys are pressed. The rotation occurs around the object’s position and axes at a rate proportional to Time.deltaTime, which is the time passed since the last frame update. This creates a nice smooth rotational movement.
Step 3. Save and attach the script to the cannon2 object in the Hierarchy.
Step 4. Play. Use the arrow keys to rotate the cannon.
Step 5. Next we want the cannon to shoot when the mouse is clicked. Create a new prefab from a sphere and add a rigidbody to it. Name this prefab cannonball.
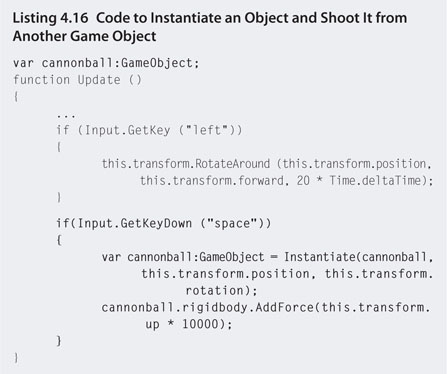
Step 6. Change aim.js as shown in Listing 4.16 to add shooting capability.
Step 7. Save the code. Select Cannon in the Hierarchy; in the Inspector, set the aim script component’s Cannonball variable to the prefab just created.
Step 8. Play. Press the space bar to shoot cannonballs from the cannon. Modify the value of 10000 in the aim.js script if you want to see the effects of adding more or less force to the balls.
Step 9. On the terrain opposite the cannon is a flat area. Create a cube and place it on the flat area. Ensure that you switch between top and side views to get it in the correct location. Coordinates near (1758,134,953) are good.
Step 10. Add a rigidbody to the cube.
Step 11. Right-click on the cube in the Hierarchy and select Duplicate. Use the arrow keys in the Scene to move the duplicate cube next to the original.
Step 12. Continue this process to create your own castle of cubes. Copy and Paste will have the same effect as Duplicate and make the building process quicker.
Step 13. Play. Attempt to knock over the cubes with the cannonballs by changing the direction of the cannon. If the cannon seems too far away for you, drag and drop the cannon object onto the Main Camera in the Hierarchy. It will become attached to it. Move the camera to the desired location in the Scene. The cannon will move with it.
Step 14. To add some impact explosions, import the
detonator package (Detonator.unitypackage) used in Chapter Two.
Step 15. Create a JavaScript file called explode and enter the code shown in Listing 4.17. This is the same code used for the flattening sphere bombs in Chapter Two but with the flattening part removed.
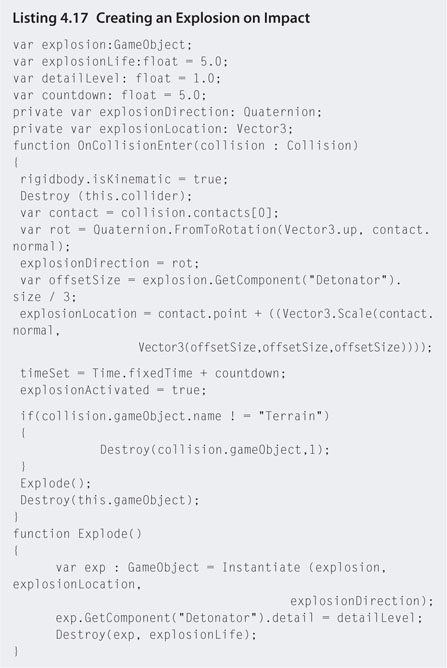
Step 16. Save this code and attach it to the cannonball prefab.
Step 17. In the Standard Assets > Detonator > Prefab Examples folder in the Project, select a detonator prefab and drag and drop it onto the Explosion variable of the explode script attached to the cannonball.
Step 18. Play. The cannonballs will now explode when they impact.
Step 19. To allow the player to set the strength of the cannonball shot, we will add a meter. The shot strength will build up while the space is held down and the cannonball will be released when the space is released. Create a new JavaScript file called strengthMeter.js and add the code in Listing 4.18.

Step 20. Attach this new script to the Main Camera.
Step 21. Edit aim.js to reflect the changes shown in Listing 4.19.

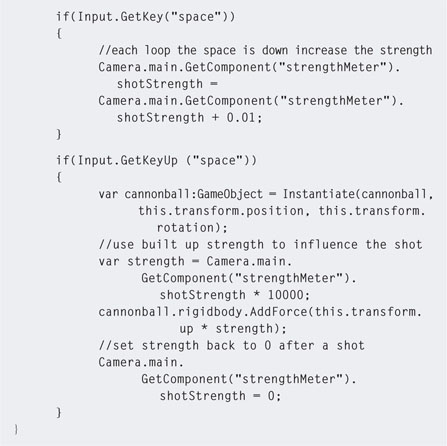
Step 22. Play. This time when firing, hold down the space bar to build up the strength and then release when you think it is enough. Slider bars used in the GUI only allow values between 0 and 1, which is why the final strength is multiplied with the maximum allowed strength in order to create a larger force for the cannon.
4.4.3 Racing
Racing involves one or more players attempting to get from one location to another in order to beat the clock or beat one another. Racing is a common sport found involving unaided human participants (in many Olympic events), motor vehicles (such as formula 1 or drag racing), and animals (including horses, dogs, and, on Australia Day in Australia, cockroaches!).
Many computer games include racing in a variety of forms. Project Gotham sees players racing around the streets of the world’s cities in production cars, Grand Theft Auto requires the player to race away from authorities or to locations, and Kinect Sports allows players to race in track and field events.
Racing need not involve people or vehicles moving around a track. Performing a task within a certain time is racing against the clock. In The Sims, for example, a player’s Sims can be given packages to deliver downtown or tasks to perform within a specified time period. If the job gets done, the Sim is rewarded.
![]() Unity Hands On
Unity Hands On
Racing
In this hands-on session you will create a simple racing game.
Step 1. Download Chapter Four/Racing.zip from the Web site. Unzip and open the project in Unity. Open the scene called racing. In the game you will see a terrain and a car.
Step 2. Play. The car can be driven with the arrow keys. The Main Camera is attached to the car prefab, such that when the car moves, the camera automatically moves too.
Step 3. Select the car prefab in the Hierarchy. Right-click on it and select Duplicate. Call the duplicate Player2. Select Player2 and in the Scene move it so the cars sit side by side.
Step 4. Select Player2 in the Hierarchy and delete the Car script component in the Inspector. Also delete the Main Camera object attached to Player2. This isn’t needed as the original car already has a camera.
Step 5. Add a sphere to the Scene. Select it in the Hierarchy and delete the Sphere Collider component. Position the sphere in front of Player2 raised slightly above the ground. We are going to use a series of spheres as points to specify a path for Player2 to follow. This is a common technique used in games to direct the movement of nonplayer characters (NPCs). Each sphere acts as a waypoint.
Step 6. Number and duplicate the sphere; place the duplicate farther down the road as shown in Figure 4.10 (you may want to increment the sphere number). Each waypoint should be in line of sight of the other. Because the NPC is traveling in a straight line between each waypoint, if they are on the other side of the terrain, the NPC will travel through the terrain mesh. This won’t look real or be very fair to the human player.
Step 7. Continue duplicating and positioning spheres until the whole track is covered.

FIG 4.10 Adding and positioning waypoints.
Step 8. Attach the script waypoints.js from the Project onto Player2. Select Player2 in the Hierarchy and locate the waypoint script in the Inspector. Add each sphere to the script under the Waypoints variable, as shown in Figure 4.11. Ensure that the spheres are added in the order you would like the Player2 car to move around the track, with the first sphere in front of the car being assigned to Element 0.
Step 9. Play. The NPC car will start moving off following the waypoints. In the Inspector you can change the speed, rotation speed, and accuracy values of the waypoint script to modify the car’s behavior. When following a path and moving, sometimes objects don’t land in the exact location of a waypoint. We need to give a close enough is good enough value. This is the value called accuracy. Rotation speed will cause the car to make tighter turns the higher the value.
Step 10. At this point, Player2 may appear to sink into the road when moving. This is because the collider does not include the wheels. The player’s car does not sink because of the Car script. As Player2 no longer has this script, select the chassis collider element under Player2 in the Hierarchy and modify the size and position of the Box Collider to include the wheels. Now Player2 will not sink.
Step 11. Now experiment with the speed of Player2 by racing against it.
Step 12. To create a finish line, add a cube to the scene. Resize it to stretch across the road. Remove its Mesh Filter and Mesh Renderer components. Leave the Box Collider and tick the Is Trigger box. The remaining box collider for the cube should be big enough to trigger an event when the NPC or player drives through it.
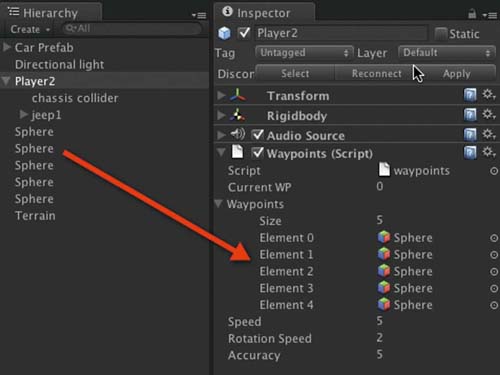
FIG 4.11 Adding spheres as waypoints to the waypoint script.
Step 13. Create a new JavaScript file called finishline.js and attach it to the new cube. Enter the code in Listing 4.20. This will cause a Game Over screen to pop open when either car collides with the cube.
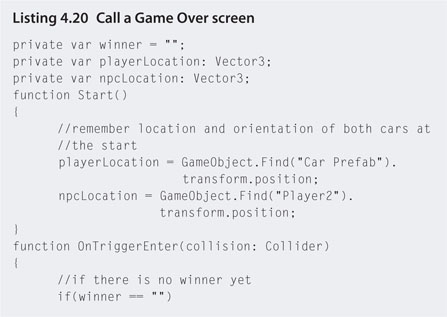
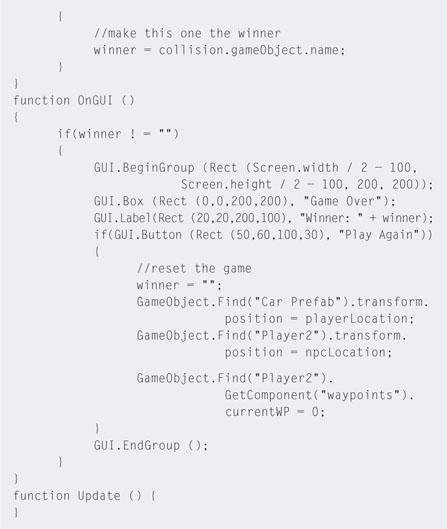
Step 14. The preceding script uses the name of the colliding object to display the winner on the screen. Currently, both the Car Prefab and the Player2’s elements are named the same. Select each chassis collider in the Hierarchy and give them different names in the Inspector.
Step 15. Play. But be ready for a quick restart when you click on Play Again.
We will leave this hands-on session at this point. When artificial intelligence is introduced later in the book, we will return to look at modifying the behavior of the NPC.
4.4.4 Avoidance and Collecting
Avoidance is a game action that involves players having to go out of their way not to interact with another game object or to make an effort not to perform some action. In the original Donkey Kong, the player had to get to the top of a set of scaffolding while avoiding rolling barrels. In all FPS games the player has to avoid being shot. In Snakes and Ladders the player must avoid landing on the head of a snake, and in Mine Sweeper the player has to avoid mines.
Collecting is the opposite action to avoidance. The player must make all attempts to gather items. In Mario Brothers, players can collect coins and other items to improve their abilities and score. In Dungeons and Dragons, players collect magic potions and experience points and weapons. In EVE Online, players collect minerals.
Parts of these mechanisms are their visual cues. Items to be avoided should look like they should be avoided. For example, the lava flows in Doom obviously looked menacing and hot because they were red and bubbling. In nature, humans are attuned to the warnings of red colors. Red represents hot. Fire is hot, the sun is hot, and lava is hot. The game player already has a built-in instinct for avoidance. The same goes for sharp prickly objects. From cactus to underwater mines, the spikes relay a message of “keep away.” As a game designer, if you can leverage human instinct and assume much about how someone will play your game, a lot of the work explaining how the game works is already done for you.
The same principle works for collecting. Why do you think so many games have little gold coins for the player to pick up?
![]() Unity Hands On
Unity Hands On
Avoiding and Collecting
In this hands-on session you will reuse the starting project from the previous workshop and add items to the map—some that you have to run over to collect and some that must be avoided. The objective will be to collect as many rubber ducks as possible in 2 minutes and get them to the finish line.
Step 1. Download Chapter Four/DuckRacing.zip from the Web site. Unzip and open the Project in Unity. Open the scene called racing. In the game you will see a terrain and car.
Step 2. Drag the cone prefab into the Scene to create a traffic cone object. This needs to have a collider attached to it in order to make it interact with the car. With cone selected in the Hierarchy, select Component > Physics > Box Collider from the menu. As shown in Figure 4.12, modify the box collider values to position it around the traffic cone.
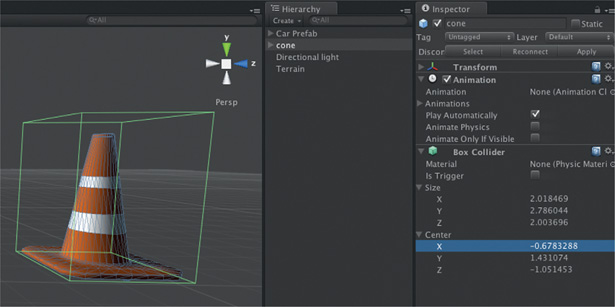
FIG 4.12 Positioning a box collider around an existing mesh.
Step 3. Drag and drop the cone from the Hierarchy onto the cone prefab in the Project to replace it with a new copy that includes a collider. Remove the existing cone from the Hierarchy.
Step 4. Using the new cone prefab, add several cones into the Scene on the road in front of the car.
Step 5. Play. Try to run over the cones. They won’t budge because they do not have a rigidbody attached.
Step 6. Because all the new cones are linked to the prefab, to add rigidbodies to them all, just add a single rigidbody to the cone prefab in the Project. Select it and then Components > Physics > Rigidbody from the main menu.
Step 7. Play. The cones will now move out of the road when hit with the car. If your cones seem to fall through the ground, check that their starting position in the scene has the rigidbody above the terrain. If there is any overlap, gravity will cause the cones to fall through the ground.
Step 8. Create a prefab call Duck, attach the RubberDucky model, and then add a rigidbody and a box collider. Add the Duck prefab to the scene.
Step 9. Create a new cube. Make it about twice the size of the car and position it behind the car. Embed it in the ground so that only a small part of the top appears out. It should be low enough to drive the car up onto. Offset the box collider so that it is above the ground, as shown in Figure 4.13. Tick the Is Trigger box for the collider.
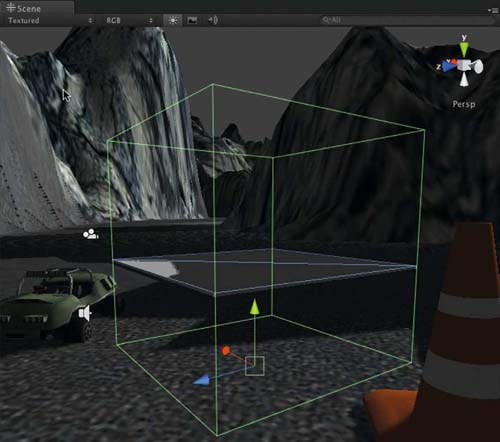
FIG 4.13 Adding a new tag.
Step 10. Create a new JavaScript file called releaseDuck.js. Add the code in Listing 4.21.
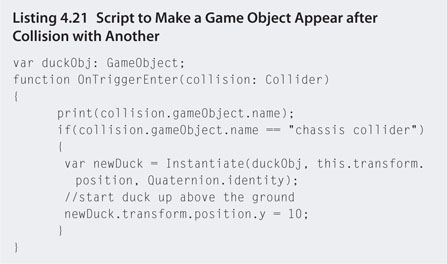
Step 11. Attach the code to the large cube. Select the cube in the Hierarchy; in the Inspector, set the duckObj variable of the releaseDuck script to the duck prefab. Now when the car drives up onto the platform, a new duck will be released. Note that the collision in the script is checked that the car is the one doing the colliding, as otherwise each time a duck is created it would cause the collision to create another duck, ad infinitum. The name of the collision object is “chassis collider,” as this is the name of the child object of the car prefab that has the collider attached.
Step 12. As with the previous game, create another large box collider for a finish line. Ensure that the Is Trigger box is selected.
Step 13. Assign the tag duck for the duck prefab. All created ducks will have this tag.
Step 14. Create a JavaScript file called finish.js. This script will be attached to the finish line collider and count the number of ducks going through it. Use the code in Listing 4.22 to register the duck count.
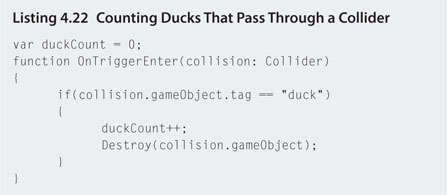
Step 15. Attach finish.js to the finish line. Note that after a duck is counted it is destroyed. This will ensure that the player can’t keep pushing the duck back and forth over the finish line to get extra points.
Step 16. Next, download Chapter Four/corfont.ttf from the Web site. This is the font used to display the time and score. Add the font to the Project. Select it and give it a size of 32 in the Inspector, as shown in Figure 4.14. Press the Apply button. Note that once you have changed the size of this font, it will stay this size for all the places you use it. If you want to use the same font with a different size in the same game, rename the font file, drag it into the Project for another copy, and change the size of the new one.
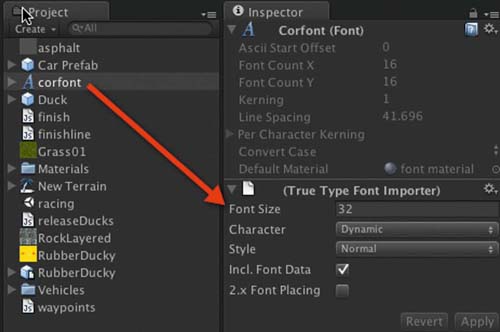
FIG 4.14 Changing the size of a font.
Step 17. Modify finish.js to include some code to display a GUI as shown in Listing 4.23.
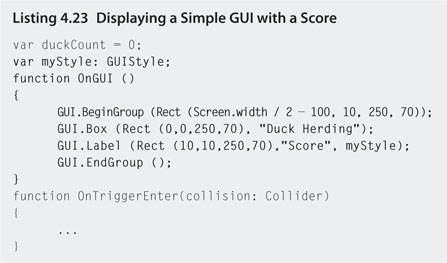
Step 18. Unlike the previous GUIs we’ve used before, this one includes a variable called myStyle. This will allow you to set font, size, colors, backgrounds, and more for a GUI element. After modifying finish.js, select the finish line object in the Hierarchy and look for the finish script in the Inspector. As shown in Figure 4.15, once a script uses the GUIStyle on an object (such as the score label in finish.js), the Inspector allows you to set a whole lot of properties relating to the GUI. In this case, the previously added font, its color, and alignment have been changed. Change these in your game and press play to see the GUI come up on the screen.
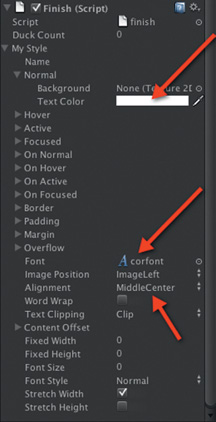
FIG 4.15 GUIStyle properties.
![]() For Rsearch
For Rsearch
Unity GUI System
The entire Unity GUI system is explained in the manual at http://unity3d .com/support/documentation/Components/GUI%20Scripting%20Guide.html.
Step 19. To print out the score and the time since the game started, modify finish.js to reflect Listing 4.24.
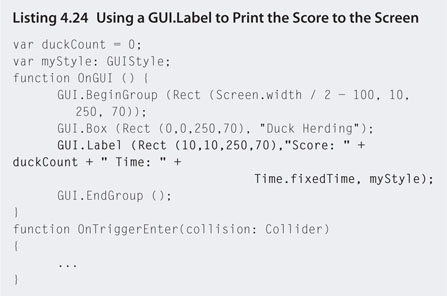
Step 20. Save and play. Note how the score and time value changes in size. This is because as the time changes, so do the numbers being displayed. Because the font being used is not a fixed width, the entire text length can grow and shrink depending on what is written. To fix this, instead of putting the score in the middle, set the alignment to MiddleLeft in the Inspector view of myStyle.
Step 21. Play. You may want to play around with the positioning of the GUI later, but for now try out some duck herding.
Step 22. Finally, to make the game run out after 2 minutes, we will add a timer. Edit the finish.js script to reflect the changes in Listing 4.25.
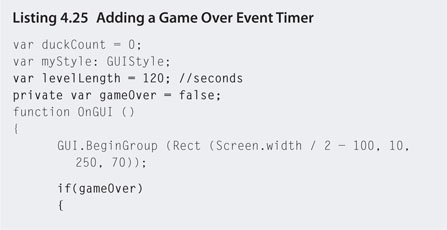
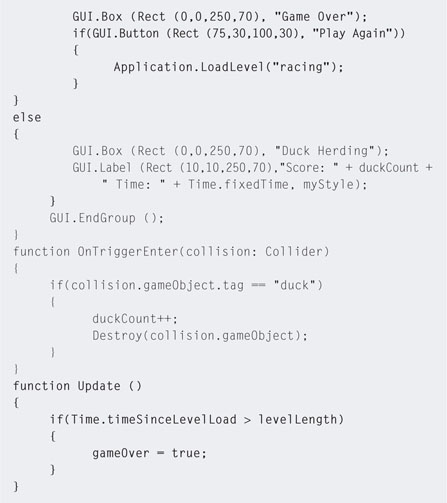
Step 23. Play. Once the game reaches 2 minutes, the game over screen will come up and you can choose to play again. Unlike the previous workshop, where the position of the players was reset with the play again button, this one reloads the entire level. This saves a lot of work remembering the locations of players and ensuring that any stray ducks are removed from the environment. A clean reload will put the game back in its starting state.
4.4.5 Searching
Searching is common human activity. Whether it is for food (in combination with collecting—hunting and gathering), car keys, or Russian Ultranationalists in Tom Clancy’s Ghost Recon, the human brain is attuned to quickly examining environments and looking for icons and patterns. Naturally, the searching mechanism goes hand in hand with matching.
The ways in which searching is implemented as a game mechanic are as varied as game genre. In Doom, the player has to find colored keys to unlock the same colored security doors; in Full Throttle, the player must locate and use objects to help him in his quest to find a murderer in a cross-country road trip; and in Manhunter: New York, the player is entrusted with the task of hunting down resistance fighters. Searching can be performed by moving the mouse around a scene to find and pick up objects. This is the mechanism employed in the original Myst. It can also involve moving the main character around a game level, such as looking for medkits in Quake.
![]() Unity Hands On
Unity Hands On
A HUD Radar for Searching
In this hands-on session we are going to create a game environment with a number of items scattered over a large map that players must seek out. To assist them on their quest, a heads-up display (HUD) radar system will be deployed to give them some basic location details for the items.
Step 1. Download Chapter Four/RadarSearching.zip from the Web site. Open the project with Unity. Open the hudRadar scene. This is the finished project from the Chapter Three character animation workshop.
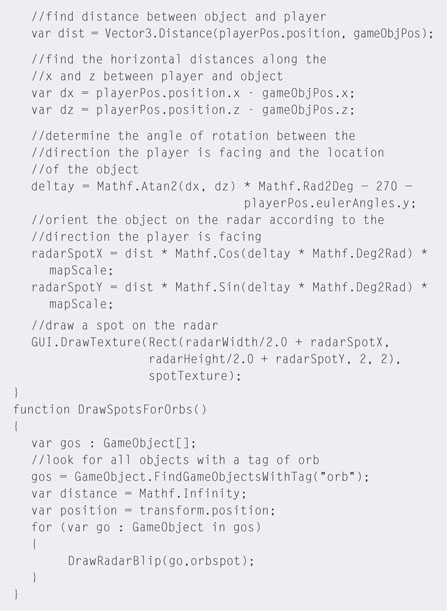
Step 2. Create a new JavaScript file named radar.js and add the code given in Listing 4.26.

Step 3. Attach the script to the Main Camera, which is a child object of the Hero game object.
Step 4. Locate the OrbPrefab in the Orb folder in the Project. Create a tag for this prefab and call it orb. Ensure that after creating the tag it is assigned to the OrbPrefab in the Inspector.
Step 5. In order to draw radar blips on the HUD, you will need to create a texture. This need only be a very small texture of a single color as it will only take up one pixel on the screen. Create a .png image that is 8 × 8 pixels and color it red. Call the file spot.png and add it to the Project.
Step 6. Select Main Camera in the Hierarchy and locate the Radar script in the Inspector. Drag and drop the spot texture from the Project for the value of Orbspot. Drag and drop thr Hero child object of Hero (yes there is one inside the other) from the Hierarchy onto the Player Pos value for the Radar script. This will be used as the center and orientation for the radar.
Step 7. Play. The radar HUD will appear on the screen without any red blips.
Step 8. Locate the OrbPrefab in the Project. Drag and drop as many orbs as you like onto the terrain in the Scene at any location you like. Put some near the player.
Step 9. Play. The radar will be populated with red spots indicating the location of the orbs. As the player turns and moves, the radar will reorientate to show objects in the forward-facing direction at the top of the radar screen.
Step 10. The radar will not encompass the entire map. Orbs will only come into view as the player moves within a certain distance of them. To fit more of the environment map onto the radar, change the value of mapScale at the top of radar.js to a smaller value. If you want less of the environment map visible, make the value larger.
4.5 Rewards and Penalties
Let’s face it; we play games for the rewards—whether they be in the form of points, unlocked levels, kudos, virtual clothing, virtual food, virtual health, more votes, more friends, or more money. It’s the rewards that provide players with motivation to perform any of the actions listed in this chapter. In some texts, rewards are listed as a mechanic themselves; however, they are really the motivation or reason for performing the mechanic in the first place.
Rewards aren’t just given at the end of the game but throughout to influence the player’s behavior. They teach the player how to play and how to play better by providing continued feedback from the game environment. Sometimes this feedback can also be perceived negatively by the player as a penalty for incorrect game play.
Feedback can both be positive or negative and involve the addition or subtraction of something to/from the game environment. The feedback can be given for player actions to indicate success or failure. Together with action without feedback and feedback without action, this makes for six distinct categories, as shown in Figure 4.16.
With the exception of confusion, these classifications come from the domain of behavior management called operant conditioning. They are applicable in games, as operant conditioning is a behavioral management technique used
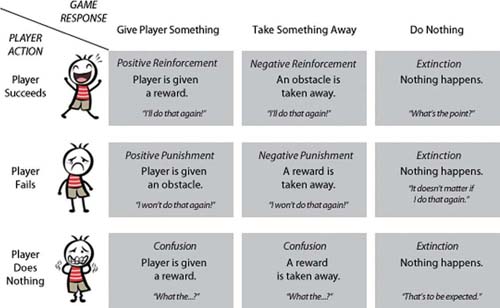
FIG 4.16 Player action versus game response matrix.
for teaching the most relevant behaviors to participants under voluntary circumstances; that is, people wanting to be conditioned are open to behavior management techniques that will teach them to behave in the most appropriate way to succeed. These techniques include the following.
Positive Reinforcement
This is a situation in which positive behavior is followed by positive consequences. For example, when players complete a challenge successfully they are rewarded with something that influences their future game play progress in a good way. This could be in the form of gaining new powers or abilities, getting money to spend in the game environment to better their status, or simply getting points. This type of reward keeps players motivated to continue playing for more reward.
Negative Reinforcement
This occurs when positive behavior is followed by the elimination of negative consequences. For example, if a player is in harm’s way and can do something to get out of the situation, the removal of the continued harm is a reward. Such a situation will happen when a player being fired upon in a FPS stops being fired upon when he takes cover. This reinforces to the player that hiding and ducking is a desirable behavior to keep the character alive.
Positive Punishment
This occurs when negative behavior is followed by the addition of a negative consequence. In a game, this is a situation in which a handicap is placed on the player’s progress after he has done something wrong or performed inadequately. This type of punishment occurs in The Sims when the player makes the Sim eat rotten food. The Sim gets sick and is then in a bad mood for an allocated period of time.
Negative Punishment
This is the condition where negative behavior is followed by the removal of positive consequences. It is like taking away a child’s toy when she is naughty. In the multiplayer version of the original Halo in sniper mode, the more frequently a player gets killed, the longer before the character will spawn again. In this example, the negative punishment is taking away the game world.
Extinction
This occurs when neither positive nor negative behavior attracts any feedback. This could happen when a player shoots at a tree or picks up a rock and tosses it in the ocean. As far as the game environment and the player’s progress through the game are concerned, the action performed requires no feedback as it neither interrupts nor enhances the game play.
Confusion
Confusion is not a technique in operant conditioning. In fact, it has the exact opposite effect as it provides feedback when no action has occurred. When this occurs in a game, the player becomes confused as to the reason behind any reward or penalty.
There is a fine line in game play between reinforcement and punishment. For example, in the Black & White series where the player is essentially a god, he can pick up and throw rocks at villages. In the real world, morally, this would be considered negative behavior and something that should be punishable. However, in the case of Black & White, the player is rewarded with more faith and worshipping from the villagers. This game play should be considered in the category positive reinforcement because it reinforces behavior in the player that the game designer wanted. Punishment in a game is therefore a feedback mechanism that should stop the player from doing something for which the game wasn’t designed. One example comes from Colin McRae Rally, a rally driving simulation game. If a player goes off the road or drives in the wrong direction for too long the game resets the player’s position on the road. It stops the player from performing the behavior and also slows down his time.
Some rewards and penalties inherently exist in a game environment without the need for onscreen advice or information. In the case of 3D environments, designers can force players in certain directions by physically restricting their access to out-of-bound areas of a level map. For example, the map levels in Halo may seem infinitely large; however, although the player can move freely around the map by foot or vehicle, the terrain and physics system prevents him from going to parts of the map that don’t exist. Any attempt to walk or drive up steep mountain edges just results in the player sliding down the side.
When using feedback to mould a player’s behavior, the effectiveness of the feedback will be increased and decreased according to a variety of factors.
Saturation
The more a player is rewarded with or receives the same feedback, the less he will be motivated by it. For example, if a player receives a gold star for some activity, the highest award for a particular game, the less likely he will be motivated to try it again. Of course in order for this strategy to be effective, the game must be sufficiently difficult that the first time he plays he is more likely to get a bronze star and get better with time.
Immediacy
The time between the player’s action and the feedback is critical. Rewarding a player minutes after he has performed a task successfully will make it difficult for the player to attribute the reward with the action. It’s like punishing a puppy an hour after it has chewed up your shoe. There is no association. Haptic feedback mechanisms in games such as vibrating controllers would not make sense if the actions in the game didn’t meet exactly with the vibrations. The same applies to sound effects.
Consistency
The feedback given to players needs to align with their beliefs about the environment and how consistently it reacts to their interaction. In an FPS, players would expect to get killed 100% of the time they step on a land mine. However, if this does not turn out to be the case, and instead they only die 20% of the time, the feedback will not become an effective way to curb player behavior.
Cost Versus Benefit
Players will evaluate the effort they need to spend on an action based on the reward. This fits with the greater the risk, the greater the reward philosophy. The evaluation will differ from person to person based on their attitudes toward risk aversion. For example, in EVE Online, mining and trading in the more dangerous zones of the universe can make greater amounts of money. Because there is a bigger chance a pirate will blow up your ship in these areas, the designer has to provide extra incentive for the player to go there in the first place.
4.6 Summary
This chapter examined how games play the human brain by providing it with the tasks for which it was designed. These fundamental game interaction patterns are known as game mechanics. An understanding of what makes these mechanics so compelling and how they can be manifest in a game environment is critical to designing a playable game. It is these very primary mechanics that define what the player does when engaged in playing your game. For example, in defining Bejeweled, one could say it is a game where the player sorts and matches jewels. It’s laughable how obviously simple these mechanics are when you think about it, but it takes some ingenuity to put them together in the right context to make a truly exceptional game to stand for all time.