Lesson 26. Upgrading a MacBook Pro
Reference Files
MacBook Pro service manual (macbook-pro.pdf)
Time
This lesson takes approximately 15 minutes to complete.
Goals
Install memory in a MacBook Pro
The MacBook Pro is the first Mac portable based on an Intel Core Duo processor. It sports a sleek, one-inch thick design that rivals dual-processor desktop performance. Despite having a similar exterior look as the aluminum PowerBook, in reality only the power cord “duckhead” and power adapter AC plug are the same.
This lesson explains how to install additional random-access memory (RAM) in the MacBook Pro to further enhance system performance. We will focus on the original MacBook Pro with a 15-inch liquid crystal display (LCD).
Servicing a MacBook Pro requires a precise and careful touch, as it is composed of many expensive components in a very compact form factor. Always exercise care and do not exert excessive pressure when working on its sensitive parts.
Given the experience gained in previous lessons in this book, you will be required to locate the online resources and sections in the service manual to accompany this text. The Apple Service Manual has been provided for you on this book’s companion website, www.peachpit.com/ats.deskport3.
Because users of this computer are most probably professionals, ensuring a minimum of downtime for the customer is of utmost importance.
Note
Apple maintains an extensive online collection of instructions and videos for each Macintosh model’s Do-It-Yourself (DIY) parts. End users can install these replacement parts and upgrades, as they require only a moderate amount of technical ability and common tools. For a complete list of DIY parts, visit www.apple.com/support and look for the Do-It-Yourself link.
Required Tools and Equipment
To complete this lesson, you need the following:
• Clean, non-marring work surface
• Soft cloth
• Phillips #0 screwdriver (magnetized)
• Electrostatic discharge (ESD) wrist strap and anti-static mat
• PC2-5300 small outline dual inline memory module (SO-DIMM) double data rate 2 (DDR2) memory modules
Before You Do Anything
Follow the normal antistatic procedures discussed in Lesson 4, “Safe Working Procedures and General Maintenance.” It is vital that you follow these instructions and that you do so in the order presented. Take precautions, as ESD can do permanent harm to the computer.
Removing the Battery
Whenever you open any portable computer—whether to install memory or remove a faulty component—your first step is to shut down the computer and remove the battery.
- Shut down the computer and wait 30 minutes before continuing to allow the computer to cool.
Warning
Always shut down the computer before opening it to avoid damaging its internal components or causing injury. After you shut down the computer, the internal components can be very hot. Let the computer cool down before continuing.
- Disconnect the power cord and any other cables connected to the computer.
- Place the computer face down on a clean, flat surface.
- Slide both battery latches away and lift the battery out of the battery bay. Removing the battery will prevent you from turning on the computer accidentally.
Warning
Removing the battery before shutting down your computer may result in data loss.
Slide the battery latches (1) and then lift the battery out of the way (2).
Installing RAM
The MacBook Pro comes with a minimum of 512 megabytes (MB) of 667 megahertz (MHz) DDR2 synchronous dynamic RAM (SDRAM) installed. Both memory slots can accept an SDRAM module that meets the following specifications:
• SO-DIMM format
• 1.25 inch or smaller
• 512 MB or 1 gigabyte (GB)
• 200-pin
• PC2-5300 DDR2 667 MHz
Depending on the configuration of the MacBook Pro, both memory slots may already be full. The maximum amount of memory that can be installed in the MacBook Pro is 2 GB, by using 1 GB modules in both memory slots. The MacBook Pro will run well with unmatched memory sizes, however by loading both slots with an equal amount of memory, you can take advantage of the system’s dual-channel memory architecture, thus enabling the MacBook Pro to reach a memory throughput of up to 10.7 GB/s.
Warning
Apple recommends that you have an Apple Authorized Service Provider (AASP) install memory. If a non-AASP attempts to install memory and damages the unit, such damage is not covered by the AppleCare limited warranty.
The following installation process is extremely simple. It assumes you have already removed the MacBook Pro battery following the steps in this lesson.
- Using a Phillips #0 screwdriver, remove the three screws from the memory door and set the door aside.
Three 2.15 mm screws (circled in blue)
Note
If only one memory module is installed, the factory installs it in the bottom memory slot. Memory must be removed from the top slot before removing from the bottom slot. In the images that follow, both slots are filled with modules that must be replaced.
Note
If performing a DIY, non-AASP installation (not using a grounding strap), touch a metal surface inside the computer to discharge any static electricity from your body, without touching any circuit boards or exposed components. An ESD wrist strap and mat are highly recommended.
- To remove the memory modules, carefully spread the two locking tabs for the top slot away from the top module on both sides and allow the module to pop up slightly.
Note
Handle the memory module only by its edges. Do not touch the gold connectors.
Spread locking tabs (1) away from top module; the module will pop up slightly.
- Pull the module straight back and out of the memory slot at a 25-degree angle. Repeat steps 2 and 3 using the lower set of locking tabs to remove the module from the bottom slot.

Pull out the card in the direction indicated by the arrow.
- To install a memory card, align the notch in the memory module with the tooth in the slot, and then insert the module at a 25-degree angle. If installing the bottom module, insert it behind the locking tabs of the top slot.
Note
If installing two modules, be sure to install the bottom module first.
- Firmly push the card straight into the slot until it is fully and securely seated along its length.
Note
If the back of the module drops down before it is fully seated, raise it up enough to push it fully into the slot.

Insert the memory module in the direction indicated by the arrow.
- When the card is fully seated, push the card straight down until the tabs click onto both sides of the card, locking it into place.
- To ensure that the lower memory card is fully and securely seated, use a nylon probe tool (also called a black stick) or other non-conductive tool leveraged against the frame to evenly push along the back of the card.
Gently push along the back of the card in the direction of the arrows.
- To ensure that the upper memory card is seated properly, push with your thumbs to verify that the card is fully seated.
- Check that the cards are secured by the brackets on both sides.
- Install the memory door.
- Replace the battery.
- Position the computer in the upright position. Reconnect the power cord and remaining cables. Power on the computer.
- After logging in, choose Apple menu > About This Mac. Click More Info, select the System Profile tab, and open the Memory overview to verify that the computer recognizes the newly installed memory.
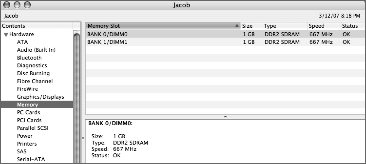
In this example, two 1 GB memory modules have been recognized properly.
Lesson Review
1. True or false: The MacBook Pro models use the same PC2-5300 DDR2 667 MHz type RAM as the MacBook (13-inch).
2. Which of the following tools is necessary when upgrading memory in a MacBook Pro?
a. TORX T8 screwdriver
b. Phillips #0 screwdriver
c. Coin
3. How many SDRAM slots are available in the MacBook Pro?
a. Zero
b. One
c. Two
4. True or false: Before installing memory in a MacBook Pro, you must remove the battery.
5. True or false: Before installing memory in a MacBook Pro, you should touch the gold connectors on the module to discharge any static electricity.
6. How many screws hold the memory door to the bottom of the MacBook Pro?
a. Three
b. Four
c. Five
7. True or false: Top and bottom memory modules are inserted at a 35-degree angle in the MacBook Pro.
8. True or false: It is possible to remove the module from the bottom slot without first removing the module from the top slot in a MacBook Pro.
Answer Key
7. False, modules are inserted at a 25-degree angle
8. False, removing the top module is necessary before accessing the bottom module.