
9. Creating Custom Screens
IF the plain old LCDUI screens are not sufficiently jazzy or flexible for your application, you can create your own screen using a canvas. It’s more work, but it’s more fun. You can control almost all of the drawing on the display and you get fine-grained event information as well.
The Canvas class is a lot like the other screens, a descendent of the Displayable class. This means that it can have commands, a title, and a ticker.
You can’t just create a canvas directly, as you can with other screens. Canvas is an abstract class, with a single abstract method, paint(). You must write a subclass of Canvas and define a paint() method that draws whatever you want. Then you can create an instance of your canvas and show it on the device.
9.1. Getting Information about the Display
A successful canvas adapts to different devices smoothly. To adapt, your canvas must understand its milieu. If you want to draw a border around the whole display, you need to know the size of the display.
Getting the canvas size is easy. Just use the getWidth() and getHeight() methods. Sizes returned are in pixels. In general, a canvas will not occupy the entire device display, because the device usually reserves some screen real estate to show network signal strength, battery power, and other information. You can request the entire display space using setFullScreenMode(true), but ultimately the device decides exactly how much of the display you get. If the size of your canvas changes for any reason, the device calls sizeChanged() in your Canvas subclass.
Displays are either color or grayscale. You can find out what type of display a device possesses by calling isColor() in Display. For grayscale displays, numColors() (also in Display) returns the number of gray levels. For color displays, numColors() returns the total number of distinct colors that can be used.
Alpha compositing is a technique by which colors can be blended with the colors that are already on the display. Alpha levels are also called transparency. MIDP devices can support alpha compositing for images if they wish. You can find out if your device supports alpha compositing by calling numAlphaLevels() in Display. The minimum return value is 2, which indicates no blending (one value is fully transparent, the other is fully opaque).
Double buffering is a technique for reducing flicker in animations. Call isDoubleBuffered() in Canvas to find out if the device implements double buffering. Most (if not all) devices nowadays are double buffered.
9.2. How Painting Works
The paint() method is called whenever the device decides the display needs to be updated. The device passes a Graphics object that represents the device’s display. Your application calls methods in Graphics to show shapes, text, and images on the display.
If you want to update the display, call repaint() in Canvas. The device will eventually call your paint() method again, but it won’t happen immediately. For animations, then, you can start a separate thread that updates the application’s state and then calls repaint().
A refinement of Canvas, GameCanvas, provides more control over repainting. You’ll learn about it in Chapter 11, “Using the Game API.”
9.3. Making Colors
Regardless of the color support of the underlying display, colors in MIDlets are always represented as a packed integer. Eight bits of red, green, and blue occupy the low 24 bits of the integer.

The upper eight bits are unused, except in the special case of alpha compositing with images.
To set the current drawing color, use setColor() in Graphics.
Most devices have a set of colors that are used for menus and other screens. Display provides a method, getColor(), that you can use to retrieve the device’s preferred color scheme. Pass one of the following constants to retrieve the corresponding color:
COLOR_BACKGROUNDCOLOR_FOREGROUNDCOLOR_BORDERCOLOR_HIGHLIGHTED_BACKGROUNDCOLOR_HIGHLIGHTED_FOREGROUNDCOLOR_HIGHLIGHTED_BORDER
Although it’s nice that you can ask the device for its preferred color scheme, don’t believe everything it tells you. There is no guarantee that you’ll get meaningful colors. The Nokia 6270 emulator returns the same color (white) for both COLOR_BACKGROUND and COLOR_FOREGROUND. This is fine for drawing white cows in a blizzard, but not practical otherwise.
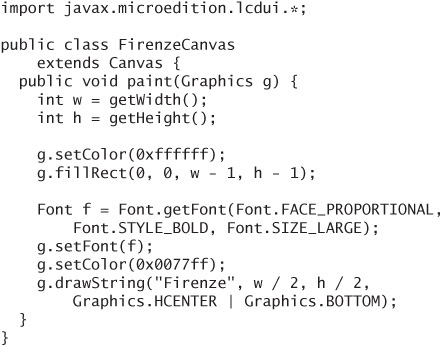
Here is a simple canvas that clears itself and draws a rectangle using the device’s preferred colors. If the background and foreground colors are the same, it sets the background color to be the opposite of the foreground.
You’ll learn about fillRect() in the next section.
To show the canvas on the display, you need to create a simple MIDlet. In the rest of this chapter, I’ll assume you can write your own MIDlet, but here is one to get you started:

If you download the source code for the book, you’ll find a single MIDlet, NineMIDlet, that is capable of displaying nearly all the Canvas examples in this chapter.
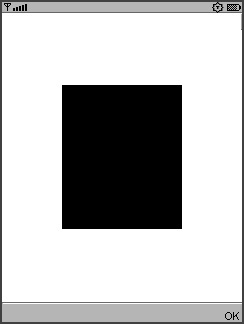
The output is not inspiring (Figure 9.1), but you have to crawl before you can walk.
9.4. Drawing Lines and Shapes
MIDP uses a coordinate system that places the origin at the upper left corner of the display. The x axis increases to the right, and the y axis increases downward.
You can move the origin of the coordinate system by passing the change in x and y to Graphics’ translate() method. The current translation is returned from getTranslateX() and getTranslateY().
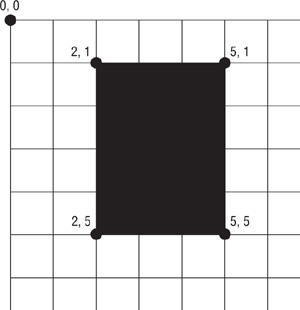
Coordinates correspond to pixels on the display, but the points themselves are located between the pixels. This is important because it affects how shapes are drawn and filled.
For example, if you fill a rectangle whose corner is 2, 1 and whose width is 3 and height is 4, you’ll get the result shown in Figure 9.2.
Figure 9.2. Filling a rectangle
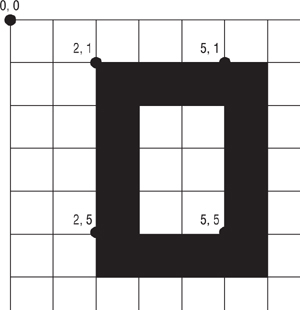
If you want to draw the outline of a shape, the pixels that are directly down and to the right of the coordinates you specify are filled. So, for example, if you draw a rectangle with the same origin of 2, 1 and a width of 3 and a height of 4, it comes out as shown in Figure 9.3.
Figure 9.3. Drawing a rectangle
If you want to show a shape as well as its outline, the safest method is to first fill the shape, then draw the outline afterwards. This ensures that you’ll see all of the outline, even if the filled shape and its outline overlap. Even if you think you’ve got it all figured out, it’s very possible that the filled shape and the outline will overlap either because of a miscalculation on your part or an incorrect implementation on a device. Just draw the outline last.
Graphics offers a straightforward set of methods for drawing and filling shapes. Drawing and filling are done using the current color.

For rectangles with rounded corners, specify a vertical and horizontal radius for the corners:

Finally, you can create arcs by specifying the bounding rectangle of an ellipse, a start angle, and a angle extent. Angles are measured in degrees, starting from zero pointing right and increasing counterclockwise.

One final feature of drawing lines and shape outlines is the stroke style. The Graphics object maintains a current stroke style that is used to draw lines. Call setStrokeStyle() with either SOLID or DOTTED to make a change.
The best way to learn this stuff is by trying it out, so here is a canvas class that shows off the shapes you can draw and fill.
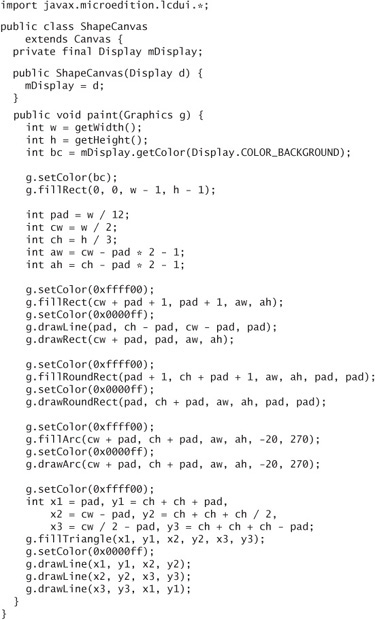
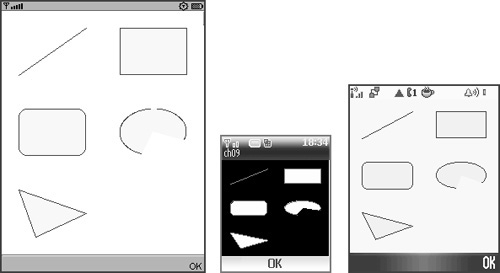
Figure 9.4 shows ShapeCanvas running on three different platforms. Notice how the Nokia 6135 emulator has black as a background color instead of white.
Figure 9.4. Sun’s toolkit, Nokia 6136 emulator, and Motorola RAZR V3
Note how ShapeCanvas adapts to different screen sizes. All the drawing in paint() is based on the canvas size.
9.5. Drawing Text
Drawing text in MIDP is pretty simple: just supply the text and tell the device where to put it. The method you’ll probably use all the time is this one:
![]()
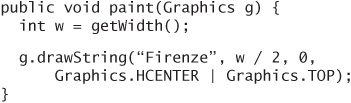
The anchor argument tells the device how to place the text relative to the point x, y. It is a combination of a vertical value and a horizontal value. For text, the vertical values are TOP, BASELINE, and BOTTOM. The horizontal values are LEFT, HCENTER, and RIGHT. In English text, the baseline is the line upon which most letters lie, with descenders like the bottom of a g and the tail of a y dipping below the baseline. For example, this code places a string at the top center of a canvas:
Graphics also contains methods for drawing part of a string, an array of characters, or a single character, but most of time you will use drawString().
Text is drawn using the current color and the current font. The font determines the shape of the characters. Don’t get your hopes up, though, because you don’t get much of a choice. The javax.microedition.lcdui.Font class provides three font faces:
FACE_SYSTEMis the font normally used by the device.FACE_MONOSPACEhas characters that are all the same width.FACE_PROPORTIONALhas characters with variable widths.
Keep in mind that fonts will not look the same on different devices.
Each font comes in three sizes: SIZE_SMALL, SIZE_MEDIUM, and SIZE_LARGE. Finally, the font can be STYLE_PLAIN, STYLE_BOLD, STYLE_ITALIC, possibly combined with STYLE_UNDERLINED.
To retrieve a font, use the static getFont() method, passing the face, size, and style:
![]()
Font provides two other static methods for retrieving fonts in a more general way. The first is getDefaultFont(). The second is getFont(), which takes a single argument, either FONT_INPUT_TEXT or FONT_STATIC_TEXT. This method is most useful when you write a custom form item and want the text to match other form items. Chapter 10, “Custom Items,” has information about custom form items.
Once you’ve retrieved a font that you like, pass the Font object to setFont() in Graphics. All subsequent text will be drawn using the current font.
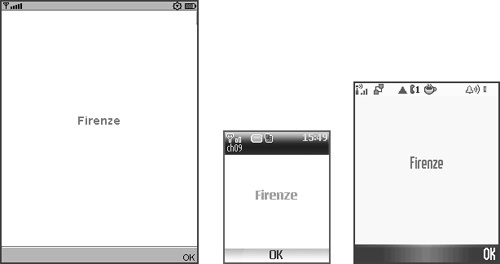
To wrap things up, here is a small example that shows some text near the middle of the screen (see Figure 9.5).
Figure 9.5. The same font can look different on different devices.
9.6. Measuring Text
Drawing text is a little more complicated if you want to make it handle different display sizes and different device fonts gracefully. To adapt, your application needs a way to understand how large text will be on the screen.
Font offers methods that are handy for measuring text. The height of a single line of text is returned by getHeight(). This method is handy for rendering multiple lines of text and for centering text vertically.
Find the width of a particular string by passing it to stringWidth(). Other variations on this method are available if you need them: substringWidth(), charsWidth(), and charWidth().
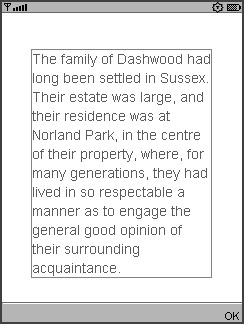
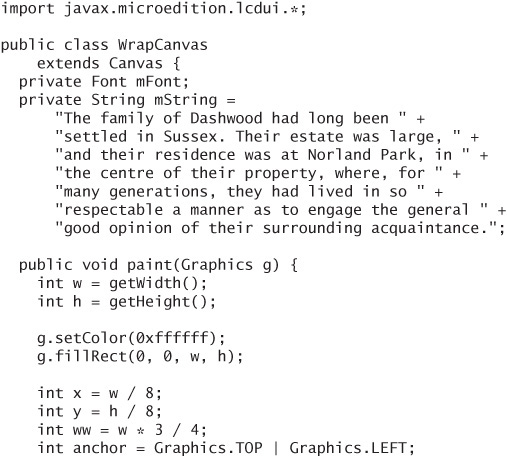
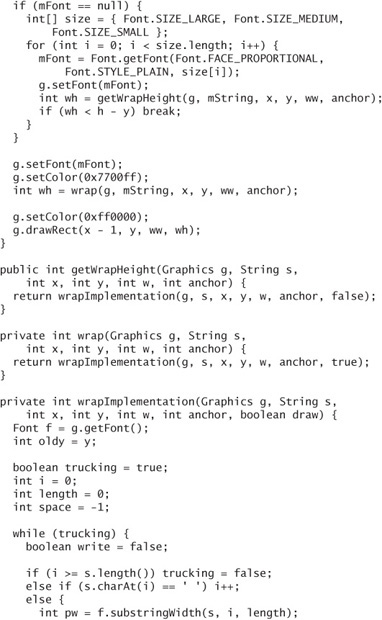
Using these methods, you can perform fundamental operations like word wrapping. Here is a canvas that defines a generally useful wrap() method. Based on the current font, wrap() fits as much of each line as it can based on the available width. Lines are broken at spaces, if they are available. The height of the resulting text is returned.
The canvas in Figure 9.6 uses the wrapping implementation to draw a long string. A red frame is drawn around the entire text. If you use this method in your own code, you can also make use of getWrapHeight(), which calculates the height for a piece of text without drawing it. Also note that you can use the same wrap() method for right-justified or centered text just by modifying the anchor value.
Figure 9.6. WrapCanvas demonstrates word wrapping.
9.7. Creating Images
Although it’s possible to create custom screens using text and shapes, you’ll probably want to use images for the best possible visual impact. It’s easy enough to adapt shapes and text to differing screen sizes, but the rendering is aliased (jaggy), and you’re at the mercy of the device’s fonts.
The problem with images is that they have a fixed size, which means adapting to different device display sizes is a challenge. One technique is to assemble screens from an assortment of images. For example, a title bar could be created from a left end, a right end, and an image could be tiled (repeated) to form the middle. The problem is similar to designing adaptable graphic borders for Web pages.
MSA dictates that devices must be able to load PNG and JPEG images. Other image formats might be supported, but that support is the device’s prerogative.
If you were paying attention back in Chapter 7, “Basic User Interface,” you already know how to load an image from a file in the MIDlet suite JAR:
Two other variants on createImage() allow you to load an image from a byte array or an input stream.
Images are either mutable or immutable. You can draw on mutable images, as you’ll see in a moment. The createImage() methods described so far return immutable images.
Two additional createImage() methods create immutable images from another image or part of another image.

In the second version, x, y, width, and height describe the region of the source image you want to use to create the returned image. In addition, you can flip the region or rotate it by specifying a transform value from the javax.microedition.lcdui.game.Sprite class (which you’ll read about later):
TRANS_NONEdoes nothing.TRANS_ROT90,TRANS_ROT180, andTRANS_ROT270rotate the source image region clockwise by the specified number of degrees. This is opposite from the angle direction used indrawArc()andfillArc().TRANS_MIRRORflips the source image region horizontally.TRANS_MIRROR_ROT90,TRANS_MIRROR_ROT180, andTRANS_MIRROR_ ROT270flip the image and subsequently rotate it.
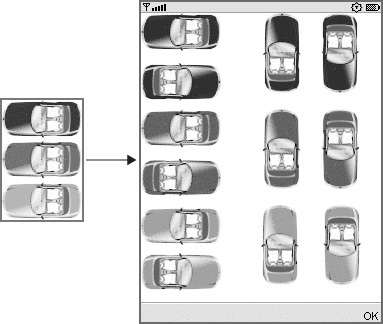
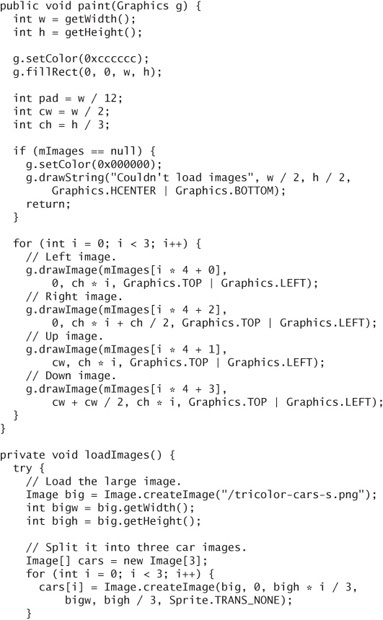
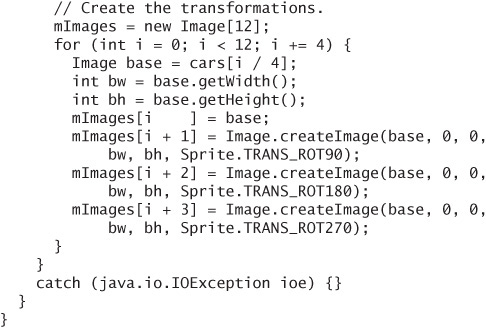
This version of createImage() is handy for creating lots of images to be used at runtime from a single larger resource image. Using a single resource image helps keep the overall size of the MIDlet suite JAR low. Also, the ability to flip and rotate image regions means that you can use one set of source images to create a wide variety of useful images in your application. In the next section, I’ll show you some source code that slices up and transforms an image of three cars, as shown in Figure 9.7.
Figure 9.7. Use one source image to create lots of images at runtime.
9.8. Drawing Images
Drawing images is a lot like drawing text. All you have to supply is the image and an anchor point.
The anchor points work nearly the same as for drawing text, except the BASELINE anchor point won’t work with images. Instead, you can use VCENTER to specify that the image should be vertically centered with respect to the anchor point.
If the device supports alpha compositing, images that contain alpha information will be blended with existing drawing on the canvas.
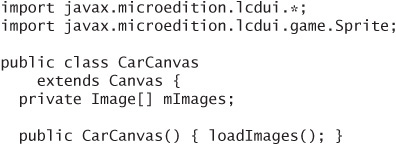
Here is the complete source code for CarCanvas, which shows how to split up and transform the car image. All the image transformation craziness happens in loadImages().
9.9. Keeping Resources Small
One of the challenges of creating MIDP applications is keeping the overall size small. This is necessary because MIDP devices have limited storage space and processing power. Also, because current wireless networks are relatively slow, keeping the MIDlet suite small means faster downloading times.
One way to keep a MIDlet suite small is by minimizing the space taken up by image resources.
Instead of many image files, combine a set of images into one file and split it up at runtime. You’ll save on the overhead of the graphic file format.
Minimize the number of images you need by using the
Spritetransformations described previously. If you have a spaceship that spins around through twelve different positions, you can supply only three positions and generate the rest by rotating by 90, 180, or 270 degrees.Minimize the number of colors in the image.
Make sure your desktop image software isn’t saving some kind of preview or icon image into the image file.
For example, I once had a sequence of twelve images for a spinning animation (AnimationGauge in the next chapter). As separate files, the twelve images were 8,093 bytes. Combined into one file, they were 4,691 bytes. When I used just three frames instead of twelve, the resulting file was just 2,253 bytes.
9.10. Drawing on Images
All the images you’ve learned about are immutable. Mutable images are cool because you can draw directly on them. Here is how it works:
- Create a mutable image by passing a width and height to yet another version of the static method
createImage()inImage. - Retrieve a
Graphicsobject from the image withgetGraphics(). - Draw on the image using the
Graphicsobject.
Here is an example that demonstrates how you can use this technique. It creates and uses a smallish tile image for a brushed metal title bar, much like you’ve seen in iTunes. It’s a classy look for very low cost. The tile image is created in getTitleTileImage(). The size of the image is based on the height of the title bar, which in turn is based on the height of the current font.
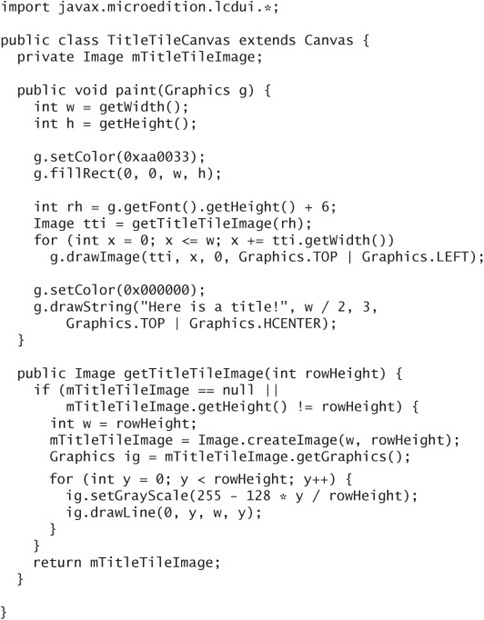
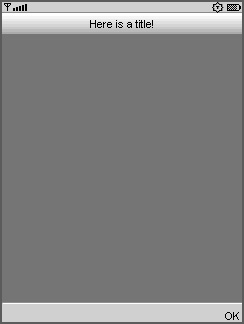
Figure 9.8 shows how that lovely title bar looks when it’s running:
Figure 9.8. The title bar is composed of a dynamically generated tile image.
You might be tempted to load images from resource files and try to draw on them, but that won’t work directly. Images that are created from files are immutable, so when you try to call getGraphics() to draw on them, an exception is thrown.
The workaround is to create a mutable image and draw the immutable image on it. Here is a method that does that:

9.11. Getting Your Fingers on the Bits
For all you control freaks out there, MIDP offers the ability to directly examine and manipulate the color of individual pixels in an image.
You can retrieve the data for an image with Image’s getRGB() method:

x, y, width, and height describe the portion of the image you are retrieving. The offset and scanlength arguments can be used to place the image data at a certain location in the integer array or to interleave it with other data. scanlength indicates the number of array entries between the data for each image row. Most of the time, you’ll just pass 0 for the offset and use the image width as the scanlength. Here is an example that retrieves an image’s data into an array that is just big enough to contain it.
Once you’ve got image data, you can display it by calling this method in Graphics:
The processAlpha flag tells Graphics whether your integer array contains alpha data in addition to red, green, and blue. If you pass true for processAlpha, then the high-order 8 bits of each integer will be interpreted as an alpha value. Note that whatever you do with alpha values, the device might or might not support alpha blending. Call Display’s numAlphaLevels() to find out what the device supports.
Instead of drawing the RGB integer array directly, you can create a new image from the integer array using this method in Image:
![]()
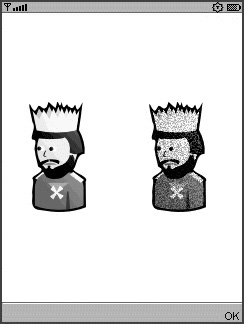
Here’s an example that loads an image from a resource, obtains its data with getRGB(), then adds some random noise to each pixel. Notice how the frizz() method preserves alpha information, if there is any, so the call to drawRGB() includes a processAlpha value of true.

In paint(), the original image and the processed integer array are displayed next to each other, as in Figure 9.9.
Figure 9.9. Processing an image by manipulating its integer array
9.12. Clipping
One last technique related to Graphics is clipping. Clipping limits all drawing on the display to a specific region. It’s as if you placed a stencil over the display and then drew on top of it.
Graphics supports only rectangular clipping regions. Pass the rectangle’s corner, width, and height to setClip() to set the current clipping region. A related method, clipRect(), sets the clipping region to the intersection of the current clipping region and the rectangle passed to clipRect().
9.13. Event Handling
Canvas subclasses are notified about key presses, pointer activity, and whether the canvas is being shown. Your application can respond to these notifications by overriding corresponding methods.
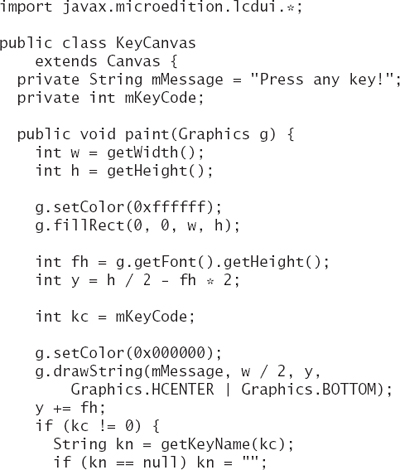
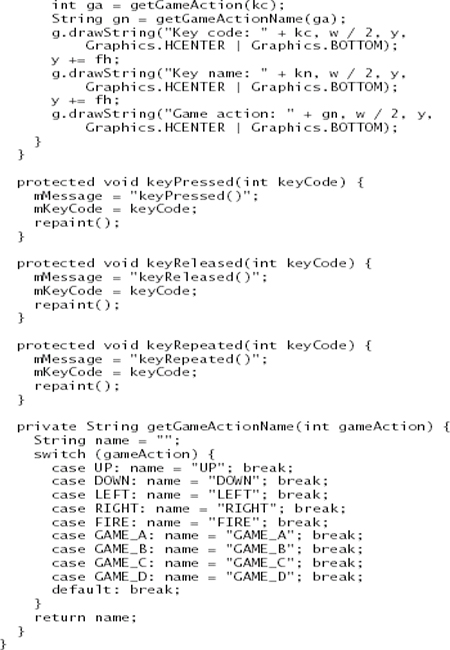
Key presses are passed to keyPressed() and keyReleased(). The value that is passed to these methods is a key code. Devices are likely to have their own sets of key codes, except for a few standard ones defined by constants in Canvas: KEY_NUM0 through KEY_NUM9, KEY_STAR, and KEY_POUND.
You can ask the device for a human-readable name of a key by passing the key code to getKeyName(). This capability is useful if you want to display the controls for an application in a help screen.
A key that is held down might generate repeat events. Ask your canvas about this by calling hasRepeatEvents(). If the canvas supports repeat events, the repeating key code will be passed to keyRepeated().
To make applications as portable as possible, Canvas offers an abstraction of key codes called game actions. Convert a key code to a game action with getGameAction(). The game action constants are UP, DOWN, LEFT, RIGHT, FIRE, GAME_A, GAME_B, GAME_C, and GAME_D. It’s possible that more than one key can map to the same game action. On my Motorola RAZR, for example, the arrow keys map to UP, DOWN, LEFT, and RIGHT, but the 2, 8, 4, and 6 keys do as well.
Here is a Canvas subclass that should help you make some sense of key codes and game actions. It waits for incoming key events and prints information about them on the display. Remember, key codes are likely to vary among devices, so your event handling should be based on game actions or the standard key codes.
Some MIDP devices have touch screens. In the MIDP world, touch screens generate pointer events. Call hasPointerEvents() in your canvas to find out if these are supported. Call hasPointerMotionEvents() to see if dragging is supported. Pointer events are delivered to your application in the pointerPressed(), pointerReleased(), and pointerDragged() methods. The device passes the x and y coordinates of the event to the appropriate method.
Finally, a canvas receives notification when it is about to be shown or about to be removed from the display. The showNotify() method is called just before a canvas is shown, while hideNotify() is called just before something else is shown in place of the canvas. These are very important methods. They are great places to start and stop animation threads and sounds.
9.14. Controlling Command Placement
If the vagaries of command placement are causing you heartburn, you can use a full screen canvas and some ugly code to provide a more consistent user experience. Almost all MIDP devices have two soft keys located at the bottom left and bottom right of the screen. You can draw your own commands or menu labels at the bottom left and bottom right of a full-screen canvas. By responding directly to the soft keys (in your Canvas’s key event methods), you can simulate commands but have more control over their placement.
Soft buttons have different key codes on different platforms, but in many cases you can determine the proper key codes at runtime. One way is to examine the existing mapping between key codes and game actions to see if it matches a known device or device class. Another possibility is to look at the system property microedition.platform.
Here is one example of a keyPressed() method that tests for the left and right soft buttons.
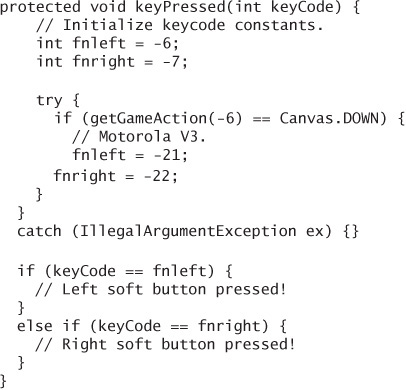
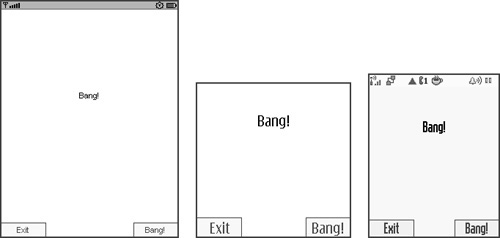
It works correctly on Sun’s emulator, Nokia Series 40 devices, and my Motorola V3 (Figure 9.10). You should be able to expand on this technique to support more devices. In the example code, look at SoftCanvas (and SoftMIDlet) to see how to draw and respond to your own soft button commands. Notice the consistent experience on different devices.
Figure 9.10. SoftCanvas behaves the same on different devices.
9.15. Summary
Canvas is the base class for all custom screens. Create a subclass to draw shapes, text, and images and respond to incoming events. Graphics is capable of drawing lines, rectangles, rounded rectangles, arcs, and triangles. A few different fonts are available, but they will appear different from device to device. Images can be loaded from resource files, created dynamically, and manipulated at the pixel level. Key events can be captured, and game actions provide a useful abstraction of different device key layouts. For a unique presentation and user experience, use a subclass of Canvas.