
Manager: Did you test that program? Programmer: Well, it compiled. | ||
| --Both the Manager and Programmer chose to remain anonymous (but you know who they are). | ||
We’ve probably all made a program change that was so small and so straightforward that we really didn’t need to test it. And then we lived to regret that decision. Why do developers often avoid testing? One of the reasons is that it isn’t always easy to do. By providing tools for making testing easier, Dojo encourages developers to do what they know they should—test, test, and test. We test to find errors, and after we find them, we must fix them. In this chapter we explore some special features that Dojo provides to aid in finding errors and fixing them.
It is more important to build quality into our programs than to inspect them for quality after the fact. We should write our code in such a way that we don’t introduce errors. Easier said than done, of course. And because of that we still need to inspect our programs for errors. The classic pattern for inspection testing consists of the following steps:
Select the thing to test
Prepare test input
Prepare expected results
Execute code
Compare the actual results to the expected results
An historic difficulty with this approach was that the pieces of our application that we could easily execute were usually quite large—often entire programs. That meant that they required lots of input and generated lots of results. Creating a set of expected results for a single execution pass and then comparing those results with the expected output was difficult and time-consuming. Fortunately, a real paradigm shift occurred in understanding how to do testing that we still benefit from today. What if our program “pieces” were much smaller? Then they would require less input and generate fewer results. An important additional benefit is that when the smaller pieces failed, it would be much more apparent what went wrong because we would be dealing with a much smaller amount of code. So a testing approach- was developed that focused on the smallest pieces of executable code possible. These small pieces were called units, and the approach became knows as unit testing.
In the JavaScript world, the best candidate on which to perform testing are object methods. Methods usually contain a relatively small amount of code (or at least should), and they return a single object for a set of input parameters. A single unit test should execute a single method for a given set of parameters and can then be compared to a single result. By testing at this fine-grained level we can make our output comparison very simple, and the test either fails or succeeds. Understanding the results of the test becomes straightforward.
All right, so unit testing is a good thing. But how do we do it? Remember, we’re from Dojo, and we’re here to help. Dojo provides an excellent framework for helping us define and run unit tests. This framework is named “doh.” It is pronounced like Homer Simpson’s famous exclamation: Doh! (often accompanied by a smack to the forehead). The Dojo team “eats their own dog food.” That is, in industry parlance, they use doh for testing. Dojo is delivered with an entire suite of unit test scripts that were run on the various components of Dojo using doh. And we can also use the doh testing framework to test custom JavaScript code that we write ourselves.
Unit tests typically follow a pattern. Following are the steps that occur inside almost all unit test methods:
Create the object whose method is to be tested.
Execute the method under test with appropriate parameters and get back a result.
Compare that result to an expected result.
Sometimes these separate steps are combined together in a line of code, but we can still think of them as distinct. Let’s see an actual example of creating a unit test. First we need an object and method to test. We’ll create an object called StringUtils that has a method countLetters, which can count the number of occurrences of a letter within a given string. Following is the code to create the constructor for this object:
         function StringUtils() {

             this.countLetters = function( string, char ) {
                 var count = 0;
                 for (i=1; i<=string.length; i++) {
                     if (string[i] == char) count++;
                 }
                 return count;
             }
         }
This code could be included within the <script> tag of a page or in an included JavaScript file. To create an instance of the object, we would use the new keyword on the constructor.
var su = new StringUtils();
We can now test the utility method by running it and seeing what results we get.
result = su.countLetters("hello","o");The value of result should be “1” because there is one occurrence of the letter “o” in the string "hello". We could just display the result using an alert box. But instead of using this informal approach to testing, we’ll create the test as a doh unit test.
    var testCase = { runTest: function() {
          var su = new StringUtils();
          result = su.countLetters("hello","o");
          doh.assertEqual(1,result);}
    }
We’ve created a new object called testCase that contains a function called runTest. Note that a unit test in doh is actually a JavaScript object itself. The object must contain certain properties, one of which must be a function called runTest. This is the function that will be run by doh and contains the test case itself. There are also other possible properties such as setUp and tearDown, which are run before and after the test methods, respectively, and can create and remove objects and other resources that the test method might need.
The last line of code in the preceding example is especially interesting. This is known as an assert method and is a standard unit test function that compares the output to the expected results. For the test to succeed, the assert method must evaluate as true. Sometimes this results in tests that might appear backwards at first. For example, imagine that our string utility also has a method called hasLetter that returns a true or false depending on whether a given letter is in a string. Not only do we want to test for the true condition when looking for a letter we expect to find, but we also want to test for the false condition when the function looks for a letter that it should not find. In that case, we use the assertFalse method as shown here:
doh.assertFalse( su.hasLetter("cat","z"));Now we can verify that the function works when it doesn’t find the letter. In the given example, the function hasLetter returns false, but because the assert function assertFalse expects a false result, the assert method then returns true, which designates that the test succeeded!
Use the assert functions to compare values returned or created by your functions against the values you expect—that is, the values you expect if the function operates properly. You can then make changes to your JavaScript code and run the tests again. If all the tests still pass, your change has not introduced any new errors. (Or at least your changes have not introduced errors for the behavior you test, which may be another matter entirely.)
There are additional assertion methods, including the following:
assertEquals...compares expected to actual resultsassertFalse...verifies that argument is falseassertTrue...verifies that argument is true
We’ve created the test as an object with a runTest property containing the test case. You might think that the next step would be to run the test, but we first have to let the doh unit testing framework know about the test. This is done because often we want to add lots of tests together before we start running them. To register the test, use the doh.register() function.
doh.register( testCase );
There are a number of variations of this function. They mostly deal with assigning this test to a group of tests that can be run together. A group is just a collection of unit tests identified by a single name. For example, to add this test to a group called "StringUtilsTest" use the following code.
doh.register( "StringUtilsTest", testCase );
Now we need to run the test case. We can use the doh.run() method to execute all the tests that have been registered with the framework.
doh.run();
The doh framework will execute all the tests that have been registered and disply the results.
The results of the test will be displayed to the console. If you are using Firebug, the results will display to the Firebug console; otherwise, they will display at the end of the web page. Following is a screen shot of the test for the countLetters method in StringUtils.
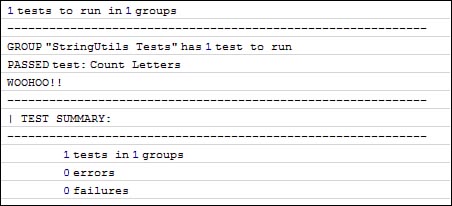
These results show that no errors have been detected. What is the difference between errors and failures? Failures occur when an assert method has returned a false value. Errors occur when the test is not able to run.
So we’ve created a unit test, run it, and reviewed the expected results. And it worked! So we’re done, right? Not quite. Not only are there other types of tests we can perform, but we’re not even finished with our unit testing. Let’s review the test condition we’re checking for. Study the code that is in bold type in the example below.
    var testCase = { runTest: function() {
          var su = new StringUtils();
          result = su.countLetters("hello","o");
          doh.assertEqual(1,result);}
    }
We’re checking to see if the countLetters method in StringUtils counts the correct number of occurrences of the letter “o” within the string "hello". And even though it worked, the method is not fully tested. We may also want to check boundary conditions. For example, does our method still work if the letter is at the beginning of the string? Or at the end? What about if the letter is capitalized in the string? Or when the letter doesn’t occur at all? Now we can see why doh allows us to register tests within groups—because we’re going to need more then a single test to feel confident that our method is correct. And we’ll need a group of tests for each of the other methods in our object to be tested.
How much testing do we need to do? Dojo provides us with a framework to do unit testing but does not provide us with actual tests to perform. Creating tests is up to us, and we have to decide when enough is enough. Testing every possible combination of inputs for a method usually isn’t practical. Remember the 80/20 rule—most of the benefit of testing can be achieved with a relatively small number of test cases.
Unit testing alone is not enough. Just because a method seems to perform correctly for a given input doesn’t mean that we are done testing. We need to perform other types of tests to ensure the validity of our system. Let’s briefly discuss some of the additional types of testing you need to do.
Integration testing determines if objects are working well together, not just alone as in the case of unit testing. Functional testing is used to verify that the object actually performs the function that the user expects it to. Stress testing shows us how our system performs under the stress of a heavy user load or large number of transactions.
Certainly all these types of testing are important and must be done. However, Dojo doesn’t provide any specific support for these are kinds of testing methodologies, so we won’t say any more about them here.
Note
Although I said I wouldn’t talk about any other testing tools, I can’t quite help myself. There is a Firefox plugin called Selenium that is excellent for testing user interaction with a web application. You can get more information and download the plugin at http://selenium.openqa.org/.
Next let’s discuss what happens when unit testing shows us that our program is failing in some way. Does Dojo provide any techniques for debugging our application after a problem is discovered?
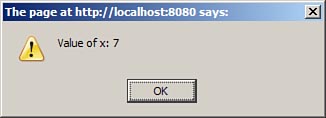
When good programs go bad it is helpful to know what they were doing when they crossed the line. A simple debugging technique is to have the program display some output showing the value of a variable. In JavaScript, this can done by using the alert method. The following line of code could be put into any function to display the value of x at the time that the alert method runs.
alert("Value of x: " + x);This code would create a dialog box that would appear on top of the web page. An example of an alert box is shown in Figure 17.2. This example assumes that x is used in the program and has the value 7 at the time the alert statement is executed.
This technique is sometimes described as “the poor man’s debugger.” It gets the job done, and it works in all browsers—but there are a few problems. One problem is that you must be sure to remove the code when deploying the application. Your users certainly don’t want to see these messages and have their work interrupted.
So our dilemma is that we’d like to write some messages to display the internal state of our code and have those messages be separate from the output of our page. Also, just to be greedy, we’d like it if we didn’t have to touch any code to turn the messages off when we move the program out of development. After all, if we believe the benchmarks, every time we touch code, there is a 5% chance that we unintentionally break something, so we need to minimize code changes.
The solution to our problem is to use logging. You may be familiar with logging in other environments. For example, Java provides a number of logging frameworks such as the open source log4j or the new logging framework built right into the JDK. Dojo can give us some of the same functionality of these existing logging frameworks but within in the JavaScript environment.
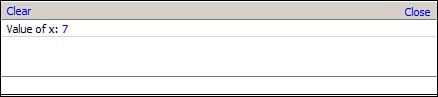
To implement logging, Dojo allows us to write messages to a separate area on our page called the console. The console will appear at the end of the web page. However, if we happen to be using Firebug, which is a plug-in for Firefox, Dojo will write log messages to the Firebug console instead. To add logging to your page, set the isDebug attribute to true in the <script> tag, which references Dojo as shown in the code here (the attribute is in bold):
    <script type="text/javascript"
    src="../dojo-release-1.1.0/dojo/dojo.js.uncompressed.js"
    djConfig="parseOnLoad: true, isDebug: true"></script>
Now you can write log messages whenever you want. Insert a call to console.log anywhere in your JavaScript where you’d like to display the internal state of the program.
console.log("Value of x: ", x);Now, whenever your program executes the console.log method, output will be sent to the console. When using Internet Explorer or when using Firefox without Firebug, the console is attached to the end of the page. Figure 17.3 provides an example of what the console output would look like in IE.
You can display as many objects in the log message as you like. Simply pass any additional objects as parameters to the console.log method call.
console.log(a, b, c);
You can easily turn logging off by setting the isDebug attribute to false.
    <script type="text/javascript"
    src="../dojo-release-1.1.0/dojo/dojo.js.uncompressed.js"
    djConfig="parseOnLoad: true, isDebug: false"></script>
Although this is a change to your code, it is certainly small and less invasive then having to remove or comment out all the various log messages in your code. And turning logging back on is a snap. Just set the property back to true.
Dojo logging provides some additional methods and configuration options that can be quite useful.
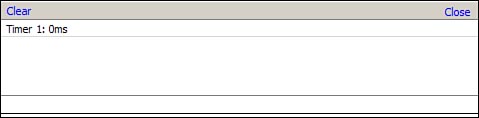
A very useful feature of the logging mechanism allows us to measure how long it takes to execute some JavaScript code. We can use a timer that we can turn on using the console.time() method and then turn off using the console.timeEnd(). Be sure to pass the name of the timer to the function. By naming the timer, you may have multiple timings running at one time. The name is arbitrary and is just used to identify the timing. An example of a simple timer is shown here:
          console.time("Timer 1");
          // ... some code to be timed
          console.timeEnd ("Timer 1");
The amount of time in milliseconds since the timer was started is shown in the console (see Figure 17.4).
Using a timer can sometimes be useful, but be careful about certain issues. Don’t include any user input within the code being timed. Also because of the speed of JavaScript, single executions of a block of code may not take very much time—often you’ll see timings of zero as in the preceding example. So repeated executions are usually necessary before slower code blocks become obvious.
There is an interesting variation of the logging framework that allows us to write out different types of logging messages. Instead of using console.log for all messages, we can use any of debug, info, warn, or error as the logging method that will write the message to the console in a different color. This makes viewing a lengthy log file in the console much easier. Your eyes are immediately drawn to the more important messages first. Following are examples of writing each of the various types of log messages:
    console.error("This is a log message written using console.error()");
    console.warn ("This is a log message written using console.warn()");
    console.info ("This is a log message written using console.info()");
    console.debug("This is a log message written using console.debug()");
    console.log  ("This is a log message written using console.log()");
The log messages will display in the console as shown in Figure 17.5.

The different types of log messages are in different colors. Also there are icons assigned to some of the types to make them stand out even more. In some logging frameworks, it is possible to set an option that allows only certain types of messages to display—this is not yet a feature of the Dojo logging framework.
We’ve now completed our tour of Dojo. Now start developing. Good luck!